

These homemade garlic knots are extra soft and flavorful, and use a dough similar to this reader-favorite pizza dough. Top with garlic herb butter before AND after baking for the tastiest knots!
I originally published this recipe in 2020 and have since made a few changes to improve the texture and flavor of the dough, which are reflected in the recipe below. This recipe is brought to you in partnership with Red Star Yeast.
Tell Me About These Garlic Knots:
- Made from an easy homemade dough
- Leftovers freeze beautifully
- Super soft and fluffy
- Golden brown
- Extra garlic butter
And I know you’ll appreciate this too: You can use the entire batch of dough for 16 knots OR you can use half of the dough to make a pizza or stromboli, and then have 8 knots on the side. Perfect for pizza night—no delivery required.
One reader, Michelle, commented: “These were perfect! Brushing on the garlic butter before baking makes such a difference. These are near foolproof! So fluffy and delicious! ★★★★★“
One reader, Catie, commented: “My husband agrees—best garlic knots ever! This recipe works! ★★★★★“
Garlic Knots From Pizza Dough
You can make these garlic knots with 1 or 2 pounds of store-bought or homemade pizza dough. Today’s dough is very similar to my homemade pizza dough, which yields about 2 pounds of dough. You can make 16 knots or 1 pizza + 8 knots. If you only need about 8 knots, freeze the other half of dough for another time. You will want to make these garlic knots again.
- Besides garlic knots and pizza, you can use this dough for cheesy breadsticks, pepperoni pizza rolls, and ham & cheese pockets too! So versatile.
Compared to my pizza dough, I reduced the water so the dough is easier to handle when shaping into knots. I add 1 extra Tablespoon of olive oil for a little extra flavor and richness, and include garlic powder too. Sometimes for extra flavor I use butter instead, similar to what I do when making homemade breadsticks. Either one works. (Melted butter in the dough is convenient because you also need melted butter for the topping.)
Even though store-bought dough is convenient, I encourage you to try homemade dough. The dough requires so few ingredients!
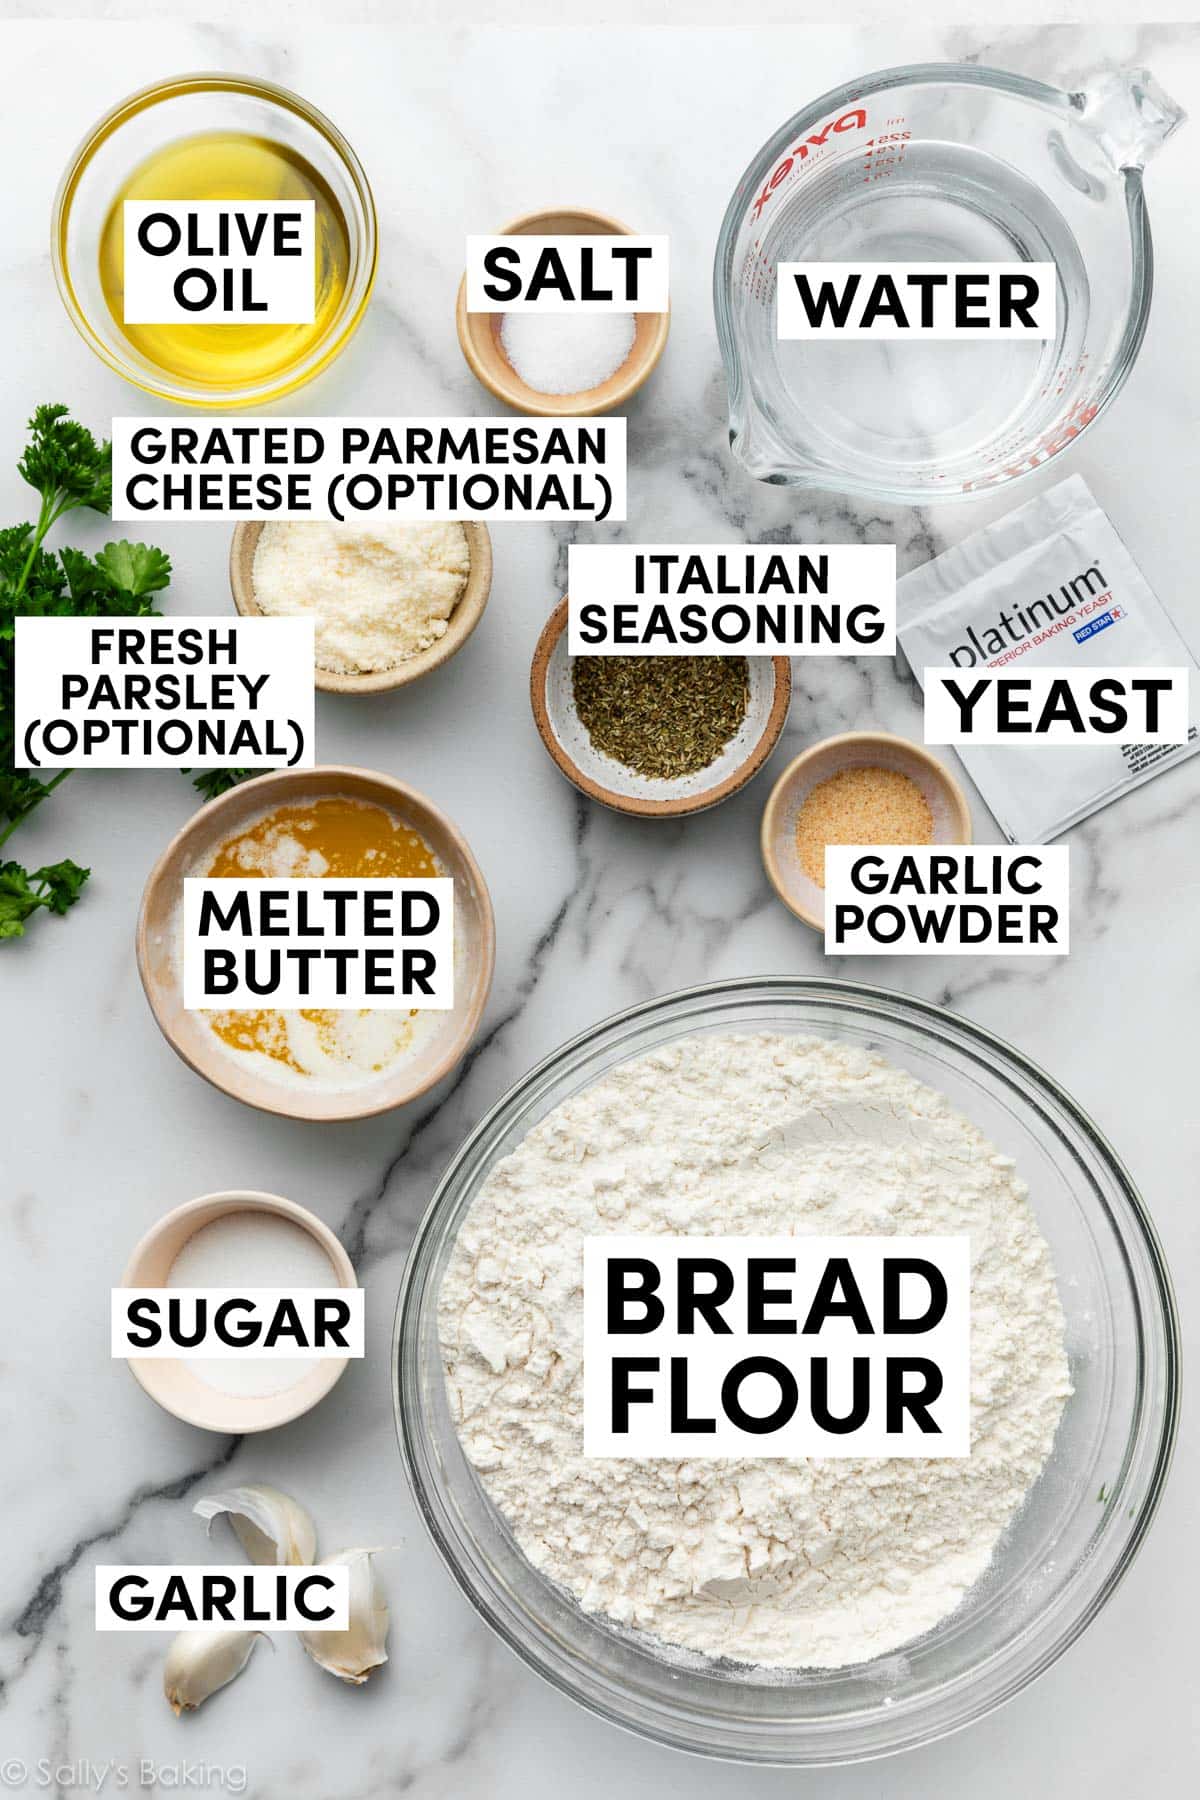
Ingredients You Need:
- Water: Use warm water here, to activate the yeast.
- Instant Yeast: I always use Platinum Yeast from Red Star. If you’ve been baking my yeast breads for a while, you know I swear by it! Its careful formula strengthens dough and makes working with yeast simple. You can use active-dry yeast instead; the rise time may be a bit longer.
- Sugar: To feed the yeast.
- Olive Oil: Or melted butter.
- Salt: Can’t make flavorful bread without salt!
- Garlic Powder: We’ll top the knots with fresh minced garlic, but you can use garlic powder in the dough.
- Bread Flour: The original recipe called for all-purpose flour, but we find that bread flour makes for a better texture. If you don’t have any, you can use all-purpose instead.

Let Me Show You How to Shape Garlic Knots
After the dough rises, punch it down to release the air. Then begin shaping the dough. If you know how to tie a knot, you can shape garlic knots.
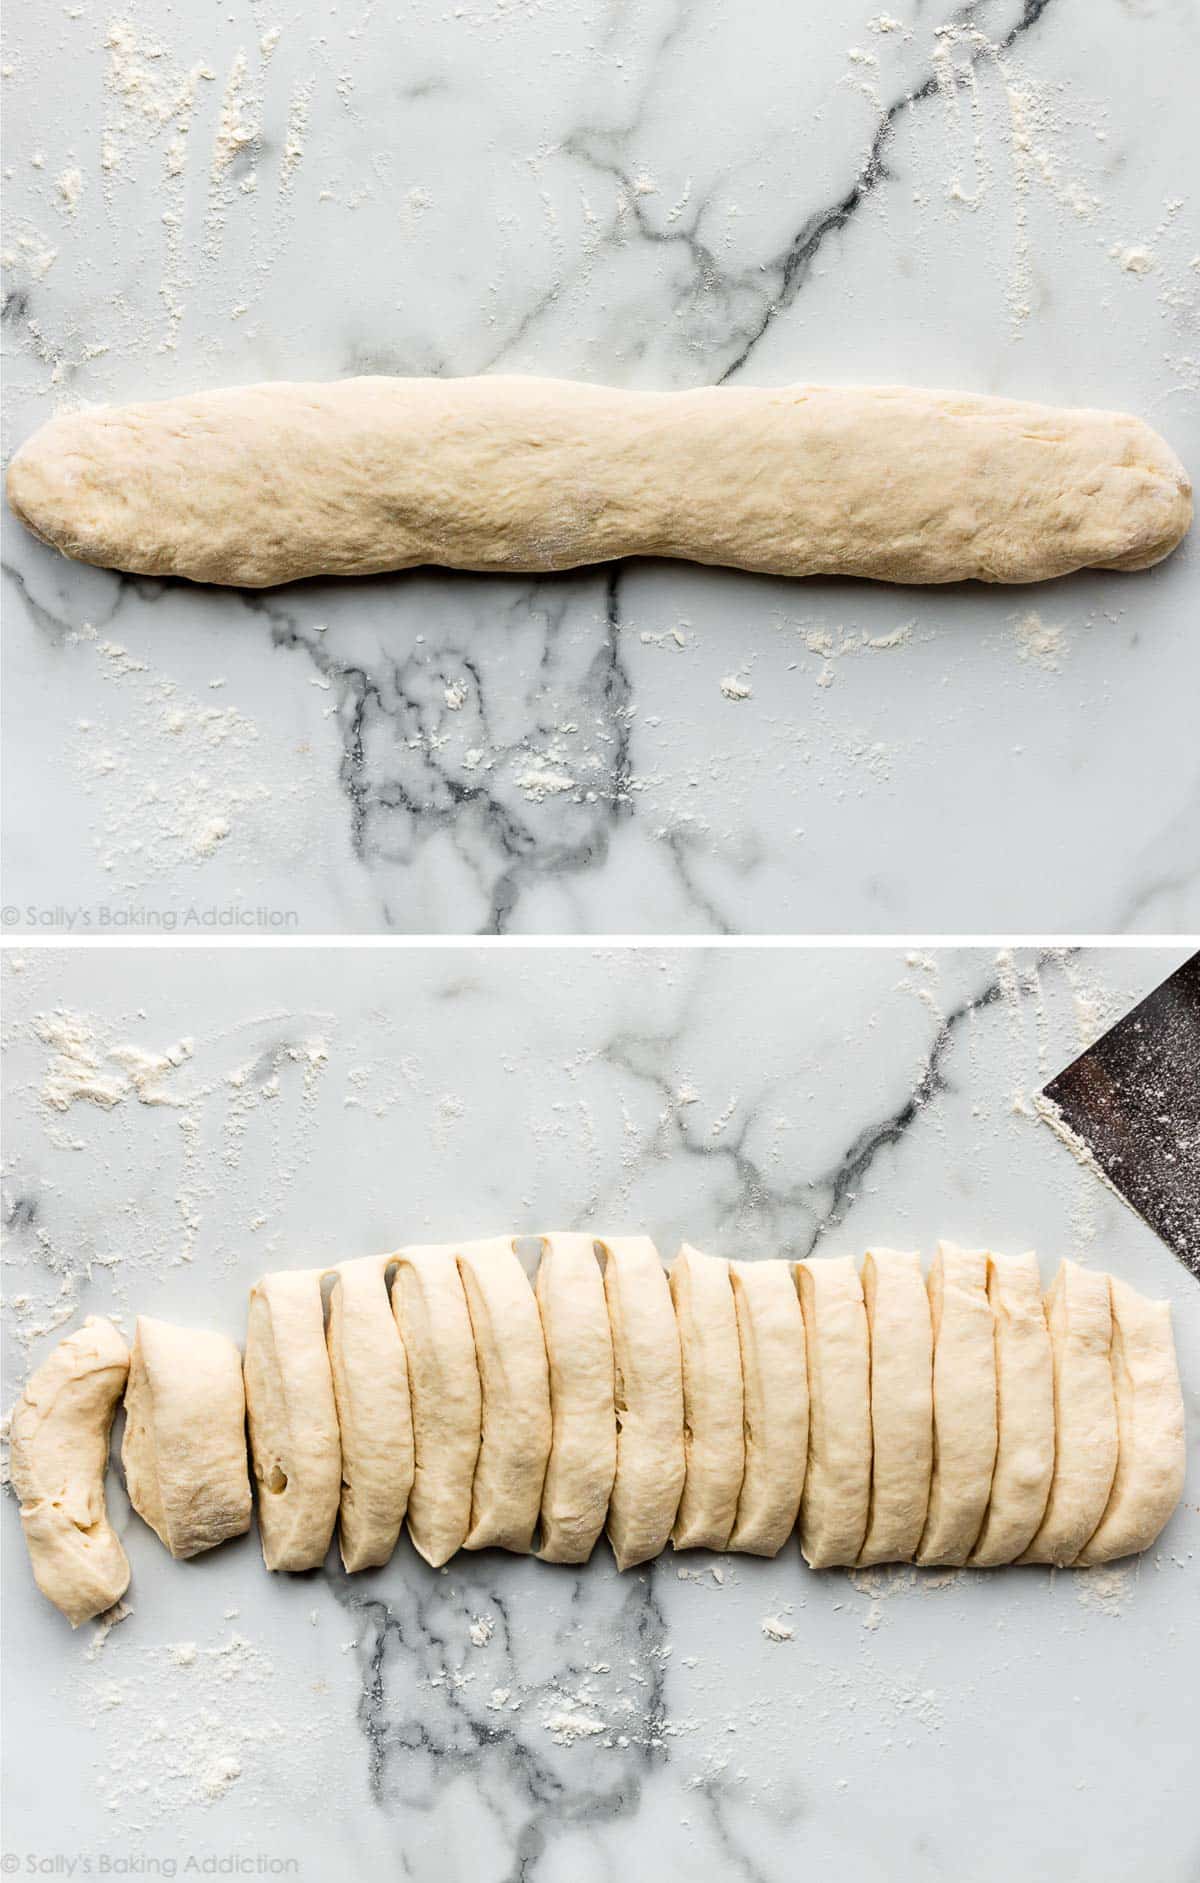
- Shape into a 16-inch log: Using your hands, shape the dough into a 16-inch log. No need to use a rolling pin because this doesn’t need to be perfect.
- Cut into 16 pieces: Cut the log into 16 1-inch sections of dough.
- Roll each piece into an 8-inch rope.
- Tie the rope into a knot.
Here are step-by-step pictures of the shaping process. It’s a lot easier than it sounds, and you don’t need any special tools.
Shape each rope into a knot:
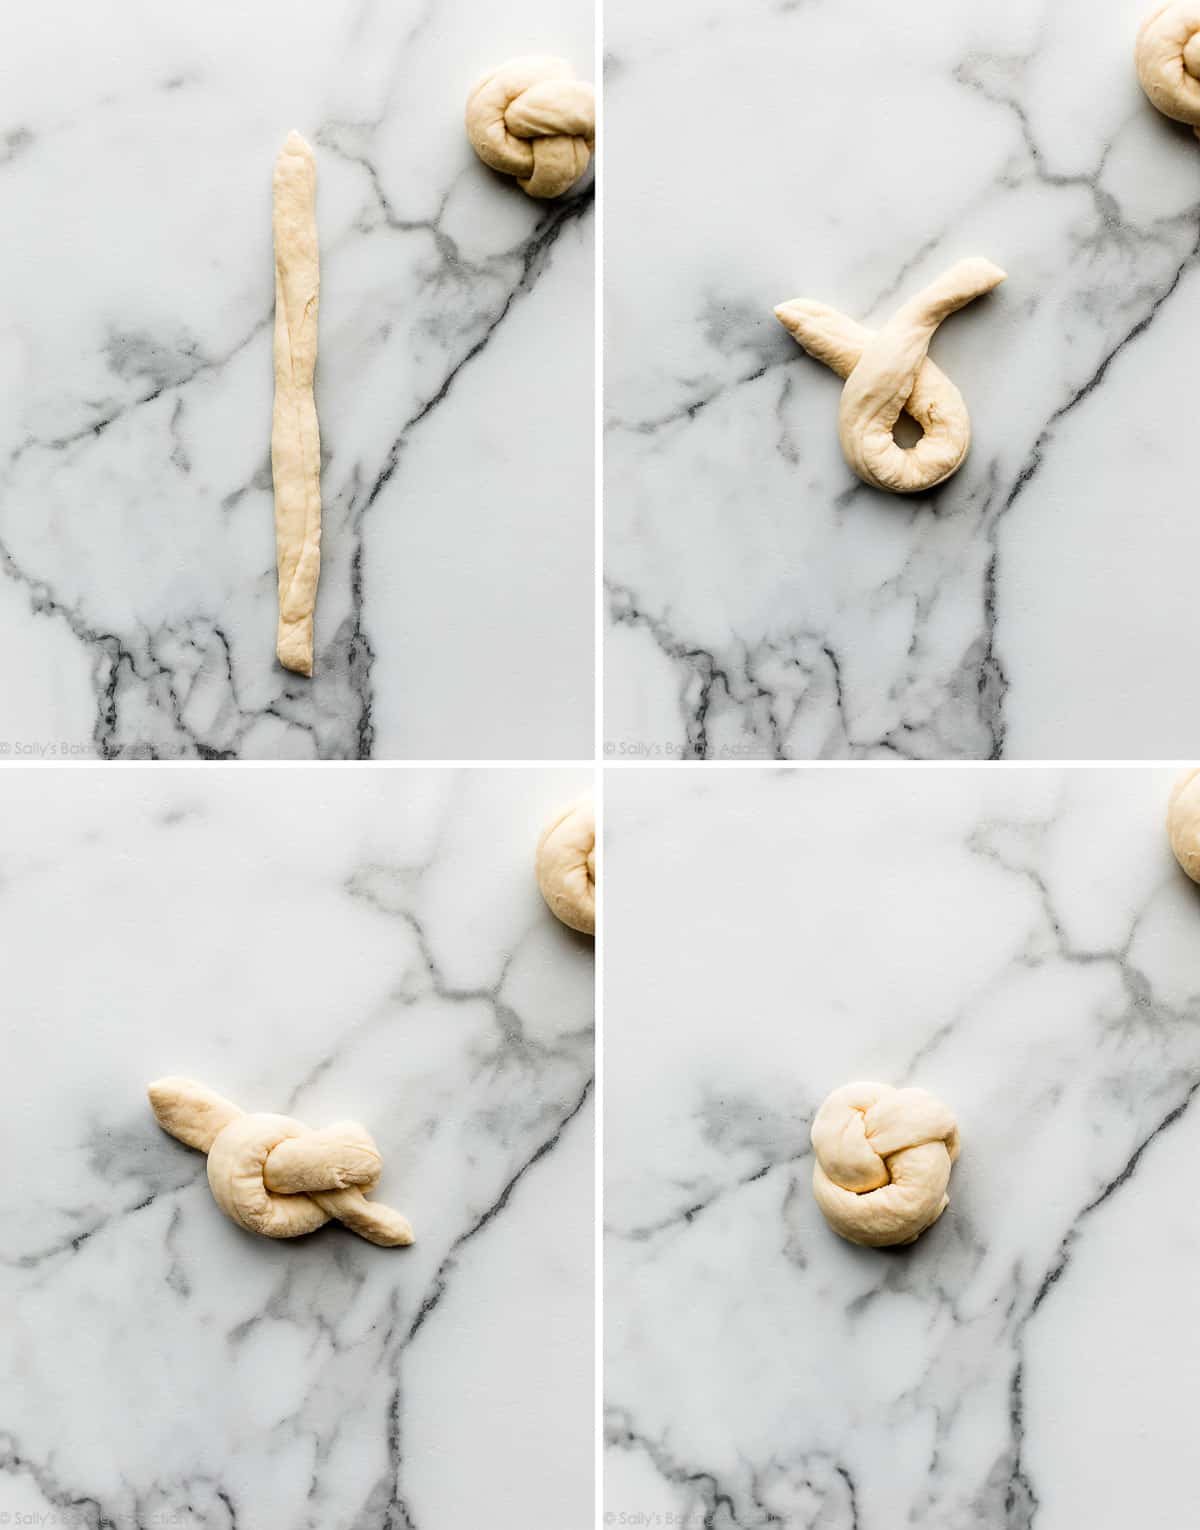
You can tuck the ends underneath the knot or leave them out—that’s totally up to you. The ropes are longer when making soft pretzel knots, but tying the knot is the same.
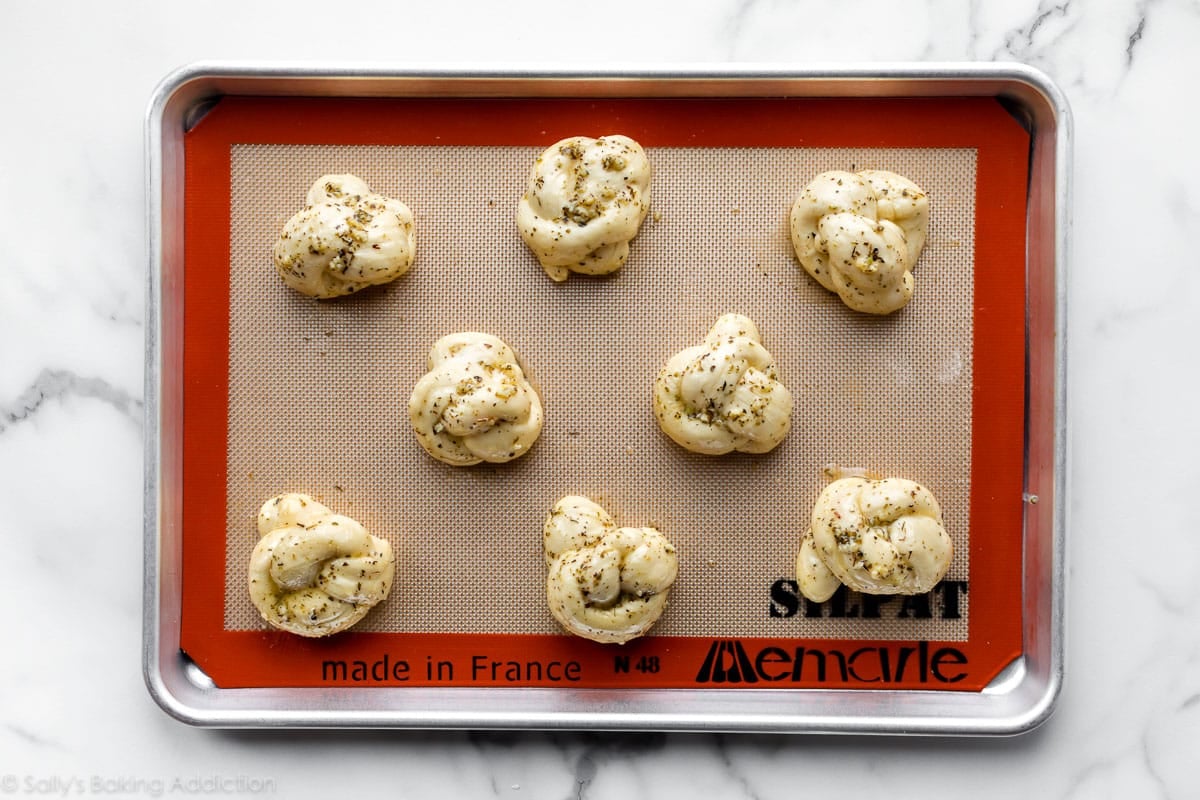
Let the shaped knots rest for about 30 minutes before brushing with garlic butter and baking.
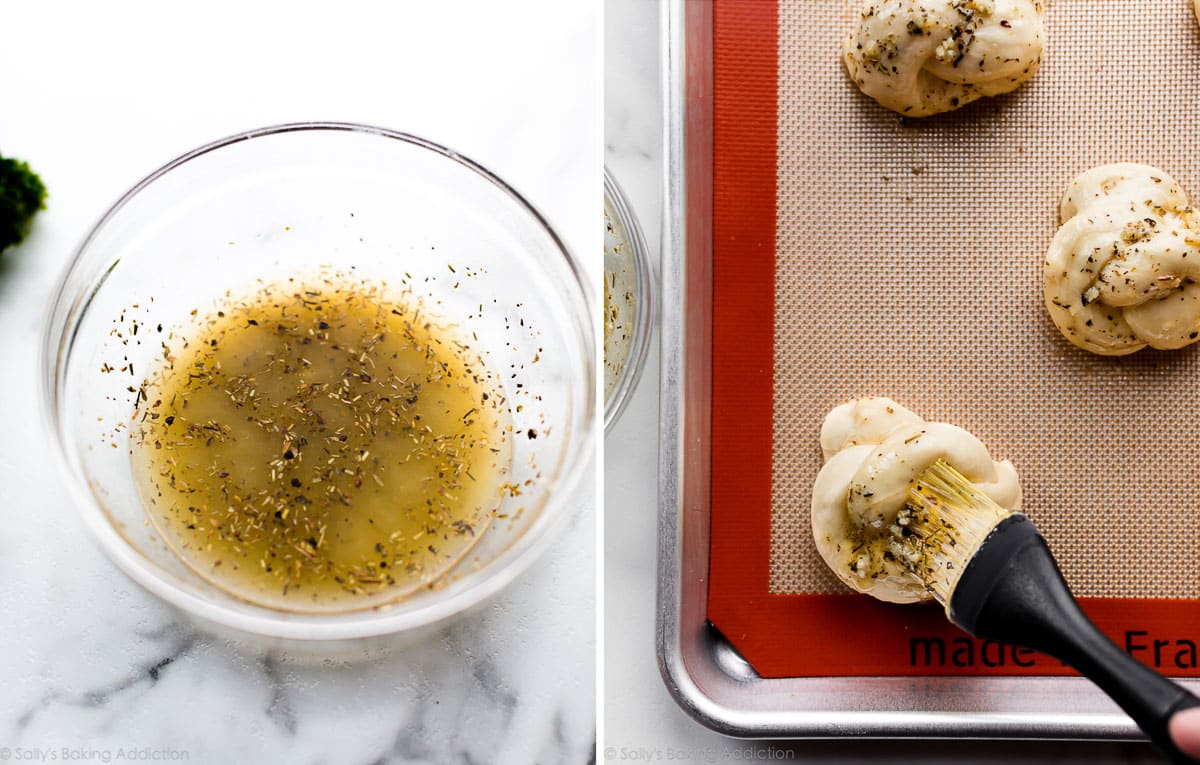
Garlic Herb Butter
Right before baking, generously brush the knots with garlic herb butter. Simply combine melted butter, fresh minced garlic or garlic powder, Italian seasoning, and salt.
If you can’t find an herb mixture labeled “Italian Seasoning” in the spice aisle of the grocery store, use dried oregano, dried basil, and/or dried parsley instead.
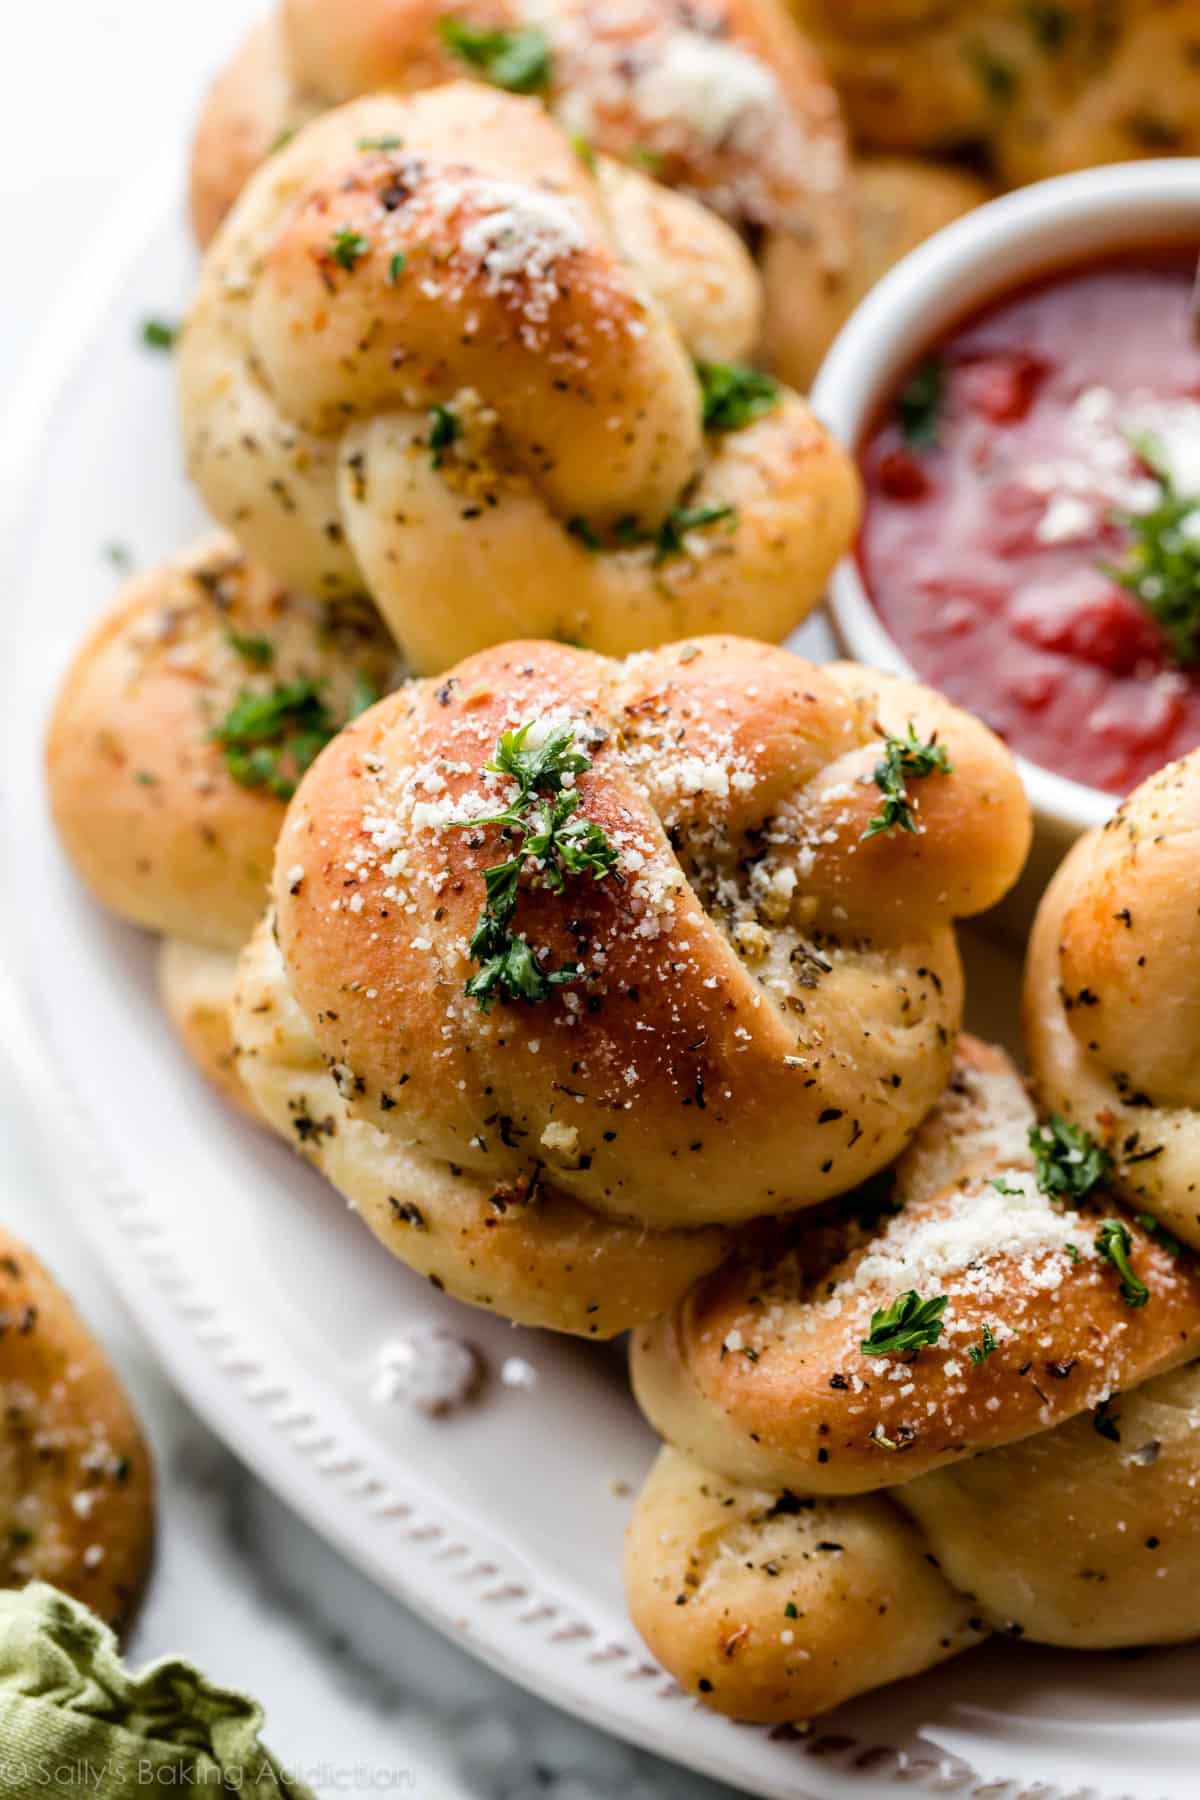
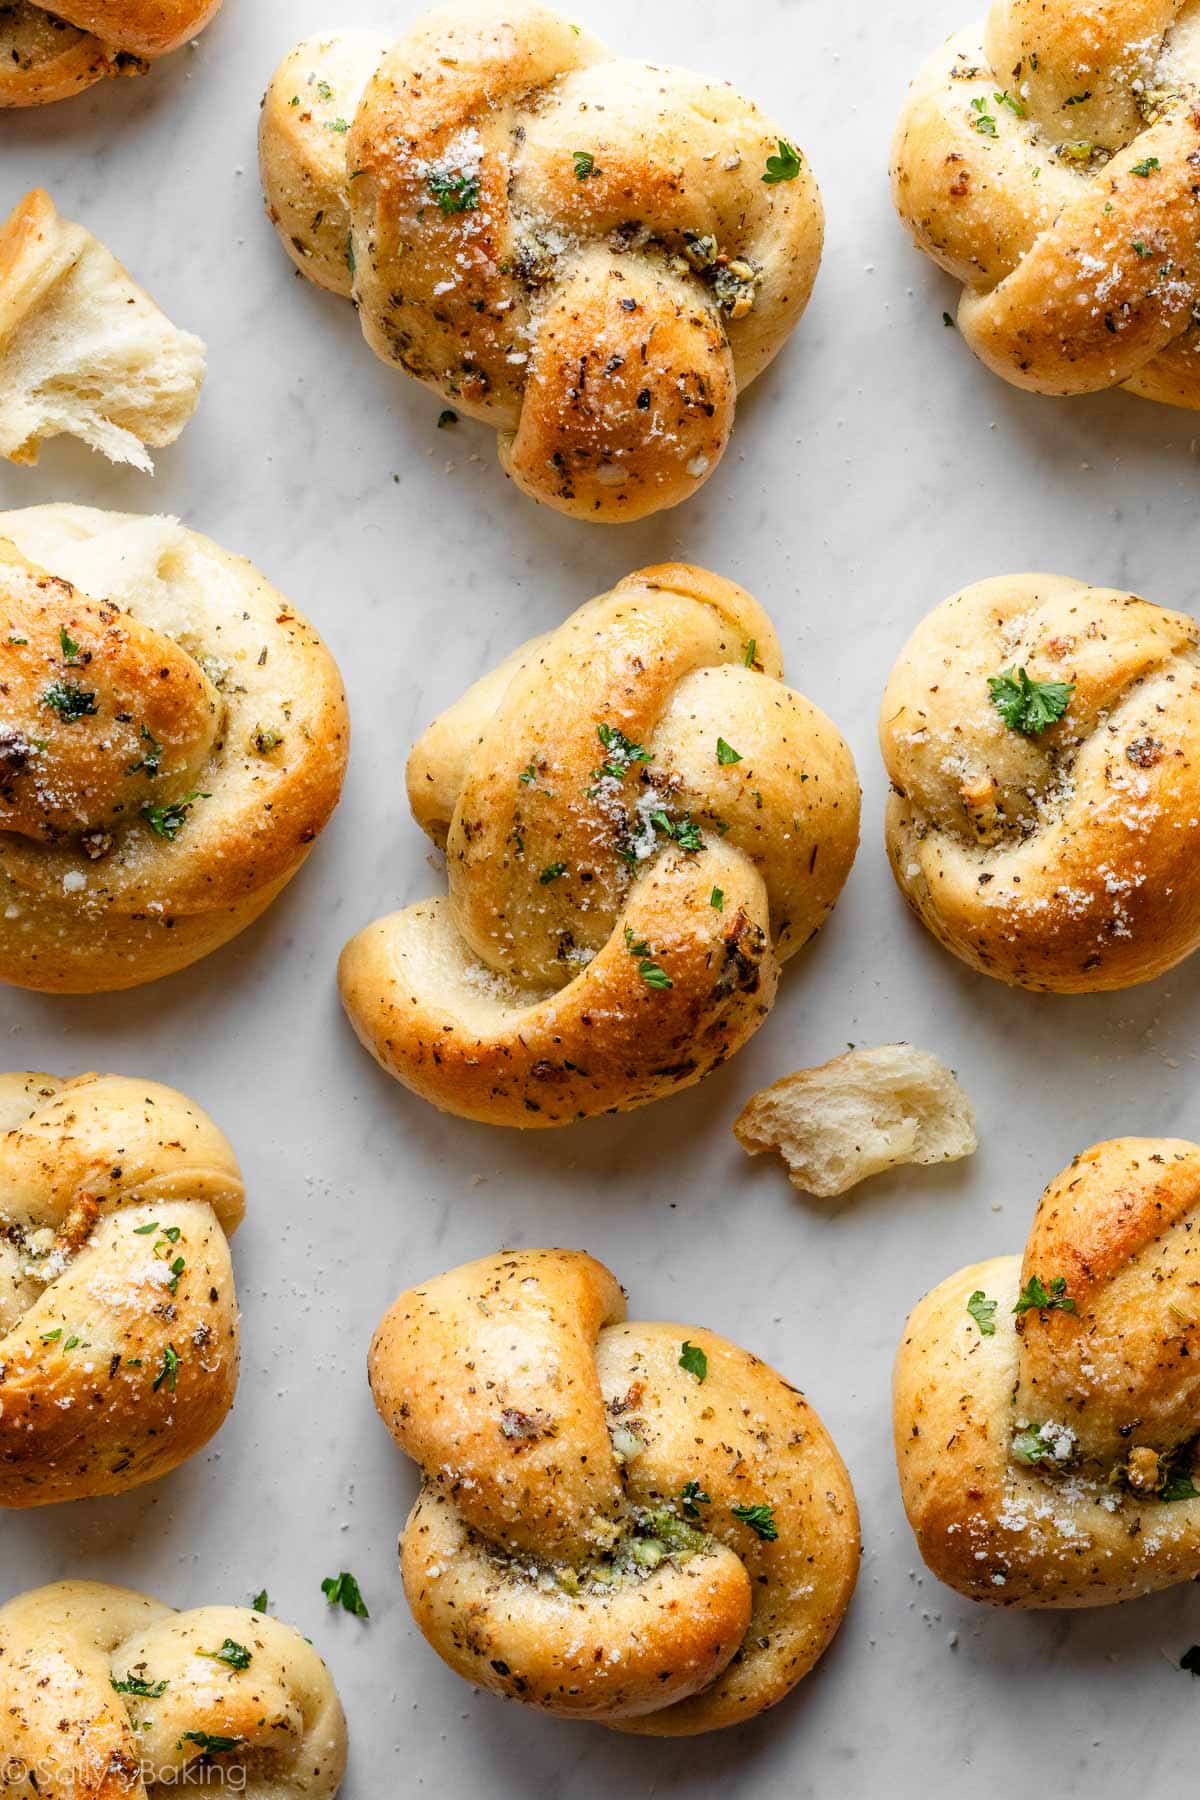
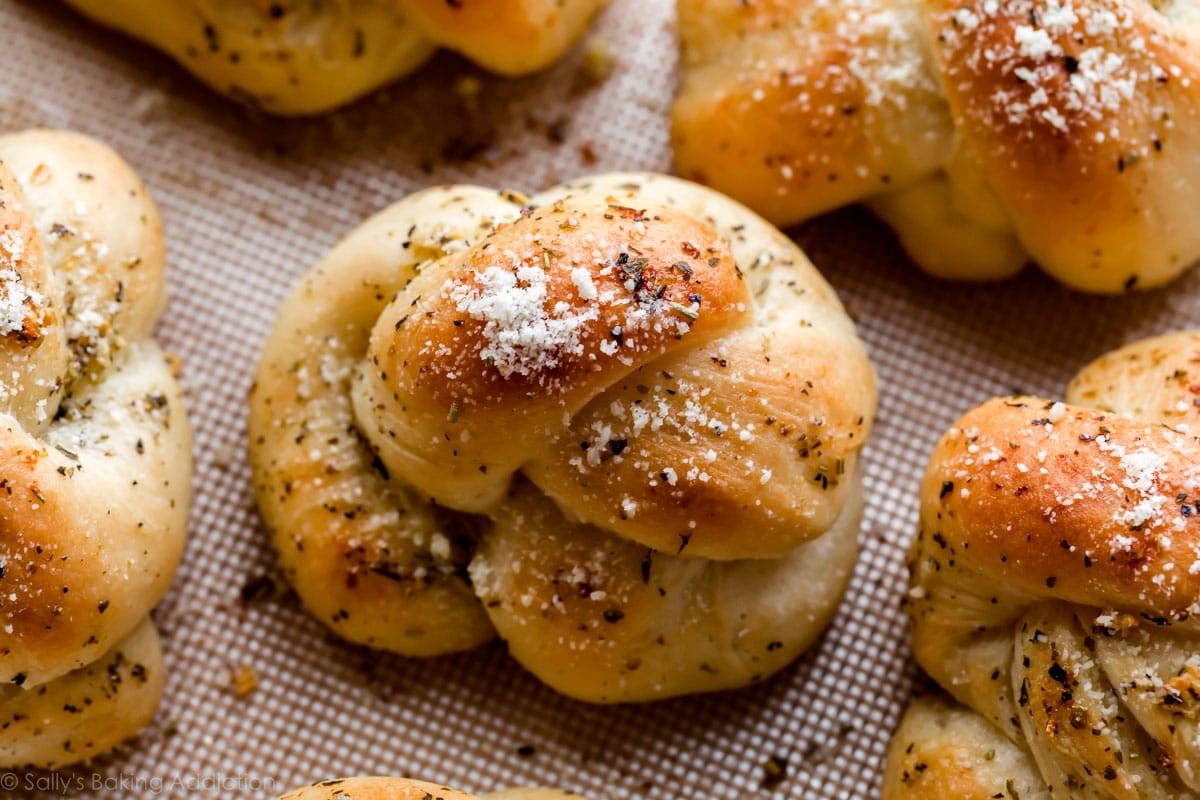
Bake the knots until golden brown and experience the lofty smell of garlic throughout the kitchen. Everyone (maybe even your neighbors) will know what’s on the menu tonight!
Flavor Tip: Save some of the garlic butter to brush onto the knots as they come out of the oven, then top each with fresh parmesan and chopped parsley. The parmesan and parsley are completely optional, but make a fabulous garnish.
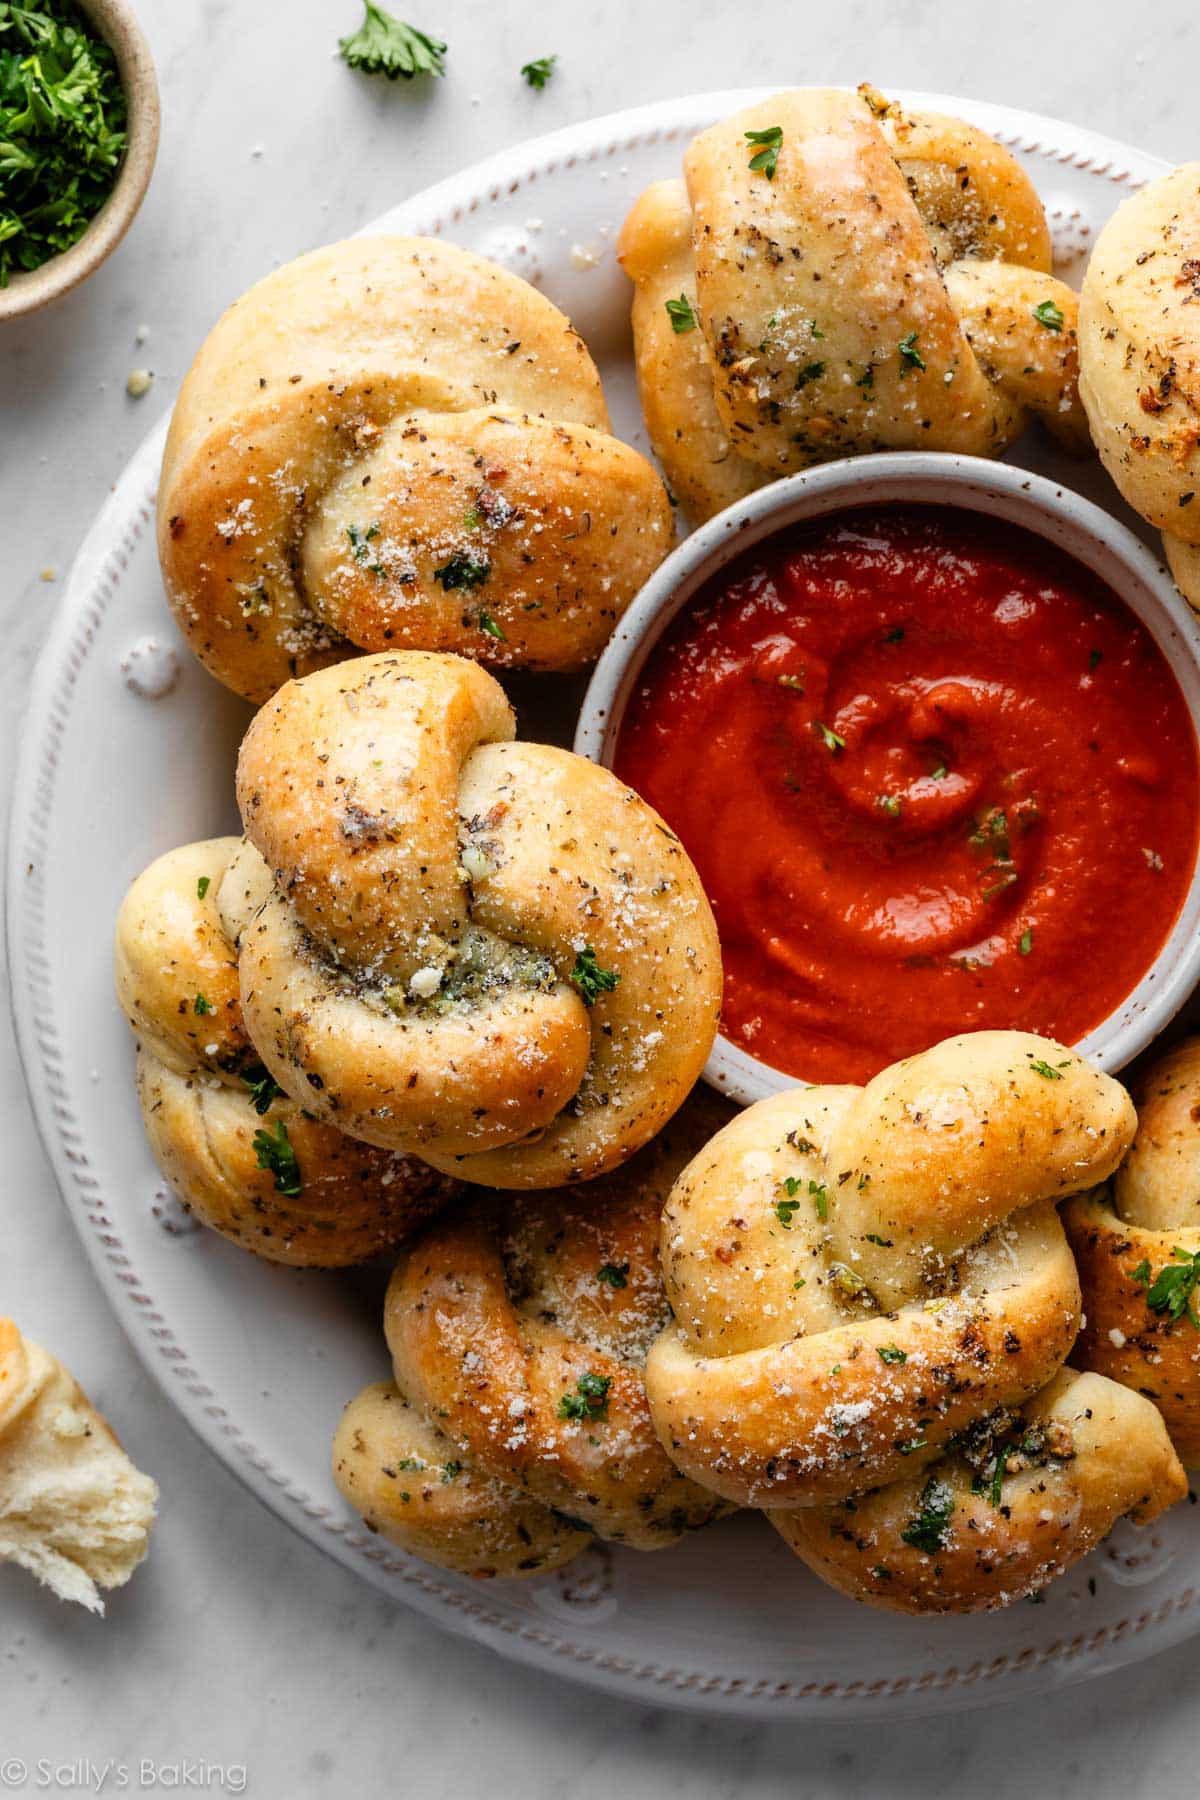
Serve the garlic knots warm, with a side of warm marinara sauce or homemade tomato soup for dipping. This is your happy place!*
*Unless you’re a vampire.


Homemade Garlic Knots
- Prep Time: 3 hours (includes rising)
- Cook Time: 20 minutes
- Total Time: 3 hours, 25 minutes
- Yield: 16 knots
- Category: Dinner
- Method: Baking
- Cuisine: Italian
Description
These homemade garlic knots are extra soft, fluffy, and packed with flavor thanks to a buttery garlic-herb topping brushed on before and after baking. Made from an easy homemade dough similar to my reader-favorite pizza dough, they freeze beautifully and are perfect for pizza night—no delivery required.
Ingredients
Homemade Dough
- 1 cup + 2 Tablespoons (270g/ml) warm water (between 100–110°F/38–43°C)
- 2 and 1/4 teaspoons (7g) Platinum Yeast from Red Star instant yeast (1 standard packet)*
- 1 Tablespoon (13g) granulated sugar
- 3 Tablespoons (43g/ml) olive oil or melted butter
- 1 teaspoon salt
- 1 teaspoon garlic powder
- 3 and 1/3 cups (433g) bread flour* (spooned & leveled), plus more for hands and work surface
Topping
- 5 Tablespoons (71g) unsalted butter, melted
- 3 garlic cloves, minced; or 1/2 teaspoon garlic powder
- 1 teaspoon Italian seasoning*
- 1/4 teaspoon salt
- optional after baking: 1/4 cup (25g) grated Parmesan cheese
- optional after baking: 2 Tablespoons chopped fresh parsley
Instructions
- Proof the yeast: Whisk the warm water, yeast, and sugar together in the bowl of your stand mixer fitted with a dough hook or paddle attachment. Cover and allow the mixture to sit for about 5 minutes, or until foamy on top. *If you do not own a stand mixer, you can do this in a large mixing bowl and, in the next step, mix the dough together with a large wooden spoon or silicone spatula. It will take a bit of arm muscle. A hand mixer works, but the sticky dough can repeatedly get stuck in the beaters. Mixing by hand is the better choice.
- Make the dough: Add the olive oil (or butter), salt, garlic powder, and about half of the bread flour. Beat on low speed for 30 seconds. Scrape down the sides of the bowl and add the remaining flour. Beat on low speed for 2 minutes, or until a soft dough forms and pulls away from the sides of the bowl. Dough will be very soft, but should not be overly sticky. If it seems too sticky and clings to the sides of the bowl instead of forming a rough mass around the dough hook, add more flour, 1 Tablespoon at a time, and continue to mix until the dough pulls away from the sides of the bowl but is still moist and tacky. If it feels dry and crumbly, add more water, 1 teaspoon at a time, mixing well after each addition.
- Knead the dough: Keep the dough in the mixer (and switch to the dough hook if using the paddle) and beat for an additional 5 full minutes, or knead by hand on a lightly floured surface for 5 full minutes. (If you’re new to bread-baking, my How to Knead Dough video tutorial can help here.) If the dough becomes too sticky during the kneading process, sprinkle 1 teaspoon of flour at a time on the dough or on the work surface/in the bowl to make a soft, slightly tacky dough. Do not add more flour than you need because you do not want a dry/tough dough. After kneading, the dough should still feel a little soft. Poke it with your finger—if it slowly bounces back, your dough is ready to rise. You can also do a “windowpane test” to see if your dough has been kneaded long enough: tear off a small (roughly golfball-size) piece of dough and gently stretch it out until it’s thin enough for light to pass through it. Hold it up to a window or light. Does light pass through the stretched dough without the dough tearing first? If so, your dough has been kneaded long enough and is ready to rise. If not, keep kneading until it passes the windowpane test.
- 1st rise: Lightly grease a large bowl with oil or nonstick spray—just use the same bowl you used for the dough. Place the dough in the bowl, turning it to coat all sides in the oil. Cover the bowl with aluminum foil, plastic wrap, or a clean kitchen towel. Allow the dough to rise in a relatively warm environment for 2 hours or until double in size. (I always let it rise on the counter and it takes about 2 hours. For a tiny reduction in rise time, see my answer to Where Should Dough Rise? in my Baking with Yeast Guide.)
- Line two baking sheets with parchment paper or silicone baking mats.
- Shape the dough: Use the step-by-step photos in the blog post as your guide for this step. When the dough is ready, punch it down to release the air. Using floured hands on a lightly floured work surface, shape the dough into a 16-inch (41cm) log. Using a very sharp knife, pizza cutter, or bench scraper, slice the log into 16 1-inch sections. Roll each piece of dough into an 8-inch rope. Tie each rope into a knot. You can tuck the 2 ends of the knots underneath or leave them out. Arrange the knots on the prepared baking sheets.
- 2nd rise: Lightly cover the shaped knots and let them rest for 30–45 minutes. They will slightly puff up during this time, producing softer rolls.
- Towards the end of the rise time, preheat the oven to 400°F (204°).
- Make the topping: Stir the melted butter, garlic, Italian seasoning, and salt together. Brush on the knots. Reserve some of the topping for when the knots come out of the oven.
- Bake for about 20–23 minutes or until golden brown on top. Remove from the oven and brush the warm knots with remaining garlic butter. Sprinkle with parmesan cheese and/or parsley, if using.
- Serve warm, plain or with marinara sauce for dipping.
- Cover and store leftover knots at room temperature for up to 2 days or in the refrigerator for up to 1 week. Reheat as desired.
Notes
- Freezing Dough: After the dough has its 1st rise and you punch it down to release the air, lightly coat all sides of the dough ball with olive oil. Place the dough into a freezer zipped-top bag and seal tightly, squeezing out all the air. Freeze for up to 3 months. Thaw in the refrigerator overnight. Once thawed, remove the dough from the refrigerator and allow to rest for 1 hour on the counter, then continue with step 6.
- Freezing Unbaked Shaped Knots: Instead of freezing the dough as a whole, you can freeze the shaped knots before baking them. Shape the knots as directed in step 6. Arrange on a lined baking sheet. Freeze, uncovered, for 1–2 hours. Remove from the freezer. At this point, knots should be frozen and no longer sticky. Place them into a freezer-friendly container or zipped-top bag. Freeze for up to 3 months. Thaw in the refrigerator or on the counter. Bring to room temperature, arrange on 2 lined baking sheets, cover lightly, and allow to rest/rise for 1 hour before continuing with step 8.
- Special Tools (affiliate links): Electric Stand Mixer or Glass Mixing Bowl and Wooden Spoon or Silicone Spatula | Dough Scraper | Pizza Cutter | Baking Sheets | Silicone Baking Mats or Parchment Paper | Pastry Brush
- Halving the Recipe: This recipe yields about 2 pounds of dough, which is enough for 16 knots or 1 pizza + 8 knots. If you want to make just 8 knots, punch the dough down as directed in step 6. Cut in half. Use the other half of the dough however you’d like or freeze for later. Shape into an 8-inch log and cut into 8 1-inch strips. Continue with the recipe as directed.
- Yeast: Platinum Yeast from Red Star is an instant yeast. You can use active dry yeast instead. The 1st rise time may take a little longer. Reference my Baking With Yeast Guide for answers to common yeast FAQs.
- Italian Seasoning: If you can’t find Italian seasoning in the spices section of the grocery store, use a mix of dried oregano, dried basil, and/or dried parsley instead.
- Recipe Updates in 2026: Based on reader feedback, we retested and updated the dough recipe as written above. If you prefer the original version, increase the water to 1 and 1/3 cups (320ml), use all-purpose flour instead of bread flour, and reduce the garlic powder to 1/2 teaspoon.


Reader Comments and Reviews
I think I messed up. I don’t know how, I followed the recipe to a T. I even measured everything while creating the knots. But, my garlic knots are the size of a baseball. They’re huge! I haven’t finished baking them yet, but oh my god. What did I do wrong?
Hi Lori! Could the dough have risen too much? We hope they turn out for you!
These were a hit with my family!
My garlic knots tasted too yeasty. I had used instant yeast and allowed the dough to rise for 90 minutes. But they tasted so bad. 🙁
Very disappointed. What could I have done differently?done
Does anyone have tips for how to stuff with cheese and get a little cheese pull? Excited to try this, Sally’s pizza recipes have been great
Hi Rawan, you could add 1 cup of shredded cheese into this dough when you add the second half of the flour. The cheese might melt around the edges a bit as the knots bake, but that’s not a problem. Or you can try adding a small cube of cheese to the center of the knot as well. Lining your pan with silicone baking mats or parchment is best. Let us know what you try!
Thanks this sounds amazing, will report back!!
I opened only the bottom of the oven, and followed the recipe to the dot but my bottoms got cooked quicker and burned while they were still uncooked from the top. Why did that happen?
Hi Sukaina, when baked goods burn easily on the bottom it can sometimes be the pan — do yours happen to be dark pans? For next time, you can try lowering the temperature a bit and moving it away from the heating element. This should help prevent the bottoms from burning too fast.
Awesome recipe! Thank you! Love the extra tips for freezing, etc.
The dough worked perfect! I hand kneaded so I ended up using a touch more water to make it a little easier…still wrked well.
I brushed mine in melted butter and za’tar spice mix.
SO good.
Can I make one braided loaf with this recipe rather than individual knots?
Hi Lisa, We wouldn’t recommend one braided loaf with this recipe, but you might love our Rosemary Garlic Pull Apart Bread.
Third time using this recipe today, this time as a side for a family BBQ. It’s been a hit every time and I have several people asking me for your recipe. Your recipes and clear instructions and pictures have never failed me and adding the weight of your ingredients as well helps a lot for this european girl. Your website will always be the first thing I go to when I wanna try a new recipe! Thanks a bunch!
Turned out delicious. I did bake for lesser time (15 mins) as per other comments and it was perfectly done.
Hey! I just pulled my knots out of the freezer and came back to check the directions for baking from here. I noticed it says freeze up to 3 months. It’s been 9. Whoops! Use or toss?
Hi Dalynn, that’s entirely up to you! We find they taste best when only frozen for up to 3 months.
I had the same problem of my knots being to dry. I was so disappointed! I have to try again with maybe baking less time. I did use regular yeast and gave it about 5hrs to rise. Humidity was pretty bad the day I made them. Please give me any suggestions for my next batch.
Could these be baked in an 8in circular foil pan instead? Kinda like pull-apart garlic knots
Hi Hannah, we haven’t tried it but we can’t see why not. Let us know how it goes!
How many grams is 2 and a half teaspoons of yeast?
Hi Kinjal, 2 and 1/2 tsp of yeast (one standard packet) is 7 grams.
I don’t have any butter at my house.
Is it okay if I use ghee, or vegetable shortening instead?
Or can I skip the butter topping altogether?
Hi Bee, we don’t recommend shortening in place of the butter. You could skip the butter topping, but then the knots will be plain and not like signature garlic knots.
what about the ghee? can I use ghee?
Hi Bee, the flavor would be different, but we don’t see why ghee wouldn’t work as a topping.
My favorite pizza place makes knots like this but they just use olive oil and fresh garlic… delicious!
This is my experience as well when going by weight. I had to add a lot of flour to make it work.
I’m letting my dough rise overnight in the fridge. When I take it out of the fridge, can I use it right away or do I have to let it sit out for a bit before using it?
Hi Vanessa, you can punch the dough down right away, but if the dough didn’t quite double in size overnight, let it sit at room temperature for 30-45 minutes before punching down. Enjoy!
Can I put in the refrigeration the night before my company comes for dinner or no ?
Thank you
Hi Laurna, You can allow the dough to rise for 8-12 hours in the refrigerator (see the overnight instructions in the Pizza Dough post for details.) Or you can bake the garlic knots and store them covered at room temperature for 2 days or in the refrigerator for up to 1 week. Feel free to warm them up before serving.
After rolling into the little logs, before knotting, I brushed each piece of dough with some melted butter and pesto. This made a big difference- the knots were soft and buttery and they didn’t get too tough in the centre. Great recipe!! I was just making pizza and used leftover dough for these. (One quantity of dough for me made 3 pizzas and 5 knots)
Hi there,
Is sugar required for the yeast? Can I create the recipe without or with truvia?
Looking forward to trying your recipe
Hi Jennifer, we don’t recommend leaving the sugar out in this recipe. We’d love to help but we are not trained in baking with sugar substitutes. For best taste and texture (and so you don’t waste your time trying to adapt this recipe since it may not work properly), it may be more useful to find a recipe that is specifically formulated for sugar substitutes like Truvia. Thank you!
Hi! I want to try making these this weekend but was wondering if I could make the dough, cover in garlic butter and let them sit in the fridge overnight? I want to make them fully in advance so all my husband has to do is pop them in the oven for dinner (I won’t be home beforehand). Thanks!
Unbelievably deee-licious! Soft, chewy and flavorful. Thanks, Sally for making baking simple and fun!
Hello, this recipe looks great however I was wondering if I would need to make any changes if I were to use active dry yeast instead of instant. I’m newer to baking with yeast, and have used both instant and active dry before but am out of instant and unable to go to store. I saw in the notes you said you can replace it but was wondering if any of the recipe would need to be changed. Thank you
Hi Elena! No changes necessary. The rise time may take slightly longer. You may enjoy this baking with yeast guide as well!
Thank you so much! Glad to know it won’t be too much of a difference, and that article is very informative and helpful!
Ok so 2, 1/4 teaspoons (lol), first time I made these I put 2 teaspoons plus 1/4.. they were huge and still good
omg! I just did the same thing didn’t think twice until i started to read the comments. haha. I was only reading the comments to see any tips for proof time !!
I retract my previous comment. I see it actually IS 2 and 1/4 teaspoons.
OH MY GAWD! I did the same
These were amazing! My husband was obsessed and the dough was so soft. It was hard not to eat them all before dinner time. The instructions for getting the knot shape was perfect. Thank you!
…and ☆☆☆☆☆ more! Our family thinks this recipe is better than the restaurant in Florida that hooked us to knots. I errored and put chopped garlic, along with everything else, over the baked knots. Aroma! mmm. Tnx Sally.
This was very good for a novice baker. But they came out with a crust and soft on the inside. How can I make them just soft and fluffy? That would be ideal..
I needed to find a recipe for something nice and on the easier side to give in gift bags to a bunch of friends. I decided to make garlic knots and came across this recipe. Turned out delicious!! So soft and delicious. I served it with a homemade dill dip, marinara and schug. Beyond.
Definitely recommend this recipe.
Hi can I prepare the knots in early afternoon and then bake them later.
Hi Andrea, we don’t recommend letting the shaped dough sit for longer than 45 minutes. You can however do a slow rise in step 3 for 8-12 hours in the refrigerator. See our pizza dough recipe notes for full instructions.
I’m not rating the recipe because I’m not happy with how these turned out…but that’s my fault, not yours. When I set the dough to rise, I think my oven was too hot (the lowest temperature my oven will reach is 170 degrees) because the dough had a slightly hard crust. (In my defense, it was a cold Michigan winter’s day .). And although I knotted them, the knots are not distinct and they seem more like lumps than knots. Does this all go back to the “too-hot rising”?
It sounds like you may have over-proofed your dough? They would not hold their shape if that happened. Trust me, I have done it myself!
Sally, Thank you for this recipe! I have a batch in the oven as I tex you. They smell good! Should gp well with my shrimp scampi tonite. I found this recipe very easy although im still doing it all by hand, I find it theraputic! Looking forward to the buzzer Thank you
Hi Lesley! This sounds like it could be fixed with a few oven adjustments. (By the way, I’m not sure how I missed this question earlier in the month!) I recommend lowering the oven temperature to 375°F (191°C) and extending the bake time. A lower oven temperature should help bake the tops and bottoms more evenly– bake until golden brown on top. I hope this is helpful if you ever try them again.
Thank you for this! I improvised from my Mom’s old recipe. Instead of garlic powder, I minced 15 medium cloves of garlic, then sautéed them on med low heat using 3 TBS unsalted butter and a couple teaspoons of water. It takes frequent stirring for about 8-10 minutes and the garlic becomes straw colored and smells sweet and earthy, no bitterness! After removing the skillet off the heat, I then added 6 more TBS of butter to melt in the skillet while the cloves cooled. I strained and saved the butter out of the garlic and took out a couple of TBS of the melted butter, then added to it the minced garlic and the salt. Add this to the dough along with the bloomed yeast and sugar, just before adding the flour. The result was gorgeous flecks of garlic throughout the dough. I saved the rest of the melted butter and brushed the knots lightly before baking. After they were done, I brushed the rest of the butter on the baked knots, using it all. I only added parmesan and flaked sea salt on these. I also upped the oven temp to 450f and baked for 10 minutes. Game changer!