

These homemade garlic knots are extra soft and flavorful, and use a dough similar to this reader-favorite pizza dough. Top with garlic herb butter before AND after baking for the tastiest knots!
I originally published this recipe in 2020 and have since made a few changes to improve the texture and flavor of the dough, which are reflected in the recipe below. This recipe is brought to you in partnership with Red Star Yeast.
Tell Me About These Garlic Knots:
- Made from an easy homemade dough
- Leftovers freeze beautifully
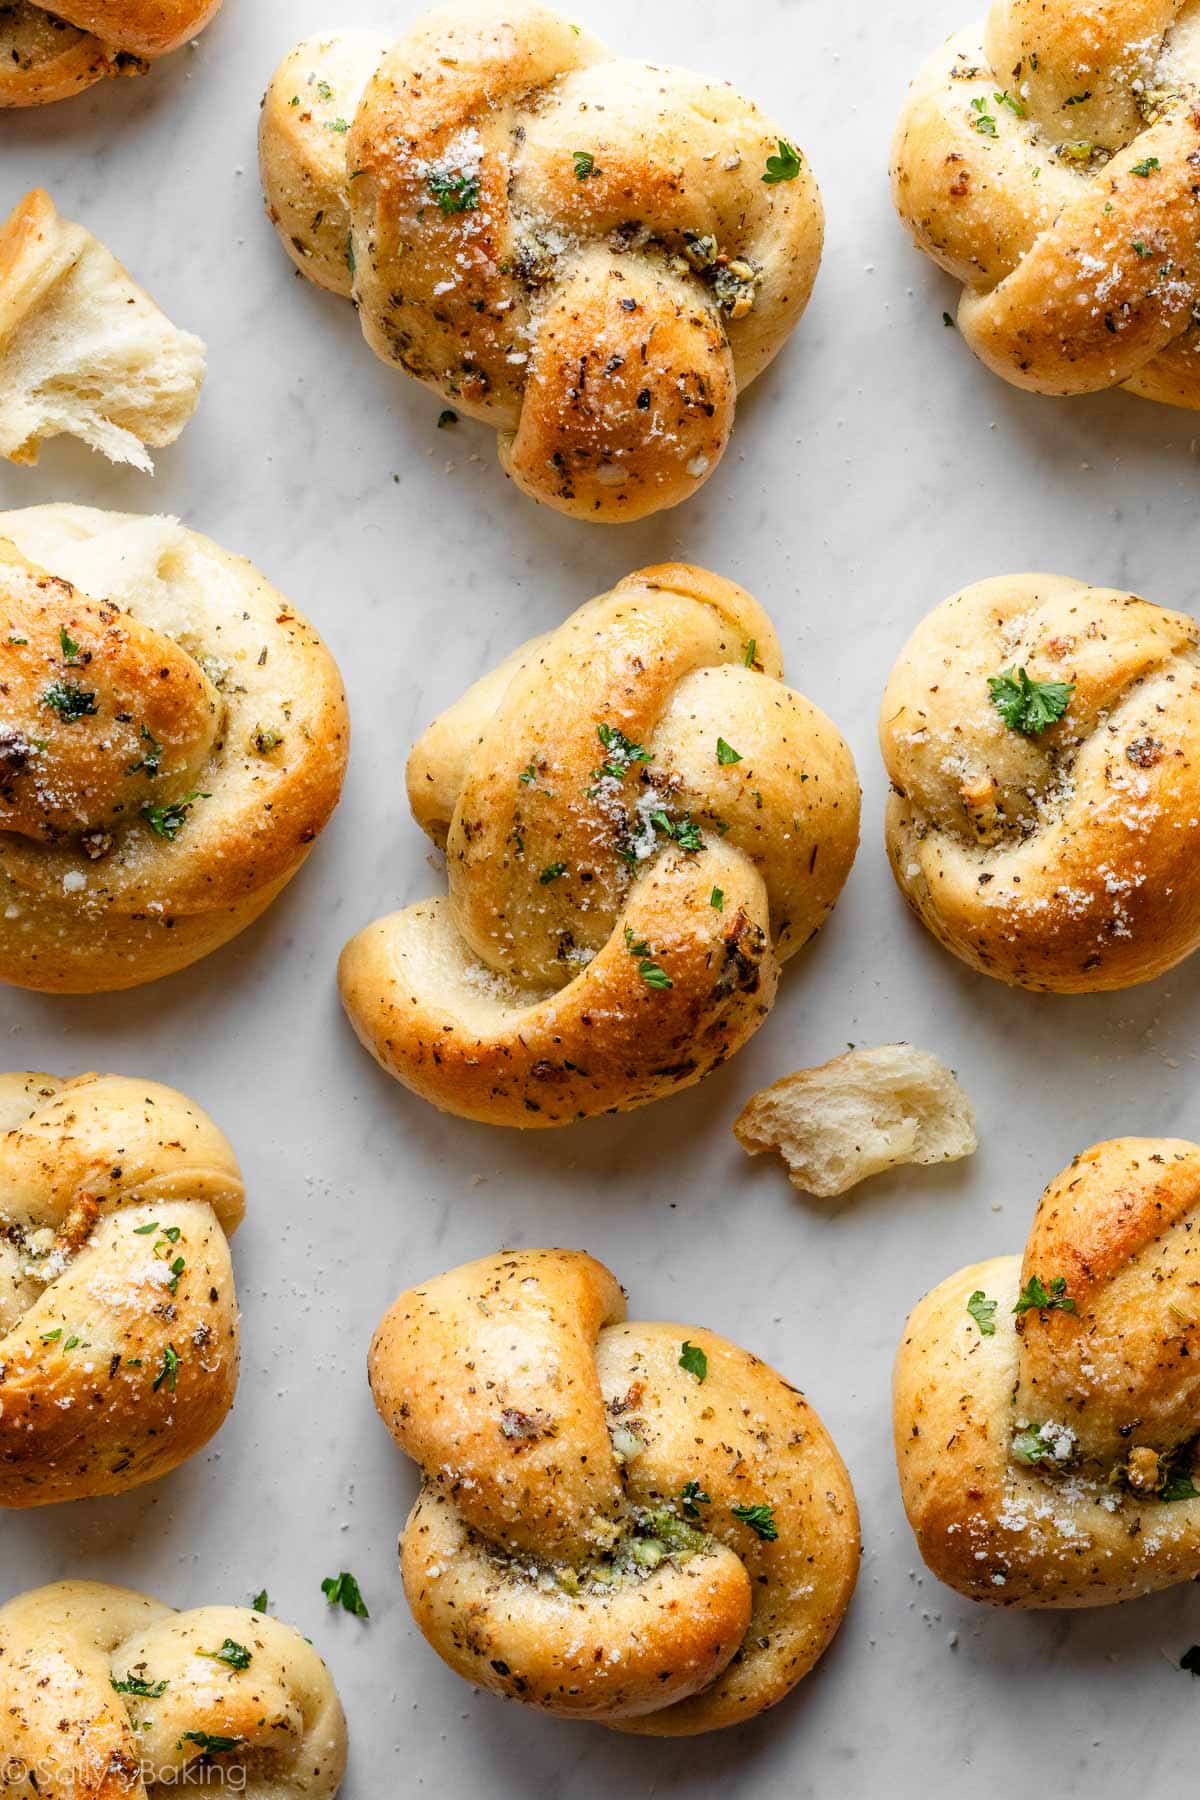
- Super soft and fluffy
- Golden brown
- Extra garlic butter
And I know you’ll appreciate this too: You can use the entire batch of dough for 16 knots OR you can use half of the dough to make a pizza or stromboli, and then have 8 knots on the side. Perfect for pizza night—no delivery required.
One reader, Michelle, commented: “These were perfect! Brushing on the garlic butter before baking makes such a difference. These are near foolproof! So fluffy and delicious! ★★★★★“
One reader, Catie, commented: “My husband agrees—best garlic knots ever! This recipe works! ★★★★★“
Garlic Knots From Pizza Dough
You can make these garlic knots with 1 or 2 pounds of store-bought or homemade pizza dough. Today’s dough is very similar to my homemade pizza dough, which yields about 2 pounds of dough. You can make 16 knots or 1 pizza + 8 knots. If you only need about 8 knots, freeze the other half of dough for another time. You will want to make these garlic knots again.
- Besides garlic knots and pizza, you can use this dough for cheesy breadsticks, pepperoni pizza rolls, and ham & cheese pockets too! So versatile.
Compared to my pizza dough, I reduced the water so the dough is easier to handle when shaping into knots. I add 1 extra Tablespoon of olive oil for a little extra flavor and richness, and include garlic powder too. Sometimes for extra flavor I use butter instead, similar to what I do when making homemade breadsticks. Either one works. (Melted butter in the dough is convenient because you also need melted butter for the topping.)
Even though store-bought dough is convenient, I encourage you to try homemade dough. The dough requires so few ingredients!
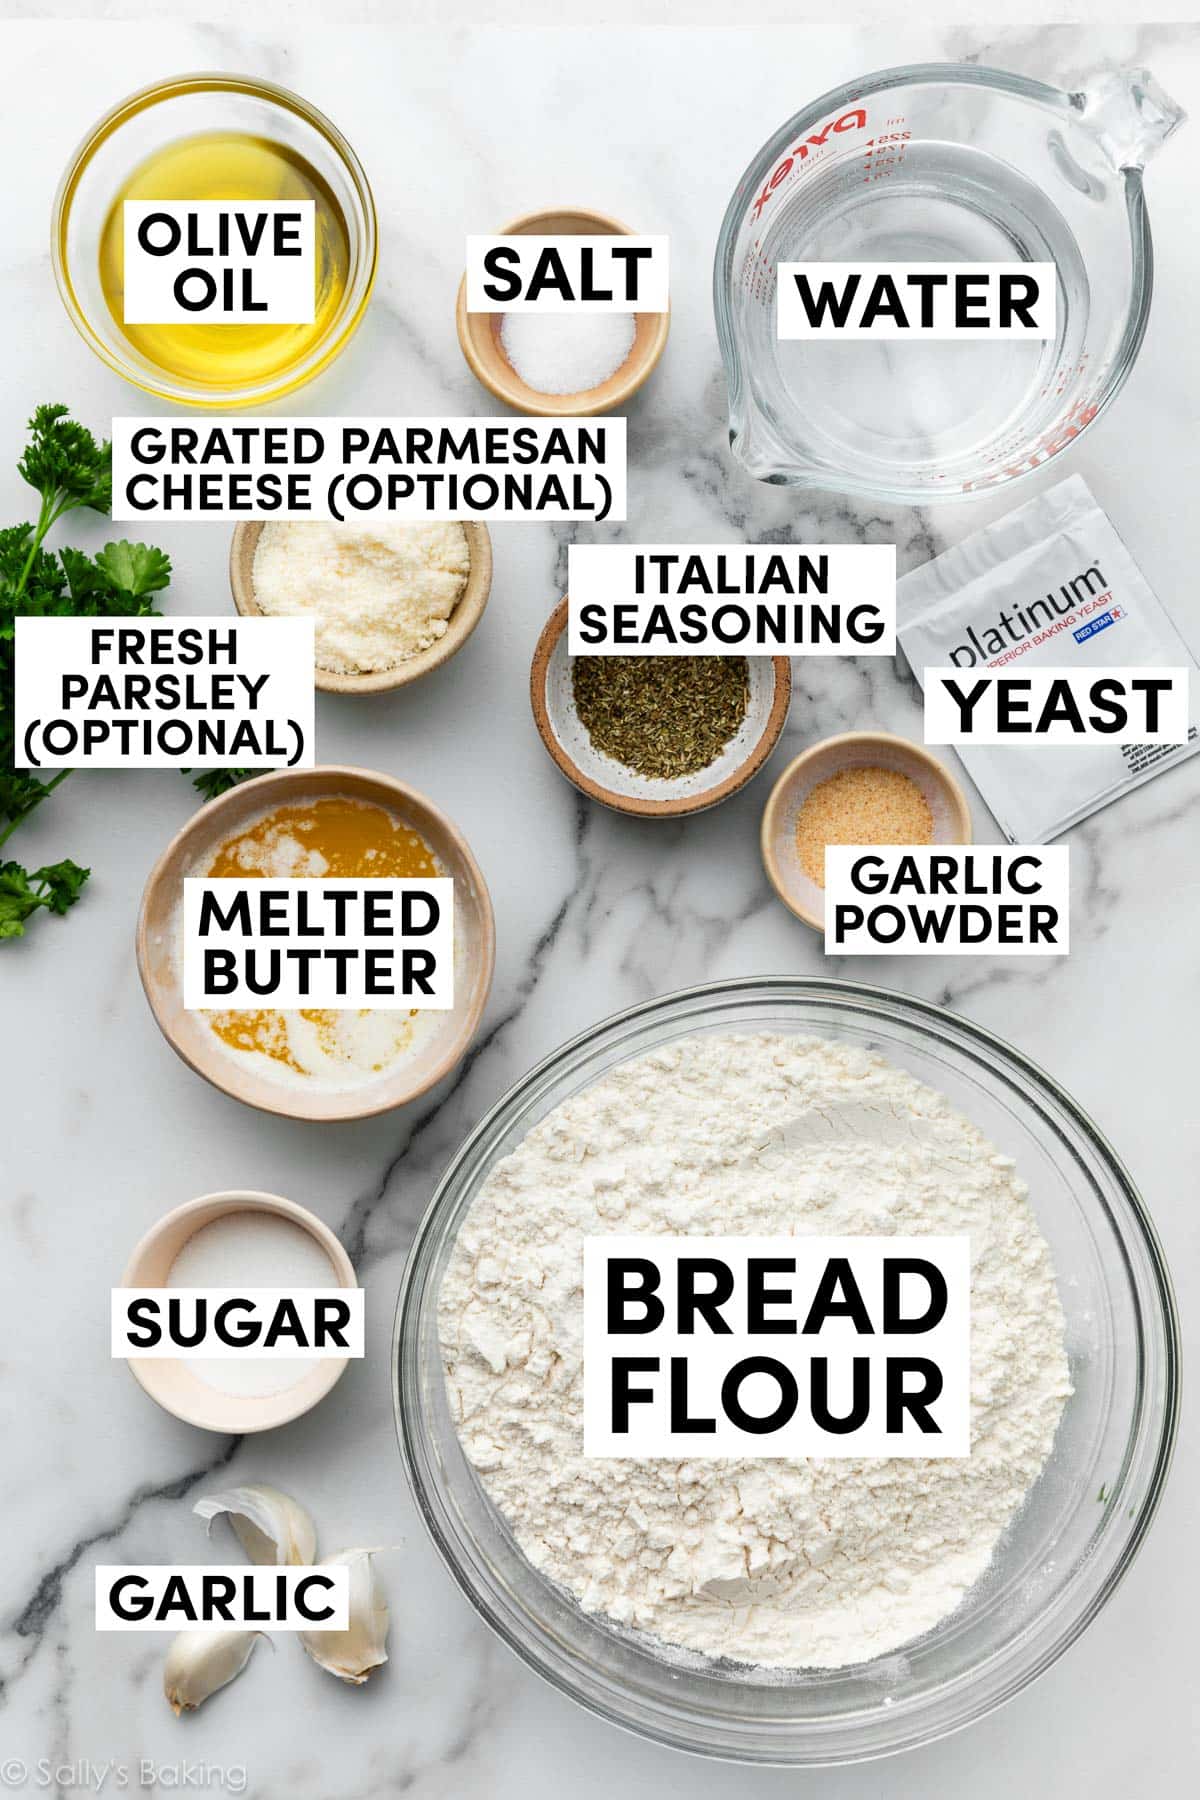
Ingredients You Need:
- Water: Use warm water here, to activate the yeast.
- Instant Yeast: I always use Platinum Yeast from Red Star. If you’ve been baking my yeast breads for a while, you know I swear by it! Its careful formula strengthens dough and makes working with yeast simple. You can use active-dry yeast instead; the rise time may be a bit longer.
- Sugar: To feed the yeast.
- Olive Oil: Or melted butter.
- Salt: Can’t make flavorful bread without salt!
- Garlic Powder: We’ll top the knots with fresh minced garlic, but you can use garlic powder in the dough.
- Bread Flour: The original recipe called for all-purpose flour, but we find that bread flour makes for a better texture. If you don’t have any, you can use all-purpose instead.

Let Me Show You How to Shape Garlic Knots
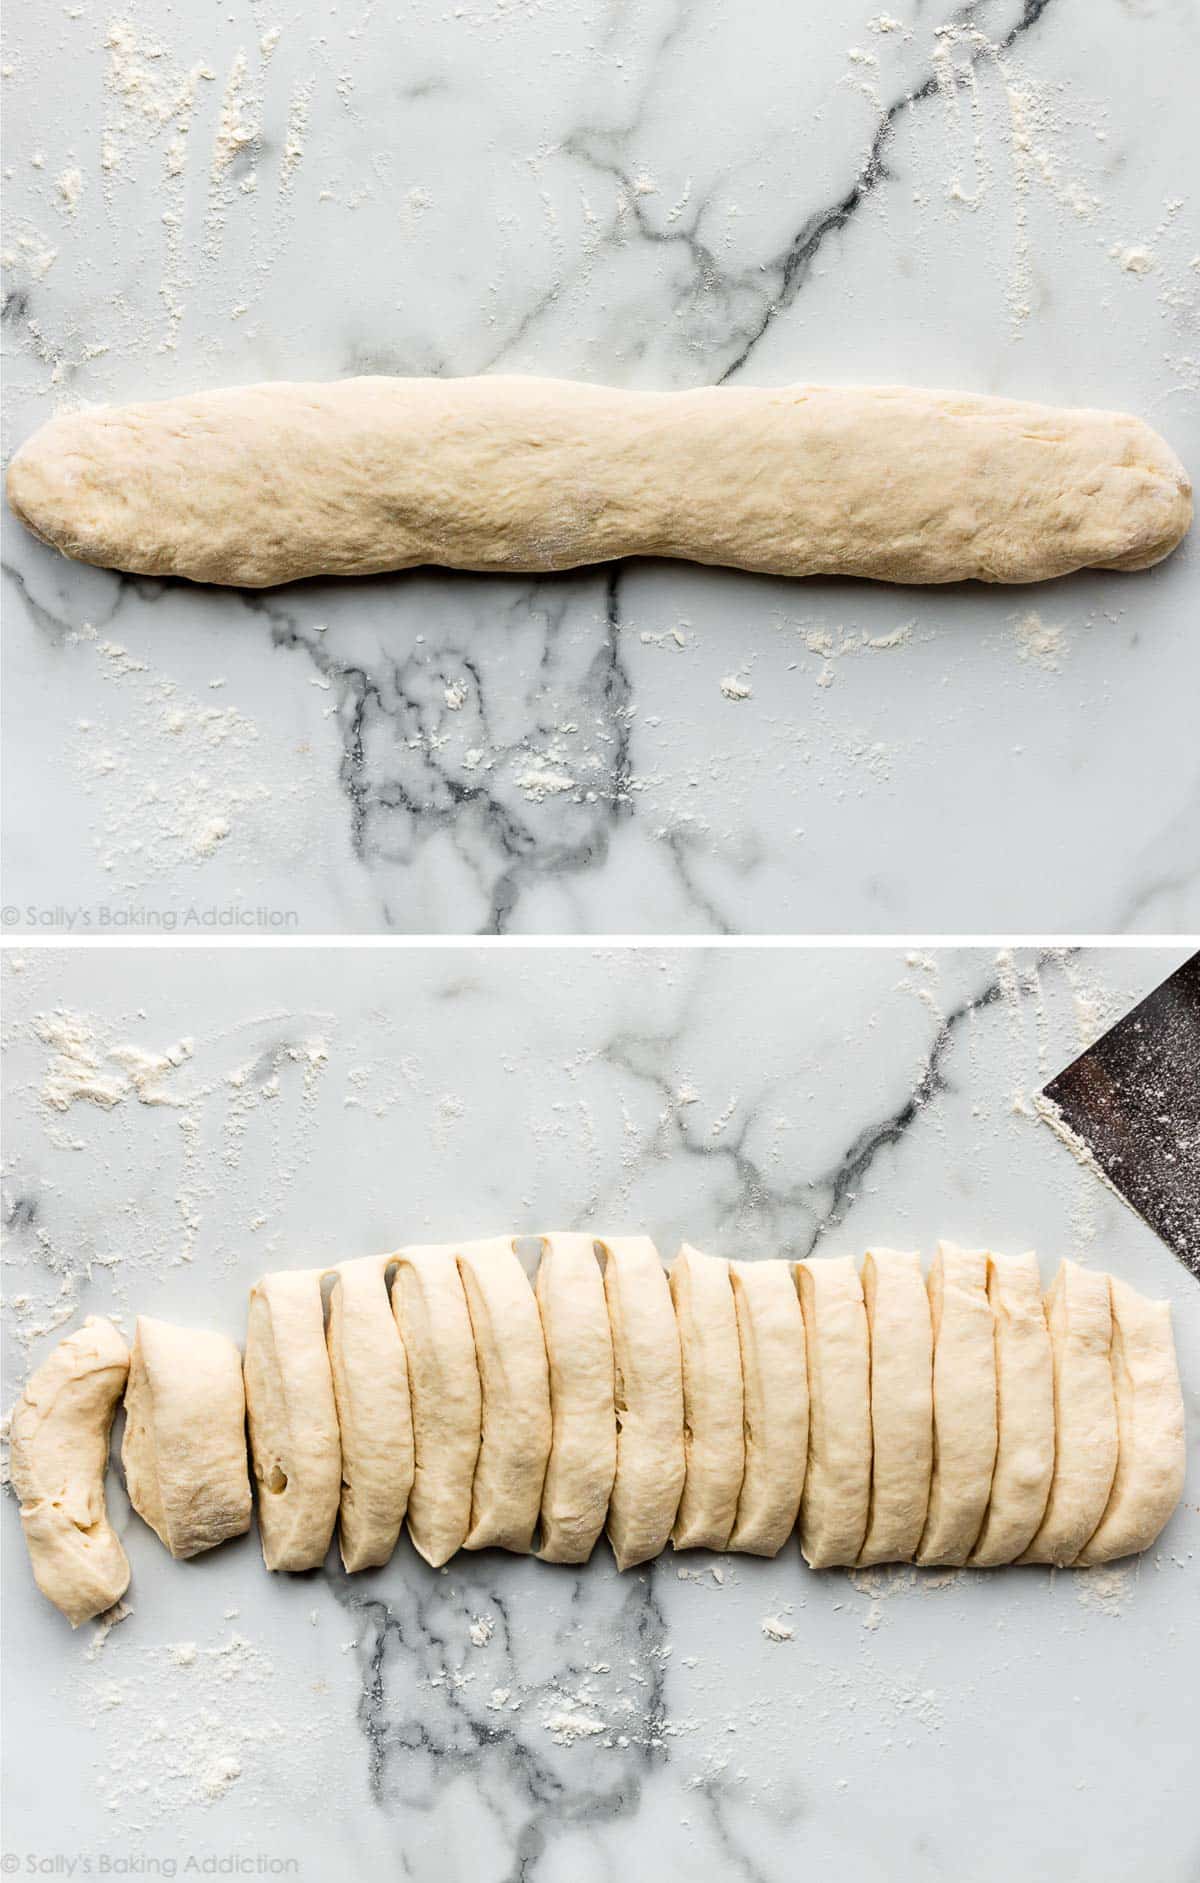
After the dough rises, punch it down to release the air. Then begin shaping the dough. If you know how to tie a knot, you can shape garlic knots.
- Shape into a 16-inch log: Using your hands, shape the dough into a 16-inch log. No need to use a rolling pin because this doesn’t need to be perfect.
- Cut into 16 pieces: Cut the log into 16 1-inch sections of dough.
- Roll each piece into an 8-inch rope.
- Tie the rope into a knot.
Here are step-by-step pictures of the shaping process. It’s a lot easier than it sounds, and you don’t need any special tools.
Shape each rope into a knot:
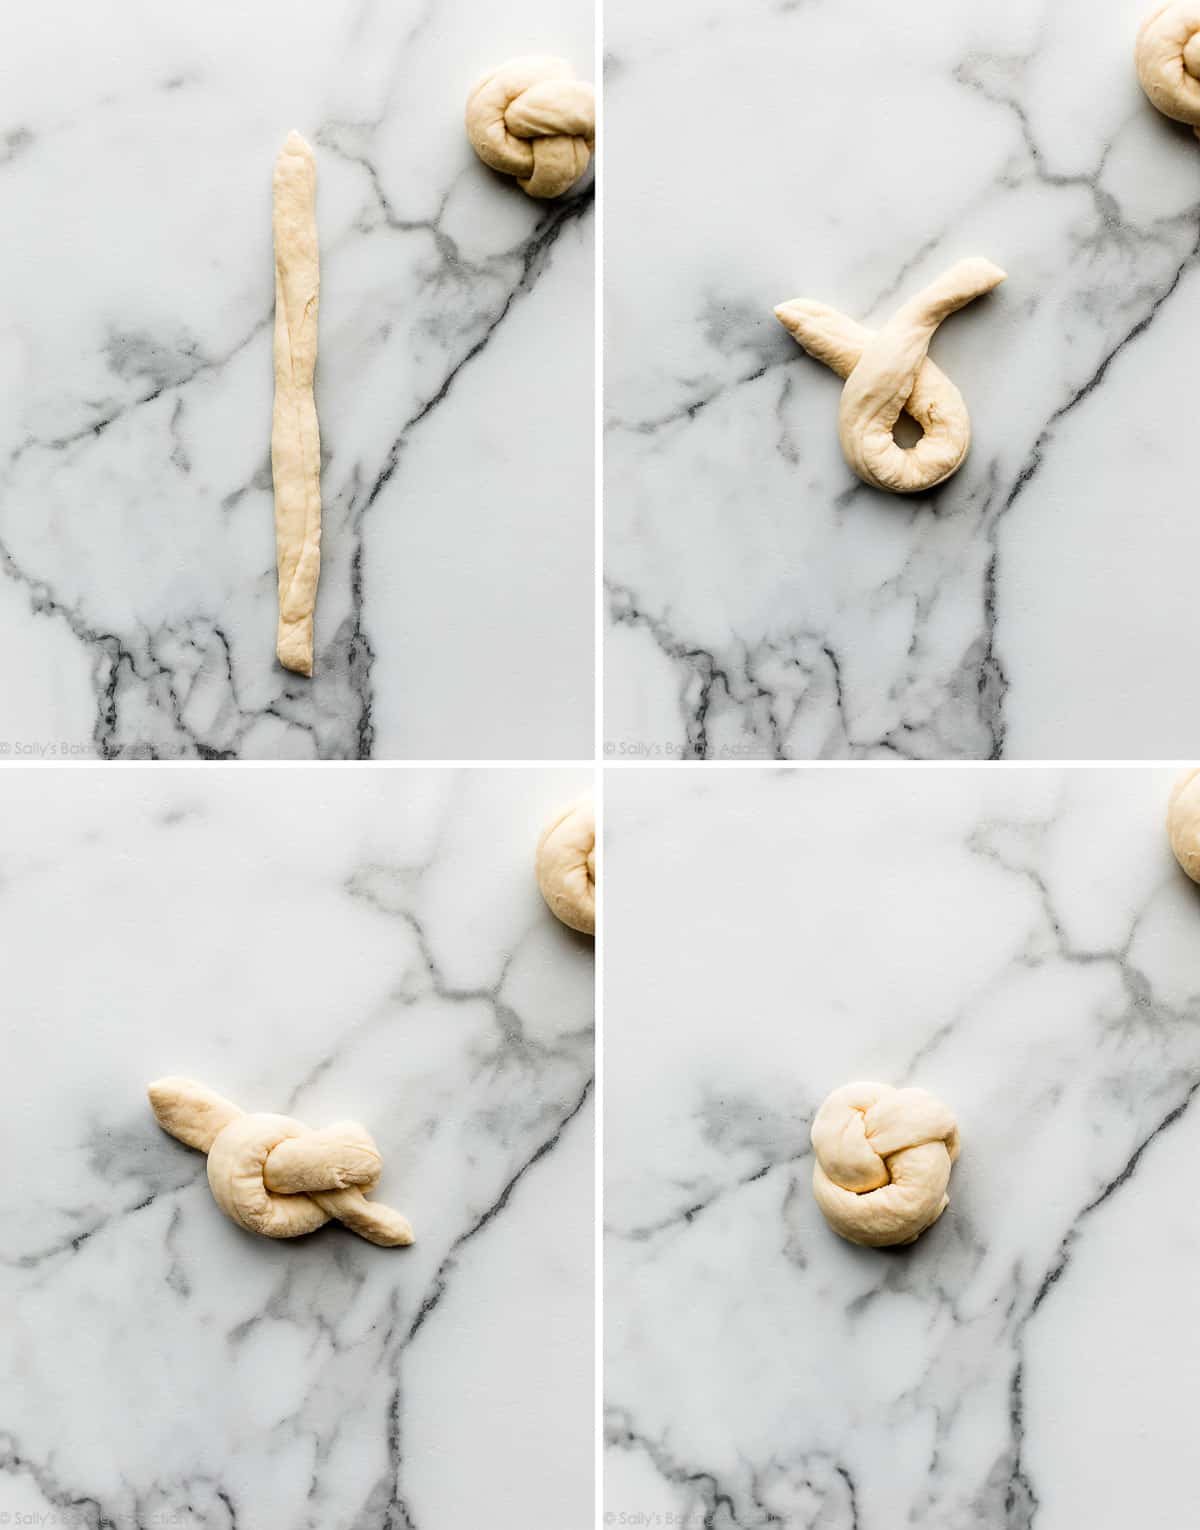
You can tuck the ends underneath the knot or leave them out—that’s totally up to you. The ropes are longer when making soft pretzel knots, but tying the knot is the same.
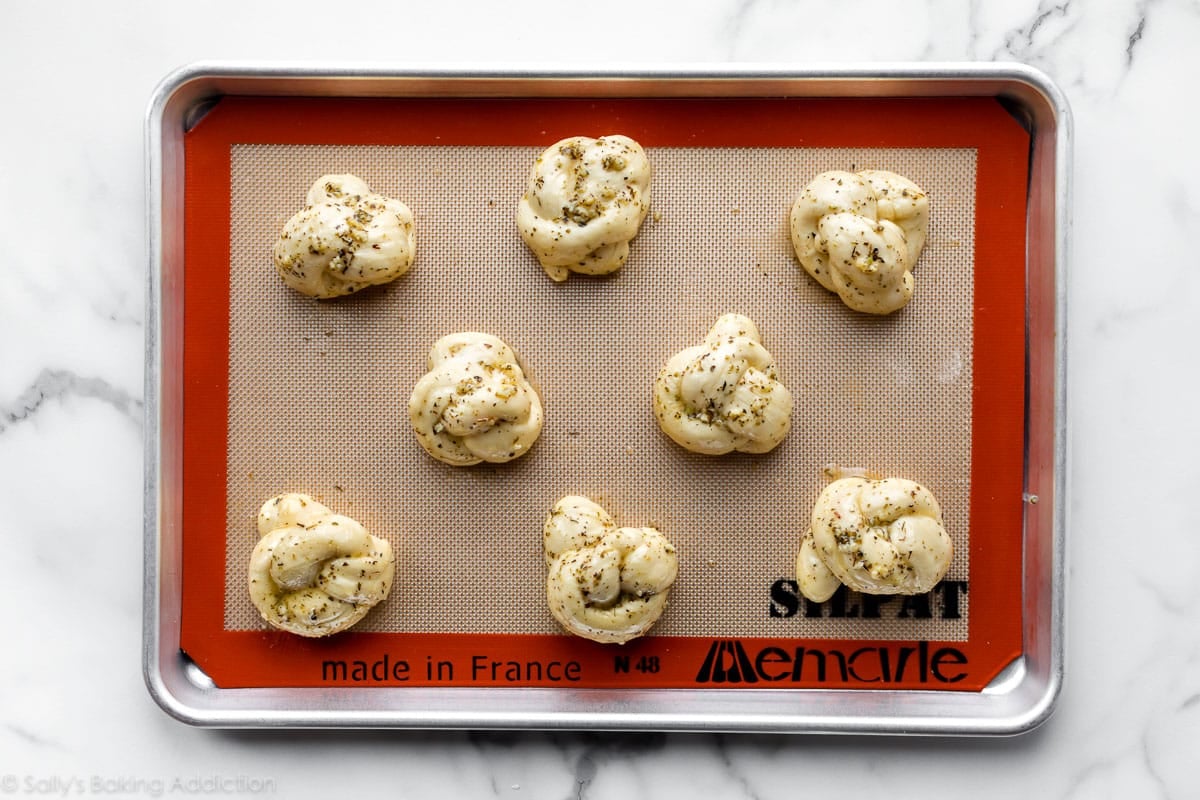
Let the shaped knots rest for about 30 minutes before brushing with garlic butter and baking.
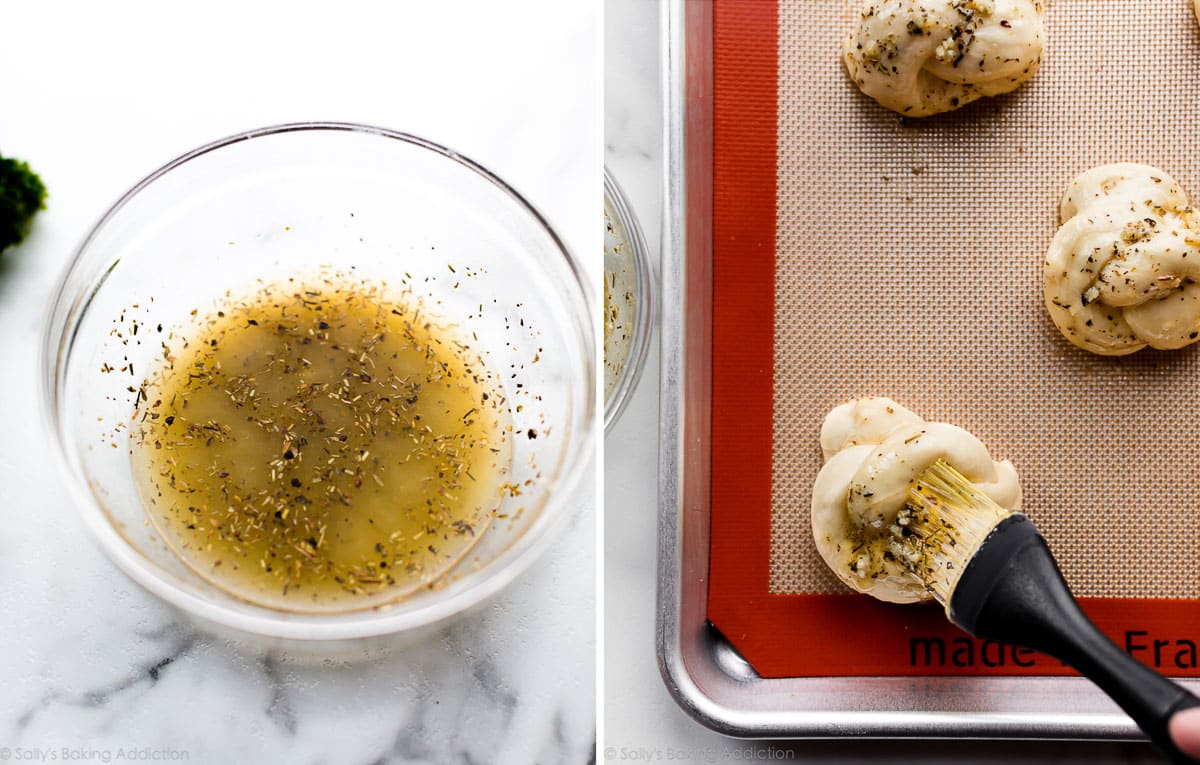
Garlic Herb Butter
Right before baking, generously brush the knots with garlic herb butter. Simply combine melted butter, fresh minced garlic or garlic powder, Italian seasoning, and salt.
If you can’t find an herb mixture labeled “Italian Seasoning” in the spice aisle of the grocery store, use dried oregano, dried basil, and/or dried parsley instead.
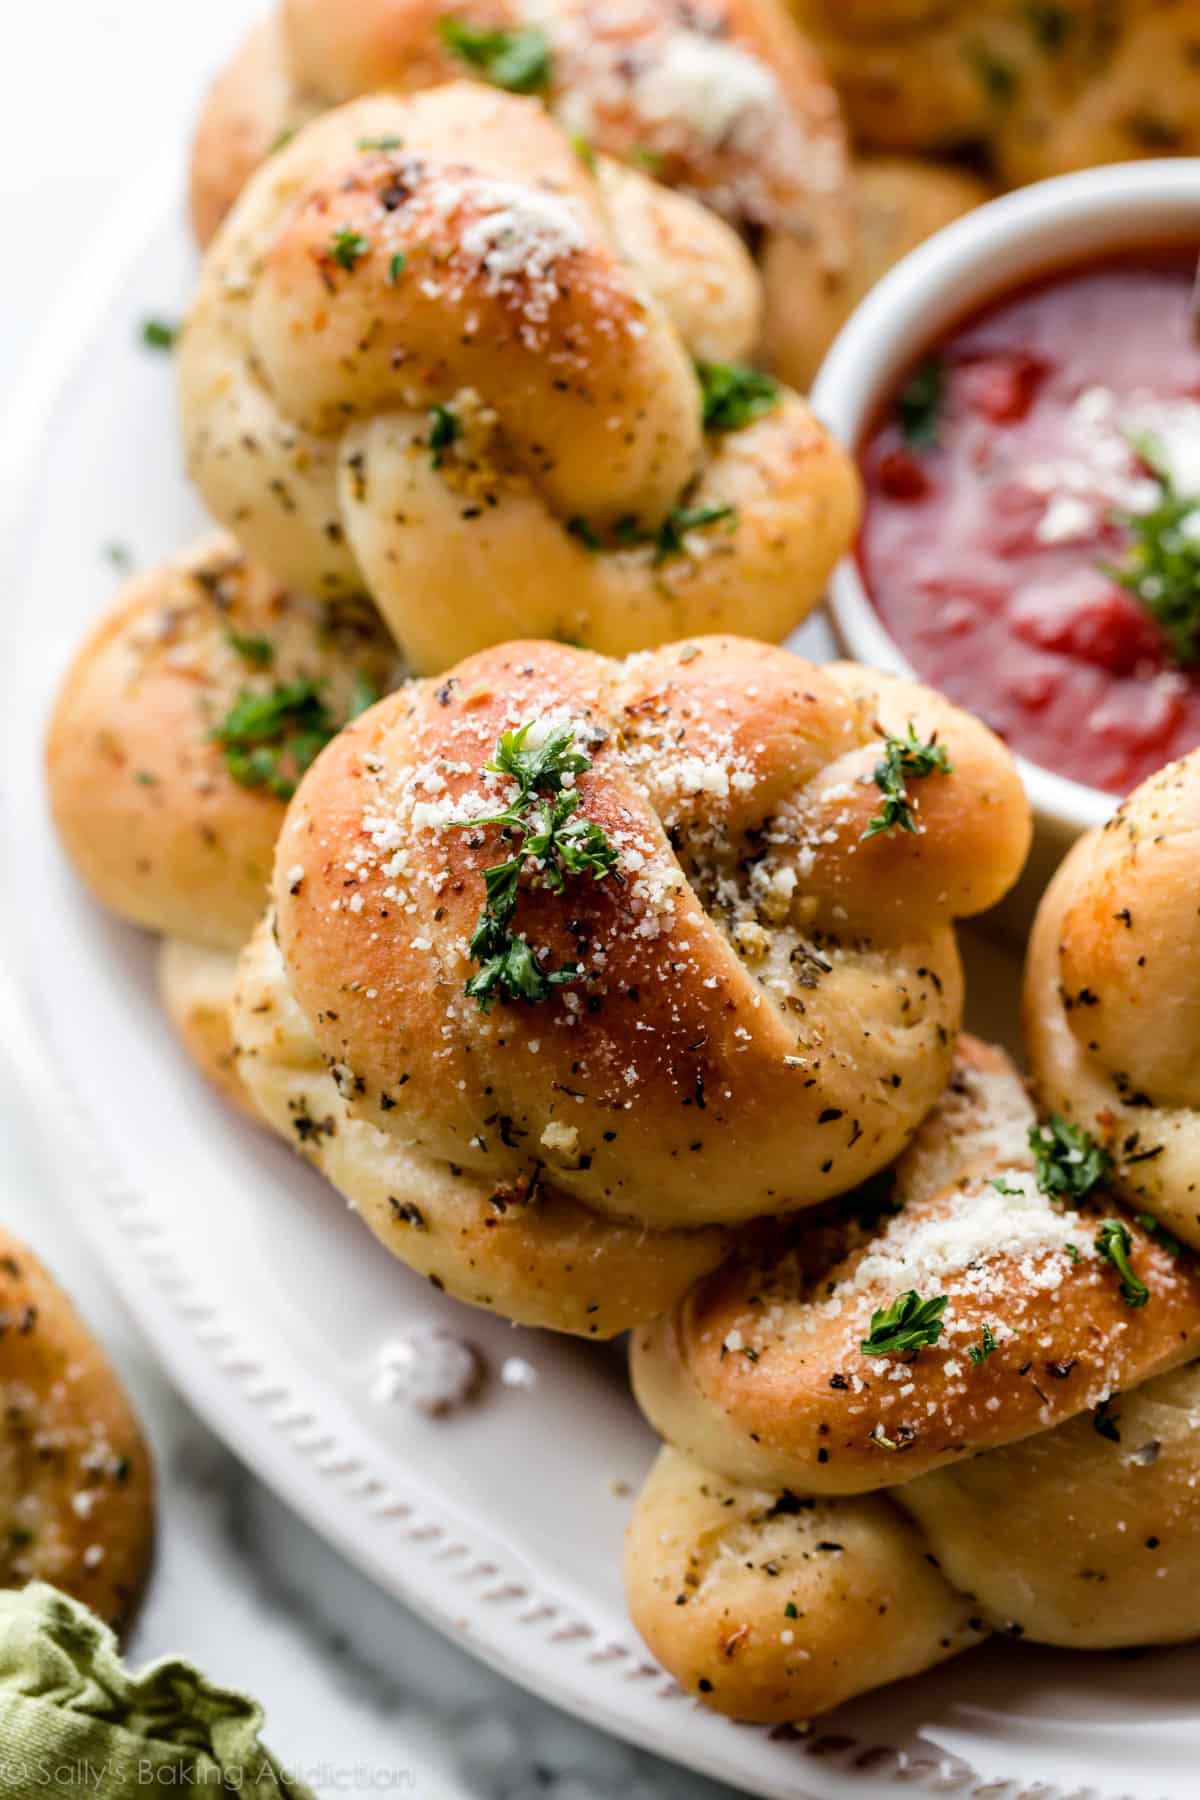
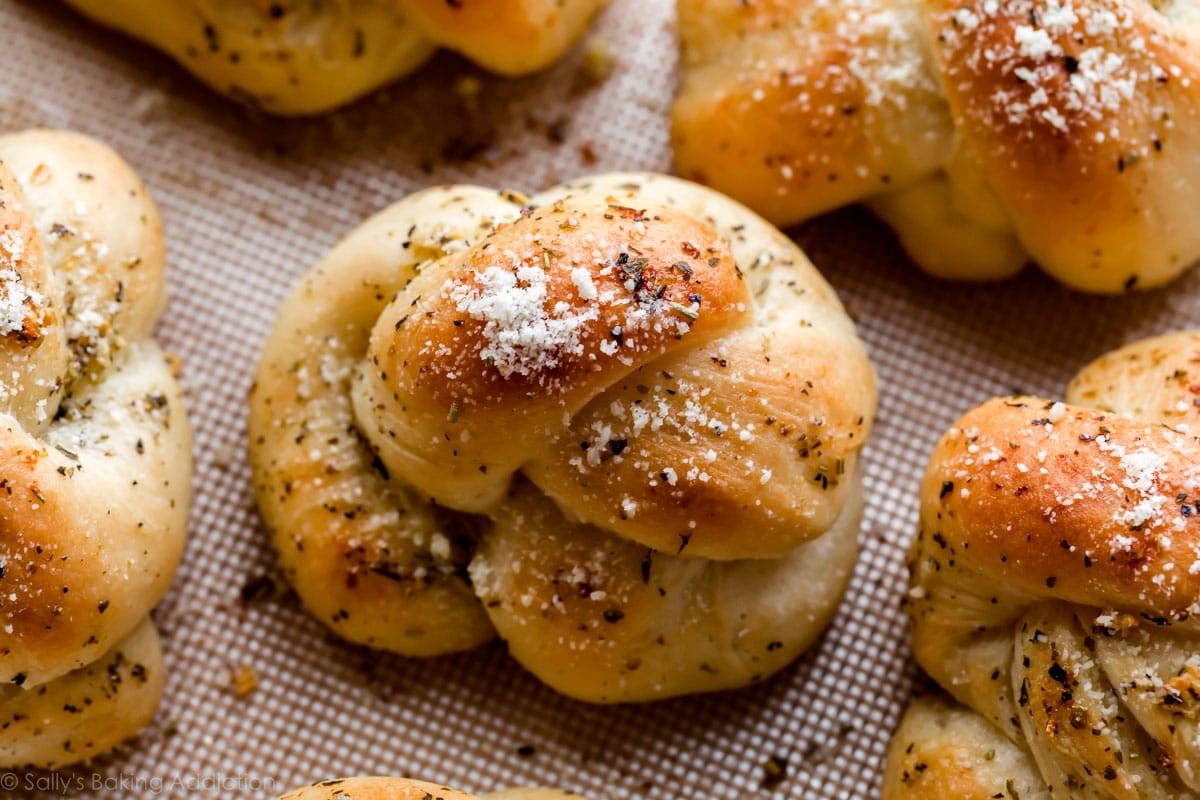
Bake the knots until golden brown and experience the lofty smell of garlic throughout the kitchen. Everyone (maybe even your neighbors) will know what’s on the menu tonight!
Flavor Tip: Save some of the garlic butter to brush onto the knots as they come out of the oven, then top each with fresh parmesan and chopped parsley. The parmesan and parsley are completely optional, but make a fabulous garnish.
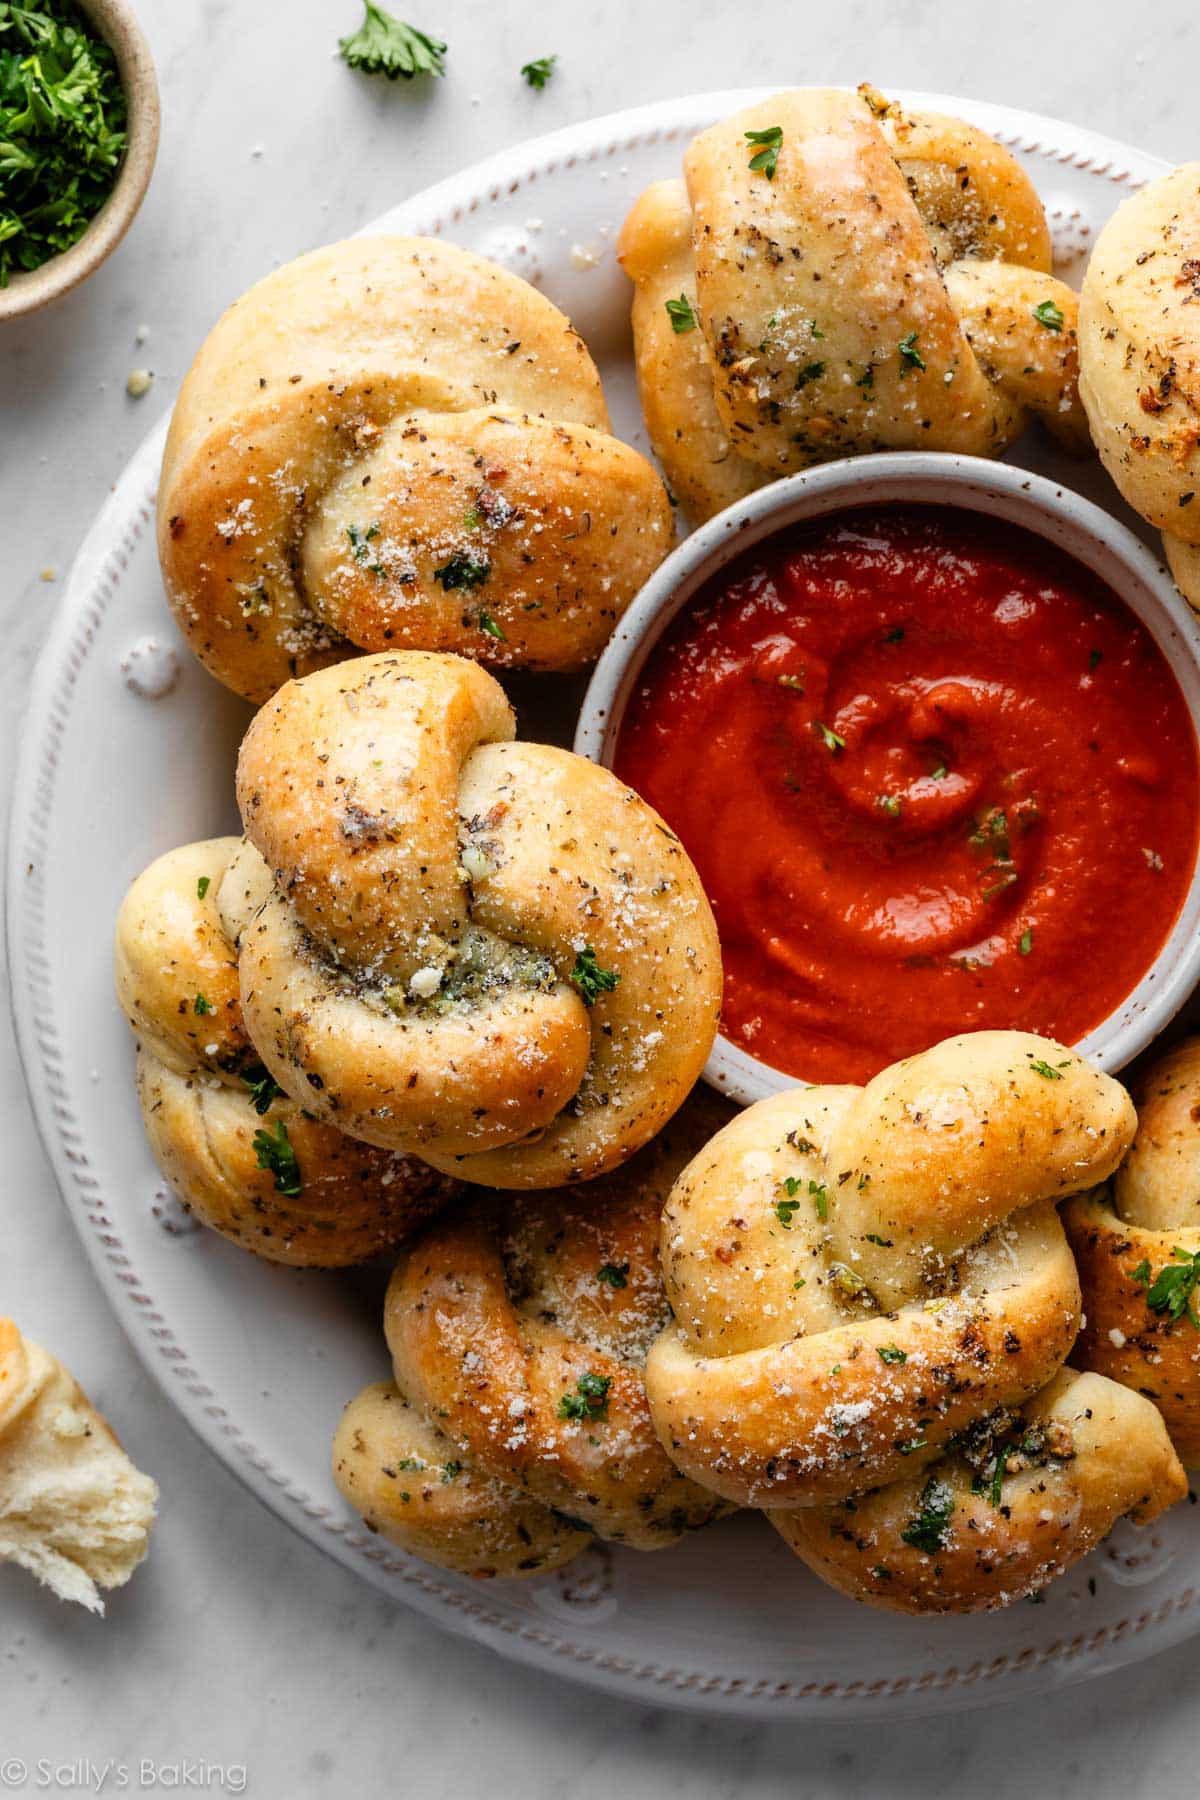
Serve the garlic knots warm, with a side of warm marinara sauce or homemade tomato soup for dipping. This is your happy place!*
*Unless you’re a vampire.


Homemade Garlic Knots
- Prep Time: 3 hours (includes rising)
- Cook Time: 20 minutes
- Total Time: 3 hours, 25 minutes
- Yield: 16 knots
- Category: Dinner
- Method: Baking
- Cuisine: Italian
Description
These homemade garlic knots are extra soft, fluffy, and packed with flavor thanks to a buttery garlic-herb topping brushed on before and after baking. Made from an easy homemade dough similar to my reader-favorite pizza dough, they freeze beautifully and are perfect for pizza night—no delivery required.
Ingredients
Homemade Dough
- 1 cup + 2 Tablespoons (270g/ml) warm water (between 100–110°F/38–43°C)
- 2 and 1/4 teaspoons (7g) Platinum Yeast from Red Star instant yeast (1 standard packet)*
- 1 Tablespoon (13g) granulated sugar
- 3 Tablespoons (43g/ml) olive oil or melted butter
- 1 teaspoon salt
- 1 teaspoon garlic powder
- 3 and 1/3 cups (433g) bread flour* (spooned & leveled), plus more for hands and work surface
Topping
- 5 Tablespoons (71g) unsalted butter, melted
- 3 garlic cloves, minced; or 1/2 teaspoon garlic powder
- 1 teaspoon Italian seasoning*
- 1/4 teaspoon salt
- optional after baking: 1/4 cup (25g) grated Parmesan cheese
- optional after baking: 2 Tablespoons chopped fresh parsley
Instructions
- Proof the yeast: Whisk the warm water, yeast, and sugar together in the bowl of your stand mixer fitted with a dough hook or paddle attachment. Cover and allow the mixture to sit for about 5 minutes, or until foamy on top. *If you do not own a stand mixer, you can do this in a large mixing bowl and, in the next step, mix the dough together with a large wooden spoon or silicone spatula. It will take a bit of arm muscle. A hand mixer works, but the sticky dough can repeatedly get stuck in the beaters. Mixing by hand is the better choice.
- Make the dough: Add the olive oil (or butter), salt, garlic powder, and about half of the bread flour. Beat on low speed for 30 seconds. Scrape down the sides of the bowl and add the remaining flour. Beat on low speed for 2 minutes, or until a soft dough forms and pulls away from the sides of the bowl. Dough will be very soft, but should not be overly sticky. If it seems too sticky and clings to the sides of the bowl instead of forming a rough mass around the dough hook, add more flour, 1 Tablespoon at a time, and continue to mix until the dough pulls away from the sides of the bowl but is still moist and tacky. If it feels dry and crumbly, add more water, 1 teaspoon at a time, mixing well after each addition.
- Knead the dough: Keep the dough in the mixer (and switch to the dough hook if using the paddle) and beat for an additional 5 full minutes, or knead by hand on a lightly floured surface for 5 full minutes. (If you’re new to bread-baking, my How to Knead Dough video tutorial can help here.) If the dough becomes too sticky during the kneading process, sprinkle 1 teaspoon of flour at a time on the dough or on the work surface/in the bowl to make a soft, slightly tacky dough. Do not add more flour than you need because you do not want a dry/tough dough. After kneading, the dough should still feel a little soft. Poke it with your finger—if it slowly bounces back, your dough is ready to rise. You can also do a “windowpane test” to see if your dough has been kneaded long enough: tear off a small (roughly golfball-size) piece of dough and gently stretch it out until it’s thin enough for light to pass through it. Hold it up to a window or light. Does light pass through the stretched dough without the dough tearing first? If so, your dough has been kneaded long enough and is ready to rise. If not, keep kneading until it passes the windowpane test.
- 1st rise: Lightly grease a large bowl with oil or nonstick spray—just use the same bowl you used for the dough. Place the dough in the bowl, turning it to coat all sides in the oil. Cover the bowl with aluminum foil, plastic wrap, or a clean kitchen towel. Allow the dough to rise in a relatively warm environment for 2 hours or until double in size. (I always let it rise on the counter and it takes about 2 hours. For a tiny reduction in rise time, see my answer to Where Should Dough Rise? in my Baking with Yeast Guide.)
- Line two baking sheets with parchment paper or silicone baking mats.
- Shape the dough: Use the step-by-step photos in the blog post as your guide for this step. When the dough is ready, punch it down to release the air. Using floured hands on a lightly floured work surface, shape the dough into a 16-inch (41cm) log. Using a very sharp knife, pizza cutter, or bench scraper, slice the log into 16 1-inch sections. Roll each piece of dough into an 8-inch rope. Tie each rope into a knot. You can tuck the 2 ends of the knots underneath or leave them out. Arrange the knots on the prepared baking sheets.
- 2nd rise: Lightly cover the shaped knots and let them rest for 30–45 minutes. They will slightly puff up during this time, producing softer rolls.
- Towards the end of the rise time, preheat the oven to 400°F (204°).
- Make the topping: Stir the melted butter, garlic, Italian seasoning, and salt together. Brush on the knots. Reserve some of the topping for when the knots come out of the oven.
- Bake for about 20–23 minutes or until golden brown on top. Remove from the oven and brush the warm knots with remaining garlic butter. Sprinkle with parmesan cheese and/or parsley, if using.
- Serve warm, plain or with marinara sauce for dipping.
- Cover and store leftover knots at room temperature for up to 2 days or in the refrigerator for up to 1 week. Reheat as desired.
Notes
- Freezing Dough: After the dough has its 1st rise and you punch it down to release the air, lightly coat all sides of the dough ball with olive oil. Place the dough into a freezer zipped-top bag and seal tightly, squeezing out all the air. Freeze for up to 3 months. Thaw in the refrigerator overnight. Once thawed, remove the dough from the refrigerator and allow to rest for 1 hour on the counter, then continue with step 6.
- Freezing Unbaked Shaped Knots: Instead of freezing the dough as a whole, you can freeze the shaped knots before baking them. Shape the knots as directed in step 6. Arrange on a lined baking sheet. Freeze, uncovered, for 1–2 hours. Remove from the freezer. At this point, knots should be frozen and no longer sticky. Place them into a freezer-friendly container or zipped-top bag. Freeze for up to 3 months. Thaw in the refrigerator or on the counter. Bring to room temperature, arrange on 2 lined baking sheets, cover lightly, and allow to rest/rise for 1 hour before continuing with step 8.
- Special Tools (affiliate links): Electric Stand Mixer or Glass Mixing Bowl and Wooden Spoon or Silicone Spatula | Dough Scraper | Pizza Cutter | Baking Sheets | Silicone Baking Mats or Parchment Paper | Pastry Brush
- Halving the Recipe: This recipe yields about 2 pounds of dough, which is enough for 16 knots or 1 pizza + 8 knots. If you want to make just 8 knots, punch the dough down as directed in step 6. Cut in half. Use the other half of the dough however you’d like or freeze for later. Shape into an 8-inch log and cut into 8 1-inch strips. Continue with the recipe as directed.
- Yeast: Platinum Yeast from Red Star is an instant yeast. You can use active dry yeast instead. The 1st rise time may take a little longer. Reference my Baking With Yeast Guide for answers to common yeast FAQs.
- Italian Seasoning: If you can’t find Italian seasoning in the spices section of the grocery store, use a mix of dried oregano, dried basil, and/or dried parsley instead.
- Recipe Updates in 2026: Based on reader feedback, we retested and updated the dough recipe as written above. If you prefer the original version, increase the water to 1 and 1/3 cups (320ml), use all-purpose flour instead of bread flour, and reduce the garlic powder to 1/2 teaspoon.


Reader Comments and Reviews
Wil cinnamon bun dough(without cinnamon) work as well?
Hi Naieen, This dough (like pizza crust, homemade bagels, artisan bread, and focaccia), is a lean dough. A lean dough doesn’t use eggs or butter. Without the extra fat to make the dough soft, you’re promised crusty bread-like garlic knots. Cinnamon rolls require fat to yield a “rich dough,” which creates a softer and more dessert-like bread, so your results will be different.
Okay thank you. I am currently waiting for my dough to rise using your recipe so I’m looking forward to the end result!
I just made these garlic knots and they are a hit with everyone. I don’t think there will be any leftovers. I’m definitely making these again in a couple days; so delicious. Thanks for another great recipe!
This is the first of Sally’s recipes that I’ve ever been disappointed in (and I bake a ton and have made lots of them). Primarily it just doesn’t have enough salt. The dough has that weird bland/flavorless quality as if I’d forgotten the salt (which was not the case). They also weren’t as soft and fluffy as I would have liked (I made loose knots and they rose beautifully before baking, and weren’t overbaked). Gave 2 stars because my family liked them regardless.
Made these a million times and they never disappoint
Great recipe…I think my yeast might have been a little bit to old. I’m an advanced baker and I know what I’m doing but they were not as tender as they could have been. I always use the best ingredients too. If your gonna make something special like these garlic knotts then use the good stuff in them.
Thank you so much…I loved your recipe the best….
What a wonderful and fool-proof recipe! The dough is easy to work with and we loved the added flavor that the granulated garlic gave to the bread. I used every drop of the butter topping, and suggest perhaps making a bit more so there’s enough for after baking (maybe I went a little crazy!). The hubby kept saying how these are the best garlic knots he’s ever had, including those from restaurants. I agree!
These look delicious. Could I use the dough setting on my bread maker for the first three steps?
Hi Laura, we don’t see why that wouldn’t work. Enjoy!
i love this recipe. What’s even better is I’ve used the dough for so many other things – i’ve used it to make cinnamon scrolls, vegemite and cheese scrolls, bread rolls etc. Its such a good dough!
Recipes found here are always a success and a hit! Quick question though. How would you go about incorporating cheese in these? I absolutely love cheesy goodness with my garlic and carb addiction. I was thinking maybe flattening the strips and topping with some shredded mozzarella then pinching them closed over it before knotting them….
Hi Mel! You could add 1 cup of shredded cheese into this dough when you add the second half of the flour. The cheese might melt around the edges a bit as the knots bake, but that’s not a problem. Or you can try adding a small cube of cheese to the center of the knot as well. Lining your pan with silicone baking mats or parchment is best. Let us know what you try!
Great recipe! I made these tonight and my son loved them! I’ve made garlic knots before that were only so-so. The second rise called for here makes a huge difference in the texture and softness. Thanks!
Today I tried this recipie and it came out perfect. I have tried making garlic breads in the past but it always becomes either very hard from outside or it’s not fully baked, but with your recipe it was perfect crust from outside and very soft from inside. Will try more of your recipes.
Thank you.
These came out amazing! I made the butter topping with the garlic powder and I diced some fresh garlic to top it off. Perfect! I suggest making a little more of the butter as a dip/spread.
Thanks Sally for the amazing recipe, best ever garlic bread I had. It was easy to make, your instructions were very good for non baker like me
Hey! Just tried making these. For some reason the dough was too sticky and it was difficult to knead. I added flour which helped abit but it soon turned sticky again. I face a similar issue while using your recipe for cinnamon rolls but the dough became easier to work with once i added about a tablespoon of butter. Adding butter didnt seem to work for this recipe.i’m also not sure if its because its relatively humid and warm where i live. Any advice?
Hi Ruth, Thank you for trying this recipe! There are a lot of variances that go into the consistency of dough, even down to the brand of flour and the weather and humidity in the air, like you mention. There’s nothing wrong with adding a little more flour to bring the dough into a less sticky and knead-able consistency.
I am obsessed with this recipe. They are so delicious and I now also use the garlic butter for the crust of my pizzas which I make using the 6-ingredient recipe. So straightforward to make and a wonderful side for any pasta dish. They’ve become a regular fixture in our house.
Because of the rise time they aren’t always easy for me to make after work so I’ve been trying to freeze some for days like that. I do it as suggested but when I thaw them in the fridge and then sit them at room temp for an hour, they don’t seem to rise at all and before cooking it’s like the dough has a slightly crusty skin. Any suggestions for what I might be doing wrong? I’ve forgotten them on the tray in the freezer a couple of times so they were in more than 2 hours before putting them in a bag – could this be it?
Hi Rachel, I’m so glad to read that you love these garlic knots! I’d love to help. Are you keeping the rolls covered as they’re thawing/rising? See if you can keep them covered very tightly and extend that rise time until they do begin to puff up.
Great recipe! I made these for my husbands family for their “tour of Italy” dinner. They loved it! Thank you!
Tried this recipe for the first time today and I couldn’t be more pleased. They were a huge hit a my dinner party! Fluffy and flavorful. I added more garlic and salt as a personal preference bit the dough was just perfect. Thank you Sally!!
Great recipe! Surprisingly easy. I made these twice: once with regular active dry yeast and then with rapid rise yeast. They both turned out great! I did add a little more garlic. I used raw, preminced from store and also garlic powder. Everyone loved them!
Hi Sally! I love all your recipes! I tried the garlic knots but the inside wasn’t fluffy. I followed the instructions but I am not sure what I did wrong or how can I get these to be fluffy. the taste was amazing and I baked them just right. Thank you!
Hi Sheila, a dense garlic knot can be caused by not letting the dough rise enough. Make sure to allow the dough to rise until doubled in size. You can read more tips in our baking with yeast guide!
Great recipe! Definitely cook at 360 for around 20-25 minutes if you don’t want the bottoms to be burn. Produced a wonderful, fully cooked and golden brown garlic knot.
WOW!! This recipe was so easy to follow, and the end result is amazing! These garlic knots are going to be a new go to recipe in my house from now on. Thank you for creating and sharing such a wonderful recipe!
I followed the recipe to a T and the dough was a bit dense. I reduced the flour by 1/4 cup and it was perfect!! I think the difference was the mount of flour I used for my surface, hands, kneading.
Hey Stephanie!! Are you a baker as well?
When mixing ingredients together, could I use a whisk and my hand? Or is that not recommended? I imagine it would be more difficult that way, but my stand mixer has grown legs and gotten itself lost!!
This will be my first time making dough! Im SO elated!! Have a NICE day!!
Hi Glo! Without a stand mixer, you can simply use a large mixing bowl and mix the dough with a wooden spoon or rubber spatula to bring it together – then knead by hand. Hope you love these homemade garlic knots!
Yes! I use a wooden spoon for baking!! It works just as well, takes a touch longer sometimes.
Definitely need to cook them at a lower temperature. I tried 375 and 5 mins less and the bottoms were burnt.
Mine too! And I apparently have a hot side. ☹️
I needed a LOT more flour during kneeling time as well…I figure it’s the humidity & I think I did you a better protein flour (KA UBAP). I got too happy with the garlic butter, too…not that’s always a BAD thing. These were still a delectable texture inside, however! I’ll have to tweak it for my kitchen, but but b/c it’s a bad recipe at all! My first scratch yeast bread…I think I have started a new obsession!
These are by far the best garlic knots o have ever tasted before! They are so soft and fluffy and have just the right amount of garlic flavor. The grated Parmesan cheese makes these knots delicious.
I am a TERRIBLE baker but you’re recipes are so easy to follow, I feel confident in my baking abilities now. I’ve made your yule log, merignues, brownies,macron,crepes, and now these garlic knots and everything turns out amazingly. This recipe is no exception. Thank you for your site!
This is a repeat recipe in my house! The dough is a perfect soft and fluffy texture. They turn out perfect every time and are always requested by my friends and family!
Hi my bread turned too hard and overly chewy. Followed the recipe to T. Any recommendations as to what can I do differently?
Hi Tar! A dense garlic knot can be caused by not letting the dough rise enough. Make sure to allow the dough to rise until doubled in size. You can read more tips in our baking with yeast guide!
Hello, it seems like this recipe would be amazing! I followed the recipe however my knits came out very doughy. It taste and feel like the inside is still slightly raw. Trying to figure out where I could have went wrong. Any suggestions
Hi Tbarra! Sounds like your garlic knots are simply under-baked. Try baking for a new minutes longer next time 🙂
Such a good recipe! I use my bread machine so I skip the steps until you shape and let rise again. Came out perfect. I baked with garlic powder butter and topped after with minced garlic butter and it was delicious
When 8 measured 3.5 cups of flour then weighed it, it weighed 504 g. Any thoughts would be appreciated!
Should say when “I”
Hi Jadine! Flour is an easy ingredient to mis-measure. You can read more about properly measuring baking ingredients in this post!
Can pizza dough yeast work just as well
Yes, absolutely!
Always use grams if you can, because measuring stuff is never as accurate as weighing.
I just finished making the dough (it is rising now) and it was so dry I had to add some water to get it to hold together. I double checked the ingredients and I measured them all perfectly, not sure why yours would be wet and mine was dry and crumbled?
Hi Amy! How did you measure the flour? Make sure to spoon and level (instead of scooping) to avoid packing in too much flour into your measuring cups. You can read more about properly measuring baking ingredients in this post.