

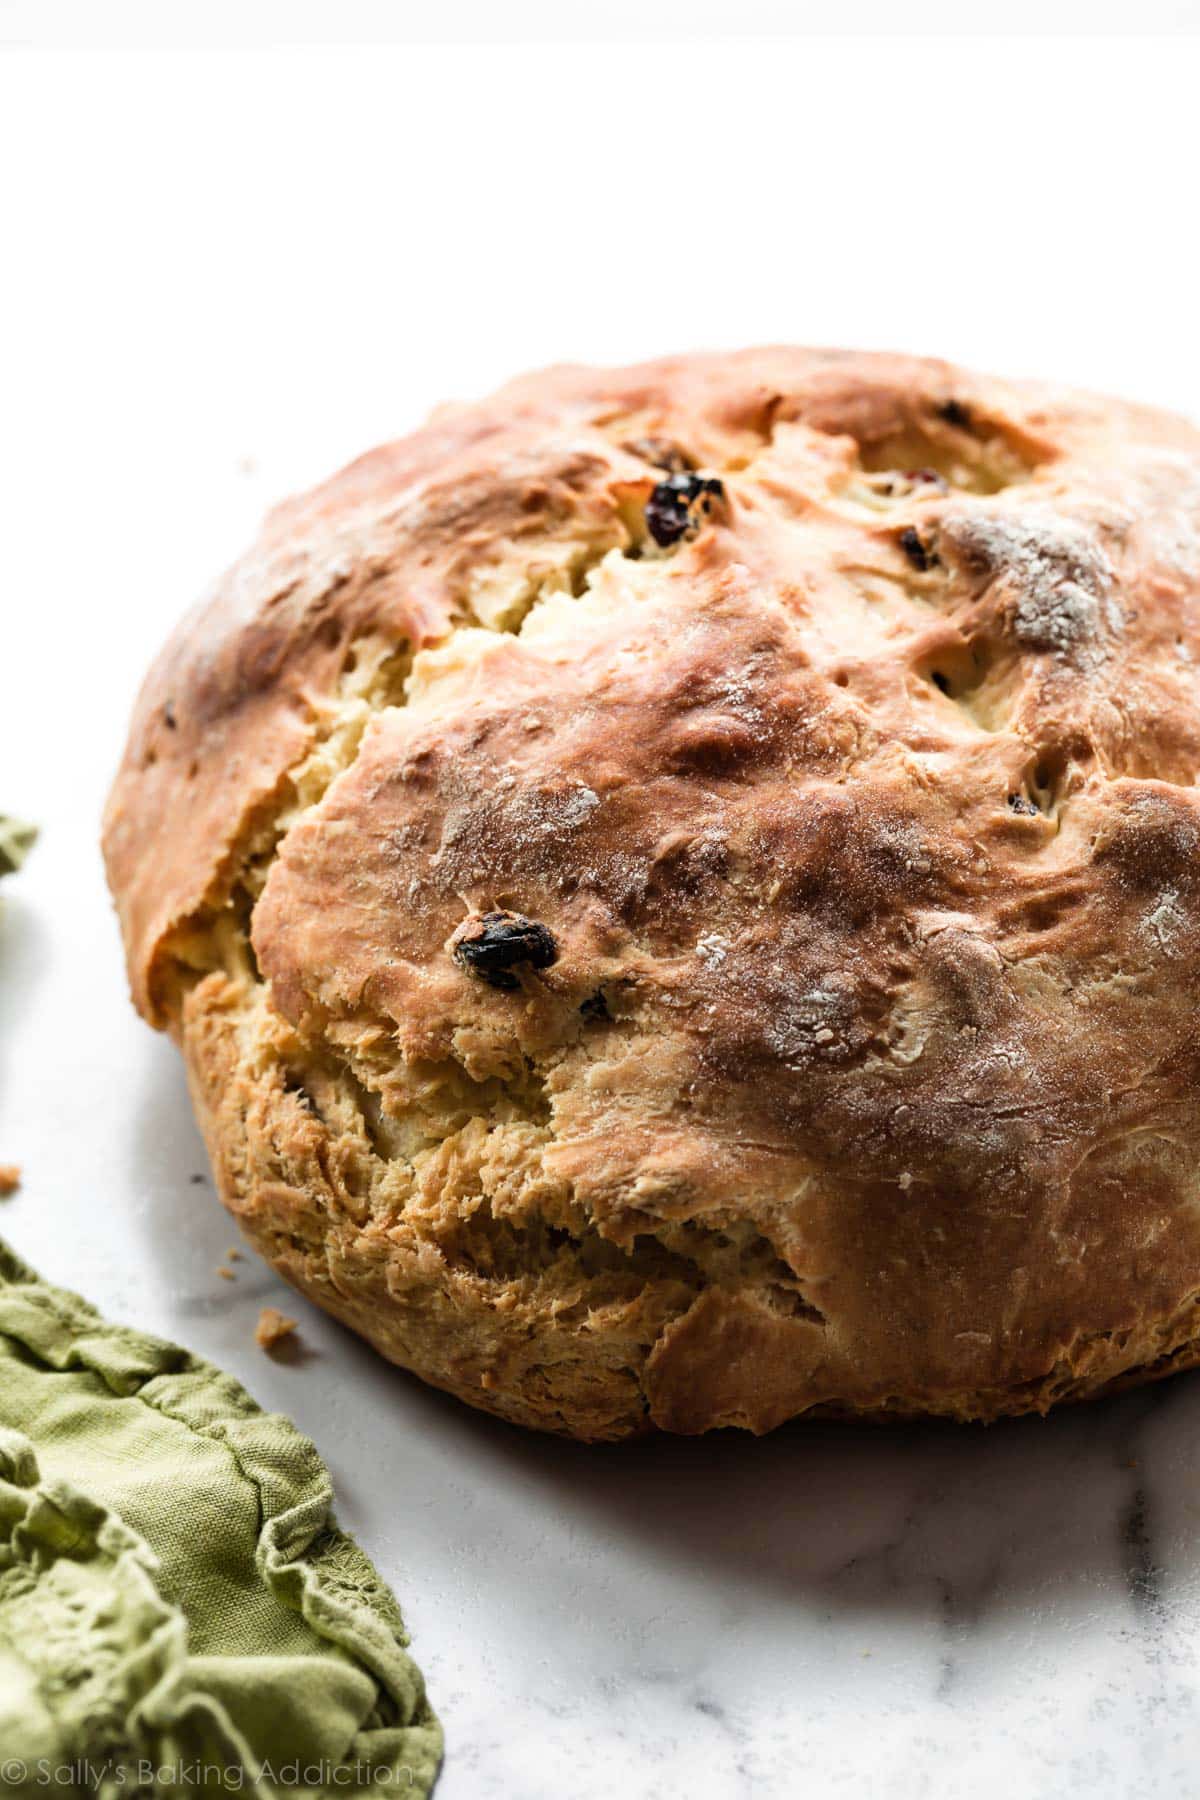
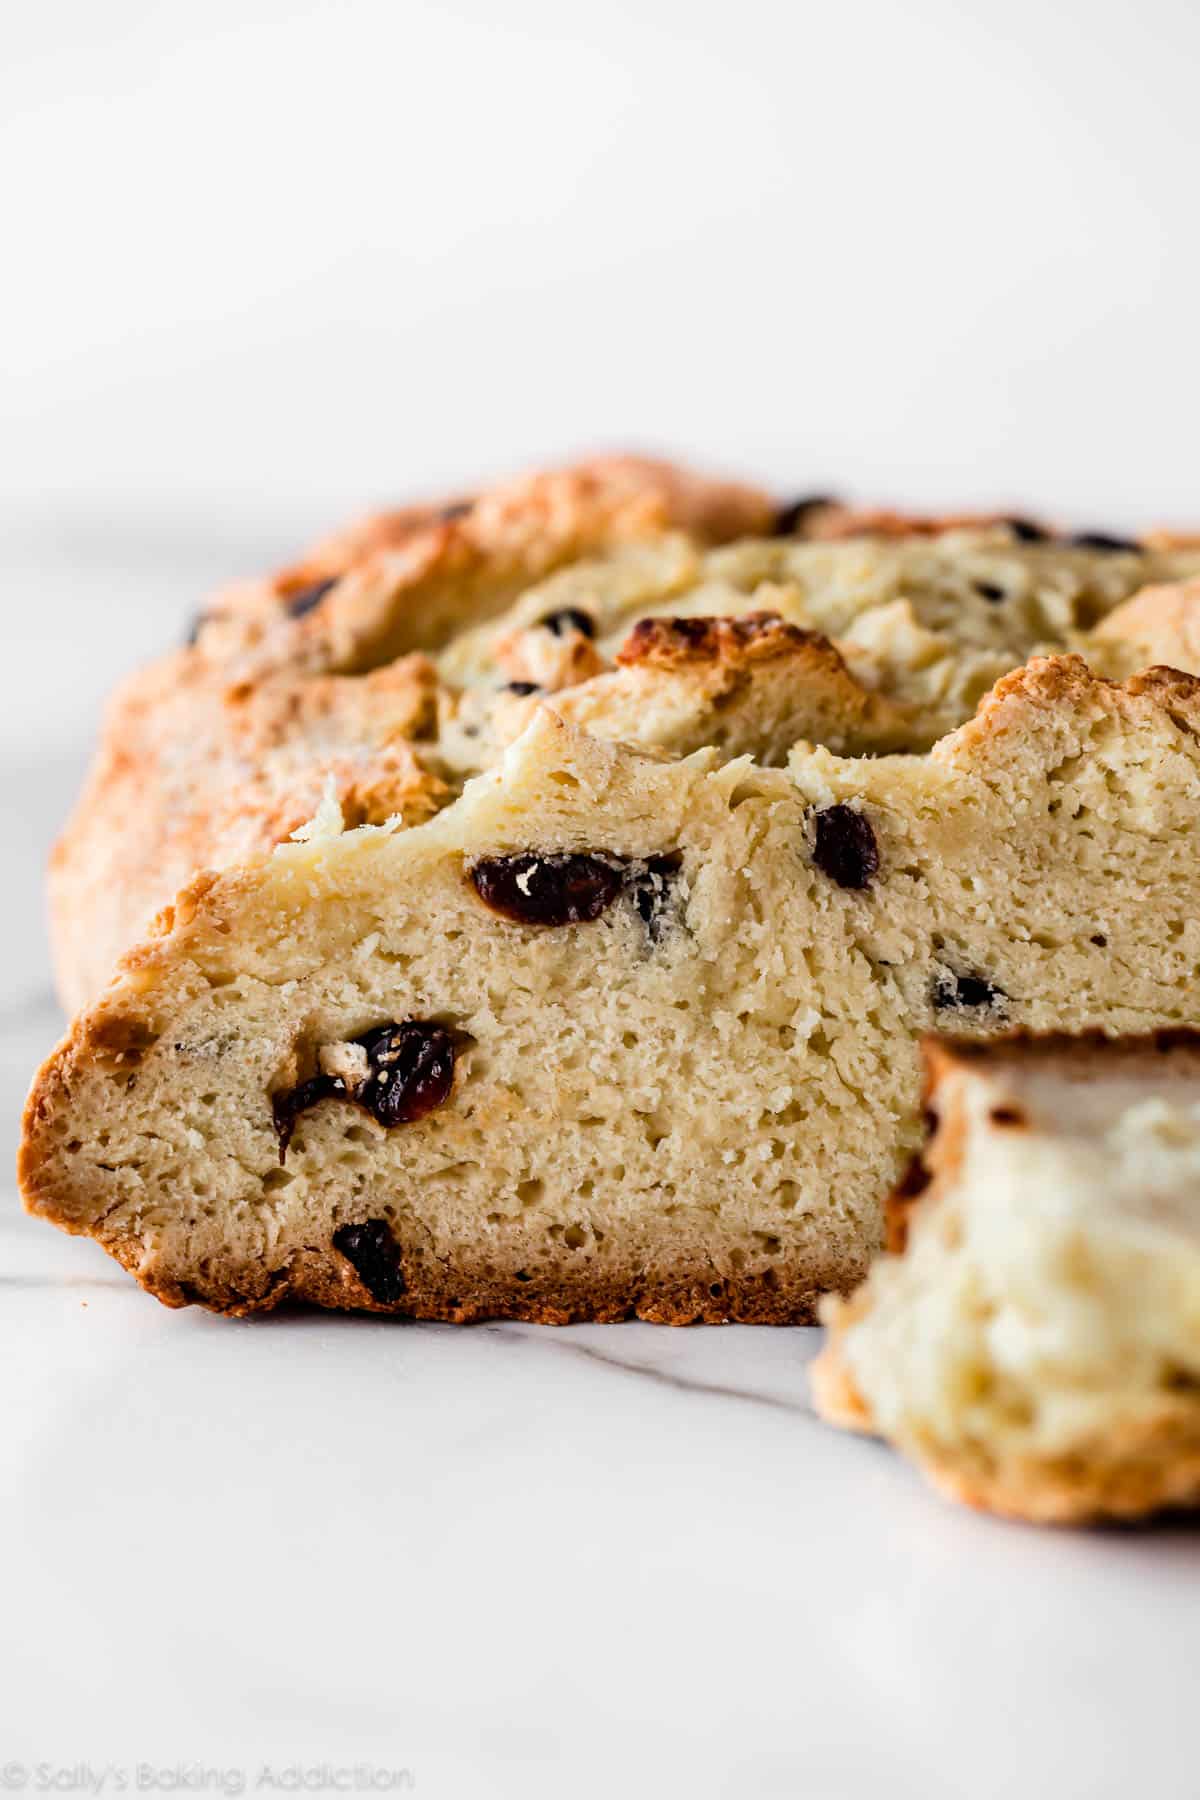
Irish Soda Bread is a quick bread that does not require any yeast. Instead, all of its leavening comes from baking soda and buttermilk. This Irish soda bread recipe is my grandmother’s and has been cherished in my family for years. It’s dense, yet soft and has the most incredible crusty exterior. Buttermilk and cold butter are the secret to its delicious success!
Welcome to my favorite Irish Soda Bread recipe. I shared this no yeast bread recipe on my blog a few years ago and decided to revisit with fresh new pictures and a video tutorial. This recipe is my grandmother’s. She passed away in 2011, 2 weeks before I started this food blog. I dedicated my 1st cookbook to her. Full of energy and the creator of the best homemade pie crust on earth, she would be in her 90s today. St. Patrick’s Day is her birthday.

Irish Soda Bread is a Quick Bread
Does the thought of homemade bread send you running for the hills? Sometimes homemade bread feels daunting, but you’re in luck today. Irish soda bread is a quick bread made with baking soda, not yeast. Like my easy no yeast bread, this is a shortcut bread that doesn’t skimp on flavor. (If you want a yeast bread, I recommend my sandwich bread recipe!)
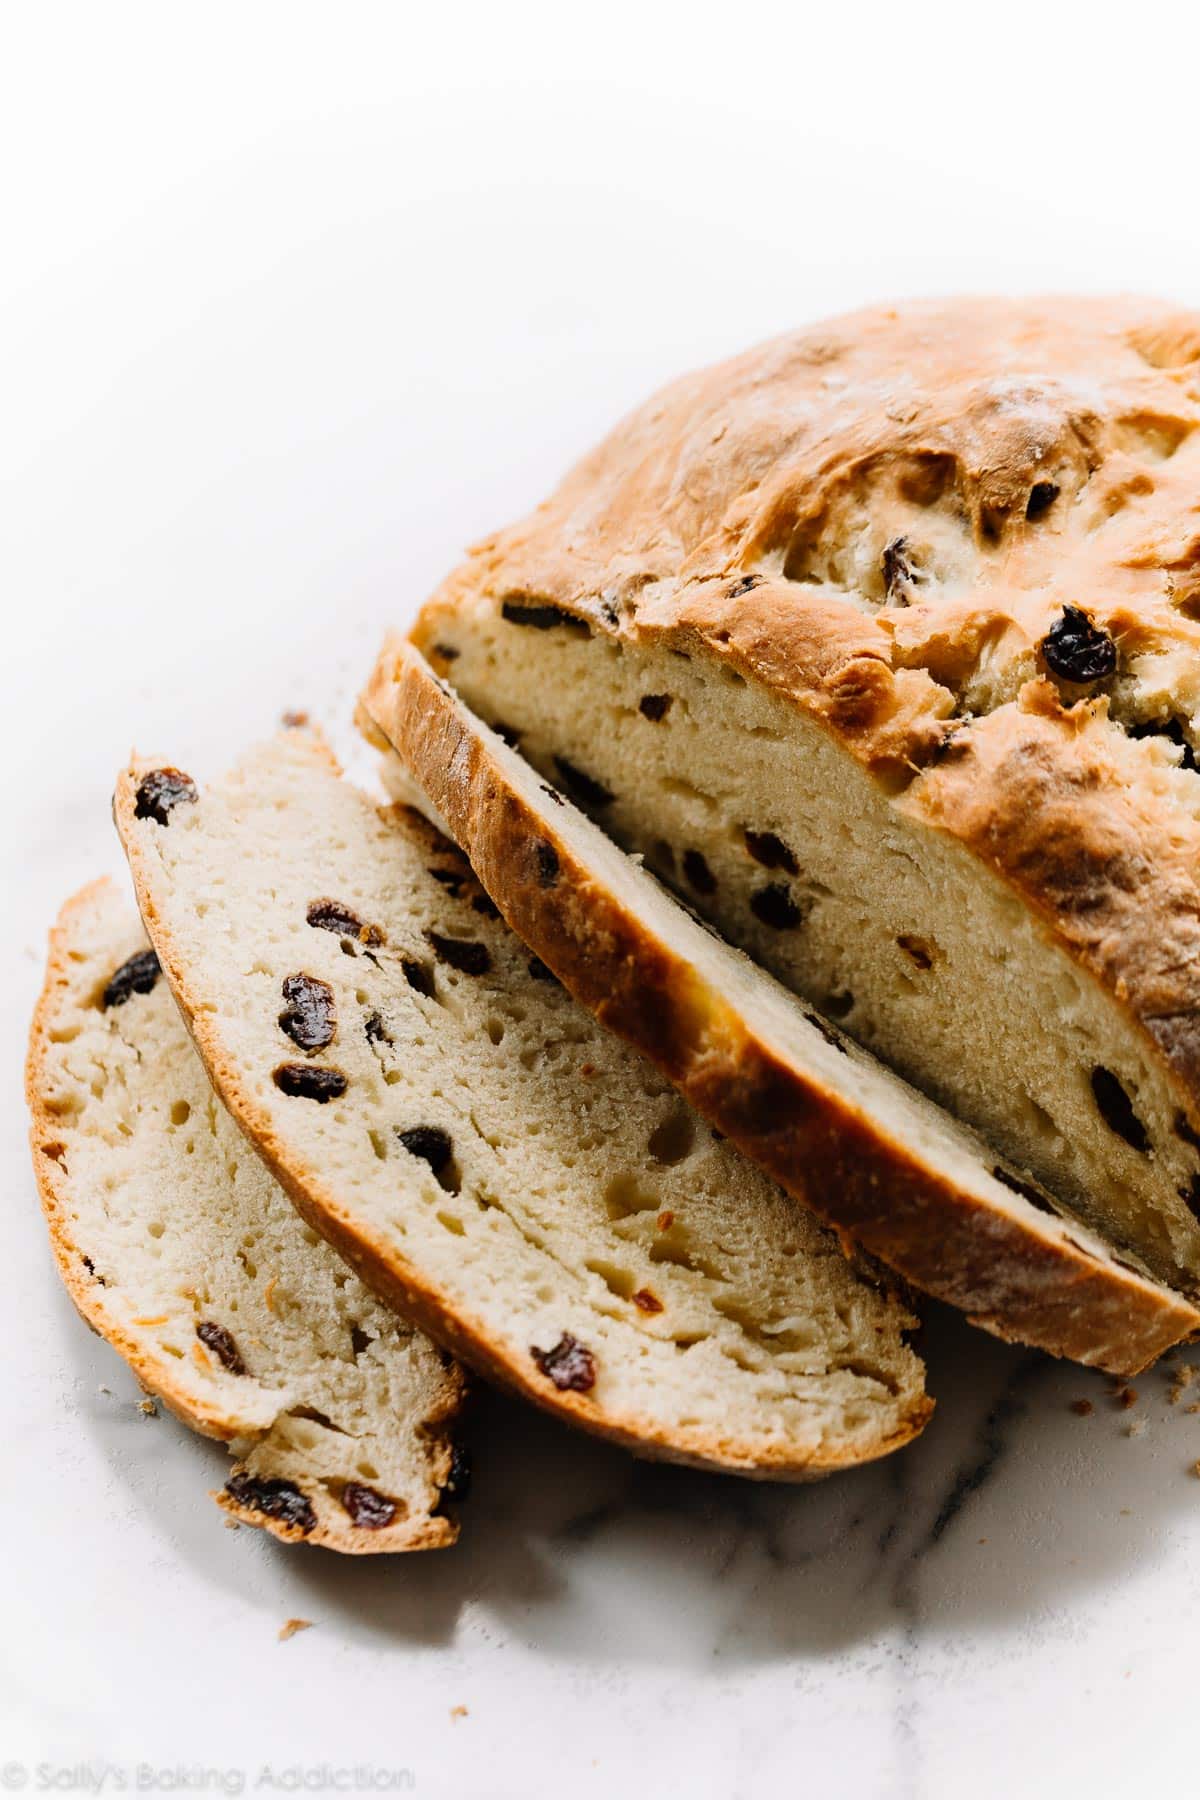
- What’s the texture like? The best Irish soda bread, like this recipe, has a golden brown crust with a dense, tight crumb. The bread isn’t heavy, it’s actually quite tender and soft inside. The crust is nice and crisp when it comes out of the oven and becomes a little chewy on day 2 and 3. It’s so good.
My grandmother’s Irish soda bread contains some sugar, but it’s not overly sweet. It’s a wonderful companion for savory dinners like hearty stew or you can serve it with butter, honey butter, jam, and/or cheese. The raisins are optional, but Grandma would never let you skip them.
Video Tutorial: Homemade Irish Soda Bread
Overview: How to Make Irish Soda Bread
The full printable recipe is below. Irish soda bread dough comes together in about 10 minutes. You need buttermilk, egg, flour, sugar, baking soda, salt, and butter.
- Whisk buttermilk and 1 egg together. Whisk the flour, sugar, baking soda, and salt together in another bowl.
- Cut cold butter into the flour mixture. Like scones and pie crust, cutting cold butter into the flour is a key step. Coating the flour in cold butter guarantees a lovely flaky texture. You can use a fork, your hands, or a pastry cutter. Add the wet ingredients.
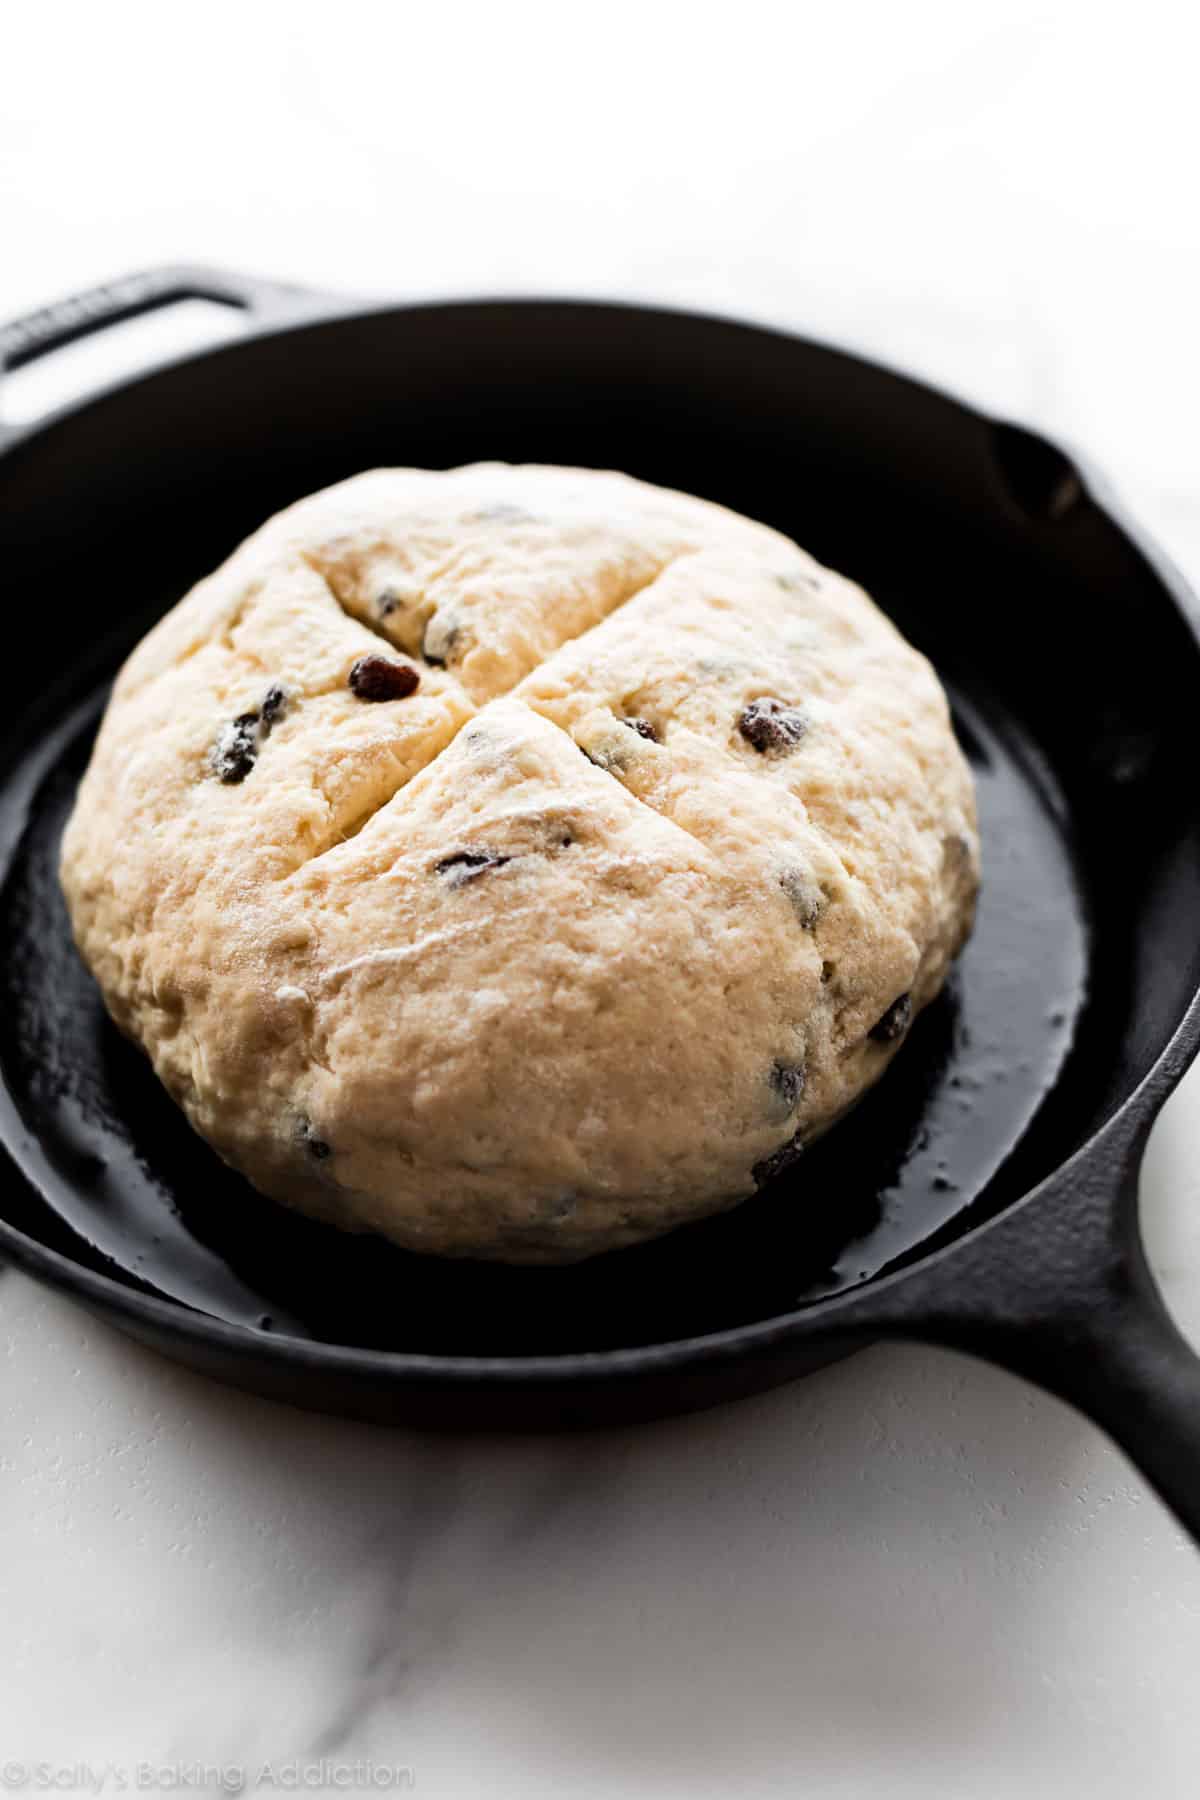
- Bring the dough together with your hands. Using a very sharp knife, score the dough. This allows the center to bake.
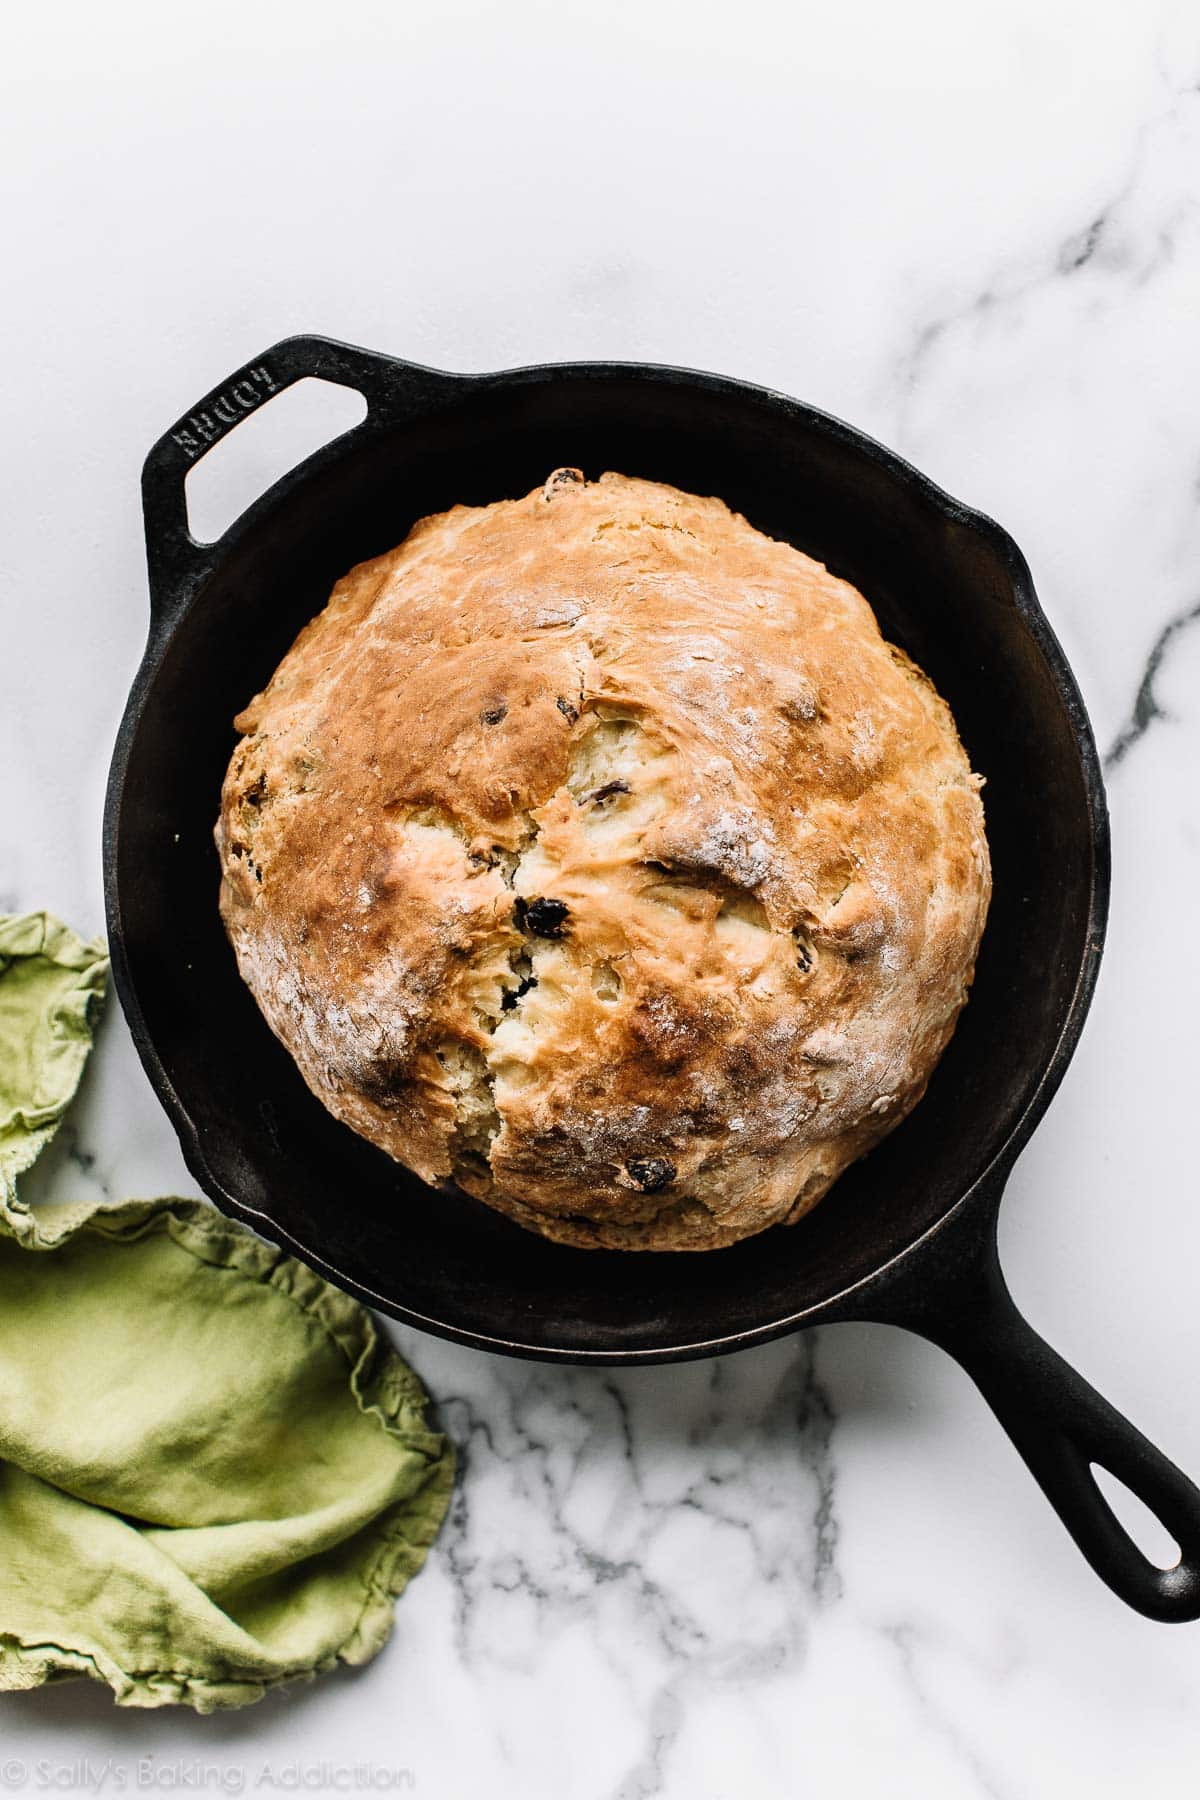
- Bake until golden brown.
Buttermilk is the Secret
Irish soda bread only requires a few ingredients, including buttermilk. Buttermilk reacts with the baking soda to provide the bread’s leavening. It also adds wonderful flavor! We use buttermilk for the same reasons in my regular no yeast bread, too. If you’re interested, I have plenty more on this topic in my Baking with Buttermilk post (including a DIY buttermilk substitute recipe).
Feel free to Skip the Egg
Irish soda bread can be made with or without an egg. 1 egg adds richness and density. Feel free to skip it to make a slightly lighter loaf. No other changes necessary, simply leave out the egg.
3 Success Tips
- Don’t over-work the dough. It’s supposed to look a little shaggy.
- Score the top of the dough with an “X” before baking. This helps the center bake through.
- You can bake Irish soda bread on a baking sheet, in a baking pan, or in a cast iron skillet. I recommend a cast iron skillet because it helps guarantee a super crispy crust. Here’s how to keep your cast iron cookware seasoned.
If you’re baking for St. Patrick’s Day, you’ll love my Guinness Brownies, Baileys and Coffee Cupcakes, Guinness Chocolate Cake, Guinness Chocolate Cupcakes, Lucky Charms Treats, and shamrock St. Patrick’s Day Cookies, too.
Print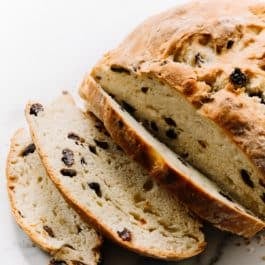
Grandma’s Irish Soda Bread
- Prep Time: 10 minutes
- Cook Time: 45 minutes
- Total Time: 55 minutes
- Yield: 1 loaf
- Category: Bread
- Method: Baking
- Cuisine: Irish
Description
Irish Soda Bread is a quick bread that does not require any yeast. Instead, all of its leavening comes from baking soda and buttermilk. This Irish Soda Bread recipe is my grandmother’s and has been cherished in my family for years. It’s dense, yet soft and has the most incredible crusty exterior.
Ingredients
- 1 and 3/4 cups (420ml) buttermilk*
- 1 large egg (optional, see note)
- 4 and 1/4 cups (531g) all-purpose flour (spooned & leveled), plus more for your hands and counter
- 3 Tablespoons (38g) granulated sugar
- 1 teaspoon baking soda
- 1 teaspoon salt
- 5 Tablespoons (71g) unsalted butter, cold and cubed*
- optional: 1 cup (150g) raisins
Instructions
- Preheat oven & pan options: Preheat oven to 400°F (204°C). There are options for the baking pan. Use a regular baking sheet and line with parchment paper or a silicone baking mat (bread spreads a bit more on a baking sheet), or use a seasoned 10-12 inch cast iron skillet (no need to preheat the cast iron unless you want to), or grease a 9-10 inch cake pan or pie dish. You can also use a 5 quart (or higher) dutch oven. Grease or line with parchment paper. If using a dutch oven, bake the bread with the lid off.
- Whisk the buttermilk and egg together. Set aside. Whisk the flour, granulated sugar, baking soda, and salt together in a large bowl. Cut in the butter using a pastry cutter, a fork, or your fingers. Mixture is very heavy on the flour, but do your best to cut in the butter until the butter is pea-sized crumbs. Stir in the raisins. Pour in the buttermilk/egg mixture. Gently fold the dough together until dough it is too stiff to stir. Pour crumbly dough onto a lightly floured work surface. With floured hands, work the dough into a ball as best you can, then knead for about 30 seconds or until all the flour is moistened. If the dough is too sticky, add a little more flour.
- Transfer the dough to the prepared skillet/pan. Using a very sharp knife or bread lame, score the dough with a slash or X about 1/2 inch deep. (“Score” = shallow cut.)
- Bake until the bread is golden brown and center appears cooked through, about 45-55 minutes. Loosely tent the bread with aluminum foil if you notice heavy browning on top. For a more accurate test, the bread is done when an instant-read thermometer reads the center of the loaf as 195°F (90°C).
- Remove from the oven and allow bread to cool for 10 minutes, and then transfer to a wire rack. Serve warm, at room temperature, or toasted with desired toppings/spreads.
- Cover and store leftover bread at room temperature for up to 2 days or in the refrigerator for up to 1 week. We usually wrap it tightly in aluminum foil for storing.
Notes
- Freezing Instructions: Baked and cooled bread freezes well up to 3 months. Freeze the whole loaf or individual slices. Thaw in the refrigerator or at room temperature, then reheat as desired.
- Special Tools (affiliate links): Cast Iron Skillet, 9-inch Round Cake Pan, 9-inch Pie Dish, Dutch Oven, or Baking Sheet with Silicone Baking Mat or Parchment Paper | Glass Mixing Bowl | Whisk | Pastry Cutter | Bread Lame | Instant-Read Thermometer
- Baking Pan: There are options for the baking pan (see Special Tools Note above). You can use a lined large baking sheet (with or without a rim), a seasoned 10-12 inch cast iron skillet, or a greased or lined 9-10 inch cake pan or pie dish. I don’t recommend a loaf pan because the loaf may not bake evenly inside. This dough is best as a flatter loaf.
- Buttermilk: Using cold buttermilk is best. Buttermilk is key to the bread’s flavor, texture, and rise. The bread will not rise without it. If you don’t have any buttermilk on hand, you can make a homemade buttermilk substitute. Whole milk or 2% milk is best, though lower fat or nondairy milks work in a pinch. Add 1 Tablespoon of lemon juice or white vinegar to a liquid measuring cup. Add enough cold milk to make 1 and 3/4 cups. Whisk together, then let sit for 5 minutes before using in the recipe.
- Egg: 1 egg adds richness and density. Feel free to skip it to make a slightly lighter loaf. No other changes necessary, simply leave out the egg.
- Cold Butter: The colder the butter, the less sticky the dough will be. Make sure it’s very cold, even frozen cubed butter is great.
- Smaller Loaves: You can divide this dough up to make smaller loaves. The bake time will be shorter, depending how large the loaves are. An instant read thermometer will be especially helpful. Bake the loaves until an instant-read thermometer reads the center of the loaf as 195°F (90°C).


Reader Comments and Reviews
Made this for the first time last night and it came out splendid! Like I’ve seen some people say, I needed it to cook a tad longer than the 45 minutes. But no complaints! I just put it in for longer and kept an eye on it until it looked about done (and Googled some tips for confirming bread is done). All in all, it came out great! Next time I’m going to try adding raisins into it – but this go I left them out! A huge thanks for sharing this recipe with us!
I can’t wait to try this tomorrow with our (one day early) corned beef and cabbage dinner!
I’m not an experienced baker so I need to ask, could I make the dough in the morning, wrap and refrigerate it, then when I get home put it into a room temp cast iron skillet and stick it in the oven? Will it turn out ok? Thanks for your time and advice!
Hi Wendy, that should be fine. The bake time may be longer since the dough will be even colder going into the oven.
Hi can this recipe be used in a bread machine and if yes what setting would you use? Thank you
Hi Jan, we don’t recommend a bread machine for this dough.
I need to make 100 loaves, I’ll be using the small spring pan3-4 inch, how. Long can I freeze for? Will they get soapy?
Another year, another soda bread win with your recipe!! I too followed this recipe “to a tee”, and we’re baked all the way through over here. Dear NORA, I wish you the best in your next recipe endeavor
I will make this tomorrow. Can I prepare it and not bake it for a few hours so it will still be warm when served with the stew?
Hi Nancy, that shouldn’t be a problem.
First time making this! Took it to cousins on Sunday evening. Everyone loved it! Thanks for a great recipe!
Love this recipe! Have you tried to make this as muffins? Any advice on adjustments I should consider?
Hello, can I leave the sugar out?
Hi Fran, you can try reducing the sugar to 1 or 2 Tablespoons, but we recommend don’t recommend leaving it out completely.
I made this recipe and turned out perfectly.
Wow! It made a very large loaf, not like the smaller ones in grocery stores.
I added the raisins too. I also grated the butter.
I didn’t have buttermilk so used the vinegar /milk combo which I’ve used many times for other recipes.
I used the parchment lined cast iron pan and also covered with foil towards end of baking. Also checked doneness with knife inserted in middle til it came clean.
And yes toasting it in the morning was awesome with softened butter.
I WILL make this AGAIN!
Used this recipe last week and it was so good, we made three batches last night for family and friends! 2 of the batches I substituted chocolate chips for the raisins. My neighbors and my kids have gobbled it all up. TY <3
Unlike all those complaining about it not coming out done … lets be real. DONE depends on YOUR oven, and how hot it is, or whether you use convection baking or regular, and whether you put this near the top of the oven or ridiculously near the bottom.
My dear ol’ Grandma’s approach was exactly as per the recipe above. However, since she had a self professed ‘slow’ oven, she used a higher initial temperature (she started at 425), gave it 15 minutes, then turned the oven down to 375 to ‘finish it off.’ Her words.
And it took about 1 hour 15 to 1 hour 20 minutes. The simplest test was to stick a toothpick in the center, all the way to bottom. If it dragged out ‘clean’ (without batter clinging on) it was ready. Otherwise, back in the oven for another 10 minutes. UNTIL DONE.
Bob … the Irish Goat
My first bread and it turned out perfect! Thank you for the recipe!
Delicious! I thought it was going to be doughy when it came out of the oven, but once it cooled, it was perfect.
So good! I followed the recipe using whole milk plus egg. I did add another splash of vinegar to the whole milk as I didn’t see much curdling. I knead it maybe 10-12 times very gently. Shaped it and then pat it slightly.
The crumbs were amazing. Very soft but not bready. Not dense. Crunchy top. Will definitely make again.
I made this (again) to go with an early St. Patrick’s Day dinner of Irish stew. My normally reticent husband said while buttering his third slice, “WHY is this so good?”
Definitely a keeper. 😀
Super delicious. I made this a long time ago but then couldn’t find the right recipe. This is the ONE I have been looking for. Thank you for sharing!
If I wanted to make two smaller sized breads by dividing the dough in half, how long would you recommend I cook it for? Thank you!
Hi Emily, we’re not sure of the best bake time. I would say at least 30 minutes at the same oven temp. Bake until the loaves are golden brown and the top of the score looks cooked through.
I made this yesterday to bring to a St. Patrick’s Day dinner and it was fabulous! By far the moistest and most tender soda bread I’ve ever made! Most tend to be dry and coarse but this one…it has a soft crumb and texture and tastes delicious…I even toasted a slice for breakfast this morning and it was wonderful. I didn’t have raisins on hand but did have currants so I macerated 2/3 cup of currants in some Jameson’s whiskey to plump them up and after draining them, added them when the raisins would have gone in. I used my old cast iron skillet and threw a parchment round on the bottom to set the dough on. I followed another reader’s suggestion after cooling the bread in the pan for 10 minutes, removed it and wrapped it in a clean cotton dish towel to finish cooling. I got rave reviews and was told this is the only recipe I am to use for the annual St Pat’s dinner. Thanks for a fabulous recipe!
This is the second year I’ve made this bread. This year I used King Arthur all-purpose flour and weighed it as well as the other ingredients. The butter and buttermilk were kept cold. The dough is SUPER sticky and so again this year I added about 1/2 cup more flour. The dough was still sticky. Cutting a cross into the bread didn’t work because the dough just flowed together. The picture of your bread appears nicely shapen and flour hydrated. What type of buttermilk do you use because obviously this is what is giving this bread a sticky texture (fat-free, whole milk buttermilk, powdered etc.) All of these milks aren’t created equal and will yield various results. I would appreciate the answer. Thank you.
Hi Janice! We usually use a low fat buttermilk, but have successfully tested this recipe with buttermilk alternatives as detailed int the recipe notes. The dough is supposed to be pretty sticky, but if it seems stickier than what you see in the photos and video tutorial, feel free to add a bit more flour — try an additional tablespoon at a time until it starts to come together. Flouring your hands helps also.
This was delicious! I doubled the recipe to take to an event and just before baking, I put frozen blueberries on top of the flattened bread, then folded them in carefully before shaping and x-ing the loaf. It turned out great and got lots of compliments.
Should I preheat the cast iron skillet before baking the loaf?
Hi Brandi, no need to preheat the pan!
In the oven but I doubt it will turn out. The recipe said the dough would be crumbly but it was a wet mess. I added an extra CUP of flour and I could still barely get it in the cast iron skillet. I think it’s going to stick in there and I’ll have another mess to clean up getting out! But we’ll SEE!
Same here Debbie. My wet blob is in the oven baking now…. My fingers are crossed it will turn out okay.
I agree, VERY wet dough. Typically I weigh all ingredients but my scale died on me this morning. Maybe I miscounted the number of cups of flour? Sally’s recipes and directions are usually perfect. I’ll see how this comes out of the oven.
Excellent bread with full texture and good flavor! Ate it with pasta tonight…I look forward to toasting it in the morning for breakfast with butter and honey
Followed all directions , handle and fold this wet dough gently, you will completely mix the flour in with light kneading on a floured board. Substituted 1/2 cup mini chocolate chips instead of raisins. Baked in a 9” glass pan about 50 min total, needed the foil when got very browned, scored the dough down to the pie plate to ensure it baked through and checked temp with thermometer to make sure fully baked, served with honey butter, so good!
Hi.Can this be made in a food processor?
Thanks
I just made this bread… Delicious! This is not a very sweet bread, The raisins add all the sweetness.
Great recipe! I followed it exactly except that I let the loaf “rest” for 15 minutes before I popped it in the oven. I also added caraway seeds. It’s delicious!
I have made this twice and it came out perfect both times. I baked it in a cast iron pan. If I wanted to cut the dough in half and make two loaves at once.. how long should I cook the smaller loaves for?
Hi Lori, We haven’t tried that before but it shouldn’t be a problem– however, we’re not sure of the best bake time. I would say at least 30 minutes at the same oven temp. Bake until the loaves are golden brown and the top of the score looks cooked through.
Can I use frozen grated butter (like in your scones recipe)? Also, do you think golden raisins would work well in this recipe?
Hi Beth, You can grate frozen butter. This dough needs to come together quickly like scones. Golden raisins should be fine!
Absolutely a family favorite!! There’s nothing we don’t love about this recipe! I make it every year for our St. Patty’s dinner. Goes fast!! Can’t believe there isn’t any baking powder. It’s the BEST!!!
I always use golden raisins. Wouldn’t make the bread without them.
Like Nora above, I followed the recipe to a tee and the bread came out doughy in the midfle…Very disapoidisappointed.
Hi Gary, maybe you didn’t score it deep enough? You want to have it about an inch deep so the middle gets baked as well.
The Irish soda bread I’ve tasted had a hint of almond extract. How much would you use?
Hi Margaret! We’ve never tested almond extract but would start with 1/2 tsp. Enjoy!
I made this for an early St. Patrick’s Day dinner party. I followed the directions exactly as written and baked it in a cast iron skillet. It took about an hour to bake and I did cover it half way through with foil. The only change I made was using whiskey soaked currents and I made whipped honey whiskey butter. It was a hit! Everyone loved it! Thank you for sharing, I’ll be back for more recipes.
I have never made bread before and I’m pretty terrible at baking. My bread came out perfect! My husband was very impressed.
Thank you!
Good lord, people. If it isn’t done in the middle then bake it longer. Everyone’s oven is different and you can’t just blindly follow the baking time of any recipe. Test it with a toothpick and put it back in the oven if you need to. If the recipe worked for almost everyone else it probably isn’t the recipe’s fault.
I laughed out loud at your comment Matt. Spot on.
I made it today for the 1st time. I did score it deep and baked it an extra 10-15 mins just to make sure the inside was done. It was fantastic! Will definetely make again.
I’m looking forward to trying this recipe! Question: Is cutting the butter in with a pastry cutter essential to the bread’s composition? Would a food processor on pulse not work just as well?
Hi Jodi, we recommend using a pastry cutter, forks, or even your fingers. A food processor will quickly overwork your dough, though can work in a pinch.
Thanks for the speedy reply Michelle. Pastry cutter it is! I’m sure this will be a welcome addition to my St Patty’s Day table.