

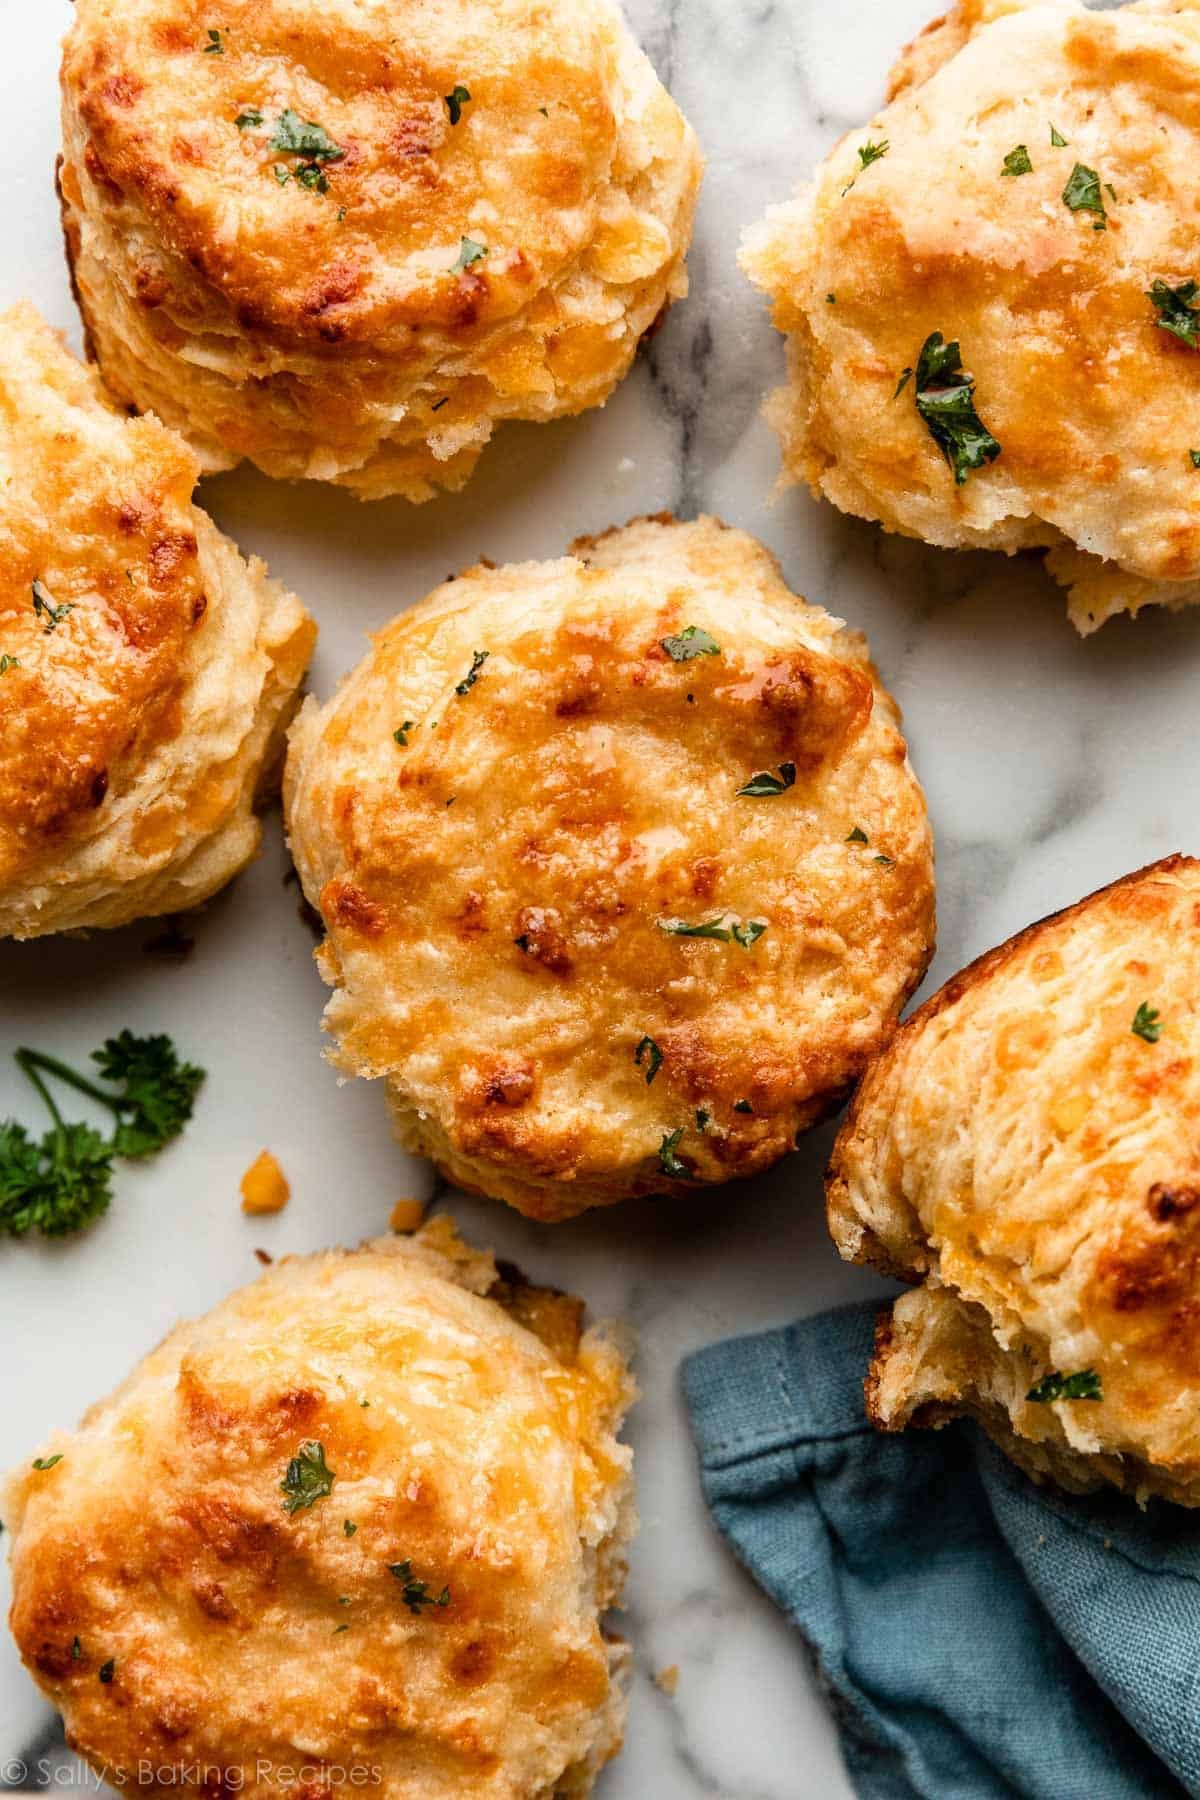
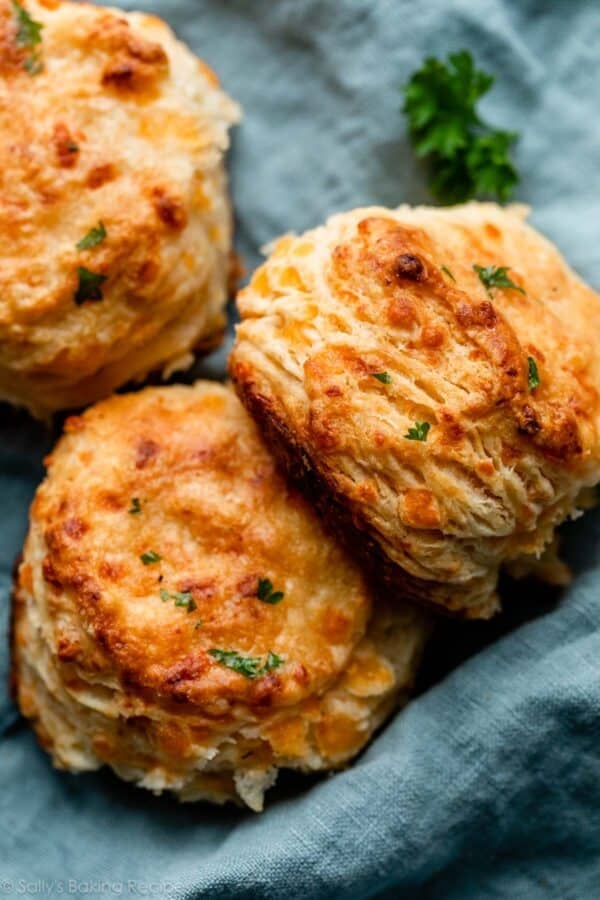
Soft, flaky, and fantastically flavorful, these homemade cheddar biscuits practically fly off the table anytime they’re served. Good thing they’re so quick and easy to make!
I originally published this recipe in 2017 and have since added new photos, a video tutorial, and a few more success tips.
One reader, Teri, commented: “These are now sitting on the kitchen counter next to bacon so when the fam wakes up they can fix an egg and make a great breakfast sandwich—delicious!!! ★★★★★“
Another reader, Amanda, commented: “These were UNBELIEVABLE! I will say that I made part of my batch in a round metal cake tin, and some in a cast iron skillet—both were good but the cast iron biscuits were magical! ★★★★★“
You’ll find many quick bread recipes on my website, like banana bread, no yeast bread, and Irish soda bread. They’re labeled quick breads because they don’t require any yeast or rise time… but loaves of bread still take a while to bake, and need time to cool before you slice into them. I love making biscuits because they also don’t require any yeast or rising, and they bake in just about 20 minutes and can be enjoyed warm—they’re really, truly quick!
Here’s Why You Will Love These Cheddar Biscuits
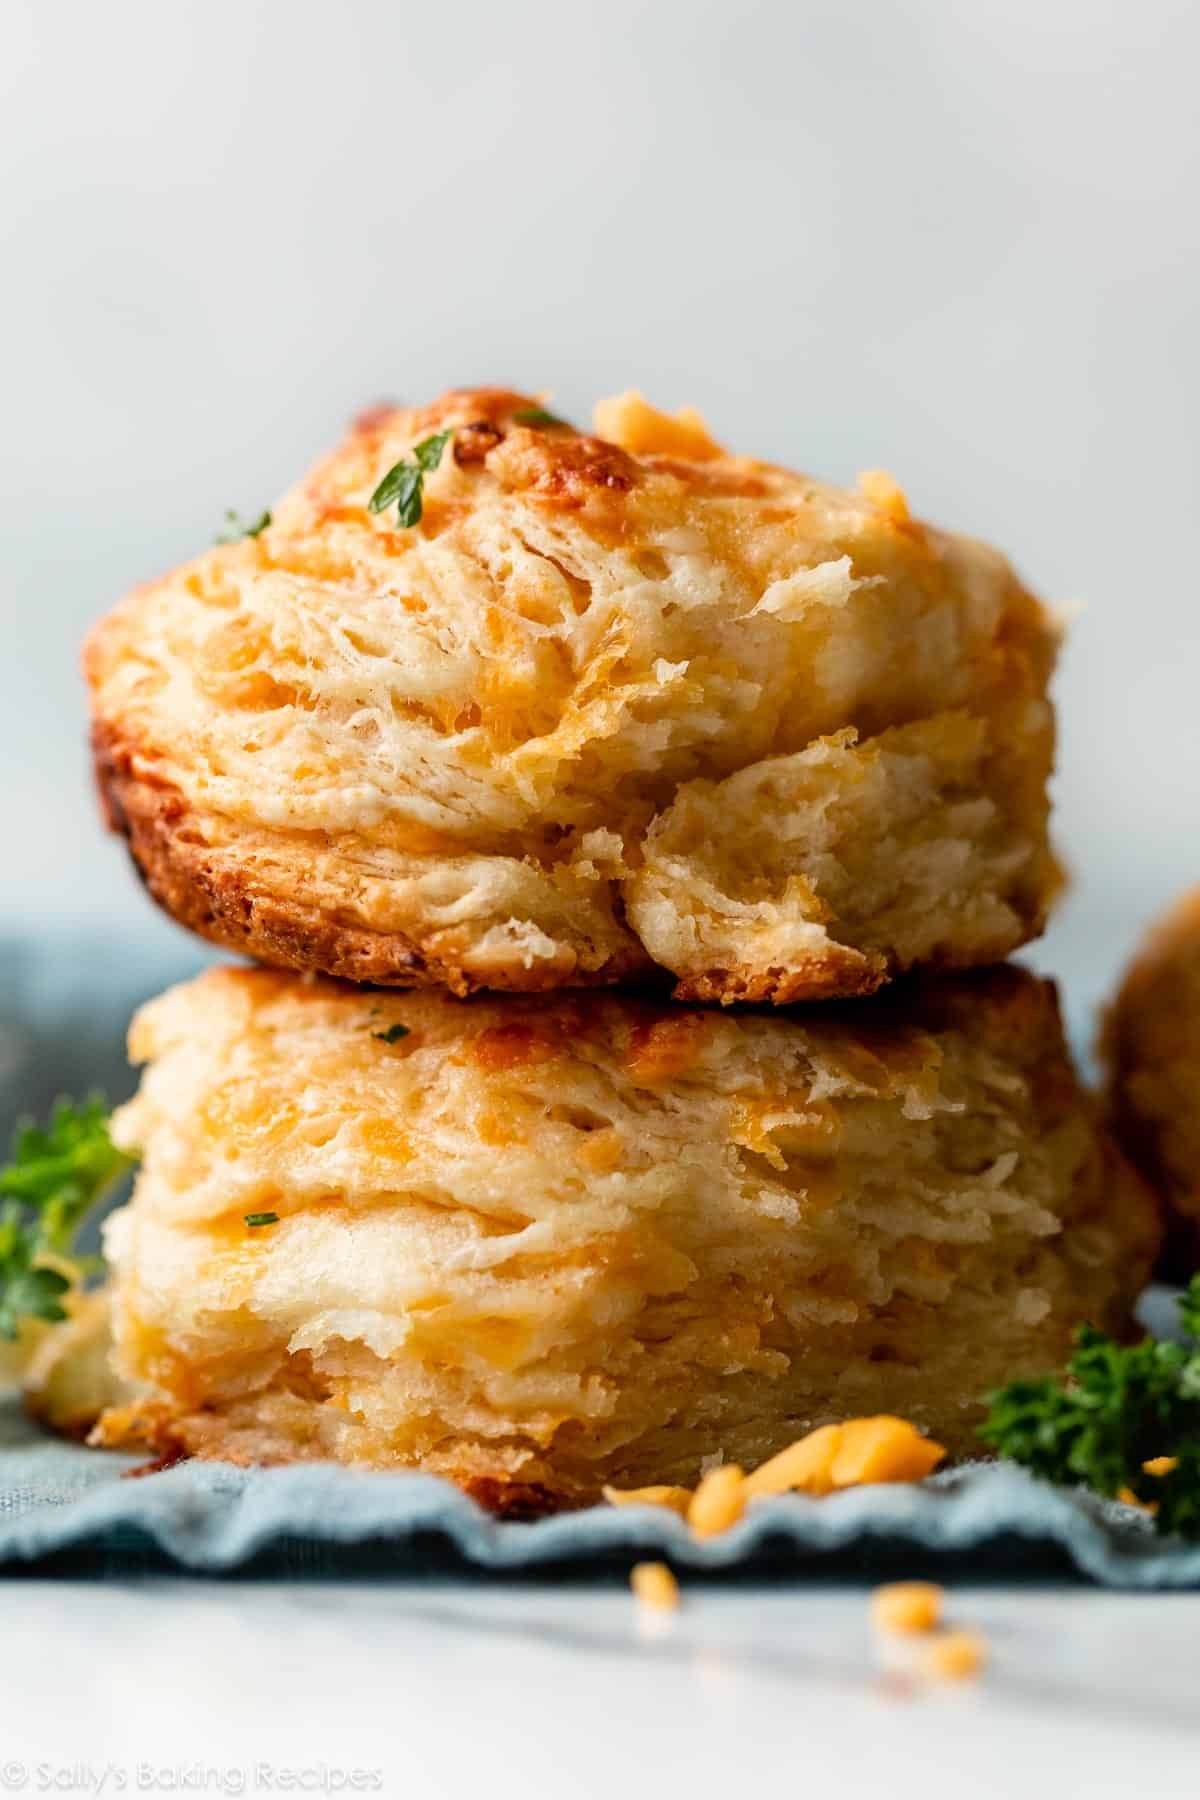
- Rise extra tall with extra flakes
- Buttery, garlicky, cheesy flavor
- Another egg-free baking recipe
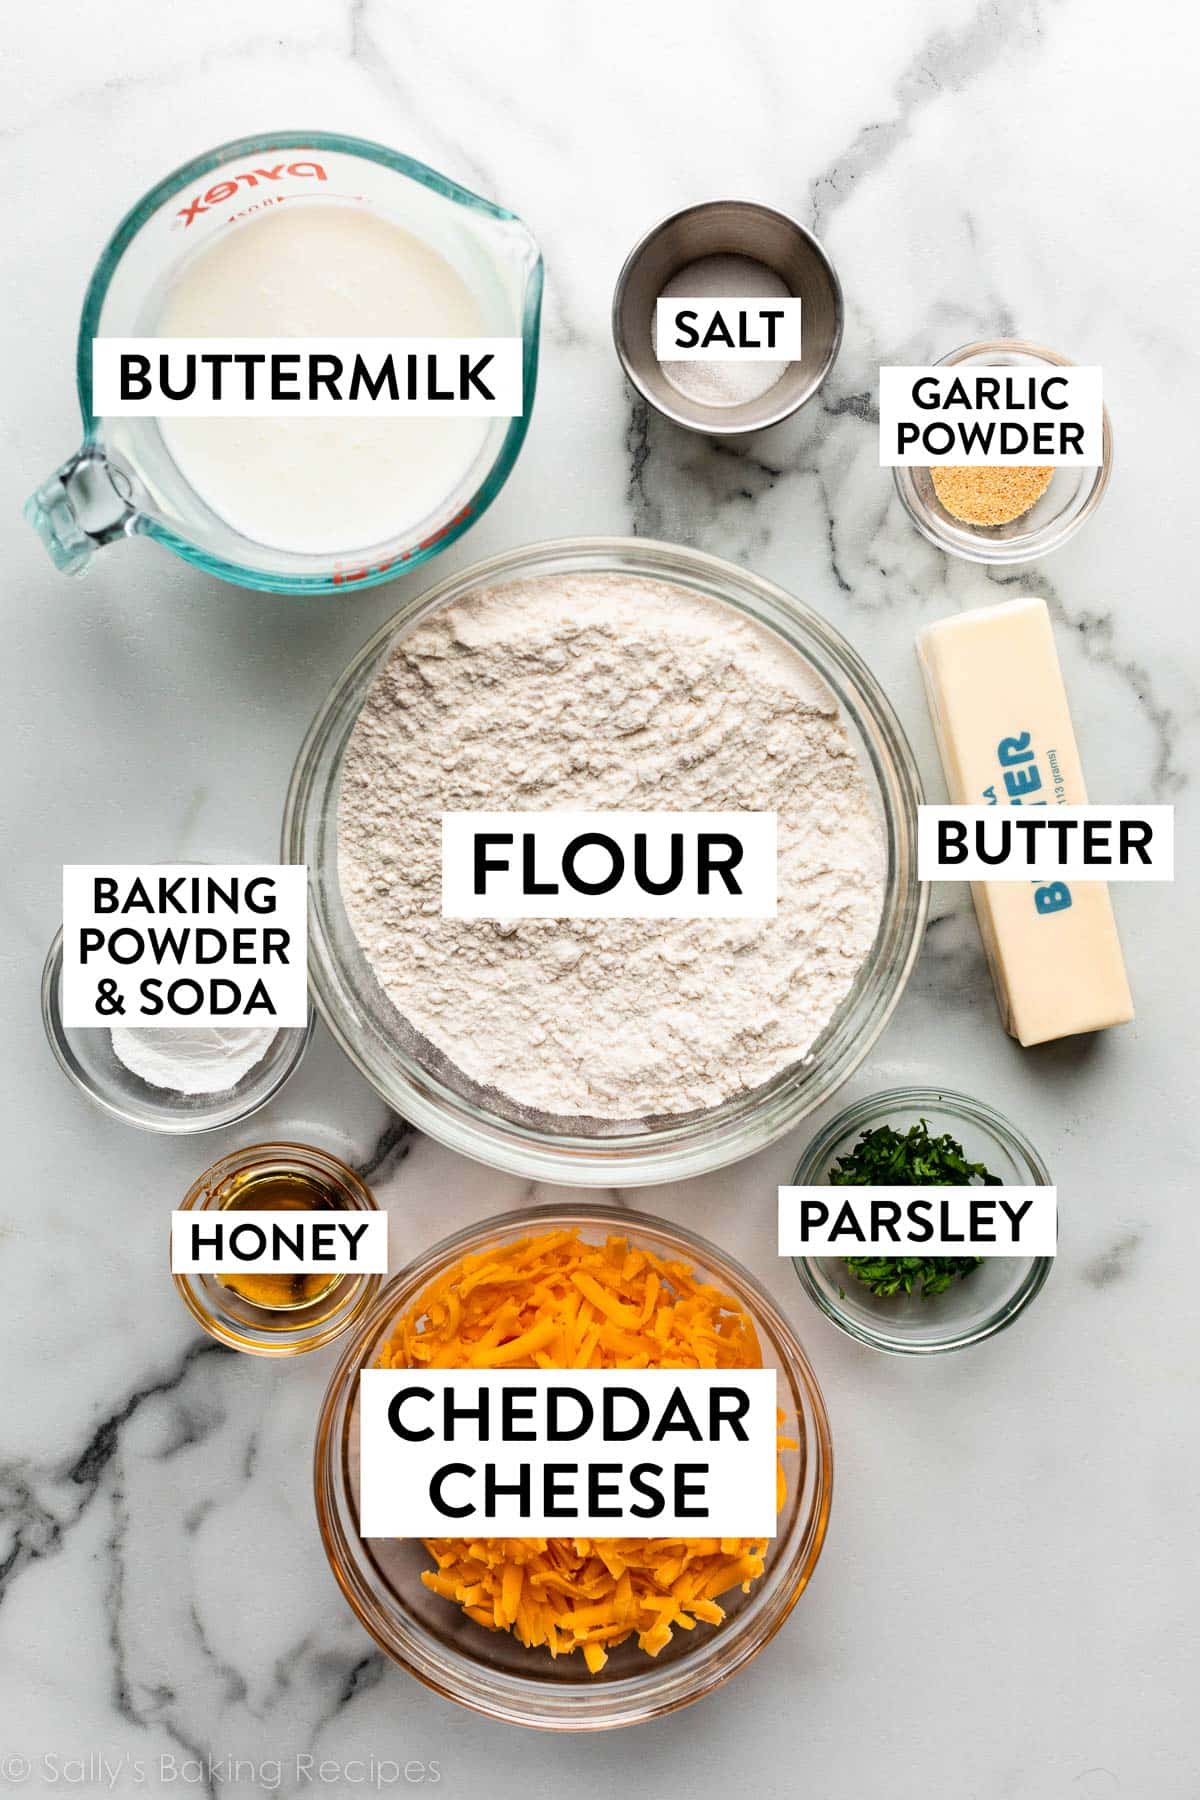
- Just 10 simple ingredients
- Quick to prep and bake, ready in about 35 minutes total
- Enjoy warm with plenty of melty cheese pockets inside!
- Top with an easy melted butter, garlic, and parsley topping
If you’ve made my homemade buttermilk biscuits before, you’ll be familiar with the technique I use to make countless buttery, flaky layers. That’s my go-to biscuit recipe; it’s easy, quick, requires minimal ingredients, and produces beautifully tall biscuits. For today’s cheddar biscuits, we’re adding cheese, garlic, and even more butter. I also use the baking powder/baking soda combination detailed in those recipe notes.
Today’s biscuits taste remarkably similar to the popular cheddar bay biscuits served at Red Lobster. (By the way, if you enjoy adding flavor to plain biscuits, you’ll love my everything biscuits and zucchini biscuits (flavored with parmesan & herbs), too.)
Grab these ingredients:
I have 2 quick tricks for flaky biscuits and 2 quick tricks for tall biscuits. First, the flakes!
How to Make Flaky Cheddar Biscuits
Success Tip #1: Use Cold Fat
For flaky layers, use cold fat. This is very important. When little crumbs of butter melt as the cheddar biscuits bake, they release steam and create little pockets of air—this makes the biscuits flaky on the inside while remaining crisp on the outside. You don’t want the butter to melt BEFORE hitting the oven, because then there would be no steam. No steam means no pockets of air, and no pockets of air means no flakes.
It’s the same thing that happens when making pie crust, ham & cheese scones, and the topping for my berry cobbler recipe. Make sure your butter is COLD. Cut it into your dry ingredients by following the printable recipe below. You can use a food processor or pastry cutter for that step. You’re looking for coarse, flour-coated butter crumbles. Mix in your cheese, and then pour in the buttermilk/honey mixture and gently mix to combine:

Success Tip #2: Fold & Flatten
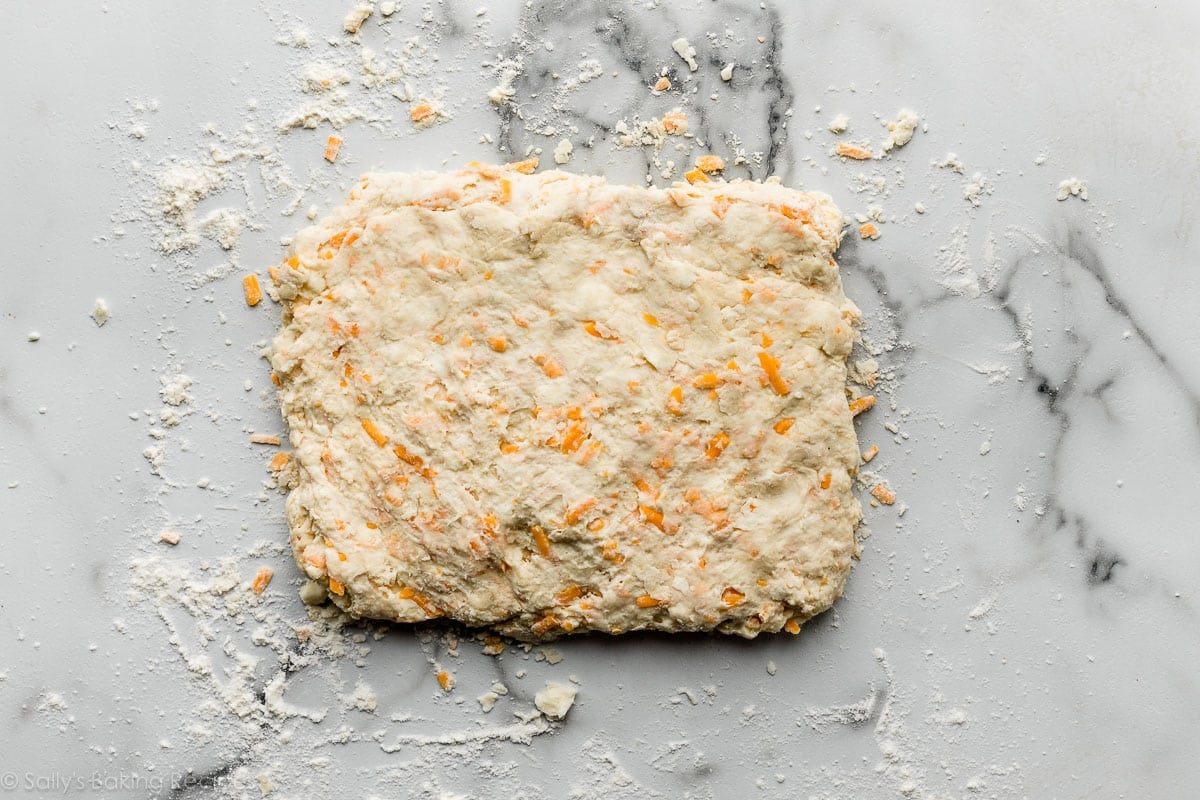
For the flakiest cheddar biscuits ever, flatten and fold the dough before cutting into biscuits. Flattening and folding creates layers, and you might remember this if you’ve ever tried my homemade puff pastry and croissant bread recipes. Tip the scrappy, crumbly biscuit dough onto a work surface and work it together with your hands. Form into a rectangle:
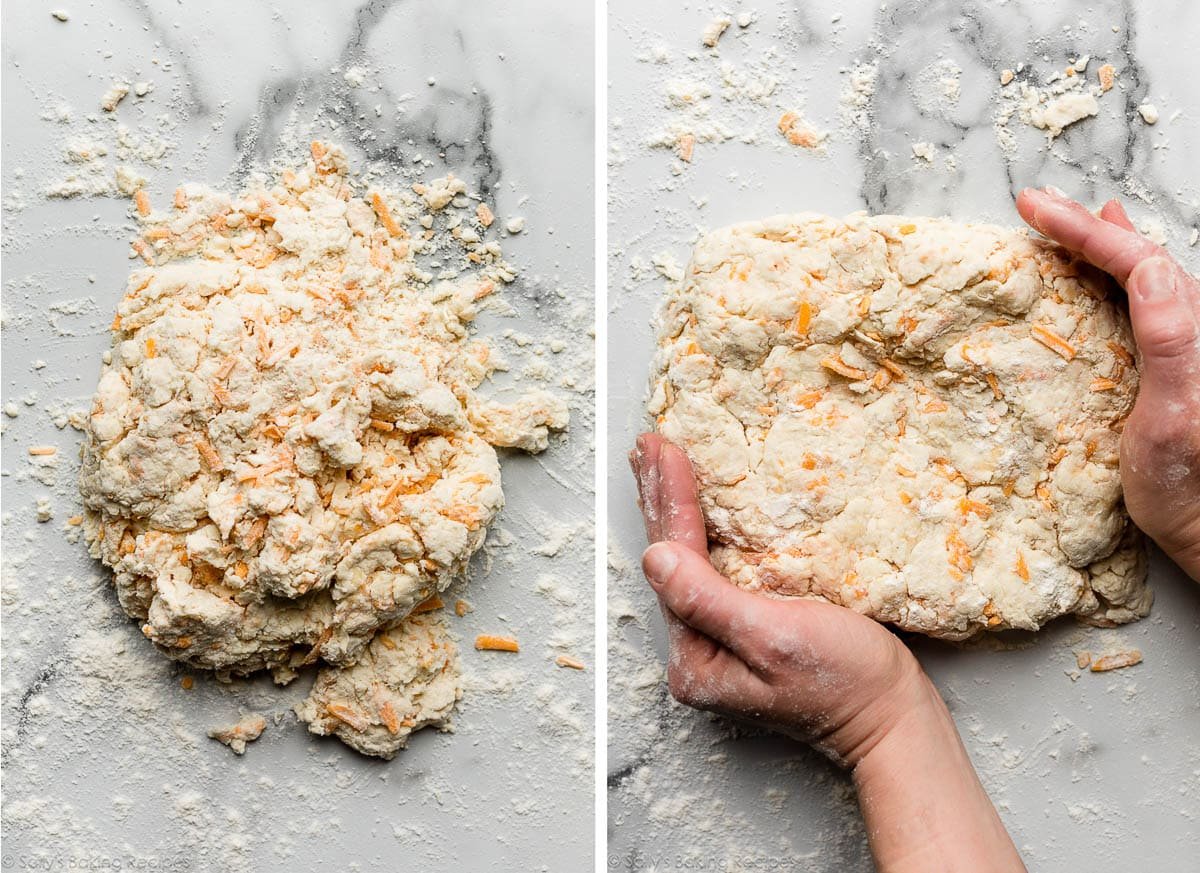
Flatten into a 3/4-inch-thick rectangle, and then begin folding. Fold one end of the rectangle in towards the center, and then the other end on top of that as if you were folding a business letter:
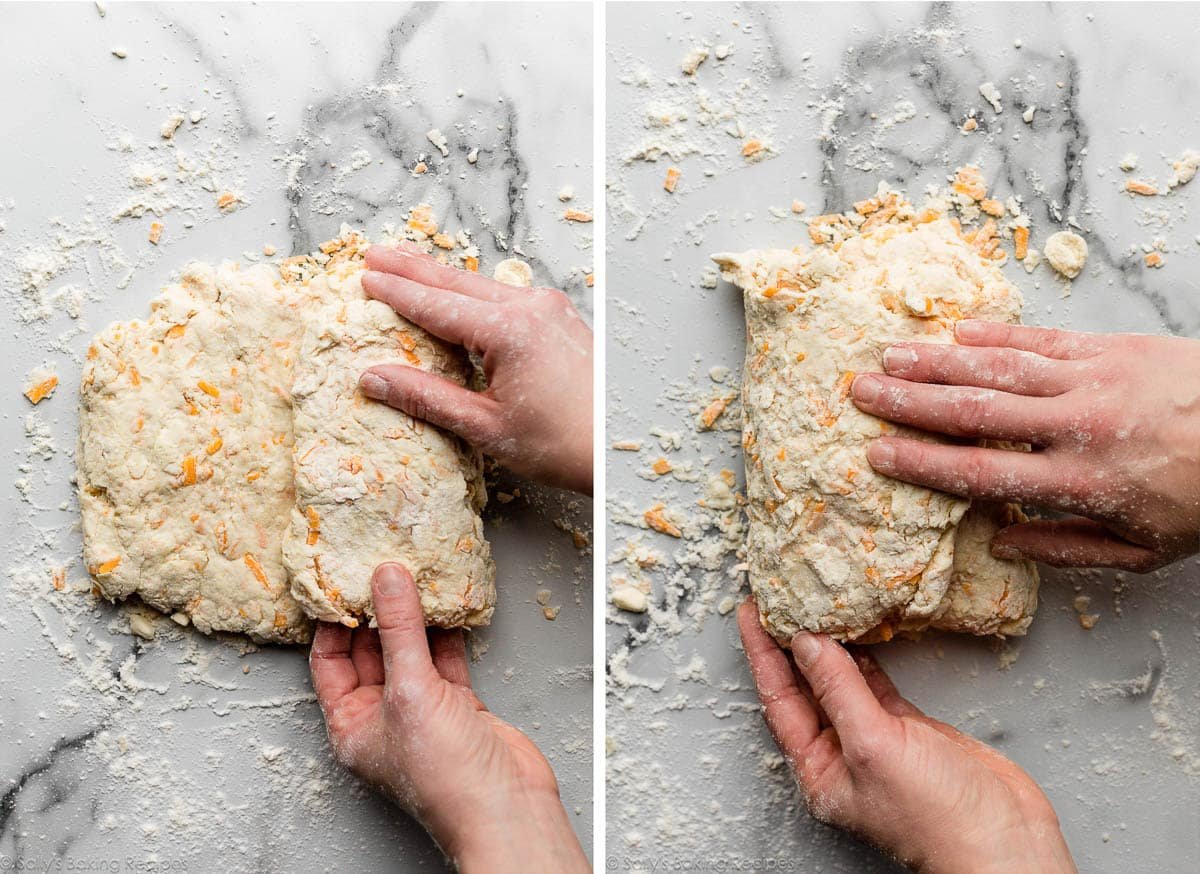
Turn the folded dough horizontal, and flatten again into a 3/4-inch-thick rectangle.
Repeat the folding process 2 more times before cutting into round biscuits.
Now let’s move on to the tricks for tall biscuits.
How to Make Super Tall Cheddar Biscuits
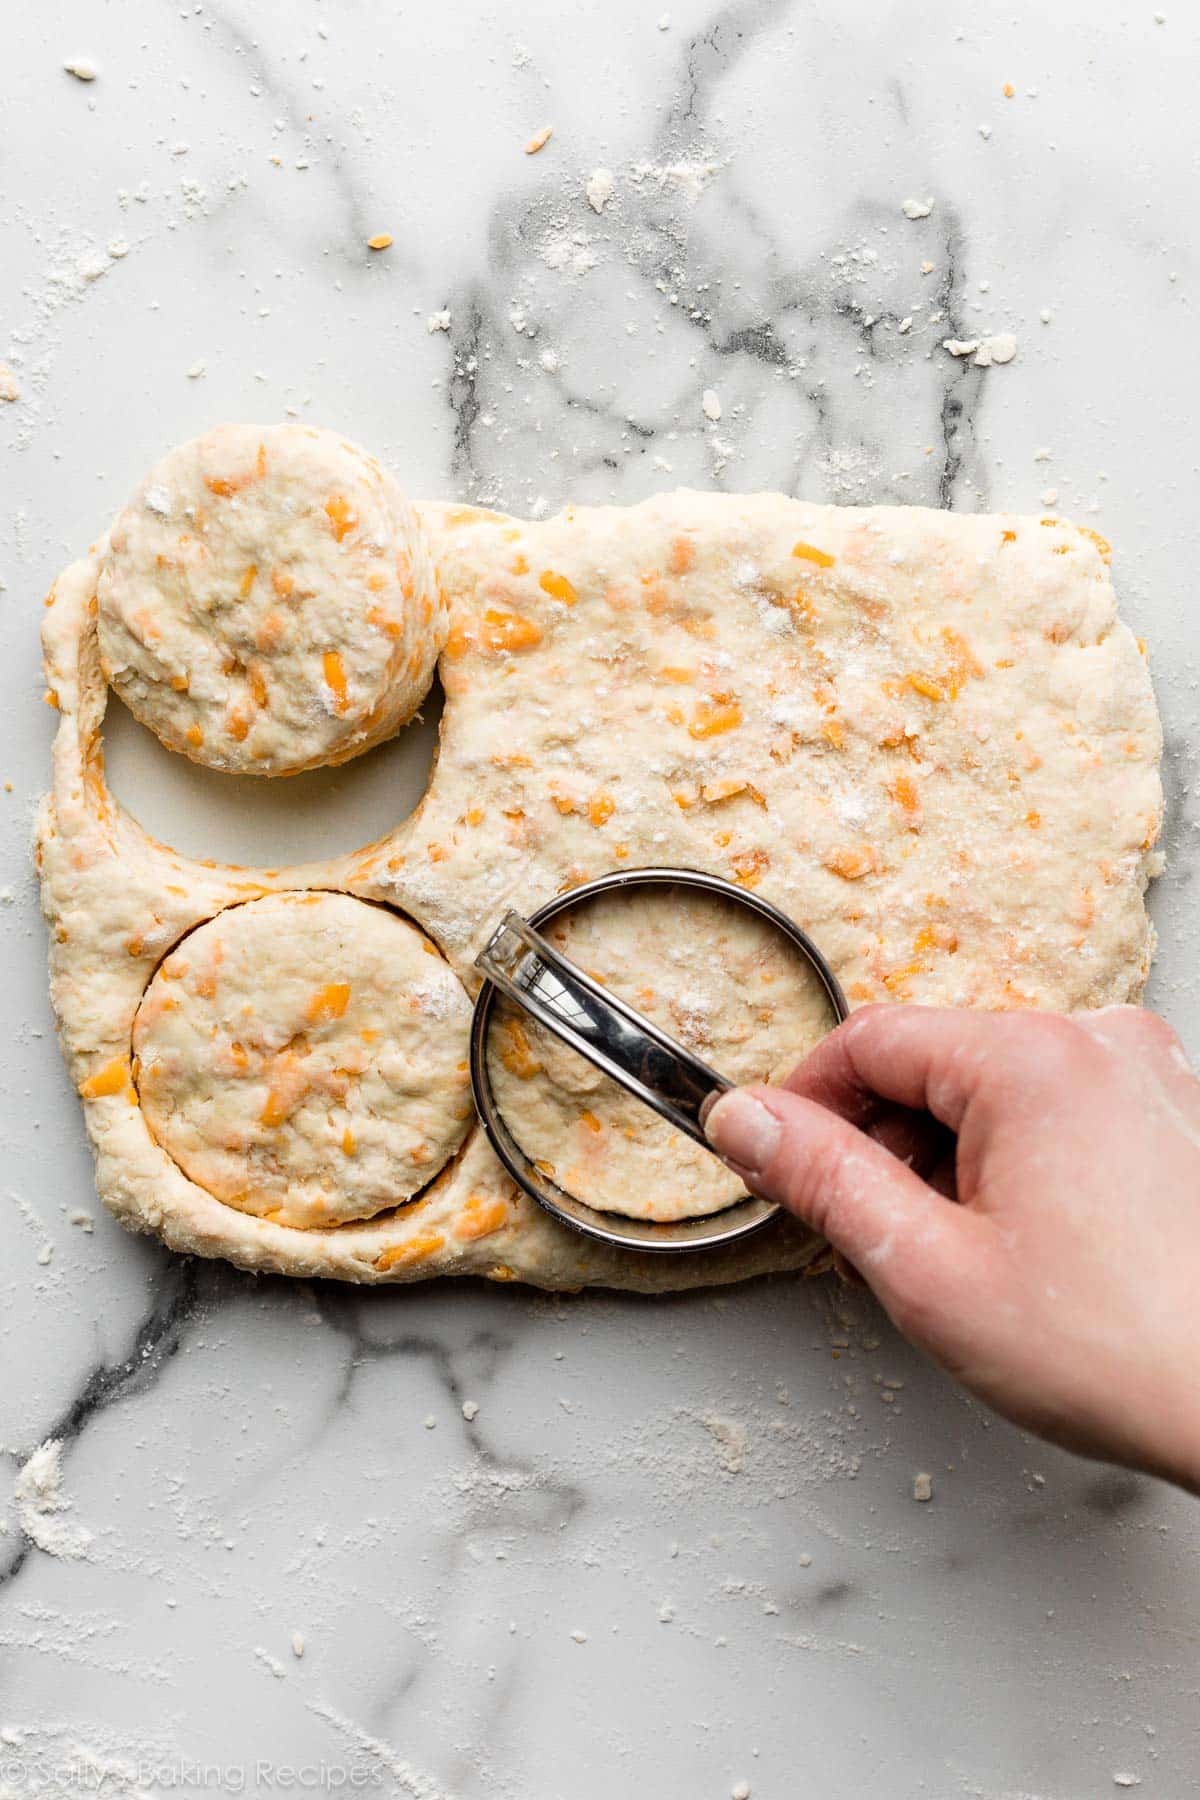
No Twisting = Super Tall Biscuits
When cutting the dough with a biscuit cutter, don’t twist the cutter. Twisting it will seal off the biscuit edges, preventing the biscuits from fully rising.
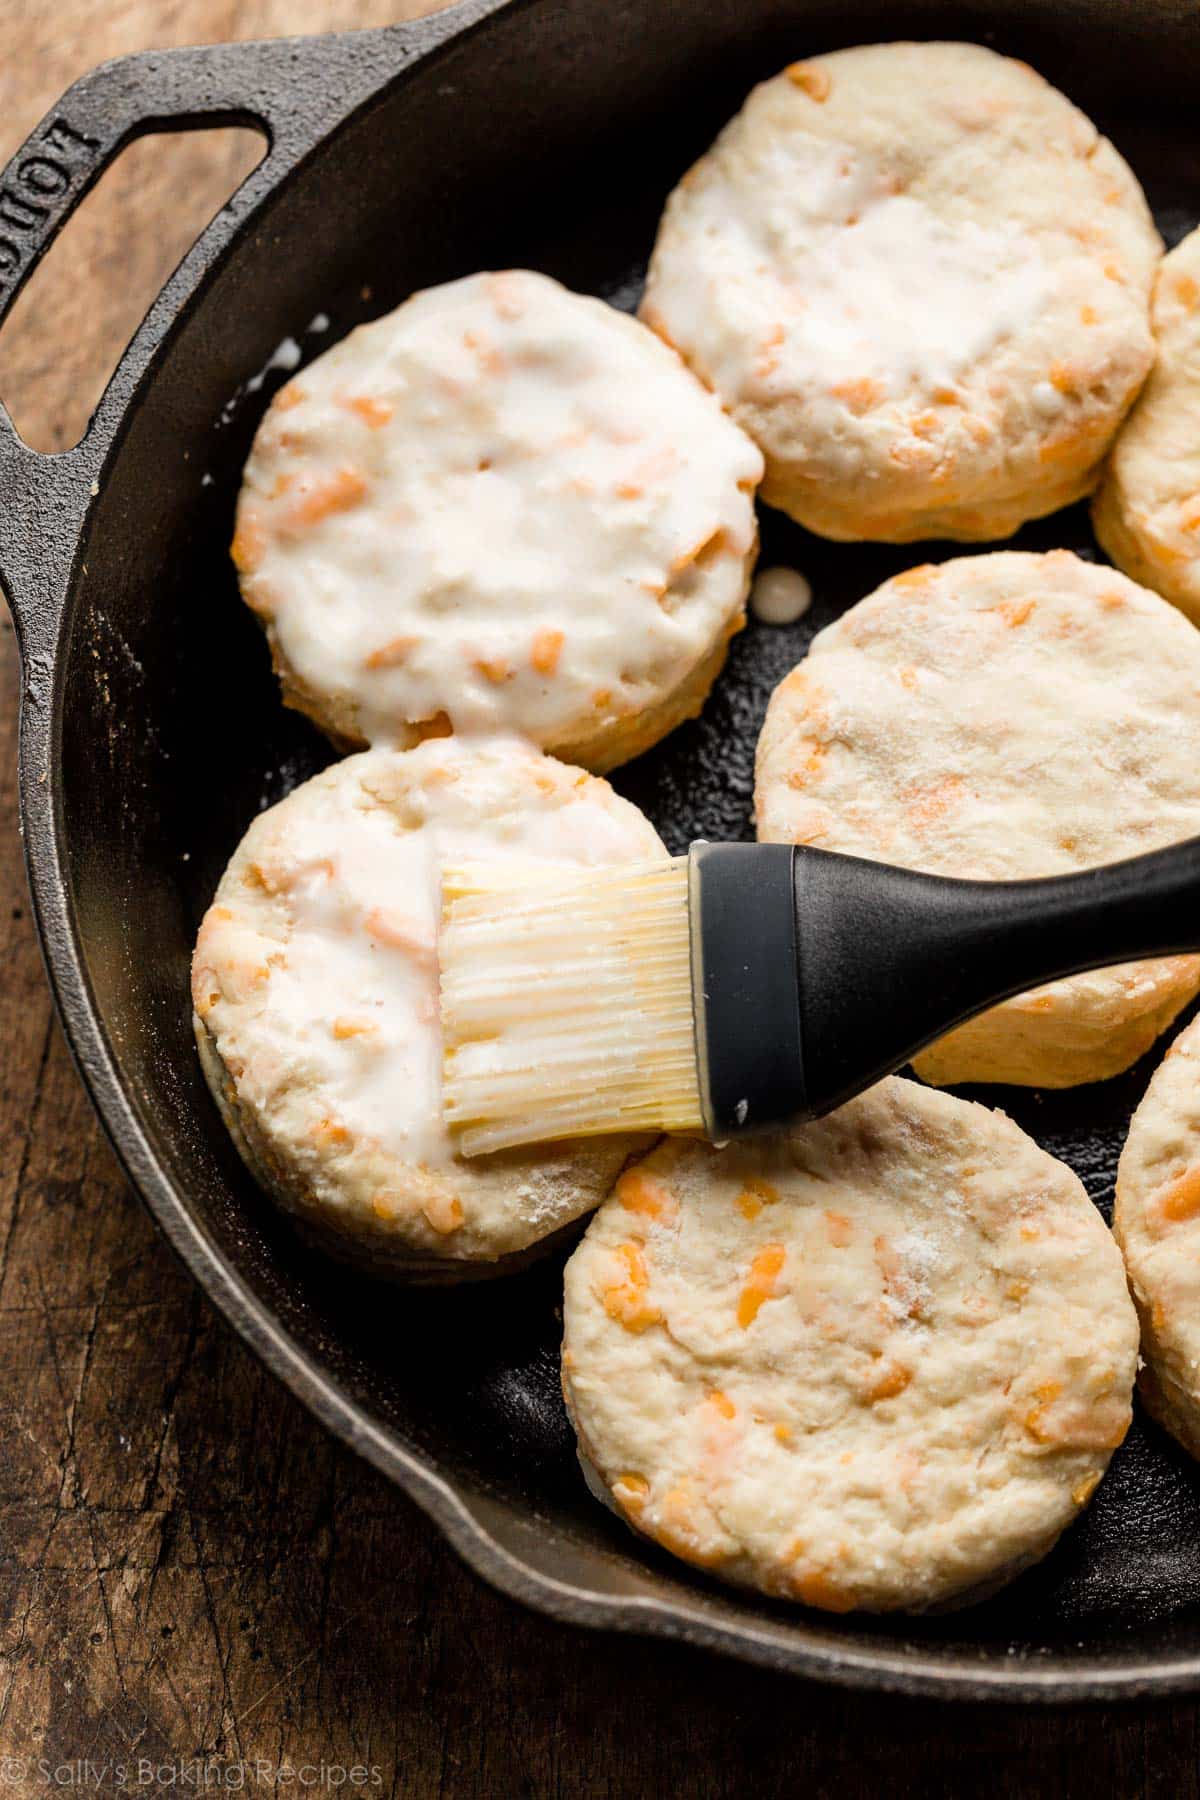
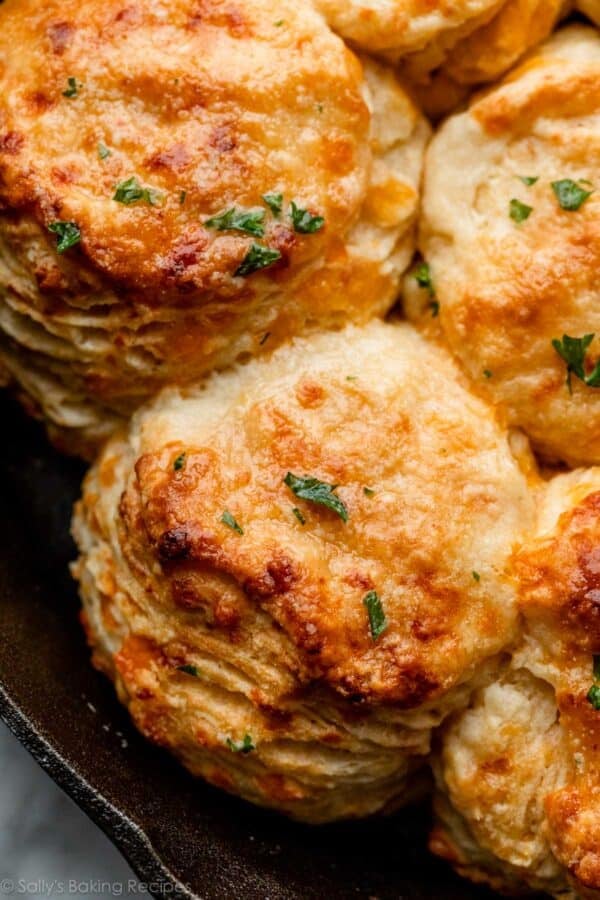
Snug as a Bug = Super Tall Biscuits
Biscuits rise up nice and tall when they’re pressed snuggly against one another. Arrange them tightly in a cast iron skillet or on a lined baking sheet/baking pan. A cast iron skillet helps produce a super crisp bottom, so I prefer it over a baking sheet or pan. I use this 10-inch cast iron skillet for biscuits.
Before baking, brush the biscuits with a little extra buttermilk. Why? This gives the biscuits a slightly crispier crust.
After baking, brush with melted garlic parsley butter. Why? Because yum. The garlic butter seeps down into all the crevices and, obviously, makes the tops extra buttery.

You brush finished breadsticks with something similar.
So let’s get all this straight. There are 2 things you need to remember for flaky biscuits and 2 things you need to remember for tall biscuits. You will (1) use cold butter in the dough and (2) fold the dough together a few times to help guarantee lots of flakes. Plus, you (3) won’t twist the biscuit cutter and (4) you’ll place the biscuits close together so they rise tall in the oven.
And 2 things to remember for deliciously flavored biscuits: cheddar + garlic. 🙂
What to Serve With Cheddar Biscuits
These flavorful cheddar biscuits are such a versatile side. They’re as welcome with Thanksgiving recipes next to turkey and green bean casserole as they are at Easter brunch alongside bacon and eggs or quiche. And they can go from accompanying baked lemon garlic salmon, cilantro lime chicken, or vegetarian pumpkin chili for dinner, to making a phenomenal breakfast sandwich with breakfast sausage the next morning.
If you enjoy savory baking recipes like this one, you’ll love these homemade ham & cheese pockets, this cheese bread, and these pizza pull apart rolls.
Print
Homemade Cheddar Biscuits
- Prep Time: 20 minutes
- Cook Time: 20 minutes
- Total Time: 40 minutes
- Yield: 8-10 biscuits
- Category: Bread
- Method: Baking
- Cuisine: American
Description
These deliciously simple homemade cheddar biscuits easily rival Red Lobster’s cheddar bay biscuits. Baked in only about 20 minutes, they’re a must-try for brunch or dinnertime.
Ingredients
- 2 and 1/2 cups (313g) all-purpose flour (spooned & leveled), plus more as needed for hands and work surface
- 1 Tablespoon aluminum-free baking powder (yes, Tablespoon)
- 1/2 teaspoon baking soda
- 1 teaspoon garlic powder
- 1 teaspoon salt
- 1/2 cup (8 Tbsp; 113g) unsalted butter, cubed and very cold (see Note)
- 1 cup + 2 Tablespoons (270ml) cold buttermilk, divided
- 2 teaspoons (14g) honey
- 1 cup (125g) shredded cheddar cheese
Topping
- 2 Tablespoons (28g) unsalted butter, melted
- 1/4 teaspoon garlic powder
- 1 teaspoon dried or fresh chopped parsley
Instructions
- Preheat oven to 425°F (218°C).
- Make the biscuits: Place the flour, baking powder, baking soda, garlic powder, and salt together in a large bowl or in a large food processor. Whisk or pulse until combined. Add the cubed butter and cut into the dry ingredients with a pastry cutter or by pulsing several times in the processor. Cut/pulse until coarse crumbs form. See photo in blog post for a visual. If you used a food processor, pour the mixture into a large bowl.
- Fold in the shredded cheese. Make a well in the center of the mixture. Pour 1 cup (240ml) buttermilk and drizzle honey on top. Fold everything together with a large spoon or spatula until it begins to come together. Do not overwork the dough. The dough will be shaggy and crumbly with some wet spots. See photo in blog post for a visual.
- Pour the dough and any dough crumbles onto a floured work surface and gently bring together with generously floured hands. The dough will become sticky as you bring it together. Have extra flour nearby and use it often to flour your hands and work surface in this step. Using floured hands, flatten into a 3/4-inch-thick rectangle as best you can. Fold one side into the center, then the other side on top. Turn the dough horizontally. Gently flatten into a 3/4-inch-thick rectangle again. Repeat the folding again. Turn the dough horizontally one more time. Gently flatten into a 3/4-inch-thick rectangle. Repeat the folding one last time. Flatten into the final 3/4-inch-thick rectangle.
- Cut into 2.5- or 3-inch circles with a biscuit cutter. (Tip: Do not twist the biscuit cutter when pressing down into the dough because this seals off the edges of the biscuit, which prevents them from fully rising.) Re-roll scraps until all the dough is used. You should have about 8–10 biscuits. Arrange in a 10-inch cast iron skillet (see Note) or close together on a parchment paper-lined baking sheet. Make sure the biscuits are touching.
- Brush the tops with remaining buttermilk. Bake for 18–22 minutes or until tops are golden brown. Remove from the oven.
- Make the topping: Mix the topping ingredients together. Generously brush on the warm biscuits, and serve warm.
- Cover leftovers tightly and store at room temperature or in the refrigerator for up to 5 days.
Notes
- Make Ahead & Freezing Instructions: Baked biscuits freeze well for up to 3 months. Thaw at room temperature or in the refrigerator, then warm up to your liking before serving. You can also freeze the biscuit dough. Prepare the dough in steps 2 through 4. Wrap up tightly in plastic wrap (plastic wrap is best for freshness) and freeze for up to 3 months. Thaw overnight in the refrigerator, then continue with step 5. Also, after step 4, you can wrap the dough in plastic wrap and refrigerate for up to 2 days before continuing with step 5.
- Special Tools (affiliate links): Pastry Cutter or Food Processor | Glass Mixing Bowl | Silicone Spatula | 2.5- or 3-inch Biscuit Cutter | 10-inch Cast Iron Skillet | Pastry Brush
- Baking Powder & Baking Soda: This recipe used to call for 2 Tbsp of baking powder and no baking soda, like my regular biscuits recipe. And that still absolutely works! However, to avoid a chemical aftertaste, which *can* be present if you’re not using aluminum free baking powder, I swapped the leavener to 1 Tbsp baking powder and 1/2 teaspoon baking soda. (I usually use Clabber Girl brand and though the ingredients state aluminum, I’ve never noticed an aluminum aftertaste.)
- Butter in Biscuit Dough: Cut into 1/2-inch cubes. Keep butter as cold as possible until you need it. I recommend placing the cubed butter in the freezer for about 15 minutes before you begin.
- Buttermilk: You can substitute whole milk for buttermilk if desired. However, if you’d like the tangy flavor, which I highly recommend, you can make your own DIY buttermilk substitute. Add 2 teaspoons of fresh lemon juice or white vinegar to a liquid measuring cup. Add enough milk to make 1 cup. (You need 1 cup in the recipe, plus 2 Tablespoons for brushing—you can use regular milk to brush on top.) Whisk together, then let sit for 5 minutes before using in the recipe. Whole milk is best for the DIY buttermilk substitute, though lower fat or nondairy milks work in a pinch. (In my testing, the biscuits don’t taste as rich or rise quite as tall using lower fat or nondairy milks.)
- Cast Iron Skillet: If your cast iron skillet isn’t well seasoned, I recommend greasing it with a little vegetable oil or melted butter. Brush a thin layer of either on the bottom and around the sides. No need to heat the cast iron skillet before using, though you certainly can. Place in the preheated oven for 15 minutes before arranging the shaped biscuits in it.


Reader Comments and Reviews
made these for the first time (first time making biscuits ever also) and I loved how easy the recipe was to follow! they turned out amazing and me and my boyfriend nearly ate the entire batch in one day!
This recipe looks absolutely delicious. Can’t wait to try it!! I’ve been making your recipes for a long time and love them all❤️ Quick question…when you freeze, baked biscuits, do you put the topping on and then freeze? Or do you wait until they are thawed, and put the topping on and then warm in the oven? Also when warming in the oven…at what temp and how long? Thank you! Brianne
Hi Brianne! We would add the butter topping after re-warming the biscuits. Warm to your liking – usually around 300-350 degrees F until warm.
Is it fine to double this recipe or do I need to make it twice?
Hi Amy! We would make it twice for best results.
These biscuits were amazing and so quick and easy to make. The folding and turning seemed intimidating, but was actually super easy with my bench scraper. I have saved this recipe!
Hi – what if I don’t have a cast iron skillet? Is a glass baking dish ok? Or a nonstick bread pan? How high do the edges need to be?
Hi Sara, you can use a lined baking sheet/baking pan instead of the cast iron skillet. Make sure the biscuits are still touching one another to help achieve those high sides.
My husband said these were much better than Red Lobster! Loved them.
Clarification about baking powder
If using the Clabber Girl brand, is it necessary to add the baking soda?
Yes!
Sally, what are your thoughts on cutting the dough into squares with a bench scraper if we don’t have a biscuit cutter? Thanks!
Hi Michelle, that should work just fine!
The recipe was great, I added another half cup of cheese, only because I didn’t want any left over. it turned out great. I made them in my cast iron frying pan, the bottoms came out nice and crispy. I did rub shortening on the bottom of the pan first. Thank you for the recipe.
My wife’s Grandmother Georgia made buttermilk biscuits that drew all to the table. She passed a few years back and my wife has lamented for her biscuits, so when I found this recipe it had been enough time to try to give my wife a biscuit in an attempt to honor a special woman that we all miss.
I’ll never try to equal those biscuits but these are very good and we have had them every weekend since finding your recipe, they are now my biscuits to remember Georgia.
Thank you for the Memories of times gone by and yet to come.
Thank you so much for giving these biscuits a try, Chip. So glad this recipe brings back such fond memories!
Hi Sally,
Now a septuagenarian, have only been baking for my family for the last ten years, starting with your homemade breads – I LOVE it, and so does the family! You have helped me understand baking processes and what steps are vital for a great product, like room temperature staples and how yeast works. I have a terrible time making pie dough! Never seems to be “perfect”. Could you publish a detailed video to show exactly how you cut butter into dry ingredients? Maybe on pie crusts and your cheddar, garlic buttermilk biscuits? I am sometimes “okay” doing it but I make a huge mess and wear myself out. :>D
Hi Pat, the video on our All Butter Pie Crust recipe should show you exactly what you’re looking for!
This looks delicious! Can I use fresh garlic instead of powdered or in addition to powdered??
Hi Robin, Absolutely. Use 1-2 teaspoons minced garlic in the dough (as well as what’s called for in the topping). Hope you enjoy the biscuits!
Could I make ahead and cut out biscuits to bake 3 days later? If not, any tips for reheating?
Hi Amy, for that amount of time, we’d recommend freezing the cut biscuits instead. If doing that, we do recommend baking them thawed, not frozen. After shaping them, place them on a plate or in a freezer-friendly container, cover tightly, then freeze for up to 3 months. Thaw in the refrigerator, then bake as directed. Or, you can make the biscuits and reheat in the microwave or oven to your liking. Enjoy!
Thanks! Another great and straight forward recipe- I have yet to make one of your recipes that wasn’t delicious and spot on!
Can I use chickpea flour?
Hi Verna, we haven’t tested it, so we’re unsure of the results. For best results, we recommend sticking to all-purpose flour as written.
Can you cut back on butter a little?
Hi Mary Ann, we don’t recommend decreasing the butter in the biscuits. You could decrease the topping a bit if you wish, but the biscuits won’t be quite as flavorful.
I tried this recipe this evening and it turned out great. I’d added more cheddar so the dough was a little wetter and I made them as drop style biscuits on a baking sheet lined with parchment. Will definitely make again.
These biscuits are amazing! My biscuits usually are hit or miss but these are the best I have ever made! Thank you Sally! (Made your delicious brownies for dessert too, everything I have tried of yours is delicious!)
I make a lot of biscuits, for one reason or another, my cheddar biscuits don’t rise well. These came out perfect. I skipped the garlic powder.
I just made these. They look like your picture. I haven’t tasted one yet, but they smell and look wonderful!
My fault for not reading all the way through the instructions but I if they are to be like Red Lobster, they are dropped from a scoop, not folding the dough six way to Sunday and using a biscuit cutter.
Fantastic! The only thing I’ve EVER made that my husband rated a 10/10. Absolutely no edits, do everything as written and they will come out fantastic!!
Also, I really appreciated all the pro tips, those were very helpful. Thanks for those too!
With all the wordage around baking soda and baking powder I accidentally reversed the amounts. Perhaps a separate paragraph for a crusade against aluminum please.
This recipe was a hit today at lunch, served with my homemade Tomato Soup. I’m saving the recipe for future use, and sharing it, because my guests asked for the recipe. Next time, I will be adding some bacon and serving these with eggs for breakfast. I also like the idea that another person had re: serving the biscuits with bacon on the side, with eggs ready to cook, so folks can make their own breakfast sandwich. Great idear! Thanks!
Could I add zucchini to this recipe, similar to your Zucchini Biscuits?
Hi Claire, instead, we’d recommend using the zucchini biscuits recipe and swapping the parmesan cheese there for cheddar cheese. You can also use the topping here instead of the buttermilk in those. Enjoy!
Can this recipe be made with gluten free flour?
Hi Barbara, we haven’t tested a gluten-free version of these biscuits. Although some readers report using an all-purpose 1:1 gluten-free flour in many of our recipes with success, you should expect slightly different results anytime you substitute ingredients.
Would this work with white whole wheat flour?
Hi Rebecca, whole wheat flour will make the biscuits a bit heavier and drier. If you want to try it, you might start with swapping just half of the all-purpose flour with whole wheat, and then adjust from there for future batches.
Another successful recipe ! I look like a wizard in the baking department. I have always struggled with flaky biscuits and these were amazing. I tell everyone about Sally’s baking addiction
I served this with a poached egg and bacon for lunch – Yum Yum!
Hi! I am looking forward to making these to serve alongside a seafood boil at the beach next week. I saw the notes about making in advance, either by freezing the dough (before cutting into biscuits) or by freezing baked biscuits. I was wondering if the unbaked cut biscuits can be frozen (after cutting into biscuits, but before baking)? This is what I do with my breakfast biscuit recipe. Thank you!
Hi Stephanie, you can freeze the shaped biscuits, but we do recommend baking them thawed, not frozen. After shaping them, place them on a plate or in a freezer-friendly container, cover tightly, then freeze for up to 3 months. Thaw in the refrigerator, then bake as directed. Enjoy!
I didn’t really like the garlic flavor. They came out very flaky and nice. Next time I won’t use garlic powder.
This is a flavorful, easy, and quick biscuit! My family loved it! I used fresh basil, dried parsley, and Parmesan cheese. Temped it at 197 degrees and would wait a bit longer next time. A keeper!
These came out amazing! I used a bench scraper to cut into smaller squares and they came out incredible. I’ve made them twice already and will keep this recipe forever.