

Make this simple 4-ingredient sweet salted caramel sauce at home with ease—no candy thermometer required! Ready in just 10 minutes, this rich homemade caramel is perfect for drizzling over cakes, cupcakes, cookies, pound cake, ice cream, cheesecake, scones, salted caramel apple pie, and more!
I originally published this recipe in 2013 and have since added new photos, a video tutorial, and additional success tips. This recipe is such a fan favorite, that it deserved a spot in print! You’ll also find this recipe in my cookbook, Sally’s Baking 101.

What once intimidated me became the subject of my 2nd cookbook: Sally’s Candy Addiction. As it turns out, homemade candy isn’t all that difficult. And salted caramel sauce is one of the easiest. There’s only 4 ingredients required: sugar, butter, heavy cream, and salt.
This salted caramel is a reader favorite recipe, consistently marking its spot in the top 10 most popular recipes on my website and published in 2 of my cookbooks. It’s sweet, buttery, and tastes phenomenal on anything it touches. (Though you really only need a spoon to enjoy.)
Trust me, after trying this 1 time, you’ll be hooked like the rest of us!
How to Make Salted Caramel
Use the written out instructions below, but here’s the basic process: The first step is to melt sugar, which is called caramelization. This requires 1 small (stainless steel, not nonstick) pot/saucepan and a wooden spoon. Stir until melted and caramelized. Stir in butter, then stir in heavy cream and let it boil for 1 minute. Finally, add the salt.

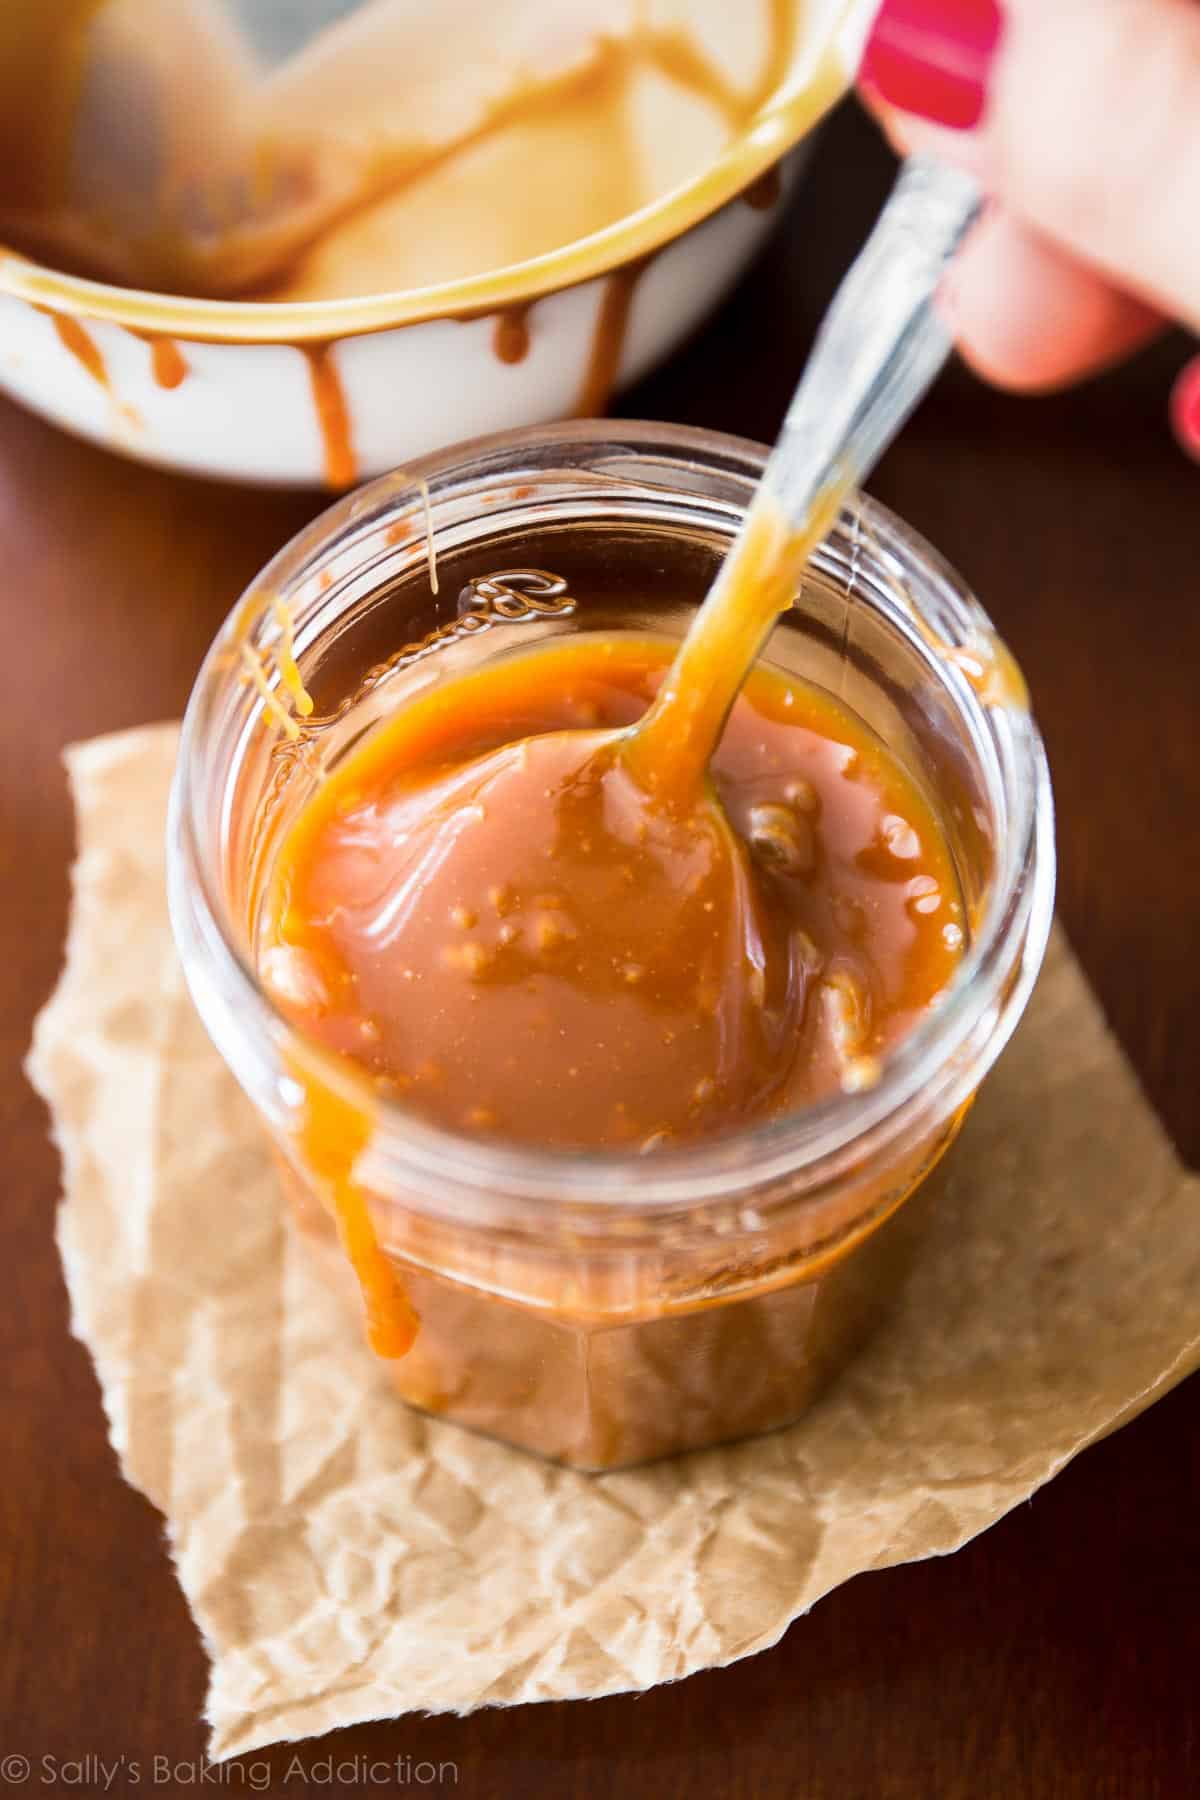
That’s it, the caramel is done.
As always, use caution when cooking over the stove because the hot liquid, butter, and cream may splatter. If needed, kitchen gloves come in handy.

No Candy Thermometer Required
Unlike most caramel recipes, this salted caramel doesn’t require a candy thermometer. Instead, I encourage you to follow the recipe and use your eyes to determine when to add the next ingredient. If you’d like to be precise and use a candy thermometer, the temperature will rise to about 220°F (104°C), and that’s when the caramel is done on the stove.
The caramel thickens as it cools.
What to Eat With Salted Caramel?
You will love homemade salted caramel with sweets like cinnamon rolls, cheesecake, and apple pie bars. Use it as a dip for apples, spoon over ice cream, or pour into decorated jars and gift it for the holidays.
The possibilities for salted caramel are endless:
- Turtle Brownies
- Burnt Sugar Caramel Cake
- Caramel Apple Cheesecake Pie
- Caramel Coconut Macaroon Thumbprints
- Chocolate Caramel Toffee Icebox Slice & Bake Cookies
- Butterscotch Pudding
- Snickers Caramel Tart
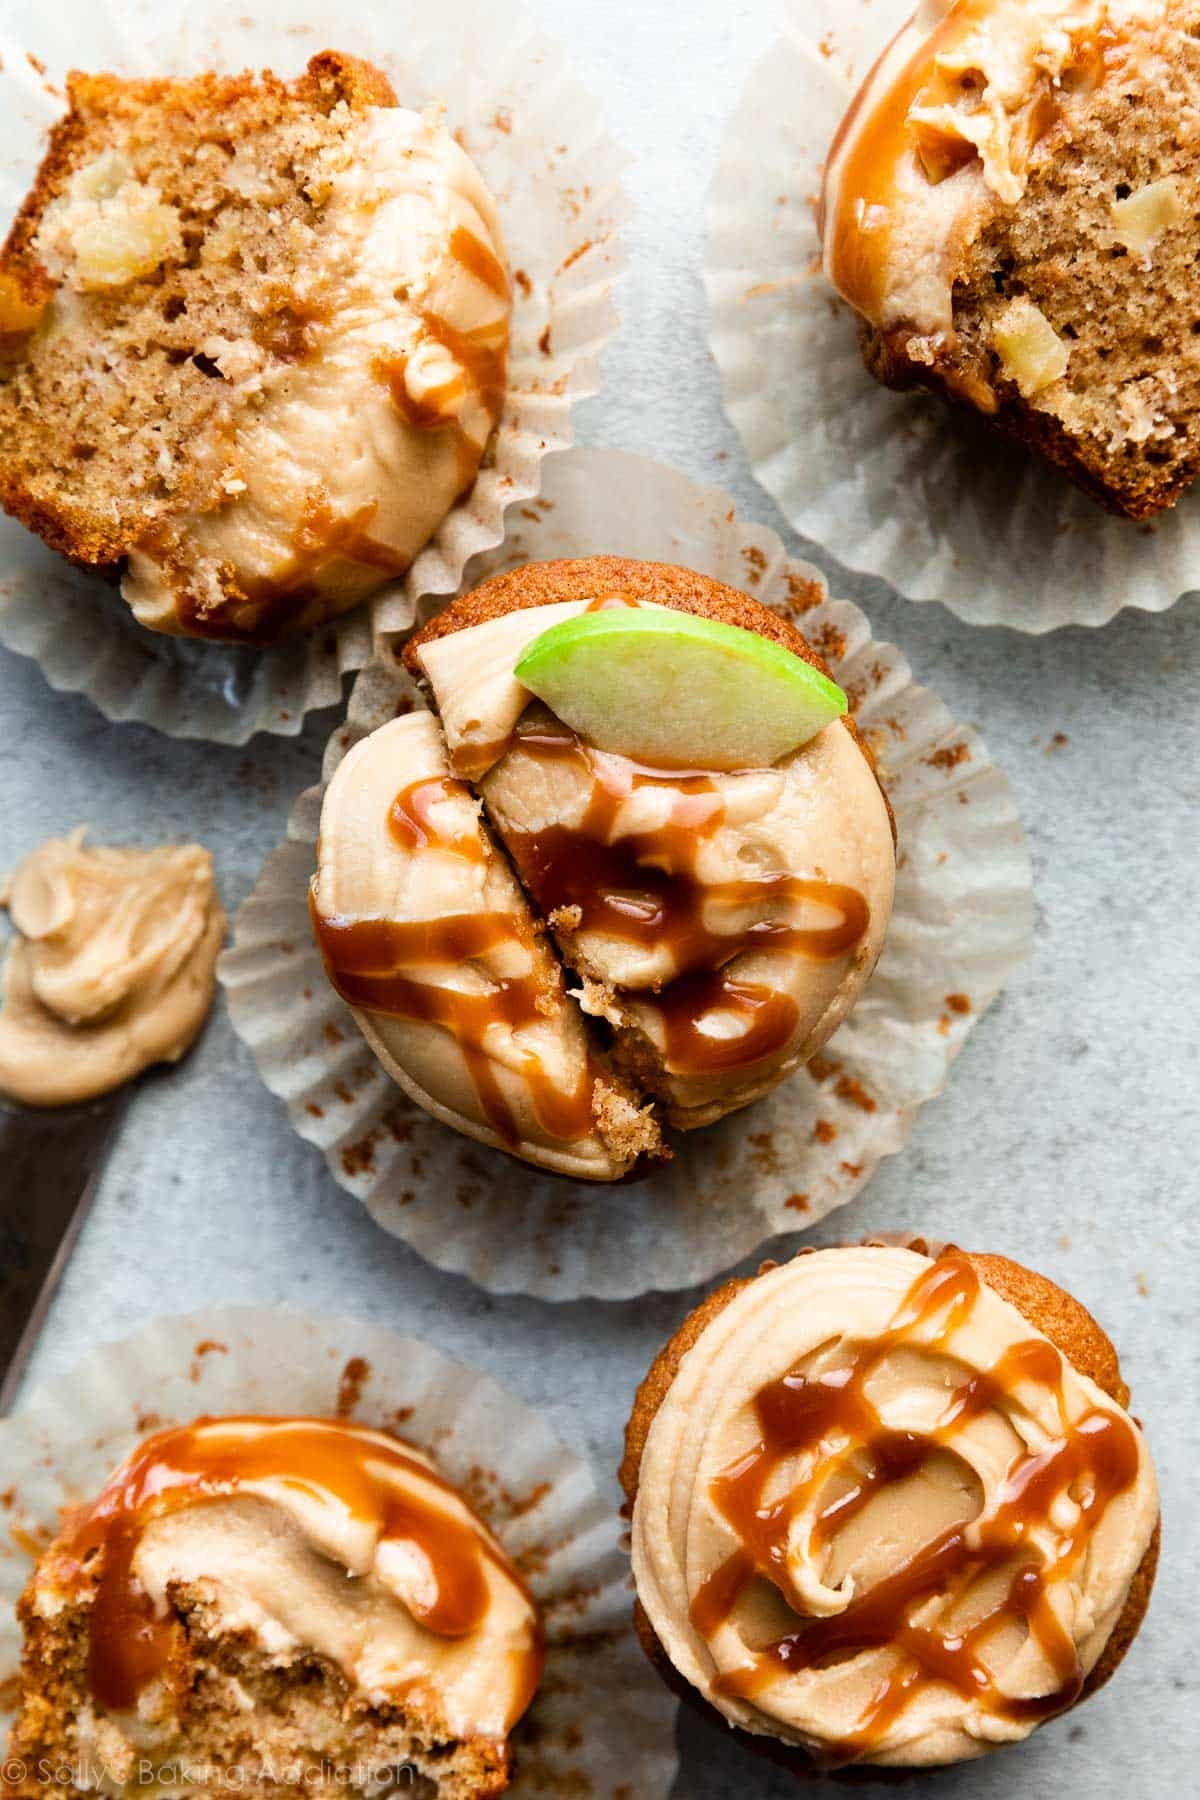
- Apple Cupcakes (pictured above)
- Caramel Dipped Pretzels
- Pumpkin Swirl Cheesecake
- Salted Caramel Apple Pie & Apple Cake
- Cheesecake Pie
- Chocolate Bread Pudding
- Apple Turnovers
- Caramel Turtle Cheesecake
- Apple Cider French Toast
- Dutch Baby Pancake
- Cake Mix Chocolate Cupcakes
- Skillet Brownie
- Apple Cobbler
- Apple Cinnamon Scones
- Topping for Homemade Eclairs
- Drizzled on cookies like Shortbread, Brownie Cookies, and Snickerdoodles
- Drizzle over No-Churn Peach Cheesecake Ice Cream
- As a filling for your favorite cupcake recipe (see my How to Fill Cupcakes post for all the details)
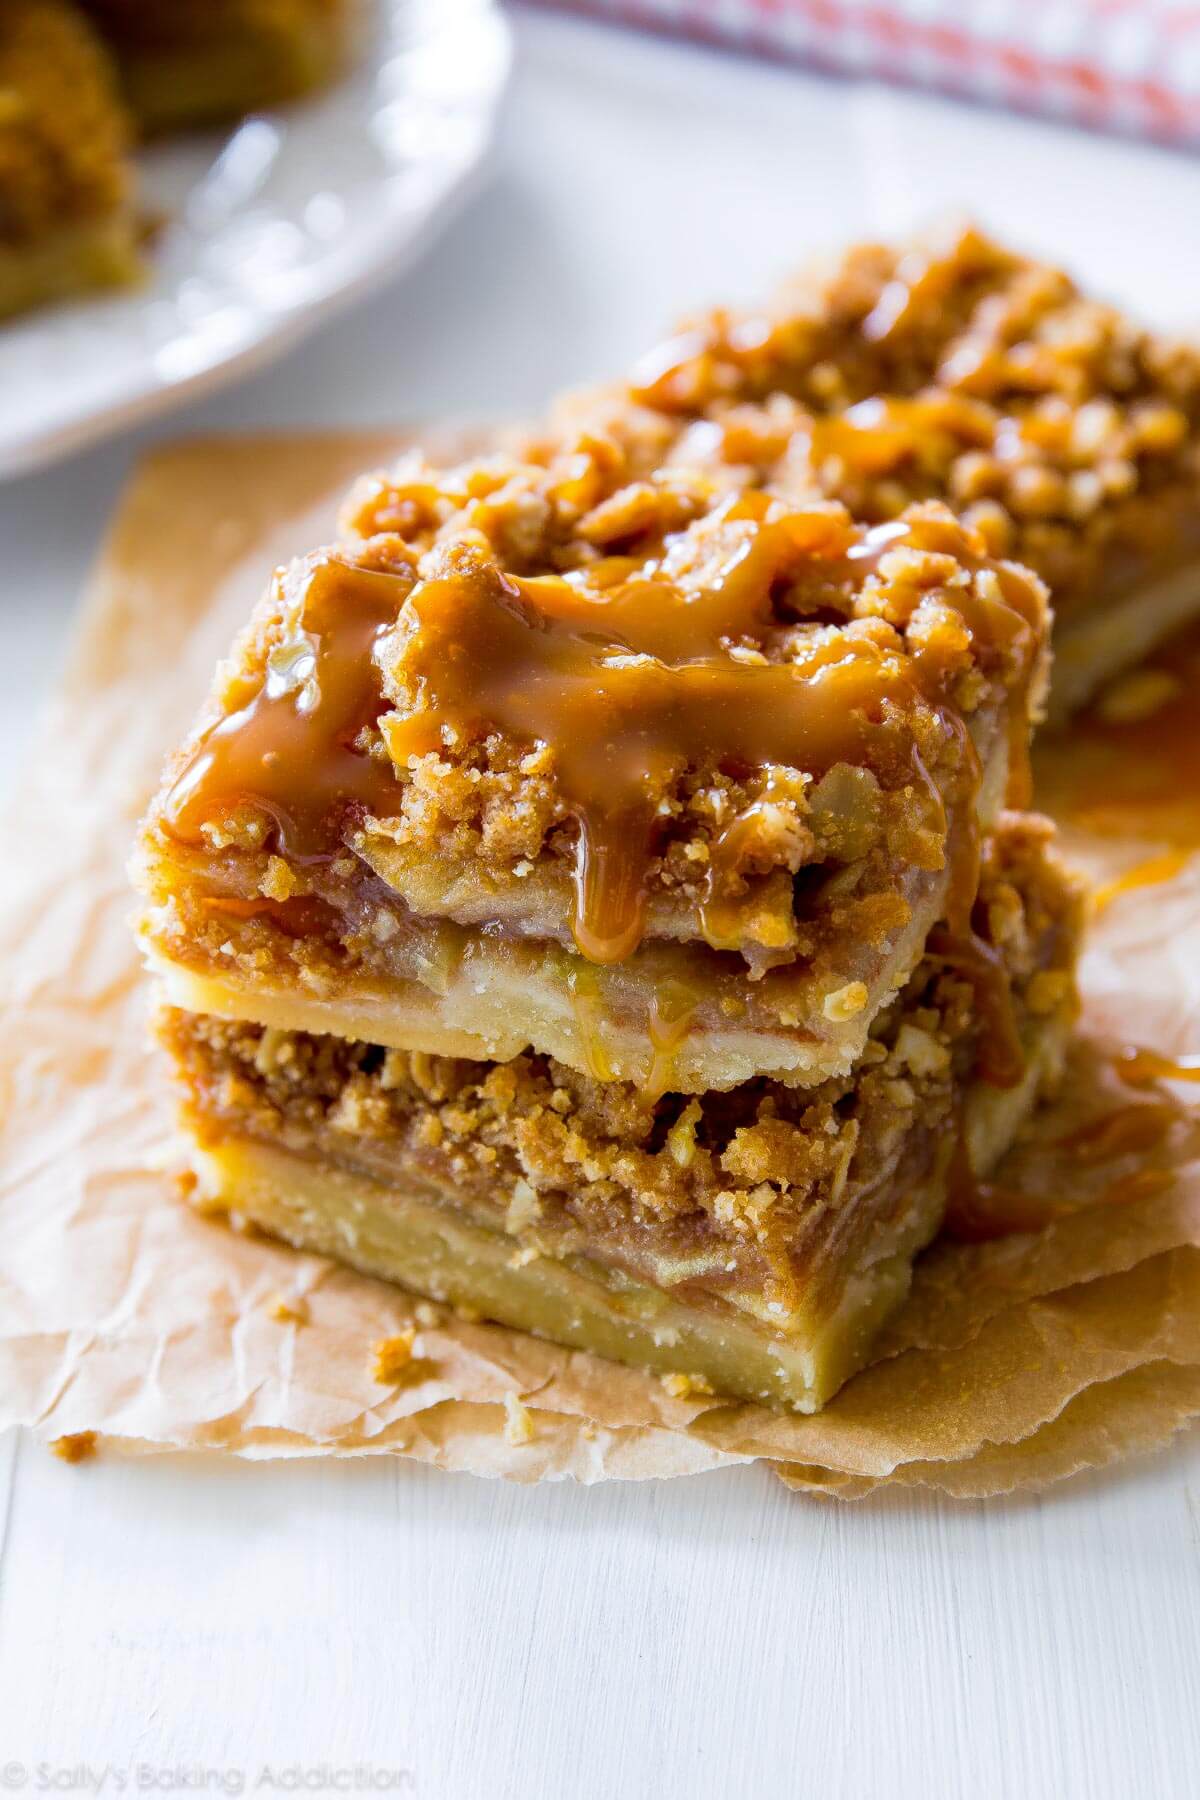
- Butterscotch Pie & Apple Pie Bars (both pictured below)

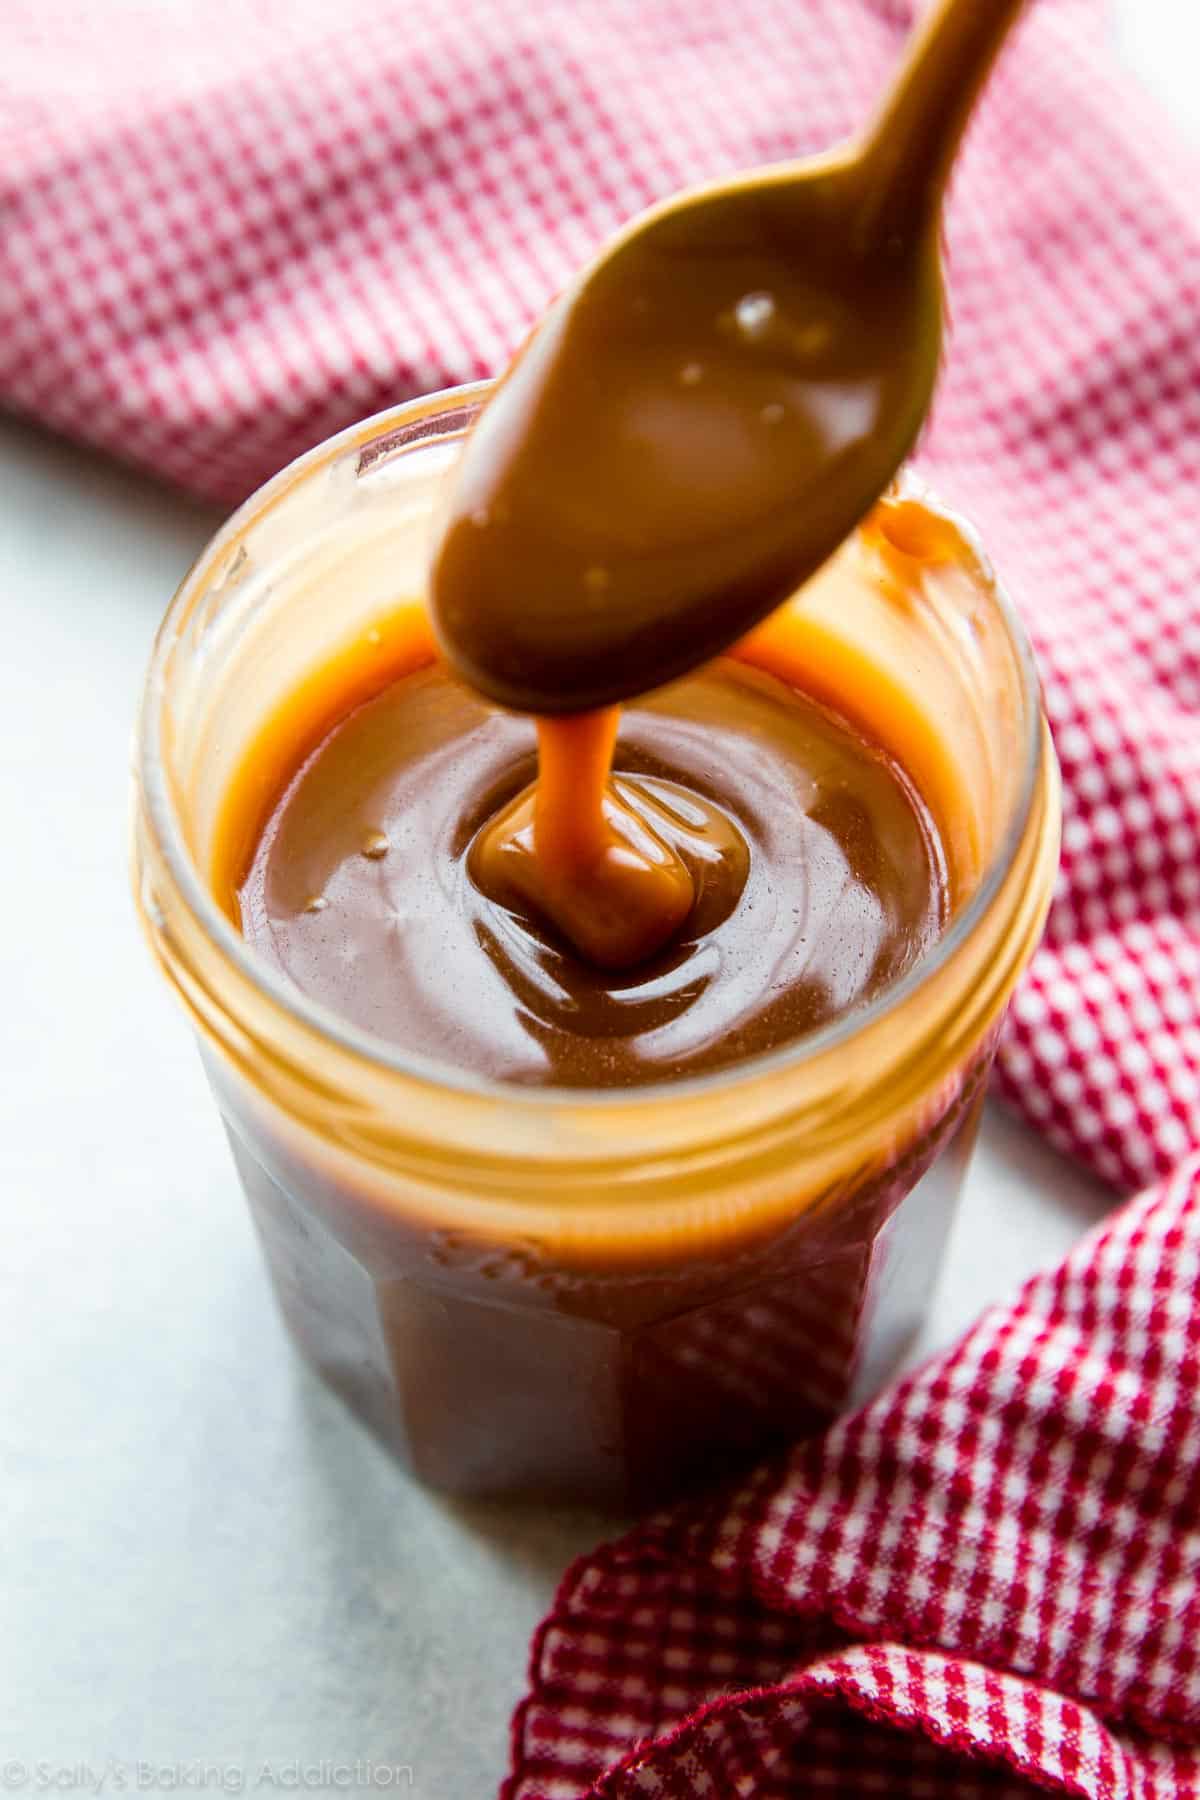
What Is the Consistency Like?
The caramel is liquid as it comes off heat. As the caramel cools, it solidifies into a chewy texture. After refrigerating, the caramel is hard and you must heat it up to bring it back to a liquid consistency. Do you need a thinner caramel? Feel free to add 2 more Tablespoons of heavy cream to the recipe.
Can I Skip the Salt to Make Regular Caramel?
If you’re looking for a sweet caramel, rather than a salted caramel, you can still use this recipe. Do not cut out the salt completely because the caramel’s sweetness will be overpowering. Instead, reduce the salt to 1/2 teaspoon.
No. You can’t really turn this sauce into a homemade wrapped candy. Instead, try my soft caramel candies recipe which is a little different.
This caramel is not thick enough to coat apples for caramel apples. Instead, I recommend my homemade caramel apples recipe.
Yes. When the caramel is done, it’s thin and liquid. As the caramel cools, it thickens. After refrigerating, it thickens even more and must be reheated to thin out and use as a topping or dip.
This caramel isn’t ideal to layer between cake layers because it will just spill out the sides under the weight of top layers. However, it’s great as a filling for cupcakes, such as these chocolate caramel coconut cupcakes. See How To Fill Cupcakes for more info!
How to Store Salted Caramel
After the caramel cools down, pour it into a glass jar or container. Refrigerate for up to 1 month. The caramel solidifies as it cools, but you can reheat in the microwave or on the stove so it’s liquid again. You can freeze the salted caramel, too. Freeze in an airtight container for up to 3 months. Thaw in the refrigerator or at room temperature, then warm up before using.
Print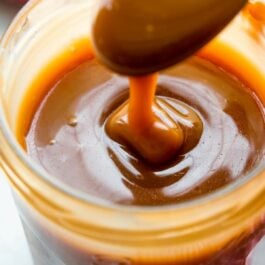
Homemade Salted Caramel Recipe
- Prep Time: 5 minutes
- Cook Time: 15 minutes
- Total Time: 20 minutes
- Yield: 1 cup (290g)
- Category: Dessert
- Method: Cooking
- Cuisine: American
Description
Made from only 4 simple ingredients, this homemade caramel is salty, sweet, and irresistibly buttery. No candy thermometer required and the possibilities for serving are endless. (Though just a spoon is acceptable!) Use caution as the cooking caramel may splatter. Stand back and wear kitchen gloves if desired. Review recipe notes prior to beginning. This recipe is also in my cookbook, Sally’s Baking 101.
Ingredients
- 1 cup (200g) granulated sugar (make sure it’s labeled “pure cane”)*
- 6 Tablespoons (85g) unsalted butter, at room temperature and cut into 6 pieces
- 1/2 cup (120g/ml) heavy cream, at room temperature
- 1 teaspoon salt
Instructions
- In a medium heavy-duty stainless steel saucepan (do not use nonstick) over medium heat, cook the sugar, stirring constantly with a wooden spoon or heat-safe silicone spatula. Sugar will form clumps and eventually melt into a thick brown, amber-colored liquid as you continue to stir. On my stove, this takes about 6 minutes. Stir constantly, especially around the bottom edges, and be careful not to let it burn.

- Once the sugar is completely melted, reduce the heat to low and stir in the butter. Be careful in this step because the caramel will bubble rapidly when the butter is added. (If you’re nervous for splatter, wear kitchen gloves.) Cook and stir constantly until the butter is melted and well combined. If you notice the butter separating or if the sugar clumps up, remove the pan from heat and vigorously whisk to combine it again. Keep whisking until it comes back together, even if it takes 3–4 minutes. It will eventually—just keep whisking. Return to heat when it’s combined again.

- Very slowly and carefully pour in the heavy cream, stirring constantly. Since the heavy cream is colder than the hot caramel, the mixture will rapidly bubble and steam when added. When all of the heavy cream has been added, stop stirring, increase the heat to medium, and let it boil for 1 minute. It will rise in the pan as it boils. If you’d like to be precise and use a candy thermometer, the temperature should reach 220°F (104°C).

- Remove from heat and stir in the salt. The caramel will be a thin liquid at this point. Allow to slightly cool and thicken before using. Caramel thickens considerably as it cools.

- Cover tightly and store in the refrigerator for up to 1 month. Caramel solidifies in the refrigerator. Reheat in the microwave or on the stove to desired consistency.


Notes
- Make Ahead & Freezing Instructions: You can make this caramel in advance. Make sure it is covered tightly and store it for up to 1 month in the refrigerator. Warm the caramel up for a few seconds before using in a recipe. See “What Is the Texture of This Salted Caramel?” in the post above. This caramel is OK at room temperature for a day if you’re traveling or gifting it. You can freeze the salted caramel, too. Freeze in an airtight container for up to 3 months. Thaw in the refrigerator or at room temperature, then warm up before using.
- Special Tools (affiliate links): Medium Heavy-Duty Saucepan (do not use nonstick) | Wooden Spoon | Candy Thermometer (like this one or this one)—optional
- Sugar: This recipe is most successful using granulated sugar that’s labeled “pure cane” on the packaging. I usually use and recommend Domino brand regular granulated sugar which says “pure cane granulated” on the packaging.
- Heavy Cream: Heavy cream (approximately 36% milk fat) may also be sold as whipping cream. Light whipping cream (30% milk fat), or double cream (48% milk fat) may be substituted. Do not use half-and-half or milk. Room-temperature cream is best.
- Salt: Use regular table salt or kosher salt. If using larger flaky salt, add 1 teaspoon, taste, then add more if desired. This recipe works with 1 teaspoon of any variety of salt. You can always add 3/4 teaspoon, taste, then add more if desired.
- Caramel Candies: This caramel is great as a sauce, topping, or filling, but won’t set up properly to make soft caramel candies. Here is my soft caramels recipe.
- Regular Caramel Sauce: If you want to make regular caramel, reduce salt to 1/2 teaspoon. Do not leave it out completely.
- Larger Batches: Avoid doubling or tripling this recipe. The added volume could prevent the sugar from melting evenly and properly. Make multiple batches instead.


Reader Comments and Reviews
Can I use this to drizzle on cookies
Hi Pan, you can. The caramel solidifies as it cools.
Hi Sally, I make this this recipe several times a week and it always turns out amazing but recently i’ve noticed as the caramel cools a shell form on top. Any idea why this is occurring?
Hi Anthony, it sounds like there may be some separation of the ingredients while cooling. Does it come back together when warmed/mixed? We’re glad this is a favorite for you!
This is so delicious. We eat it almost every night with sliced apples. Yummy
I usually don’t comment on recipes even if they’re good, however, i felt the need to comment on this one. This recipe turned out amazing. It took a little longer than expected and at times i was uncertain it would turn out, but i trsuted the process, followed the instructions and WOW! 100x better than store bought and even better than i’ve had from bakeries. I used it for muffins, banana bread, and to drizzle over vanilla ice cream. SO GOOD, thank you for sharing with us.
Amazing! It tasted like store bought or even better and I can’t believe how easy it was to make and how quick!
Hi Sally, my butter cldnt combine at all even after constant stirring for about 20 min. Nt sure what went wrong.
Hi Sayida, was your heat too high? Whisking is key to getting the salted caramel to come together, and next time you can also try turning your stove top down just a bit and that should help, too. Thank you for giving this a try!
I’d like to use this recipe as a swirl for ice cream. How could I thin the sauce so that it doesn’t harden up too much in the freezer?
Hi Elizabeth, We haven’t tried adding this caramel to homemade ice cream before but suggest thinning it out a bit before adding. We recommend adding 2-3 extra Tablespoons of heavy cream to the recipe when you stir in the heavy cream. This will thin out the caramel so it’s softer, which is ideal for swirling into ice cream. Wait for it to cool to room temperature before adding to your ice cream mixture.
Made this and boiled until it reached the 220° on the candy thermometer.
It was not thin at all it was a perfect sauce consistency when I poured it into the jar.
It’s for tomorrow, so a few hours after refrigerating I wanted to give my son a taste and it was hardened solid!
I have it sitting out waiting for it to soften a bit and plan on reheating and adding 1 tablespoon more of cream.
I did notice that it took a few minutes for it to reach the noted temperature, once it started boiling.
It didn’t burn and everything else went per the instructions.
All ingredients were weighed.
Is it supposed to harden up so solid?
It’s definitely not a sauce consistency.
Hi Sandi, it doesn’t sound like you did anything wrong. The caramel is quite thin and liquid right after cooking it, then it thickens considerably as it cools. You can use the microwave to warm up salted caramel that has already been made on the stovetop. Hope this helps!
This is so delicious. We eat it almost every night with sliced apples. Yummy
Holy freakin’ moly. So crazy good.
That’s all I came to say
Hi! Would it be possible to layer this between two sponge cakes, or would it end up absorbing into the cake? (Additionally, maybe spread over a layer of buttercream?)
Hi Malakai, we don’t have a caramel recipe that would be perfect as a cake filling yet, but let us know if you find one you love! If you do want to give it a try, a thin layer of buttercream and a buttercream dam would be a great start.
After the caramel cools to where it’s thick but not cold beat with a hand mixer. It gets lighter in color and texture. Then use it as a cake filler. I just did this and it was a huge hit with everyone. Absolutely delicious.
Why is it important/significant to use a stainless steel pan as opposed to a nonstick?
Hi Alexis! Using a nonstick pan can often cause the caramel to burn and/or crystallize, and generally just make it harder to cook properly. Sometimes nonstick works, but we have much better and more consistent luck (and others do as well) when using a stainless steel pot.
Can I halve this recipe with out it changing the taste?
Hi Maria, if halving the recipe, the cooking times will be different. Many readers have successfully halved the recipe. In step 3, you may need to reduce the time to 30-45 seconds. And in step 4, you may need to reduce the boil time down to 30-45 seconds as well.
Mine turned out a lot darker than yours did. What did I do wrong?
Hi Mary, how is the taste? If it tastes bitter/burnt and looks darker than the photos, it’s likely been cooked for too long – an easy fix for next time! Try turning your heat down a bit.
Hi! I want to use a salted caramel sauce to infuse into a cream cheese-based whipped cream, do you think this will hold up well in a stable whip?
Hi Grace, we haven’t tested anything like that, but we fear the caramel would solidify too much for inclusion in a whipped cream. Let us know if you do any experimenting, though!
I made this a week ago and it’s almost gone. It’s so good!! But I’m curious how it would be with brown sugar. Have you all tried that?
Hi Garret, this recipe doesn’t work with brown sugar because it has too much moisture. We do have a brown sugar glaze recipe, as well as a butterscotch sauce recipe, which both use brown sugar. Hope this helps!
Best caramel recipe out here in my opinion. I tried a different recipe for my candy and I couldn’t even share it the taste was not the same as this one. I will never cheat on you again ❤️
This recipe was easy to follow and has yielded consistent results. I’ve used the caramel as a bundt cake glaze, ice cream topping, and milkshake addition. I had always been intimidated by caramel before. I don’t think I’ll ever purchase caramel sauce again. Thanks, Sally!
Same here!
Could I add rosemary? Any tips?
Is there any way to make this recipe slightly thicker so that I can use it as a filling for a cake? I have made it many times and I love this recipe! There’s nothing else like it. I’m hesitant to try and recipes, I just want it a bit thicker…
Hi Donna, we don’t have a caramel recipe that would be perfect as a cake filling yet, but let us know if you find one you love!
I just tried Sugar and Sparrow’s “thick caramel for cake filling” yesterday and it’s fantastic!! Exactly what I need for cake filling next weekend.
Making this one today for an apple dip recipe 🙂
I’ve repeatedly used this recipe and my daughter loves it by the spoon full! Super easy, and adding a little bit of salt and taste trying can easily get you the perfect salt amount that you like! Thank you so much!