

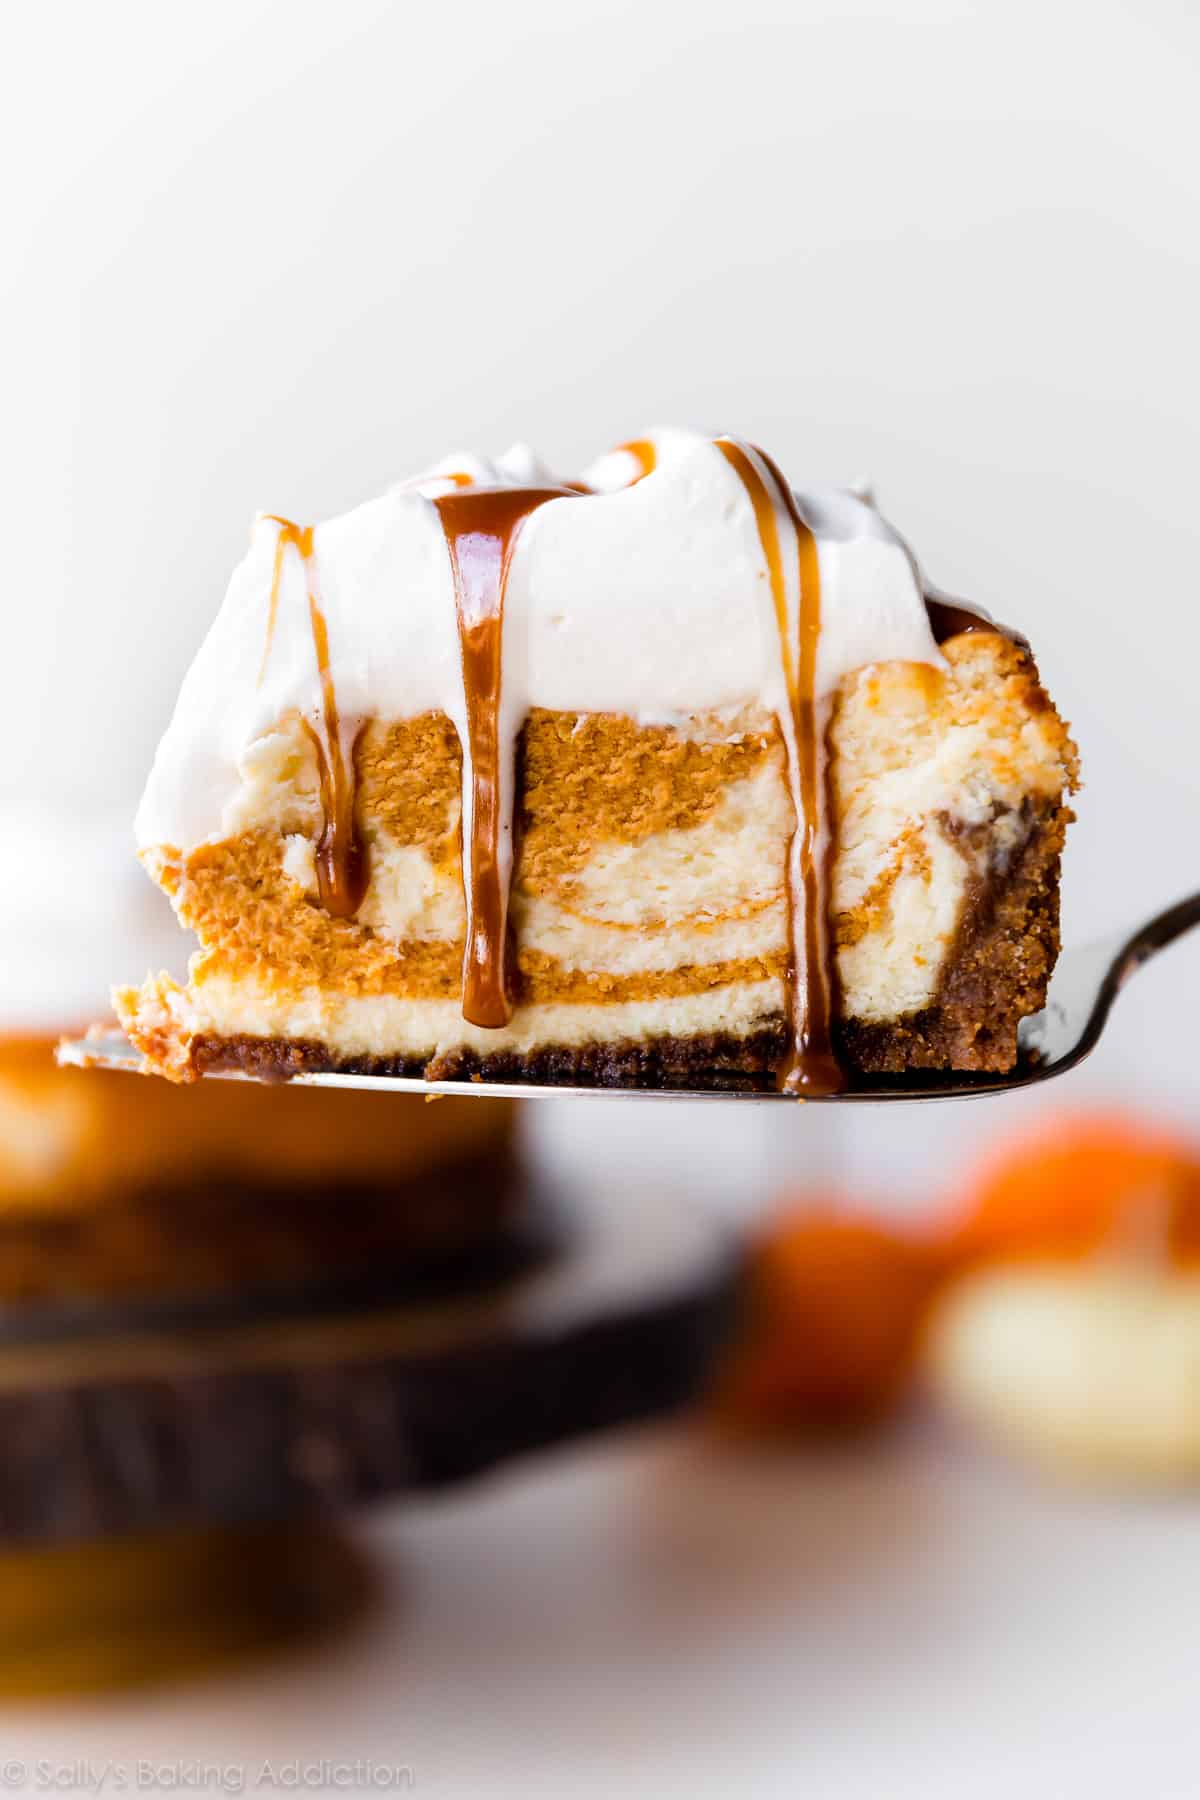
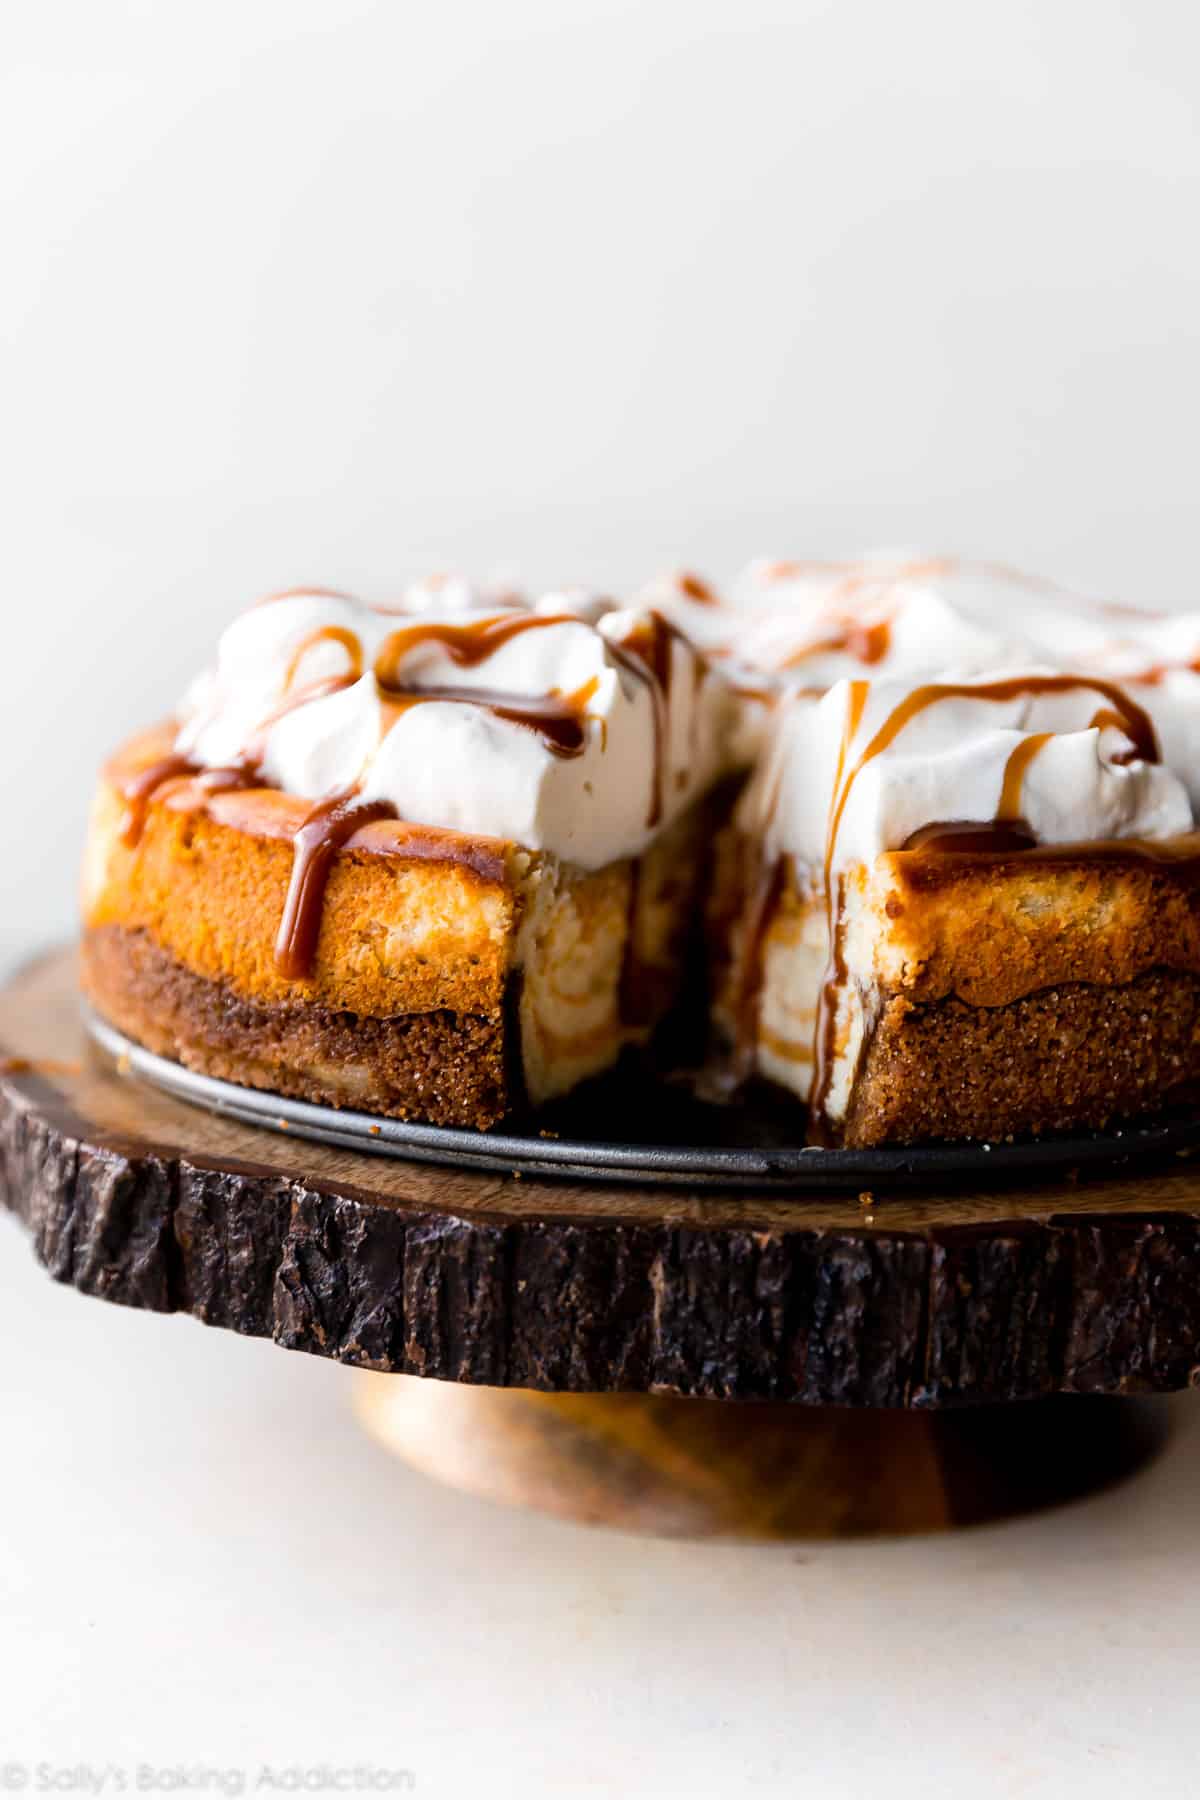
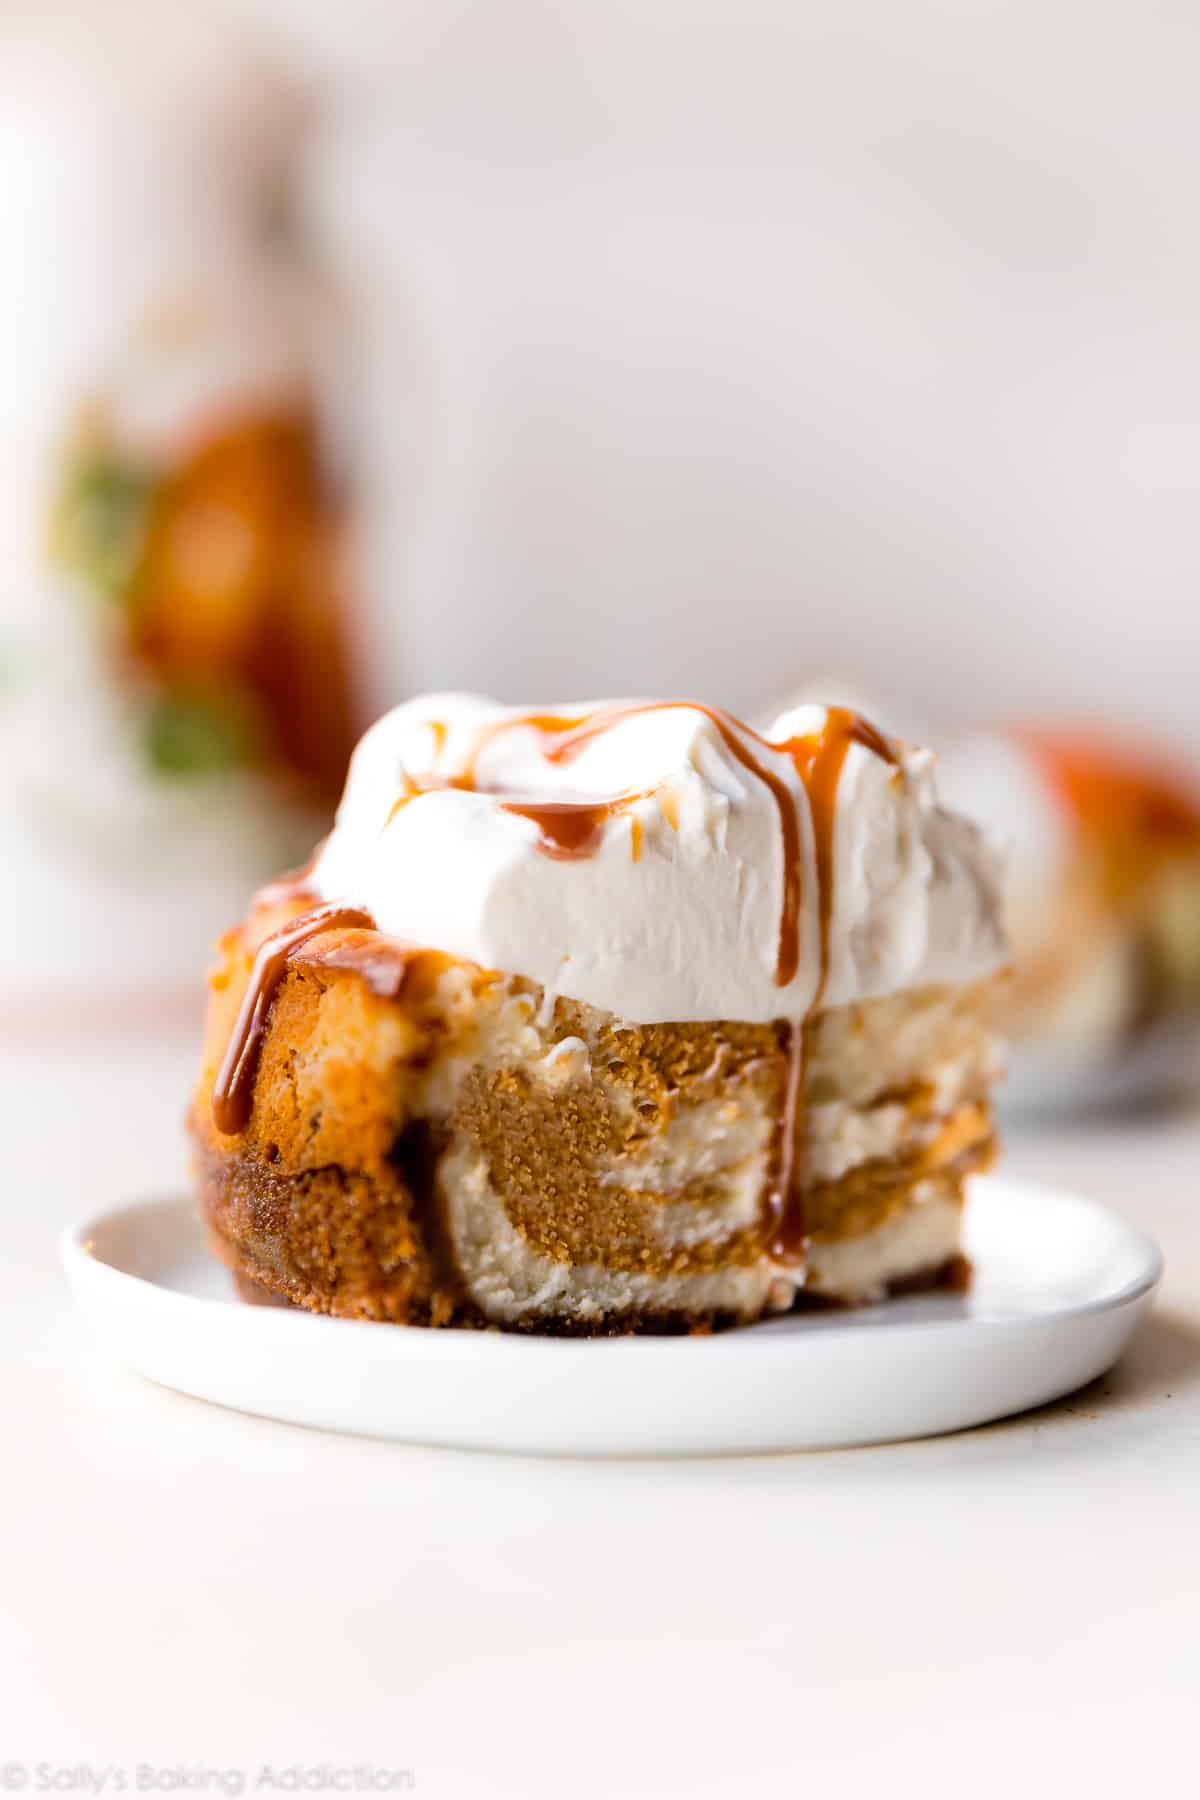
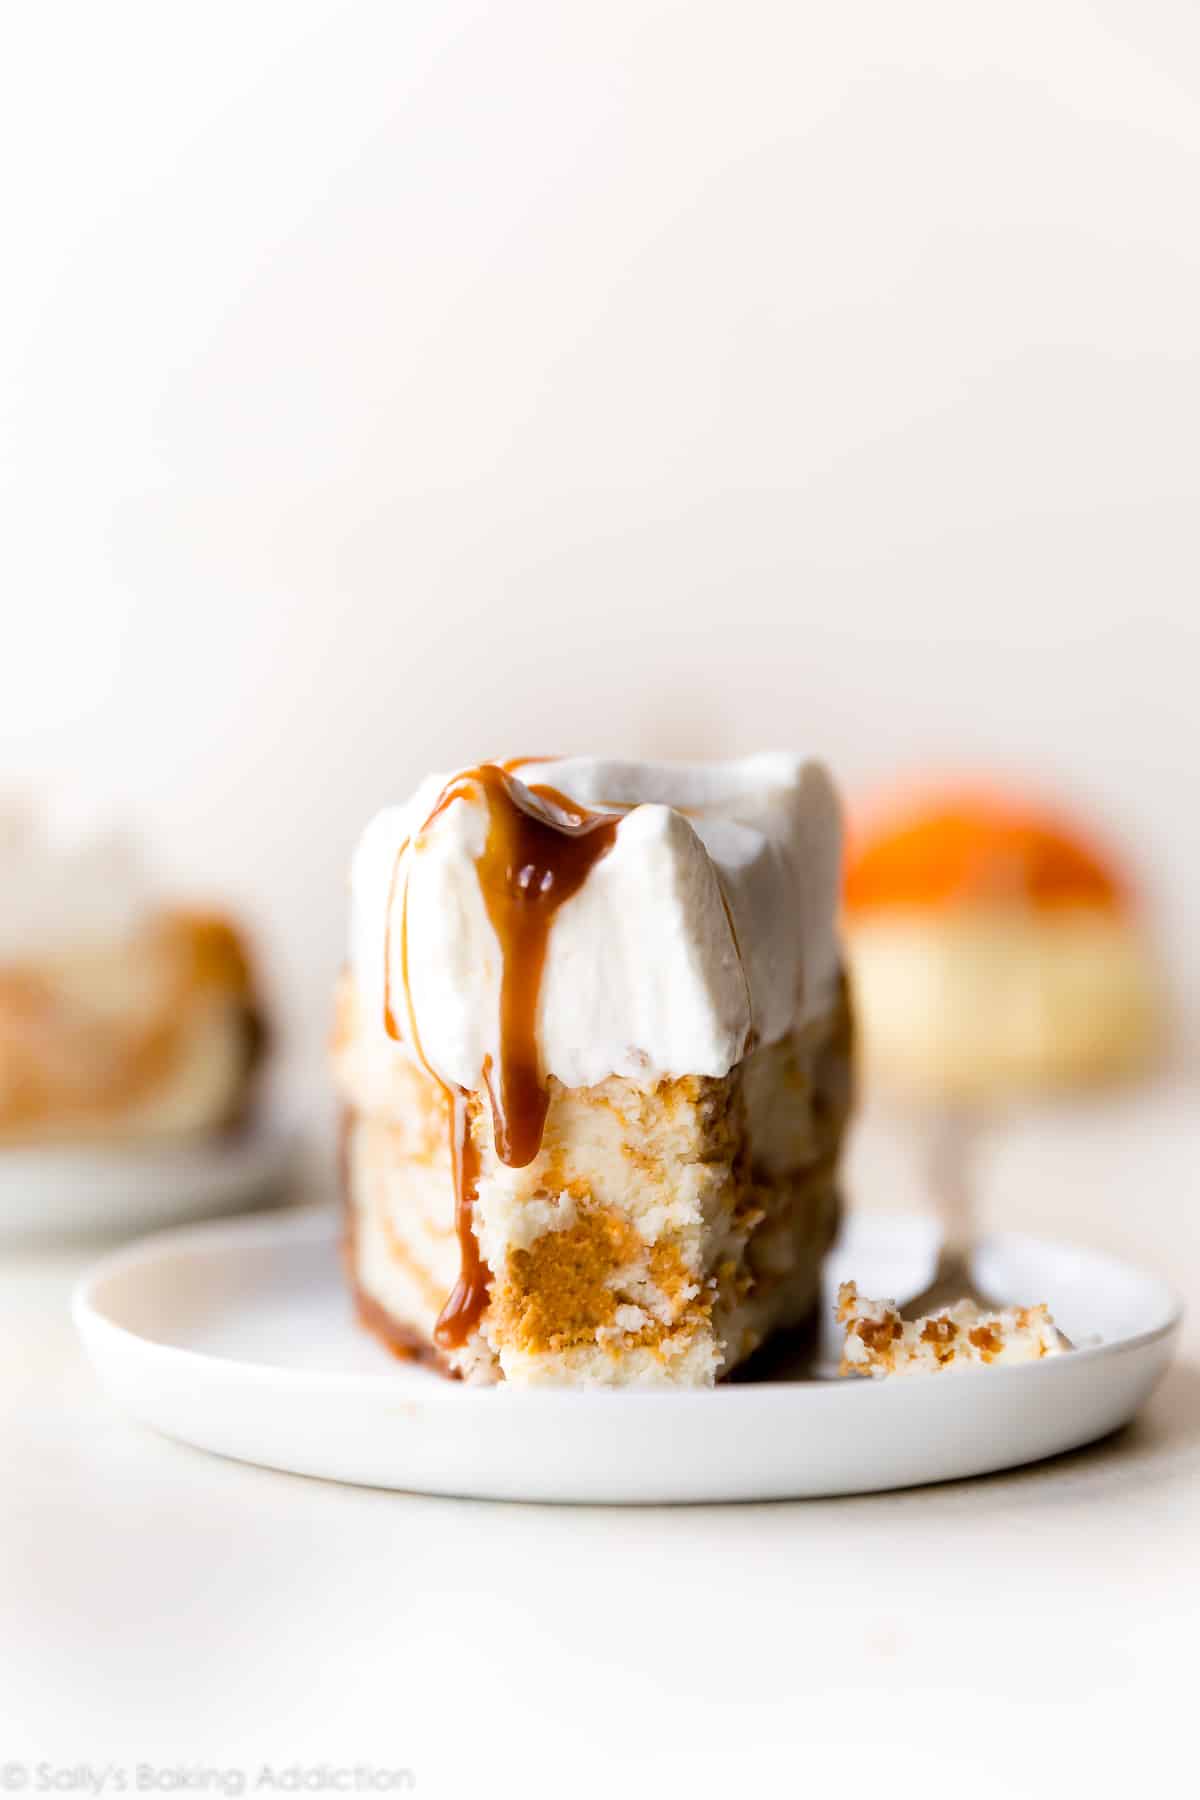
This pumpkin swirl cheesecake features a delicious pumpkin spice swirl, rich and creamy cheesecake filling, a deliciously spiced and crunchy gingersnap cookie crust, and is topped with fresh whipped cream and salted caramel sauce.
Fall has arrived and we’re all in a mad dash to bake all the fall things like jalapeño cheddar bread and apple cider donuts. My latest creation is pumpkin swirl cheesecake, a delicious alternative to pumpkin pie and pumpkin cake. Judging by this reader-favorite cheesecake recipe, I know most of you are CRAZY for cheesecake too.
How to Make Pumpkin Swirl Cheesecake
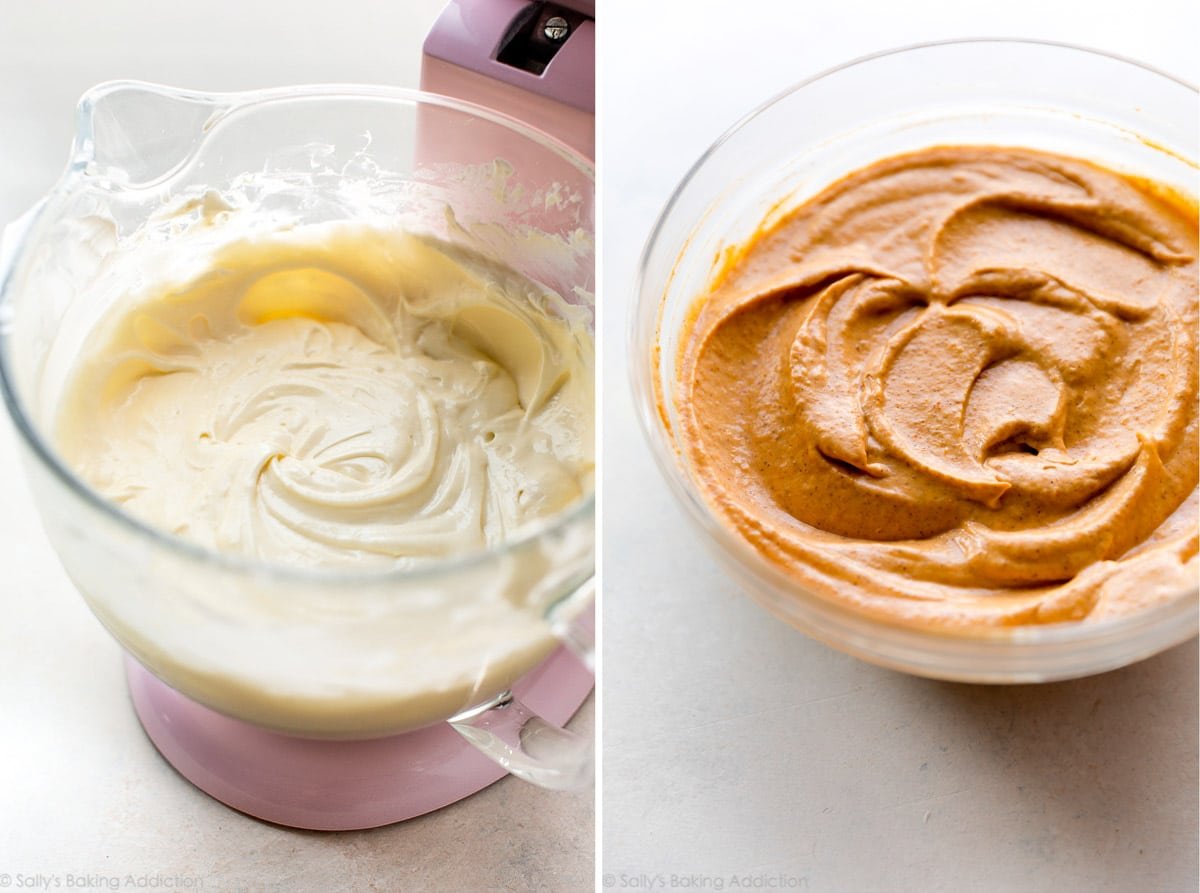
If you look at my classic cheesecake recipe, you’ll notice that today’s pumpkin cheesecake uses mostly all of the same ingredients. Besides the amounts of each, the difference is that we’ll divide the batter in half and add pumpkin puree + spices to create a hypnotizing pumpkin swirl. The result is pockets of luscious cheesecake paired with rich, creamy, perfectly spiced pumpkin cheesecake.
You can absolutely use homemade pumpkin pie spice here!
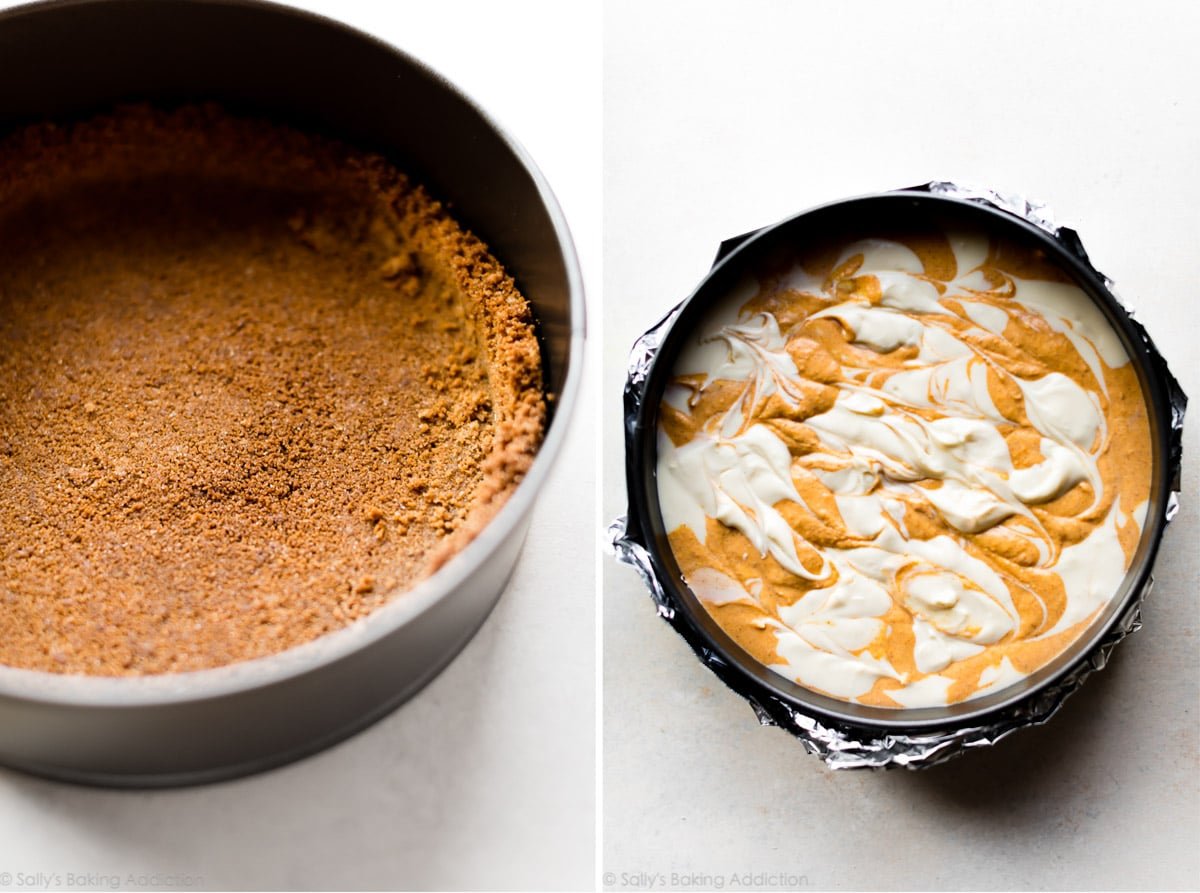
All this cheesecake sits on top of a crunchy gingersnap cookie crust. Add extra flavor to the crust with a bit of cinnamon and ginger. Here’s my tip: Not all store-bought gingersnap cookies are the same, so make sure you read my notes below about which cookies are best for a cookie crust.
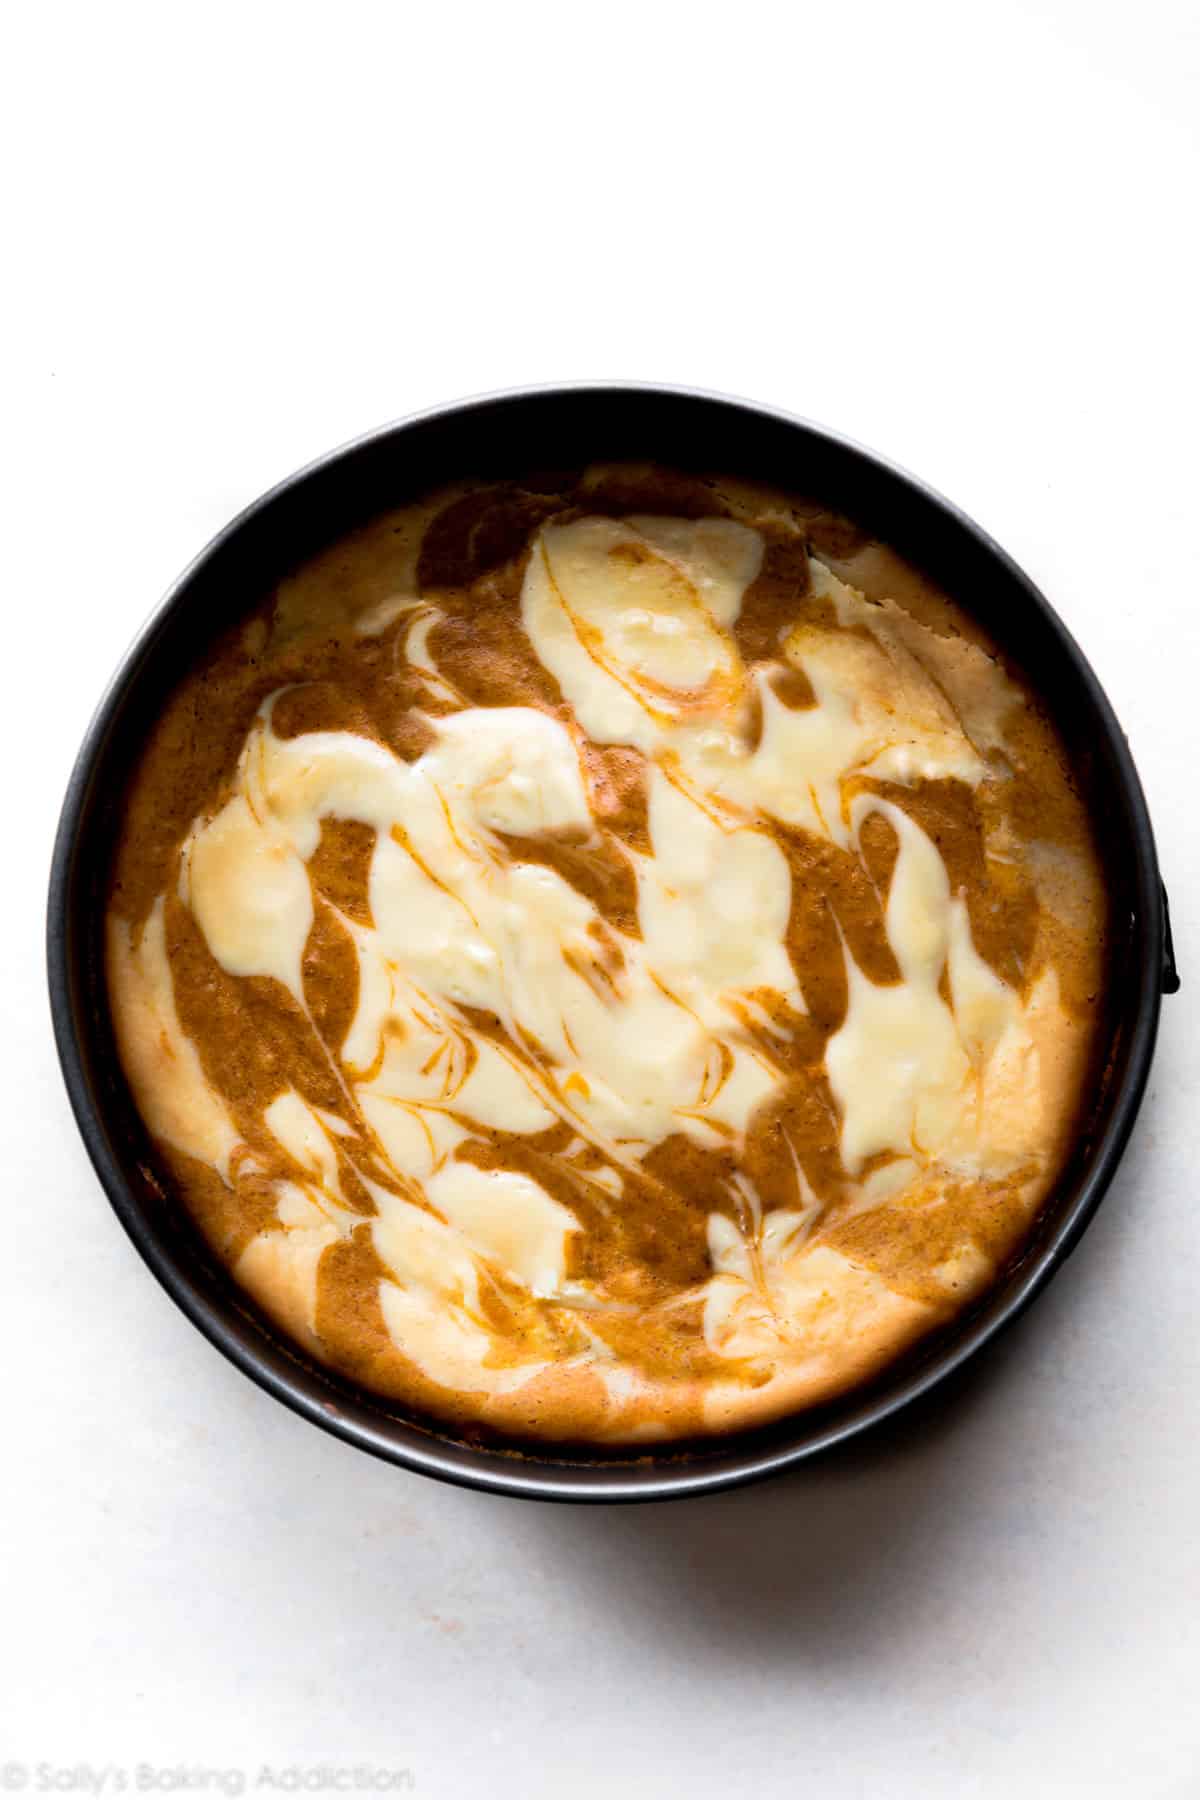
How to swirl: My trick is to drop spoonfuls of alternating batter—plain and pumpkin—until the pan is filled, then use a toothpick or knife to swirl. It doesn’t need to be perfect and it certainly doesn’t need to be neat.
Cheesecake Water Bath
I promise a water bath is nothing complicated. All you’re doing is placing the springform pan in a roasting pan, filling it with hot water, and baking. What’s the point, you ask?
I actually have an entire post and video tutorial for How to Make a Cheesecake Water Bath.
You see, cheesecake loves a humid environment. The steam from the hot water will lift the cheesecake up slowly and evenly, reducing the risk of cracks on the surface. Additionally, this slow and even baking method helps prevent the cheesecake from sinking back down as it cools. Taking a few extra minutes to prepare a water bath for this cheesecake recipe is well worth it.
Want to skip all the water bath drama? Try my no-bake pumpkin cheesecake. It tastes like pumpkin mousse and is definitely one of my fall favorites. Or try pumpkin cheesecake pie which has the same great flavors, but is scaled down to fit in a pie dish.
Tips for the Perfect Pumpkin Swirl Cheesecake
- Make sure you’re using bricks of cream cheese, not cream cheese spread.
- All of the cheesecake batter ingredients must be at room temperature so the batter remains smooth and combines quickly, so as to not over-beat the eggs.
- Do not over-mix the cheesecake batter
- Bake cheesecake in a water bath or alternate discussed in the recipe notes below
- Leave cheesecake in the cooling oven for 1 hour
- Cool completely at room temperature before chilling
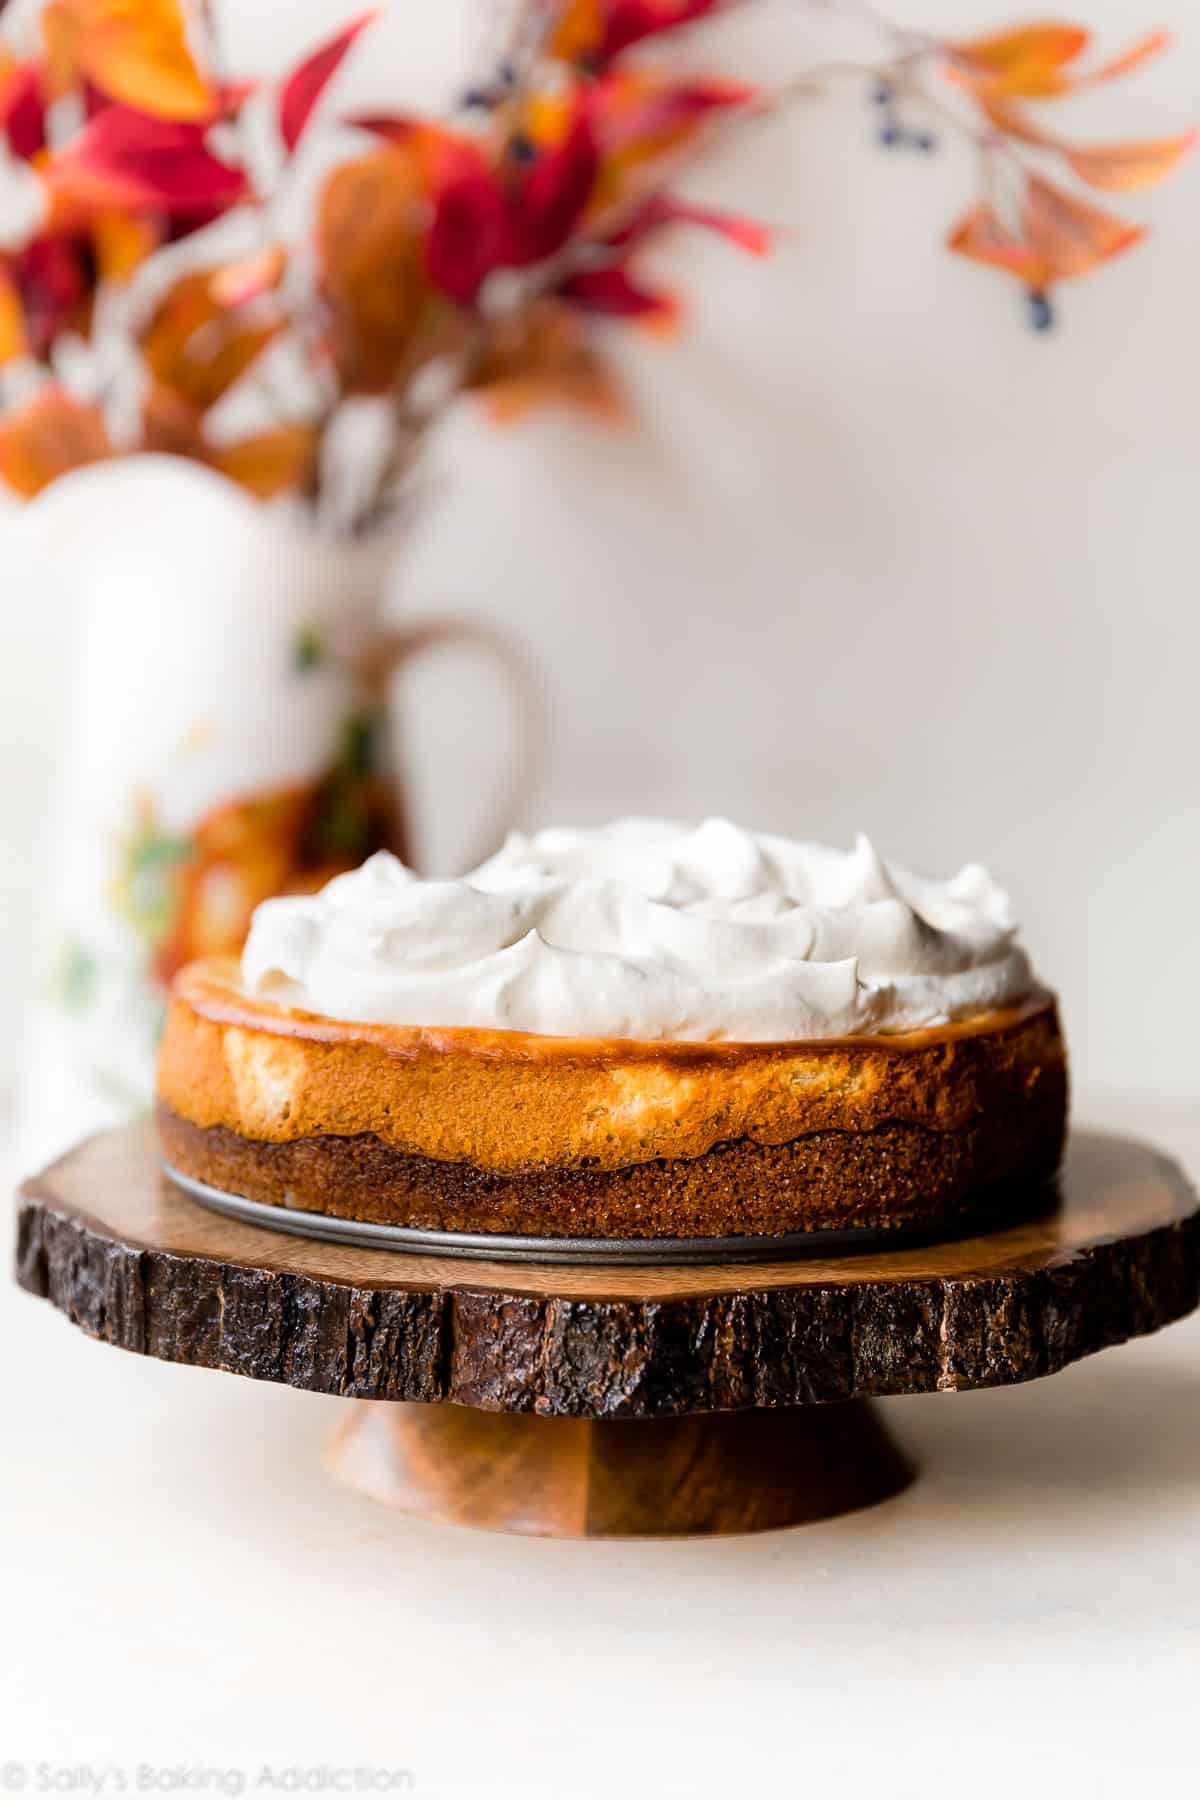
I did have a small crack in the upper right edge of my pumpkin cheesecake, but that’s nothing a thick layer of fresh whipped cream can’t hide! Add a little salted caramel and I’m pretty sure this pumpkin cheesecake is the definition of pumpkin dessert heaven. How lovely would this look on a dessert table with your Thanksgiving pies?
How to Freeze Cheesecake
- Cool the cheesecake on the counter before freezing. No need to chill it in the refrigerator
- Freeze on springform pan: Remove the outer rim from the springform pan. Wrap the cheesecake with the bottom of the pan with a few layers of plastic wrap, then a final layer of aluminum foil.
- Or freeze without springform pan: After the cheesecake has completely cooled, run a sharp knife underneath the crust to release it from the bottom of the pan. Carefully slide it onto a parchment paper lined piece of cardboard or use a plate. Wrap it all in a few layers of plastic wrap, then a final layer of aluminum foil.
- Freeze for up to 3 months, then thaw overnight in the refrigerator before serving.
- Do not freeze cheesecake with any toppings. Prepare toppings like homemade whipped cream and salted caramel for serving cheesecake.
I would LOVE to know if you try the pumpkin cheesecake! If you want something smaller, I also have a recipe for mini pumpkin cheesecakes and pumpkin pie bars. You may also enjoy my pumpkin cream cheese Bundt cake or my cinnamon swirl cheesecake, too!
Print
Pumpkin Swirl Cheesecake
- Prep Time: 45 minutes
- Cook Time: 1 hour
- Total Time: 9 hours, 45 minutes
- Yield: serves at least 12
- Category: Cheesecake
- Method: Baking
- Cuisine: American
Description
This pumpkin cheesecake features a delicious pumpkin spice swirl, rich and creamy cheesecake filling, a deliciously spiced and crunchy gingersnap cookie crust, and is topped with fresh whipped cream and salted caramel sauce.
Ingredients
Gingersnap Cookie Crust
- 1 and 1/2 cups (180g) gingersnap cookie crumbs*
- 1/4 teaspoon each: ground ginger and ground cinnamon
- 1/4 cup (4 Tbsp; 56g) unsalted butter, melted
- 1/4 cup (50g) granulated sugar
Cheesecake
- 32 ounces (904g) full-fat brick cream cheese, softened to room temperature
- 1 and 1/2 cups (300g) granulated sugar
- 1/3 cup (80g) full-fat sour cream, at room temperature
- 1 teaspoon pure vanilla extract
- 3 large eggs, at room temperature
- 1 cup (227g) pumpkin puree*
- 1 and 1/2 teaspoons ground cinnamon
- 1 and 1/2 teaspoons store-bought or homemade pumpkin pie spice*
- topping suggestions: salted caramel and whipped cream
Instructions
- Adjust the oven rack to the lower-middle position and preheat oven to 350°F (177°C).
- Make the crust: Using a food processor, pulse the gingersnap cookies into crumbs. Pour into a medium bowl and stir in ginger, cinnamon, sugar, and melted butter until combined. (You can also pulse it all together in the food processor.) Mixture will be sandy. Press firmly into the bottom and slightly up the sides of a 9-inch or 10-inch springform pan. No need to grease the pan first. I use the bottom of a measuring cup to pack the crust down tightly. Pre-bake for 10 minutes. Remove from the oven and place the hot pan on a large piece of aluminum foil. The foil will wrap around the pan for the water bath in step 5. Allow crust to slightly cool as you prepare the filling.
- Make the filling: Using a handheld or stand mixer fitted with a paddle attachment, beat the cream cheese and granulated sugar together on medium-high speed in a large bowl until the mixture is smooth and creamy, about 2 minutes. Add the sour cream and vanilla extract, then beat until fully combined. On medium speed, add the eggs one at a time, beating after each addition until just blended. After the final egg is incorporated into the batter, stop mixing. To help prevent the cheesecake from deflating and cracking as it cools, avoid over-mixing the batter as best you can.
- Scoop out 2 cups of batter and place in a medium mixing bowl. Stir in the pumpkin, cinnamon, and pumpkin pie spice until combined. Begin adding spoonfuls of each batter, the plain and the pumpkin, on top of the crust. Alternate until all the batter is used and pan is filled. Using a toothpick or knife, swirl the batters together by dragging the toothpick top to bottom, then left to right.
- Prepare the simple water bath (see note): If needed for extra visuals, see my How to Make a Cheesecake Water Bath; the visual guide will assist you in this step. Boil a pot of water. You need 1 inch of water in your roasting pan for the water bath, so make sure you boil enough. I use an entire kettle of hot water. Place the pan inside of a large roasting pan. Carefully pour the hot water inside of the pan and place in the oven. (Or you can place the roasting pan in the oven first, then pour the hot water in. Whichever is easier for you.)
- (Note: if you notice the cheesecake browning too quickly on top, tent it with aluminum foil halfway through baking.) Bake cheesecake for 55-70 minutes or until the center is almost set. When it’s done, the center of the cheesecake will slightly wobble if you gently shake the pan. Turn the oven off and open the oven door slightly. Let the cheesecake sit in the oven for 1 hour as it cools down. Remove cheesecake from the oven and allow to cool completely at room temperature, then refrigerate the cheesecake for at least 4 hours or overnight.
- Use a knife to loosen the chilled cheesecake from the rim of the springform pan, then remove the rim. Add toppings, if desired. Using a clean sharp knife, cut into slices for serving. For neat slices, wipe the knife clean and dip into warm water between each slice.
- Cover and store leftover cheesecake in the refrigerator for up to 5 days.
Notes
- Make Ahead Instructions: This cheesecake can be made the day before. It has to chill for quite some time before serving. See step 5. Another way to make this cheesecake ahead of time is to freeze it. Cheesecake can be frozen up to 2 or 3 months. I find this tutorial for freezing cheesecakes helpful. When ready to eat, thaw overnight in the refrigerator before serving.
- Special Tools (affiliate links): Food Processor | Glass Mixing Bowl | 9-inch Springform Pan or 10-inch Springform Pan | Electric Mixer (Handheld or Stand) | Large Roasting Pan
- Gingersnap Cookies: Store-bought gingersnap cookies are ideal as they are the most dry. The ONLY brand that I’ve had issues with is the Nabisco gingersnap cookies. They’re delicious on their own, but they’re too moist for a gingersnap cookie crust. Alternatively, you can use a graham cracker crust instead. Feel free to add or reduce the amount of cinnamon and ginger based on your taste preference.
- Pumpkin: I recommend canned pumpkin, not fresh pumpkin puree in this recipe. I like to use Libby’s brand. Fresh will work in a pinch, but the cheesecake is tastier and more firm with canned. Do not use pumpkin pie filling.
- Pumpkin Pie Spice: You can find pumpkin pie spice in the baking aisle of most grocery stores or make your own homemade pumpkin pie spice. If you don’t have either and want to use individual spices, use 1/2 teaspoon each: ground allspice and ground ginger AND 1/4 teaspoon each: ground nutmeg and ground cloves. This is in addition to the 1 and 1/2 teaspoons of cinnamon—you will still add that.
- Why is Everything at Room Temperature? Bring all cold ingredients to room temperature before beginning. Room temperature ingredients combine quickly and evenly, so you won’t risk over-mixing. Also, beating cold ingredients together will result in a chunky cheesecake batter, hardly the way you want to begin!
- Alternate Water Bath Method: This method works as well, and you don’t have to bake the cheesecake IN water. Boil a kettle or pot of water. You need 1 inch of hot water in your roasting pan for the water bath, so make sure you boil enough. Place the cheesecake on the center oven rack of the preheated oven. Place a large metal baking or roasting pan (do not use glass—I usually use a 9×13-inch baking pan or an extra-large cast iron skillet) on the bottom rack. Pour boiling water into the empty pan, about 1 inch deep. Immediately close oven to trap the steam inside. This unique water bath adds steam to the oven without having the cheesecake sit inside the water itself. No need to wrap the springform pan in foil. See How to Make a Cheesecake Water Bath for more information.


Reader Comments and Reviews
Same problem with the butter leakage and I only used 3 Tbsp and super dry cookies. I suspect it has a lot to do with local humidity and moisture content in the cookies together. I suggest starting with 2 Tbsp to see if your crust will stick together and then add as needed.
Hi sally! Just wondering if this recipe can be doubled and baked off with the alternative method at the same time? Or would you suggest separate bake times. Thank you so much!
Hi Nicole, if they fit side-by-side in your oven, it should be fine to bake them at the same time.
This site is all over the road! when I try to print out the recipe nothing is on the same page and the pictures are so large it takes 2 pages to print one picture. Stick to the basics, nobody cares if you can make a recipe 20 pages long
Hi Steven, Thank you for visiting the site! Next time, you can print just the recipe by scrolling down to the recipe itself (in the light gray box) and using the “Print Recipe” button instead of printing the whole page. Hope that helps for next time!
Hi Sally,
I’ve made this cheesecake 2 times now and each time I receive rave reviews from friends. However, both times my crust has turned out wet/gummy. Any suggestions? Should I use more cookies?
Hi JB! Is it possible that your water bath is leaking into your cheesecake crust? See recipe notes for details on an alternative to a traditional water bath that would prevent that. So glad you love this recipe!
I’ve made this once before exactly as specified and it was great!
I want to make this in a 6″ springform pan next week, which holds 4 cups by volume. Do you think that cutting the recipe into 1/3 would be correct?
Hi Jessica, we haven’t tested this recipe in a 6 inch pan, somewhere between 1/3 – 1/2 the recipe should be just about right. If you wish to be exact you can calculate the capacity of each pan using this post on Cake Pan Sizes & Conversions. We’re unsure of the exact bake time needed (same temperature) but keep an eye on it and bake until the center is almost set. Enjoy!
Looking forward to making these! I want to make individual cheesecakes (in a cupcake pan) for my husband’s fall work lunch. Should I still use a more shallow water bath under the cupcake tin or just go without? I was thinking I would put the cupcake tin in a cookie sheet water bath. Thank you!
Hi Lydia! No need for a water bath with mini cheesecakes. Hope you love them!
Can you make this into bars rather than a round pie?
Hi Bonnie! This recipe should work well in a 9×13 pan. We’re unsure of the exact bake time.
Loved this. I only had the Costco run of cream cheese on hand, which is the spreadable kind, not the block, so I looked up other recipes to see how it could be used, added two more eggs (for a total of 5) to this recipe, and upped the baking time by 15 minutes, and it worked well. I also upped the spices, because my family really likes them, but this was a wonderful recipe – thank you so much!!
Made this recipe last night and it was great! Followed it to the ‘t’ and the filling was excellent. I did have to cook it for the full 70 minutes.
The only thing I didn’t like was that my crust was a little soggy. I don’t think Ginger Snaps are a very common thing here, I had to go to three stores to find them. I ended up using New Moon Kitchen Ginger Snapper Cookies, which might be a little too soft/moist for this recipe. When I opened the springform, I did have some butter seep out the bottom.
I was thinking of trying again with less butter? Or maybe pre-baking the crust a little longer? Any suggestions would be appreciated.
*Note to Canadians: Our Philadelphia Cream Cheese blocks are a little larger than 8oz. I weighed out 904g and it ends up being about 3.75 blocks.
Hey all! So I’m a first time cheesecake maker and I have dietary issues. I decided our thanksgiving meal needed something jazzy and this recipe caught my eye. I made the crust with gluten free graham crackers and pre-baked for 10 minutes. For the filling I used lactose free cream cheese and followed the directions per the blog. Have to say it turned out AMAZING!! I’m a regular baker so my family is used to tasty treats but when they tried this everyone commented I should have my own bakery. WOW! I’d say it was a success. Thanks for all your wonderful recipes. Easy and delicious
Made this forThanlsgiving dessert. After such a big meal, I decided to serve it as small bites complete with whipped cream and the salted caramel sauce. Absolute perfection in every way! Thank you.
I just want to say that this recipe has given me so much confidence in tackling impressive looking recipe’s that are crowd pleasers! Sally, you break things down for new bakers who might not know simple steps to make things a success, and I appreciate that! This was so amazing, and my first real success with a baked cheesecake. This, along with a few other recipe’s I’ve loved always come out perfect to my tastes and preferences. This has become the site I have to come back to when I ask “Why didn’t this turn out?” Then I say, “CAUSE I DIDN’T GO TO SALLY’S!”
I find myself flipping through recipe’s and saying, “I love you Sally…” over and over. THANK YOU!
Thank you so much for your kind words, Rebecca! We’re thrilled to hear that you’re having success with our recipes. Happy baking!
Hi sally! I absolutely love your recipes and always use them. But this one wasn’t ideal.
I wish the instructions said to boil the water before hand so I wasn’t waiting until it’s done boiling to finish this.
I also wish there was an easier recipe that didn’t require the boiling water because it’s just too time consuming.
Any alternatives would be great
Hi Jos, thanks so much for giving this recipe a try — we’re sorry you weren’t satisfied with the outcome. Water baths are fairly standard for cheesecake recipes to prevent cracking on the top. However, if you’d like to skip the water bath completely, you might enjoy this No-Bake Pumpkin Cheesecake instead! Let us know if you decide to give it a try.
I made this cheesecake yesterday and OMG it was so amazing!! I loved the pumpkin so much that I was wondering if there is a way to make the whole cheesecake pumpkin flavored. As in adding a certain amount of pumpkin purée to all of the batter? Thank you so much for this recipe Sally!! :))
Hi Ally! We haven’t tested that method, but let us know if you give it a try! You may also love our no bake pumpkin cheesecake recipe.
Sally
I make you cheesecake that does not require water bath baking. Along with having done your recipe many times, without alterations, I have also made butterscotch, lemon and amaretto. Each was perfect. Can this pumpkin spice recipe be baked in your method of not using a water bath?
Hi Bruce, you can make this cheesecake with the water bath alternative of using a pan of water directly below the cheesecake — see recipe notes for details. Or, if you’d like to skip the water bath all together, we’d recommend our no-bake pumpkin cheesecake.
Love this recipe! Was such a hit at Thanksgiving that my mom requested it as her birthday cake this year.
Can you let me know how you would adjust the recipe to make a smaller 6 inch cake?
Hi Lacey, we’re so glad to hear your mom enjoyed this cheesecake! We haven’t tested this in a 6 inch pan but you can certainly try halving it (you may have some leftover). If you wish to be exact you can calculate the capacity of your pan using this post on Cake Pan Sizes & Conversions. We’re unsure of the exact bake time needed (same temperature) but keep an eye on it and bake until the center is almost set. Enjoy!
Hi Sally, this recipe looks gorgeous! I would like to make this in a 6 – 7 inch springform pan, is it alright if I adjust the ingredients by reducing it by a third? Would that make it too little/too much? Appreciate your advice! Thank you in advance.
Hi Jo, We haven’t tested this in a 6 inch pan but you can certainly try. If you wish to be exact you can calculate the capacity of each pan using this post on Cake Pan Sizes & Conversions. We’re unsure of the exact bake time needed (same temperature) but keep an eye on it and bake until the center is almost set. Enjoy!
Hi Lexi, thanks for the reply! I ended up making this in a 7 inch springform pan, reduced the ingredients by a third. Baked for about 1 hour in a water bath (my oven is a regular one without a fan).
It set beautifully throughout, not a single crack on top, was creamy and delicious. Followed all the steps and tips in the recipe. Will be remaking this for sure!
I’ve made this recipe twice and it tastes amazing, although my cheesecake cracked both times. The first time I may have overbaked it (first time making a cheesecake), but the second time I was hoping I had gotten everything right. Aside from greasing the pan, do you know any other way to prevent cracks for this recipe? I saw some recommending adding a teaspoon of flour or cooking at 325°. Thanks!
Hi Alex, thanks so much for giving this recipe a try! Did you make a water bath either time? We find that’s the best way to prevent cracks when making cheesecakes — we share that and more in our post How to Prevent Cracks in Cheesecake. Hope you find it helpful!
I’m not much of a baker and I am so pleased with how this cheesecake turned out. Easy to follow instructions and not too difficult to make. Everyone raved about how delicious it was, rivaled a Cheesecake Factory cheesecake.
This was really good. Like some other reviewers, I had to cook this for about 2 hours to get the perfect gentle wobble in the middle. Not sure why it took so long. And while/after it had cooled, a pumpkin-colored oily liquid (butter? Liquid from the canned pumpkin?) poured out of the bottom. I mopped it up with a paper towel and popped it into the fridge; the next day it was perfectly creamy, and the crust was still lovely and relatively crisp (not soggy, despite the liquid that had oozed out the day before). It was delicious!
So delicious and gorgeous! Came out perfect. I made a few changes since my mom doesn’t like it too spicy, and I prefer graham cracker crust: 1) I made your graham cracker crust instead. 2) I used only 1 tsp each for cinnamon and pie spices. 3) based on other comments, I used about 1-1/4 cups of the cheese filling with the pumpkin to make the swirl more defined. It’s now been requested as mandatory baking for Thanksgiving every year. Thanks for the great recipe!
Oh my oh my oh my. This was AMAZING. We made it a few days late for Thanksgiving because, well, we figured with COVID we’d just cater in Thanksgiving and keep it simple, but by the end of the long weekend I was sad we didn’t have any leftover dessert and got to baking. I’m so glad I tried this recipe; it is going to become a family yearly tradition for sure.
I made exactly as written but I did butter my springform pan, and I had to cook it about 40 minutes longer than written… that seems to be an ongoing issue with my oven when cooking cheesecakes, but I just check it every 5-10 minutes until it obtains that perfect mild ‘wobble-wobble.’
Thank you, Sally!
I forgot to rate it — 5 stars for sure!
I see all these great reviews which convinced me to make this cheesecake along with all the delicious looking photographs. However, my cheesecake didn’t turn out looking like this at all. I followed the recipe to a T, but my crust stuck to the pan and was difficult to get off. I lost some of it when serving the slices. The rest of the pie was gooey, like a soft cream pie, not resembling the pictures at all. It had no firmness whatever. I even baked it 5 minutes longer than the instructions. Not sure what went wrong other than to guess it needed to bake way longer than the instructions state.
Mine was similar, but I ran an icing knife around the edge before trying to remove the outside of the springform pan. It released ok then. I think my issue was I used the philli spreadable from the giant costco container, it’s what I had on hand. The flavor is good, could use a little stronger pumpkin, but delicious as is. Did you use cream cheese blocks or the evil spread that she warms against using?
I always use the cream cheese blocks when making cheesecakes. Not sure what happened with this one, but wont be making again.
Sally, This cheesecake was amazing! You make the directions so easy to follow and i have never claimed to be a baker! I made it for thanksgiving and my family is still raving about it. Can I use the same recipe but make like a cherry version?
Btw, my first cake I made from your website was the Lemon Blueberry 3 layer cake. It was also so delicious and special I have already made it twice.
Thank you for these fabulous recipes!
I made two of these cheesecakes for thanksgiving my cousin said and I quote “ this cheesecake is better then s*x” my aunt then proceeded to take an entire one home, my husband was not thrilled about this. Needless to say this cheesecake was a huge hit! Thanks for the awesome recipe!
Hi Sally; this tastes incredible! (I’m having a leftover slice with my coffee now.). Two oddities, though: 1. I had to bake this bad boy for more than two hours before it was anything close to done, and 2. When I took it to chill, butter poured out of the bottom of my spring form plan in a stream. It ended up fabulous regardless, but I’m wondering what happened. All my ingredients were room temperature except the sour cream; I don’t live at altitude or anything; I measured everything by weight, not volume. I made two changes that I can’t imagine caused this, but they were replacing the sour cream with non fat greek yogurt, and I baked over a water bath rather than in one (which I’m glad about, given my butter leakage!). Any ideas?
Hi Justine, I’m so glad you tried and enjoyed this cheesecake! Thank you for the feedback. Did you accidentally use more butter in the crust than called for? You need 4 Tbsp, which is 1/2 a stick. And I wonder if the gingersnap cookies you used simply didn’t soak up as much butter and that’s why it melted everywhere. If I may ask, what brand of cookies did you use?
Hi Sally. Nope, I measured the butter by weight as called for in the recipe! I used Stauffer’s gingersnaps, which were very dry and snappy.
Justine,
FYI I had the same issue with the butter. Also weigh ingredients, but in my case I used Mi-Del GF Ginger snaps. These are also pretty hard, and I felt like they shoulda held onto the butter a little better. IMO, it’s just too much butter, maybe I’ll try 3 tbsp.
This was really good (and the whipped cream and caramel were amazing) but we had an issue with the ginger snap crust getting soggy/all sticking to the pan. Any ideas why that may have happened??
I had the same exact issue and came here to read the comments to see if anyone else had that issue. The cheesecake part was delicious, and I used Stauffer’s ginger snap cookies, but my crust did the same thing – stuck to the pan and was soggy. Any suggestions would be great! I’d love to try this recipe again!
I wanted to make a pumpkin cheesecake for the family for Thanksgiving. So I went to the Internet and found Sally. Boy am I glad I did! This was the most incredible cheesecake. It got rave reviews from everyone. The gingersnaps in our grocery store were Stouffer brand. Very hard and crispy. I had to put them in a ziplock bag and pulverize them with a rolling pin. They were so hard, the food processor wouldn’t crush them. But they were ideal for this recipe. I didn’t add the spices to the crust. The cookies were spicy enough, I thought. It was the only change I made. I made the caramel sauce, but everybody opted not to use it. They thought it was sweet and delicious enough without it. What I liked best was that the pumpkin was there, but didn’t overpower the flavor of the creamy cheesecake. You made our Thanksgiving, Sally!
Very thankful for your detailed notes in your recipes. This turned out so good! It was creamy and not overbaked. I always overbake cheesecake. I made it in a pre-bought gluten free Graham cracker crust and cooked it for about 50-60 minutes in the water bath. I had extra filling that I put in muffin cups and cooked those for about 30 mins. Don’t skip the Caramel sauce! Thanks sally! Happy holidays!
Hello,
I am now a huge fan. I am making this for the second time tonight (repeats seem to be a trend here). This truly is the creamiest, smoothest cheesecake I have ever had, and I have made and eaten plenty over the years. This cheesecake is also beautiful and festive for Thanksgiving. I can’t wait to make more of your recipes and I am quite picky. I do have one question, when you say to layer in spoonfuls, do you mean an entire layer of one and then the other, or more patchwork like? Either way, it’s fabulous!!