

Here is my classic easy royal icing made with meringue powder. It’s easy to work with, sets quickly, and won’t break your teeth when it dries. It has the most delicious taste and texture and makes decorating sugar cookies FUN and SIMPLE. Use this traditional royal icing recipe for both flooding and outlining your sugar cookies!
This is the only traditional royal icing I use. It’s my favorite because it’s easy to work with, sets quickly, and doesn’t require raw egg whites. And best of all, it doesn’t have a hard cement-like texture. It won’t break your teeth like other royal icings!
This recipe is such a fan favorite, that it deserved a spot in print! You’ll also find this recipe in my New York Times best-selling cookbook, Sally’s Baking 101.
Meringue Powder in Royal Icing
There are many ways to prepare royal icing and my favorite method is with meringue powder. Meringue powder takes the place of raw egg whites, which is found in traditional royal icing recipes. Both create a very sturdy and stable icing that hardens quickly on top of cookies. Meringue powder, while containing eggs, eliminates the need for raw fresh eggs, but still provides the EXACT same consistency. You can find meringue powder in some baking aisles, most craft stores with a baking section, and online. I just buy it on Amazon in the 8 ounce container. Super inexpensive and it lasts me awhile.
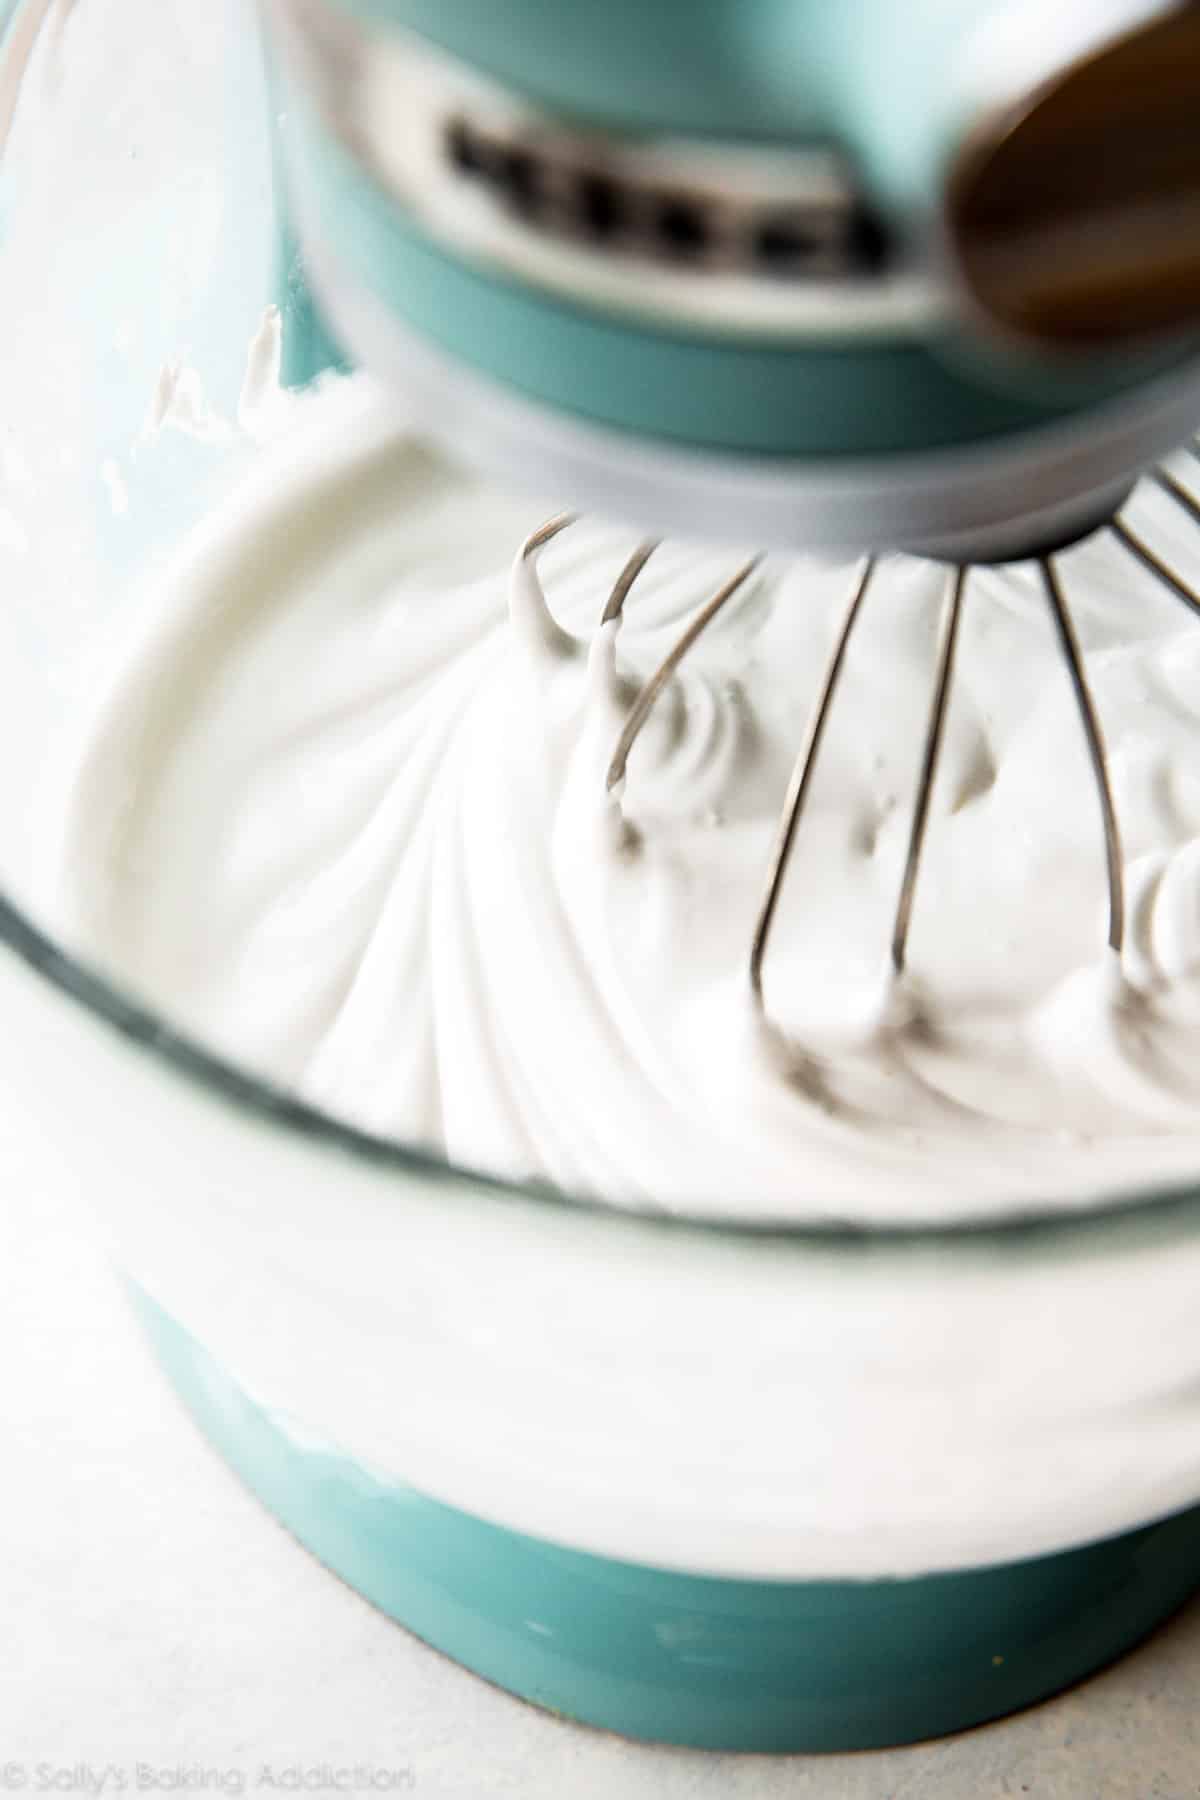
This royal icing is just 3 ingredients: confectioners’ sugar, meringue powder, and water. The trickiest part is landing on the perfect consistency, but I have a helpful video for you below. Sometimes I need more water, sometimes I need less water. But the wonderful thing is that you can manipulate the icing to get the proper consistency by adding more water or more confectioners’ sugar. It’s awesome.
Use This Royal Icing for Flooding and Piping
I use this one royal icing for both piping/outlining and flooding, like you see here on these Valentine’s Day cookies. The icing is thick enough to outline and thin enough to flood, which makes it super convenient.

Decorating Cookies
Here is the sugar cookies recipe you need. Soft centers, crisp edges, easy to decorate. You can also use this royal icing on chocolate sugar cookies, brown sugar cut-out cookies, lemon shortbread cookies, gingerbread cookies, or as the glue for a gingerbread house. It’s perfect for making these adorable Easter cookies, fireworks cookies, and Halloween cookies. And it can even be used to top homemade mille-feuille.
If you’re a decorating beginner, here’s my How to Decorate Sugar Cookies page and video showing 4 simple, yet beautiful decorating techniques.
For a full list of tools I use, see my top recommended cookie decorating supplies. The following is a good list to get started:
- Couplers – needed if you’re using the same icing color, but need to switch tips. Or if you have multiple colors of icing and only 1 tip, and need to move the tip to the other bags of icing.
- Disposable Piping Bags or Reusable Piping Bags – I prefer the 16 inch size for decorating.
- Gel Food Coloring – get the whole set. I love these colors for royal icing, cake batter, frosting, etc. They’re high pigmented so you don’t need as much coloring.
- Piping Tips – see below. Or use a squeeze bottle for less detailed designs, or these icing bottles from Michaels.
- Toothpick – I use a toothpick to help spread out the icing. You could also just use the piping tip, too.
And some piping tips. I always use Wilton piping tip #4 for outlining and flooding the cookie with icing. This is a wonderful basic piping tip to have in your collection. For any detail, I use a thinner round tip like Wilton piping tip #1 (super thin) and Wilton piping tip #2 (thin). For larger round tips that are easier to work with, I suggest Wilton piping tip #3, Wilton piping tip #4, or Wilton piping tip #5. The piping tip #s reflect their sizes. #1 being the thinnest and #5 being the largest of this particular bunch.
Just starting out with piping details? I suggest #1 (smallest), #3 (medium), and #5 (largest of the bunch). You can create anything basic with these three.


Royal Icing Consistency
After mixing the 3 icing ingredients together, lift the whisk attachment up. If the icing that drips off melts back into the bowl of icing within 5-10 seconds, you’re golden. If it’s too thick, add more water. If it’s super thin and watery, just keep beating it OR beat in more confectioners’ sugar.
Can I Freeze Royal Icing?
Yes, royal icing can be frozen. Many royal icing recipes, including this one, yield a lot of icing. Any leftover royal icing can be frozen for up to 2 months. Place leftover royal icing into zipped-top freezer bags. If you have more than 1 color, each color should have its own bag. Before sealing, squeeze as much air out of the bag as possible. Freeze on a flat shelf surface in your freezer. Thaw overnight in the refrigerator and bring to room temperature before using again.
Sugar cookies decorated with royal icing freeze well up to 3 months. Wait for the icing to set completely before layering between sheets of parchment paper in a freezer-friendly container. To thaw, thaw in the refrigerator or at room temperature.
How Can I Make Royal Icing Ahead of Time?
You can prepare this royal icing 2-3 days ahead of time. I recommend transferring it to a smaller bowl or container and tightly sealing for up to 3 days in the refrigerator. When you’re ready to use it, let it come to room temperature, then mix it up with a whisk a few times as it may have separated. Whisking in a few drops of water is helpful if it thickened.
Royal Icing Alternative
If you’d rather skip royal icing and try something easier, here’s my easy cookie icing. This opaque “glaze” style icing doesn’t set/dry as quickly as royal icing and it’s not ideal for piping sharp detail. That being said, sometimes it’s just the more convenient option! It will dry in about 24 hours, where the royal icing recipe below dries in about 1-2 hours. Or you can use cookie decorating buttercream, which can be a great alternative for icing that stays soft.
Print
My Favorite Royal Icing
- Prep Time: 5 minutes
- Cook Time: 0 minutes
- Total Time: 5 minutes
- Yield: 3 cups
- Category: Dessert
- Cuisine: American
Description
Here is my classic easy royal icing made with meringue powder. It’s easy to work with, sets quickly, and won’t break your teeth when it dries. It has the most delicious taste and texture and makes decorating sugar cookies fun and simple. Use this traditional royal icing recipe for both flooding and outlining your sugar cookies. This recipe is also in my New York Times best-selling cookbook, Sally’s Baking 101.
Ingredients
- 4 cups (480g) confectioners’ sugar, sifted, plus more as needed
- 3 Tablespoons meringue powder (not plain egg white powder)
- 9 Tablespoons room-temperature water, plus more as needed
- 1 teaspoon pure vanilla extract or 1/2 teaspoon of your favorite flavored extract, such as lemon, coconut, or peppermint (optional)
- optional for decorating: gel food coloring (I love this food coloring kit)
Instructions
- Watch the video tutorial so you get an idea of what the final consistency should be.
- In a large bowl using a handheld or stand mixer fitted with a whisk attachment, mix the confectioners’ sugar and meringue powder.
- Add the water and a flavoring (if using), and whip on high speed for 1.5–2 minutes. When lifting the whisk up off the icing, the icing should drizzle down and smooth out within 5–10 seconds. If it’s too thick, whip in more water, 1 Tablespoon at a time. I usually need 10 Tablespoons, but on particularly dry days, I use up to 12–14 Tablespoons. Keep in mind that the longer you whip the royal icing, the thicker it becomes. If your royal icing is too thin, just keep whipping it to introduce more air, or you can add more sifted confectioners’ sugar.
- If you’d like to tint the icing, divide it into separate bowls for each color, or tint the entire batch one color. A little gel food coloring goes a long way, so use a toothpick to dot the gel into the icing. Stir it in and then add more to deepen the color if desired. Keep in mind that the more you stir, the thicker the icing becomes. If needed, stir in a few drops of water to maintain the target consistency.
- When applied to cookies or confections in a thin layer, icing completely dries in about 2 hours at room temperature. If the icing consistency is too thin and runny, it will take longer to dry. If the icing is applied very thickly, it will also take longer to dry. If you’re layering royal icing onto cookies for specific designs and need it to set quickly, place cookies in the refrigerator to help speed up the setting. See blog post above for make-ahead and freezing instructions.
Notes
- When you’re not working directly with the royal icing (for example, you are decorating cookies but you still have some icing left in the bowl that you intend to use next), place a damp paper towel directly on the surface of the royal icing. This prevents it from hardening.
- Special Tools (affiliate links): Electric Mixer (Handheld or Stand Mixer) | Meringue Powder | Americolor Soft Gel Paste Color Kit | Disposable or Reusable Piping Bags | Couplers | Wilton Tip #1 | Wilton Tip #2 | Wilton Tip #3 | Wilton Tip #4 | Wilton Tip #5 | Squeeze Bottle or Icing Bottle
Here is my recipe for sugar cookies.


Reader Comments and Reviews
I haven’t tried this recipe yet, but I plan. One question: When it dries, is it brittle. That is the issue i have been having with other recipes. Dries beautifully, but very brittle. I am looking for a recipe that sets but not hardens soo much.
Hi Donna! Yes, royal icing is meant to be quite hard when it dries, but I wouldn’t say brittle. Are you having issues with royal icing breaking? We haven’t had that happen with this recipe. Let us know if you try it!
I disagree with comments stating this was too thin – you need to beat I long enough to get it thicker. I beat it nice and thick and it piped very well. Then I stored it in the fridge for 3 days in a closed bag and just beat it again for 30 seconds or so and it worked great. I like Sally’s recipes, they’re technical and metric!
Maybe too much meringue powder or it’s outdated. Just a thought.
Try adding a tsp of corn syrup. That would add a smidge of flexibility. Still tough stuff though
Can you give the quantities of ingredients to make half above recipe
Hi Mehreen, you can simple halve each of the ingredients for a half batch of this royal icing.
When is the best time to add the gel food colouring? At the end once all mixed? Or during the mixing? And how gel colouring is needed to result in a bright colour?
Going to attempt this on the weekend!
Hi Yvonne, you can add the food coloring towards the end of the mixing process. We do recommend gel coloring, not only because it produces more vibrant colors, but because the consistency does not impact the royal icing as much as liquid food coloring does.
I’ve added 10 cups of powdered sugar and it is still too soft to make decorations with. I wanted to avoid the raw eggs, so I tried this recipe. I’m not a novice baker but there is way too much water.
Hi Mary! The consistency of royal icing depends on many factors including the brand and how you measure your sugar, down to the humidity level in the air. The great thing about royal icing and this recipe is that you can control its thickness with the amount of water you add. If you try it again, add a little water at a time instead of all at once. And if it is too thin you can always add more sugar to thicken it back up!
Hello
I am going to be making Mickey Mouse cookies and I have not had luck in the past with making a bright red royal icing. Can anyone share their secret to this ?
Thank you 🙂
Hi Josephine! What kind of food coloring are you using? We always recommend gel food coloring for the most vibrant colors.
I just ordered the super black and red from americolor.
Can you mix royal icing with glace’ icing?
Hi Diane, We’ve honestly never tried it!
Hi! I’m going to try this recipe tomorrow but other tips I’ve seen is to let the icing dry overnight after flooding. Will the icing be fine in the bag at room temperature until it’s time to add detail or is there something else I should do? Thanks!
I was wondering if you’d be able to add flavouring to the royal icing recipe. I have sparking wine flavour that I was hoping to use.
Hi Kristen, absolutely. See recipe notes for tips on adding 1/2 teaspoon of your favorite flavored extract.
Loved your recipe for the icing and all the tips. However, I have a suggestion for you and your readers. Wear light weight gloves when decorating the cookies. I didn’t the first bowl of icing I was working with. I added blue and messy me had blue icing all over my hands. I am still trying to get the blue out from under my nails! It didn’t take long for me to find gloves and that worked great!
Can I use this royal icing as “glue” to stack tiered cakes?
Hi Lisa, for stacking tiered cakes, we find it best to use cake boards and dowels, like we do with our simple wedding cake recipe. Hope this helps!
Hi! Is royal icing safe to eat while pregnant if I use the meringue powder?
Hi Amanda! It’s best to check with your doctor to see if there are any concerns consuming royal icing + meringue powder while pregnant.
Love this recipe! So easy to make and use! THANK YOU!
I’ve been dying to learn how to make royal icing cookies for years. I’ve tried another recipe in the past but it was a complete fail. I made rose cookies with a 2D tip using your royal icing recipe and your sugar cookie recipe. They came out perfect. The icing held its shape and hardened pretty fast. I love how the icing is hard when you touch it but when you bite into it, it’s soft. My cookies were pretty and tasted delicious. Thank you so much for your recipes. I can’t wait to make more royal Icing cookies.
Hello! I’m trying to find an icing that will withstand heat, will this icing do the trick? Thank you.
Hi Jenn, yes, this royal icing should hold up just fine in the heat. Happy decorating!
NEED YOUR ADVICE –
I used this recipe and it went on like a dream, looks smooth and glossy. Loved the result and was so excited after 2 hours of piping…but then… MY CHALLENGE it doesn’t totally harden. it has a nice crust and looks like it’s hard, but it will still dent with pressure or fingernails – so I can’t bag and stack or transport – they will get dinged up. I dried them in front of a table fan for 2 hours, then left them out overnight with a ceiling fan on. I let them sit for 12 hours so far, still fingernail marks or can get depressed with finger. Then I tried one test cookie in the oven with the light on, no heat; and one test cookie in the tiny toaster oven/air fryer on “warm” lowest setting for 10 mins (that actually made it SOFTER). Nothing seems to make these harden totally. I did use 10 T of water instead of 8T (half a cup) and I do live in a coastal town on the water, so I am guessing the humidity is high (even though I’m in side with AC and fans on).
I also used “pure almond extract” (morton and basset) 2 capfuls. (Contains: Extractions of bitter almond oil in 35% alcohol.) (I think i’ve used in the past)
Any thoughts or help or hacks if it’s not totally hardening? more meringue powder? change the extract?
Hi Catherine! How long it takes to completely harden can vary greatly depending on how much water you added, the humidity in the air, how thick you applied the icing, etc. We usually wait a full 24 hours to stack them. For next time, you can try using less water, as that will help the icing to be a bit thicker and dry quicker. Hope this helps!
Hi! When you say 4 cups – do you mean pour sifted sugar into a measuring cup and swipe off excess? Or – should I weigh 480 g but 4 cups is actually 908 grams.???? Please advice. Thanks so much!!!!
Hi Victoria, 1 cup confectioners’ sugar, sifted means that the sugar is sifted after measuring and 1 cup sifted confectioners’ sugar means that the sugar is sifted before measuring. One cup of confectioners sugar is 120g so 4 cups is 480g total for this recipe.
Hi, does this icing set hard enough to allow the cookies to be stacked without ruining the decorations? Thanks!
Hi Tina, yes! These are stackable once the icing is dry. For extra protection, we use a piece of parchment paper between the cookies when stacked.
Hi, I just made the icing and it is not drying? Help!
Hi Jennifer! Icing completely dries in about 2 hours at room temperature. If you’re layering royal icing onto cookies for specific designs and need it to set quickly, place cookies in the refrigerator to help speed it up.
Any advice to getting your outline so neat? I’m sure practice makes perfect, but I tried your cookie and royal icing recipe today! My first time.. I can tell I’ll love working with royal icing, but my lines are not neat at all!
Hi Lauren, you’re right, it simply takes lots of practice! Some cookiers like to use an edible marker or stencils to draw out the lines first, then ice. Keep it up!
Hi! The cookies came out wonderfully and the icing seemed perfect to work with, but today I noticed that all the lines on the cookies I decorated yesterday bled. What did I do wrong? Thanks!!
Hi Kristin! Royal icing can bleed sometimes, particularly if the icing is on the thinner side. For sharper lines, try adding a bit more confectioners’ sugar to your royal icing to help thicken it up. You may even want to use the thicker icing just for the lines, while using a thinner consistency for flooding. Hope this helps, and thanks so much for giving it a try!
Thank you! I am totally new to decorating but that makes perfect sense!
I love your recipe but for some reason, it’s not showing the ingredients on your blog right now. The ingredients portion is missing. Please get back to this as soon as possible as I need it by the evening today.
I’m curious, after decorating the cookies with your royal icing how long can you refrigerate them (after the icing is set) and have them still taste great? Making cookies for a birthday party hoping to do them 2 days in advance so freezing wouldn’t be necessary. Or how long can they sit out room temp and still taste great?
Hi Krystal, decorated cookies stay soft for about 5 days when covered tightly at room temperature. For longer storage, cover and refrigerate for up to 10 days. So yes, you can definitely do these two days in advance of your party without the need to freeze!
This was my first attempt at royal icing. I followed the recipe to a T and the icing turned out amazing. Soft but by no means runny!
Hi,
I loved how easy this was to whip together and I like the taste. But for some reason, it never really dried for me. Stayed tacky, almost like a marshmallow… Too thick, do you think?
Hi Sheryl, It’s possible that your icing is layered on too thick as you mention and simply needs longer to fully set / dry. For next time, you can also add a bit more water (or less confectioners’ sugar) to thin it out a bit. Thanks so much for giving this recipe a try!
Hi Sally! Is it possible to substitute the water with whole milk? I feel that may balance the sweetness of the icing a little more for my family without sacrificing anything or will that compromise the consistency and the setting?
Hi Briana, The royal icing will not set with milk, so we don’t suggest it.
What type of sugar did you use to frost your heart shaped cookies? They seem larger than granulated and look sparkly.
Hi Cynthia! We used this royal icing and then topped the heart sugar cookies with sanding sugar crystals. You can find them online or in the baking section at your local craft store or grocery store. Hope this helps!
Hi Sally! This recipe is perfect for decorating cookies and so easy to make!
I wanted to pack some cookie decorating kits. How long can the icing stay in closed piping bags at room temp?
Hi Poonam! Royal icing will last for several days at room temperature (as long as you are using meringue powder like in this recipe) in an airtight container. However, I find it will start to separate after a few hours and need to be stirred again before using, so it’s best not to store it in icing bags until you are ready to use it.
Hi Sally! Will this consistency work for both piping and flooding? Piping once the base layer is dried of course. Thank you 🙂 so excited to try this!
Hi Michelle! We use this one royal icing for both piping/outlining and flooding. It is thick enough to outline and thin enough to flood, which makes it super convenient.
Does this harden enough to make items and dry to put on cake
Yes, I’ve done this many times! Depending on the size/thickness of the design it may be best to let it dry for a full 24 hours before moving it.
Sally,
I am 64 years old and just decided that I would teach myself to make and decorate cookies. I have made 2 batches so far and taken them to work to see how they liked them. The absolutely love the cookie recipe. My decorating still needs practice, but I have been asked to make cookies for our Widow’s Ministry at church. Thank you for these recipes. Simple and they taste wonderful!
We’re so happy to hear that you’re enjoying decorating cookies, Carol! The icing definitely takes a lot of practice to perfect. Happy baking!
I have an entire 2 lb package of powdered sugar in this batch now and it’s still just running straight out of the piping bag. Started with 4 c. confectioners sugar, 3 tablespoons meringue powder, and 7 tablespoons water (wanted it thicker). So I’ve added over a pound more sugar and also additional meringue powder and it’s still runny. I assume 7 TEASPOONS of water would have been sufficient. This isn’t my normal recipe, just googled quick to make icing for a St. Patrick’s themed gingerbread house for my kids to decorate but now I have to drag them out in the rain to the store and start over.