

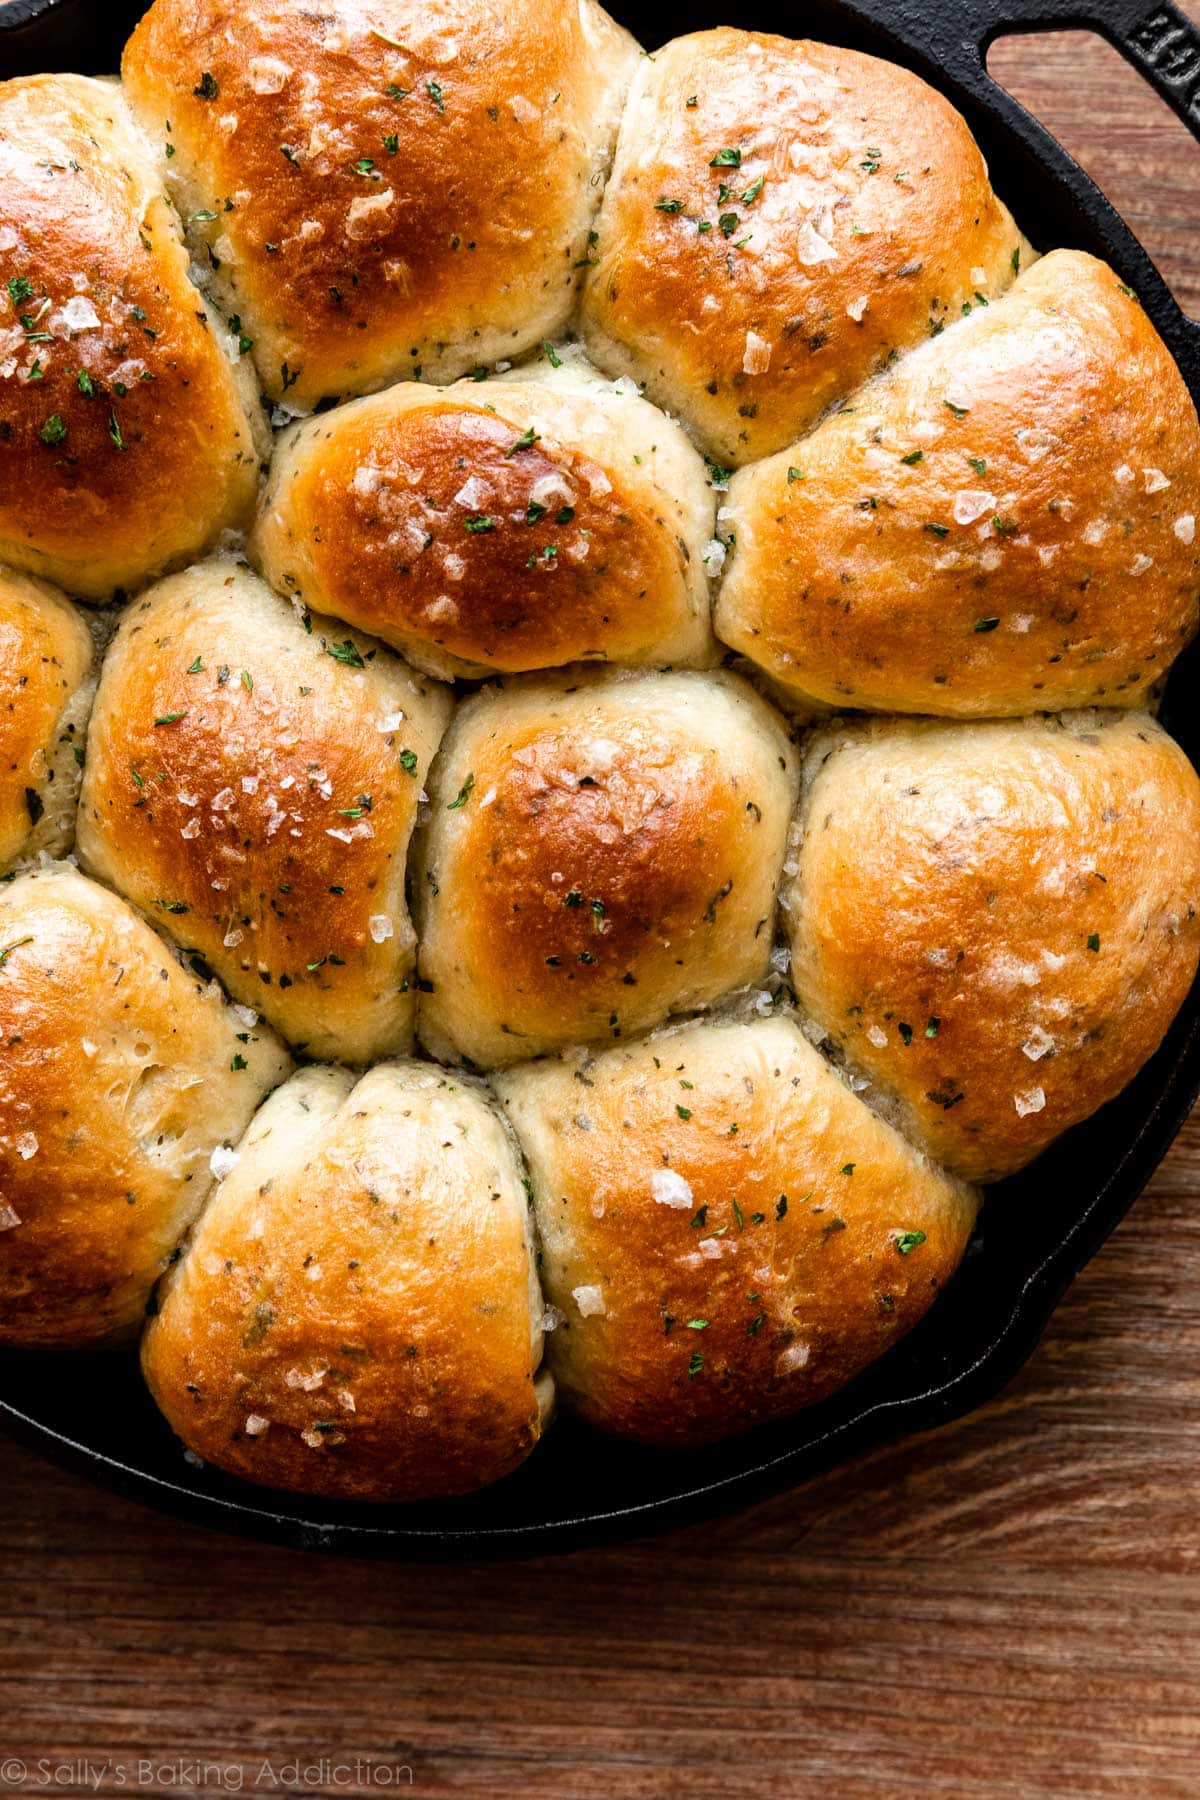
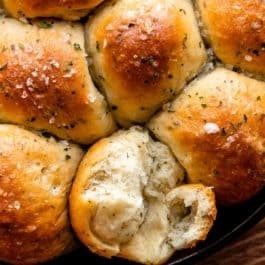
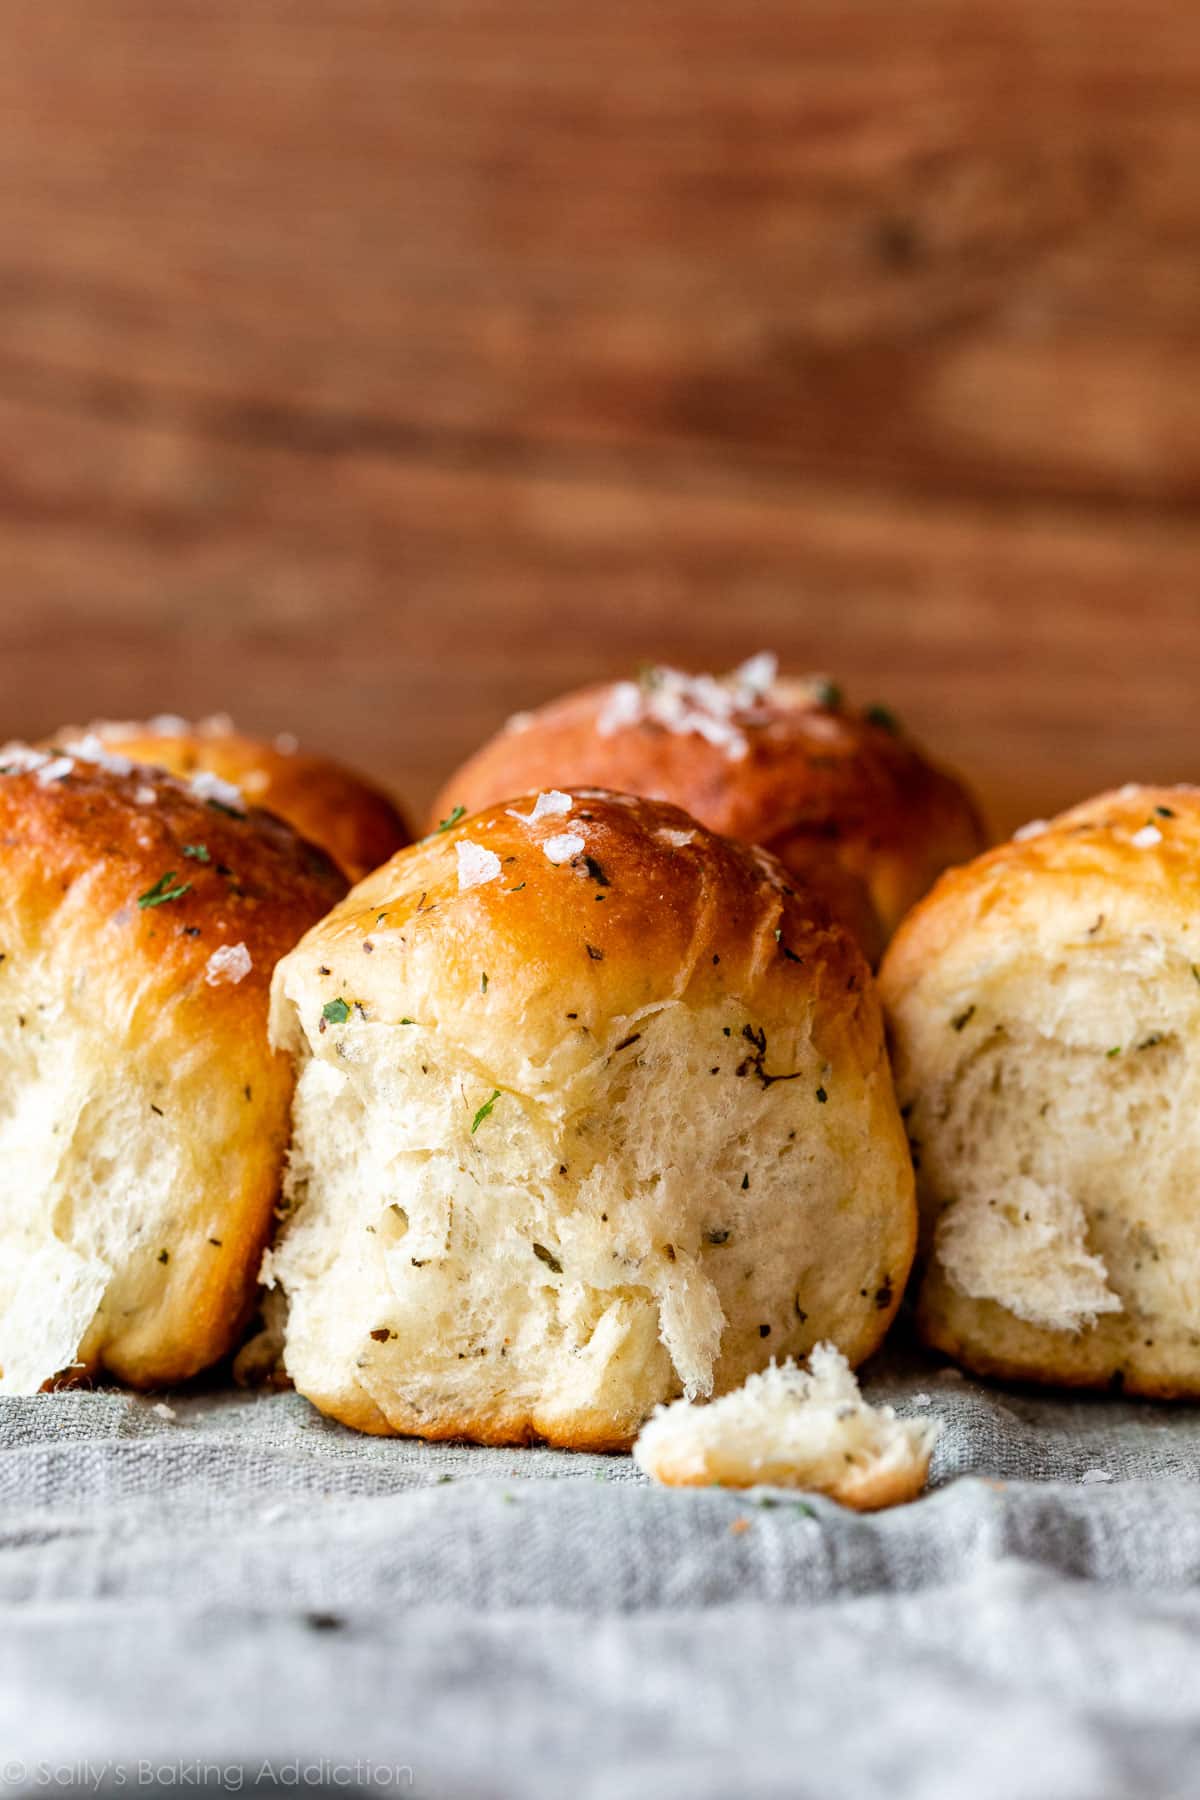
If you’re looking for a flavorful upgrade to ordinary dinner rolls, try these sea salt & herb skillet rolls. Infused with rosemary, basil, parsley, and garlic powder and topped with melted butter and flaky sea salt, each bite is as aromatic as it is delectable. They certainly steal all the attention from the main dish on the table! You can bake these soft and flaky rolls in an oven-safe skillet, but they’re just as tasty in a regular 9×13-inch baking dish.
I originally published this recipe in 2016 and have since added new photos and more success tips.
There’s no arguing that homemade bread is delicious, but adding plenty of herbs, garlic powder, sea salt, and a brush of melted butter transforms ordinary bread into a flavorful indulgence. Let me show you how to make them so you can experience this BREAD BLISS too!
One reader, Heather, commented: “These are insanely delicious! I ended up using fresh herbs and mixed/kneaded by hand. They turned out amazing… soft, chewy, flavorful, large, and perfect. My husband, who is normally pretty quiet about food, couldn’t stop saying how good these are. I have a feeling I’ll be making these often! Thanks so much for the recipe! ★★★★★”
Another reader, Melissa, commented: “Best rolls ever! We had these for Easter lunch and could not stop eating them!! They are so tender and delicious. Do not hesitate to try these rolls. You will not regret it! ★★★★★”
Tell Me About These Sea Salt & Herb Skillet Rolls
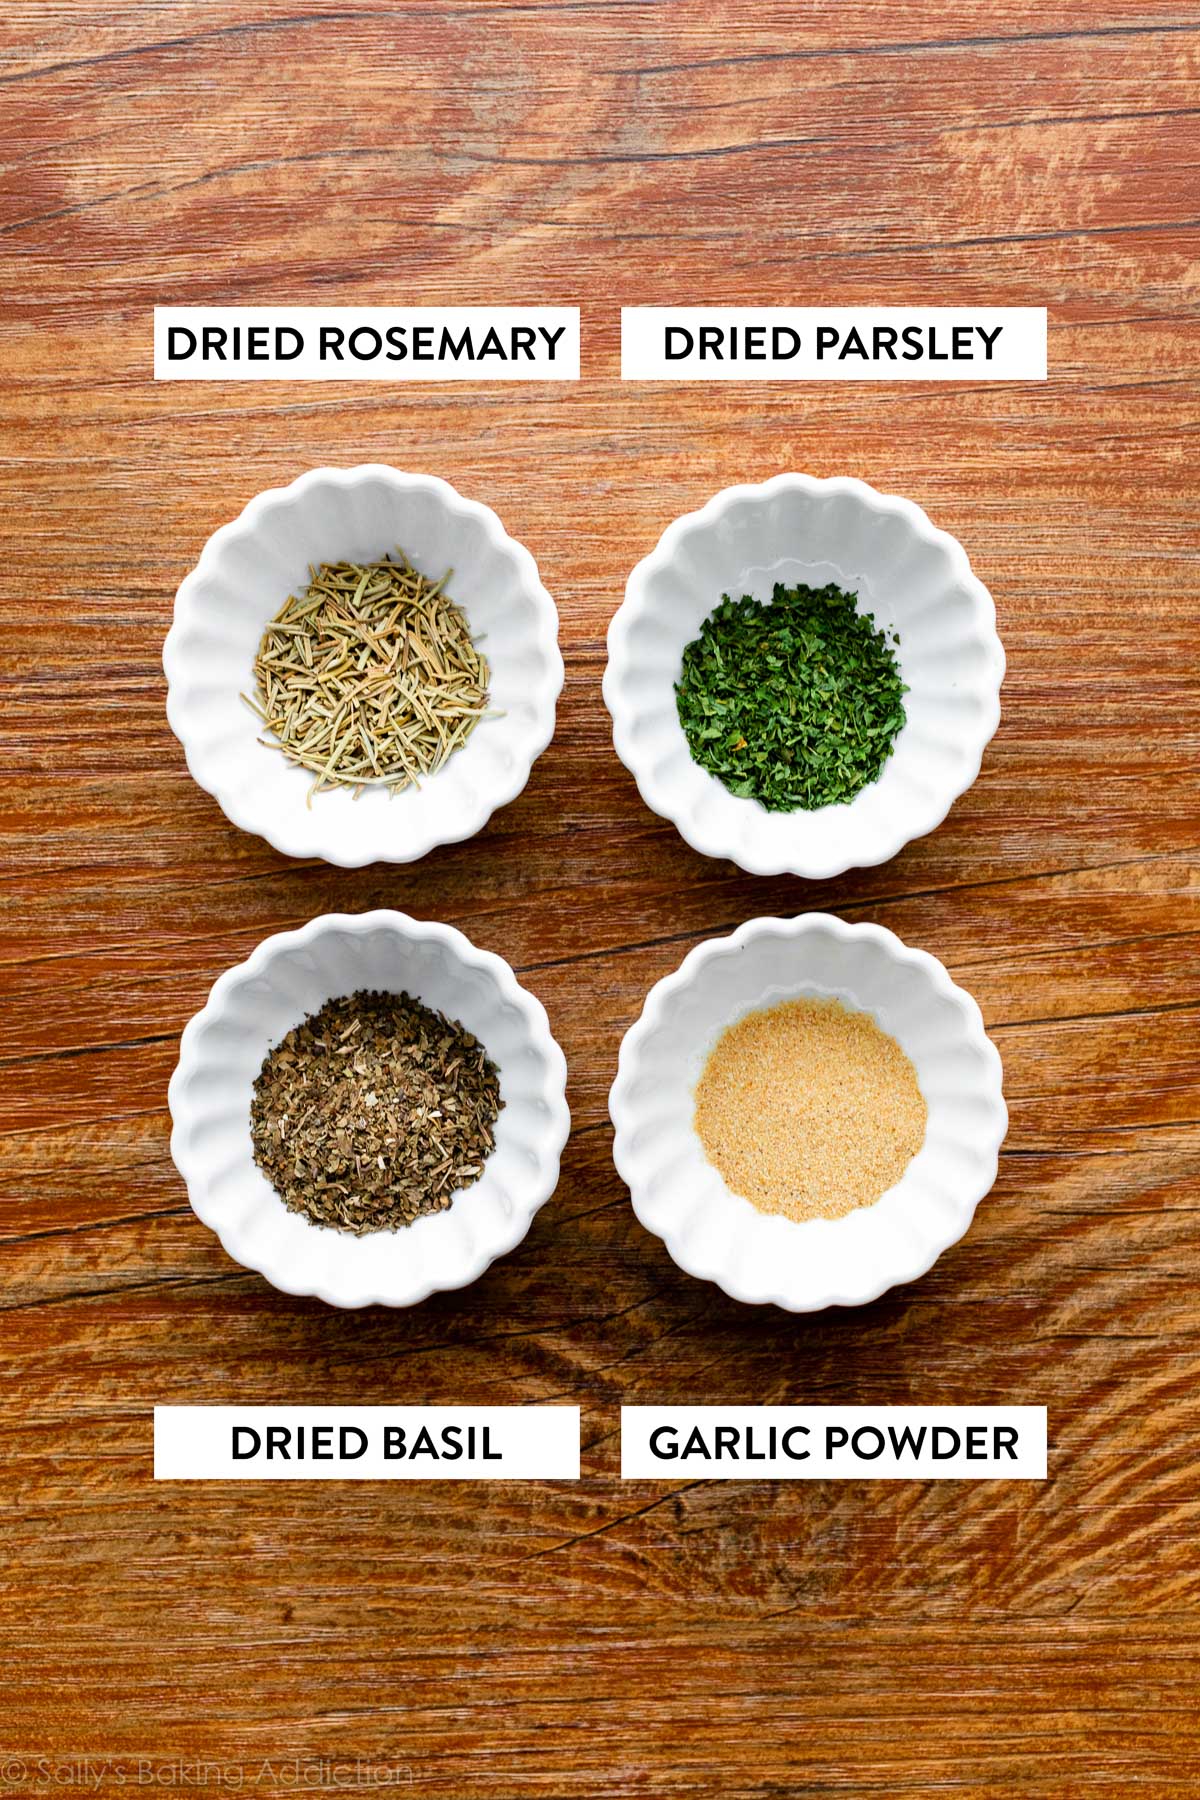
- Flavor: Enjoy rosemary, parsley, basil, and garlic all at once in a buttery roll with sea salt on top. This recipe has a range of some of the BEST flavors around. If you love the garlic, salt, and herb in this recipe, try this rosemary garlic pull apart bread or olive bread next—two favorites!
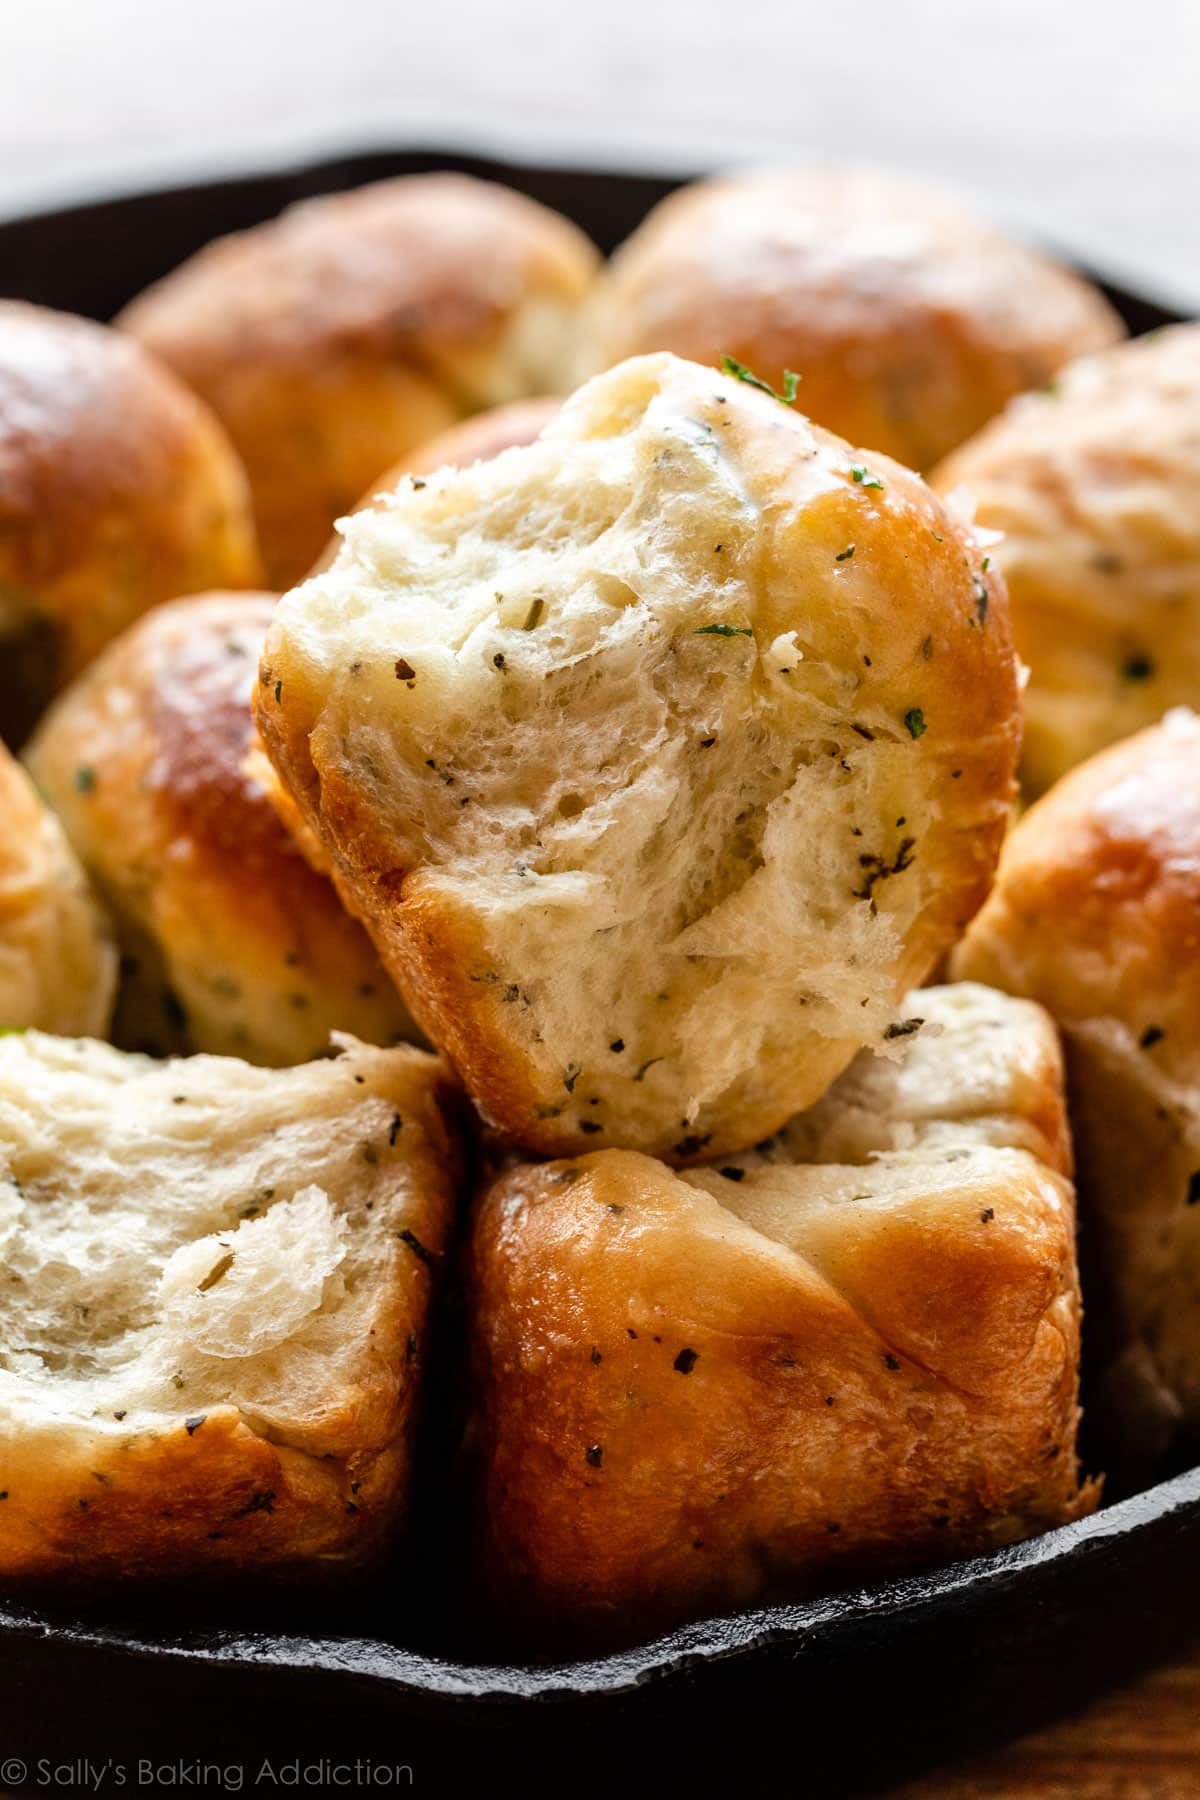
- Texture: In addition to the elevated flavor, the rolls have a wonderfully satisfying texture. Chewy edges seal in a soft and flaky roll and if you bake them in a cast iron skillet, the bottoms have a slight crisp. Don’t forget a little crunch on top from coarse or flaked sea salt. So much to love!
- Ease: Homemade bread or rolls can seem intimidating, but the recipe below is packed with thorough details so you can be confident in the kitchen. And if you’re new to baking with yeast, review my Baking with Yeast Guide.
- Time: Making rolls from scratch certainly takes time and they can be an afterthought when you’re preparing an entire meal. But after 1 taste of these homemade sea salt & herb rolls—you’ll realize they’re worth it. Set aside at least 3-4 hours from start to finish, but keep in mind most of that time is hands off as the dough rises. And you can get started ahead of time. See overnight instructions below.
Key Steps in This Recipe
- Making the dough. The dough comes together with basic kitchen ingredients including milk, yeast, sugar, egg, butter, salt, dried herbs, garlic powder, and flour. The sugar feeds the yeast and tenderizes the dough. You only need 2 Tablespoons of sugar. You can use all-purpose flour or bread flour in this recipe. All-purpose flour is convenient for most, but bread flour produces chewier dinner rolls.
- Kneading the dough. You can knead the dough with a mixer or with your hands.
- 1st rise. The dough rises in about 1-2 hours in a relatively warm environment.
- Shaping the rolls. Form the rolls into balls as if you were making regular dinner rolls. This dough recipe makes slightly fewer rolls.
- 2nd rise. Let the shaped rolls rise until puffy which takes up to 1 hour.
- Baking. Bake until the rolls are golden brown, around 25 minutes.
- Topping. Brush melted butter on warm rolls and top with sea salt.
You can use a paddle attachment or a dough hook to make this dough. You can also make the dough by hand, but it requires a bit of arm muscle. After the dough comes together in the mixing bowl, it’s time to knead. You can simply continue beating the dough with the mixer for this step or you can knead the dough by hand.
If you’re interested, I provide further detail about kneading in my How to Knead Dough video tutorial. My Baking with Yeast Guide is also a wonderful resource for all bread beginners!
Any 10-12 inch oven-safe skillet or 9×13-inch baking pan is fine. This is the cast iron skillet I use, and I highly recommend it. It’s inexpensive, comes pre-seasoned, works on all types of cooktops, heats evenly, and is made to last a lifetime. (Not sponsored, just a true pan fan!)
This 10.25-inch-diameter, 2-inch-deep size is what I use for skillet turkey pot pie, frittata, honey skillet cornbread, bruschetta chicken, cornmeal cake, biscuits, my Dutch baby pancake recipe, asiago-crusted skillet bread, and more. Talk about a useful pan to have in the kitchen!
Absolutely. I usually use garlic powder, dried rosemary, dried parsley, and dried basil because I have each on hand regularly. However, you can substitute with fresh minced garlic and fresh herbs instead. See recipe details below.
Process in Photos: Sea Salt & Herb Skillet Rolls
When you get started, use these helpful photos as your guide.
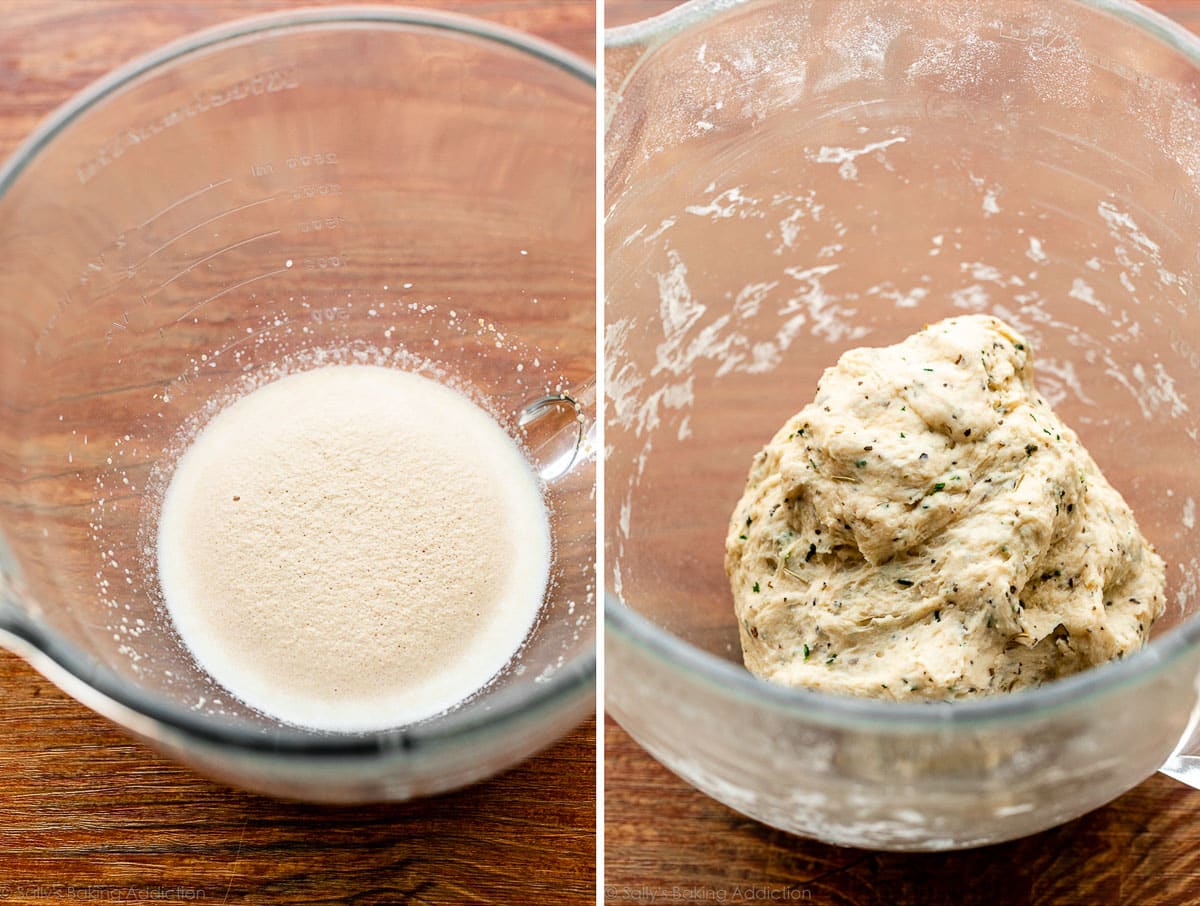
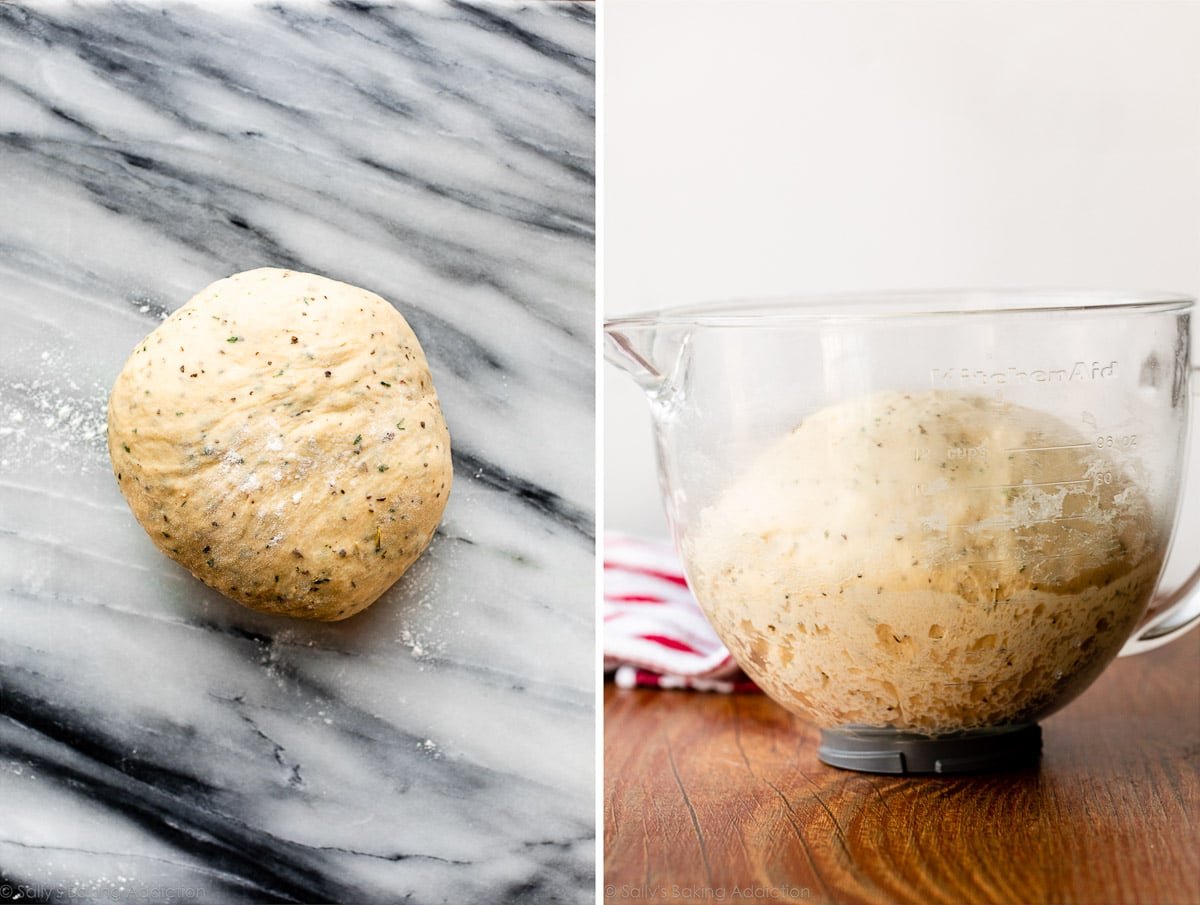
Combine warm milk, yeast, and 1 Tablespoon sugar together in your mixing bowl. Cover and let the mixture sit for a few moments until foamy on top. In this step you are proofing the yeast to ensure it’s active (and not dead and/or expired). NOTE: I do this same step even if using instant yeast. It’s not always necessary as most yeast available these days is already active, but it takes just a few minutes and doesn’t hurt.
After the dough comes together, it will be soft and slightly sticky.
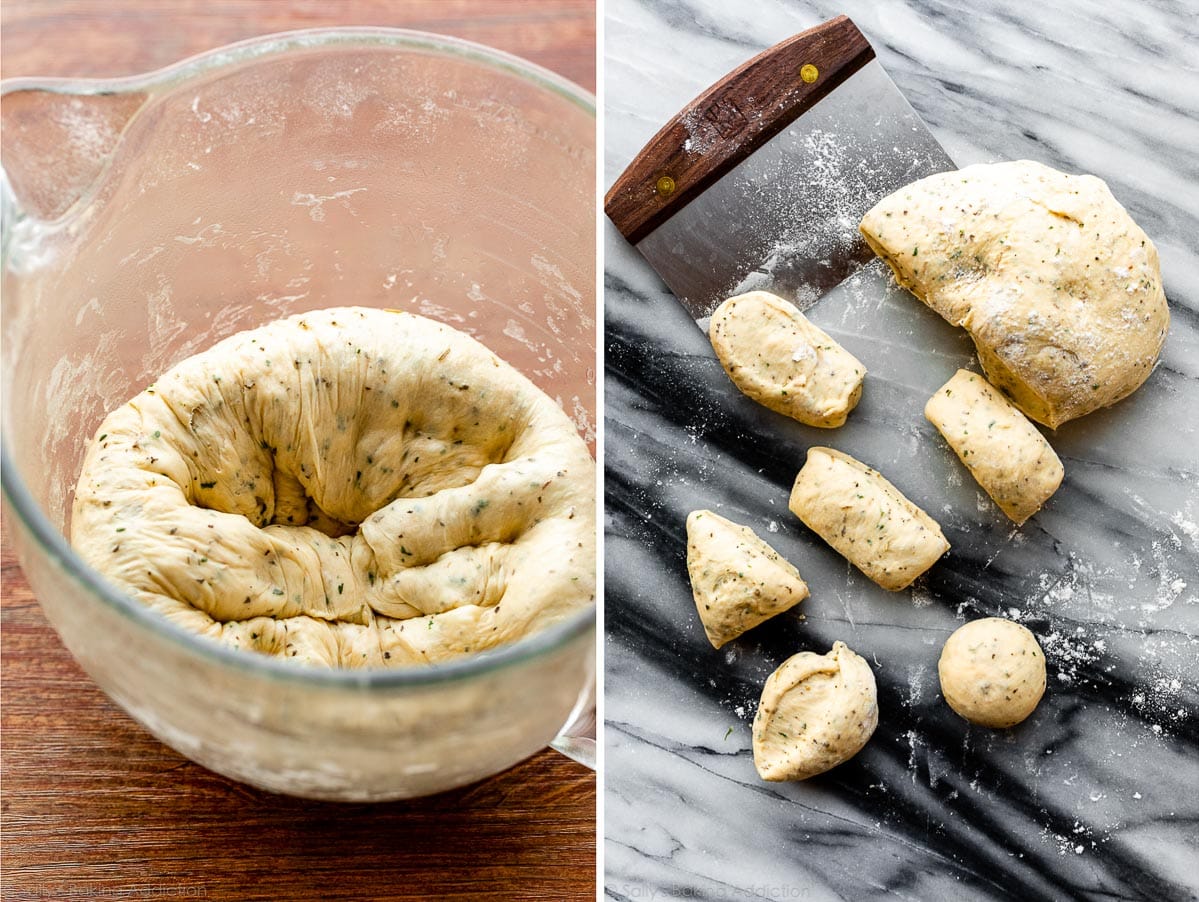
Knead the dough, using my How to Knead Dough video tutorial as necessary for visuals and extra help. After kneading, let the dough rise until doubled in size.
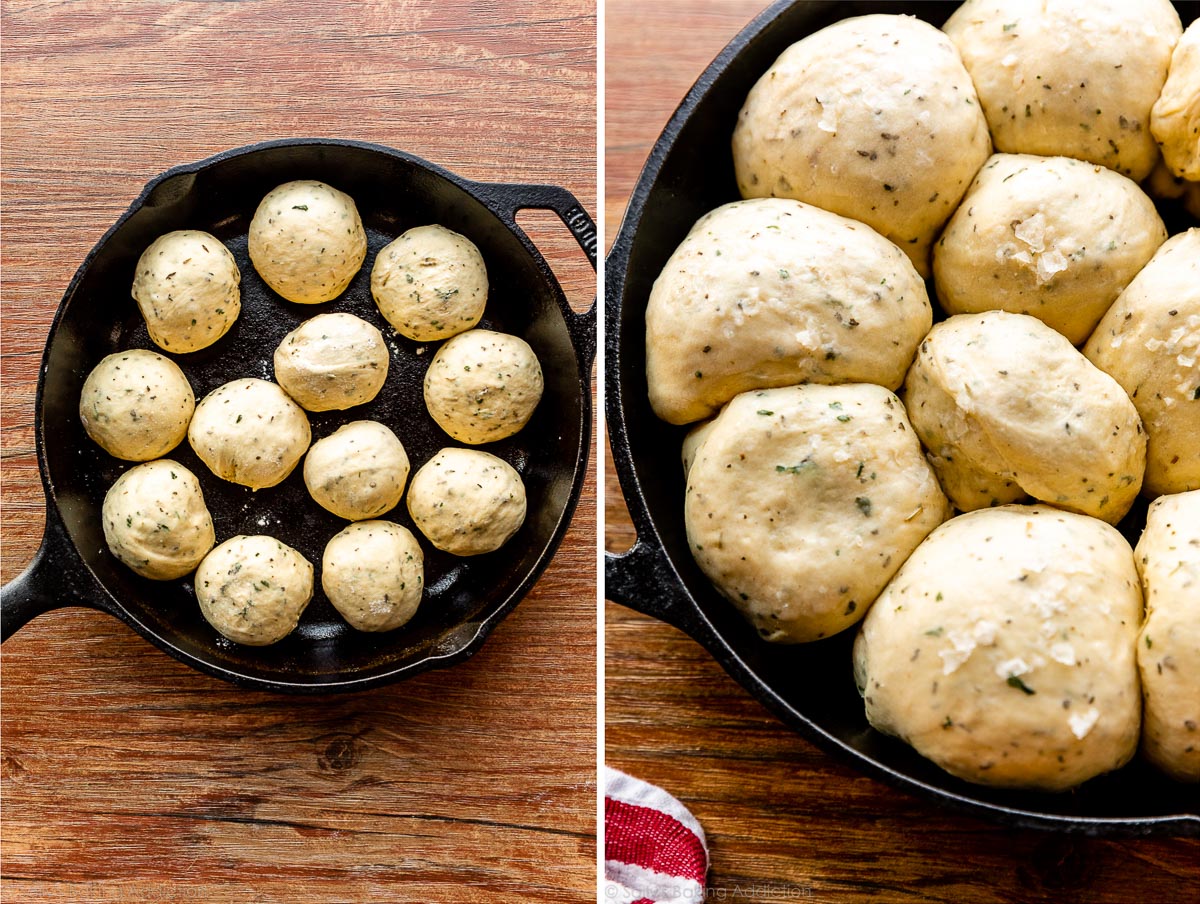
Punch it down to release the air and divide into 12 equal pieces. Shape into balls.
Arrange in your desired baking pan (I always use this 10.25 inch skillet). Let the rolls rise until puffy.
And then it’s time to bake.
Finish with Melted Butter & Sea Salt
The herb rolls are done when they’re golden brown… and when your kitchen smells like an herb garden. Brush warm rolls with melted butter and finish with sea salt. If you’re ever shopping online for sea salt and need a recommendation, I use and love Maldon flaky sea salt or this coarse sea salt from Whole Foods.
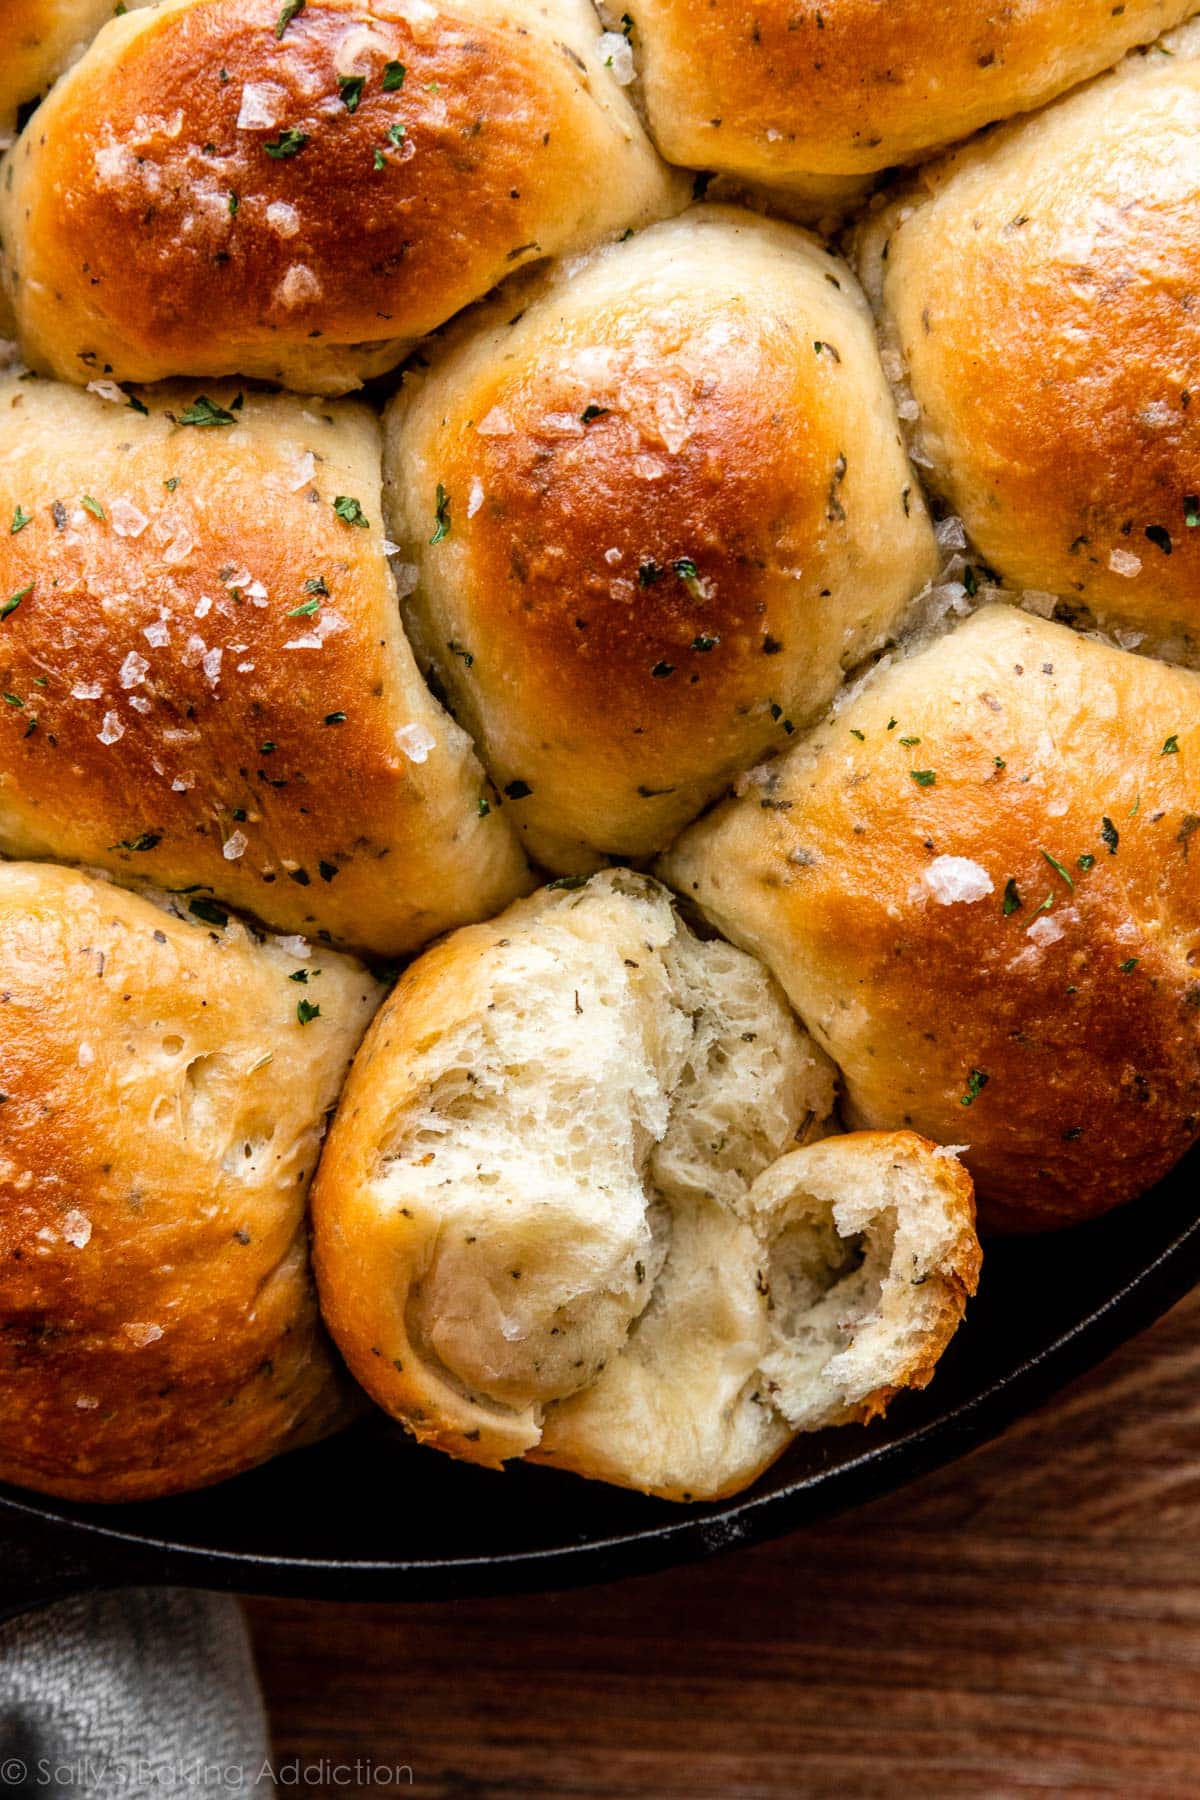
There’s a crunch from the salt on top and the centers are as soft as a mountain of cushy pillows. They’re truly out of this world warm from the oven and when you set them down on the table, all eyes will immediately dart over their way. (Impossible to resist!)
More Standout Bread Recipes
- Pizza Pull Apart Rolls
- Brown Butter Sage Dinner Rolls & Sweet Potato Dinner Rolls
- Focaccia
- Homemade Bread Bowls
- Sandwich Bread
- Pizza Dough (great for beginners!)
- Soft Multigrain Bread
- Croissant Bread
- Homemade Breadsticks
Sea Salt & Herb Skillet Rolls
- Prep Time: 3 hours, 25 minutes
- Cook Time: 25 minutes
- Total Time: 3 hours, 50 minutes
- Yield: 12 rolls
- Category: Bread
- Method: Baking
- Cuisine: American
Description
Sea salt & herb skillet rolls are the fluffiest, softest, most flavorful homemade rolls to have with dinner tonight!
Ingredients
- 1 cup (240ml) whole milk, warmed to about 110°F (43°C)
- 2 and 1/4 teaspoons active dry yeast (1 standard packet)*
- 2 Tablespoons granulated sugar, divided
- 1 large egg, at room temperature
- 1/4 cup (4 Tablespoons; 56g) unsalted butter, melted + slightly cooled and divided
- 1 teaspoon salt
- 2 teaspoons each: dried rosemary, dried basil, & dried parsley*
- 1 teaspoon garlic powder (or 2 teaspoons minced garlic)
- 3 cups (390g) bread flour (spooned & leveled), plus more for work surface
- flaky sea salt or coarse sea salt, for topping
Instructions
- Prepare the dough: Whisk the warm milk, yeast, and 1 Tablespoon sugar together in the bowl of your stand mixer. Cover and allow to sit for 5 minutes. *If you do not own a stand mixer, you can do this in a large mixing bowl and in the next step, mix the dough together with a large wooden spoon/silicone spatula. It will take a bit of arm muscle. A hand mixer works, but the sticky dough repeatedly gets stuck in the beaters. Mixing by hand with a wooden spoon or silicone spatula is a better choice.*
- Add the remaining sugar, egg, 2 Tablespoons butter, salt, rosemary, basil, parsley, garlic powder, and 1 cup flour. With a dough hook or paddle attachment, mix/beat on low speed for 30 seconds, scrape down the sides of the bowl with a silicone spatula, then add the remaining flour. Beat on medium speed until the dough comes together and pulls away from the sides of the bowl, about 2 minutes. If the dough seems too wet to a point where kneading (next step) would be impossible, beat in more flour 1 Tablespoon at a time until you have a workable dough. Dough should be soft and a little sticky, but still manageable to knead with lightly floured hands.
- Knead the dough: Keep the dough in the mixer and beat for an additional 5 full minutes, or knead by hand on a lightly floured surface for 5 full minutes. (If you’re new to bread-baking, my How to Knead Dough video tutorial can help here.) If the dough becomes too sticky during the kneading process, sprinkle 1 teaspoon of flour at a time on the dough or on the work surface/in the bowl to make a soft, slightly tacky dough. Do not add more flour than you need because you do not want a dry dough. After kneading, the dough should still feel a little soft. Poke it with your finger—if it slowly bounces back, your dough is ready to rise. You can also do a “windowpane test” to see if your dough has been kneaded long enough: tear off a small (roughly golfball-size) piece of dough and gently stretch it out until it’s thin enough for light to pass through it. Hold it up to a window or light. Does light pass through the stretched dough without the dough tearing first? If so, your dough has been kneaded long enough and is ready to rise. If not, keep kneading until it passes the windowpane test.
- 1st Rise: Lightly grease a large bowl with oil or nonstick spray. Place the dough in the bowl, turning it to coat all sides in the oil. Cover the bowl with aluminum foil, plastic wrap, or a clean kitchen towel. Allow the dough to rise in a relatively warm environment for 1-2 hours or until double in size. (I always let it rise on the counter. Takes about 2 hours. For a tiny reduction in rise time, see my answer to Where Should Dough Rise? in my Baking with Yeast Guide.)
- Grease a 10-12 inch oven-safe skillet or 9×13-inch baking pan. If using cast iron skillet and it’s already seasoned, no need to grease it. You can also bake the rolls on a lined baking sheet.
- Shape the rolls: When the dough is ready, punch it down to release the air. Divide the dough into 12 equal pieces. (Just eyeball it—doesn’t need to be perfect!) Shape each piece into a smooth ball. Arrange in prepared skillet/baking pan or a couple inches apart on a lined baking sheet.
- 2nd Rise: Cover shaped rolls with aluminum foil, plastic wrap, or a clean kitchen towel. Allow to rise until puffy, about 45-60 minutes.
- Adjust oven rack to a lower position and preheat oven to 350°F (177°C). (It’s best to bake the rolls towards the bottom of the oven so the tops don’t burn.)
- Bake the rolls: Bake for 23-27 minutes or until golden brown on top, rotating the pan halfway through. If you notice the tops browning too quickly, loosely tent the pan with aluminum foil. Remove from the oven, brush warm rolls with remaining melted butter and sprinkle tops with sea salt. Cool for a few minutes before serving.
- Cover leftover rolls tightly and store at room temperature for 2-3 days or in the refrigerator for up to 1 week.
Notes
- Freezing Instructions: Prepare recipe through step 6. Place shaped rolls in a greased baking pan, cover tightly, and freeze for up to 3 months. Once frozen, the dough balls won’t stick together anymore and you can place them in a freezer bag if needed. On the day you serve them, arrange the dough balls in a greased baking pan, cover tightly, then let them thaw and rise for about 4-5 hours. Bake as directed. You can also freeze the baked rolls. Allow them to cool completely and then freeze for up to 3 months. Thaw in the refrigerator or at room temperature. Reheat as desired. If reheating the whole pan, lightly cover and reheat in a 300°F (149°C) oven for about 10 minutes or until warm.
- Overnight Instructions: Prepare the recipe through step 6. Cover the shaped rolls tightly and refrigerate for up to about 15 hours. At least 3 hours before you need them the next day, remove the rolls from the refrigerator, keep covered, and allow to rise on the counter for about 1-2 hours before baking. Alternatively, you can let the dough have its 1st rise in the refrigerator overnight. Cover the dough tightly and place in the refrigerator for up to about 15 hours. Remove from the refrigerator and allow the dough to fully rise for 2 more hours. Continue with step 5.
- Special Tools (affiliate links): Electric Stand Mixer or Large Glass Mixing Bowl with Wooden Spoon / Silicone Spatula | 10- to 12-inch Oven-Safe Skillet, 9×13-inch Baking Pan, or Baking Sheet | Pastry Brush | Flaky Sea Salt or Coarse Sea Salt
- Milk: Whole milk is best. If needed, you can substitute with lower fat milk or nondairy milk. Avoid nonfat milk.
- Yeast: You can substitute instant yeast with no other changes to the recipe. The rise times may be a little shorter. Reference my Baking with Yeast Guide for answers to common yeast FAQs.
- Fresh Herbs: You can substitute the dried herbs with 1 Tablespoon EACH of freshly chopped herbs.
- Salt & Sea Salt Topping: Flaky or coarse sea salt is best for topping. If you’re ever shopping online for flaky sea salt and need a recommendation, I use and love Maldon flaky sea salt. I do not recommend coarse/flaky sea salt in the dough—you need fine salt. You can use fine sea salt or regular table salt.
- Flour: I recommend bread flour for extra chewy and flaky rolls. You can use all-purpose flour if needed instead. Either flour is fine and there are no other changes to the recipe if you use one or the other.


Reader Comments and Reviews
Simply delicious!
Can I double the recipe or should I make two separate??
Hi Tracy, For the best results, we recommend making 2 separate batches.
Can I make these with whole meal flour?
Hi Ankita, These rolls would be very dense. We have a recipe for whole wheat dinner rolls that you may be able to use your whole meal flour.
These were delicious!! I subbed out parsley for oregano since I didn’t have any of the former, and oh my gosh. They’re so fluffy and soft. I also used Maldon flaked sea salt for the tops. I used a 9 x 13 baking pan with parchment paper instead of a skillet and mine look very similar to the pictures.
Hi Sally,
Could these be made into sourdough rolls?
Hi Hannah, we haven’t tried making these with a sourdough starter, but let us know if you do!
I’m also curious if trying this with a sourdough starter or discard, any idea what you would change/substitute in the recipe? Still adding milk or need to change portions since the starter is a wet ingredient?? Would love to try with my starter too!
Because I have only 1 oven and am thinking of time management for Thanksgiving, is it okay to make ahead (except for using the flake salt) and then freeze the rolls, then thaw when needed, brush top with butter and add the flake salt then and then warm them after taking the turkey out of the oven?
Hi Mark, absolutely — see recipe notes for make ahead instructions.
Hi! I was wondering if you could substitute whole milk for 2%?
Hi Lindsey– absolutely! Same amount.
Perfect! Thank you so much!
Can I let this rest before the second rise? Once it has been rolled out into individual buns and in the skillet, can I put it into the fridge and hold it there for an hour or two? Then pull it out and have it rise a bit later? I didn’t time it well and would like them to go into the oven just before dinner time. Is it too late to do this?
Hi Mary, that shouldn’t be a problem. Hope you love them!
Hi sally! LOVE LOVE LOVE all of your recipes and can’t wait to try these! A quick question- If i wanted to stuff these with mozzarella or a cheese sauce to make a gooey cheesy dinner roll, would it make a difference to the second rise in any way?
Hi Sim! We haven’t tested it but don’t see why that would be an issue. A small cube of cheese would likely work best to stuff inside the rolls, a cheese sauce may be too wet.
Thankyou! Appreciate the help 😀
I have made these delicious skillet rolls three times now. We love them, I used Italian seasoning and parsley. They are so light and fluffy on the inside with a beautiful brown color. They are fairly easy to make too. I love knowing I can turn to your recipes and have success in whatever I make, thank you!
Hi, I wanted to ask if I can make it kinda a cinnamon rolls, but inside filled with savoury stuff, like cheese and spinach? I want to try and make a spinach cheese roll but not sure how to. Like for normal cinnamon rolls, we would add more sugar (1/4 cup) but obviously we won’t do that with this recipe. And would the other steps be similar?
Hi Veronica, I haven’t tested this dough as rolls so I can’t say for use. I do use pizza dough to make these pizza rolls that would certainly work with different flavors/filling.
I’m a newbie bread maker. I followed directions exactly (including slowly warming up my milk to 110!) aside from one mistake at the end (I missed the note about the 2nd rise and had already brushed them with butter).
They are DELICIOUS. The texture is beautiful (even with AP flour) and they smelled ridiculously amazing while putting them together and baking. Whew! I couldn’t wait to taste em.
My color came out great however, I noticed that the tops look more biscuit-like than smooth like a roll typically is. Ideas??
Hi KS! So glad you enjoyed these skillet rolls. A smooth top is really all about how you roll/shape the rolls. I’m glad to help– you can see and read exactly how I shape rolls like this in my soft dinner rolls recipe post. There’s a helpful video for you to visualize it.
I made these tonight and they were fabulous! I did run out of milk (I only had 1%), but added some full fat coconut milk and that seemed to work really well. Perhaps it added the extra bit of fat that whole milk would have provided. They were soft and fluffy with a delicious crust on top 😀
Can I use 1% or buttermilk instead of whole milk?
Buttermilk would be the best substitute.
I ended up using the whole milk just to be safe. These rolls were absolutely amazing!! I used the 10” cast iron, the rolls pretty much exploded out of it, but oh boy they taste fantastic!!!
Well this was fan-freaking-tastic. After a long day of cleaning up bodily fluids and dodging nerf bullets from my sadistic little children 😉 this hit the spot tonight. I needed a way to use up some left over basil and some heavy whipping cream, so I subbed the basil for herbs and mixed up the heavy whipping cream with skim milk to make it more like whole milk, and it was fragrant and delicious. Tomorrow I will make it again the way it’s actually supposed to be made (my husband went shopping for me!) and I can’t believe it’ll get better than this but here’s me, volunteering to be a taste tester! Yum yum yum yum yum. 2 of my kids were still up tonight at 10 when they came out of the oven and they were blown away by the deliciousness. Gosh I must really love my kids not to eat every last one of these myself. Thank you!
I’m just wondering if you think it would work to sub in almond milk for the whole milk in this recipe? Thanks!
That shouldn’t be a problem.
Can these be made using almond or coconut flour as we are gluten free/corn free?
Hi Loretta, I have not tested this recipe with an alternate flour, but let me know if you do!
Yes! Punch it down, cover and refrigerate. Then when you take it out, punch down again to release any more air bubbles if needed before using a sharp knife to cut.
Sally, I have a question. I plan to make these this weekend. Your recipe for honey butter rolls says to brush them with butter after baking, so they rise higher. But this recipe says to do so before baking, along with the sea salt. Which should I do? Can’t wait to try -these look fabulous!
For these I found the best flavor was when I brushed the butter on top after the second rise. You can brush more on top after they bake if you wish!
Wow, Sally! I made these last night while baking a meal for another family – of course saved a few for me. While making the trek to deliver, I got a text from my significant other that they were the best rolls he had ever had. I was literally daydreaming about eating it the entire journey home. Once I finally got a, still warm, bite of the roll, the flavor was outstanding! All the herbs inside the roll were incredible and the salt on the top was the perfect topping.
These were incredible! Thanks for this recipe!
What’s the difference between bread flour and all purpose flour?
Bread flour contains more protein than all-purpose flour. The extra protein helps with gluten development, so some recipes (like making actual bread) call for bread flour because it yields a chewy, elastic crumb.
Hwy Sally – is there any way that these can be made into whole wheat or multigrain?
Hi Roxanne, I suggest subbing half of the bread flour for whole wheat flour.
Sally! These rolls are FANTASTIC!!
First time I used yeast and they’re perfect!
Thanks for being a great teacher. <3
I made these last night and while they were delicious, they did not look golden brown like the photo. They looked almost like they did when put them in the oven, just a tiny bit more brown. Any idea why?
Hi Amy! If you find the rolls are not browning, they could have been overproofed (over-rising). Did they rise too long? If not, maybe they need longer in the oven?
Another one of your recipes that is now a regular in my home! These always bake up perfect and look so rustic baked in a cast iron. We stuffed our rolls with little cubes of mozzarella to go along side tomato soup for dinner tonight! Just perfect!
I made these for dinner with my in-laws and they were fantastic! I am making them again and planning to use for pepperoni rolls/bread. I made it today (a Thursday) and put it in the fridge after the first rise because I am not making until Saturday. My bread is still rising, perhaps even doubling in size while in the fridge. I opened the fridge to find it had busted the lid from my container haha! I know the yeast are still working, but will this be a problem for making my bread on Saturday instead of Friday? I was making another batch and wasn’t sure if maybe I should just put it in the freezer instead? Thanks for your help!
These look delicious and I really want to make them but I don’t have a cast iron skillet. Will they come out the same cooking them in a round cake pan?
Yes- just as easy in a regular baking pan. Same oven temp + time.
Can these be cooked in a regular pan such as a 9 inch round cake pan or 9×13 baking pan?
Yep! Any pan large enough to hold them all works.