

Learn how to make a perfectly buttery, flaky pie crust from scratch using this in-depth tutorial and video. This page includes all of my best success tips, lots of step-by-step photos, and a thoroughly detailed recipe. Millions of readers have been using this helpful guide since it was first published. Become a pro with this crust recipe and the rest will be as easy as… eating salted caramel apple pie!
I originally published this recipe in 2015 and have since added new photos, a video tutorial, and more success tips.
For a baker, there’s nothing more satisfying than making a pie completely from scratch. Pies are often made for special occasions, and there’s a good reason for that: they’re time consuming. This shouldn’t scare you! It should intrigue you. If you’ve ever felt intimidated about making homemade pie crust, I’m here to walk you through it and cheer you on. If I can do this, you can do this.
Pie crust is the foundation for so many delicious desserts (plus savory pies and quiche), so once you build up your confidence in making a crust, you’re opening a door to an entire baking category. And that’s exciting! Whether your favorite pie filling is apple pie or creamy banana cream pie, or even eggs & cheese, the success of the overall pie can really hinge on the quality of the crust.
You wouldn’t hang a beautiful piece of art or favorite photo in a terrible frame, right?
Today I’m teaching you everything about making a buttery, flaky pie crust. This is my absolute favorite pie crust recipe and one of the most popular recipes on this website.
With all the recipe testing that goes into publishing the many pie recipes on this website and in my cookbooks, plus my annual Pie Week, it’s not an understatement to say that I have made a LOT of pies. Along the way, I’ve learned what works and what doesn’t, and I’m happy to share it all with you.
One reader, Laurie, commented: “Wow! I made a batch of my old favorite all-butter dough and a batch of this dough so I could have a ‘bake off’ to see which was better. This crust was fantastic: tender and very flaky. It will be my new standard crust! ★★★★★“
Another reader, Leo, commented: “This recipe was great! The dough was easy to make with the simple and detailed instructions from this recipe. I used it for my peach pie and it’s delicious! I also followed the braid and lattice tutorial and my pie looks great! ★★★★★“
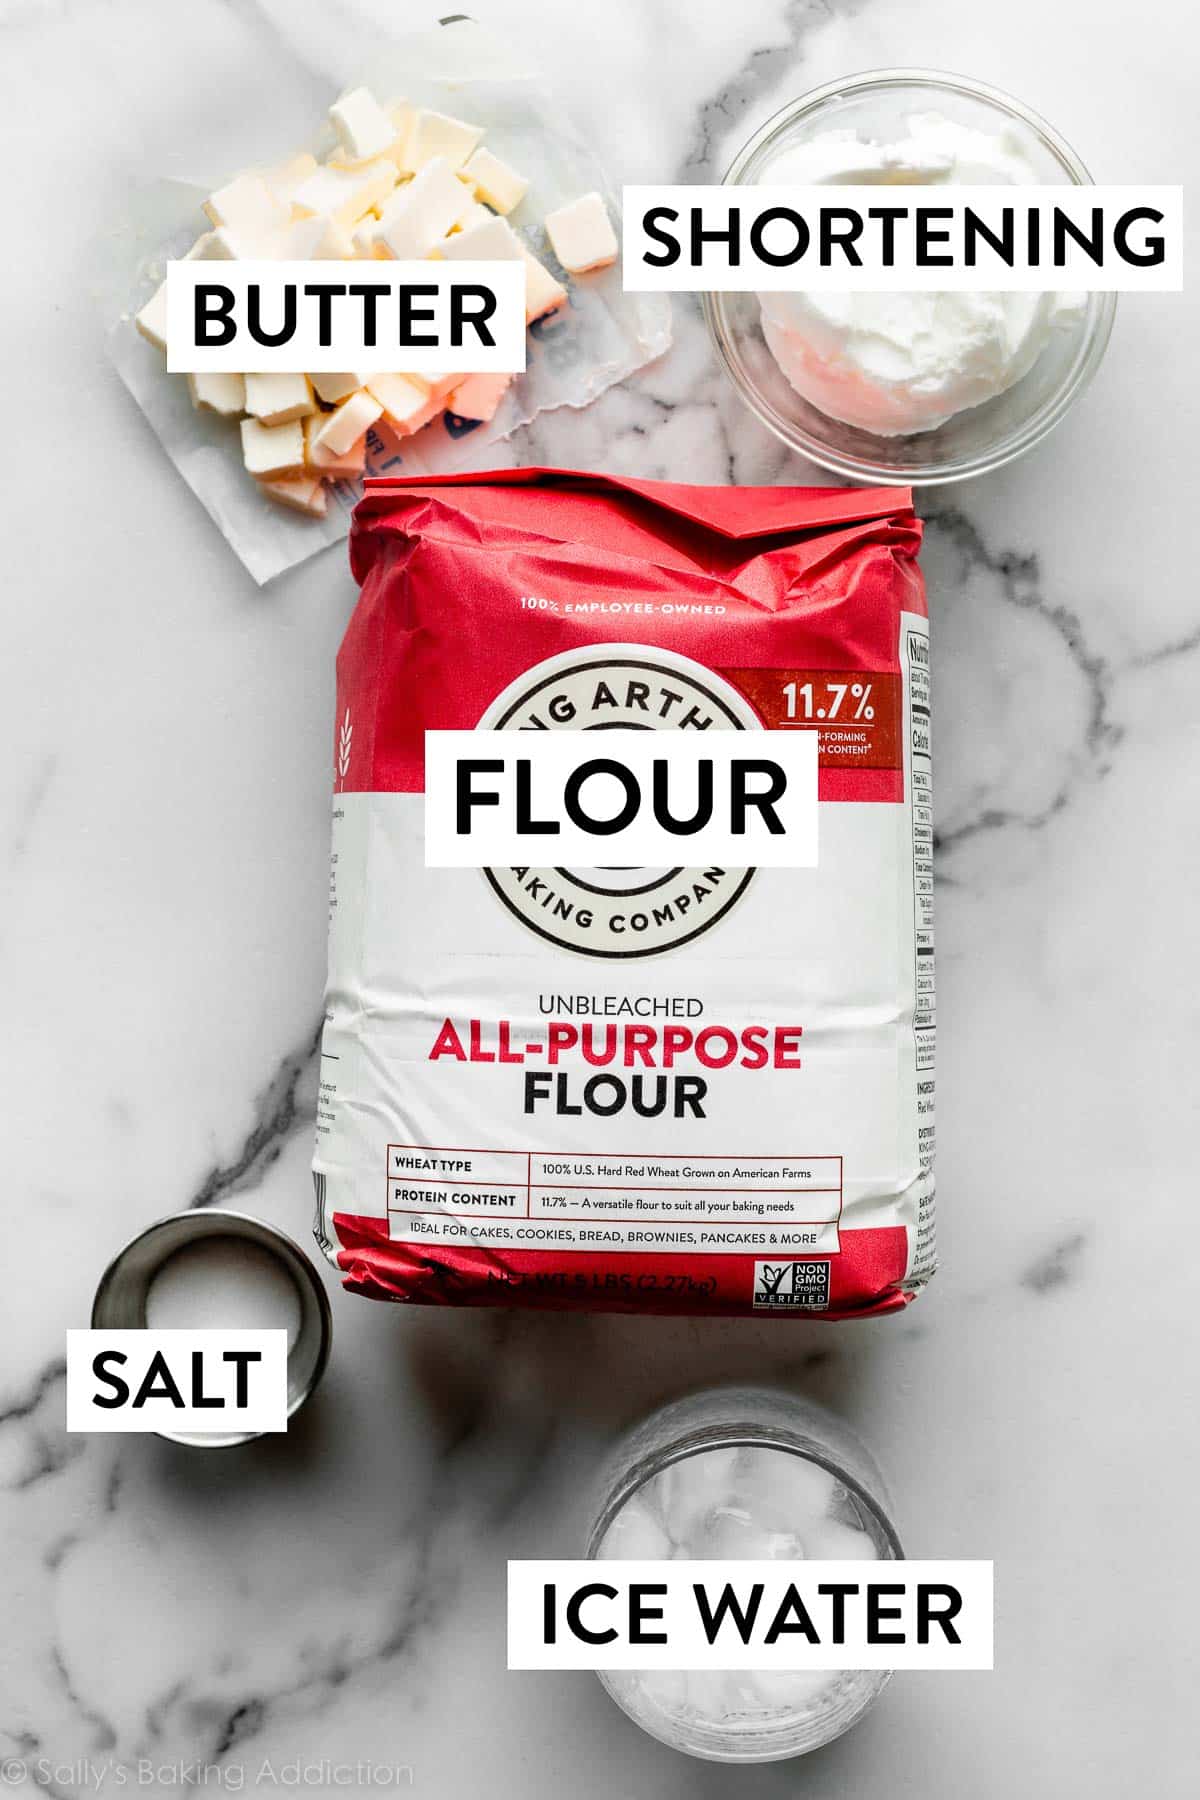
Start With These 5 Ingredients
The ingredient list for pie crust is short & simple:
- Flour: Start with quality flour. Did you know that not all all-purpose flours are equal? King Arthur Unbleached All-Purpose Flour is my go-to for not only pie crust, but for everything. (Not working with the brand, just a true fan!) Why? Its high protein level: “At 11.7% protein, it tops ordinary American all-purpose flours by nearly 2 percentage points.” What does this mean? Baked goods rise higher and stay fresh longer.
- Salt: Enhances the flavor.
- Butter: For that unparalleled buttery flavor and flaky layers.
- Vegetable Shortening: For structure and stability. More on this below.
- Ice water: Liquid brings the dough together. Some recipes call for half water and half vodka, because alcohol doesn’t promote gluten formation, which helps the crust stay flaky and tender. Basically, it’s a gift to anyone who accidentally overworks dough. If you want to try using vodka, use 1/4 cup (60ml) each cold vodka and cold water in this recipe.
You can use this pie dough for so many recipes beyond a traditional pie, too, such as mini pecan pies, mini fruit galettes, apple hand pies, and homemade brown sugar cinnamon pop tarts.
Is Pie Crust Better With Butter or Shortening?
I use BOTH shortening and butter in this pie crust because they work together to make the BEST crust. Buttery, flaky, and tender: the pie-fect trifecta.
- What does butter do? Butter adds flavor and flakiness.
- What does shortening do? Shortening helps the dough stay pliable, which is helpful when you’re rolling and shaping it. Plus, shortening’s high melting point helps the crust stay tender and maintain its shape as it bakes. Have you ever had a butter pie crust lose its shape completely? Shortening is “shape insurance.” 😉
If you don’t want to use shortening, try this all-butter pie crust instead. Let’s compare:
- Using all butter creates a lighter-textured crust and this is due to the butter’s water content. As the crust bakes, the butter’s water converts to steam, lifting up the dough and creating flaky layers. But because of all this butter, the crust doesn’t usually have a perfectly neat-edge/shape compared to the shortening and butter combination.
Both crusts taste buttery and flaky. But overall, this butter-and-shortening crust wins in terms of texture and flavor; AND, if you follow the pie crust recipe carefully, it holds shape too.
The Secret to Perfect Pie Crust: COLD
The refrigerator is as important as the oven when you’re making a homemade pie.
Why the emphasis on temperature? Keeping your pie dough as cold as possible helps prevent the fats from melting before the crust hits the hot oven. If the butter melts inside the dough before baking, you lose the flakiness. When the lumps of fat melt in the oven as the pie bakes, their steam helps to separate the crust into multiple flaky layers, as explained above. Warm fats will yield a hard, crunchy, greasy crust instead of a tender, flaky crust.
The colder the ingredients, the easier your pie crust is to work with, and the better it will turn out.
Two Tricks to Start as Cold as Possible:
- I keep some of my butter in the freezer and transfer it to the refrigerator a few hours before beginning the crust. This way it is still a little bit frozen and very, very cold. Simply keep the shortening in the refrigerator.
- Mix the dry ingredients together in a large bowl (the flour and salt). Place the bowl in the refrigerator or freezer while you get the rest of the ingredients ready.
These Step-By-Step Photos Will Help
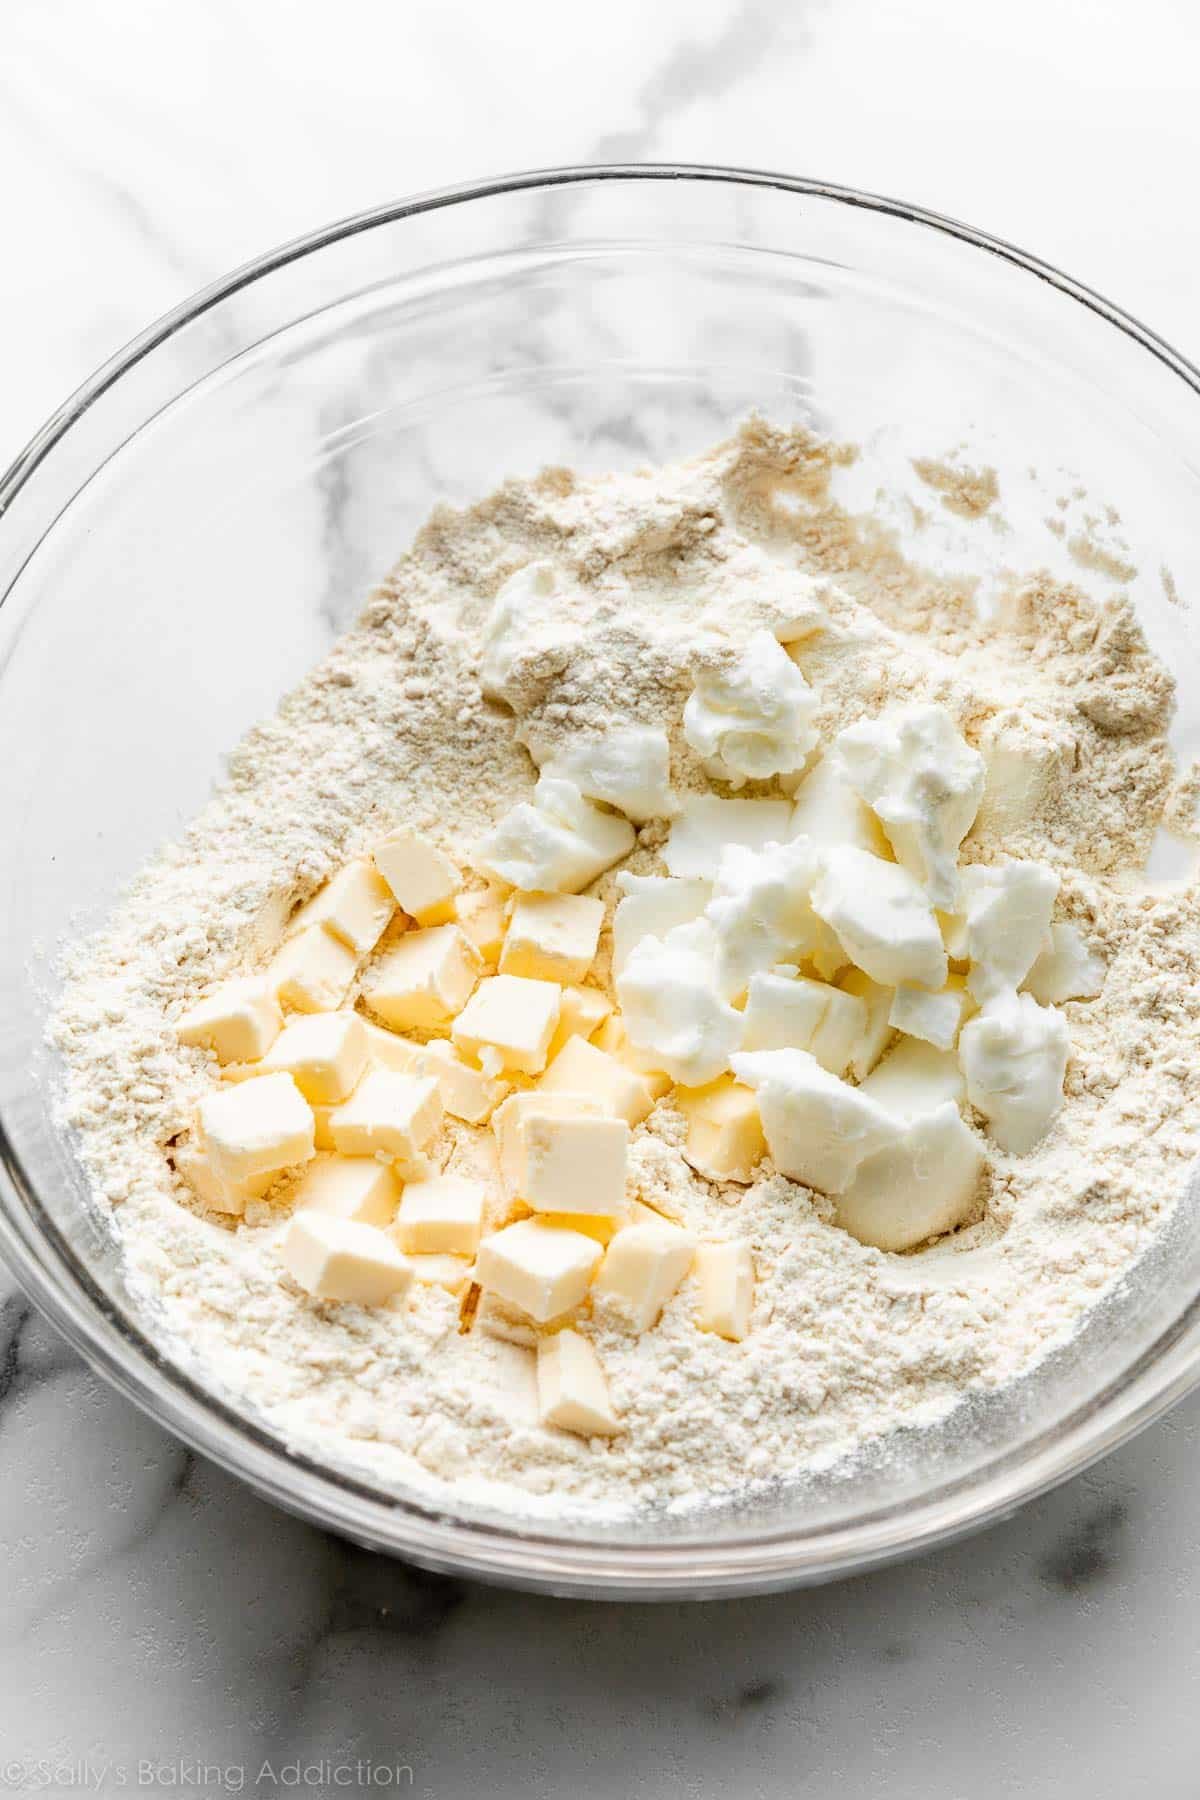
Take the butter and shortening out of the refrigerator. Cube the cold butter and measure out the cold shortening. Give the shortening a little chop—this is actually optional because, truly, the shortening is quite soft even when cold so it’s easy to mix in.
Now it’s time to combine everything. Add the butter and shortening to the dry ingredients, and use a pastry cutter (or 2 forks) to cut in the fats. Some pie crust recipes use a food processor for this, but I don’t recommend it, because it can lead to overworking the fats into the dough, cutting them up too small—which means you’ll need less water and your dough will fall apart. In this step, you’re only breaking up the cold fat into tiny little flour-coated pieces; you’re not completely incorporating it:
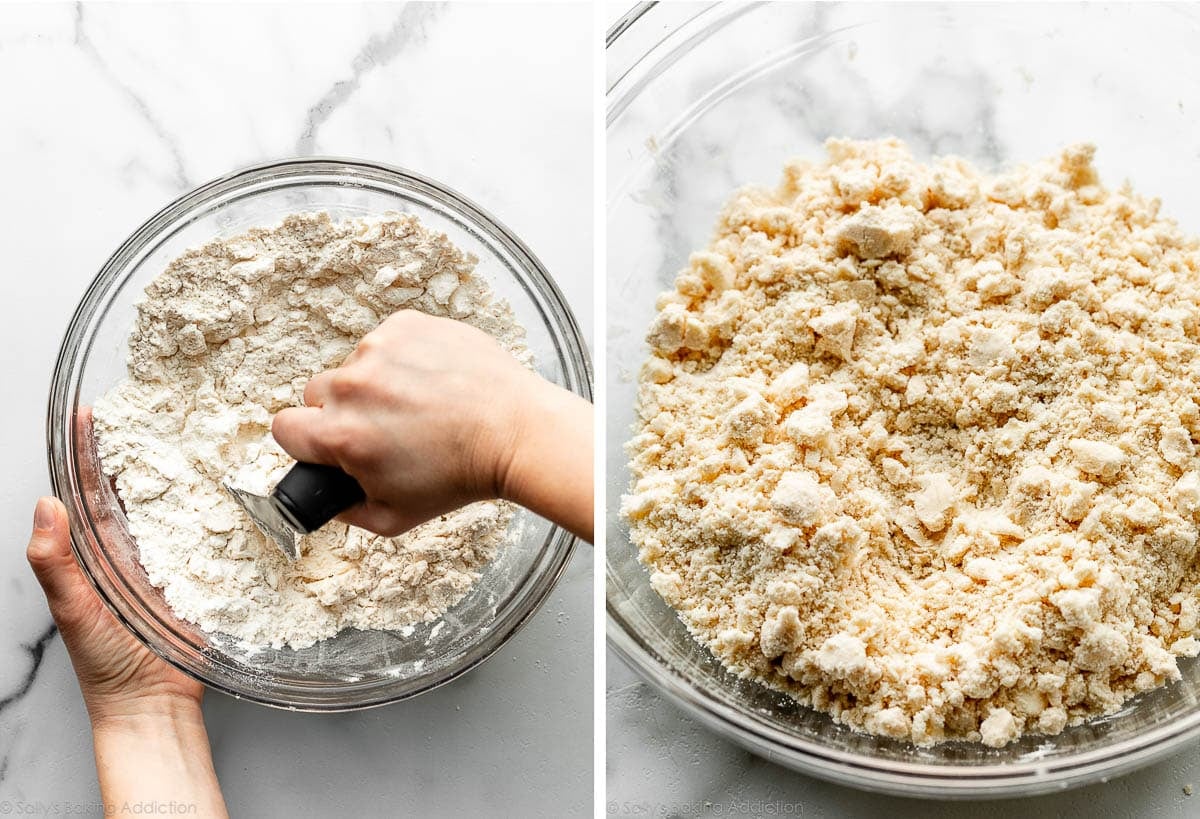
Cut in the fats until the mixture resembles coarse meal—crumbly with lots of lumps, as you see above. You should still have some larger pieces of butter and shortening when you’re done.
From a cup of ice water, measure out 1/2 cup (120ml), since the ice has melted a bit. Drizzle the cold water into the dough 1 Tablespoon (15ml) at a time, stirring after every Tablespoon has been added.
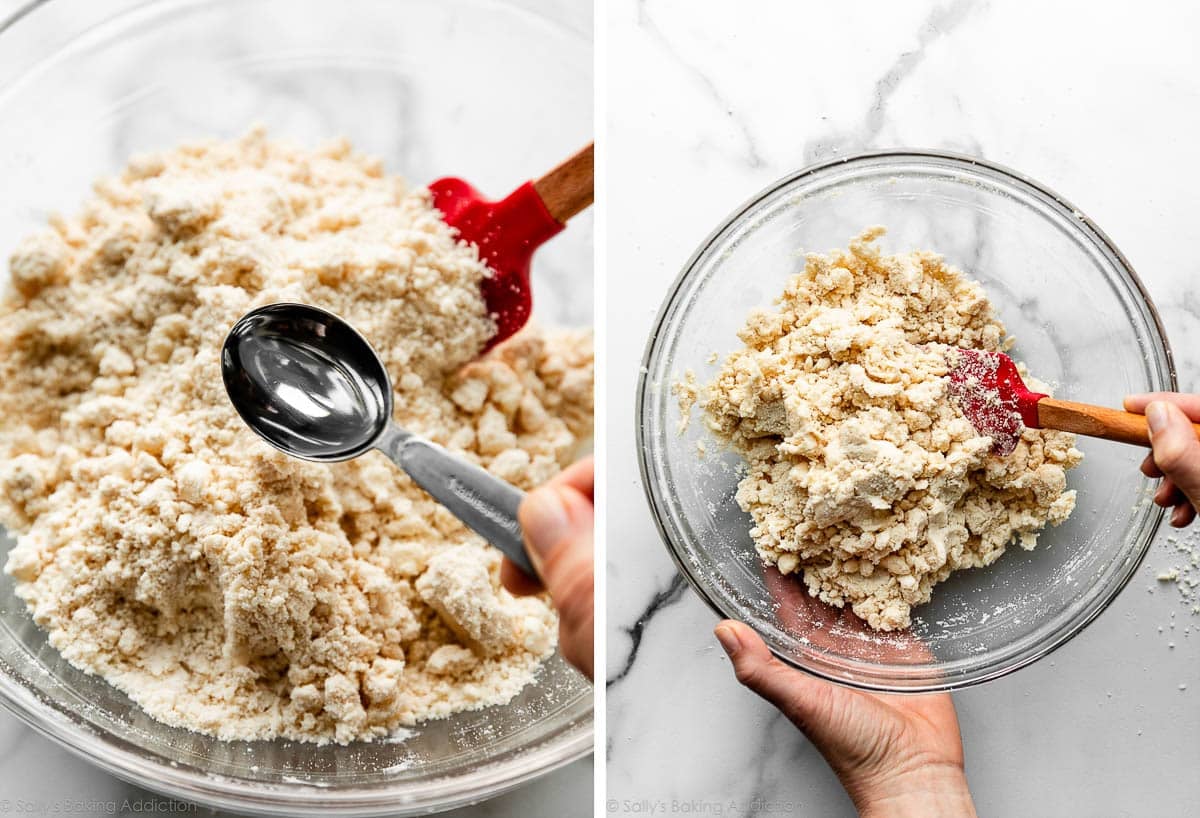
You’ll add just a little water at a time so that you don’t accidentally add too much. Stop adding water when the dough begins to form large clumps. I usually use 1/2 cup (120ml) of water, but if the weather is humid, you may not need as much, and if the weather is really dry, you may need a little more.
If too much water is added, the pie dough will require more flour and become tough.
If too little water is added, you’ll notice the dough is dry and crumbly when you try to roll it out and handle it.
You want the dough to clump together, but not feel overly sticky. Once the dough is clumping together, transfer the dough to a floured work surface.
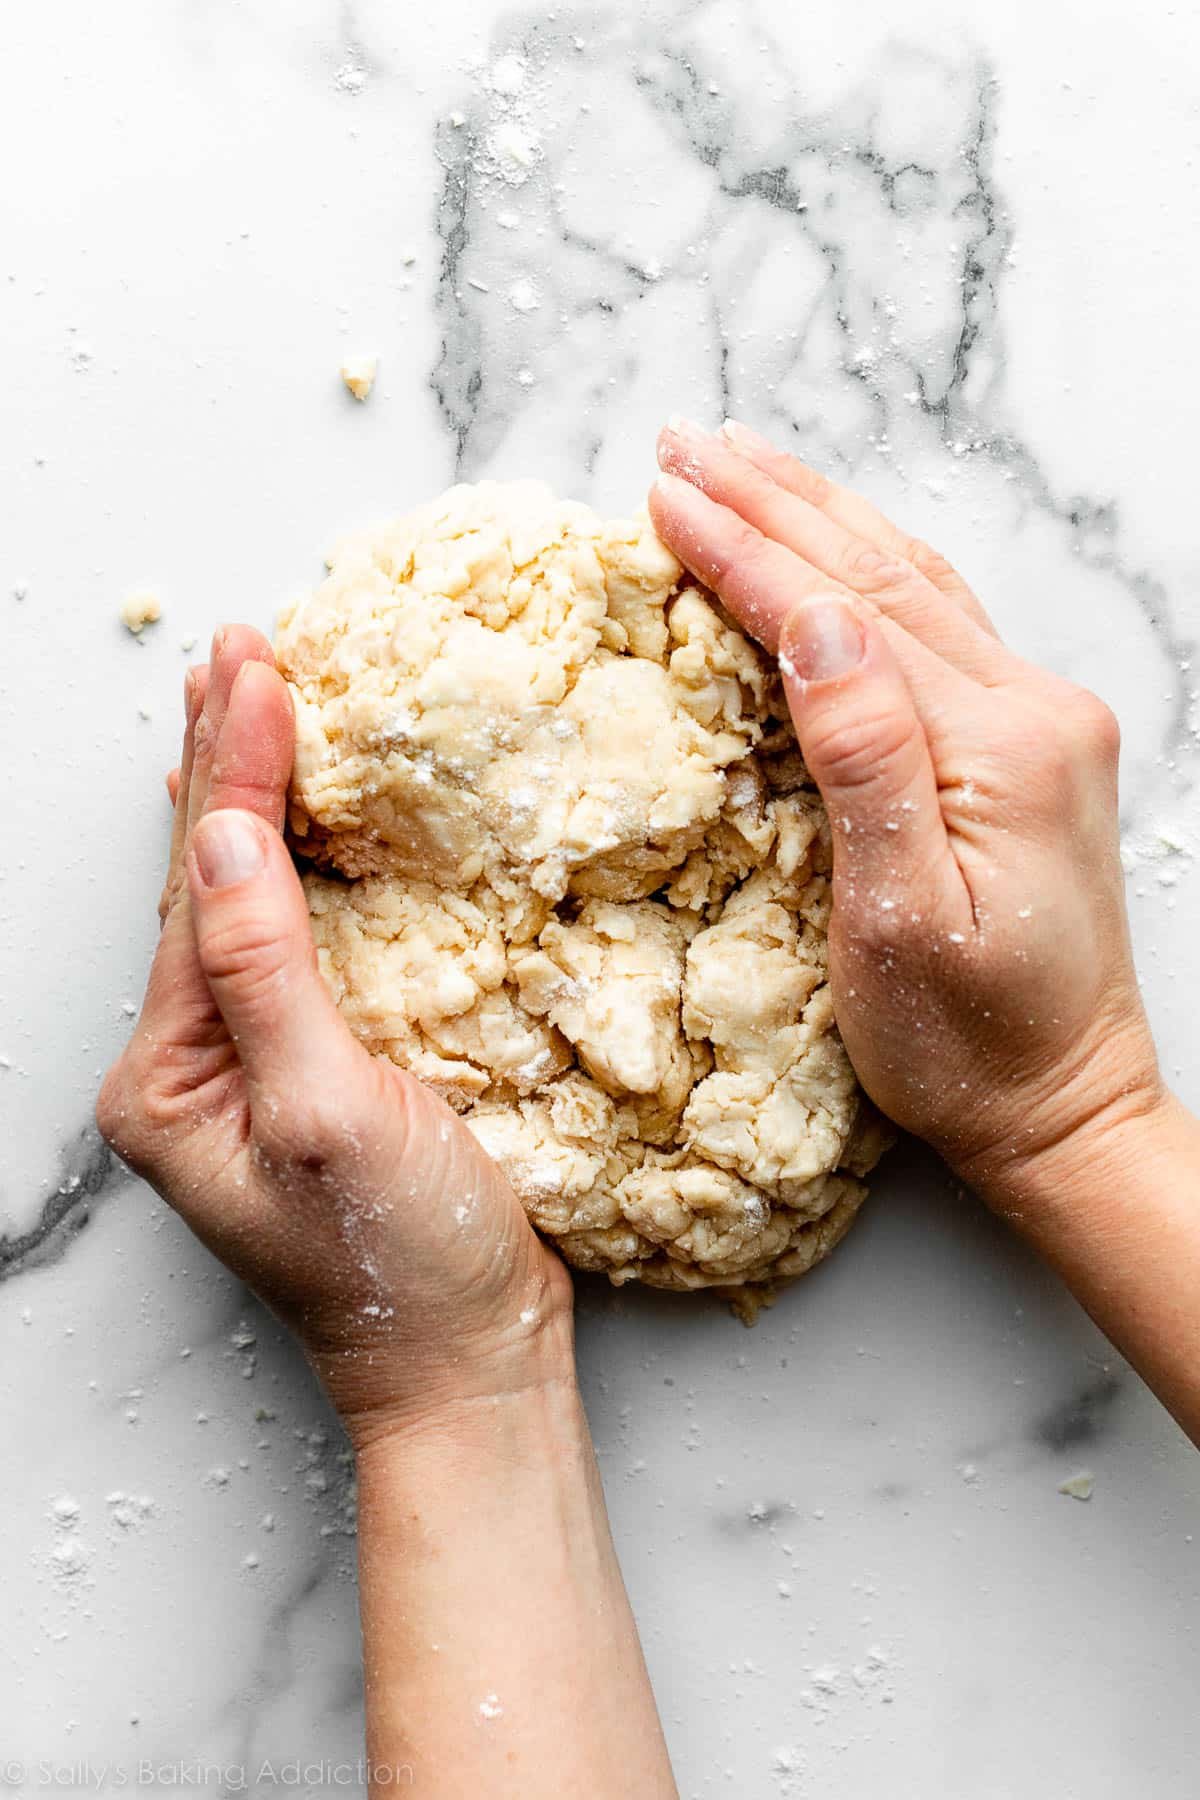
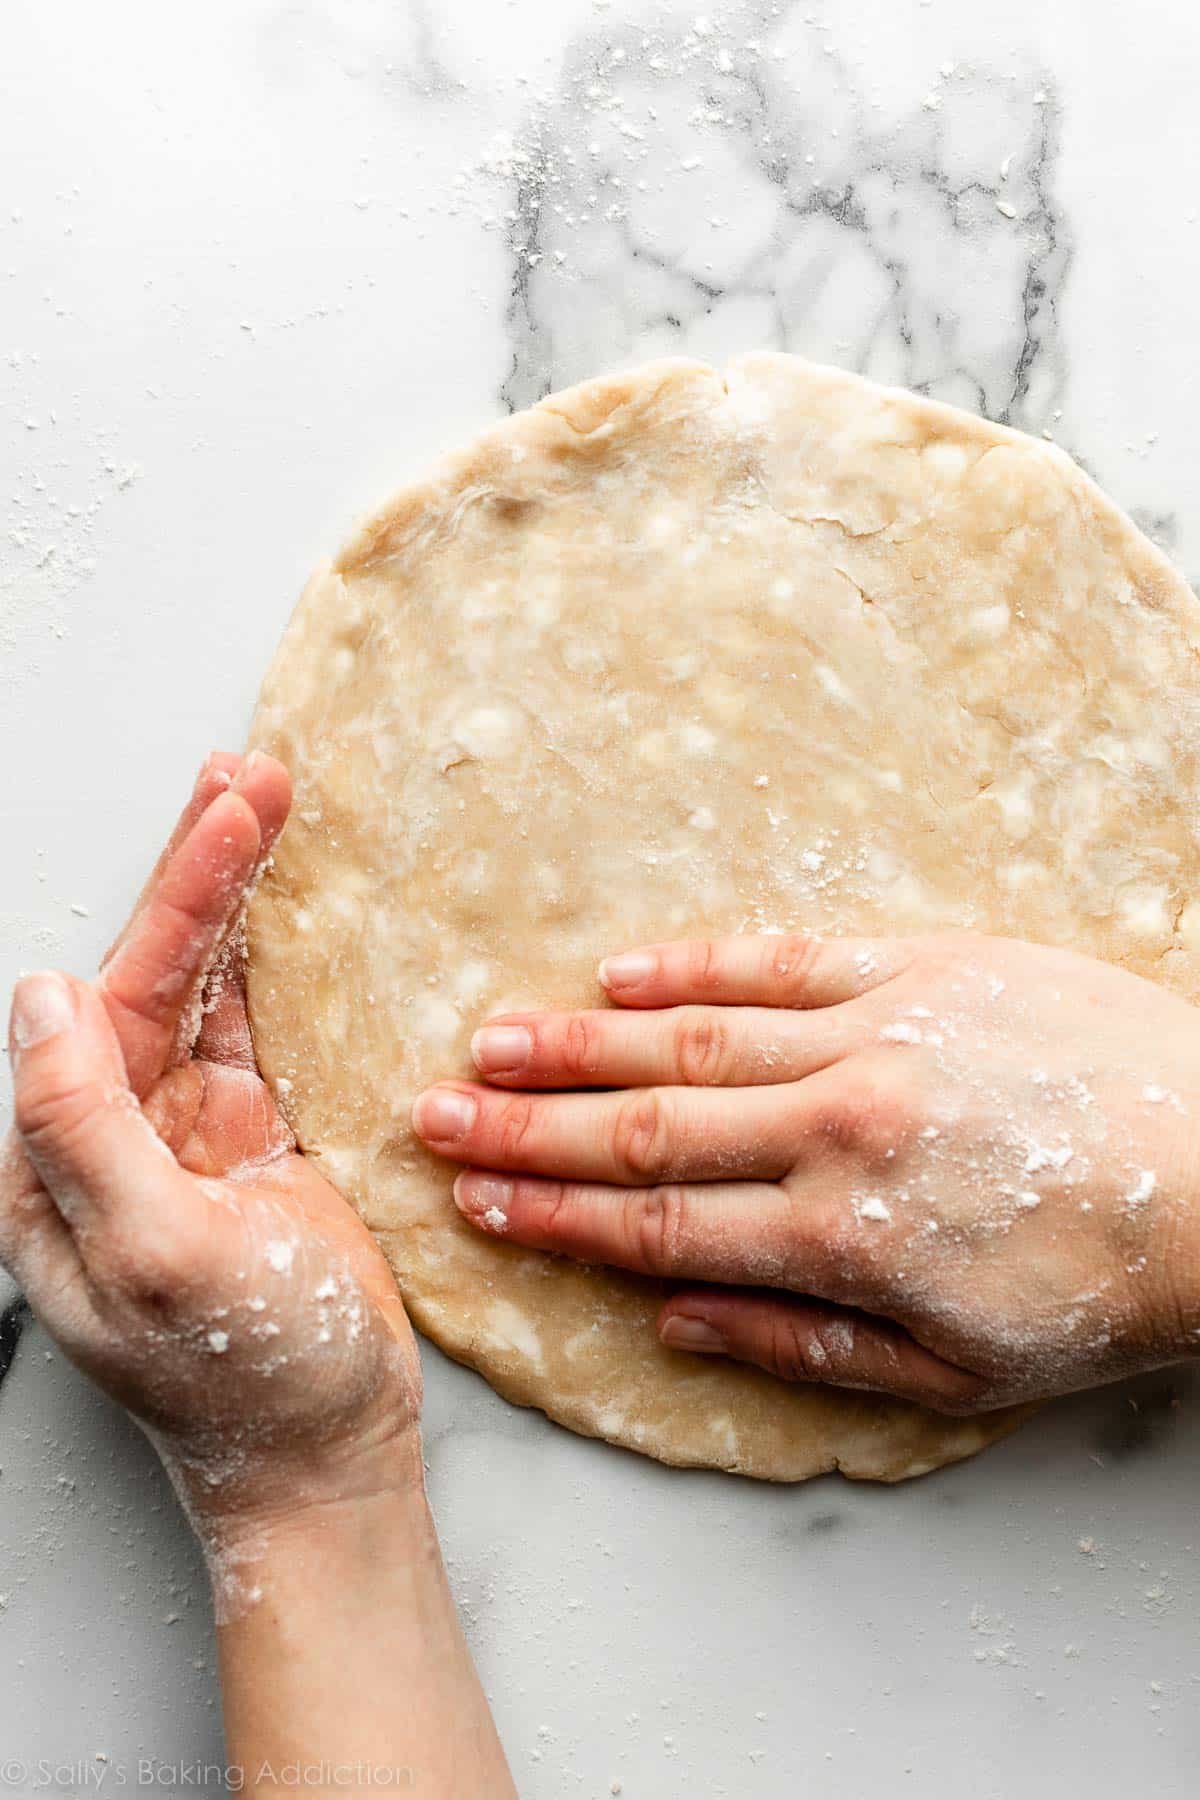
Using floured hands, fold and smush (yes, that’s the technical term) the dough into itself, forming the dough into a ball. Your hands are your best tool, just like when making homemade puff pastry.
The ball of dough should come together easily. If it feels a bit too dry or crumbly, dip your fingers in the ice water and then continue forming the dough with your hands. If it feels too sticky, sprinkle on more flour and then continue forming the dough with your hands.
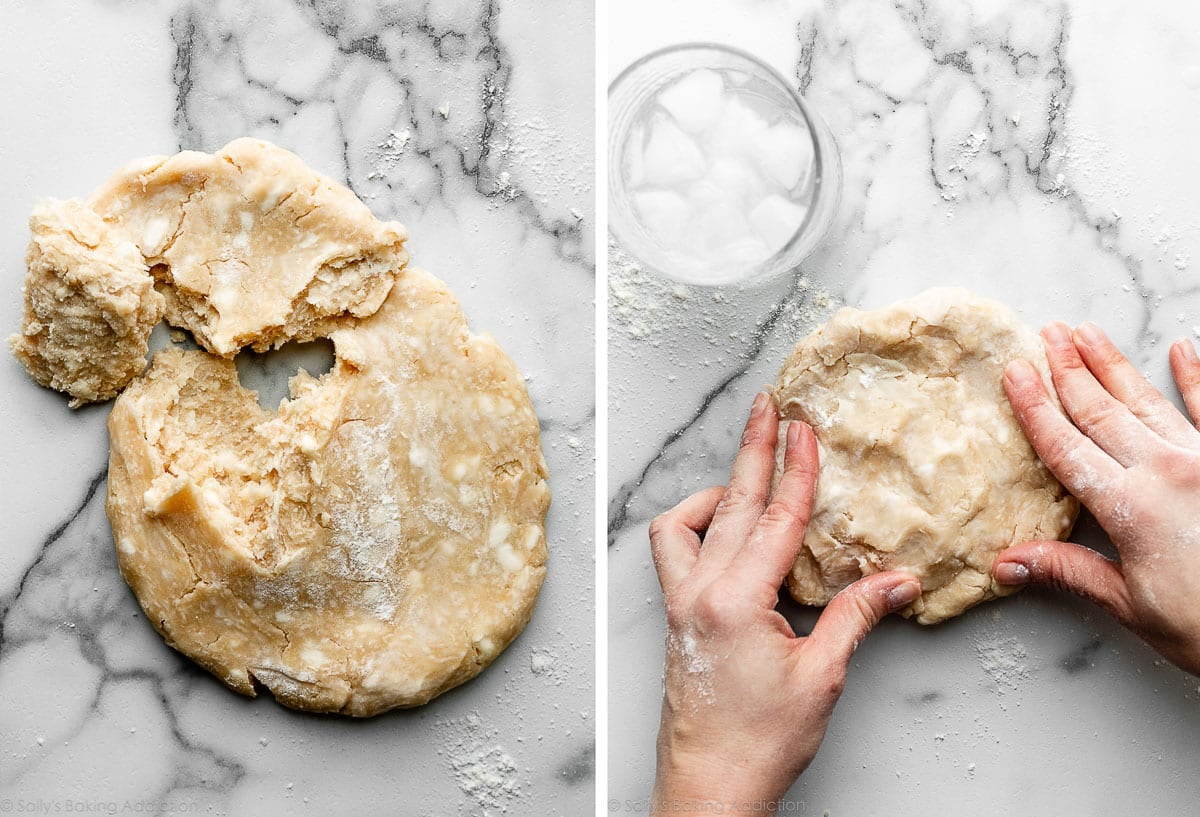
Once your ball of pie dough has come together, use a sharp knife to cut it in half:
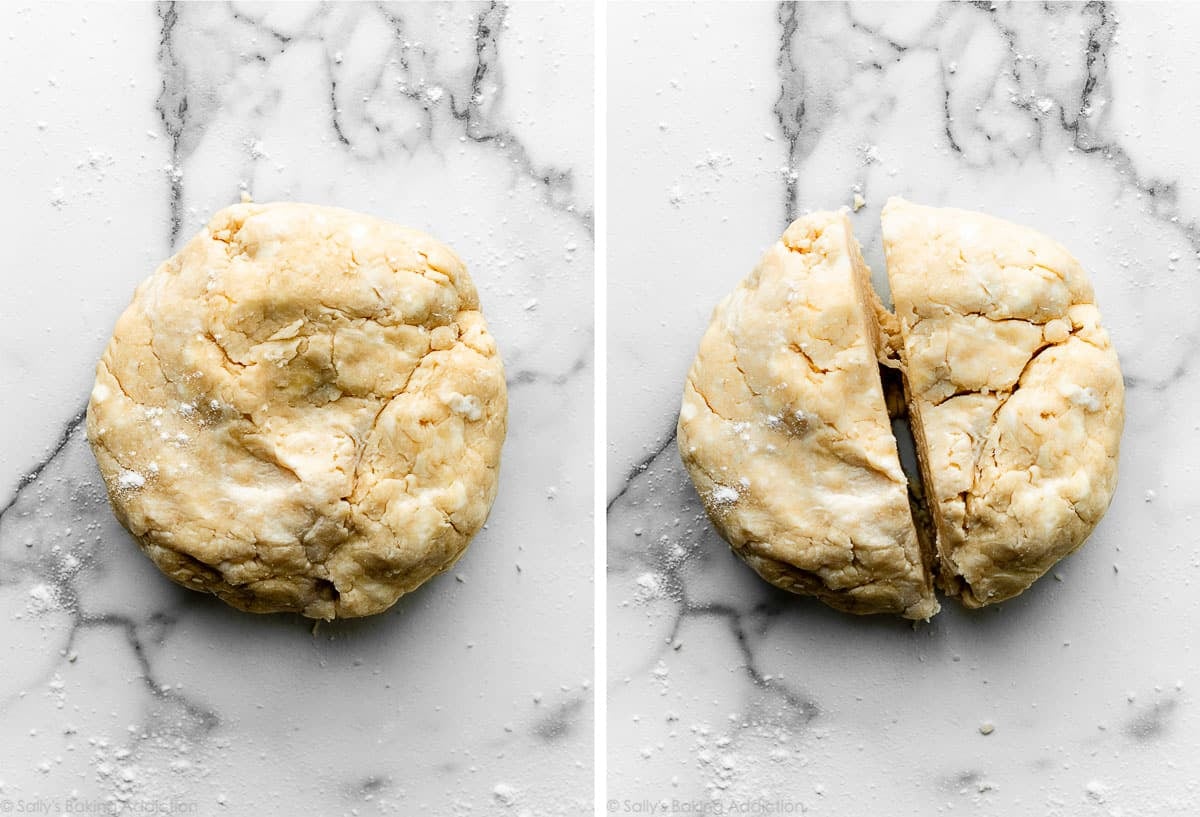
This is enough dough for 2 pie crusts. You can use both crusts for a double-crust pie, like chicken pot pie and strawberry rhubarb pie; or, if your pie doesn’t require a top crust, like coconut cream pie, brownie pie, and lemon meringue pie, save the second pie crust for another pie. You can also roll out the second dough and use cookie cutters to make an easy pie design, like on this pumpkin pie.
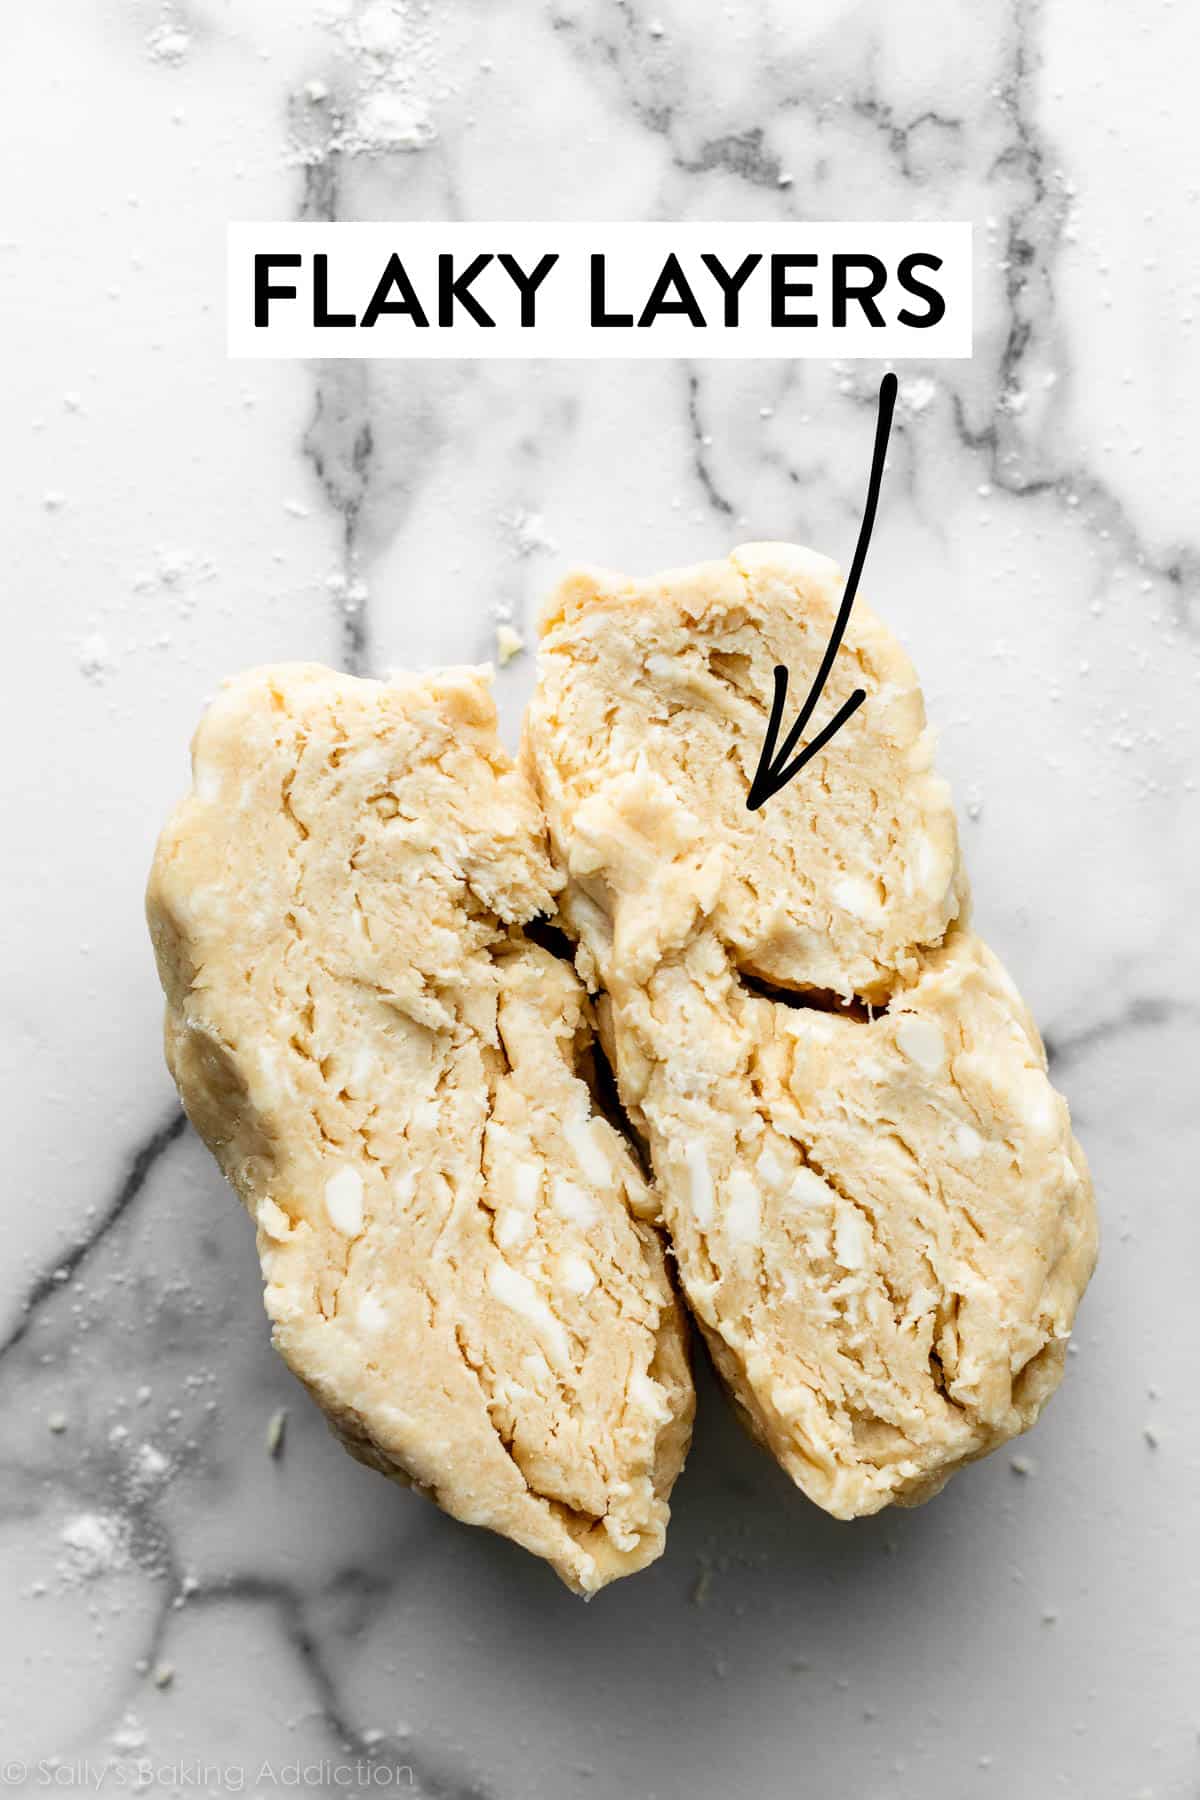
Success Tip: Visible Specks and Swirls of Fat in Pie Dough
Take a look at the inside of the dough where you just sliced it. You want to see pieces of butter and flaky layers throughout the pie dough. These specks and swirls of butter and shortening will help ensure a flaky pie dough. They are a GOOD thing!
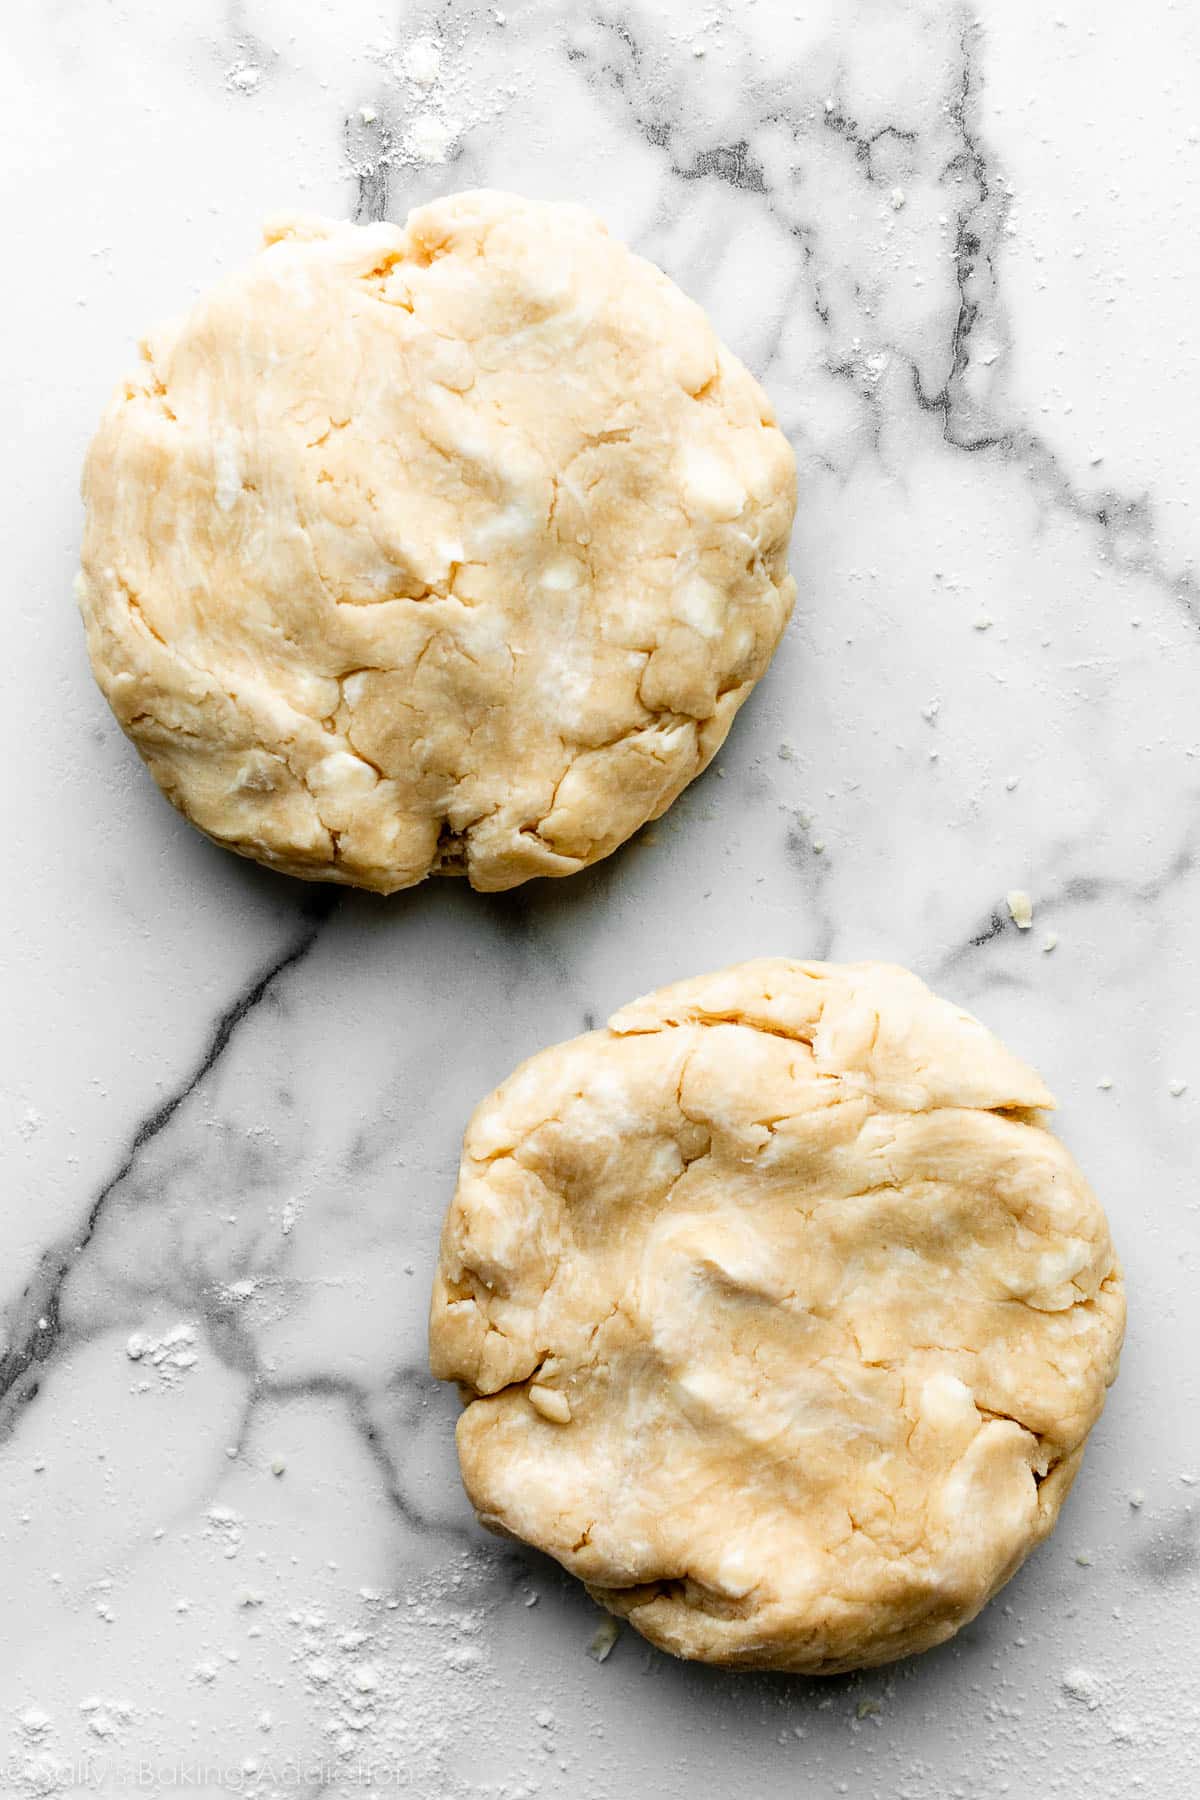
Now your pie dough is ready for a rest in the refrigerator. Flatten each half into 1-inch-thick discs using your hands. The disc shape makes it easier to roll out. Wrap each disc tightly in plastic wrap.
Refrigerate for at least 2 hours or up to 5 days.
Can I Freeze Pie Dough?
Yes, absolutely, and I encourage it! Pie crust freezes beautifully, so it’s a great thing to make ahead of time. Store the tightly wrapped discs of pie dough in the freezer for up to 3 months.
If you know you’re going to want several pies around the holidays, or when your favorite fruit will be in season (cherry pie, anyone?), you can cut down on the amount of time it takes to make pies from scratch the day you want them by making several pie crusts in advance and freezing them.
Thaw the pie crust dough overnight in the refrigerator before rolling it out. It will be extra cold, which is a great starting point.
How to Roll Out Pie Crust
After the dough has chilled for at least 2 hours, you can roll it out. Work with one crust at a time, keeping the other in the refrigerator until you’re ready to roll it out. You’ll need a clean work surface, a rolling pin, and some flour. Lightly flour the work surface, rolling pin, and your hands, and sprinkle a little flour on top of the dough. Use gentle-medium force with your rolling pin on the dough—don’t press down too hard on the dough; you’re not mad at it!
When rolling dough out, start from the center and work your way out in all directions, turning the dough with your hands as you go:
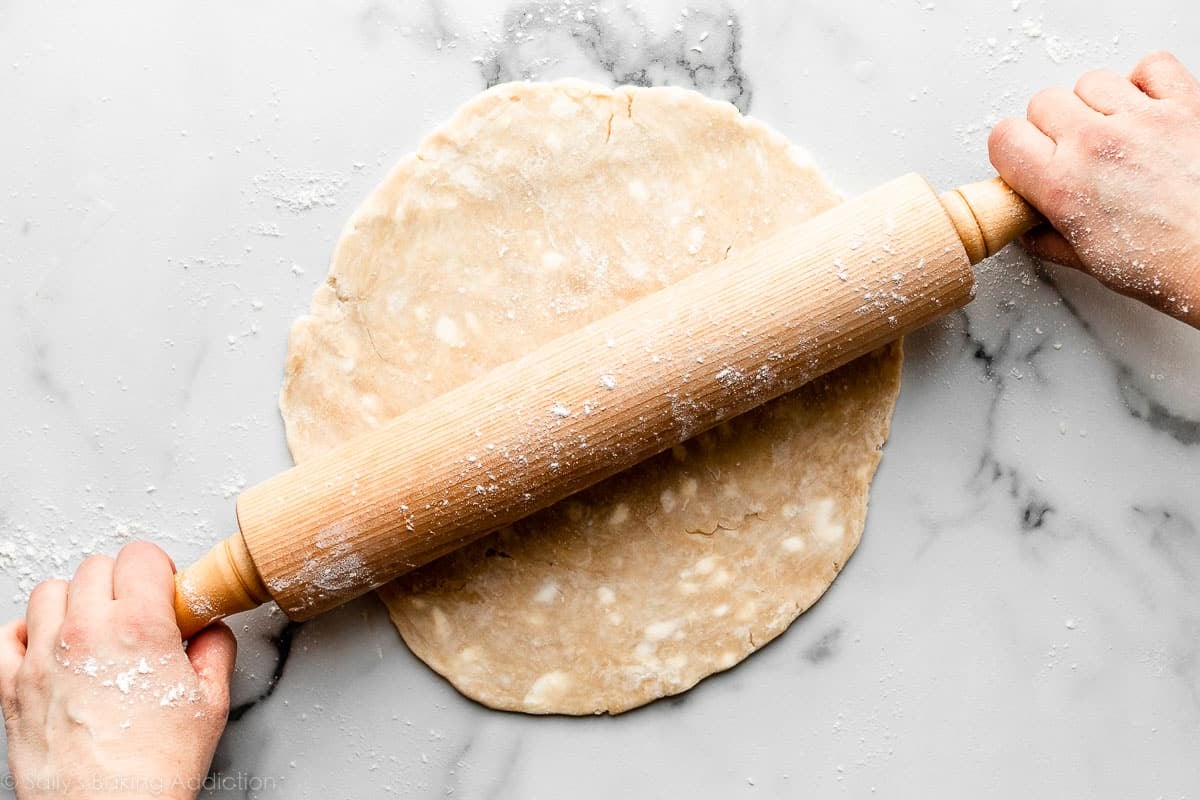
Between passes of the rolling pin, rotate the pie crust and even flip it, to make sure it’s not sticking to your work surface. Sprinkle on a little more flour if it’s sticking. Roll, turn. Roll, turn.
Do you see that beautiful marbling of the butter and shortening throughout the dough? Flaky layers, here you come!
Success Tip: If you notice the dough becoming a lopsided circle as you’re rolling it out, put down the rolling pin and use your hands to help mold the dough back into an even circle:
Roll the dough into a thin 12-inch circle, which is the perfect size to fit a 9-inch pie dish. You want enough crust to have some overhang so you can make a decorative edge for your pie.
Your pie dough will be about 1/8-inch thick, which is quite thin.
Success Tip: Since your dough is so thin, use your rolling pin to help transfer the pie crust to the pie dish. Carefully roll one end of the circle of dough gently onto the rolling pin, rolling it back towards you, slowly peeling it off the work surface as you go. Pick it up, and carefully roll it back out over the top of the pie dish. It’s helpful to watch how I do it in the video below.
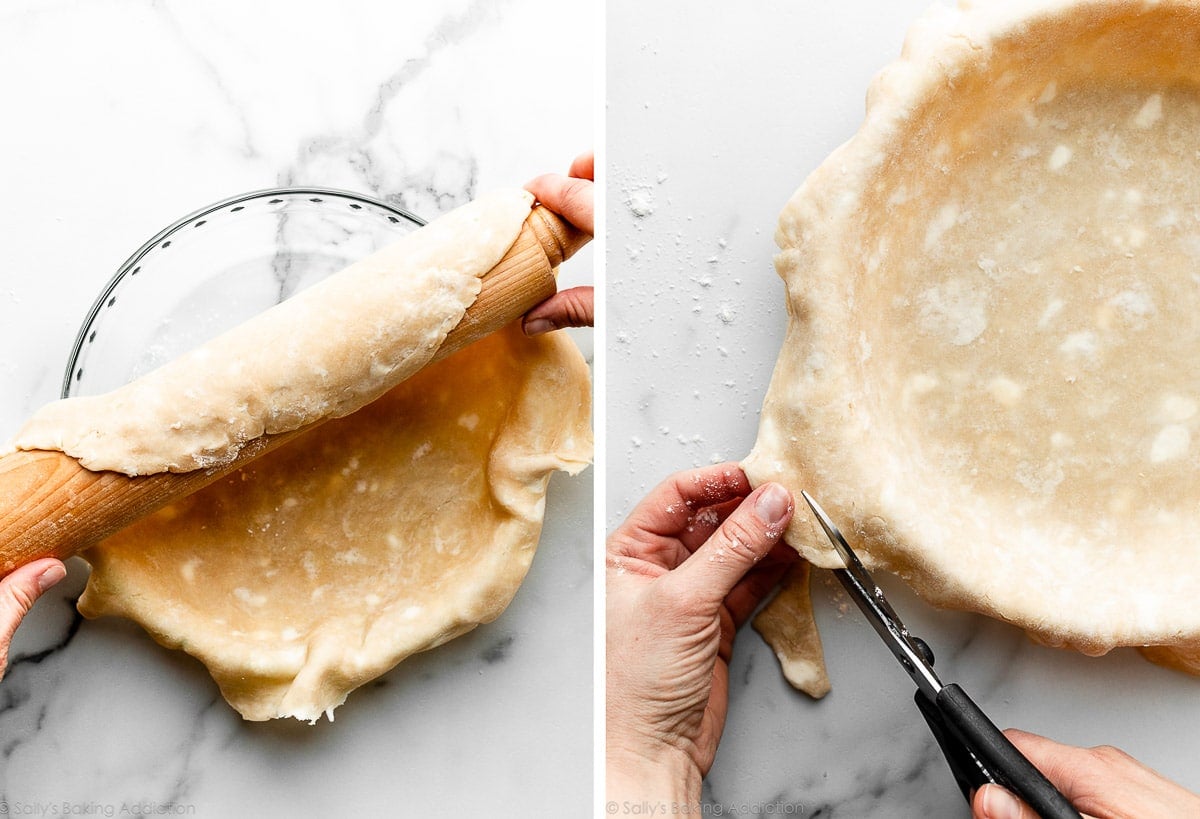
Make sure the pie crust is pretty well centered in the dish, with some overhang all around the sides. Tuck the crust into the pie dish, gently pressing it to the interior all the way around—no air bubbles.
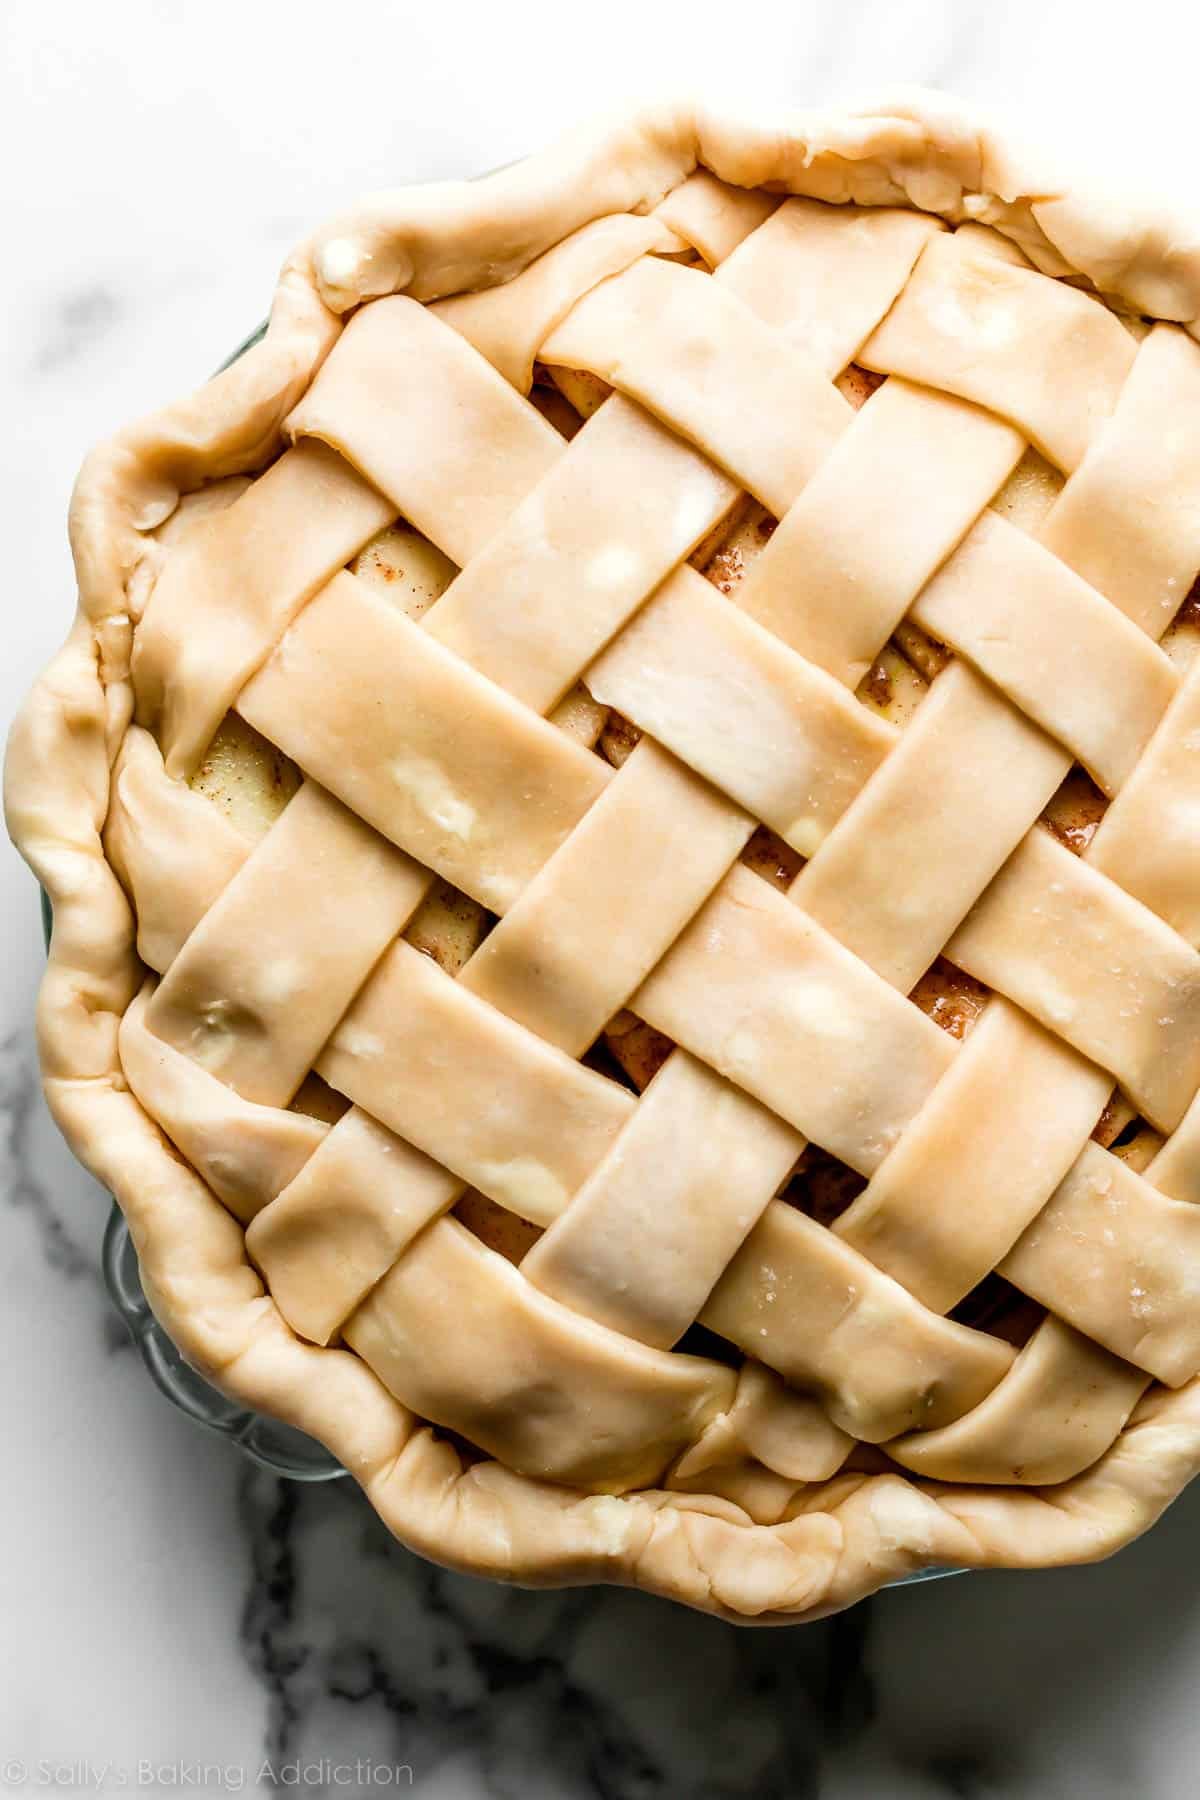
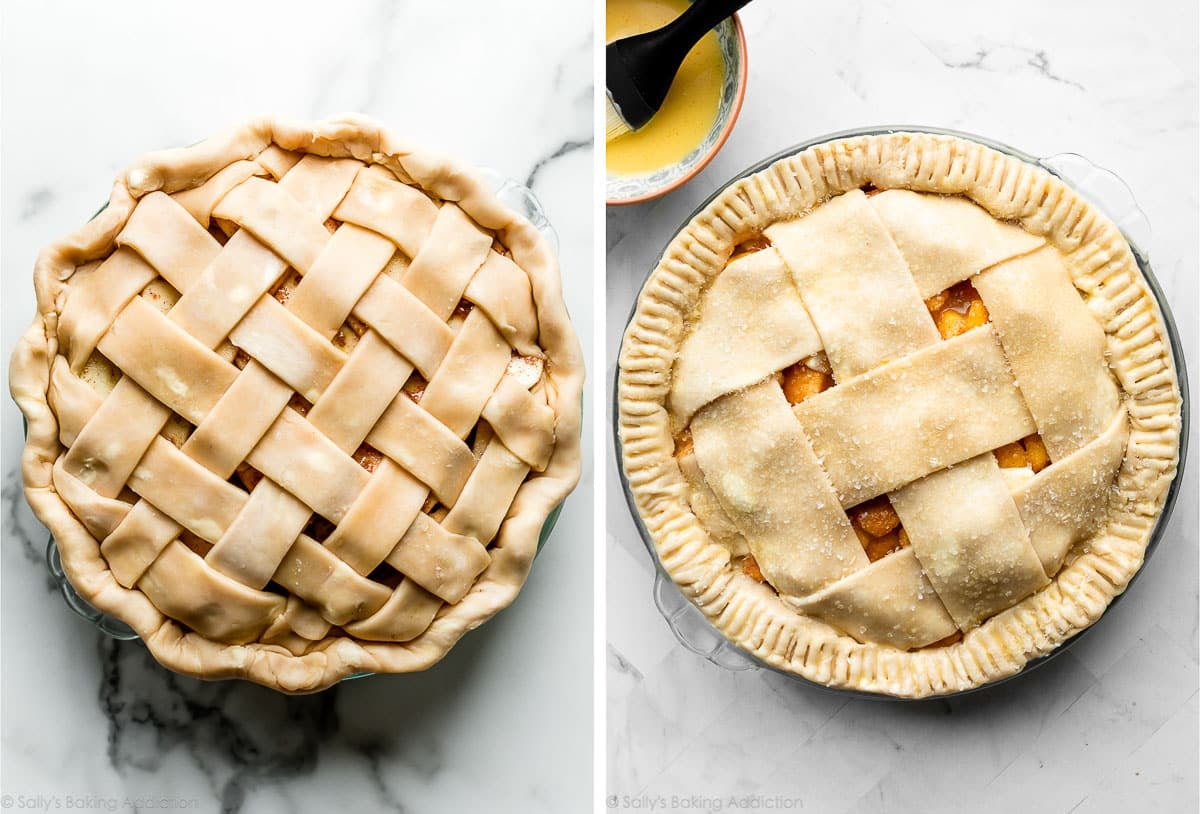
Trim dough around the edges if there’s excess dough in some spots—you want about 1-inch overhang. After you add your pie filling and top crust (such as a lattice pie crust), fold overhang back over and pinch the top and bottom crusts together. Now you can create a pretty edge, such as fluting or crimping. I have a full tutorial on how to crimp and flute pie crust, but here’s a quick overview:
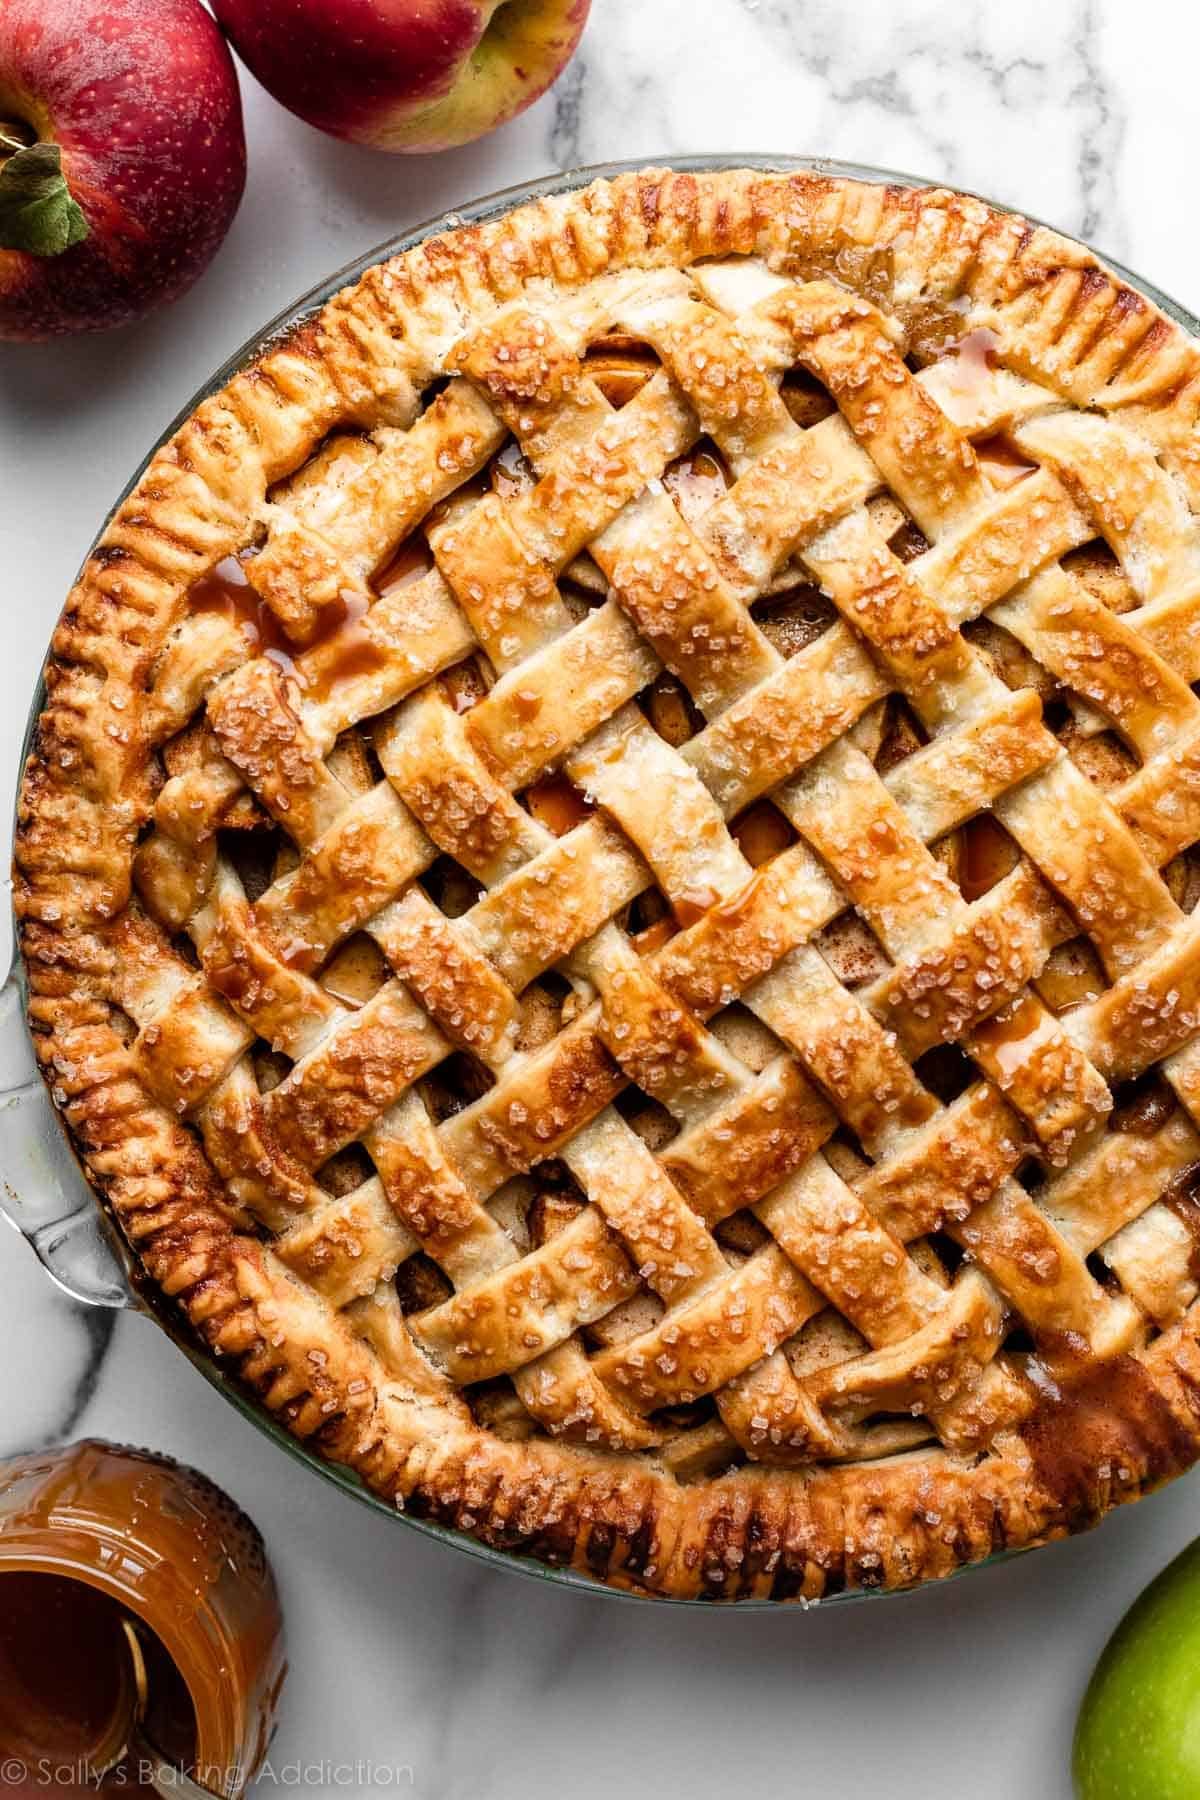
Fluting with fingers: To flute the edges, use a knuckle and 2 fingers to press around the edges of the pie crust, to give it a beautiful and classic scalloped look, like this apple pie.
Crimping with fork: You can also use a fork to crimp the edges, like I do with this peach pie.
Again, review my how to crimp and flute pie crust page and video if you need a little extra help with this step.
Your pie crust is ready to bake! Follow your pie recipe’s instructions from here; some recipes may call for a fully baked crust, and some may call for a partially baked (par-baked or blind baked) crust. You can read a tutorial on that here in this How to Par-Bake Pie Crust post. And some recipes, like this blueberry pie or triple berry pie, don’t require baking the crust at all before adding the filling, because the pie bakes for so long; just spoon/pour the filling right in.
Your pie recipe might call for an egg wash on the dough and for that, use a pastry brush. And if you bake a lot of pies, this list of 10 best pie baking tools will be helpful for you.
Troubleshooting Pie Crust
- Pie crust is tough: Tough crusts are the result of not enough fat in the crust, as well as overworking the dough. Use the recipe below (plenty of fat) and avoid handling the dough more than you need.
- Don’t have enough pie dough: This recipe yields 2 pie crusts. To ensure you have enough pie dough for overhang and a pretty topping, roll your dough out to a 12-inch circle, about 1/8 inch thick.
- Pie crust shrinks down the sides of the dish when baking: This can happen when par-baking a pie crust. See section below.
- Pie dough is dry & cracking around edges when rolling: Use enough ice water when preparing the pie dough. If you work the fats into the dry ingredients too much, the dough will feel too wet before you can add enough water. (And the dough will be dry and thirsty.) Do not overwork the fats in the dry ingredients—you still want those nice crumbles. If it’s too late and you notice the edges of your pie crust are cracking as you roll it out, dip your fingers in ice-cold water and meld the edges back together. Wait a minute, and then try rolling out again.
- Pie dough is falling apart & crumbling when rolling: The dough is likely crumbling because there’s too much fat, and not enough flour and water. Again, this is usually a result of fat being worked in too much, which can easily happen if the ingredients weren’t cold enough. (Refrigerate those dry ingredients before you start!) If it’s too late and the pie dough is crumbling as you roll it out, try adding more water AND more flour. Sprinkle a tiny bit of ice water and flour onto the cracks and crumbled pieces, and gently work it all in with your fingers. Wait a minute, and then try rolling out again.
Gently work ice water drops and flour into your crumbly pie dough to bring it back together:
Blind Baking Pie Crust
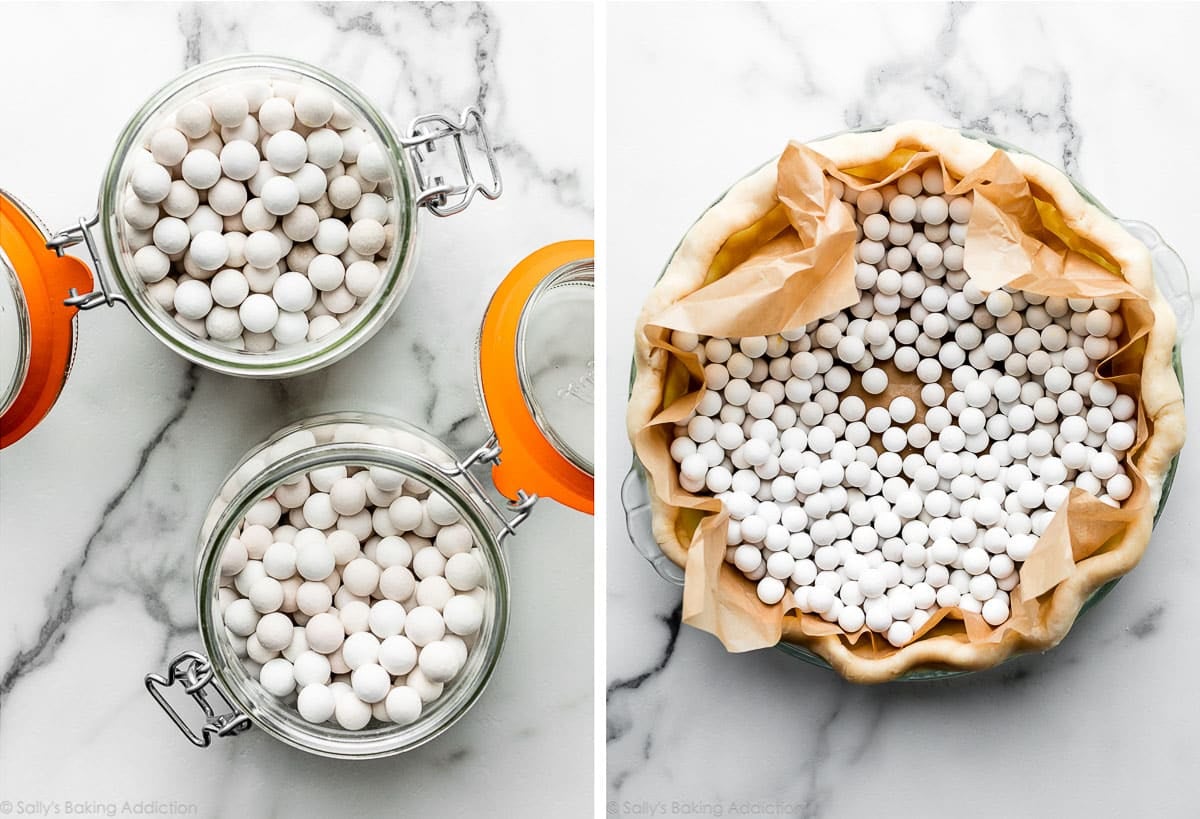
If your pie recipe requires a fully baked or par-baked pie crust before adding the filling, follow the directions and success tips in this How to Par-Bake Pie Crust guide. You need 2 packs of pie weights, which are metal or ceramic beads that serve to weigh down the crust to prevent the puffing/shrinking. You could use dried beans instead. Whichever you choose, be sure to line the crust with parchment paper, then fill the empty pie crust shell with the weights prior to baking. Without pie weights, the dough will puff up, and then shrink down the sides.
Pie Crust Success Tips
- Use a glass pie dish. I prefer using a glass pie dish when I make pie. Why? Glass dishes conduct heat evenly, which allows the bottom of the crust to bake thoroughly. Also, you’ll be able to see when the sides and bottom of the crust have browned.
- The refrigerator is pie dough’s best friend. Keep everything cold every step of the way: ingredients, the bowl, and the dough before rolling. When taking the pie crust out of the refrigerator to roll out and fill, make sure your pie filling is ready to go. If not, keep the pie crust in the refrigerator until it is.
- Keep dough cold when rolling out: Warm pie dough is unworkable. If the dough becomes too warm when you’re rolling it out, stop what you’re doing, pick it up as gently as you can, put it on a plate or small baking sheet, and then cover and refrigerate it for 10–20 minutes.
- Protect the crust edges from burning: Use a pie crust shield to prevent the edges from burning. A shield keeps the crust edge covered, but the center of the pie exposed, protecting the edges. I usually just make a pie shield out of a piece of aluminum foil. Take a piece of aluminum foil and fold it in half. Cut out a half circle. When you open it back up, you’ll have a square of foil with a circle cut out of the center. If you notice the edges of your pie crust are browning before the pie has fully baked, carefully and gently place the foil over the top of the pie, centering the cut-out hole over the pie. Carefully (obviously it’s very hot!) and lightly tuck the sides of the foil around the pie crust edges, then let the pie finish baking.
- Create a beautiful topping: For designing the top crust, see How to Lattice Pie Crust, How to Braid Pie Crust, or these Pie Crust Designs. And here is my tutorial on How to Crimp and Flute Pie Crust, too.
For more pie crust inspiration, see my graham cracker crust and homemade chocolate pop tarts (with a chocolate crust!).
Print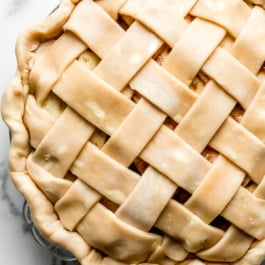
Homemade Buttery Flaky Pie Crust Recipe
- Prep Time: 15 minutes
- Cook Time: 0 minutes
- Total Time: 2 hours, 15 minutes
- Yield: 2 pie crusts (1 lb, 8 ounces dough total)
- Category: Pie
- Method: Baking
- Cuisine: American
Description
This recipe is enough for a double crust pie. If you only need 1 crust for your pie, freeze the other half per the Freezing Instructions below. Is your pie dough tearing, cracking, or crumbling as you try to roll it out? See recipe Notes.
Ingredients
- 2 and 1/2 cups (315g) all-purpose flour (spooned & leveled), plus more for shaping and rolling
- 1 teaspoon salt
- 6 Tablespoons (85g) unsalted butter, chilled and cubed
- 2/3 cup (130g) vegetable shortening, chilled
- 1/2 cup (120ml) ice cold water
Instructions
- Whisk the flour and salt together in a large bowl.
- Add the butter and shortening. Using a pastry cutter or two forks, cut the butter and shortening into the mixture until it resembles coarse meal (pea-sized bits with a few larger bits of fat is OK). In this step, you’re only breaking up the cold fat into tiny little flour-coated pieces; you’re not completely incorporating it. Do not overwork the ingredients.
- Measure 1/2 cup (120ml) of water in a cup. Add ice. Stir it around. From that, measure 1/2 cup (120ml) of water, since the ice has melted a bit. Drizzle the cold water in, 1 Tablespoon (15ml) at a time, and stir with a rubber spatula or wooden spoon after every Tablespoon has been added. Stop adding water when the dough begins to form large clumps. I always use about 1/2 cup of water, and need a little more in dry winter months. Do not add any more water than you need.
- Transfer the pie dough to a floured work surface. Using floured hands, fold the dough into itself until the flour is fully incorporated into the fats. The dough should come together easily and should not feel overly sticky. Avoid overworking the dough. If it feels a bit too dry or crumbly, dip your fingers in the ice water and then continue bringing dough together with your hands. If it feels too sticky, sprinkle on more flour and then continue bringing dough together with your hands. Form it into a ball. Use a sharp knife to cut it in half. If it’s helpful, you should have about 1 lb, 8 ounces dough total (about 680g). Gently flatten each half into 1-inch-thick discs using your hands.
- Wrap each tightly in plastic wrap. Refrigerate for at least 2 hours and up to 5 days.
- After the dough has chilled for at least 2 hours, you can roll it out. Work with one crust at a time, keeping the other in the refrigerator until you’re ready to roll it out. Lightly flour the work surface, rolling pin, and your hands, and sprinkle a little flour on top of the dough. Use gentle-medium force with your rolling pin on the dough—don’t press down too hard on the dough; you’re not mad at it! When rolling dough out, start from the center and work your way out in all directions, turning the dough with your hands as you go. Between passes of the rolling pin, rotate the pie crust and even flip it, to make sure it’s not sticking to your work surface. Sprinkle on a little more flour if it’s sticking; don’t be afraid to use a little more flour. If you notice the dough becoming a lopsided circle as you’re rolling it out, put down the rolling pin and use your hands to help mold the dough back into an even circle. Roll the dough into a very thin 12-inch circle, which is the perfect size to fit a 9-inch pie dish. Your pie dough will be about 1/8 inch thick, which is quite thin. Visible specks of butter and fat in the dough are perfectly normal and expected.
- Because your dough is so thin, use your rolling pin to help transfer the pie crust to the pie dish. Carefully roll one end of the circle of dough gently onto the rolling pin, rolling it back towards you, slowly peeling it off the work surface as you go. Pick it up, and carefully roll it back out over the top of the pie dish. It’s helpful to watch how I do it in the video below.
- Proceed with the pie per your recipe’s instructions. If your dough requires par-baking, see helpful How to Par-Bake Pie Crust tutorial.
Notes
- Make Ahead & Freezing Instructions: Prepare the pie dough through step 5 and freeze the discs for up to 3 months. Thaw overnight in the refrigerator before using in your pie recipe.
- Special Tools (affiliate links): Large Glass Mixing Bowl | Pastry Cutter | Rolling Pin | 9-inch Pie Dish | For more tools you may need to completely assemble and bake your pie, see my 10 Best Pie Baking Tools list.
- Salt: Use regular table salt. If using kosher salt, use 1 and 1/4 teaspoons.
- Shortening: This recipe uses a butter and shortening combination. Butter for flakiness and flavor, and shortening for its high melting point and ability to help the crust hold shape. You can use butter-flavor shortening if desired. If you want to skip the shortening, feel free to try this all-butter pie crust instead. Some readers have substituted lard for shortening in this recipe with success.
- Can I use a food processor? You can use a food processor to bring the dough ingredients together in step 1, but I find it quickly overworks the dough. For best results and a light, flaky crust, I recommend a pastry cutter.
- Pie dough is dry & cracking around edges when rolling: Use enough ice water when preparing the pie dough. If you work the fats into the dry ingredients too much, the dough will feel too wet before you can add enough water. (And the dough will be dry and thirsty.) Do not overwork the fats in the dry ingredients—you still want those nice crumbles. If it’s too late and you notice the edges of your pie crust are cracking as you roll it out, dip your fingers in ice-cold water and meld the edges back together. Wait a minute, and then try rolling out again.
- Pie dough is falling apart & crumbling when rolling: The dough is likely crumbling because there’s too much fat, and not enough flour and water. Again, this is usually a result of fat being worked in too much, which can easily happen if the ingredients weren’t cold enough. (Refrigerate those dry ingredients before you start!) If it’s too late and the pie dough is crumbling as you roll it out, try adding more water AND more flour. Sprinkle a tiny bit of ice water and flour onto the cracks and crumbled pieces, and gently work it all in with your fingers. Wait a minute, and then try rolling out again.
- More Crusts: If you need more than 2 pie crusts, make another separate batch of dough. Doubling or tripling the recipe leads to over- or under-working the dough, which ruins all of your efforts.


Reader Comments and Reviews
when you say use shortening what do you mean? Like crisco powered shortening? Or the sticks kind?
Hi Tiffany, you’ll want the bars, or shortening that is solid at room temperature. See the photo in the blog post (where the shortening is in the measuring cup) for an example.
Came out perfect. I have had a fear of pie crust for years. This dough did not shrink and was easy to handle. P
Worked out great for the chicken pot pie recipe on this site. I did add 1 Tablespoon of sugar per another recipe I’ve made in the past for a bit more flavor.
Hi Sally. I’m so glad I found your pie crust recipe. Thank you for sharing it! I especially love your detailed explanation about why the recipe works, and what each ingredient, step, and technique contributes to the finished product—i.e., perfect, flaky pie crust. I can’t think of anything that doesn’t work. This elusive prize is now finally in my baking arsenal. I’ve used your recipe for many fruit pies (blueberry, blackberry, apple, even mango) as well as for chicken pot pie and quiche. I’ve added crushed and lightly toasted pecans to the crust for pumpkin pie and toasted macadamia nut “flour” for coconut cream pie. (I rolled the crust in the pecans or macadamia nut flour) People go nuts for my pies. They can’t believe how amazing the crust is. I use chilled vodka and cold water up to about 1/2 cup, and of course the butter and shortening. I also glaze the crust with an egg yolk/cream mixture halfway through the bake for a golden brown sheen. Sometimes I sprinkle turbinado/coarse sugar which sticks on the glaze and adds a bit of sweetness and crunch. The recipe couldn’t be simpler and easier. Thank you again for sharing your amazing baking skills!
Delicious! Perfect pie crust recipe.
I’m making your mushroom quiche. 1) can I pre bake the crust today and refrigerate it until I fill it and eat it in 3 days or should I freeze it?
2) can I add spinach to the quiche. If so, how would I do it? I have fresh baby spinach. Thanks !
Hi Susan, For our quiche recipes you can can partially pre-bake the crust up to 3 days ahead of time. Cover cooled crust tightly and refrigerate until ready to fill.
You can definitely add spinach – it can be added fresh, but you can definitely sauté it first if desired.
I made this tonight as my first attempt at pie dough EVER (to make your chicken pot pie!). It turned out amazeballs! My husband actually turned to me and said “Are you *sure* you’ve never made this before?”. lol Light, flaky, golden crust that made me feel like a rockstar for nailing it on my first try. My husband is even foregoing a fancy expensive delivered lunch and has decided to have our LEFTOVERS from tonight during his work Christmas luncheon tomorrow (at home by video chat due to Covid). I’ll definitely be baking more pies in the future. My whole family thanks you!
Girrrrrrl, this pie crust is amazing. I didn’t have a pastry cutter so my little hands got pretty tired and I didn’t cut everything in as much as it should have been, but it was still flaky and delicious and I know how to do even better next time! Thank you for your thorough instructions!
Still haven’t mastered this. I’m on my third attempt at this crust and I think I added too little water. It was a challenge to roll out! Perhaps I should have also used a different flour. I used a bread flour. Also, when I partially blind baked after chilling in the pie pan first, the sides still shrunk down. I’ll keep trying because I have good success with your recipes usually, but any tips would be most welcome!
Hi Claire, I recommend using all-purpose flour. Be careful with how much water you add, too. I always use 1/2 cup. If you’re blind baking and there’s too much moisture in the dough, the pie dough will sink down the sides. Let me know how your next try goes.
So happy with this pie crust recipe! I’ve tried others- this is the best! Thank you for taking the time to create this recipe so thoroughly.
So I actually made a pie crust! I followed your recipe to the letter, and the good news is it was delicious. (As the base to your lemon meringue pie, which is magnificent!) But my crust was not all pretty like in your video. Hubby is more into flavor so he was completely happy, but I’d like a better presentation. I used cold ingredients, I refrigerated for 4 hours before rolling. But I knew when I was rolling it was not perfect. The edges kept crumbling off. I used a ceramic pin, not wood. Maybe more flour on the counter? I don’t know…
Don’t worry, I will try again.
Hi Lee, We are so happy you enjoyed the taste of this pie crust! If the dough is just too hard right out of the refrigerator, let it sit at room temperature for 10 minutes. It will still be cold, but even a few minutes at room temperature will help soften it up. Roll out very slowly and gently. If the edges are cracking, use your hands to bring the edges back together. (I always use my fingers to “meld” any cracks back together– as if it were play doh.) If it’s cracking, the dough may not have enough liquid. I highly recommend at least 1/2 cup of ice water. Most pie dough problems come from not adding enough water. I hope all of this can help for next time. Don’t give up!
I haven’t baked much but really like sweet potato pie. I made your Brown Sugar Sweet Potato Pie recipe with your Flaky Pie Crust recipe for Thanksgiving. I just want to thank you for the recipes because they came out perfectly. For me the pie is all about the crust, and this crust was truly light and flakey. I have always heard about the horror stories of how difficult it is to make a good crust; well I now have my go to recipe. Thanks again.
Hi Sally! I tried making this pie crust instead of the all-butter one for the first time the other day, and while it was very tasty, it was a bit difficult to roll out. I let it come out of the fridge for about 10 minutes before rolling it, but it just didn’t want to roll out as thin as the all-butter crust. I also noticed bits of shortening that kind of tore the crust as I was rolling or stuck to the pin, leaving holes.
I’m not sure if it’s the kind of shortening I used (I live abroad and we don’t have Crisco) which was palm-oil based, or maybe I didnt cut it in enough and left some chunks too big. Any insight? I’d love to make this recipe work as it’s much less expensive here than the all butter version.
Hi Mary, I’m just seeing your comment/question now so my apologies for the delay responding. It sounds like the shortening wasn’t worked into the dough as much as it should have been. Some swirls of shortening may still be visible, but the dough shouldn’t be tearing in those spots– see if you can pat extra flour on those spots if it happens again. I wouldn’t think it’s the type of shortening you used.
Hi Delia, We highly recommend chilling the dough for a minimum of 2 hours so that it’s cold enough to hold it’s shape when baked.
For the life of me, I could not lift this dough off the counter to bet it into my pie dish in one piece. It was way too soft. I couldn’t have lifted it onto a rolling pin or other instrument either. I let it rest overnight and rolled it out straight from the fridge so I know it wasn’t too warm. I thought maybe I added too much water, though I was careful to stop the minute it started coming together, but I ended up adding a ton of flour and re-rolling it a couple of times and still had that issue. In the end I took pieces of dough and flattened them out in the pie dish. I was nervous it would be tough given how much I worked it, but I froze it for 15 minutes before baking and it came out perfectly light and flaky, so at least there’s that. But I’m not sure where I went wrong that the dough was so soft it made it impossible to manage.
After decades of making horrible pie crust and finally giving up, I started using crusts in the can. Not very good, so I thought I’d give it one more try and checked out your page. The crust was just perfect. Thank you so much for your recipe and easy instructions. I can hold my 73-year-old head high.
Hi Sally,
Would it work to substitute coconut oil for the shortening?
Thank you and happy Thanksgiving! 🙂
Hi Briana, We haven’t tested it but I wouldn’t use coconut oil instead of Crisco. Shortening has a very high melting point and will stay solid longer, which is what you want here. Try this All Butter Pie Crust instead!
I really wanted this to work for me but it just didn’t. I make homemade pie dough frequently and typically make an all butter dough, but wanted to try your favorite because I LOVE your recipes! I’ve never had so much trouble with a pie dough in my life. I used cold butter and chilled shortening and about 7 tablespoons of ice water. It came together very well but completely fell apart when I rolled it out – tore and ripped beyond saving. The dough was definitely not dry but didn’t feel too wet either. Can you think of any reason why this would’ve happened?
Hi Elysha, it sounds like the shortening could have been the issue here. Was the shortening cold or perhaps not worked into the dough enough? I’m so sorry you had trouble with this, but I appreciate you trying it and the feedback.
I was super excited to try this out, and unfortunately it would not work for me. This recipe calls for way too much shortening and water, and I still only added 1/2 cup shortening and 2 tbsp water. I couldn’t roll it out or work with it at all. I worked probably an extra cup of flour into it when I was trying to roll it out, and it just breaks apart everywhere.
First time trying this recipe. Pie crust has been my nemesis for all my cooking life. I am a successful cook and baker but shrinkage plagues me with the store bought dough that I have resorted to now my mother is no longer able to make pies (she made amazing pies). Now that I have spare time on my hands I though I’d venture out again and found you. I’ve made it work but the tearing around the edges continues to haunt me. I repaired and made it work but how do you keep the edges smooth without long rips occurring? Thank you.
Hi Cheryl, I’m glad to help. Try to roll the dough out a little thicker. It may be tearing at the edges because it’s rolled out too thin. If it’s tearing because the butter in the dough is melting, pat more flour on top of it. If it’s tearing because it seems too dry, moisten your fingertips with water to dab onto the dough. (It might be thirsty!)
You say use ice but you did not say how much ice. How much ice is enough? One cube?
Hi Barbrs, You just want enough ice to make your water very cold. Measure 1/2 cup (120ml) of water in a cup. Add ice. Stir it around. From that, measure 1/2 cup (120ml) of the very cold water to use. I hope this helps!
Hello, am I able to prepare the pie crust the day before for the next day?
Hi Ellie, We actually do recommend making this crust the day before you wish to use it! It needs to chill at least 2 hours – but can chill up to 5 days before rolling it out. We usually make it the day before to let it chill overnight.
So grateful to find your site! I’ve always done all crisco crusts & this seems more delicate. When rolling out the dough seems to have more gluten than I’m used to. I’m guessing too much water as I was fearful of it being too crumbly & not able to roll. I used 2 spoonfuls more than 1/2 a cup. Hopefully less water next time will give a different feel. It felt overworked prior to working which is why I thought maybe too much water. Going to use it anyways as I try your ginger peach pie recipe. Thank you so much for these tutorials! Looking forward to improving
I am no stranger to baking but I always shied away from pies as I could never find the perfect pie crust. Being overseas for Thanksgiving this year lent more anxiety but I forged ahead substituting whatever ingredients I thought would be equal. Best pie crust I have ever made. I could not find vegetable shortening so I used the lard. Italy doesn’t have Crisco nor does it have canned pumpkin. Thanks for helping me bring a little “normalcy” to a strange Thanksgiving
I used the 1/2 cup of ice water that the recipe called for, but it was way to wet , I added it a tablespoon at a time ???? first time making crust ,I added more flour so it probably will be tough need some help
Hi Mary, If you try this recipe again, drizzle the cold water in, 1 Tablespoon (15ml) at a time, and stir with a rubber spatula or wooden spoon after every Tablespoon (15ml) added. Do not add any more water than you need to. Be sure to stop adding water when the dough begins to form large clumps – even if you haven’t used the full half cup yet.
For all my long baking life I have been pie crust challenged and gave in to store bought crusts. With Covid limitations I knew I needed to find a recipe that would eliminate the need to go out and buy one so by serendipity I gave yours a try and I can testify today that I am no longer pie crust challenged! It was tender, rich, and with a beautiful texture. Best I’ve ever had, as the saying goes, and I can’t imaging any improvements to it. So deep thanks for providing my one and only pie crust recipe that I will ever need.
I love this recipe and I use it all the time. Usually I have one in the freezer at all times just in case we have company at the last minute. It has never let me down. The only problem I have is after rolling it out, it is almost impossible to get into the pie dish without tearing. Are there any secrets to transferring from the counter to the pie dish. I usually roll out on a silestone counter that I have floured first… Thanks!
Hi Ginger! Try rolling it back up on your rolling pin. You can watch me do this in a few of my pie recipe videos. See the :36 mark in the video on my praline pumpkin pie recipe.
First time for my own crust and I’m nervous, but this site is amazing. Two questions: I halved the dough recipe because I’m making one pumpkin pie, and my disc looks pretty good, so far. But now that I’ve read the section on how to prevent the sides from shrinking I’m nervous and wonder if I should make another portion of crust – my glass pie pan is 9.5”. Second question is, do I start rolling the dough directly from the refrigerator? It’s been chilling for 3 days.
Thank you!
Hi Sally,
I love all of your recipes! I used this last Thanksgiving and it was a hit! However, this time around, I decided to use European butter (Kerrygold) instead of American butter, and I’m having a lot of trouble with it. The crust won’t stay together when baking. It either sag on the side or overflow and falls off the side when baking. It won’t keep the crimped shape. I’m not sure if it’s because of the higher fat content of the butter, or that I’m overworking my dough.
Do you have any insight? Thanks!
Hi Nikki, European style butter is wonderful in cooking, but we find it’s difficult to use in baking recipes– especially pie crust. Its higher fat percentage, while making the butter tasty, creates too much grease in doughs.
Hi Sally!
I only have a 10 inch deep pie dish for this recipe. Should I use 1 1/2 times the amount for one pie or the whole recipe for one pie?
Hi Dalia! I would use 3/4 of the dough for your 10 inch pie. So instead of using half for 1 9-inch pie (recipe yields enough for 2 9-inch pie crusts), use 3/4 of the dough for your size dish– honestly, you could just eyeball it. If you need a top AND bottom crust, I would 1.5x the recipe.
Do you have high altitude modifications to this recipe? I’m at 6,500 feet altitude
I wish we could help, but we have no experience baking at high altitude. I know some readers have found this chart helpful: https://www.kingarthurflour.com/learn/high-altitude-baking.html