

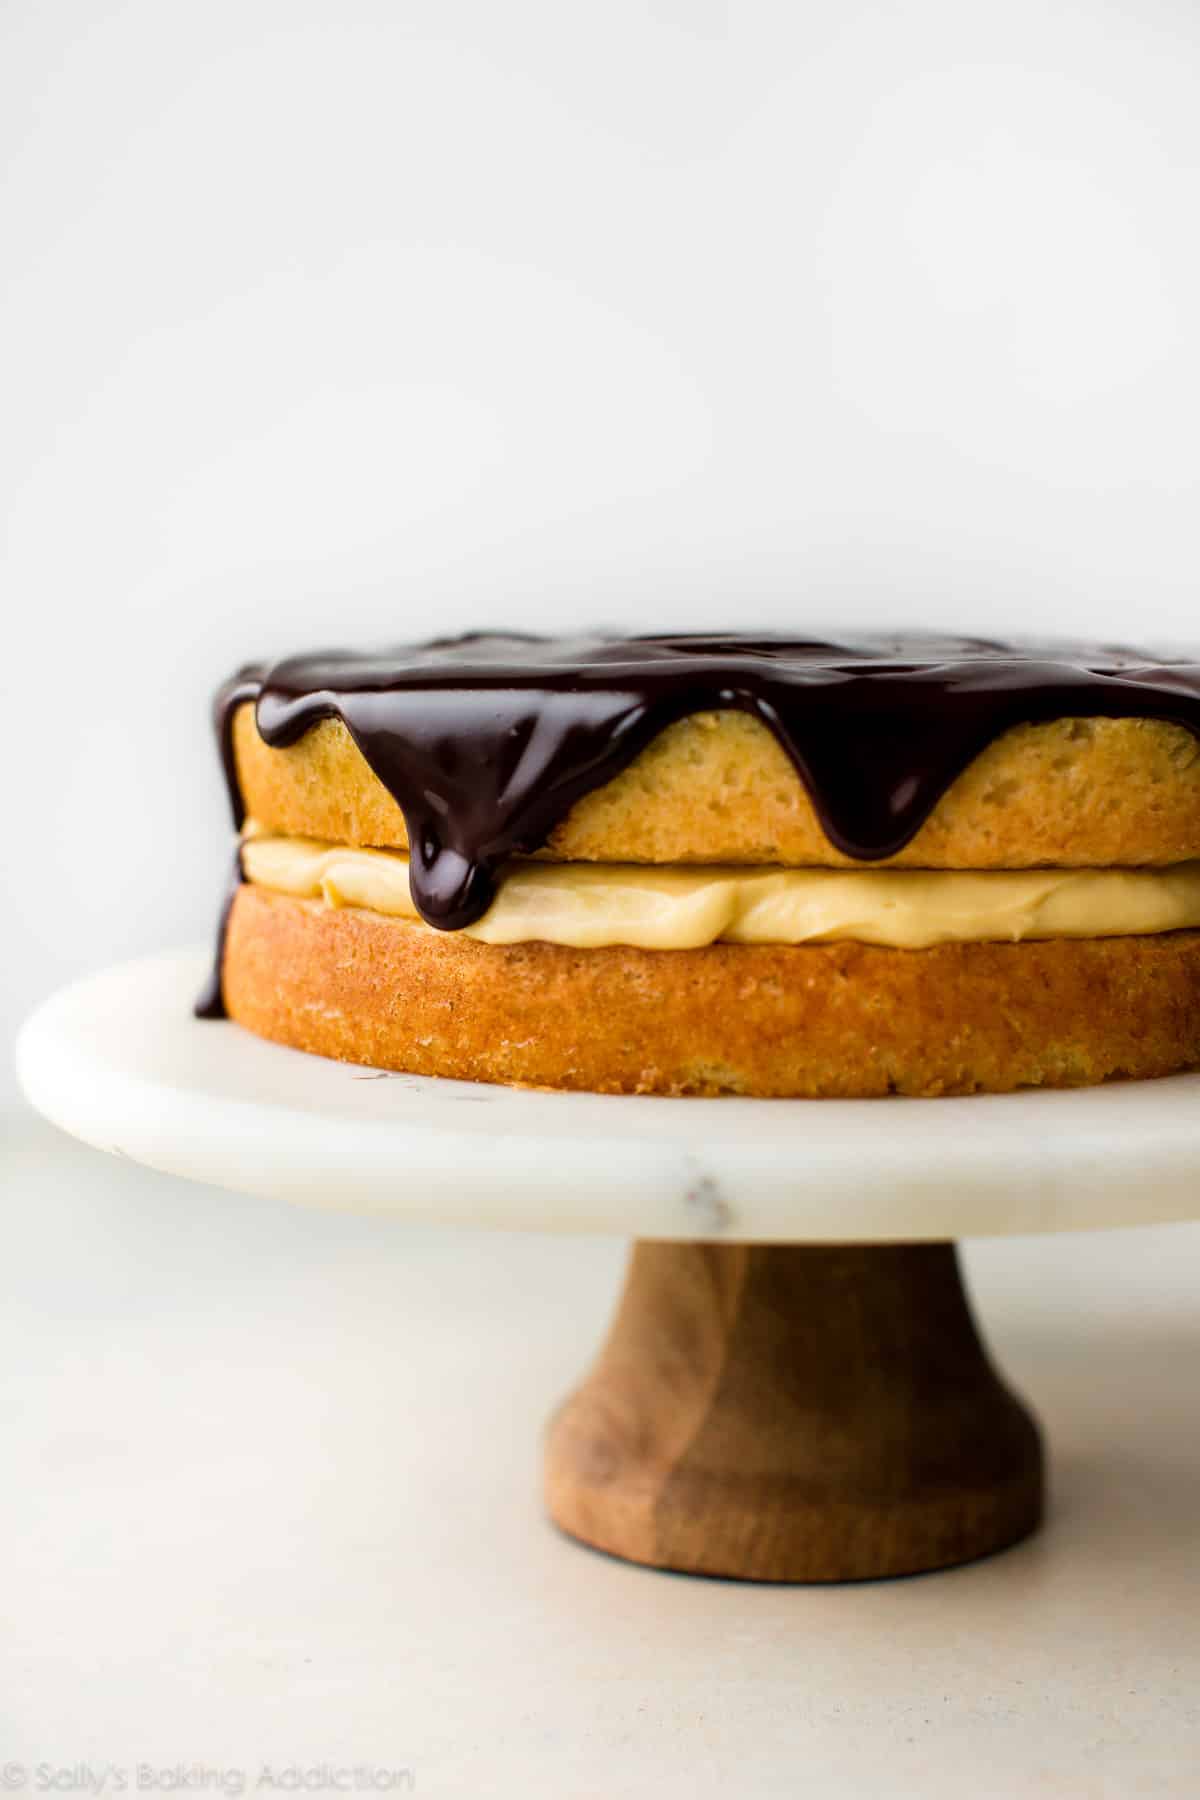
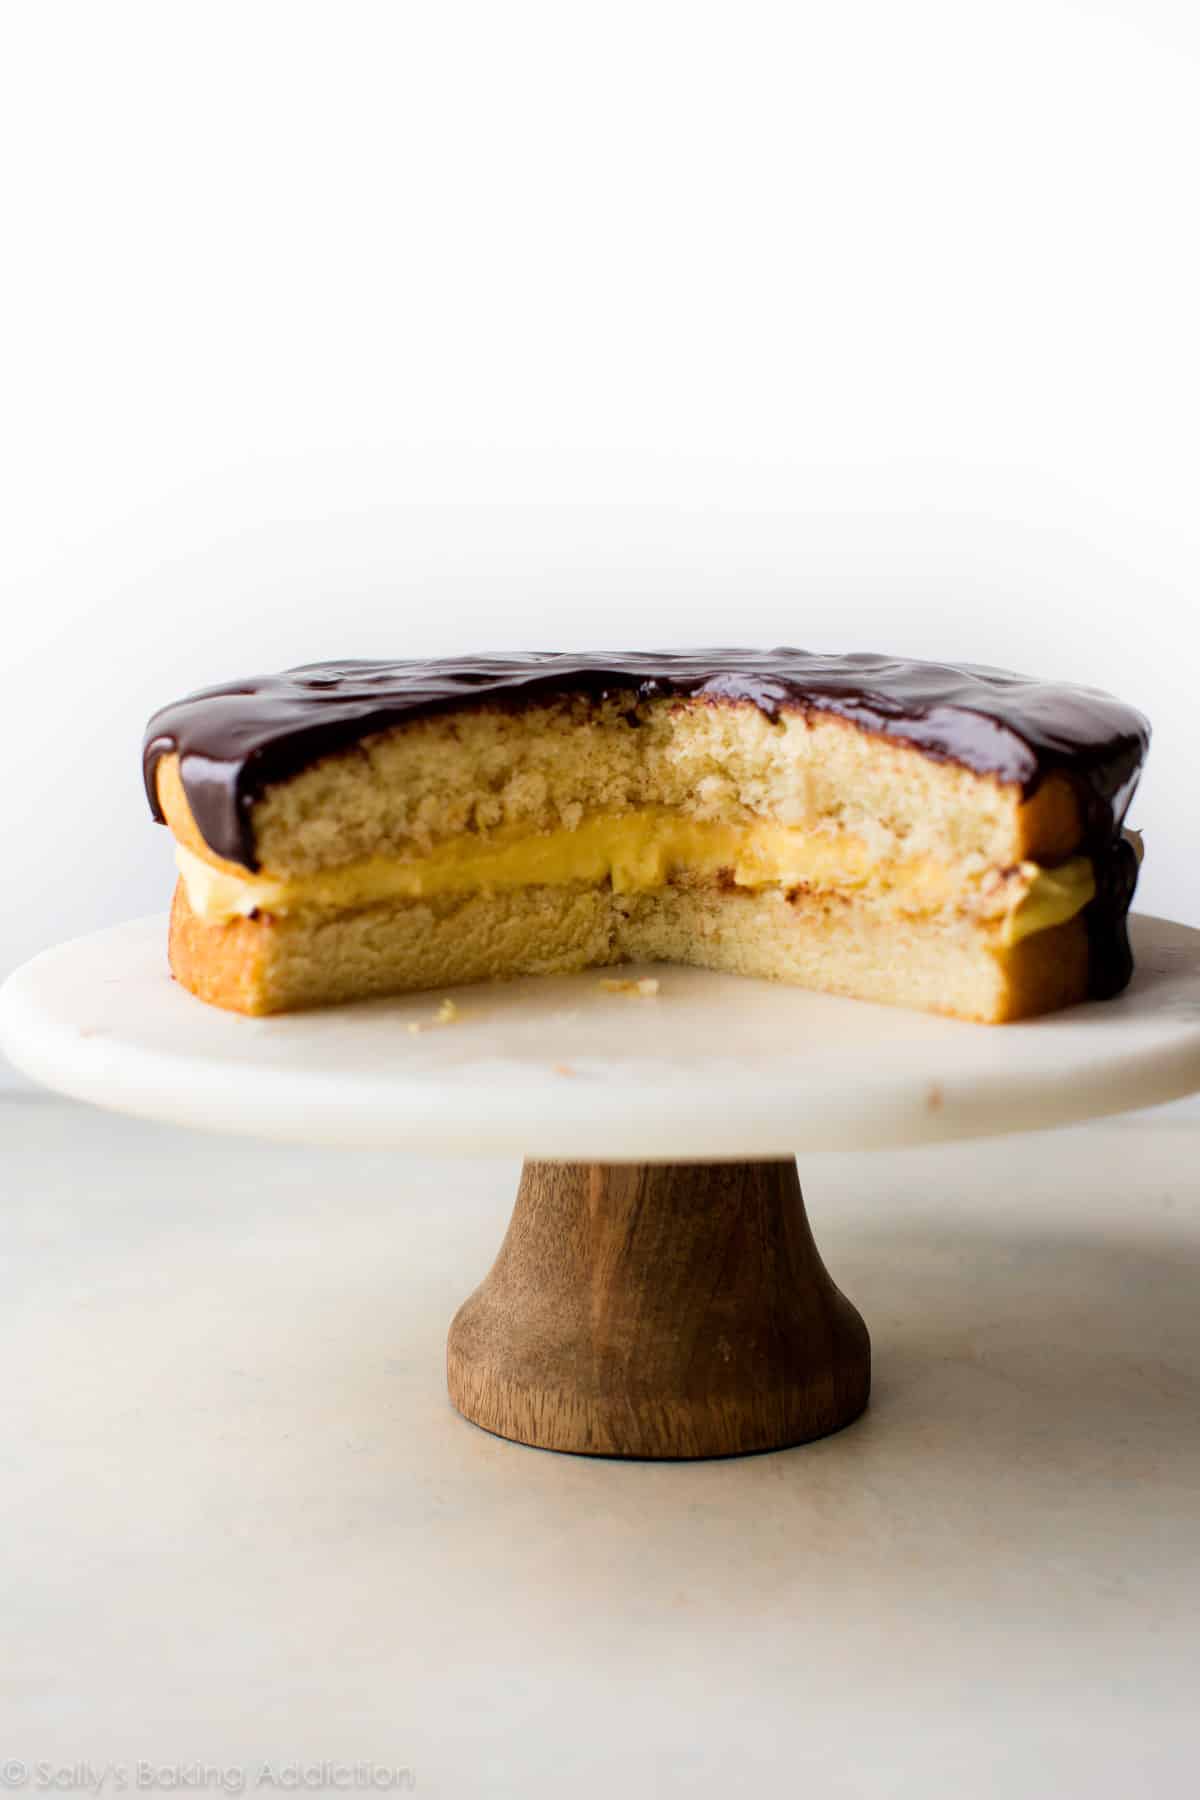
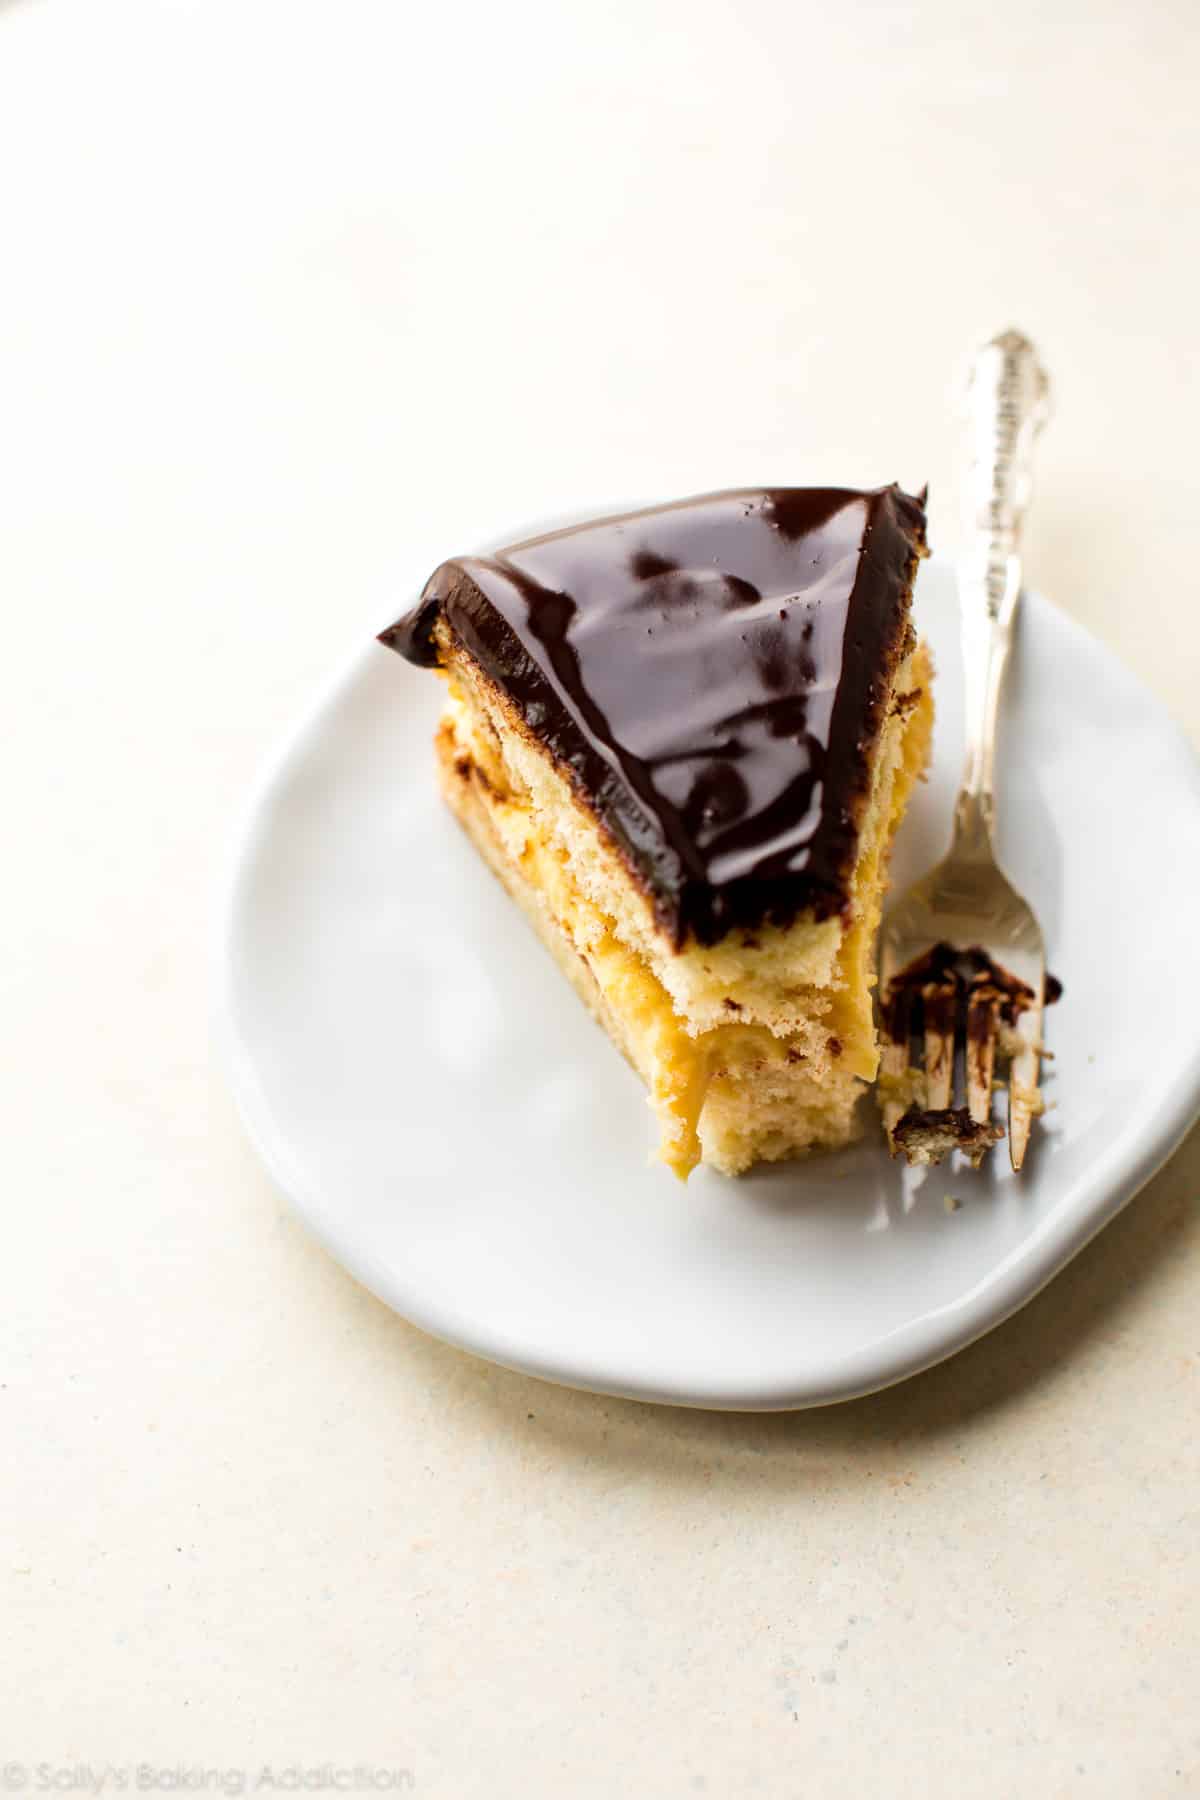
Allow us to present to you with Boston cream pie! This airy sponge cake is filled with rich pastry cream and topped with a shiny chocolate ganache glaze. It’s supremely decadent, satisfying, and melt-in-your-mouth delicious.
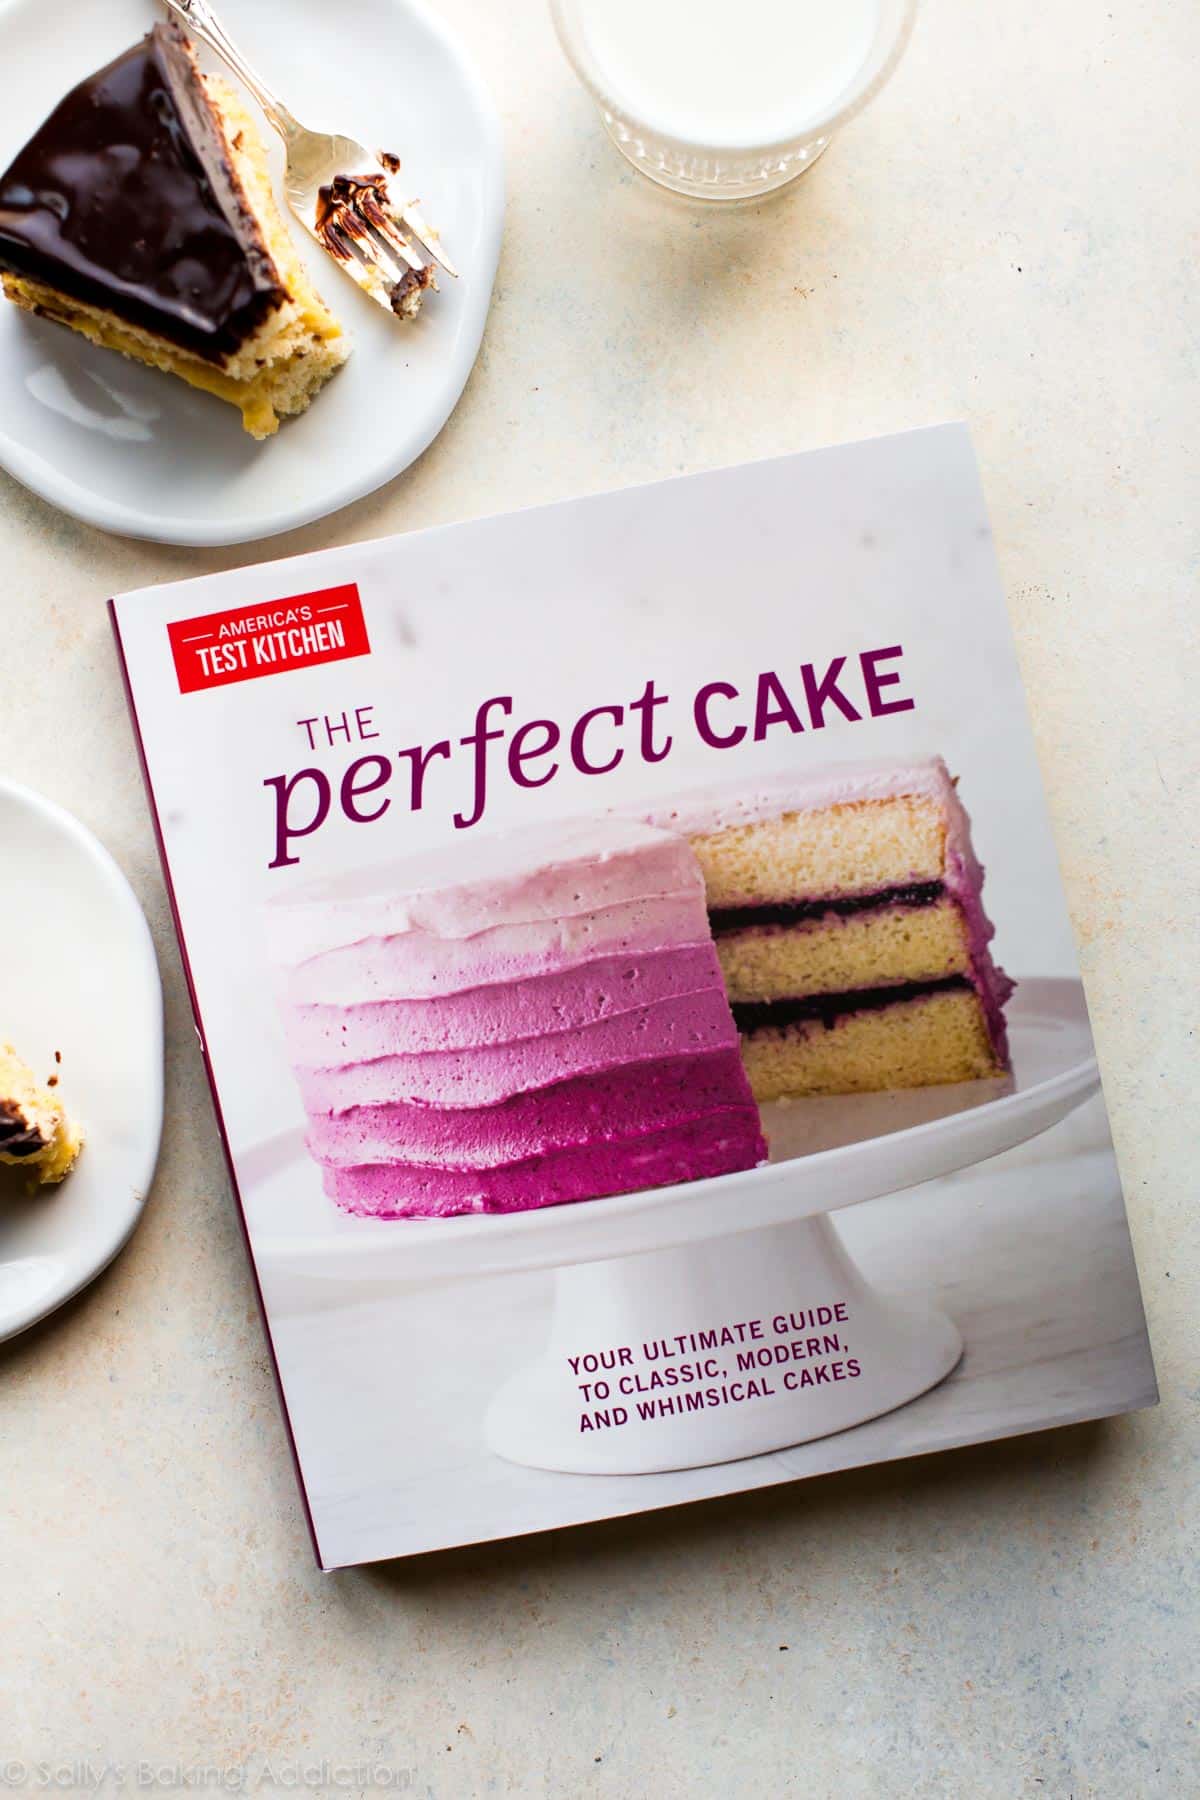
Our bookshelves are full of cookbooks, but we can say with 100% honesty that our go-tos are generally authored by America’s Test Kitchen. After all, America’s Test Kitchen and its knowledgeable test cooks, editors, and cookware specialists put the time and effort into perfecting recipes, a practice we value and respect.
Their cookbook The Perfect Cake boasts more than 240 kitchen-tested cake and cupcakes recipes ranging from a yellow sheet cake and tres leches cake to rainbow cake and bananas Foster cake. It’s the kind of cookbook that compels you to jump out of your seat, run to the kitchen, and grab the flour. So if you enjoy baking cakes, you need this cookbook.
One recipe in particular stole our hearts: Boston cream pie. We knew that if anyone could do this classic recipe justice—completely from-scratch—it’s ATK.
What is Boston Cream Pie?
The “pie” in Boston Cream Pie is a bit of a misnomer. This show-stopping dessert was originally dreamed up in the 1800s, back in the day when pies and cakes were both baked in pie plates, and names were used interchangeably. The cake features custard or pastry cream sandwiched between two rounds of buttery cake and is finished with chocolate glaze. It’s incredible.
Boston Cream Pie Recipe Details
- Texture: The sponge cake itself is light and springy, nicely offsetting the rich pastry cream and silky chocolate glaze.
- Flavor: We have buttery sponge cake, vanilla pastry cream, and deep chocolate flavors to satisfy taste buds. These classic flavors work wonderfully together—what a trio!
- Ease: This Boston cream pie may seem intimidating if you’re unprepared, but don’t be discouraged! We’ve provided some helpful tips, careful directions, step-by-step photos, and a video tutorial to guide you through the process. Turns out, Boston cream pie isn’t terribly difficult if you break the recipe down into 3 parts: 1) pastry cream 2) sponge cake 3) chocolate glaze
- Time: Set aside 6 hours to complete this recipe, which includes a lot of waiting as the components bake, cool, etc. This dessert definitely requires some time to make, but you just can’t rush perfection.
Recipe Testing: What Works & What Doesn’t
Considerations when making the pastry cream. The recipe begins with a version of my homemade pastry cream. Made with life’s best ingredients (butter, egg yolks, vanilla extract, and sugar), this buttery sweet cake filling is everything you might imagine it to be. We often use it instead of peanut butter mousse when making these homemade eclairs, and we use a variation of it in mille-feuille.
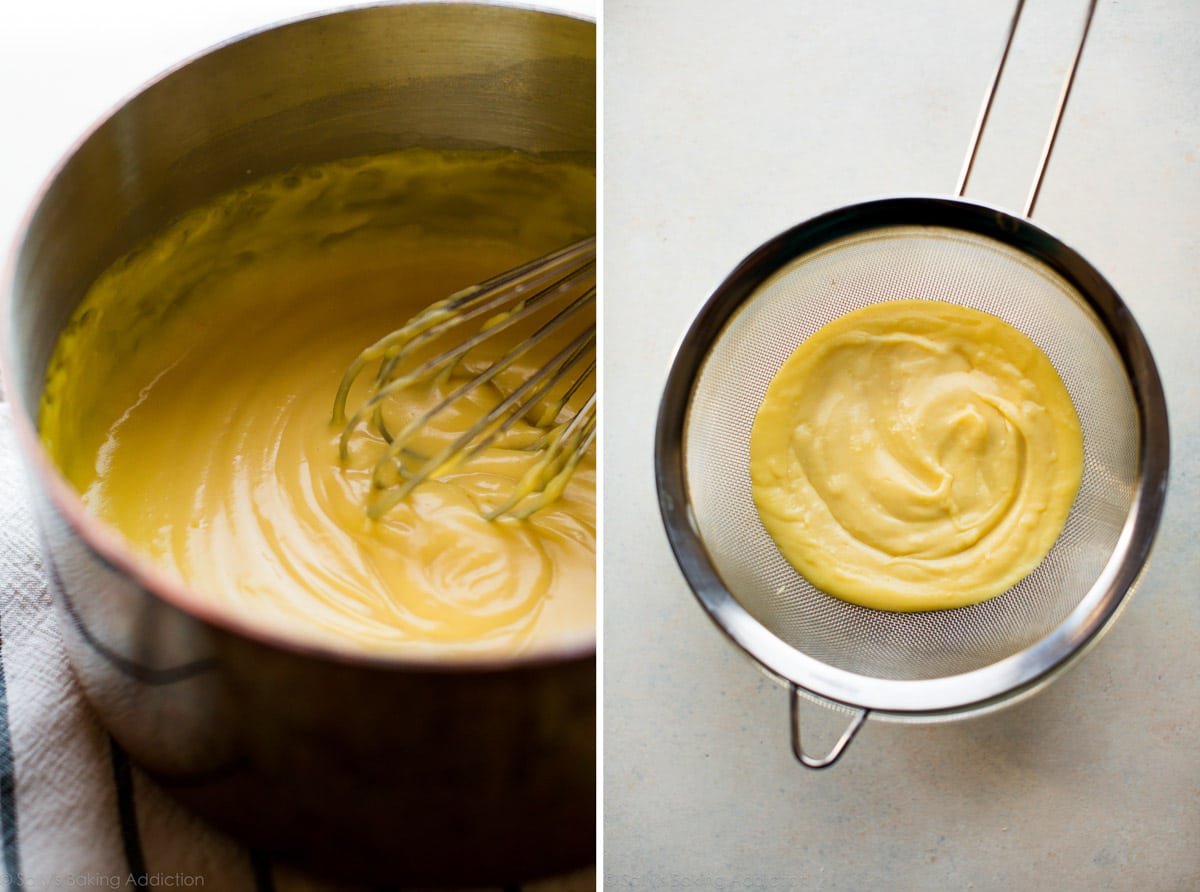
The egg yolks must be gently cooked and tempered with warm half-and-half. And remember: you’ll need to whisk the pastry cream constantly as it cooks and thickens. Then, allow the vanilla pastry cream to cool completely before spreading it on the cake.
Here are a few key points to remember:
- Pastry cream will be thick right off the stove.
- For a smooth cream, strain to rid any lumps.
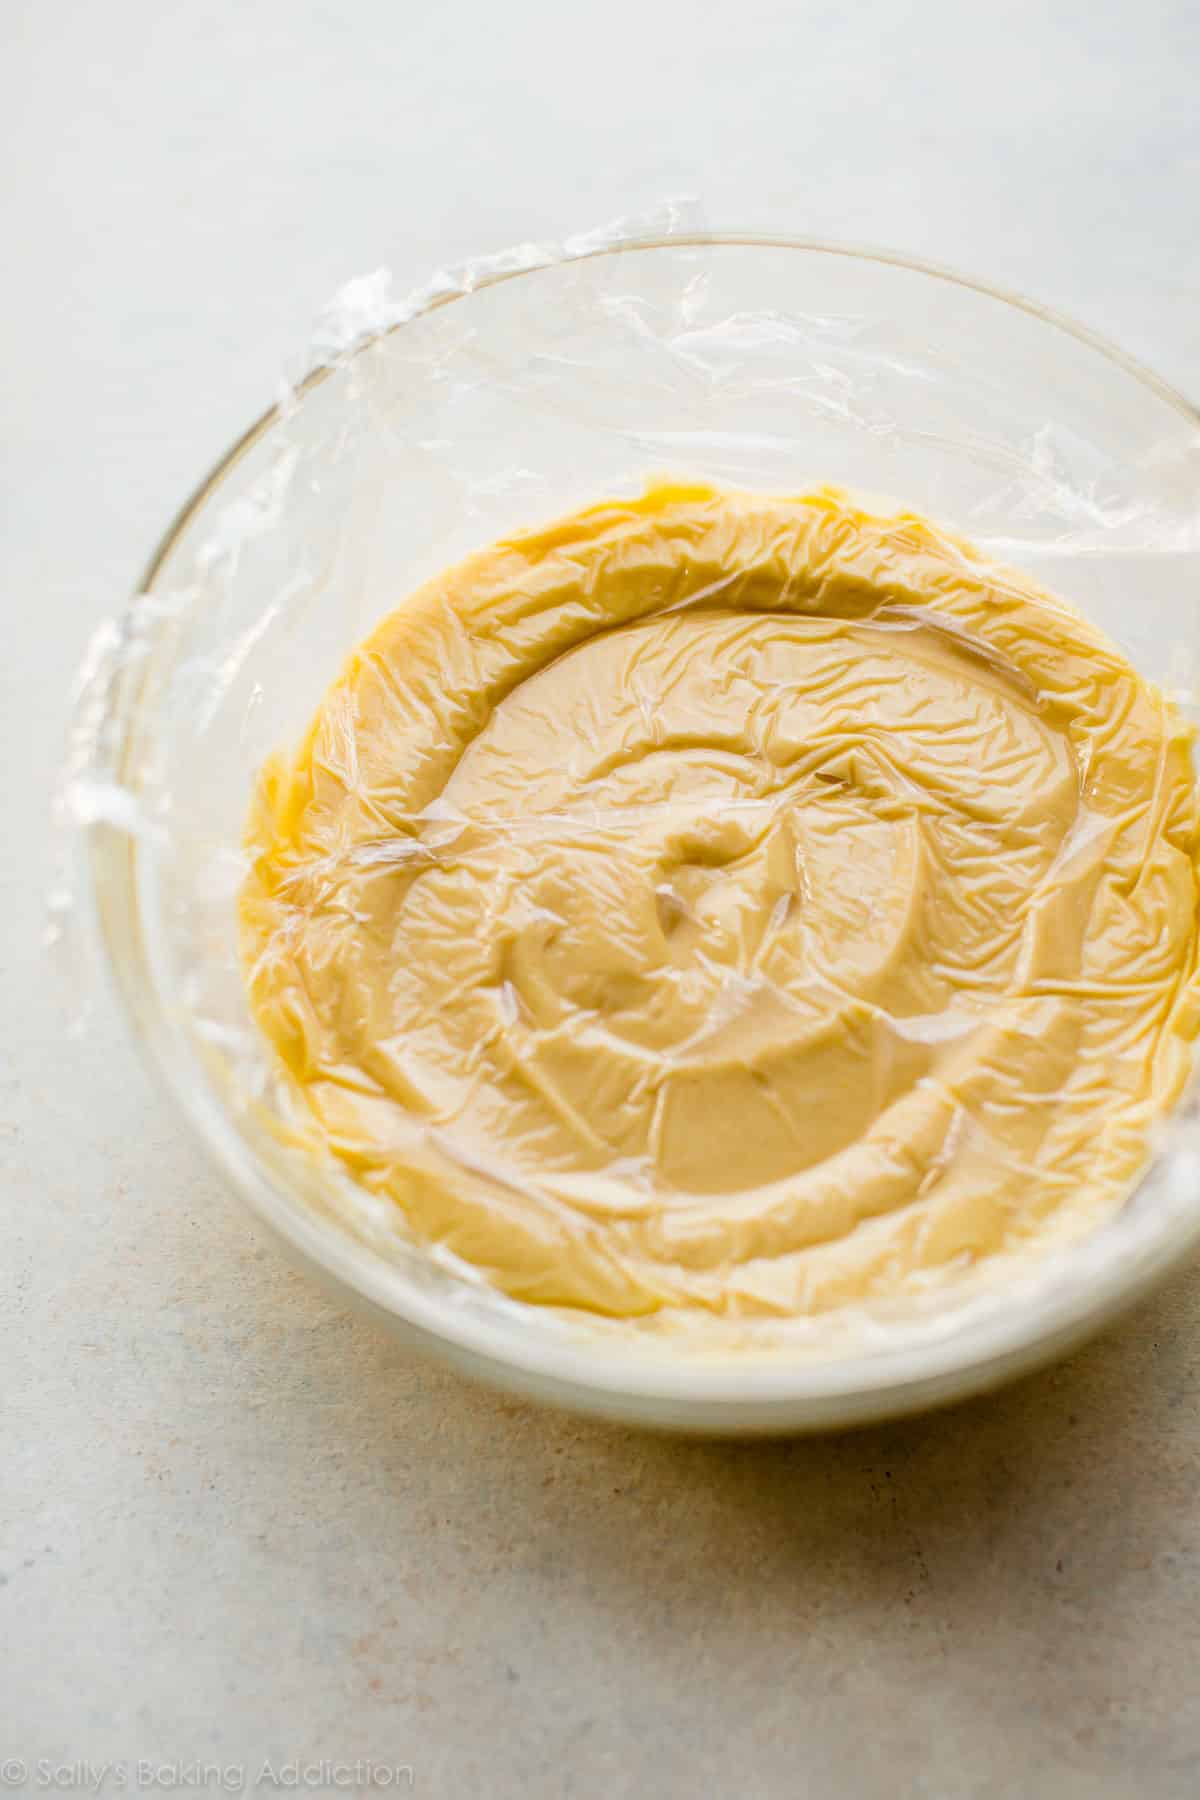
- Place plastic wrap on the surface when cooling.
If you want to save time on the day of serving, the pastry cream can be made in advance. You can watch us prepare the pastry cream in the recipe video below, which is helpful if you’ve never tempered eggs before.
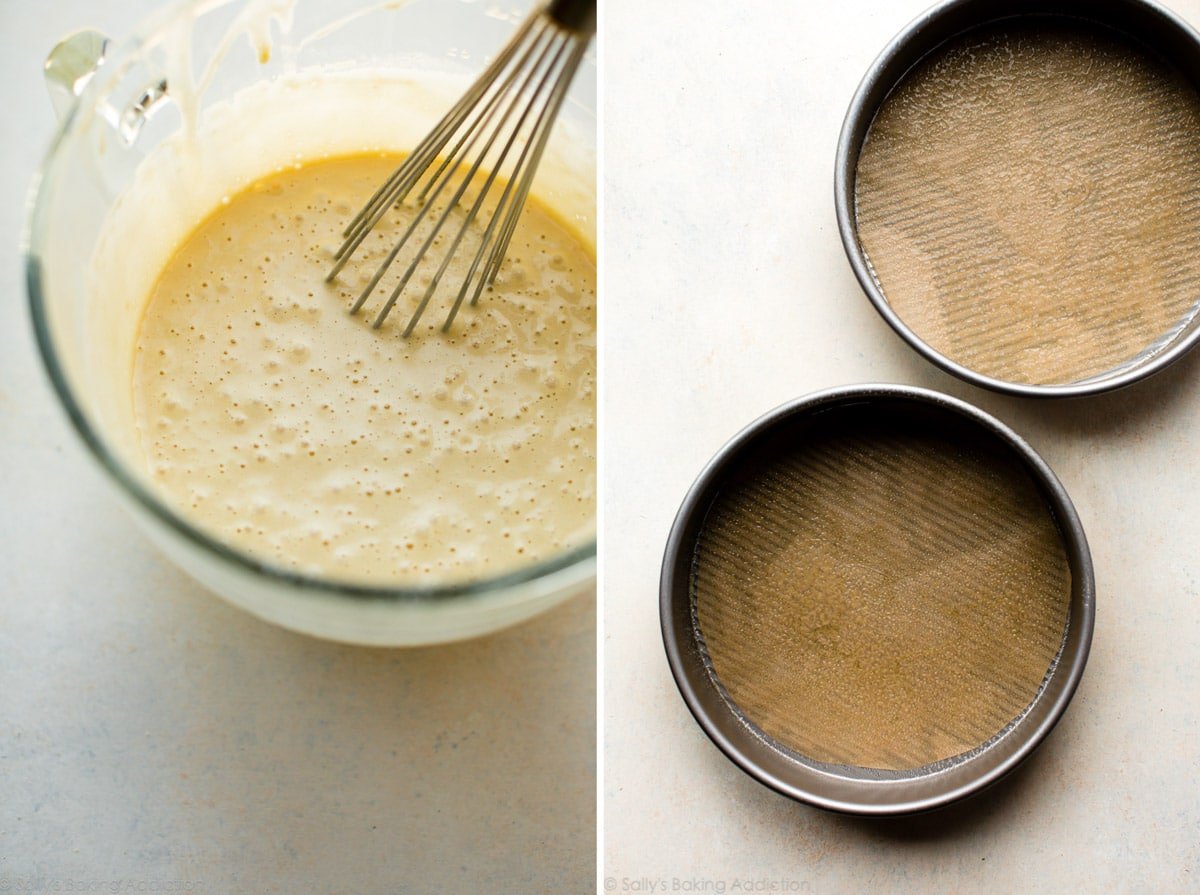
How to make sponge cake. Sponge cakes are known for their delicate and airy texture, thanks to (1) a high egg-to-flour ratio and (2) the air beaten into the eggs. America’s Test Kitchen employs the “hot milk sponge cake” method, which skips the egg separation and the meticulous folding. Instead, you whisk a warm butter + milk mixture into whipped eggs + sugar, then whisk in the cake’s dry ingredients. The warm milk keeps the butter melted, thus allowing it to mix seamlessly into the batter. And since we’re whisking together just 3 bowls of ingredients, this is an excellent recipe for sponge-cake beginners. We truly appreciate this simplified method, since this recipe does have a number of steps.
The sponge cake’s ingredients are pretty similar to the pastry cream’s ingredients. This is what we LOVE MOST about baking. It’s the same ingredients, just beaten, mixed, and cooked in different ways. Magic.
- Don’t make our mistake! By skipping over a few words in the recipe, we managed to ruin our sponge cakes… twice! That’s four 9-inch cakes completely destroyed. Line the cake pans with parchment paper. While you’re at it, grease the pans before and after they’ve been lined with parchment paper. Don’t even think about the shortcuts! If it’s helpful, see this parchment paper rounds for cakes video & post. You may be tempted to grease the pans and skip the parchment paper, but the cakes WILL stick. See this Recipe Testing blog post for proof!
By the way, if you love sponge cakes, you’ll enjoy this impressive Vertical Cake.
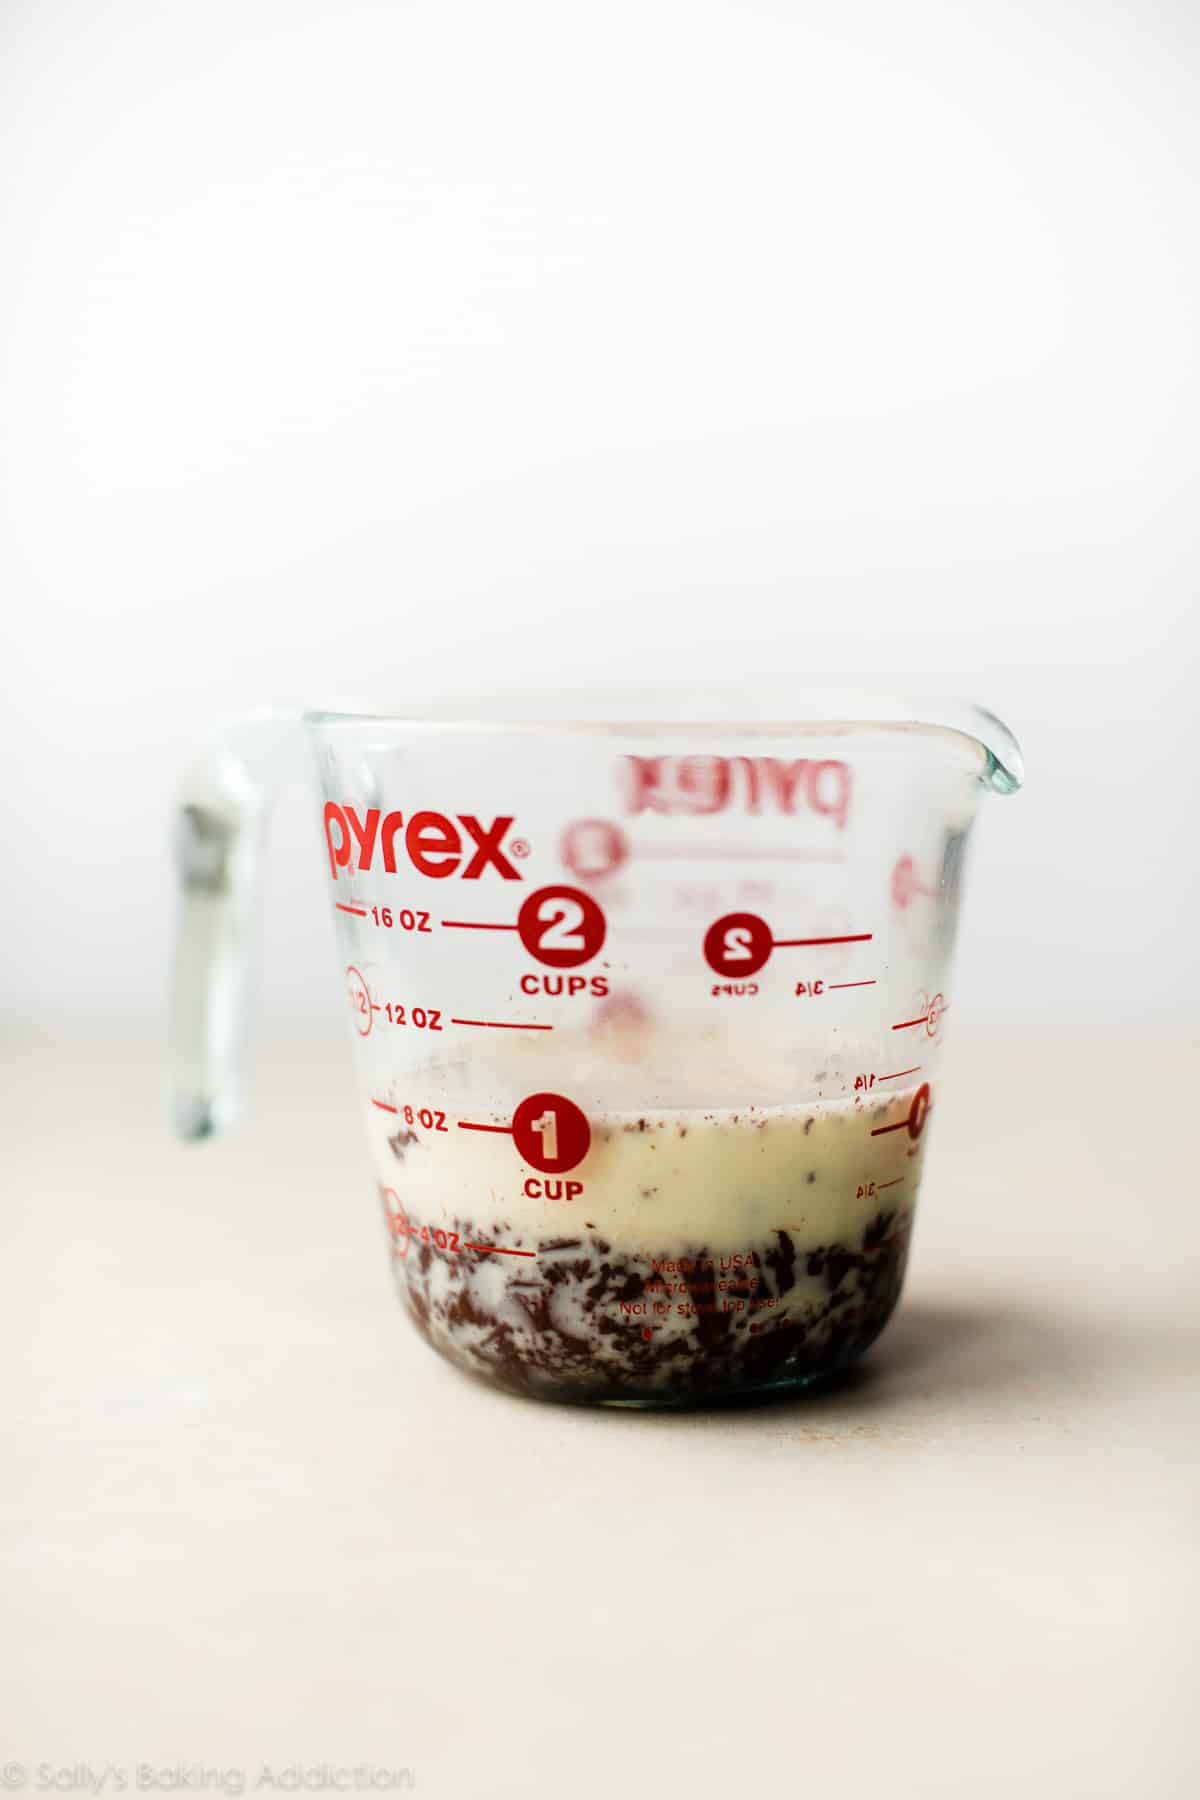
Making the chocolate glaze. Rounding out our Boston cream pie is a veil of chocolate glaze, an extra glossy version of chocolate ganache. Made with 3 ingredients, this chocolate glaze is velvety and smooth—and if you set it aside for a few minutes before stirring, it’s also thick enough to cling to the sides of the cake. You’ll heat heavy cream and a bit of corn syrup together on the stove before pouring the mixture over finely chopped chocolate. Any dark, bittersweet, or semisweet chocolate can be used. The corn syrup adds sweetness, so avoid anything very sweet. The corn syrup also provides shine and sticking power to the glaze, and I highly recommend its addition. Honey should make a nice substitution, though I haven’t tried it myself.
Believe us, this cake is worth the effort.
Overview: How to Make Boston Cream Pie
You can find the full printable recipe towards the end of this post. We include the following summary so you can prepare yourself for all of the involved steps.
- Read the recipe and watch the video first. Many of the little steps are either time-sensitive or require cooling.
- Make the pastry cream. Heat half-and-half over medium heat. Meanwhile, whisk the egg yolks, sugar, and salt in a bowl until smooth. Whisk in flour until combined and thick. Whisk 1/2 cup warm half-and-half into the yolk mixture, then slowly whisk the tempered yolk mixture into the half-and-half in the saucepan. Cook until the mixture thickens. Remove from heat and whisk in butter and vanilla. Strain through a fine mesh strainer set over a bowl. Cover with plastic wrap and refrigerate until set.
- Preheat the oven. Grease 2 9-inch cake pans, line with parchment paper, then grease the parchment paper. You must use parchment! See the recipe note.
- Make the cake. Whisk flour, baking powder, and salt in a small bowl. Heat milk and butter over the stovetop or in the microwave, then stir in the vanilla. Whisk eggs and sugar together, add the hot milk mixture, and mix until combined. Whisk in the dry ingredients.
- Bake the cakes. Divide batter evenly between the pans. Bake until light brown and a toothpick inserted into the center comes out clean. Set aside to cool.
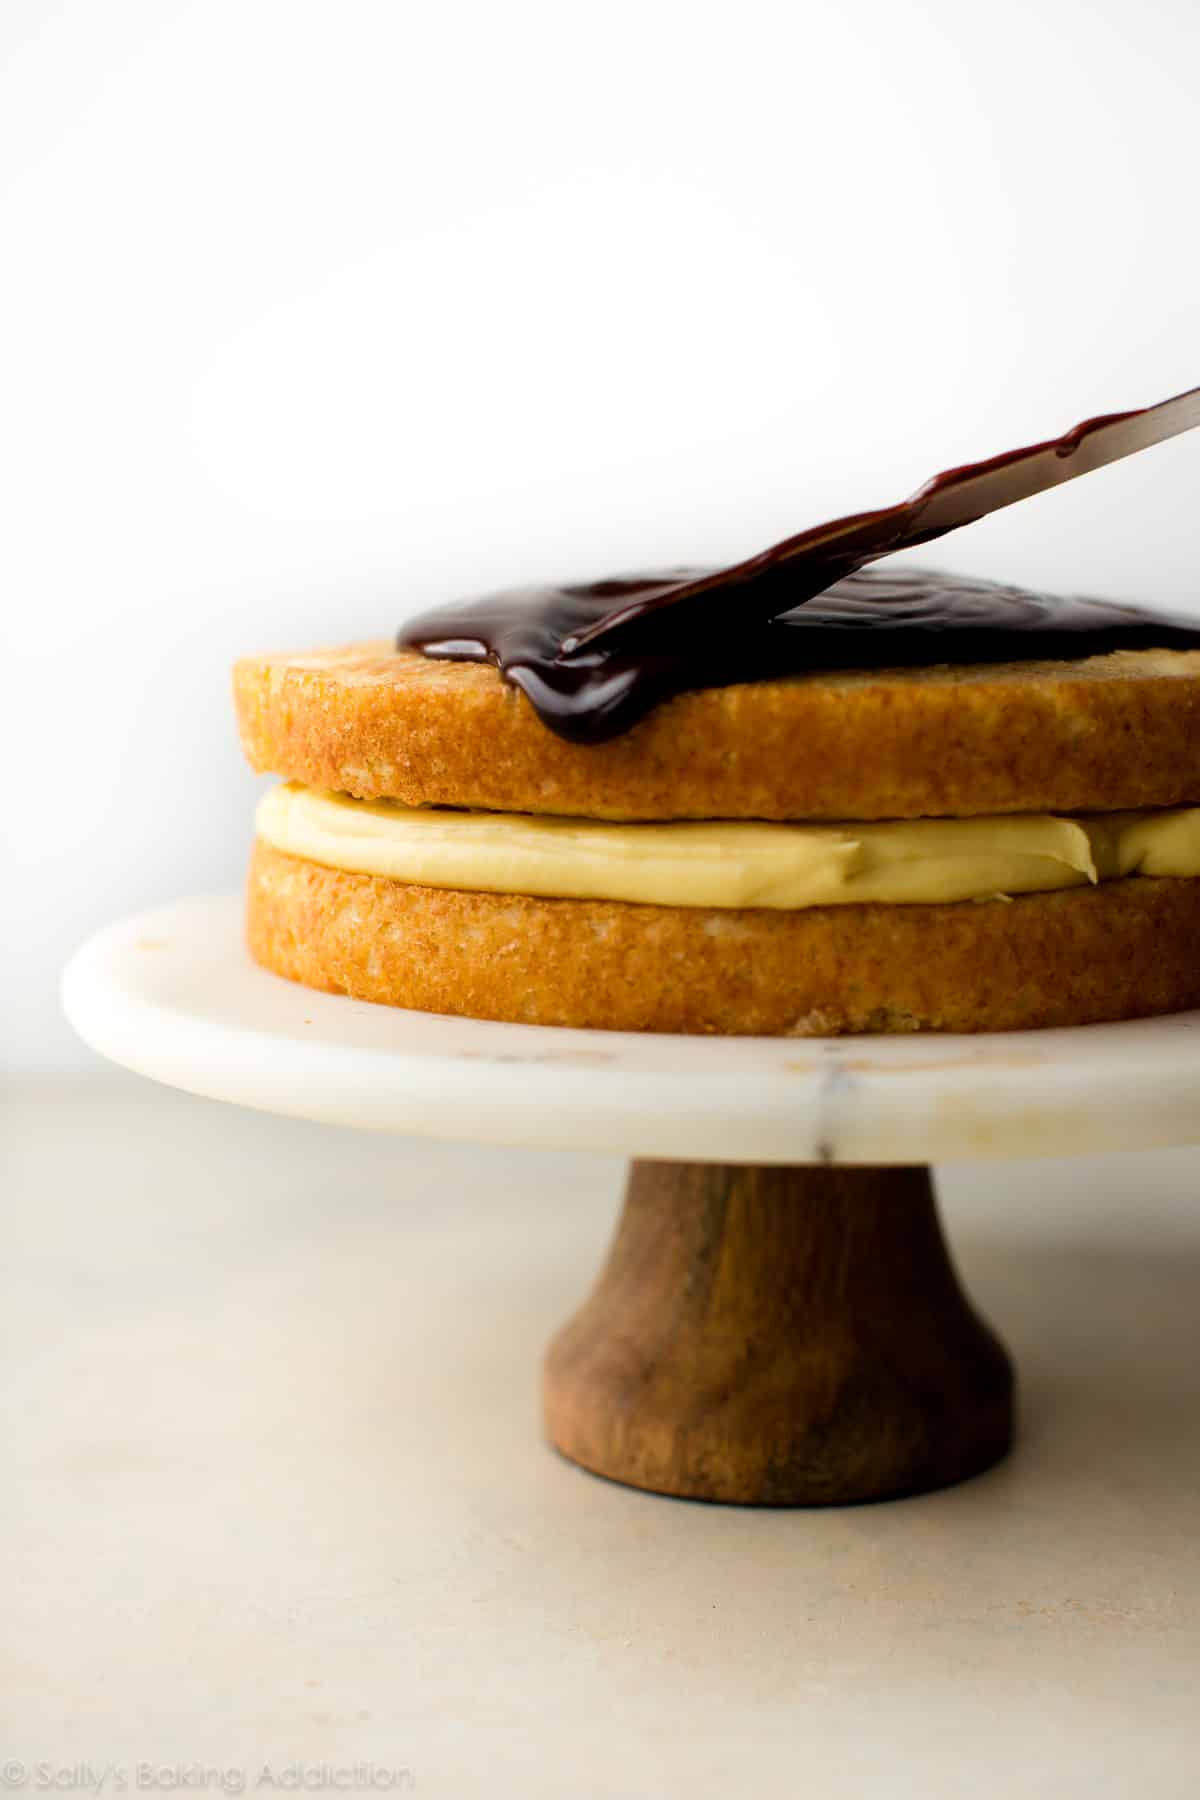
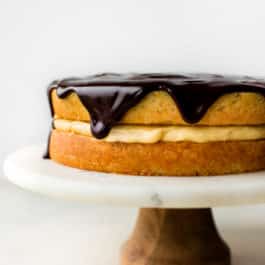
- Assemble the cake. Remove the pastry cream from the refrigerator 20 minutes before assembling the cake. Place a bottom cake layer on your cake stand or serving plate. Spread pastry cream evenly on top. Place the second cake layer on top and gently press down. Refrigerate until needed.
- Make the glaze. Heat heavy cream and corn syrup in a small saucepan. Place chocolate in a heatproof glass bowl. Pour the hot cream over the chocolate and set aside for 5 minutes to soften the chocolate. Whisk until smooth.
- Pour glaze into the center of the cake. Spread glaze to the edges of the cake. Refrigerate the cake, uncovered, for at least 2 hours before slicing and serving.
More Classic Recipes We Love
- Apple Pie
- Banana Cream Pie
- Chocolate Soufflé
- Angel Food Cake
- Choux Pastry
- Dark Chocolate Mousse Cake
Boston Cream Pie
- Prep Time: 4 hours
- Cook Time: 30 minutes
- Total Time: 6 hours
- Yield: serves 10-12
- Category: Cake
- Method: Baking
- Cuisine: American
Description
Completely from-scratch with homemade pastry cream, buttery sponge cake, and shiny chocolate glaze, this classic Boston cream pie recipe is supremely decadent and satisfying.
Ingredients
Pastry Cream
- 2 cups (480ml) half-and-half
- 6 large egg yolks, at room temperature
- 1/2 cup (100g) granulated sugar
- 1/8 teaspoon salt
- 1/4 cup (31g) all-purpose flour (spooned & leveled)
- 1/4 cup (4 Tablespoons; 56g) unsalted butter, cut into 4 pieces
- 1 and 1/2 teaspoons pure vanilla extract
Sponge Cake
- 1 and 1/2 cups (188g) all-purpose flour (spooned & leveled)
- 1 and 1/2 teaspoons baking powder
- 3/4 teaspoon salt
- 3/4 cup (180ml) whole milk
- 6 Tablespoons (85g) unsalted butter
- 1 and 1/2 teaspoons pure vanilla extract
- 3 large eggs, at room temperature
- 1 and 1/2 cups (300g) granulated sugar
Chocolate Glaze
- 1/2 cup (120ml) heavy cream
- 2 Tablespoons light corn syrup
- 4 ounces (113g) bittersweet chocolate, finely chopped
Instructions
- Read the recipe and watch the helpful video above before beginning as there are many little steps that are time sensitive or require cooling.
- Make the pastry cream: Heat half-and-half in a medium saucepan over medium heat until simmering. Meanwhile, whisk egg yolks, granulated sugar, and salt together in a bowl until smooth. Add flour and whisk until combined. Mixture will be thick. Whisk about 1/2 cup half-and-half into yolk mixture to temper, then slowly whisk tempered yolk mixture into half-and-half in the saucepan. Reduce heat to medium-low and continue to cook, whisking constantly, for 5 minutes as the mixture thickens. (America’s Test Kitchen instructs for 7-8 minutes, but mine began thickening quickly.)
- Increase heat to medium and cook, whisking vigorously, until bubbles burst on the surface, about 1 minute. Remove from heat and whisk in the butter and vanilla extract until combined. Pastry cream will be thick. Strain through a fine-mesh strainer set over a bowl. Press plastic wrap directly on surface of pastry cream and refrigerate until set, at least 2 hours and up to 24 hours.
- Preheat the oven to 325°F (163°C). Grease two round 9-inch cake pans, line with parchment paper rounds, then grease the parchment paper. Parchment paper helps the cakes seamlessly release from the pans. (If it’s helpful, see this parchment paper rounds for cakes video & post.)
- Make the cake: Whisk flour, baking powder, and salt together in a small bowl. In the microwave or on the stove, heat milk and butter together until butter has melted. Stir in the vanilla extract. Cover loosely to keep warm. In a large bowl using a hand mixer or a stand mixer fitted with a whisk attachment, whip the eggs and granulated sugar together on high speed until light and creamy, about 4 minutes. Add hot milk mixture and whisk by hand until combined, then whisk in the dry ingredients. Batter will bubbly on top and somewhat thick, similar to pancake batter.
- Divide batter evenly between 2 pans. Bake until the tops of cakes are light brown and a toothpick inserted in the center comes out clean, about 20-22 minutes.
- Remove cakes from the oven and set on a wire rack. Allow to cool completely in the pan. As the cakes cool, check the pastry cream in the refrigerator. If it’s too thick, it won’t easily spread and could tear the cake. I remove pastry cream from the refrigerator about 20 minutes before assembling the cake.
- Assemble the cake: Once cakes are cool, run a thin knife around the edges to release them from the pans. Place bottom cake layer on your cake stand or serving plate. Spread pastry cream evenly on top. Place second cake layer on top and gently press down to adhere to the pastry cream. Refrigerate cake while preparing the chocolate glaze.
- Make the glaze: Heat heavy cream and corn syrup in a small saucepan over medium heat until just simmering. As it heats up, place chocolate in a heat-proof glass bowl with a pouring spout (I use this 2-cup liquid measuring cup). Once simmering, remove cream from heat and pour over chocolate. Let sit, covered, for 5 minutes. Gently whisk until smooth.
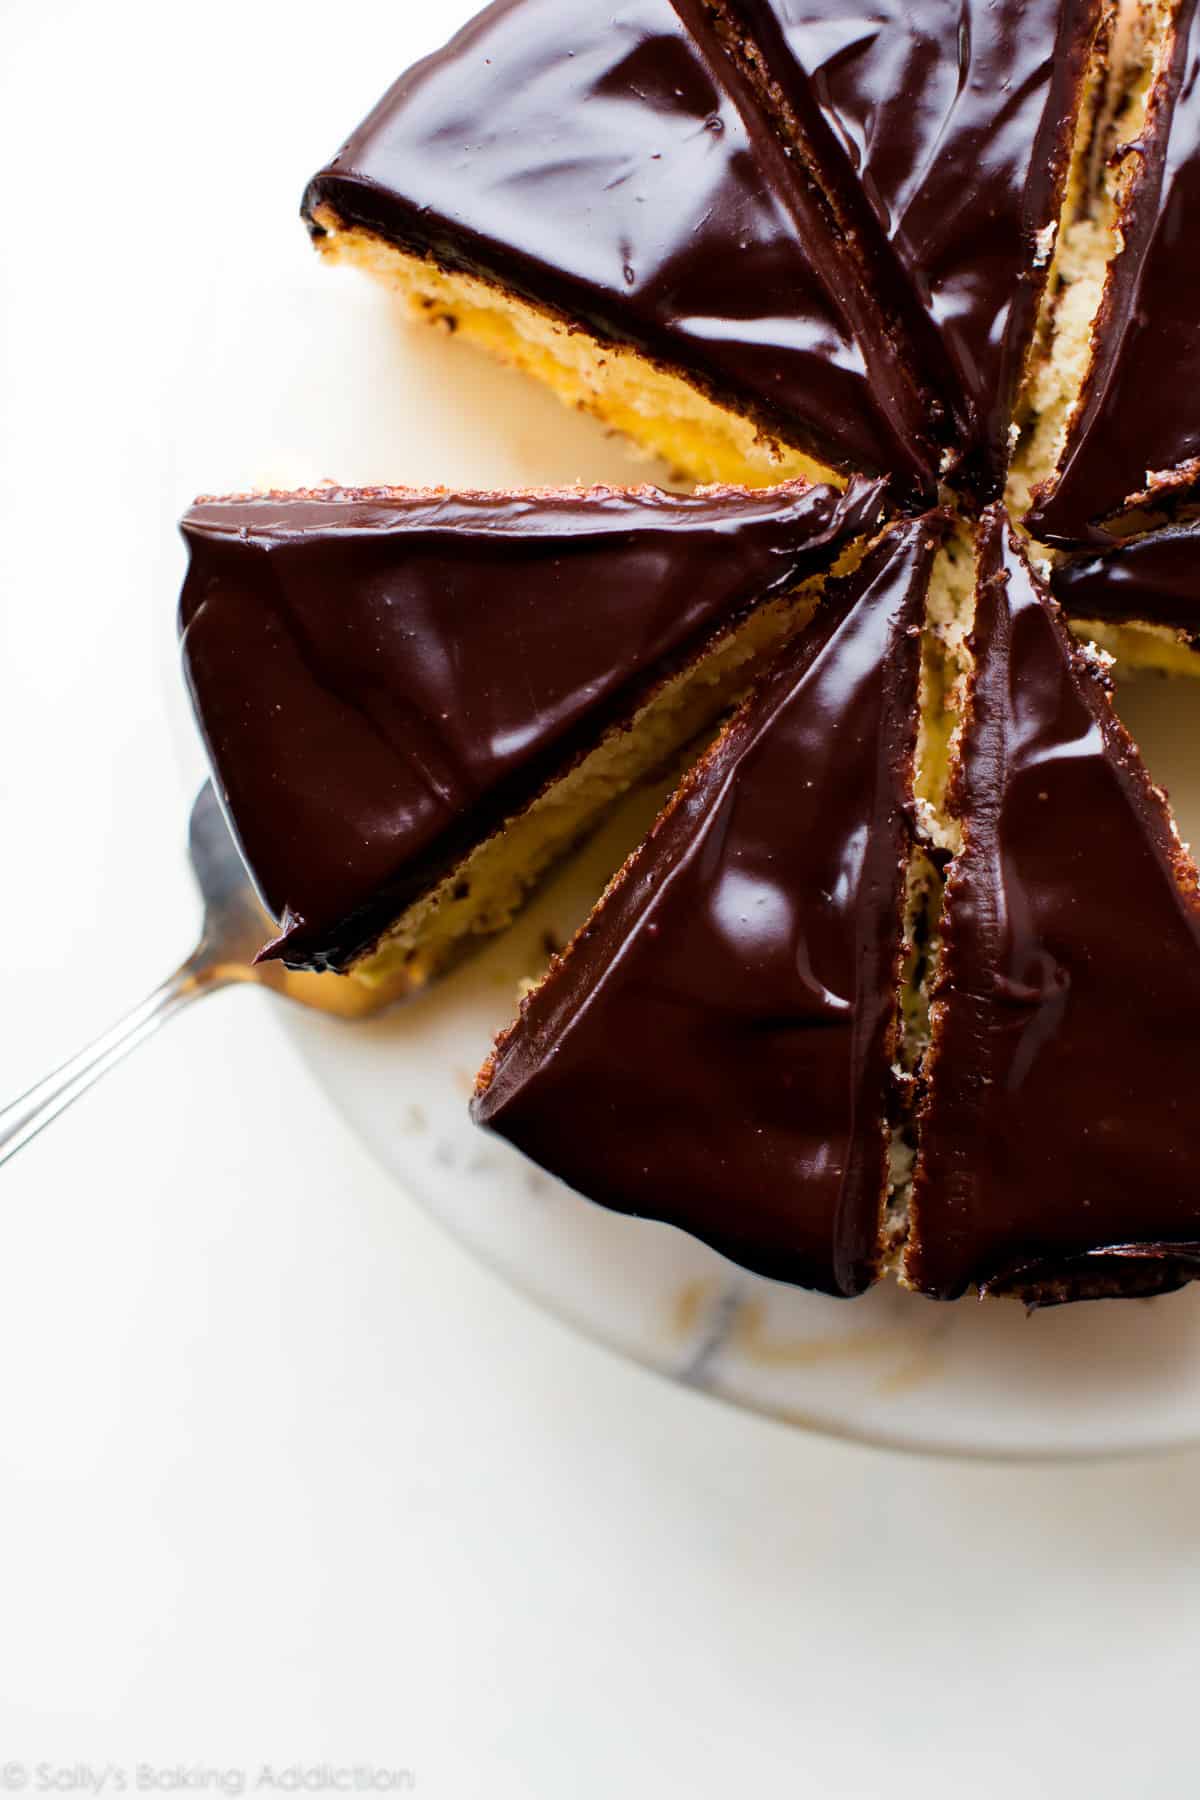
- Pour glaze into the center of cake. Spread glaze to the edges of cake allowing it to gently drip down the sides. Refrigerate cake, uncovered, for at least 2 hours (and up to 24 hours) before slicing and serving. If chilling for longer than 2 hours, allow cake to come to room temperature before slicing and serving.
- Cover leftover cake tightly and store in the refrigerator for 5 days.
Notes
- Make Ahead Instructions: You can prepare pastry cream up to 24 hours in advance. See step 3. Baked and cooled cakes can also be prepared 24 hours in advance. Cover and store at room temperature, then continue with step 8. In order to maintain the proper consistency of the chocolate glaze, I recommend preparing right before pouring over cake. However, the entire assembled cake with chocolate glaze on top can be stored for up to 24 hours. See step 10. Pastry cream can weep and break if frozen, so I do not suggest freezing this cake. You can, however, freeze the baked and cooled cake layers for up to 3 months. Thaw overnight before using.
- Special Tools (affiliate links): Glass Mixing Bowls | Whisk | Fine-Mesh Strainer | 9-inch Round Cake Pans | Electric Mixer (Handheld or Stand) | 2-cup Liquid Measuring Cup | Icing Spatula | Cake Carrier (for storage)
- Substitutions: Each ingredient is crucial to the finished cake. I do not recommend substitutions, though you can get away with using the same amount of whole milk instead of half-and-half in the pastry cream. This may be more convenient since whole milk is used for the sponge cake.
- Egg Whites: Lots of leftover egg whites! Make a scramble or use some in any of these recipes.
- Corn Syrup: Feel free to leave out the corn syrup, though it’s what adds shine and sticking power to the glaze. You can try substituting with honey.
- Chocolate: Any dark, bittersweet, or semi-sweet chocolate is a wonderful choice for the chocolate glaze. The corn syrup adds sweetness, so avoid anything very sweet.
- Parchment Paper: Parchment paper is a MUST for lining the cake pans. I failed this recipe 2x before discovering how crucial the parchment paper is. All cakes were ruined until I lined the cake pans with parchment paper on the 3rd try. Parchment paper guarantees the cakes will seamlessly release from the pans. If it’s helpful, see this parchment paper rounds for cakes video & post.
- Recipe reprinted in partnership with America’s Test Kitchen from The Perfect Cake


Reader Comments and Reviews
Hi!
Thanks for your recipes! I just discovered your artisanal bread and I loooove it. I’m making this Boston cream pie for my spouse’s birthday, and I’m wondering if the leftovers can be frozen? I wasn’t sure how well custard freezes.
Thanks!
Hi Gwen, You can freeze the baked and cooled cake layers for up to 3 months. Thaw overnight before using. See recipe notes for details!
My husband requested this for his birthday. Followed the recipe exactly using the metric weight measurements and it turned out perfectly (except cake took 37 minutes to bake). Made the sponge cake and pastry cream 2 days before, and finished up with chocolate glaze on the day of party. Very moist and so scrumptious. Can hardly wait for this afternoon to have another piece!! Loved it.
I finally get why my husband loves Boston Cream Pie – this was delicious! Everything was perfect. The cake tasted moist and just the right amount of denseness and not too sweet. The pudding was fresh and flavorful, and the chocolate was easy to work with (I used semi-sweet and dark chocolate chips).
I didn’t have whole milk so I used 2% with a splash of half and half. Other than that I used all the ingredients called for including corn syrup.
It was scrumptious! I will now have to check out that ATK cake book as well as your site to see if all the other recipes are as good!
Hi Sally,
My custard is too thick and I don’t know how to change that. HELP!!!!
I don’t undertsand straining the cream. The cream thickened within two minutes on the stove, and the cream was so thick very little passed through the strainer. I ended up scooping the cream out of the strainer and putting it in a bowl to chill.
I’d like to make this cake in a 5 1/2” cake pan and cutting the recipe in half. Any idea how long the bake time may take? (I also just have the one pan and would plan on cutting the cake into 2 layers once cooled)
Hi Michelle, I have never tested this recipe in that size pan. For reference most 6-inch cakes take about 18-21 minutes at 350°F (177°C). I do not suggest baking both layers together in one pan as over-filling your pan will cause your cake to be too heavy and not rise or bake properly. Bake one layer and leave the rest of the batter at room temperature until the first is finished and then bake the second layer.
You can also read more about changing cake pan sizes in my post Cake Pan Sizes & Conversions.
Thank you for getting back so quick! Your response was very helpful. I found 2 pie dishes that are 8 inches. Do you think I would be able to follow your recipe using these? Thanks I plan on making this for my mom’s birthday this Friday as Boston Cream is her favourite and your recipe looks delicious.
Can I make the pastry cream the day before? My time on the day I need the cake is very limited so I need to do as much the day before as possible.
Hi Jessica, You can should refrigerate the pastry cream at least 2 hours and up to 24 hours.
Made this for my husband’s birthday. A HUGE hit! Totally delicious. Wanted to ask you a question;
Can I substitute cake flour for a finer crumb?
Thank you so much
Hi Karen! I can’t see why not. The cakes will be ultra light, so make sure you grease and line the pans.
My cakes sunk down – any idea why?
Hi Shannon, thanks for trying the cake. The cakes will sink if the eggs were over-whipped or even under-whipped. Or, what’s more likely, is that the cakes were under-baked. Easy fixes for next time if you try it again.
Thank you for responding, Sally! The pastry cream was perfection. Thanks for sharing the recipe!
Finally used your recipe for this cake. I also had the same issue. Although not by much both of my layers sunk too. I know it didn’t have to do with over or under whipping the eggs because I put a timer on and they definitely weren’t underbaked because it took 29 minutes for them to bake up. I’ve used many of your cake recipes and I’ve never had this happen. I also lost a great deal of the volume the eggs and sugar created once I added the milk/butter mixture. My batter wasn’t thin but it also wasn’t as thick as you described it should be. It did bubble up like pancake batter though, lol. All of my ingredients were fresh and measuring was spot on. Could there be any other reason as to why I experienced any of these issues?
just made this for the first time, was meticulous in measurement and times and I found I had to cook it at 325 for 29 minutes before I got a clean toothpick consequently the sides of both layers had a thin crust all round. I had to trim it off because who needs a crusty sponge cake. I strained the custard but although not lumpy it seemed too thick.
By the way I have a professional oven that is calibrated
This is my husband’s favorite dessert.
It always seemed too complex, but your instructions s were spot on & made it super simple. It made a great birthday surprise. Thank you!
I also added a 1/2C of cocoa to the sponge cake to make it chocolate. It worked perfectly.
Hi Sally! I made the custard and when I added the butter, it separated. Did I cook the custard too long or do I need a better quality of butter? Maybe both…I love your recipes!
Thank you!!
Shawna
Hi Shawna! It’s possible that if you keep stirring, everything will come together. The custard could have been cooked too long as well. Both easy fixes if you decide to try the recipe again. Thank you!
Hi Sally,
This is such an amazing recipe! I have made this cake two times now…and it is the best ever!!! I have one question….Can you overcook the pastry cream, meaning making it too thick? The reason I am asking is when I cut my cake to serve, the cake layers and the pastry layer do not adhere(stick) to each other…and come a part while cutting and then again while eating. Is this normal or am I doing something wrong?
In advance, thank you for your help!
Hi Mary! I’m so happy to hear that you love this cake recipe. You can over-cook the pastry cream, yes. Is yours too thick and that’s why the layers are separating? You may want to cut down on the cook time so it’s a little thinner. Or reduce by 1 egg yolk.
I was suspicious it was too thick by the time I made the second cake because the layers were coming apart on again. Then, I went back and watched to video again. The part where you put the pastry cream through the sieve was what made me question the thickness. I believe your response will solve the issue…..and you know what they say…..Third Time’s a Charm!!!
Thank you so much Sally!!!!
Do you think the cake will work with 2% milk vs. whole milk? I bought whole milk for this but didn’t make it before it went sour!
2% milk can work in a pinch, yes!
Can you use this sponge cake to make an ice cream layer cake?
I can’t see why not!
I’m sooo sorry if I am going to be asking a redundant question…I see other have asked but for the life of me, even after reading all the comments, I can’t find the answer LOL.
What is the yield of the pastry cream? Is it enough to fill the linked eclairs recipe (qty 16)? Anyone who has tried, please share!
Thank you so much xoxoxo
Yes, you’ll have plenty of pastry cream to fill the eclairs. It yields 2 generous cups.
I dont know what happened! Made this cake today. Cake part was on point, but i made the pastry cream yesterday. It seemed on point too when i put it into the fridge but today it was runny! Would not support my cake. Oozed everywhere! Any suggestion where i went wrong? P.s. love your recipes!
Hi Jamie! So glad you enjoy this cake. Did you follow the pastry cream recipe closely including using all the egg yolks and half-and-half? Even with the 6 egg yolks and flour? I wonder if it wasn’t cooked long enough to properly thicken, too.
I’m having the same issue with the cream as well. I only used about half so far and it wants to ooze over the first layer of cake. I thought it was going to thicken over night in the fridge. Tastes great though!
Hi Sally
Excited to make this- but I am wondering is it possible to omit the butter from the pastry cream section of the pie?
I never expected there to be butter in this…
Thanks
Sarah
Hi Sarah! I don’t recommend leaving out the butter in homemade pastry cream. It’s a common ingredient in puddings and pastry creams. Thank you for checking!
I made this cake and flavor-wise it was delicious! (I think I am going to try it again for my birthday coming up!) I had some trouble with the sponge though. When I mixed the milk and butter into the whipped eggs and sugar, the eggs pretty much lost 90% of their air. The final batter was very thin, and it only puffed a little in the oven. It tasted great, the sponge was just rather dense. I had measured everything out before I began any of the whipping/melting/mixing, so I think I had the measurements right. Any thoughts on why my batter had gone so flat?
I just made the sponge and it seemed to have come out the same. Wondering why
This is the third cake I’ve made from this website and they’ve all turned out great. I’m a beginning home baker and the recipes have easy too follow detailed directions.
I was worried about the pastry cream setting properly, but it was the perfect stiffness to not collapse under the top layer of the sponge cake.
I also like that none of the elements of this cake were over-the-top sweet. It was great and my family loved it.
Thanks for the great recipes! This site is my first choice for cake recipes from now on!
Thank you for this delicious recipe. I made it for my husband’s birthday and it was delicious. The cake and the chocolate glaze are so good (I used another recipe for the pastry cream). I will do it again!
This turned out so good!! I cut the recipe in half and made cupcakes (since we can’t eat like we used to) and everyone was so impressed!! My only issue was that the top of my Cupcakes were so sticky. They were completely cooked through, but the tops never really browned or developed a “crust.” What did I do wrong? They tasted fine. They were just hard to work with.
Hi Doreen, I’m so glad these were a hit! How did you cool or store the cupcakes? Sometimes if we cover cupcakes or cakes before they are 100% cool condensation can form on top causing them to get sticky.
I don’t think that cooling was the issue. My muffin tin was deeper than my cupcake liners, so maybe that kept the tops from drying out or browning?
Thank you for the reply!!
Sally, can the cake sponge be frozen? If yes, for how long? I’ve made Boston cream pie before but I used a different recipe and at the time I was able to use the cakes so no need for freezing. I know all of your cake recipes I’ve made so far could be frozen but since I didn’t see anything about that in your note section I thought I should ask just to be on the safe side. Hope to hear from you soon. I need to use up some ingredients before they go bad, lol and I was hoping to make it today. Thanks for your time and help… Tammie
Hi Tammie, you can freeze the baked and cooled cake layers, yes. See the last part of the make ahead instructions. 🙂
This post will help you: https://sallysbakingaddiction.com/how-to-freeze-cakes/
Thanks for replying Sally. I’m so sorry. I can’t believe I didn’t see that when I looked the first time. SMH I just love how you take the time to reply. I probably shouldn’t say this but if I see someone asking for a recipe elsewhere (mainly on YouTube, lol) I always send them here. Most of the time your lucky if the YouTuber gives detailed instructions much less answers a question. Thanks again…
Any recommendations for converting this recipe to 3 layer 6-inch cake? Thank you!
Hi Sally,I’ve made this cake many times and it a hit! I made it again and realized I didn’t get heavy cream,can I use half and half instead or will it ruin the chocolate topping?
Thanks, Stacey
I made this Boston cream pie, and everything came out beautifully, because the instructions are meticulously written; however, as beautiful as it looked, the glaze is very bitter! I kept rereading the recipe to make sure I used the correct chocolate, and I definitely did, but my family did not like the cake. I am so disappointed, because it’s my sister’s favorite, and I made it for her birthday. The cake and the pastry cream are fantastic, but the glaze, terrible! I would definitely use semi-sweet chocolate, not bittersweet.
Amazing!! Turned out perfect
I just made this last night and it was a hit, even with one of my picky friends! Everything turned out beautifully and the flavors, textures just really sang! My only issue was my cakes were not even and kind of lopsided. Also, my cooking time was about 26 minutes. Nobody noticed because it was so moist and tender, just perfect! What I will do next time is put the pastry cream in a pastry bag and pipe a dam around the perimeter, so that it looks more luscious and defined.
Oh.my.goodness. This is delicious! My whole family loved this cake! Even though I was intimidated by the pastry cream, it was actually very easy! And even though I accidentally forgot to add the vanilla to the cake because one of my children distracted me, lol, it still came out delicious!
I made this for my mom’s birthday this year. I bake a lot but this is no doubt the best cake I’ve ever made. It was an absolute crowd-pleaser, even my niece who won’t usually touch cake was begging for another slice. Definitely going to become a birthday staple in my house!
I made this today and my cakes were super pale even after 26 min. Cakes generally take a few minutes LESS in my oven than what’s listed in a recipe, so this shocked me. ATK is my go-to for pretty much everything so I had to do some research to determine why my cakes turned out this way. After watching the ATK video and looking at your pictures, it appears both of you used darker pans. I used my standard light silver colored pans. As a result, 325 degrees was too low for my pans. I did a second recipe but this time at 350 degrees and the cakes were perfect. I double checked some of my other sponge recipes and they all say 350 degrees for light pans and 325 degrees for dark pans. Thought I’d share in case anyone else runs into the same issue.