

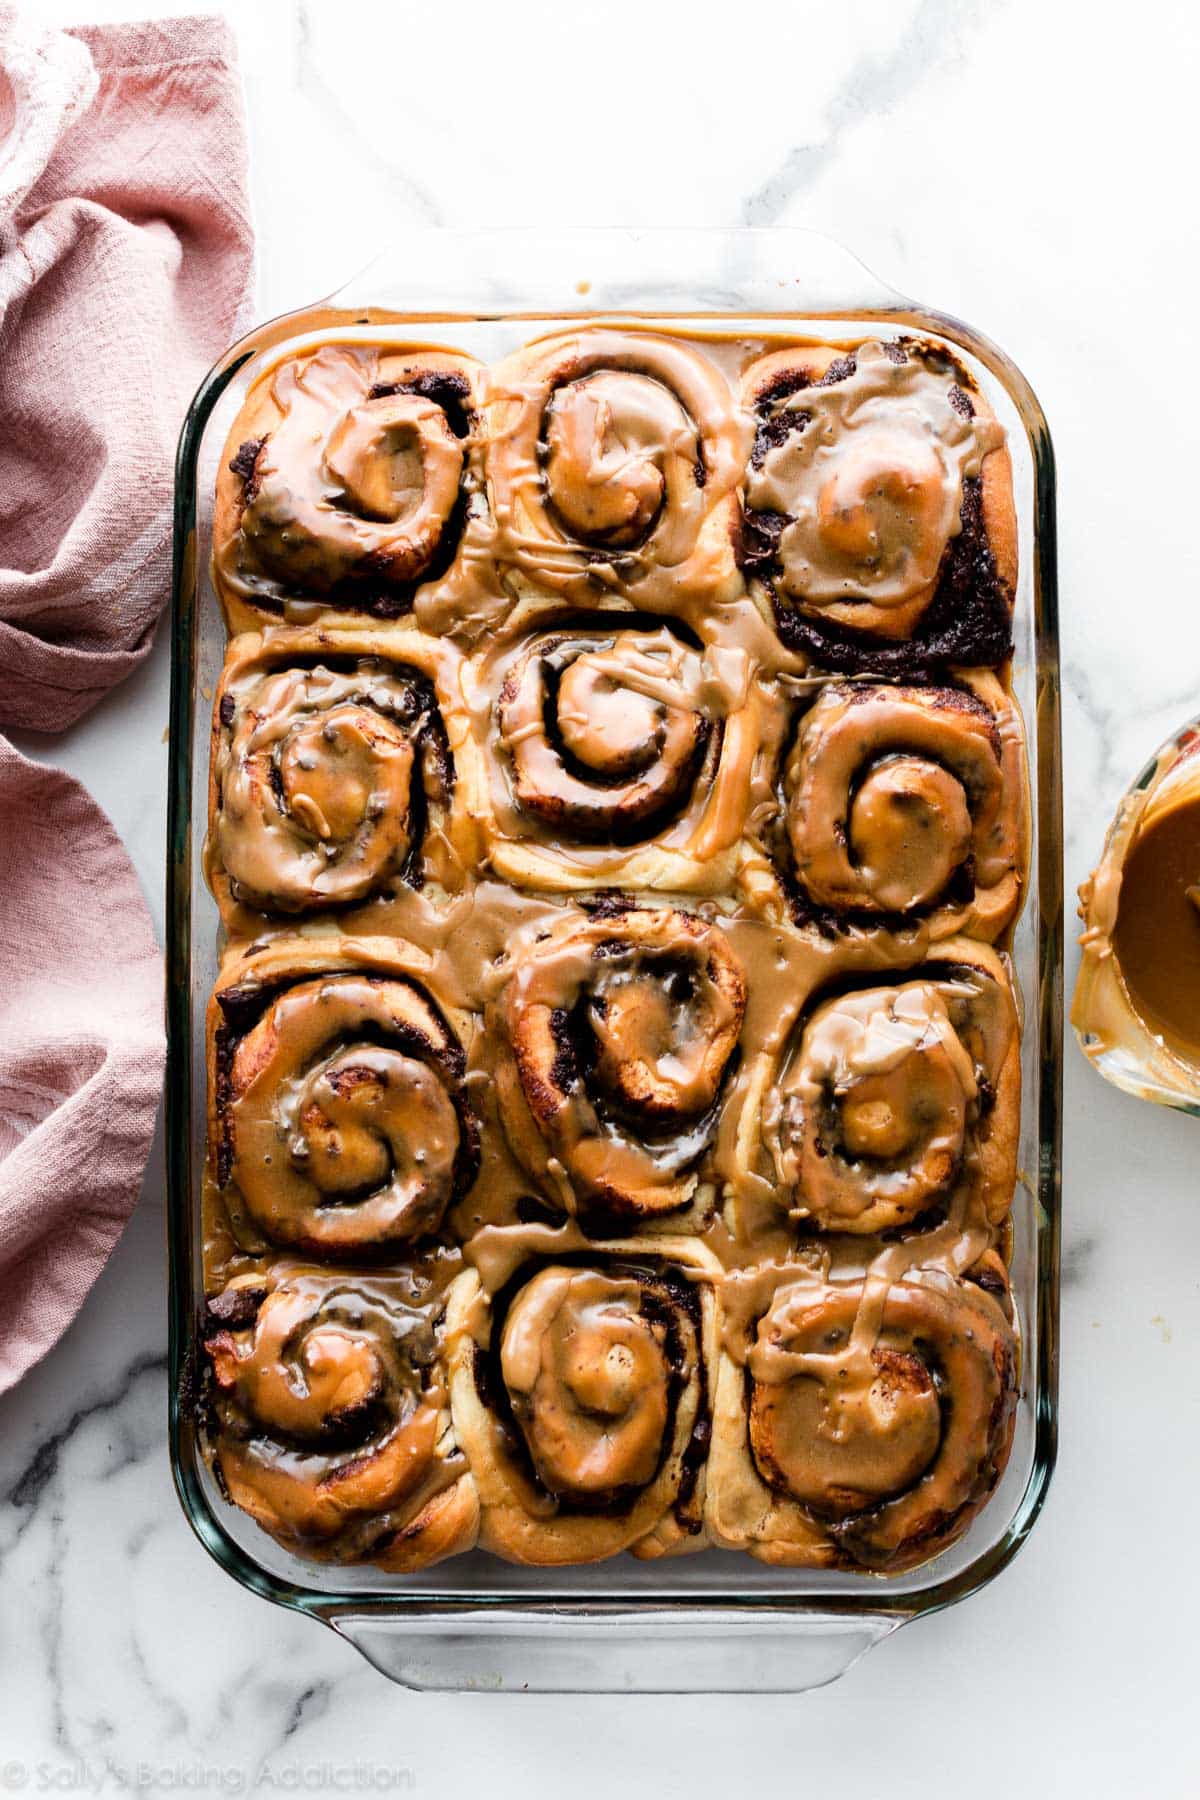
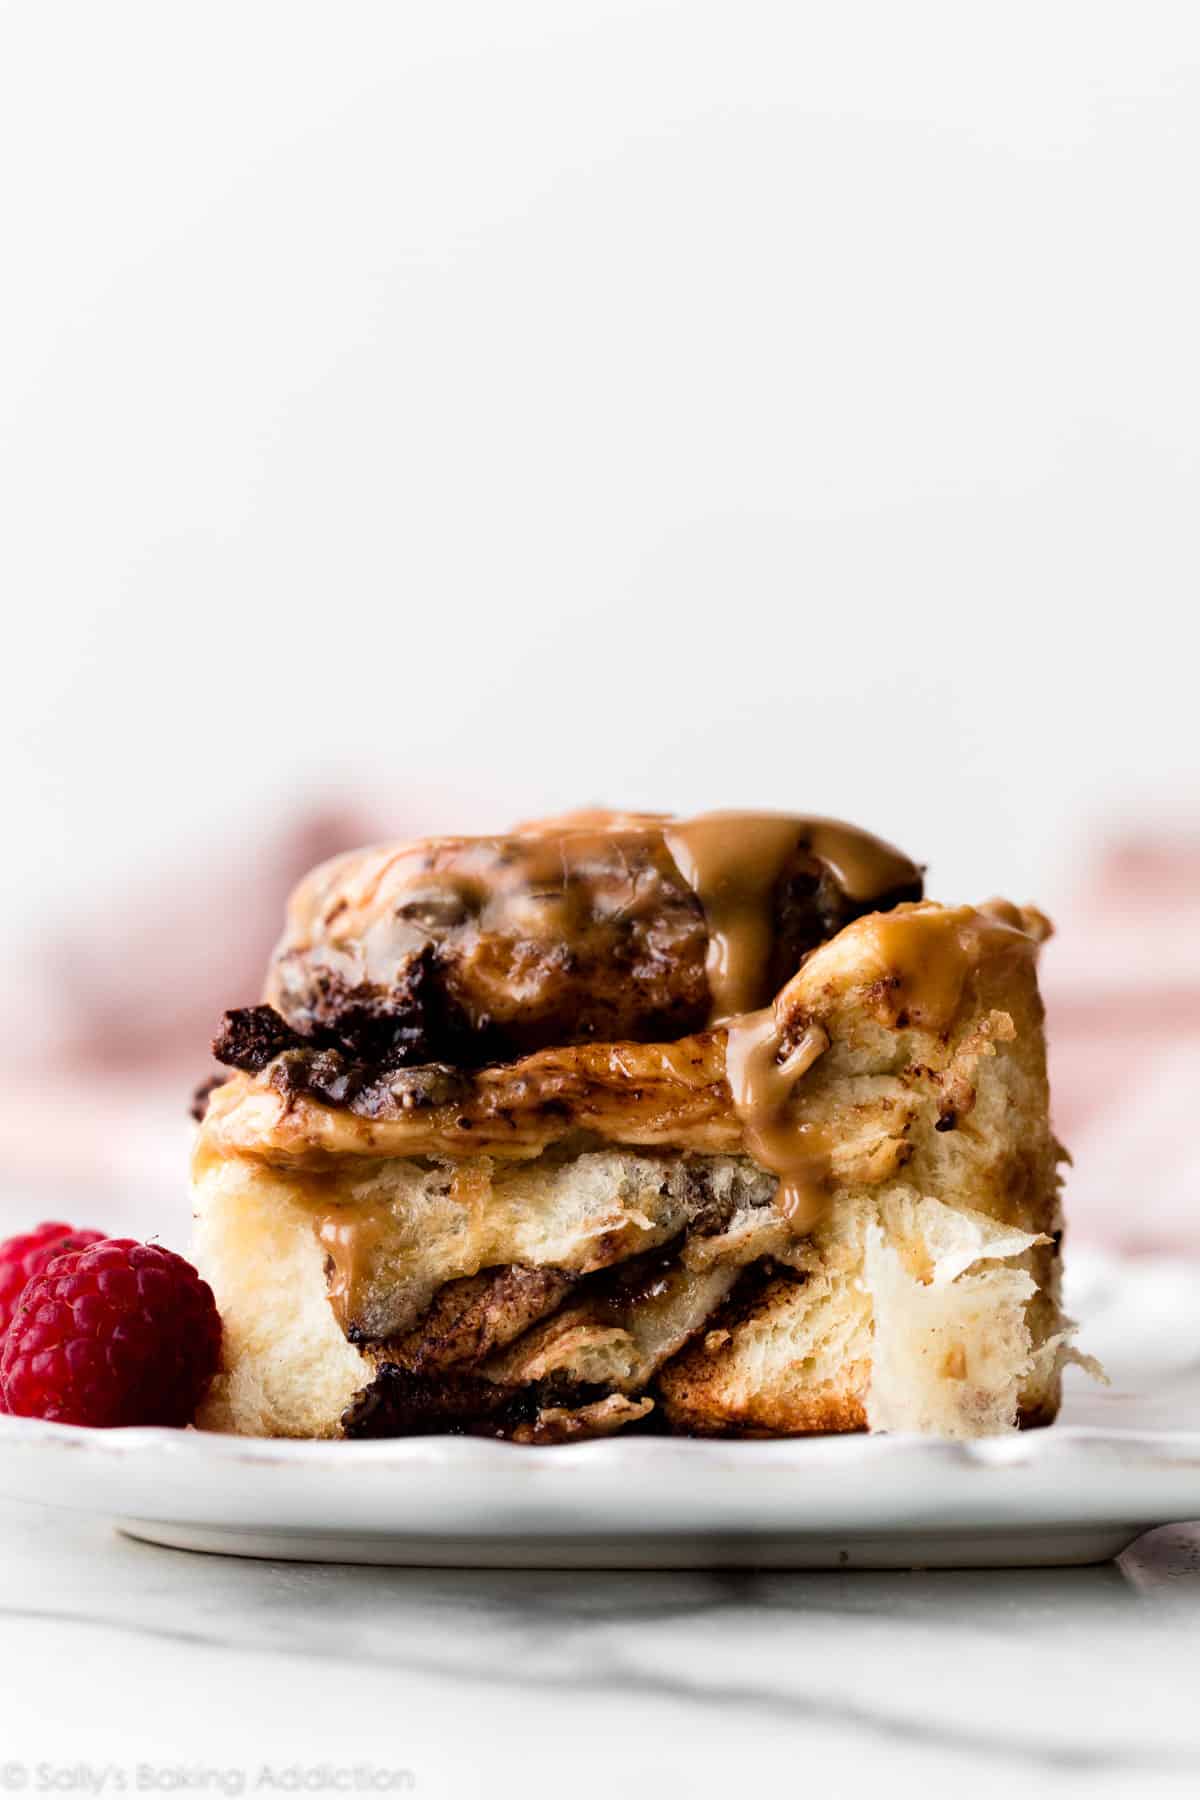
These outrageously rich and indulgent chocolate sweet rolls come together with a buttery soft fresh homemade dough and brown sugar chocolate filling. They’re shaped like cinnamon rolls, but taste like flaky chocolate babka. Drizzle the warm rolls with espresso glaze or choose another topping from the suggestions below.
These make for an extra special Christmas, Mother’s Day, Easter, or Father’s Day brunch recipe!
Melty chocolate, fresh dough, and espresso glaze. What’s not to love about this trio?
One reader, Veronica, commented: “Wow! This is very chocolatey! Tastes perfect with a giant glass of cold milk. Easy to make, delicious, and a great showstopper on any occasion. ★★★★★”
Another reader, Danielle, commented: “These were delicious! Absolutely loved the espresso icing on top and the dough was super easy to work with! Will certainly be making these again. ★★★★★”
Tell Me About These Chocolate Sweet Rolls
- Flavor: I often use softened butter in softer bread doughs, but opted for melted butter here. I find melted butter adds more, well, buttery flavor. This dough is sweet and so buttery—in fact, it would be fantastic completely plain. But plain’s not in our language today and we’re filling it with brown sugar, cocoa powder, a bit of cinnamon, vanilla, and lots of real chocolate. Don’t limit them to the morning hours because these chocolate sweet rolls definitely taste like dessert.
- Texture: Because there’s fat in the dough from the whole milk, eggs, and butter, the bread is extra soft, rich, and flaky. Though all-purpose flour is fine, bread flour promises extra bread-like chewiness. These textures work perfectly with the gooey chocolate swirls and smooth espresso glaze. Each bite has different twists, flakes, and pockets of melty chocolate—similar to the texture of apple cinnamon babka. They’re like warm chocolate babka rolls.
- Ease: It goes without saying that homemade bread takes time and effort. Consider these chocolate sweet rolls a fun afternoon or weekend baking project. The dough requires 2 rises, but otherwise is pretty straightforward. You can even get started the night before by following the overnight instructions. Freezing these is also a helpful way to prep ahead for a special breakfast or brunch! If you’re new to baking with yeast, review our Baking with Yeast Guide.
Use a Rich Dough for Chocolate Rolls
Before I show you how to make chocolate rolls, let’s talk about the dough. This is a rich dough, which means that it’s prepared with fat like milk, butter, and eggs. Rich doughs make soft breads such as dinner rolls, pull apart bread, and glazed doughnuts. Lean doughs, on the other hand, are made without much fat and produce crusty bread like homemade bagels, artisan bread, and pizza dough. There are so many ways to bake bread and if you want to expand your bread skills, here are all of our yeast bread recipes. (This cheese bread is a reader and team favorite!)
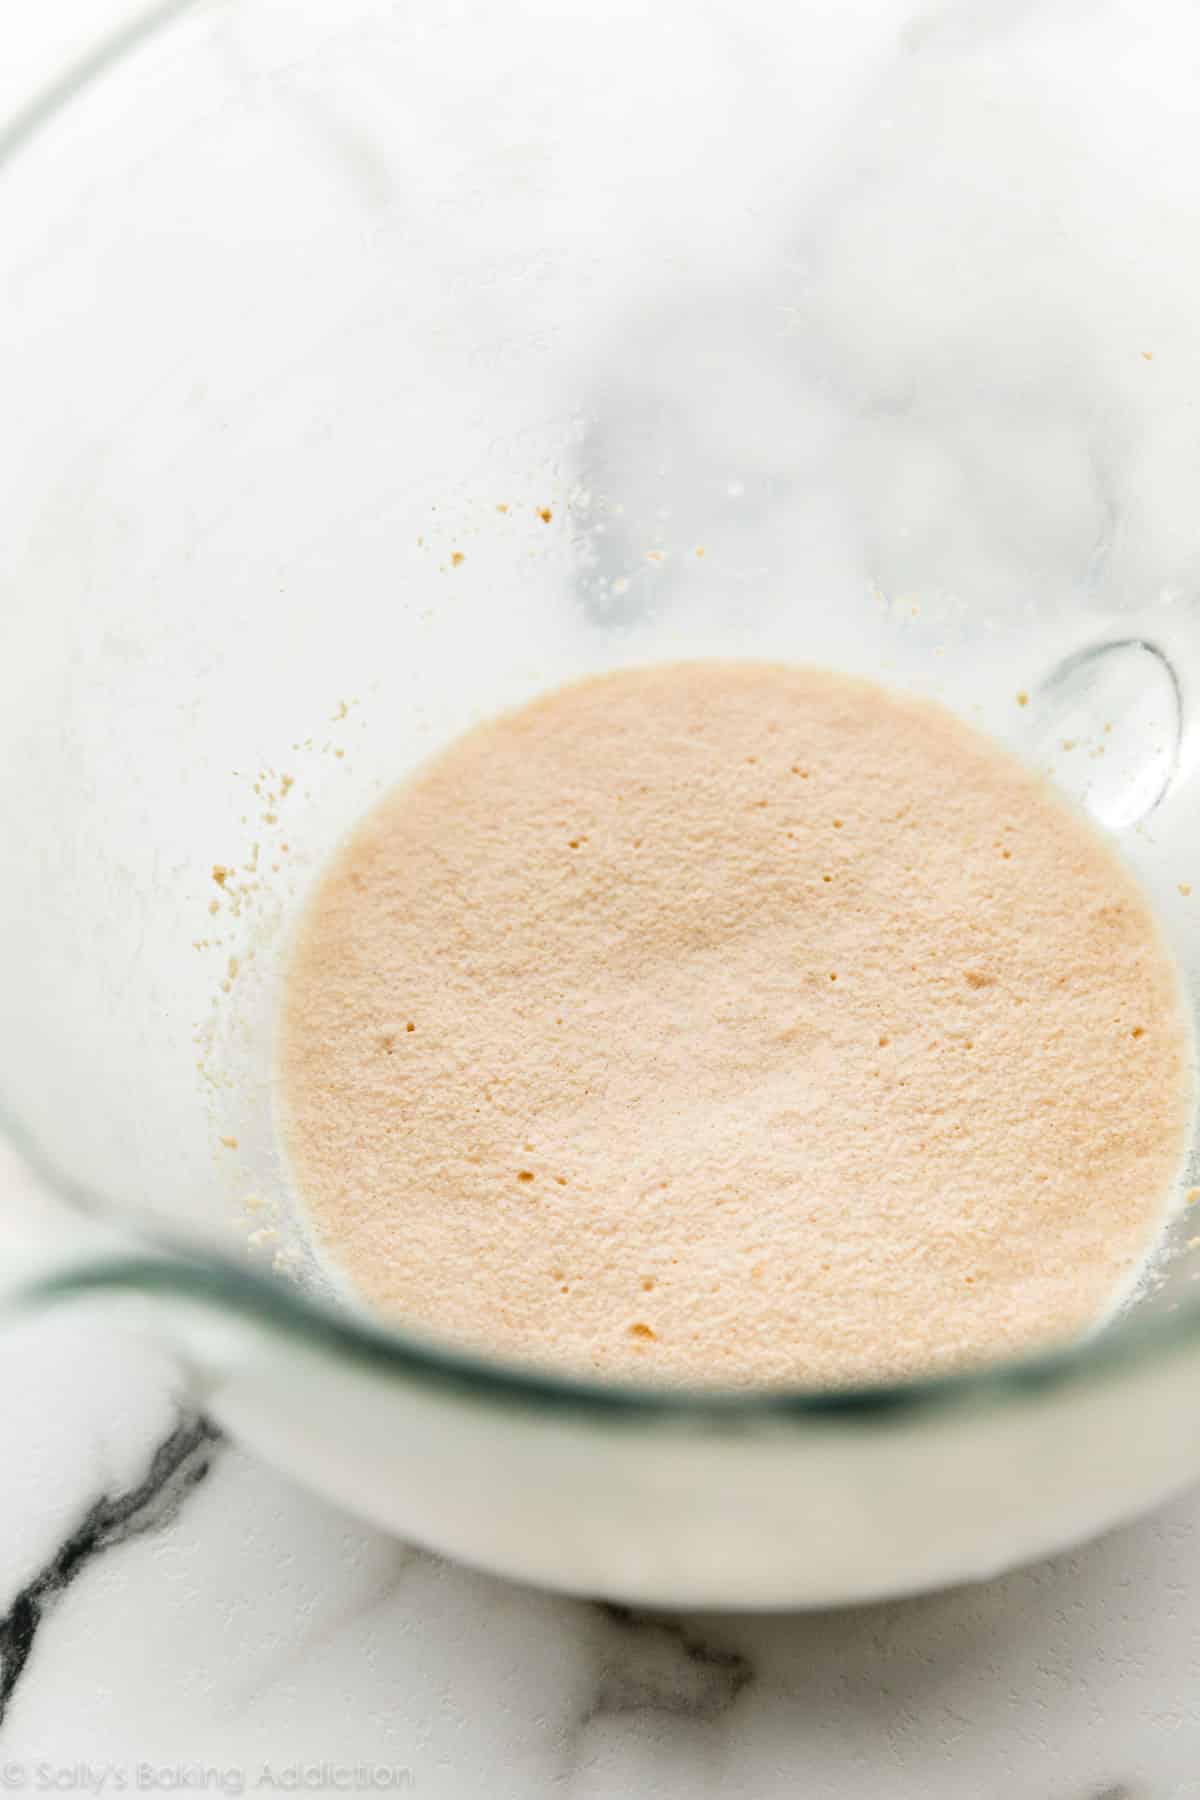
- Instant Yeast or Active-Dry? You can use instant yeast or active-dry yeast in the chocolate rolls. I usually use instant yeast and still take the time to quickly proof the yeast in step 1. Proofing the yeast means mixing it with a little sugar and the warm liquid to prove that it’s active—the mixture will look foamy on top, see photo below. But this step is not usually required when using instant yeast. Still, it doesn’t hurt and takes 5 minutes and you can prep your other dough ingredients as you wait.
This rich dough is supposed to be very soft, so don’t add more flour than absolutely needed. Embrace the softness and a sticky work surface because if you don’t mind the mess, you’ll be rewarded with the richest, flakiest chocolate rolls. I heard chocolate croissants were borderline jealous of all these flakes.
Do These Taste Like Cinnamon Rolls?
As far as the process goes, we’re essentially making homemade cinnamon rolls but with a chocolate filling. Make the dough, let it rise, punch it down, roll it out, add the chocolate filling, roll up jelly roll style, cut into rolls, let them rise until puffy, then bake. If you’ve made homemade cinnamon rolls before, this process isn’t anything new. We do use cinnamon in the filling, but it’s really just a background flavor behind all the chocolate and brown sugar. They certainly resemble cinnamon rolls, but they taste like homemade bread swirled with gooey melted chocolate. We put a spin on the same dough for these gingerbread cinnamon rolls. Try them next!
Step-By-Step Photos
Proofing the yeast:
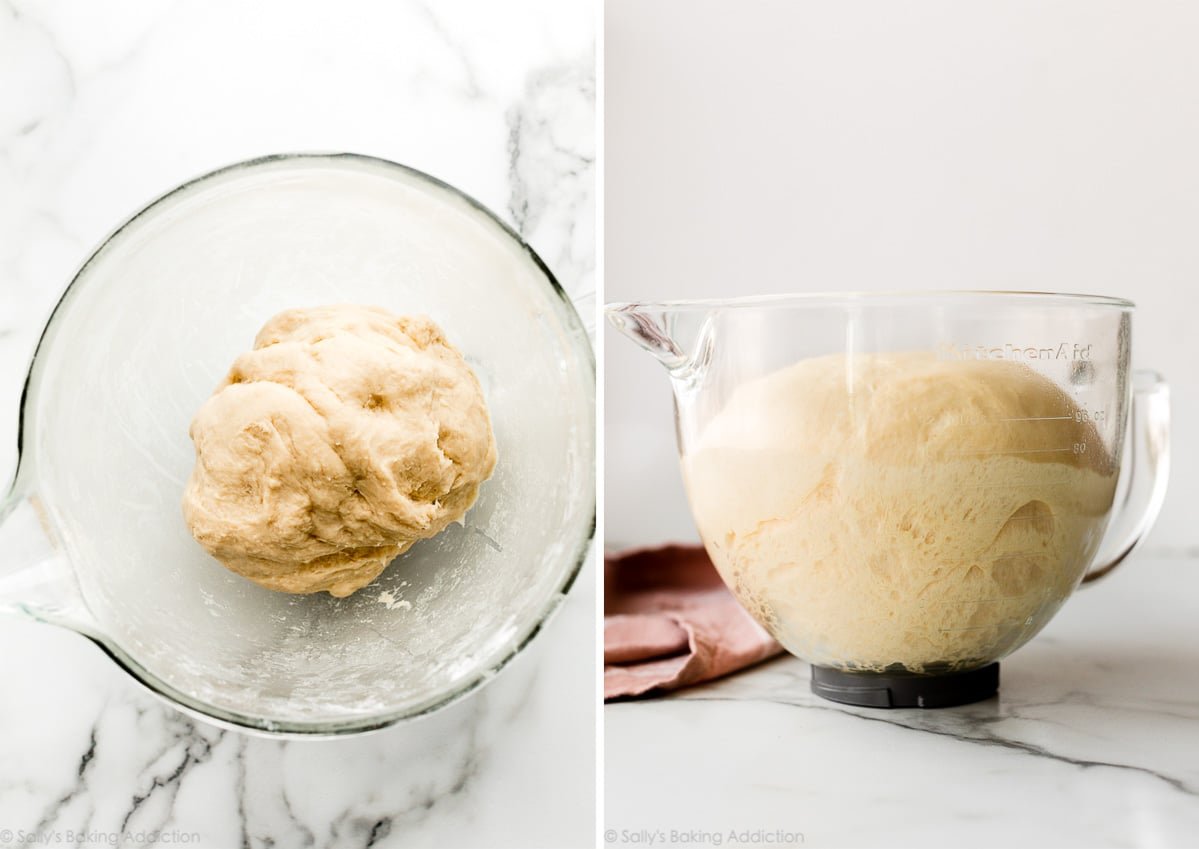
After the dough comes together, knead by hand or with your stand mixer. (See my How to Knead Dough tutorial for extra help with this step.) The dough is now ready to rise. Here is the soft dough before and after the 1st rise:
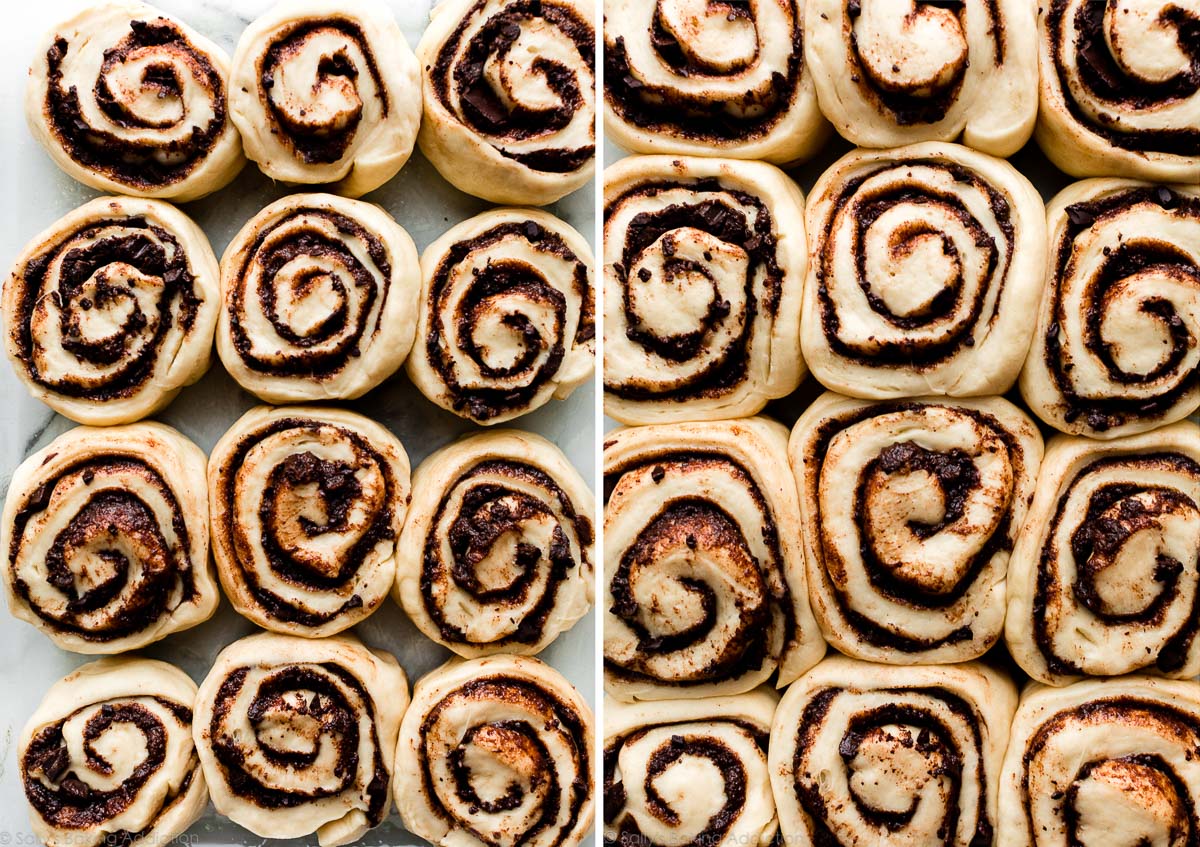
Here are the rolls before and after the 2nd rise. See how puffy they get?
I don’t want to stand in your way of chocolate bliss, so I promise I’m almost done. 😉
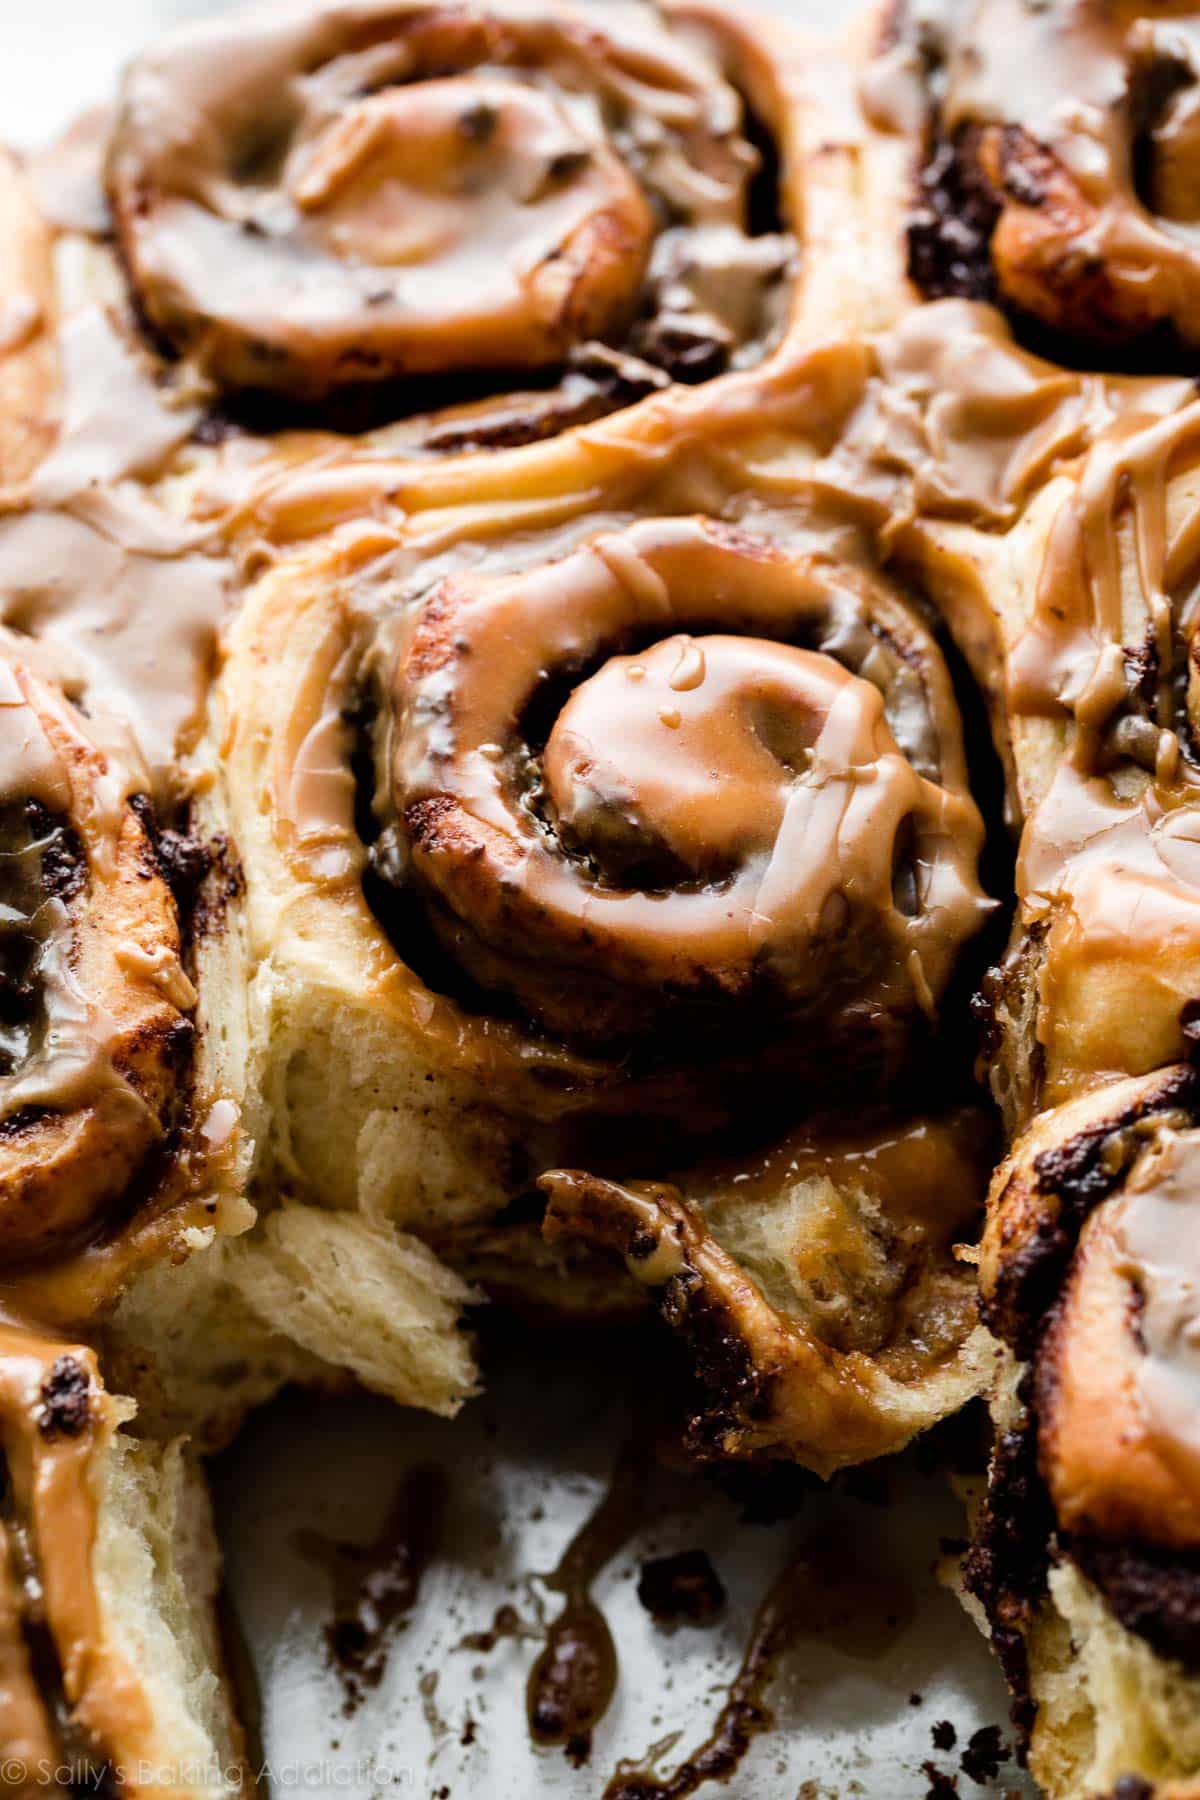
Espresso Glaze & Other Topping Options
I couldn’t decide on a topping that would be legendary enough for these extraordinary rolls, but espresso glaze comes pretty close. The bitter espresso powder helps offset the sweet confectioners’ sugar and all the sweetness in the rolls themselves. It would taste divine on these no yeast cinnamon rolls too!
Other topping options include salted caramel, vanilla icing, the maple icing from maple bacon doughnuts, or cream cheese icing from homemade cinnamon rolls or raspberry sweet rolls. For something simple, a light dusting of confectioners’ sugar would be beautiful. Peanut butter frosting would be over-the-top and I’m certain all your sweet teeth would be satisfied for weeks. Ha!
And, again, these rolls are RICH so you could easily skip the icing on top.
See Your Chocolate Sweet Rolls!
Many readers tried this recipe as part of a baking challenge! Feel free to email or share your recipe photos with us on social media. 🙂
More Cinnamon Roll Varieties:
- Cinnamon Rolls
- Apple Cinnamon Rolls
- Raspberry Sweet Rolls (my favorite!!)
- Overnight Cinnamon Rolls
- Blueberry Lemon Rolls
- Maple Pecan Sticky Buns
- Lemon Sweet Rolls
- Orange Sweet Rolls
- Birthday Cake Cinnamon Rolls
- Pumpkin Cinnamon Rolls
Chocolate Sweet Rolls
- Prep Time: 1 hour
- Cook Time: 28 minutes
- Total Time: 4 hours, 30 minutes (includes rise times)
- Yield: 12 rolls
- Category: Breakfast
- Method: Baking
- Cuisine: American
Description
These rich and fluffy chocolate sweet rolls come together with a buttery soft fresh homemade dough and brown sugar chocolate filling. They’re shaped like cinnamon rolls, but taste like flaky chocolate babka. You can make the chocolate rolls within a few hours or get started the night before using the overnight preparation option.
Ingredients
- 1 cup (240ml) whole milk, warmed to about 100°F (38°C)
- 6 Tablespoons (75g) granulated sugar, divided
- 1 Tablespoon (9g) active dry or instant yeast
- 5 Tablespoons (71g) unsalted butter, melted and slightly cooled
- 2 large eggs, at room temperature
- 1 teaspoon salt
- 4 cups (530g) bread flour (spooned & leveled), plus more as needed for hands/work surface
Chocolate Filling
- 6 Tablespoons (85g) unsalted butter, softened to room temperature
- 1/2 cup (100g) packed light or dark brown sugar
- 2 Tablespoons (10g) unsweetened natural or dutch process cocoa powder
- 1 teaspoon ground cinnamon
- 1 teaspoon pure vanilla extract
- 3/4 cup (135g) semi-sweet chocolate chips or a 4 ounce semi-sweet chocolate bar, finely chopped*
Espresso Icing
- 3 Tablespoons (45ml) heavy cream*
- 1 teaspoon espresso powder*
- 1 and 1/2 cups (180g) confectioners’ sugar, sifted (sift after measuring)
- 1/2 teaspoon pure vanilla extract
Instructions
- Prepare the dough: Whisk the warm milk, 2 Tablespoons sugar, and the yeast together in the bowl of your stand mixer fitted with a dough hook or paddle attachment. Cover and allow mixture to sit for about 5 minutes or until foamy on top. *If you do not own a mixer, you can do this in a large mixing bowl and in the next step, mix the dough together with a large wooden spoon/silicone spatula. It will take a bit of arm muscle. A hand mixer works, but the sticky dough repeatedly gets stuck in the beaters. Mixing by hand with a wooden spoon or silicone spatula is a better choice.*
- Add the remaining sugar, the butter, eggs, salt, and 1 cup (about 130g) of flour and beat on medium speed for 1 minute. Scrape down the sides of the bowl with a rubber spatula. Add 3 cups (about 400g) flour, switch the mixer down to low speed, and beat until a soft dough forms and pulls away from the sides of the bowl. Dough will be very soft, but not overly sticky. Beat in 2-3 more Tablespoons of flour if dough seems very sticky. Avoid adding more flour than you need.
- Knead the dough: Keep the dough in the mixer (and switch to the dough hook if using the paddle) and beat for an additional 6-8 full minutes, or knead by hand on a lightly floured surface for 6-8 full minutes. (If you’re new to bread-baking, my How to Knead Dough video tutorial can help here.) If the dough becomes too sticky during the kneading process, sprinkle 1 teaspoon of flour at a time on the dough or on the work surface/in the bowl to make a soft, slightly tacky dough. Do not add more flour than you need because you do not want a dry dough. After kneading, the dough should still feel a little soft. Poke it with your finger—if it slowly bounces back, your dough is ready to rise. You can also do a “windowpane test” to see if your dough has been kneaded long enough: tear off a small (roughly golfball-size) piece of dough and gently stretch it out until it’s thin enough for light to pass through it. Hold it up to a window or light. Does light pass through the stretched dough without the dough tearing first? If so, your dough has been kneaded long enough and is ready to rise. If not, keep kneading until it passes the windowpane test.
- 1st Rise: Lightly grease a large bowl with oil or use nonstick spray. Place the dough in the bowl, turning it to coat all sides in the oil. Cover the bowl with aluminum foil, plastic wrap, or a clean kitchen towel. Allow the dough to rise in a relatively warm environment for 2 hours or until double in size. (I always let it rise on the counter and it takes about 2 hours. For a tiny reduction in rise time, see my answer to Where Should Dough Rise? in my Baking with Yeast Guide.)
- Grease the bottom and sides of a metal or glass 9×13-inch baking dish or line with parchment paper.
- Roll out the dough: Punch down the dough to release the air. Place dough on a lightly floured work surface and using a lightly floured rolling pin, roll dough into a 10×16-inch rectangle. Make sure the dough is smooth and evenly thick. If the dough keeps shrinking as you roll it out, stop what you’re doing, cover it lightly, and let it rest for 10 minutes to relax the gluten. When you return to the dough, it should stretch out much easier.
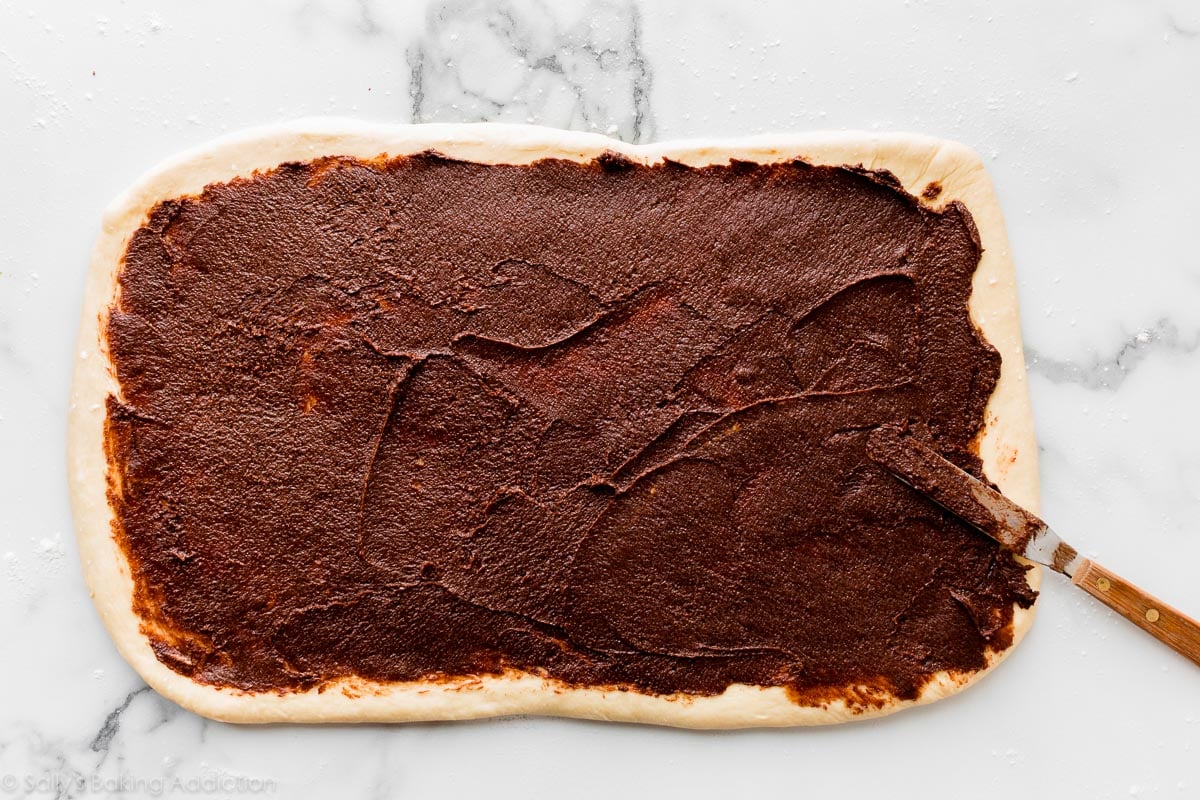
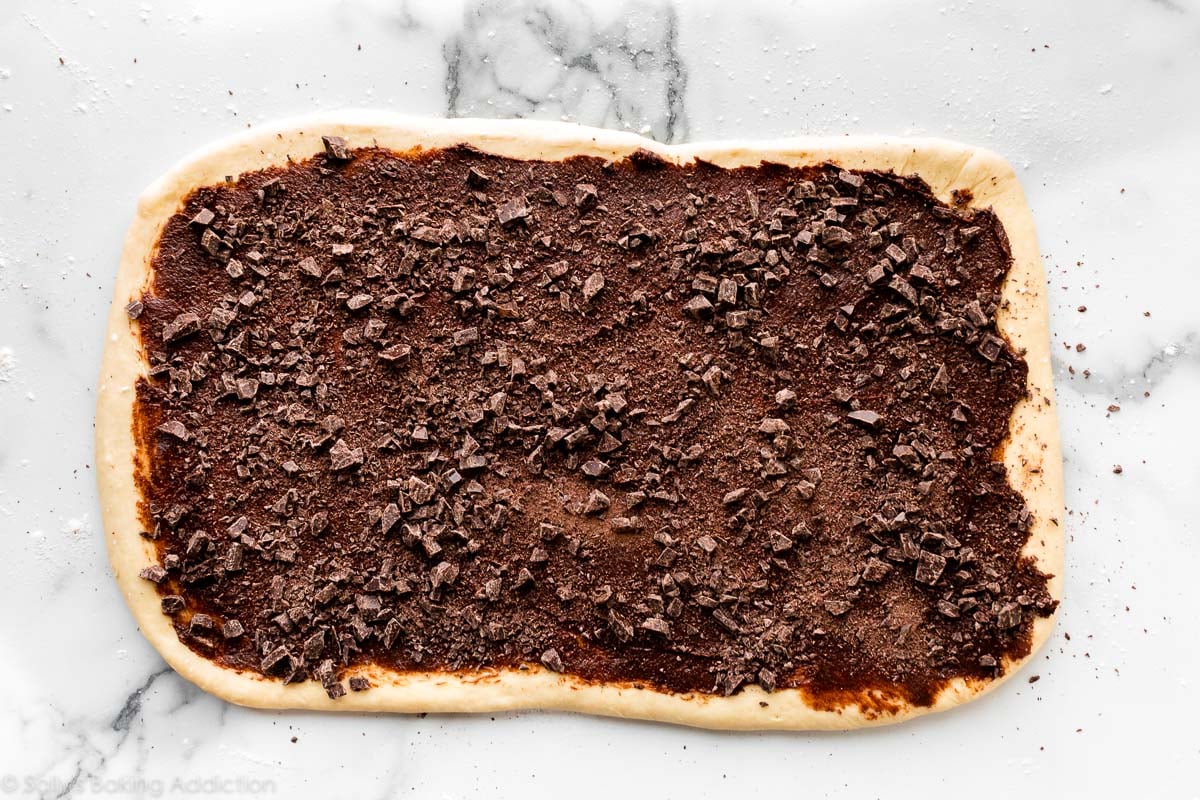
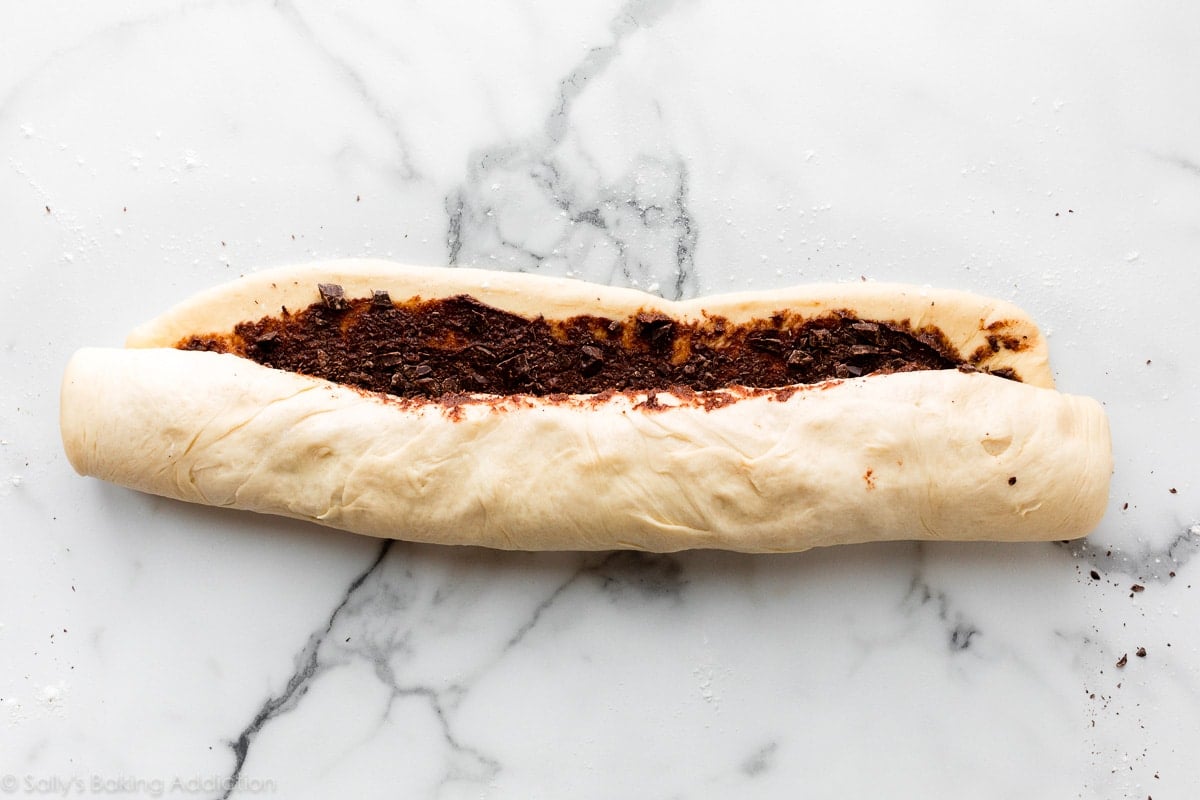
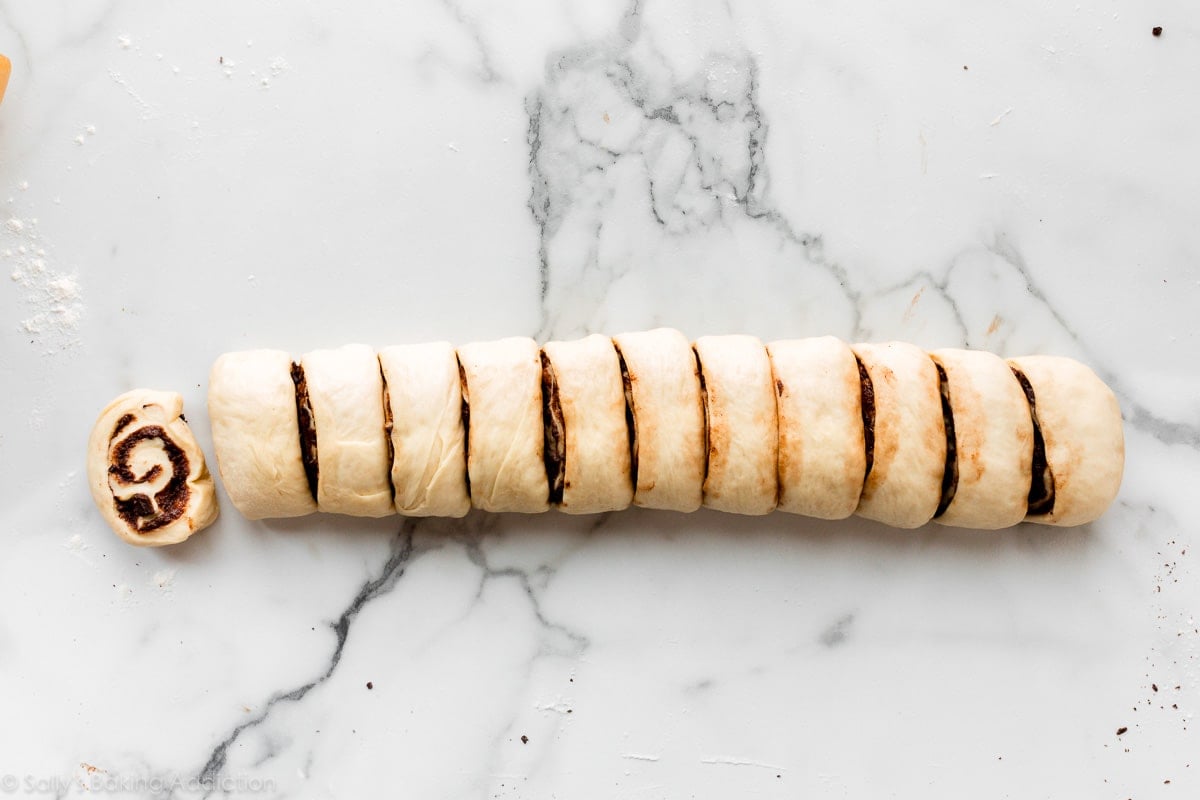
- For the filling: Mix all of the filling ingredients together except for the chopped chocolate/chocolate chips. The softer the butter is, the easier it is to mix. (Microwave it for a few seconds to soften if needed.) Spread mixture all over the dough. Sprinkle chopped chocolate/chocolate chips evenly on top. Tightly roll up the dough to form a 16-inch-long log. If some filling spills out, sprinkle it on top of the roll. With an extra sharp knife, cut into 12 even rolls, between 1-1.5 inches each. Arrange in the prepared baking pan.
- 2nd Rise: Cover the rolls tightly and allow to rise until doubled in size, about 1 hour. (Or use the overnight option below.)
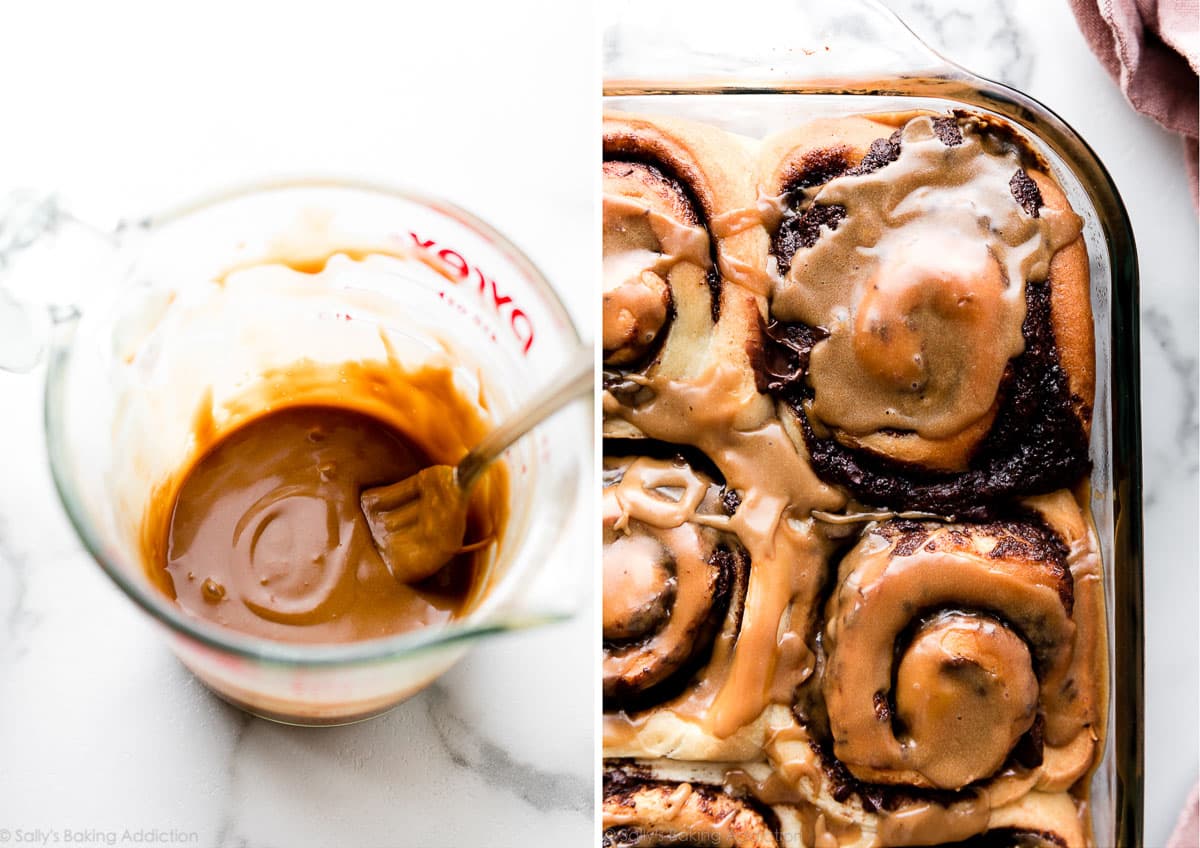
- Preheat the oven to 350°F (177°C). Bake rolls for about 25-28 minutes or until they are lightly browned on top. After about 15 minutes, tent a piece of aluminum foil over the top of the pan to prevent the tops from browning too quickly and baking unevenly. Remove pan from the oven and place pan on a wire rack for about 10 minutes as you make the icing.
- Make the icing: Warm the cream on the stove until barely simmering or warm it in the microwave for 15-30 seconds. Whisk espresso powder into the warm cream, then whisk in the confectioners’ sugar and vanilla extract until combined. Drizzle the icing over the warm rolls and serve immediately.
- Cover leftover frosted or unfrosted rolls tightly and store at room temperature for up to 2 days or in the refrigerator for up to 5 days.
Notes
- Make Ahead Instructions – Overnight: To prepare the night before serving, prepare the rolls through step 7. Cover the rolls tightly and refrigerate for 8-12 hours. (16 hours max. 8-12 hours is best, but 16 hours is OK if absolutely needed. Do not exceed 16 hours.) The next morning, remove from the refrigerator and allow to rise on the counter for 1-2 hours before continuing with step 9.
- Make Ahead Instructions – Freezing: You can freeze cinnamon rolls for up to 3 months, and I recommend a few different methods for freezing cinnamon rolls. The first method is to freeze them after shaping, before they’ve had their 2nd rise (step 7). Thaw in the refrigerator overnight, then let rise for 1.5–2 hours at room temperature before baking. The second method is to par-bake the risen rolls for 10 minutes, let cool completely, then cover and freeze. Thaw in the refrigerator overnight, then let sit at room temperature for 30 minutes before baking. Finish baking for 15–20 minutes. You can also freeze fully baked cinnamon rolls. See How to Freeze Cinnamon Rolls for more details about all of these methods.
- Special Tools (affiliate links): Electric Stand Mixer (or Glass Mixing Bowl with Wooden Spoon/Silicone Spatula) | 9×13-inch Baking Pan | Rolling Pin | Cooling Rack | Whisk
- Milk: Use whole milk for the best, richest tasting dough. You could also use buttermilk. 2%, 1%, or nondairy milk work in a pinch. Do not use nonfat milk.
- Yeast: Make sure you use 1 Tablespoon of yeast, which is a little more than 1 standard packet. You can use active dry or instant yeast in this recipe. Follow all of the same instructions. If using active dry yeast, the rise times are usually *slightly* longer, but not much. Reference my Baking with Yeast Guide for answers to common yeast FAQs.
- Best Flour to Use: For best texture, I recommend bread flour. The same amount of all-purpose flour works and the rolls will still be wonderfully rich and soft. The rolls are a little more chewy and flaky when using bread flour.
- Chocolate: I usually use and recommend one 4 ounce (113g) baking chocolate bar, such as Ghirardelli or Bakers 4 ounce bars sold in the baking aisle. Chopped fine, this is about 3/4 cup. You can use semi-sweet or bittersweet. Avoid white chocolate or milk chocolate because the rolls will be overly sweet. You can use about 3/4 cup of chocolate chips, mini or regular size, instead. Chocolate chips weigh a little more, so use 135g if you are using a scale.
- Heavy Cream & Espresso Powder: In first part of the icing recipe, we are essentially making a creamy and very strong espresso liquid by mixing warm cream with espresso powder. (Make sure you use instant espresso powder, which is typically sold as simply “espresso powder.”) Feel free to use 3 Tablespoons of very strong brewed espresso or black coffee instead. Mix icing ingredients together, then add 1 more Tablespoon brewed espresso or black coffee to thin out if needed/desired.
- Half Batch: You can halve this recipe by halving all of the ingredients and using an 8 or 9 inch square or round pan. The 1st dough rise time may be a bit shorter. Roll the dough out to (approximately) a 7×10 inch rectangle. Roll up into a 10 inch log, then cut into 6 rolls. 2nd dough rise time will be about the same. Bake time is a few minutes shorter.


Reader Comments and Reviews
These were fantastic! Perfect with a cup of coffee for breakfast! Loved them.
Could I add cacao powder to the dough to make this a chocolate chocolate roll?
Hi Socorro, Turning this dough into a chocolate dough would require testing. Let me know if you try anything!
Hi Sally,
Can you use the icing for cinnamon rolls instead of the espresso icing?
Absolutely! You can use any icing you prefer.
Are your recipes for a conventional oven? What should I do when using a convection/fan oven?
Hi Kim! We always recommend conventional settings for baking (not convection/fan). The flow of air from convection heat can cause baked goods to rise and bake unevenly and it also pulls moisture out of the oven. If you do use convection/fan settings for baking, lower your temperature by 25 degrees F and keep in mind that things may still take less time to bake.
I haven’t made these yet but I’m so excited to! Is it possible to fill it with Nutella instead of the chocolate filling?
Hi Colleen, we’re sure that would be fine! We would use about 3/4 – 1 cup Nutella for filling.
Great recipe! Used coconut sugar instead of regular sugar since my husband is allergic to cane sugar. Turned out great. Used an unsweetened chocolate baking bar and added a tad bit of honey to the inside of the rolls to keep them from turning out too bitter. Skipped icing and just ate them plain. Tasted amazing! My husband loves them!
Out of curiosity, why is the recipe for this dough so different from the one from your cinnamon rolls? These look pretty identical to cinnamon rolls except that they are filled with chocolate — is this dough supposed to have a significantly different texture?
Hi Vince, The dough here closely resembles our overnight cinnamon rolls. The biggest change is that we are using melted butter here for an extra rich and buttery dough to pair with the chocolate filling. Let us know if you give them a try!
These are hands down the best cinnamon scrolls I have EVER made! Such a family favourite, I have had so many requests for me to make these again!!! I did a plain vanilla icing instead of the espresso. I was wondering – is it possible to split the dough into 24 rolls instead? I am hoping to make some mini ones for a gathering. Would I need to adjust the cooking time? Thanks for this awesome recipe!
Hi Rachel! We imagine that should work okay — bake time should be about the same if using the same pan size, but keep a close eye on them. Let us know how it works!
Hey again Sally –
I just ended up making them today. And once again… spectacular! I will say rolling the dough longer ended up making it more difficult to chop. Thanks for this brilliant recipe!
Can I braid the dough and place into muffin tins instead?
Hi Anna, we’re sure you could!
Very good. I did not bake convection and I might next time because the outer ones were cooking faster than the middle ones. Not sure if convection would help with that but on the whole very delicious and the espresso icing is perfect.
These were so delicious! This was my first time kneading or using yeast so I didn’t get them as fluffy as they need to be but I’m excited to try again!
I want to make some to freeze for some family and friends (so they can just bake them when they wants them). I know it’s not ideal to freeze with the glaze on top. Can I make the glaze for them to keep in the fridge or freezer until baking one of the pre-made rolls? How long can it keep in the fridge or freezer? Or will the texture be too off?
Hi Lea, the glaze would keep for a few days in the refrigerator, but because it has cream in it, we wouldn’t recommend storing it for longer than that. We haven’t tried freezing the glaze, but suspect the texture and taste wouldn’t be quite as good after freezing and thawing, so it’s really best to make it fresh.
They look DELISH. Can I add shredded coconut to the filling or sub it in for the chopped chocolate?
Hi Deb, we wouldn’t leave out the chocolate, but you could certainly try adding some sweetened shredded coconut to the filling. Let us know how it goes!
Perfection! Taste, rise, bake… perfection!
Can I swap AP flour for this the way it is for your homemade cinnamon rolls?!
Hi Shiyomi, Yes, the same amount of all-purpose flour works and the rolls will still be wonderfully rich and soft. The rolls are a little more chewy and flaky when using bread flour.
Hi!!!
Tried this recipe for the first time yesterday, the dough looked good so I was expecting the rolls to turn out moisty/chewy but it was a bit dry with a strong yeast flavor (I used instant yeast). I respected every step of the recipe, what could have been wrong ?
I’ve put the rolls in the fridge before baking it but waited about 30min-1h for them to warm and rise and added about 2-3 teaspoons of flour when kneading but the dough seemed very sticky, so not sure !
Also I might have overcooked them bc it’s way too browny on the top.
Hi Melissa, we’re happy to help troubleshoot. Is it possible that the dough was over proofed in the first rise? When that happens, it can cause the dough to collapse when baking and come out a bit more dense and less light/fluffy. It can also cause a yeasty taste. An easy fix for next time!
I could be wrong, but 4 cups of flour seems like too much for the amount of liquid. I tried making a different roll recipe of yours, and I just wanna make sure this is the right amount because even though my yeast was new, I have struggled with my dough not rising, and I’m wondering if it’s because there’s too much flour to the liquid or something. Even though I don’t have instant yeast, I even used the brand recommended.
Hi JC, the flour amounts listed are correct. Is it possible that your milk was too hot? If the liquid is too hot, it can kill the yeast and prevent the dough from rising properly. This Baking with Yeast Guide will also be helpful for troubleshooting. Let us know if we can help further!
I made these and absolutely loved them. However, my family found it quite big.
Is there any way I can get smaller rolls without making it flatter?
Hi AA, We haven’t tested making them smaller, but don’t see why it wouldn’t work!
I made a mini version to bring in to work! You just want to roll the dough thinner, so that even though they’re physically smaller, they still have a good few spirals of filling. And take care baking, obviously, because the smaller ones bake up faster.
I used six-inch sheets of dough, and sliced them about an inch apart. I ended up with about thirty mini rolls (maybe two or three bites each?). I did have to make a bit more filling and glaze since there was more surface area overall (maybe increase the recipe by a third?).
I baked these yesterday and ate far more than I really care to admit! Absolutely wonderful recipe. The dough was so soft and lovely to put together. Perfectly chocolatey and very very nice to eat the next day! Huge hit at home. Thanks for the amazing bake!
These rolls. Oh boy.
I had problems when making them, because my yeast wouldn’t rise, and I realised I only have instant coffee, and no heavy cream. The dough was so sticky I was concerned I should add more flour. I added a tbsp of flour to the filling because I used a soft margarine that I was certain would come right out of the rolls\
Oh my goodness gosh these rolls. So good. So sweet, so rich, so overwhelmingly delicious. I don’t like cinnamon rolls with much frosting, so I drizzled the frosting carefully. But it just Works.
Even with my multiple subs along the way, this recipe pulled together (like a lot of SBA recipes) and became a new favourite of mine.
Subs made: water and skim milk powder, AP for bread flour, becel margarine for the filling. (mostly for cost) added flour to the filling. Lowered cinnamon to a dash.
Frosting was made on the fly, since I was missing 2/3 key ingredients. Instant coffee, maybe a tbsp, 1-2 tbsps warm water, sugar as needed.
I’m awful at yeasted baking. But I’m trying to learn! Decided to test this recipe with a “just” expired package of instant yeast and after reading all your tips and watching your tutorials. I had to refrigerate during the first rise as I ran out of time. But warmed the dough in the oven after that, like your rising tips suggest. Then refrigerated overnight. Had to leave in a warm oven in the morning to get them to really rise, but we just ate them and they are fluffy and decadent! No espresso sauce cause my kiddos are little but a drizzle of salted caramel to balance the sweetness. So excited I made something I didn’t have to toss!!
Delicious
This is my go-to cinnamon roll recipe!
We make it at least once a year during the holidays.
I especially love the espresso icing, it really adds that special kick to the entire dessert!
I am just trying this interesting recipe rn actually and I’m looking forward to how it will come out xx
This looks incredible! I have a crazy question. Would it be possible to turn this into a “double chocolate” recipe by making the dough chocolate too? How would I adjust the recipe?
That would take some testing, let us know if you try anything!
Add 6 Tbsp cocoa powder with the flour.
1/4 c might be sufficient, but we like lots of chocolate in this family!
Thanks for a great recipe!
Thank you so much for sharing this recipe I’m excited to try it out! I noticed the glaze calls for espresso powder, and I was wondering if I could substitute it with chocolate powder instead. Do you think that would work?
Thanks again for your help!
Hi Sormeh, you can leave out the espresso powder if desired. No need to replace it with anything.
This might be the best thing I have ever baked! Omg I want to eat the entire pan right now
I just made these, and can’t wait to try them. The dough goes together quickly and is by far the easiest enriched dough I have ever worked with. I ended up with 4 tablespoons of cream and a cup of powdered sugar to get a drizzleable(?) icing but other than that, everything looks awesome. Wish I could post a picture. I used 100% whole wheat artisan bread flour and will do that for all my enriched breads moving forward. Thanks.