

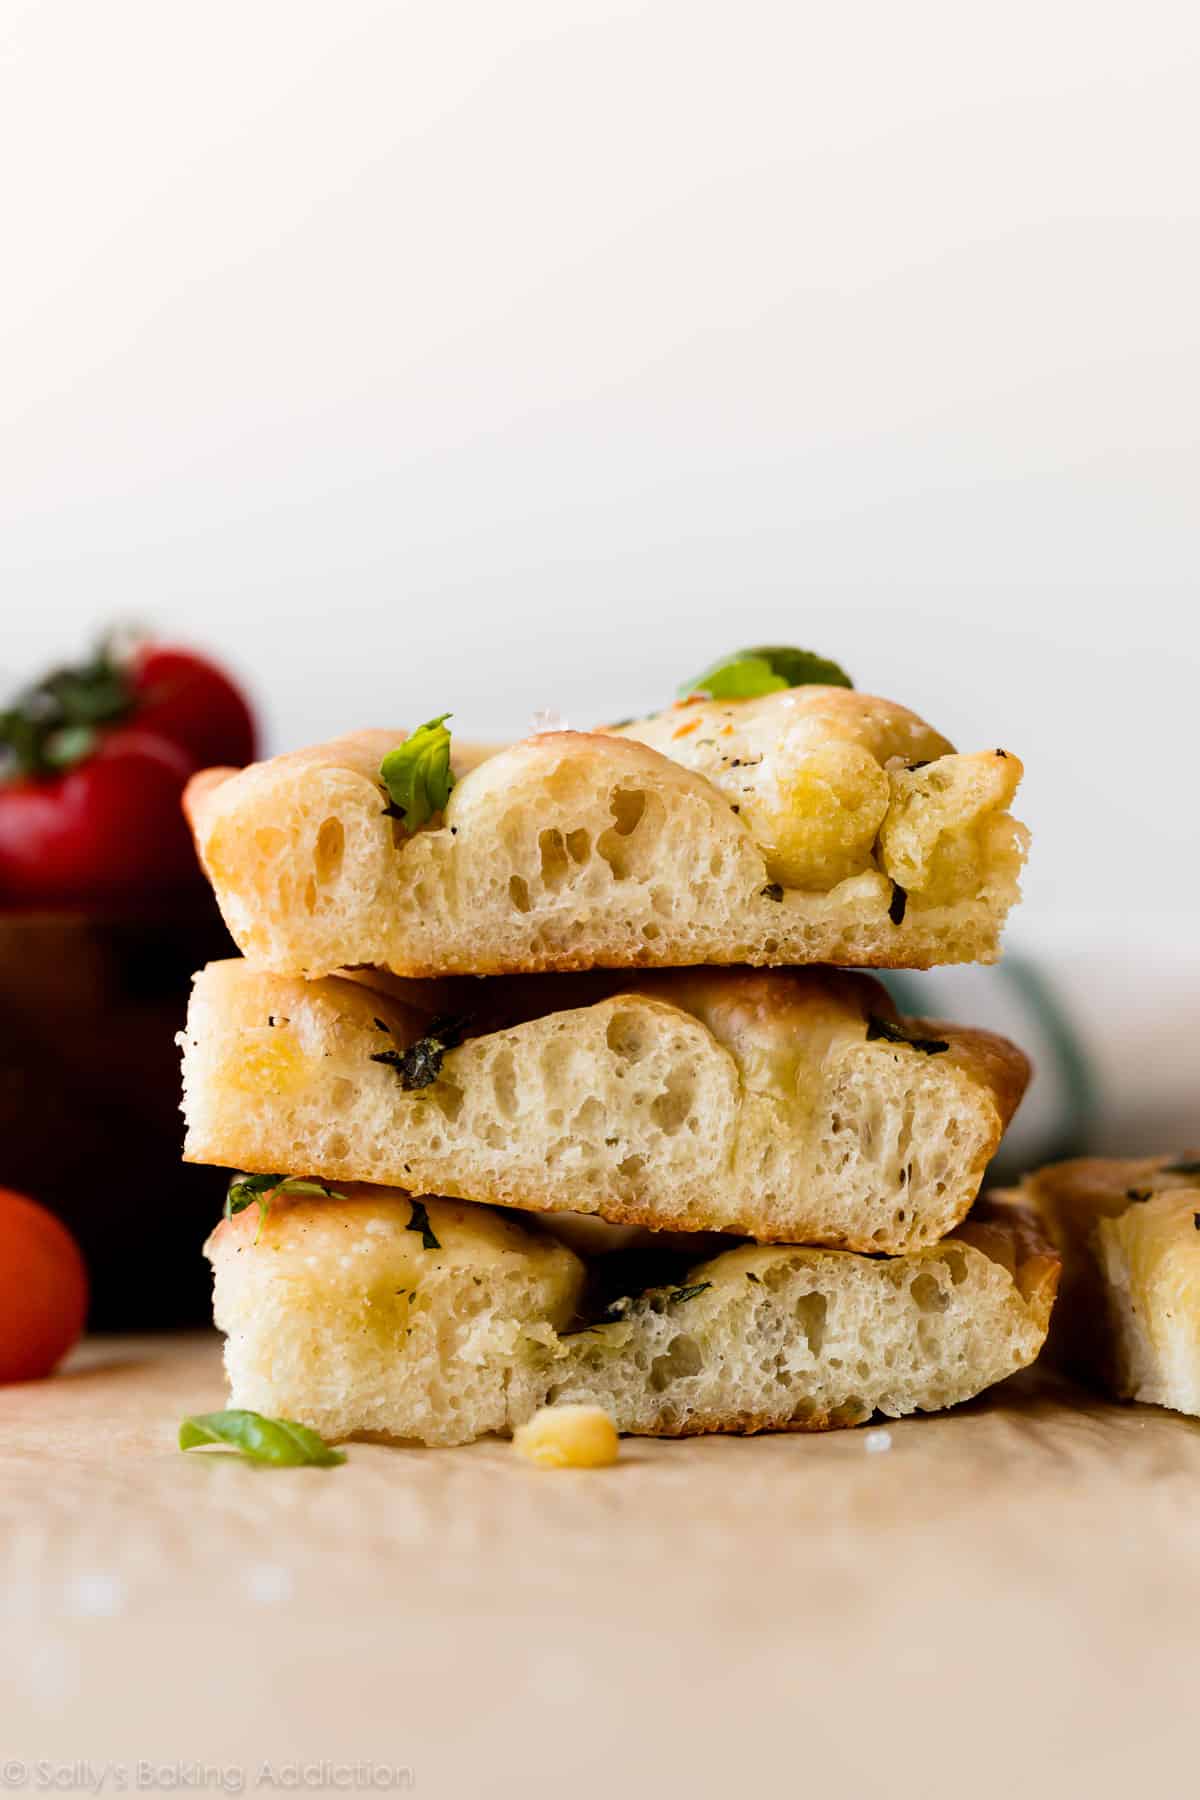
This simple 6 ingredient focaccia dough is a wonderful starting point for many different flavors, including garlic rosemary herb focaccia. The homemade bread is chewy and soft in the center with a mega crisp exterior. For the BEST flavor, let the dough rest in the refrigerator overnight. Olive oil seeps down and infuses every bite. You’ll love it!
Let’s make focaccia!! I’ve been working on perfecting focaccia for awhile. Focaccia is an Italian yeast bread. At the heart of it, focaccia is pizza dough without the sauce and cheese. Though it appears plain, focaccia is anything but boring. Its defining characteristics are the olive oil infused flavor and deliciously crisp exterior. Olive oil enrobes the entire crust, seeping into the interior as the bread bakes. Herbs and garlic are popular toppings, but you can add anything like olives, tomatoes, sesame seeds, parmesan cheese, pine nuts, pesto, caramelized onions, and more.
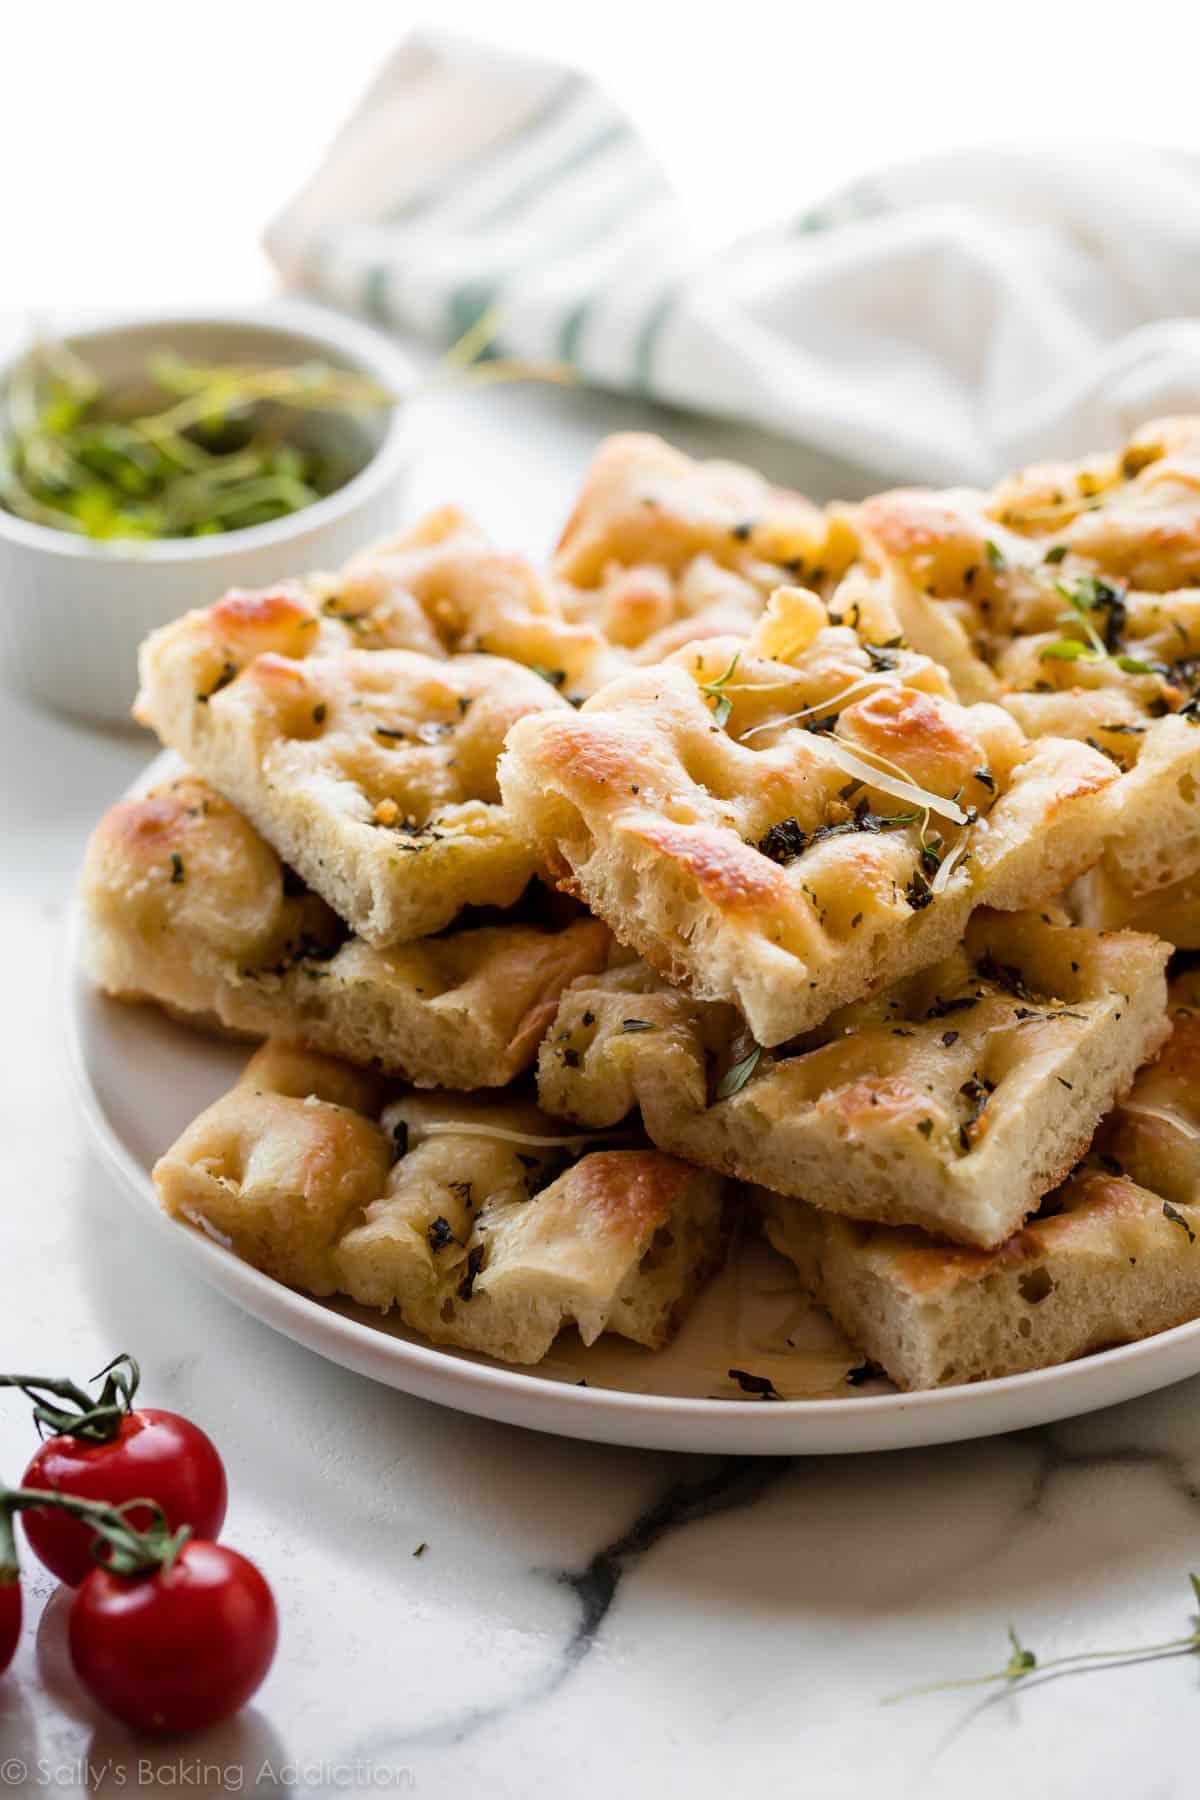
Pizza is a meal, but focaccia can be part of a meal, an appetizer, a soup dipper, a sauce soaker-upper, and even the crust of a sandwich or panini. I particularly enjoy serving it in the summer and always include it on my menu of Memorial Day recipes. Regardless of how and when it’s served, this garlic rosemary herb focaccia is remarkably chewy, rich, and flavorful.
Video Tutorial: Garlic Herb Focaccia
Sit back, relax, and watch as I walk through each step in this garlic rosemary herb focaccia recipe. In fact, most of the “work” is hands-off while the dough rises and rests so you can literally sit back and relax when it’s your turn to make it!
Only 6 Ingredients in Focaccia Dough
Focaccia dough comes together with only 6 basic ingredients. Whether or not you’re a seasoned baker, I bet you have most of these items in your kitchen. This recipe yields a big pan of bread and leftovers freeze wonderfully. (We’ve been snacking on test recipes for weeks now!) If you don’t need that much bread on hand, feel free to halve the recipe.
Let’s quickly discuss the importance of each ingredient.
- Yeast: Yeast raises focaccia bread. If you’re nervous about working with yeast, I encourage you to review my Baking with Yeast guide. You can use active dry or instant yeast. I played around with different amounts and ultimately favored the bread with less yeast than some other recipes call for. The flatter the focaccia, the more the interior is infused with the olive oil and toppings!
- Sugar: 2 teaspoons of sugar feeds the yeast.
- Warm Water: When combined with liquid and sugar, yeast makes dough rise. Use warm water to cut down on rise time, about 100-110°F. Anything over 130ºF kills the yeast.
- Salt: A lot of focaccia’s flavor comes from salt and this dough requires a lot of it. For the best flavor, I strongly recommend using kosher salt.
- Olive Oil: Some recipes only call for olive oil as the topping, but adding olive oil to the dough creates a richer-tasting bread. You’ll also use it to coat the pan and top the dough before baking, just like we do when we make pesto pizza. Use your favorite kind—I prefer extra virgin olive oil.
- Bread Flour or All-Purpose Flour: I tested this focaccia with both and prefer the bread flour variety. Both are great, but bread flour has a higher protein content so it yields a chewier texture. This recipe calls for 4.5–5 cups of flour, and if using bread flour, you’ll need closer to 4.5 cups since it absorbs more water. If using all-purpose flour, you’ll need closer to 5 cups. It all depends on how sticky the dough feels. Adding a bit too much or too little flour won’t ruin the recipe, so don’t be nervous.
Baking with Yeast Guide
Reference this Baking with Yeast Guide whenever you work with baker’s yeast. I include practical answers to all of your common yeast questions!

How to Make Garlic Herb Focaccia
Focaccia is a very simple bread. This recipe requires a rise, plus a considerable amount of “resting” in the refrigerator. Most of the dough’s flavor is developed during this cold resting period, so I don’t recommend rushing it. You can’t rush good bread.
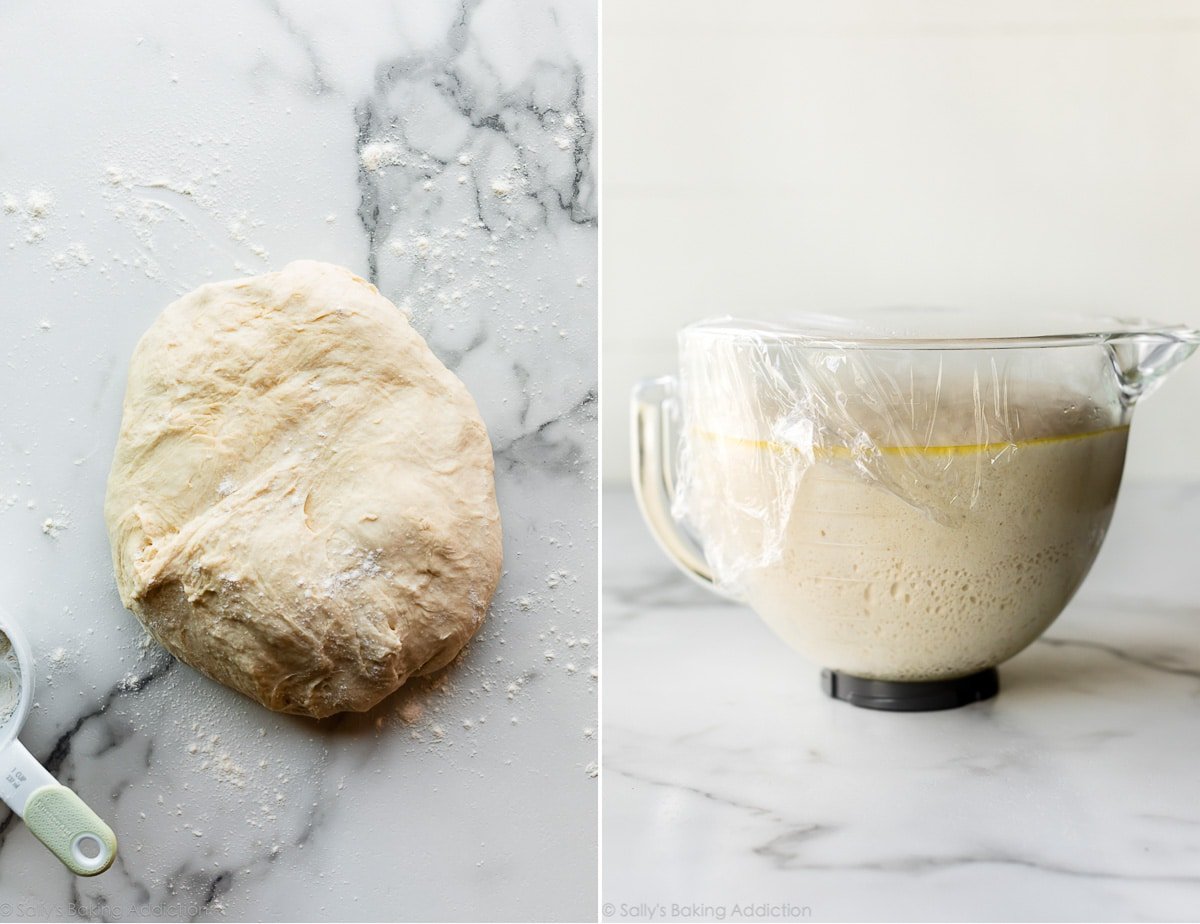
- Make the dough: Mix the ingredients together, and then knead the dough by hand or with your mixer. I like doing this by hand and you can watch me in the video, or in my separate How to Knead Dough tutorial.
- Let the dough rise: Place dough into a greased bowl, cover tightly, then set aside to rise for about 2–3 hours.
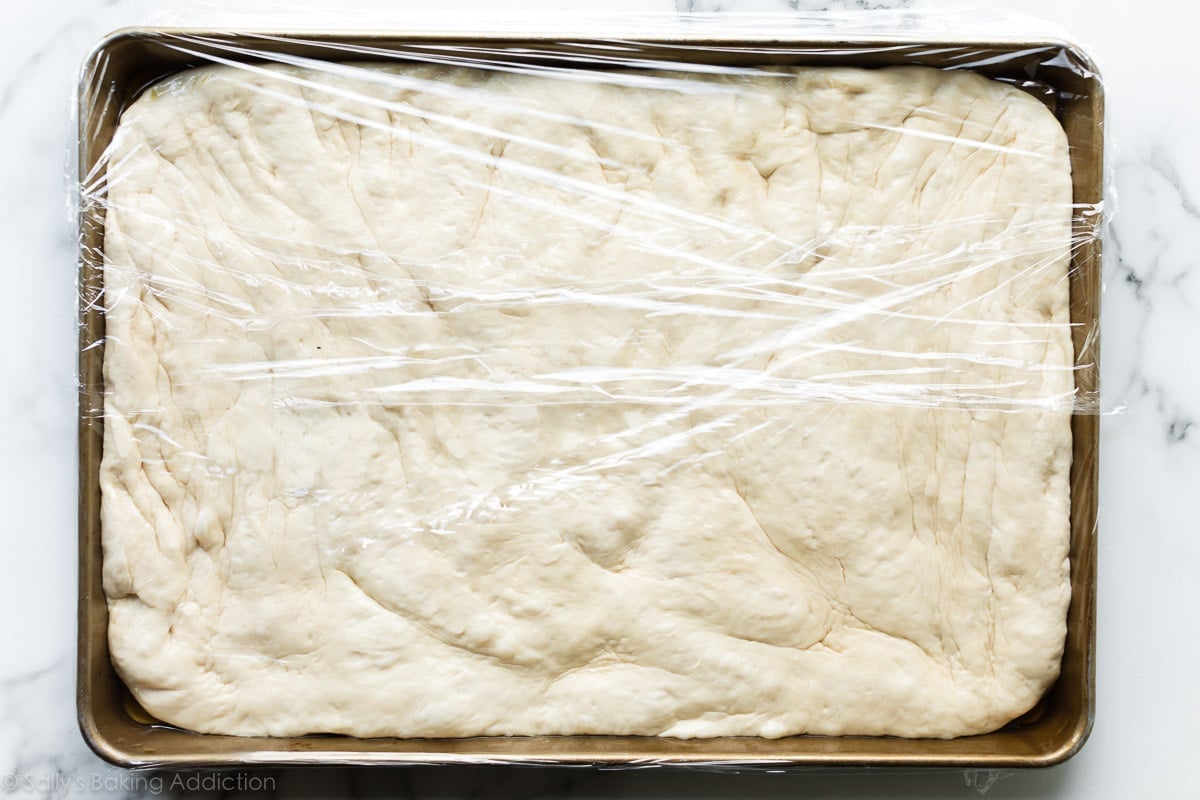
- Flatten dough out onto a baking pan: Punch down the risen dough to release the air, then use your hands to flatten the dough out onto an oiled baking sheet. If the dough keeps shrinking, cover it for 5 minutes to let the gluten settle.
- Let the dough rest in the refrigerator: The cold temperature slows down the rising. In fact, there’s so little yeast that the dough will hardly rise at all during this step. Let it rest in the refrigerator for as little as 1 hour and up to 24 hours. The longer it rests, the better the flavor. I recommend at least 12 hours, just like with my artisan bread and ciabatta bread recipes. You won’t regret it!
- Remove from the refrigerator: Let the dough hang out on the counter as you preheat the oven and prep the toppings. It will rise a little bit, but not much.
- Preheat oven: Focaccia bakes in a very hot 450°F (232°C) oven.
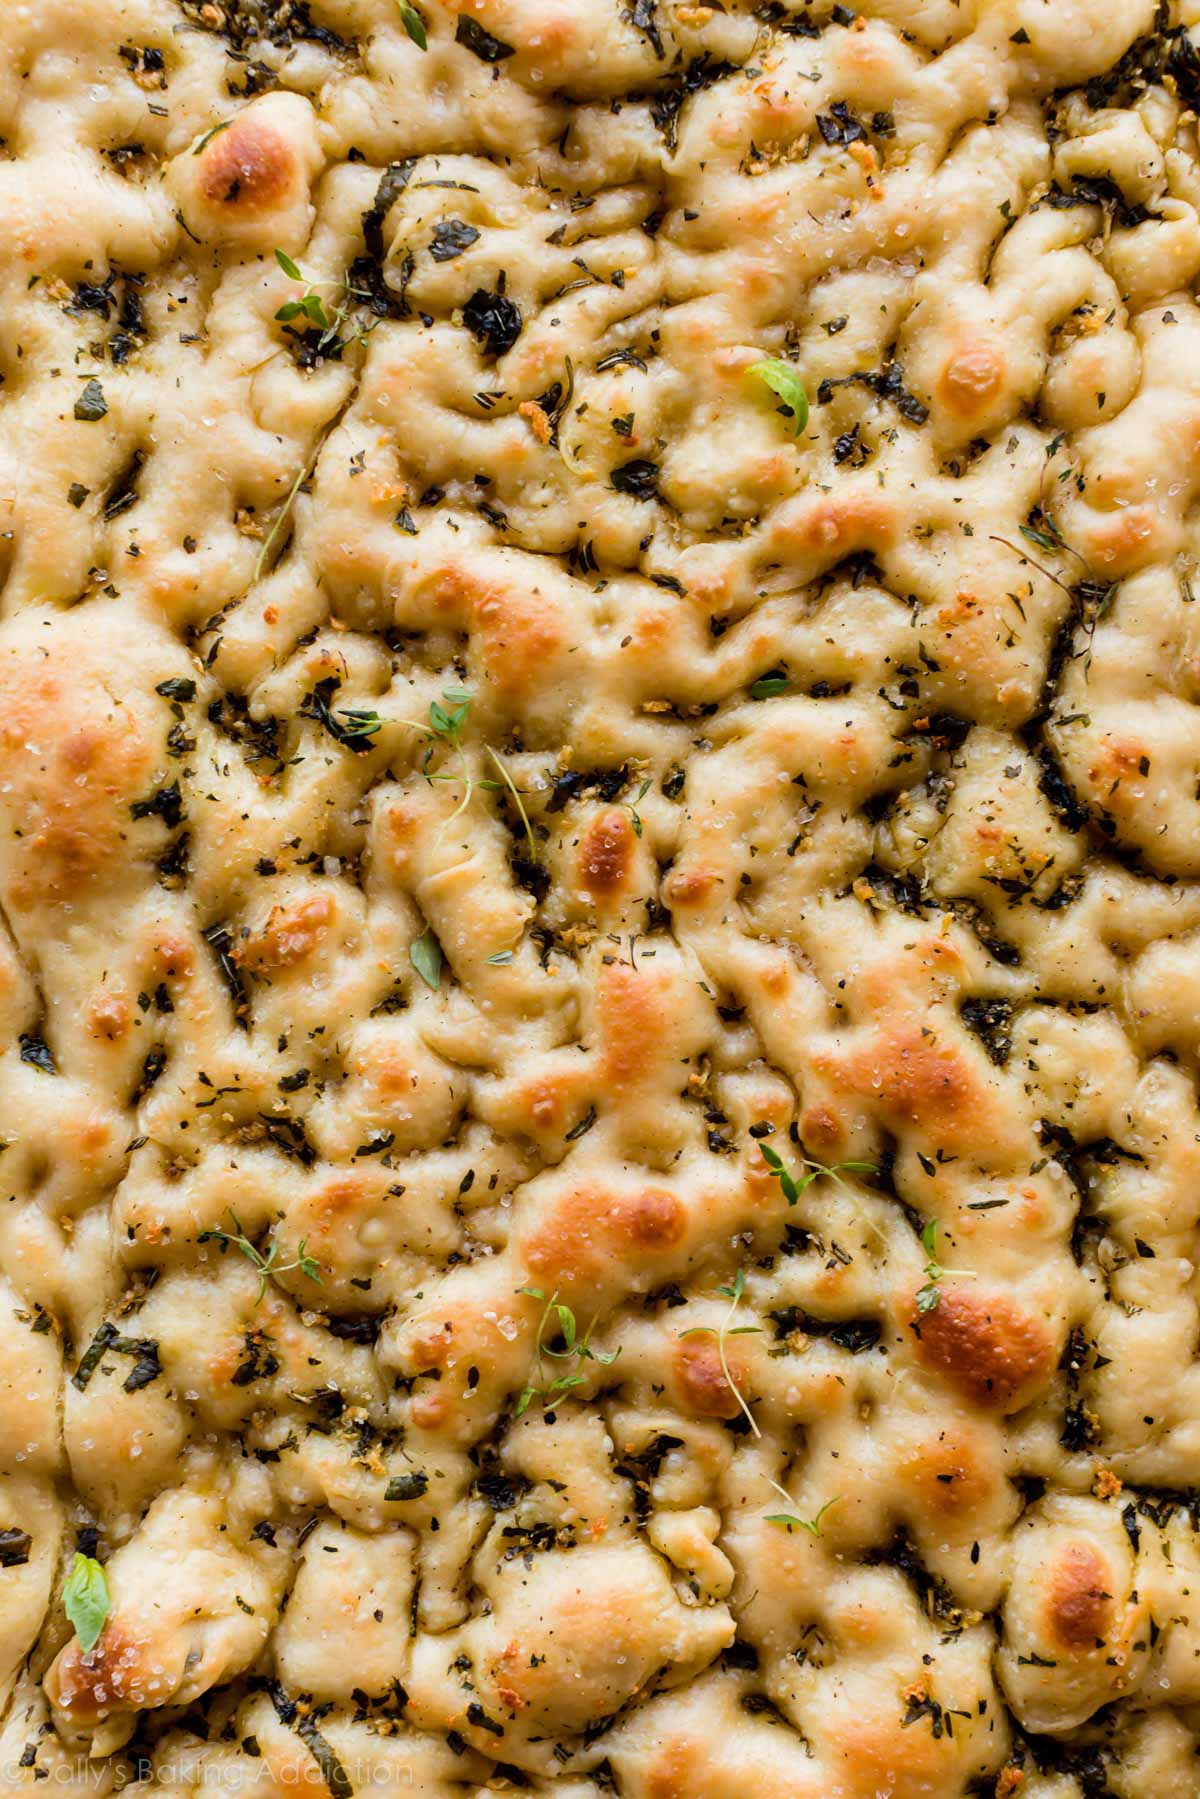
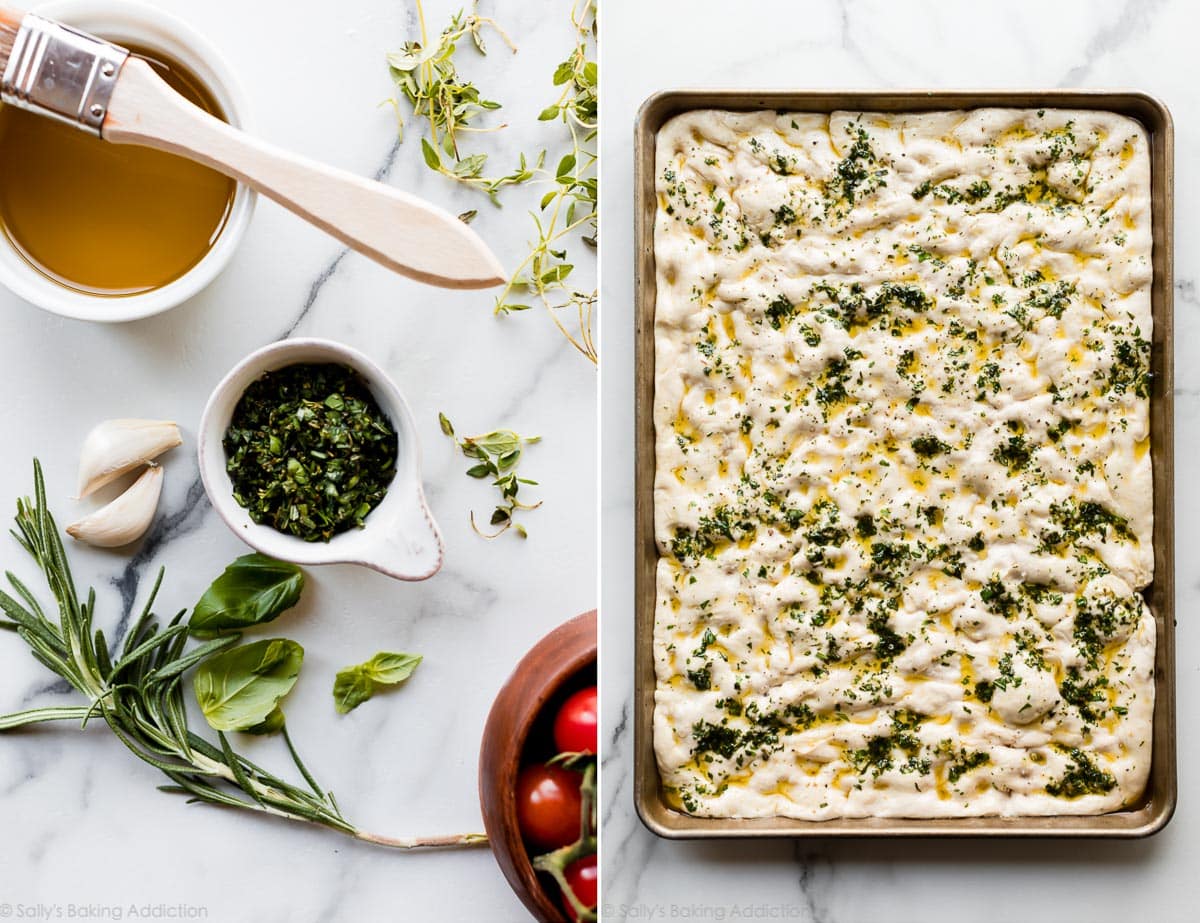
- Dimple the dough: A good stress reliever! Use your fingers to dimple the entire surface of the dough just like we do when making cold veggie pizza. The dimples give the olive oil and toppings “a place to go.” This step is fun!
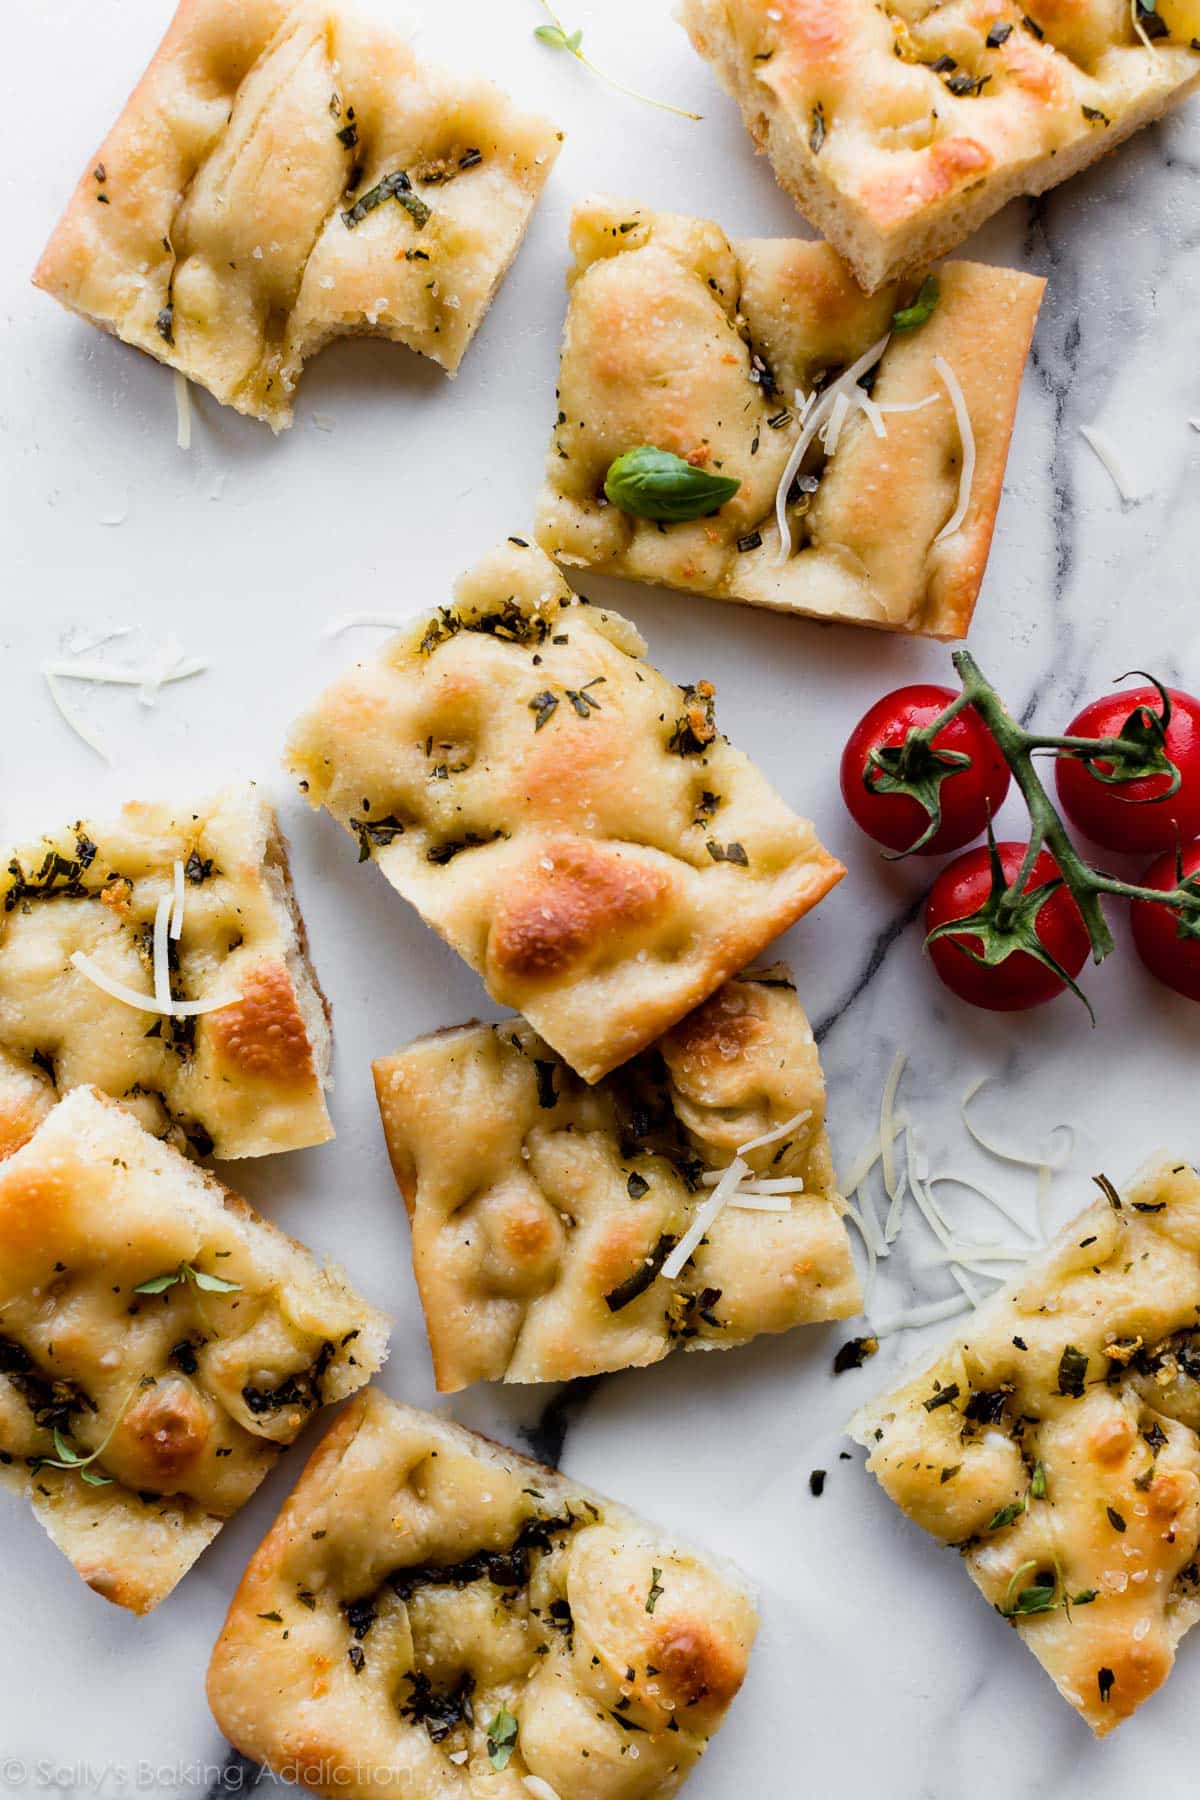
- Add toppings: A simple blend of fresh garlic, rosemary, thyme, and basil is a favorite, but I have plenty of focaccia topping suggestions listed below. No matter which topping you use, drizzle olive oil all over the surface.
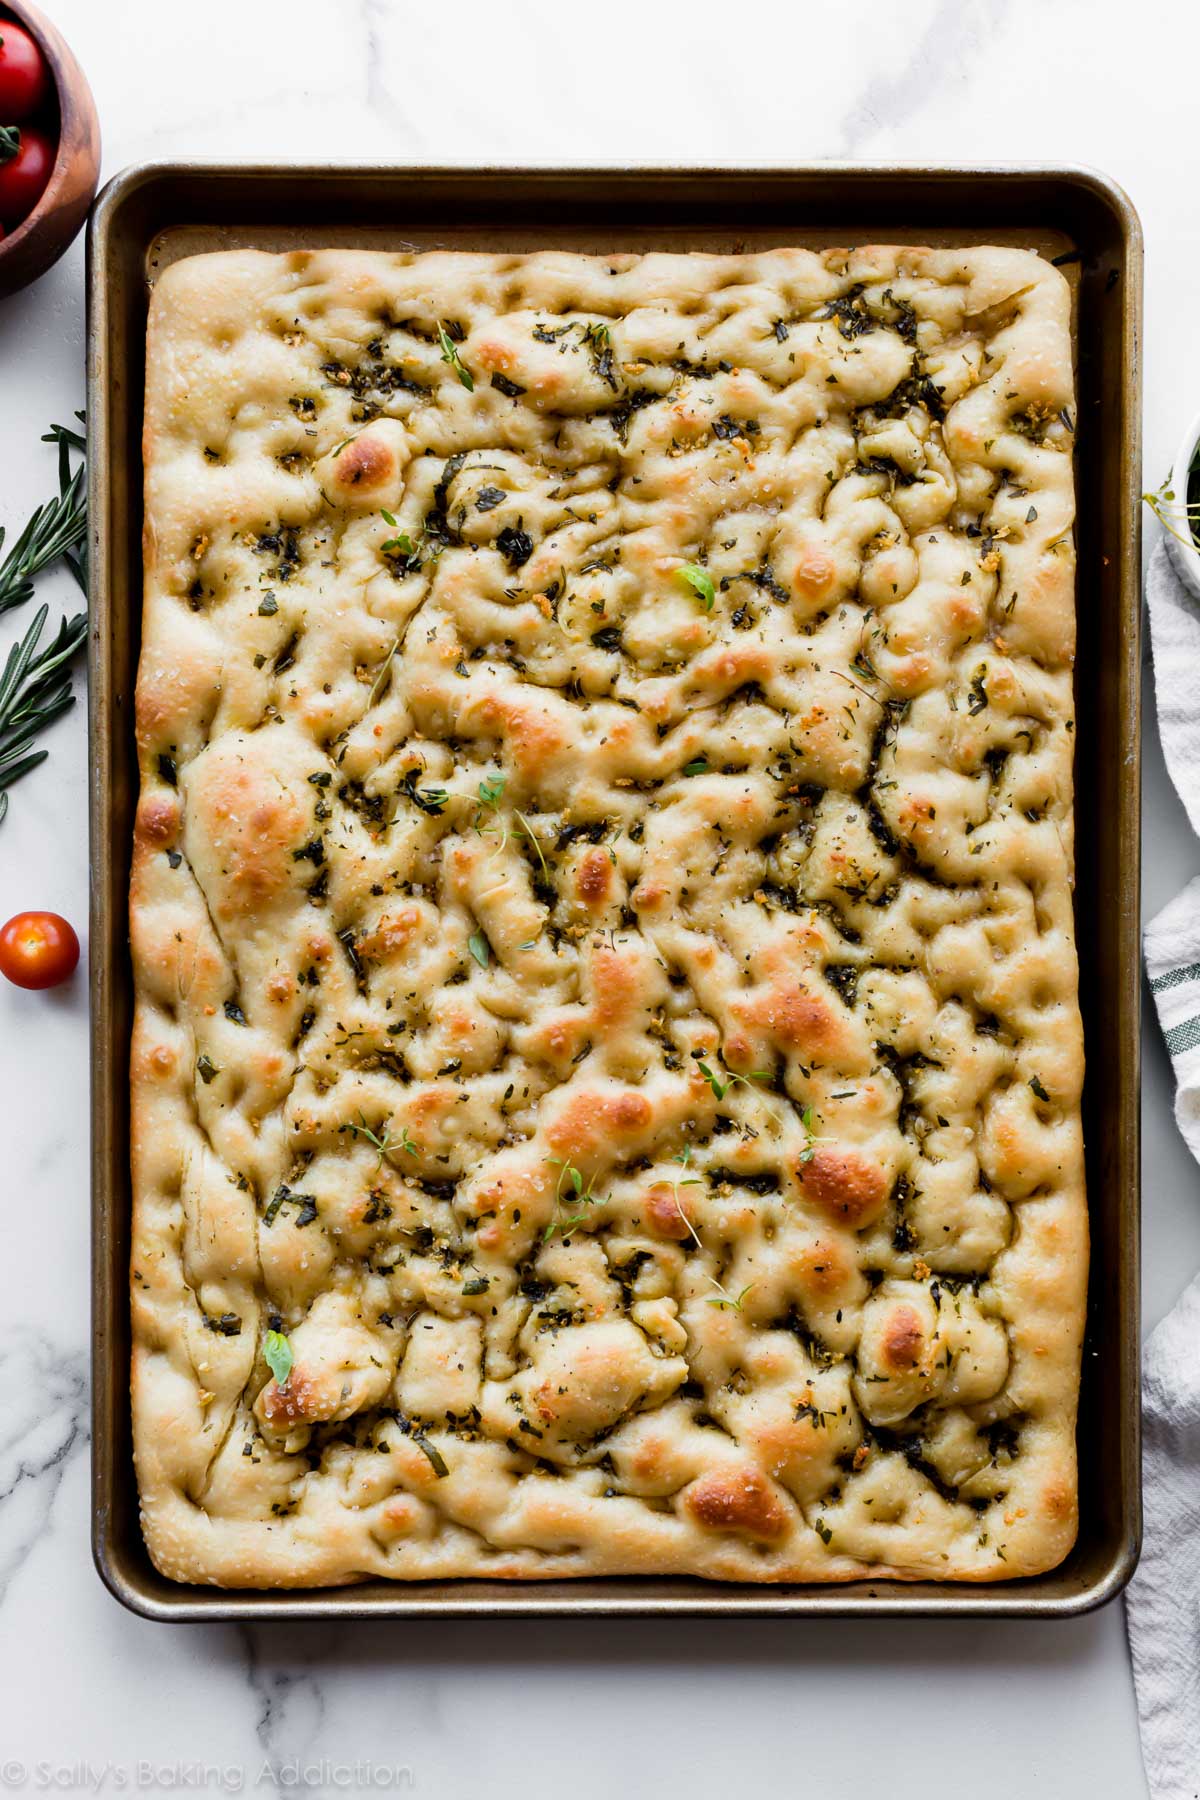
- Bake: Bake until golden brown. I set the oven to broil for the last minute to really crisp up the surface. Highly recommended!
The dough stretches to fit a large baking sheet. You can also divide the dough in half for 2 smaller focaccia loaves. I love that there’s no rolling pin or complicated shaping required.
After the dough rests in the refrigerator, dimple it with your fingers, then add toppings:
Make Ahead Recipe
As mentioned above, the longer the dough rests, the better it tastes. Focaccia is a convenient make-ahead recipe since you can do most of the work the day before serving. The bread tastes AWESOME warm from the oven, but it lasts all day if you want to bake it several hours prior to serving. Leftovers keep well for a few days or even a few months in the freezer, but some of the crispiness is lost over time. However, a few minutes in a preheated oven quickly brings leftover focaccia back to life!
Freezing dough: You can also freeze focaccia dough just as you would freeze pizza dough. After the dough rises in the mixing bowl, punch it down to release the air, coat it with a little olive oil, then cover and freeze for up to 3 months. Thaw in the refrigerator. Once thawed, remove the dough from the refrigerator and allow to rest for 30 minutes on the counter. Finally, shape the dough on the baking sheet and continue with the recipe.
Focaccia Toppings
Garlic & rosemary herb focaccia is a classic favorite, but you can customize it with various toppings. There’s truly no limit and here’s a list to prove it. Leave out the garlic and herbs (or keep them!), drizzle the dough with the olive oil, then add any of these toppings:
- Everything Bagel Seasoning
- Cherry Tomatoes or Sliced Tomatoes
- Parmesan (add before or after baking)
- Pesto (add before or after baking)
- Sliced Zucchini
- Pine Nuts
- Sliced Lemons or Lemon Zest
- Sun-Dried Tomatoes
- Olives
- Mushrooms
- Artichokes
- Raw or Caramelized Onions
I topped a test batch with the garlic & herb olive oil called for in the recipe below, plus some pine nuts and thinly sliced tomatoes. We all DEVOURED it.
More Simple Homemade Bread
- Homemade Pizza Dough
- No Yeast Bread
- Soft Pretzels
- Garlic Knots
- Brown Butter Sage Dinner Rolls
- Artisan Bread
- Homemade Garlic Bread
- Cornbread
- Olive Bread
- Whole Wheat Bread

Garlic Rosemary Herb Focaccia
- Prep Time: 16 hours
- Cook Time: 20 minutes
- Total Time: 16 hours, 20 minutes
- Yield: 2 dozen pieces
- Category: Appetizer
- Method: Baking
- Cuisine: Italian
Description
This simple 6-ingredient focaccia dough is a wonderful starting point for many different flavors, including this garlic rosemary herb focaccia. The homemade bread is chewy and soft in the center with a mega-crisp exterior. For the best flavor and texture, let the dough rest in the refrigerator overnight.
Ingredients
- 2 cups (480ml) warm water (between 100–110°F, 38–43°C)
- 2 teaspoons granulated sugar
- 2 teaspoons instant or active dry yeast (slightly less than 1 standard packet)
- 1/4 cup (60ml) extra virgin olive oil
- 1 Tablespoon kosher salt
- 4 and 1/2–5 cups (563–625g) all-purpose flour or bread flour (spooned & leveled), plus more for hands
Topping & Pan
- 5 Tablespoons (75ml) extra virgin olive oil or more as needed, divided
- 2 garlic cloves, minced
- 3–4 Tablespoons chopped fresh herbs such as basil, thyme, and rosemary (or 2 Tablespoons dried herbs)
- sprinkle of coarse salt and freshly ground black pepper
Instructions
- Prepare the dough: Whisk half of the water (1 cup; 240ml), 2 teaspoons sugar, and 2 teaspoons yeast together in the bowl of your stand mixer fitted with a dough hook or paddle attachment. Cover and allow to rest for 5 minutes.
- Add the remaining water, olive oil, salt, and 1 cup (130g) flour. Beat on low speed for 20 seconds, then add 3 and 1/2 cups (440g) more flour. Beat on low speed for 2 minutes. If the dough is still sticking to the sides of the bowl, add the last 1/2 cup (60g) of flour.
- Knead the dough: Keep the dough in the mixer and beat for an additional 5 full minutes, or knead by hand on a lightly floured surface for 5 full minutes. (If you’re new to bread-baking, my How to Knead Dough video tutorial can help here.) If the dough becomes too sticky during the kneading process, sprinkle 1 teaspoon of flour at a time on the dough or on the work surface/in the bowl to make a soft, slightly tacky dough. Do not add more flour than you need because you do not want a dry dough. After kneading, the dough should still feel a little soft. Poke it with your finger—if it slowly bounces back, your dough is ready to rise. You can also do a “windowpane test” to see if your dough has been kneaded long enough: tear off a small (roughly golfball-size) piece of dough and gently stretch it out until it’s thin enough for light to pass through it. Hold it up to a window or light. Does light pass through the stretched dough without the dough tearing first? If so, your dough has been kneaded long enough and is ready to rise. If not, keep kneading until it passes the windowpane test.
- Let the dough rise: Lightly grease a large bowl with a teaspoon of oil or some nonstick spray—just use the same bowl you used for the dough. Place the dough in the bowl, turning it to coat all sides in the oil. Cover the bowl with aluminum foil, plastic wrap, or a clean kitchen towel. Allow the dough to rise at room temperature for 2–3 hours or until double in size. (Tip: For the warm environment on a particularly cold day, heat your oven to 150°F (66°C). Turn the oven off, place the dough inside, and keep the door slightly ajar. This will be a warm environment for your dough to rise. After about 30 minutes, close the oven door to trap the air inside with the rising dough. When it’s doubled in size, remove from the oven.)
- Prepare the pan: Generously grease a 12×17-inch baking pan (with at least 1-inch-tall sides) with 2 Tablespoons of olive oil. This is the base layer of the bread, so be generous with the oil. A pastry brush is helpful to spread it.
- Flatten the dough: When the dough is ready, punch it down to release any air bubbles. Place on the oiled baking pan, then stretch and flatten the dough to fit the pan. Don’t tear the dough. If it’s shrinking (mine always does), cover it with a clean towel and let it rest for 5–10 minutes before continuing. This lets the gluten settle and it’s much easier to shape after that.
- Let the dough rest: Cover the dough tightly and let it rest in the refrigerator for at least 1 hour and up to 24 hours. The longer it rests, the better the flavor. I recommend at least 12 hours.
- Remove the dough from the refrigerator and let it sit at room temperature as you preheat the oven and prepare the toppings. Keep it covered. It may rise a little during this time, but not much.
- Preheat oven to 450°F (232°C). Allow it to heat for at least 10–15 minutes so every inch of the oven is very hot.
- Prepare the toppings: Whisk the 3 remaining Tablespoons of olive oil with the minced garlic and herbs. Set aside.
- Using your fingers, dimple the dough all over the surface. You can watch me do this in the video above. Drizzle on the olive oil topping and use your hands or a pastry brush to spread it all over the top. Add a little more olive oil if needed so the dough is completely covered. (This creates the crisp crust!) Sprinkle with a little coarse salt and freshly ground black pepper.
- Bake for 20–23 minutes or until lightly browned on top. If desired, broil on high for the last minute to really brown the top.
- Cut and serve hot or let it come to room temperature before slicing and serving. Focaccia tastes wonderful warm or at room temperature. Cover leftover focaccia tightly and store at room temperature for 2 days or in the refrigerator for 1 week. You can also freeze the baked and cooled focaccia for up to 3 months. Thaw in the refrigerator or at room temperature. To reheat the slices, you can use the microwave or bake in a 300°F (149°C) oven for 5 minutes.
Notes
- Freezing Instructions: After the dough rises, punch it down to release the air as instructed in step 5. Freeze the dough or portions of the dough to make at a later time. Lightly coat all sides of the dough ball(s) with olive oil. Place the dough ball(s) into individual zipped-top bag(s) and seal tightly, squeezing out all the air. Freeze for up to 3 months. To thaw, place the frozen dough in the refrigerator overnight. Remove the dough from the refrigerator and allow to rest for 30 minutes on the counter, then continue with shaping the dough to fit the baking pan as instructed in step 5. (Even after thawing, the dough must still rest in the refrigerator as instructed in step 6.)
- Make Ahead Instructions: The is a wonderful recipe to begin the day ahead of time. The dough must rest in the refrigerator for at least 1 hour and up to 24 hours, as instructed in step 6. I’ve let it go for as long as 30 hours and the flavor is incredible. I wouldn’t go past 24-30 hours.
- Special Tools (affiliate links): Stand Mixer | 12×17-inch Baking Pan | Pastry Brush
- Smaller Portions: This recipe yields a big pan of bread. You can divide the dough in half and bake smaller portions on 2 baking sheets or 9×13 inch baking pans. If desired, you can divide the dough in half and freeze half of it. Or you can halve the entire recipe.
- Yeast: You can use instant or active dry yeast instead. The rise time in step 3 may be a little quicker if using instant yeast. No matter which yeast you choose, you only need 2 teaspoons which is a little less than 1 standard 7g packet. Reference my Baking with Yeast Guide for answers to common yeast FAQs.
- Flour: You can use all-purpose flour or bread flour. All-purpose flour is convenient for most, but bread flour produces a chewier bread. No matter which you choose, the focaccia is still soft and rich with a crispy exterior. Either flour is fine and there are no other changes to the recipe if you use one or the other. You may need slightly closer to 5 cups of flour if using all-purpose.
Adapted from Bon Appetit & Pizza Crust


Reader Comments and Reviews
You did such a great job having all the details about the bread, I was looking for. This really boosts my knowledge about this great bread. Looking forward to such helpful and lovely recipes. Thank you.
Best Focaccia! I made the dough a few days ago and froze it. Topped it with lots of minced garlic and fresh rosemary. Delicious!
Five stars! I made this last night exactly as the recipe directed and it turned out perfect! We had it for dinner with soup and today we made Italian sandwiches with the leftovers. Thank you so much! I will be making this again very soon.
(I tried to post a photo unfortunately I was unable to)
Hi Sally, does this recipe HAVE to be in a 12×17 baking sheet? I have some around that size but they don’t have 1″ sides. Any other pan options I could use? I do have a jumbo baking sheet (15″ x 21″) that has the taller sides, but the dough wouldn’t meet the edges. Thank you! Can’t wait to make this!
Hi Nikki, You can use your jumbo pan OR divide the dough in half and bake smaller portions on 2 baking sheets or 9×13 inch baking pans.
Hi Sally. I tried to make the focaccia but it didn’t have a lot of holes like yours – there were only a few holes barely noticeable. Any specific step that I should pay more attention to to get the same outcome?
Hi Ean, After the dough rests in the refrigerator, dimple it with your fingers, then add toppings. You can see a photo in the post above of my dough before it goes in the oven for a good visual to help you!
I’ve been trying to bake something new each week to pass the time by and tried this recipe – it was super easy and my family loved it! My dad who is very hard to please said this was the best thing I’ve made so far.
Great recipe! This was my first time using using yeast and making ANY type of bread! I wasn’t sure how I’d get on but it turned out great. Only thing was mine was a little overdone on the top vs your pictures but think that was because I followed the oven temperature Quoted but I have a fan assisted oven so probably should have reduced temp down. Still tasted great though and nice and soft in the middle. Will make again!
My dough is currently in the pan in the fridge, and I have an impatient sister that doesn’t want to wait any longer! If I let it sit in the fridge for an hour or less, will it not turn out as good? Thanks so much for the recipe, we can’t wait to try it!
This is the only focaccia recipe you need. Just incredible! Love the crisp exterior and airy interior. Thanks so much
Hi Sally,
I am a huge fan of your blog and your recipes. I’ve never had trouble with any of them. Love them all. I love focaccia bread too, and I was so sad that after making it twice, it did not turn out well. It was thin and hard. It did not rise and it wasn’t fluffy inside like focaccio bread normally is. The bottom was super hard from the high heat and the inside didn’t cook. Would you have any tips for me? Thanks so much in advance!
Hi Tricia, this focaccia isn’t fluffy– it’s more on the chewy side with a crisp crust. But I’m concerned the dough didn’t rise and that’s likely why it tasted hard and dense. Was your yeast expired? The dough could have been over-worked as well. Thank you for trying my recipe and I’m sorry this didn’t turn out as expected. I hope you try it again because it’s a favorite!
Thank you, Sally. I will try it again. The yeast is brand new. Thank you for letting me know that it is more on the chewy side rather than fluffy. I will give it one more try and see how it goes.
I had what I consider to be a great victory with this recipe tonight. With the COVID-19 situation yeast has been hard to come by. I am down to 4 packets and less than 1/2 of a 4oz jar and no idea when I will be able to get more, so I have been really trying to conserve. I found a great sandwich bread recipe that only requires 1/8tsp of yeast and I wondered if it would be possible to adapt a regular-yeast recipe into low-yeast. My first experiment was with this recipe and it turned out great!
I halved the recipe (since the full amount is too much for my family at one time) and used 1/8tsp of yeast. The only other thing I changed with the ingredients was a little extra water to give the dough the same consistency that I have found with other low-yeast recipes. I did not knead the dough and gave it about 18 hours for the first rise. 12 hours in the refrigerator in the pan, and then I let it rise for two hours on the counter before going into the oven.
It was amazing!!! Even better than when I have made this recipe with the regular amount of yeast. Need to plan ahead even more, but I’m no longer worried as much about running out of yeast
Thank you Sally for such a versatile recipe!
Made this for my usual “bread and treats testing” friends and they said it is the freshest and yummiest bread they have ever had! 5 of us went through half the pan in no time.
Any change at high st altitudes, I’m at 7000 ft.
Hi Barbara, I wish I could help, but I have no experience baking at high altitude. I know some readers have found this chart helpful: https://www.kingarthurflour.com/learn/high-altitude-baking.html
I was searching for a focaccia recipe and came across this one – It is easy and tastes delicious and smells wonderful while baking!! I did add some finely chopped rosemary to the bread dough….My topping was olive oil and basil….I will make this over and over – Thanks so much!
I made this recipe twice in 2 weeks ,it came out perfect.Must say its way better then supermarket.Once again Sally your recipes are always a hit on first try.Thanks.
This looks so good. Can I make it without the mixer? I don’t have a stand mixer to use at the moment.
Yes, you can make the dough by hand in a large mixing bowl with a wooden spoon or rubber spatula.
Great recipe – easy to follow and accurate! My focaccia came out beautifully! Thanks for sharing!
This is the 3rd recipe I’m making from Sally’s website and this one is again a smashing hit! I ended up using at least an extra half cup of flour and would use more garlic in the future but otherwise everything else was right on point. Clear directions that were easy to follow for a noob like me, and turned out delicious!
Hello! I’m a 14-year-old living in Japan, and this focaccia was AMAZING! It became a little quarantine baking project, and I was not disappointed! My mother and I made some tweaks to the recipe such as instead of using fresh herbs (they are a bit hard to get in Japan) we used Italian seasoning and it turned out great! I was worried when we took out the focaccia after it was done baking since it was so hard. I was worried maybe something went wrong even though I followed the recipe. After letting it cool down, and cutting it when I bit into the bread, the top was nice and crusty and the bottom part of the bread was so fluffy and soft! Probably with cooling it down and the rest of the olive oil seeping into the bread, it made the top softer. (I don’t know that’s just a theory) It was a lot of preparation and waiting to do, but in the end, it was all worth it! Definitely a 5 out of 5, and I’m going to make it again soon!
I made your foccaccia bread today and followed exactly your recipe .It came out much better than the store bought ..I m not going to buy from market anymore ..Thank you so much …
I made your foccaccia bread today and followed exactly your recipe .It came out much better than the store bought ..I m not going to buy from market anymore ..Thsnk you do much …
This was my first quarantine focaccia and it came out amazing. I want to try to use this as a base for a Sicilian style pizza. Do you think that is possible? Would adding sauce and cheese to the dough change how long it needs to cook ?
Hi Bryce! So glad you enjoyed it. You can definitely use this focaccia as the base for pizza.
I can’t believe I made focaccia!! I’m not sure if I did it perfectly as I had to add a lot more flour..the dough was really wet throughout the whole process. And I used king Arthur Bread flour. But it seemed to work in the end and tasted amazing. Sally!! You have made me look like a baking genius. Thank you
Turned out perfectly. Added a few cherry tomatoes on top. Delicious!
I have a question about the coarse salt you use. I only have Morton Coarse Kosher Salt and I have read that not all coarse salt in the same! Is the 1 TBL called for in the recipe for Morton Coarse Kosher Salt? Or should i reduce the amount to account for Morton’s extra saltiness. Thank you.
Hi Jeanie! I would still go ahead and use the 1 Tablespoon, but if you’re nervous and know this brand and product is saltier than others, you can reduce down to 2 teaspoons.
It’s cooking in the oven – recipe very easy to follow but when refrigerated overnight, the dough seemed to have exploded and was overflowing from oiled pan (and dough that leaked out dried up). What do you think I did wrong?
Hi Vanessa! Was the dough rising in certain areas from a large air bubble? I’ve never had focaccia explode in the oven before. Did you use a different size pan or alter the recipe/process at all?
I have used a bunch of you recipes that turned out great the first time I made them. This one not so much. It is not bad. Simply more cracker than focaccia. It held up well with the chili so that was good, but it needed either butter or soup to be palatable.
Hi Sally,
If baking in smaller batches should the baking time be reduced? Thanks!
Yes, it should be reduced if you’re baking smaller batches of focaccia.
I loved this recipe and it worked perfectly for me. My 17-year-old son has dubbed this “better than restaurant quality focaccia bread!” So yummy!
I used my KitchenAid paddle, and then halfway through switched to the dough hook because it became a little too much for the paddle. This worked perfectly, and I didn’t need to knead the dough by hand at all. It was chilly here today so I did put my oven on warm and let my dough rise in there. Once it was done I put it in a pan like you suggested covered it and put it in the fridge for a couple hours. I pulled it out, dimpled it and then put on my herb mixture. Can’t say enough about how wonderful this was!
Lovely recipe and lovely bread! I’ve made many a focaccia over the years, but this is tasty with great texture! Thank you so much-we needed a pantry basic bread while sheltering at home and this was a bright spot in the day for sure!