

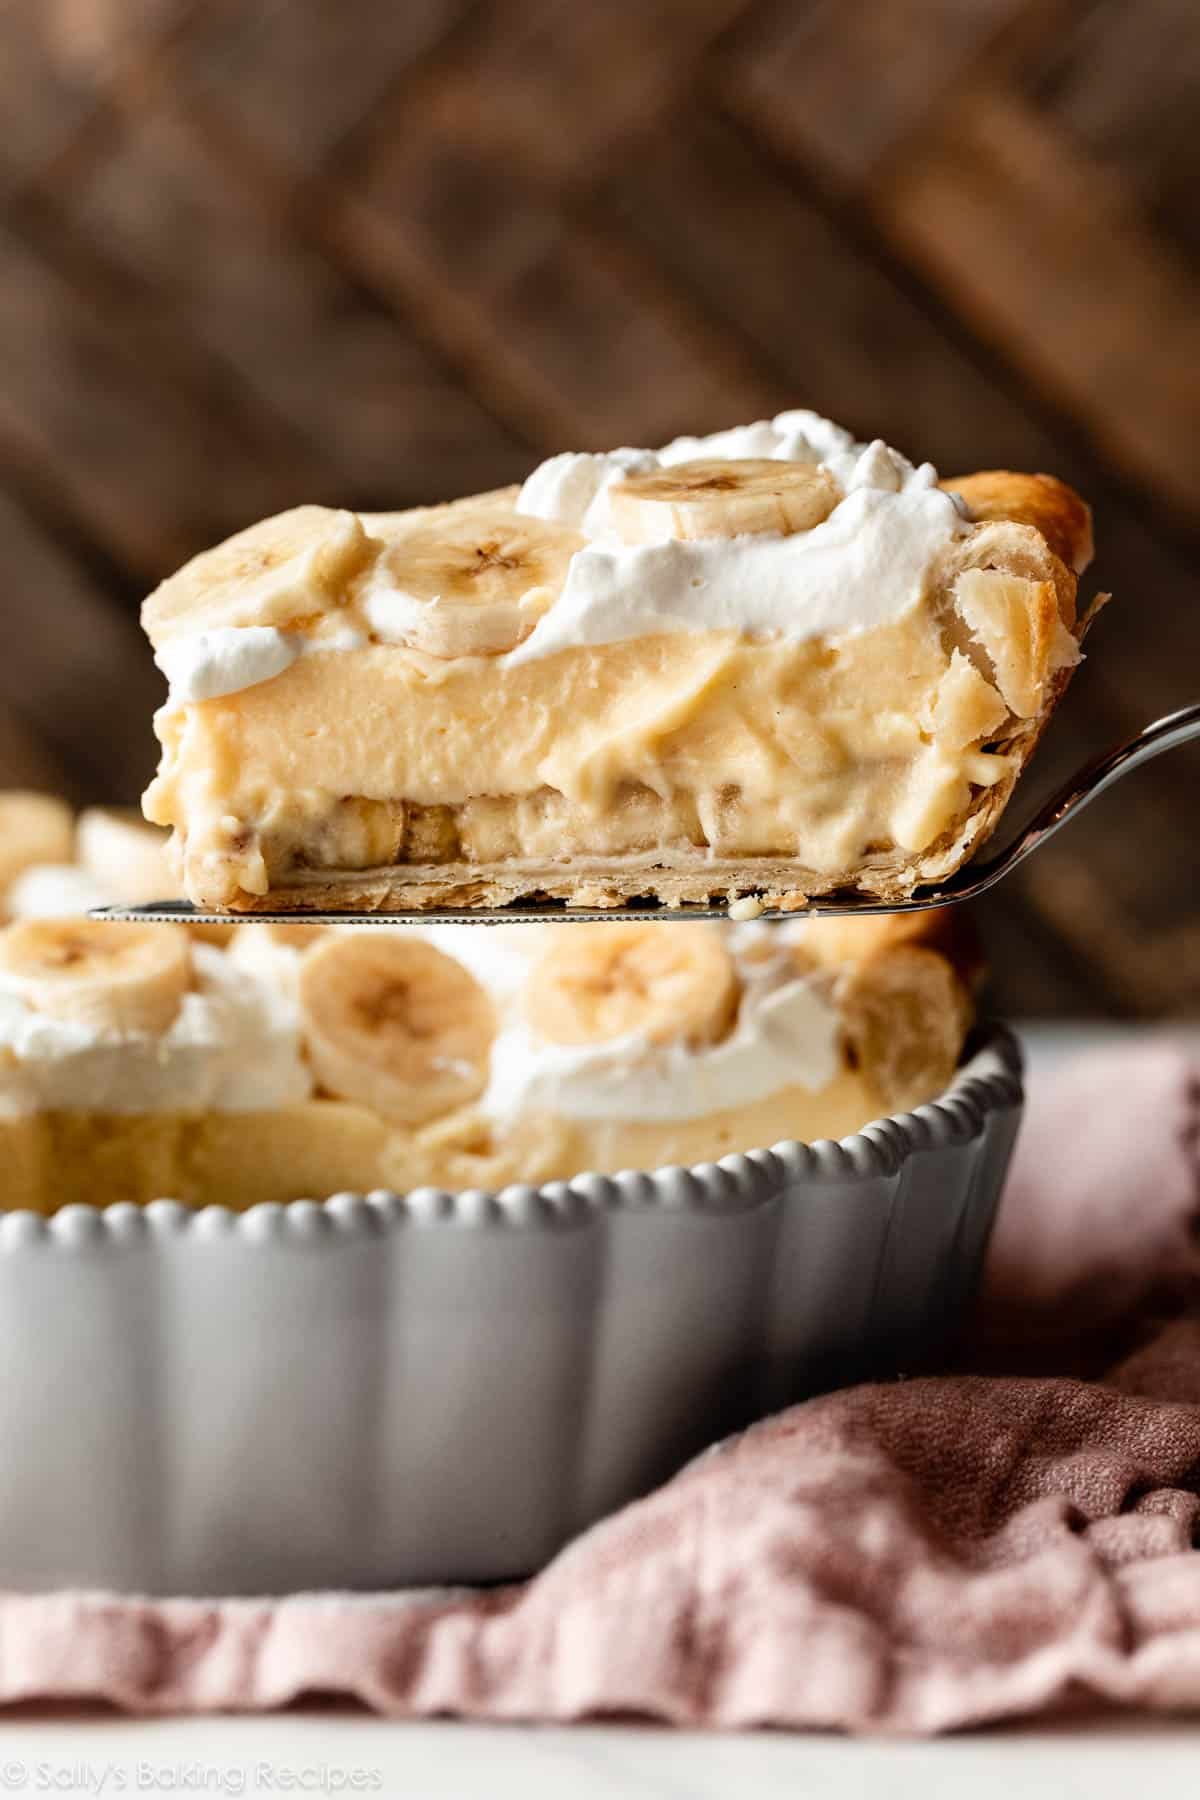
Creamy and smooth from-scratch custard joins bananas, whipped cream, and a buttery flaky baked pie crust to make one epic banana cream pie. This classic dessert is 100% homemade, like my cherry pie, and the perfect make-ahead option because the layered beauty needs to set before garnishing and serving.
I originally published this recipe in 2016 and have since added new photos, a video tutorial, and have fine-tuned the process and recipe. See recipe notes for exact changes.
This is a completely from-scratch banana cream pie recipe. You won’t find any box pudding mixes or artificial flavors hiding inside. Get ready for a blissful banana experience where you can truly taste the homemade difference. And it will graciously satisfy your heart, soul… and your tastebuds.
Here’s Why You Will LOVE This Banana Cream Pie
- 100% from scratch dessert recipe, and you can taste the difference.
- Creamy and undeniably rich.
- If custard is cooked properly, it’s sturdy and smooth.
- Flaky pie crust shell, or try a graham cracker crust.
- An optional sprinkle of cinnamon adds a special and flavorful touch.
- Perfect make-ahead dessert.
One reader, Stephanie, says: “…This is the first time I’ve used this particular recipe and it was AMAZING. Honestly the best one I’ve made. I will be bookmarking this one for the future! ★★★★★“
What Is Banana Cream Pie?
The combination of kitchen magic. 😉 Seriously, though, banana cream pie combines homemade pie pastry crust, fresh bananas, vanilla custard, and fluffy whipped cream.
- Baked Pie Crust Shell
- Banana Slices
- Homemade Vanilla Custard: This is a lot like my caramelized banana pudding, only a bit sturdier so it holds a nice slice.
- Whipped Cream
Let me walk you through each layer, so you’re fully prepared when it’s your turn to make it.
First, Bake Your Pie Crust
It’s helpful to review my how to blind bake pie crust tutorial before getting started. Blind baking a pie crust shell = baking it without a filling. Why do we do that? Well, if you have a no-bake pie filling like coconut cream pie, butterscotch pie, or today’s banana cream pie, you need a baked pie crust.
Start with homemade pie dough. I always use this pie crust recipe, or I have an excellent all butter pie crust option. To bake pie crust without a filling, you need to weigh it down to help prevent it from shrinking. I’m pretty loyal to these ceramic pie weights; they’re inexpensive and get the job done. You can also use dry beans. (Note: You’ll need 2 packs of the pie weights!)
Here are the steps:
- Make the pie dough ahead of time, and then refrigerate or freeze until you’re ready to make the pie. Pie crust must chill for at least 2 hours before rolling out.
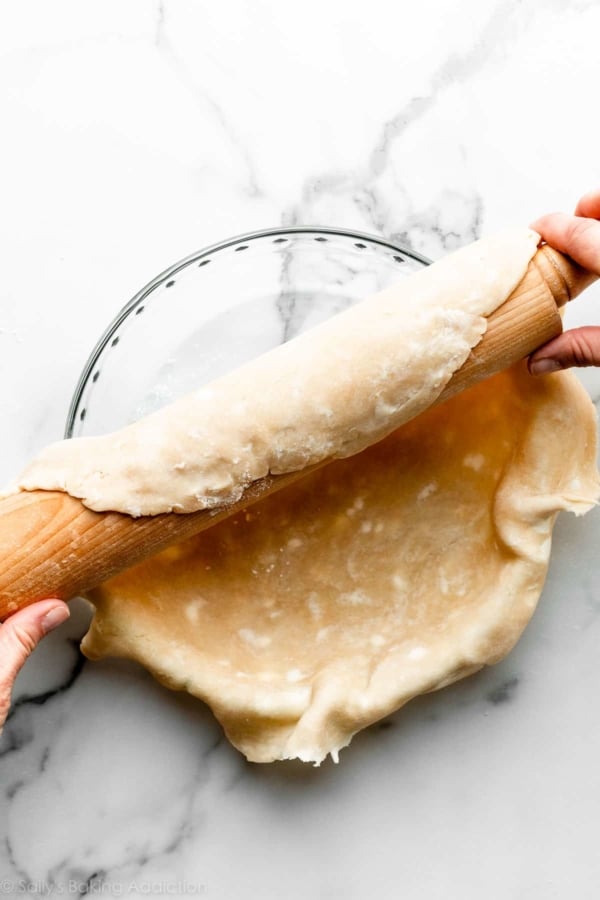
- Roll itout, then fit into your 9-inch pie dish. Crimp or flute the edges. See my how to crimp and flute pie crust tutorial for helpful tips and visuals.
- Chill the shaped pie crust for at least 30 minutes. This prevents shrinking. Remember that pie dough must be cold when it hits the oven.
- Line with parchment paper, and then fill with pie weights.
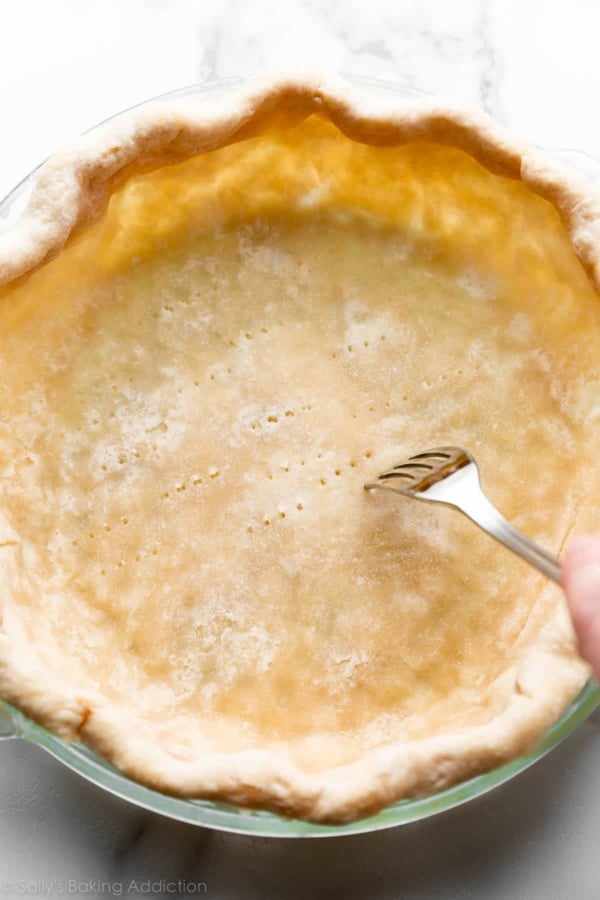
- Bake until the edges are lightly brown, about 15 minutes.
- Remove pie weights, then prick the bottom with a fork. This lets air escape the bottom.
- Return crust to oven until the entire pie shell is golden brown.
- Cool pie shell completely. You can do this up to 3 days ahead of time!
This baked pie crust “shell” is crispy, flaky, and ready for your banana cream filling.


Other Crust Options:
- For something easier, you can use a graham cracker crust. Make sure you bake it for 10 minutes at 350°F (177°C), then let it cool completely before filling.
- Or try the peanut butter cookie crust from my peanut butter banana cream pie!
Now Let’s Work on the Filling
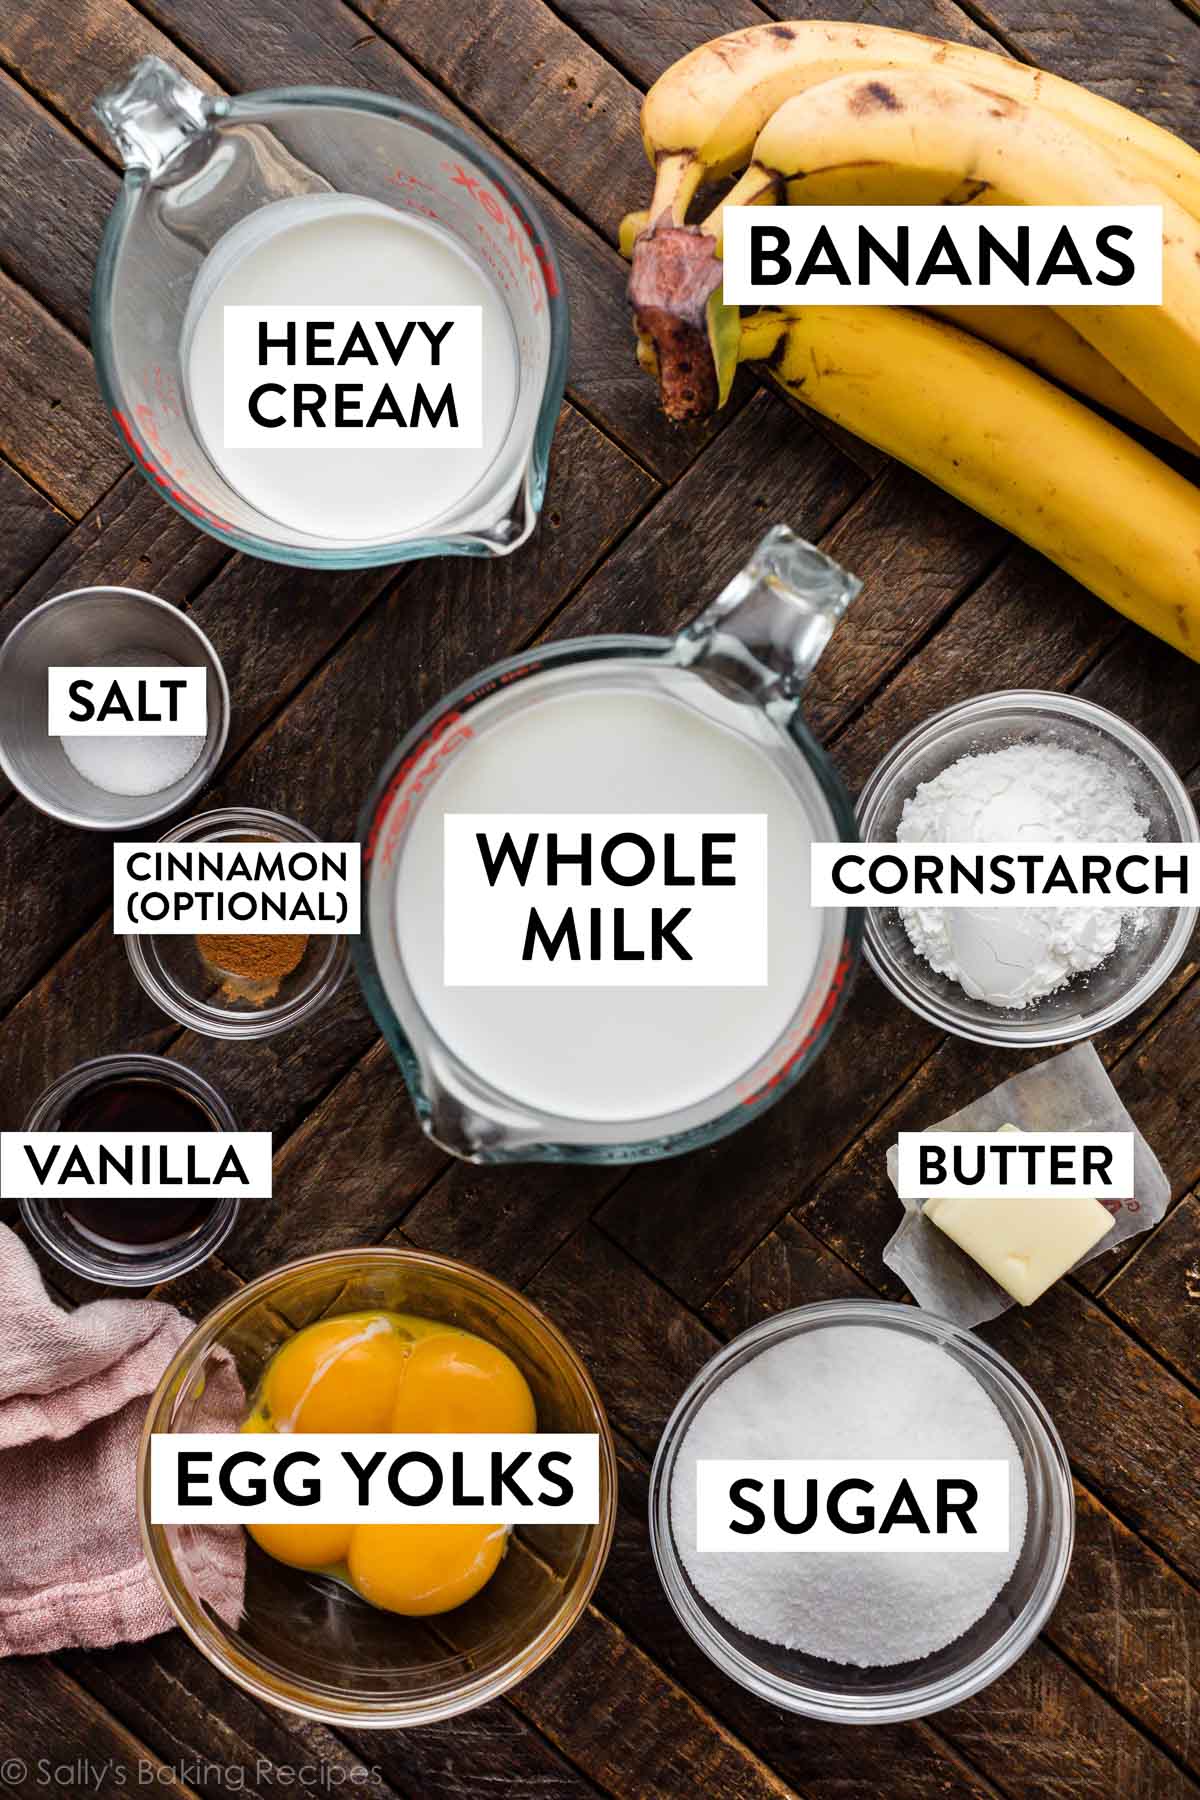
Here are the ingredients you need:
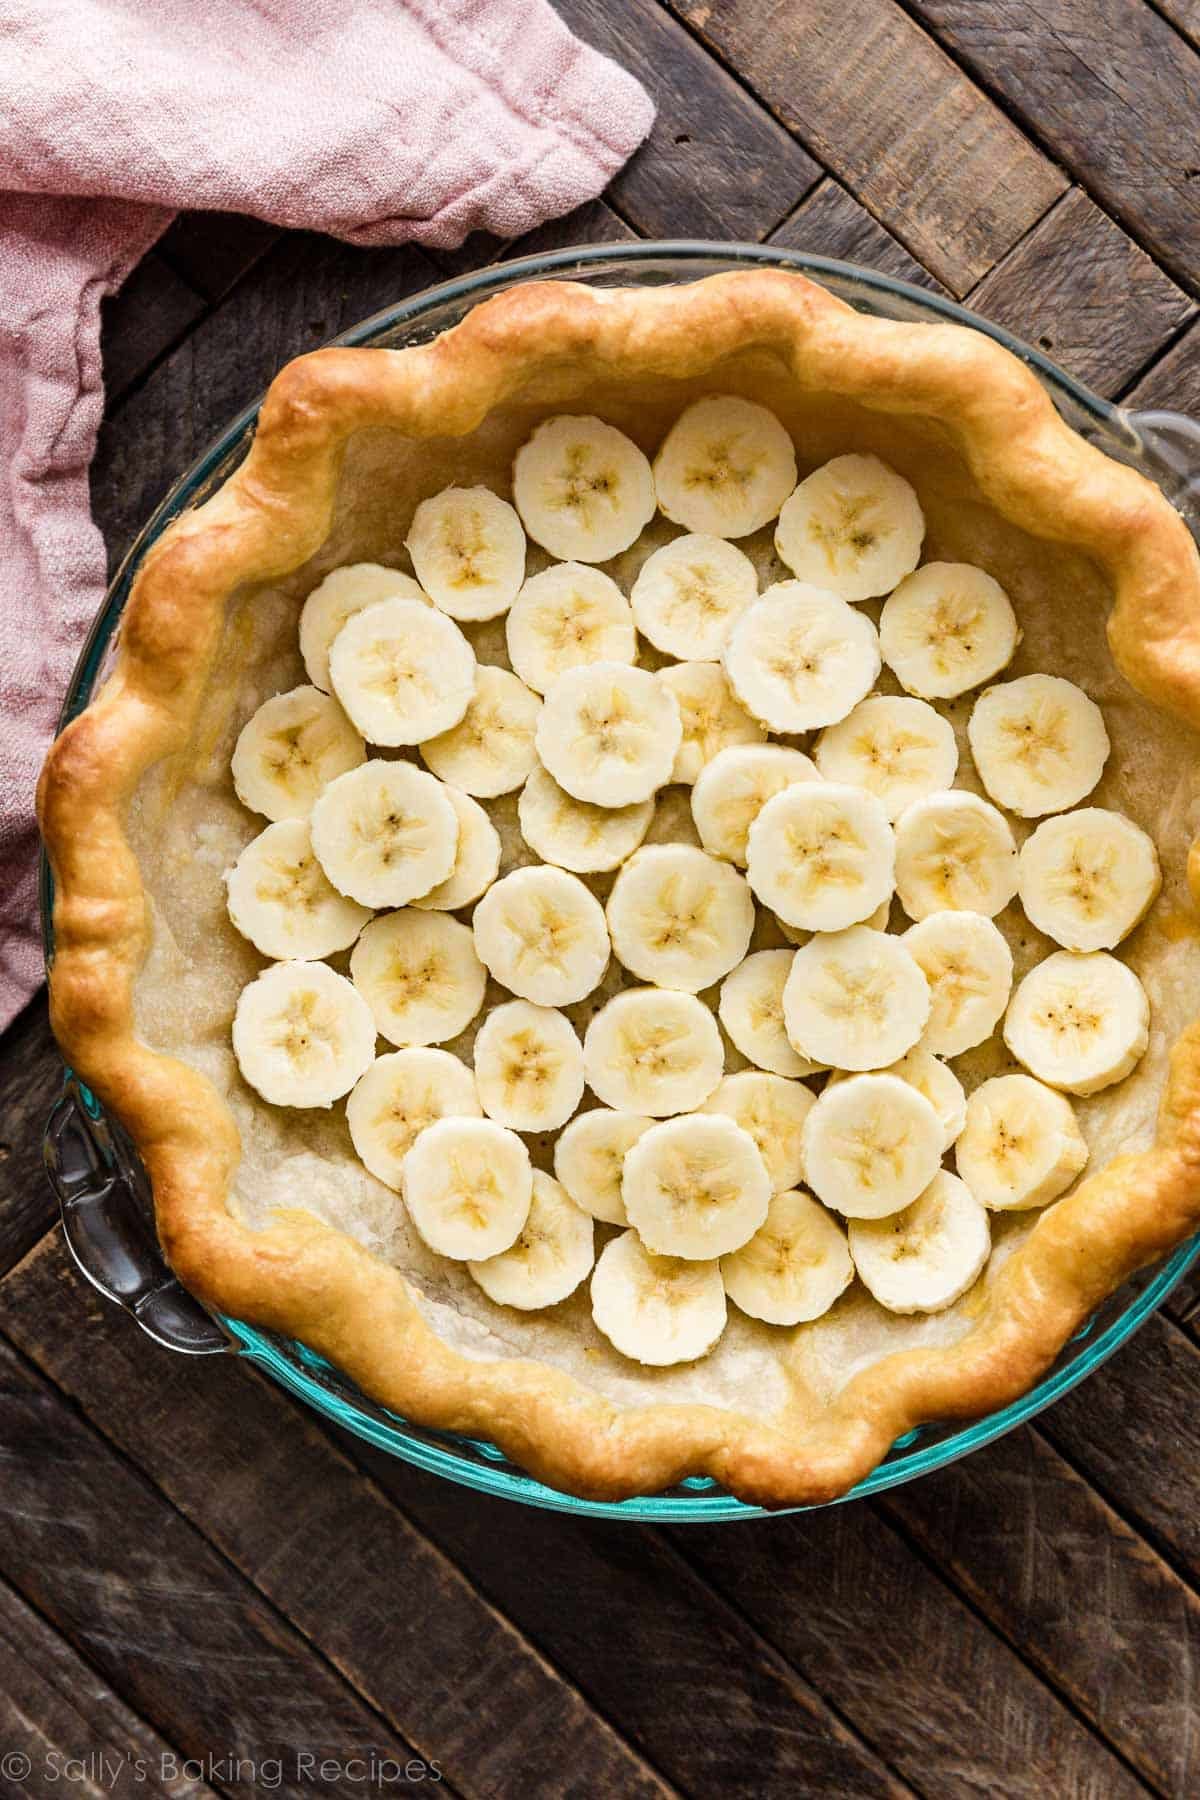
Layer in Your Banana Slices
Layer banana slices into your baked pie crust shell. Sometimes I add a sprinkle of cinnamon on top of the banana slices. This is definitely a unique addition to BCP, but wow!!! It tastes unbelievable. I didn’t add it to the pictured pie, but taste testers and readers who have tried it usually rave about it.
Success Tip: Don’t use overly ripe bananas because they can seep liquid and break your thick custard filling. Save your brown spotty bananas for banana bread or banana baked oatmeal, and use the yellow ones for banana cream pie.
I squeeze in as many banana slices as I can:
Homemade Custard Filling
I’m here to squash any fears that you may have about from-scratch custard. It’s actually pretty easy—if you know how to whisk, you can make it. If you’ve ever made coconut cream pie, mocha chocolate pudding pie, homemade dirt pudding, pumpkin pie in a jar, pastry cream, or even mille-feuille, the process will look familiar. You’ll need sugar, whole milk, heavy cream (also needed for the whipped cream topping), and egg yolks. For flavor, you’ll add vanilla and butter. For thickening, you’ll use cornstarch. (The egg yolks and cream help, too.)
The first step is to mix egg yolks and cornstarch together:
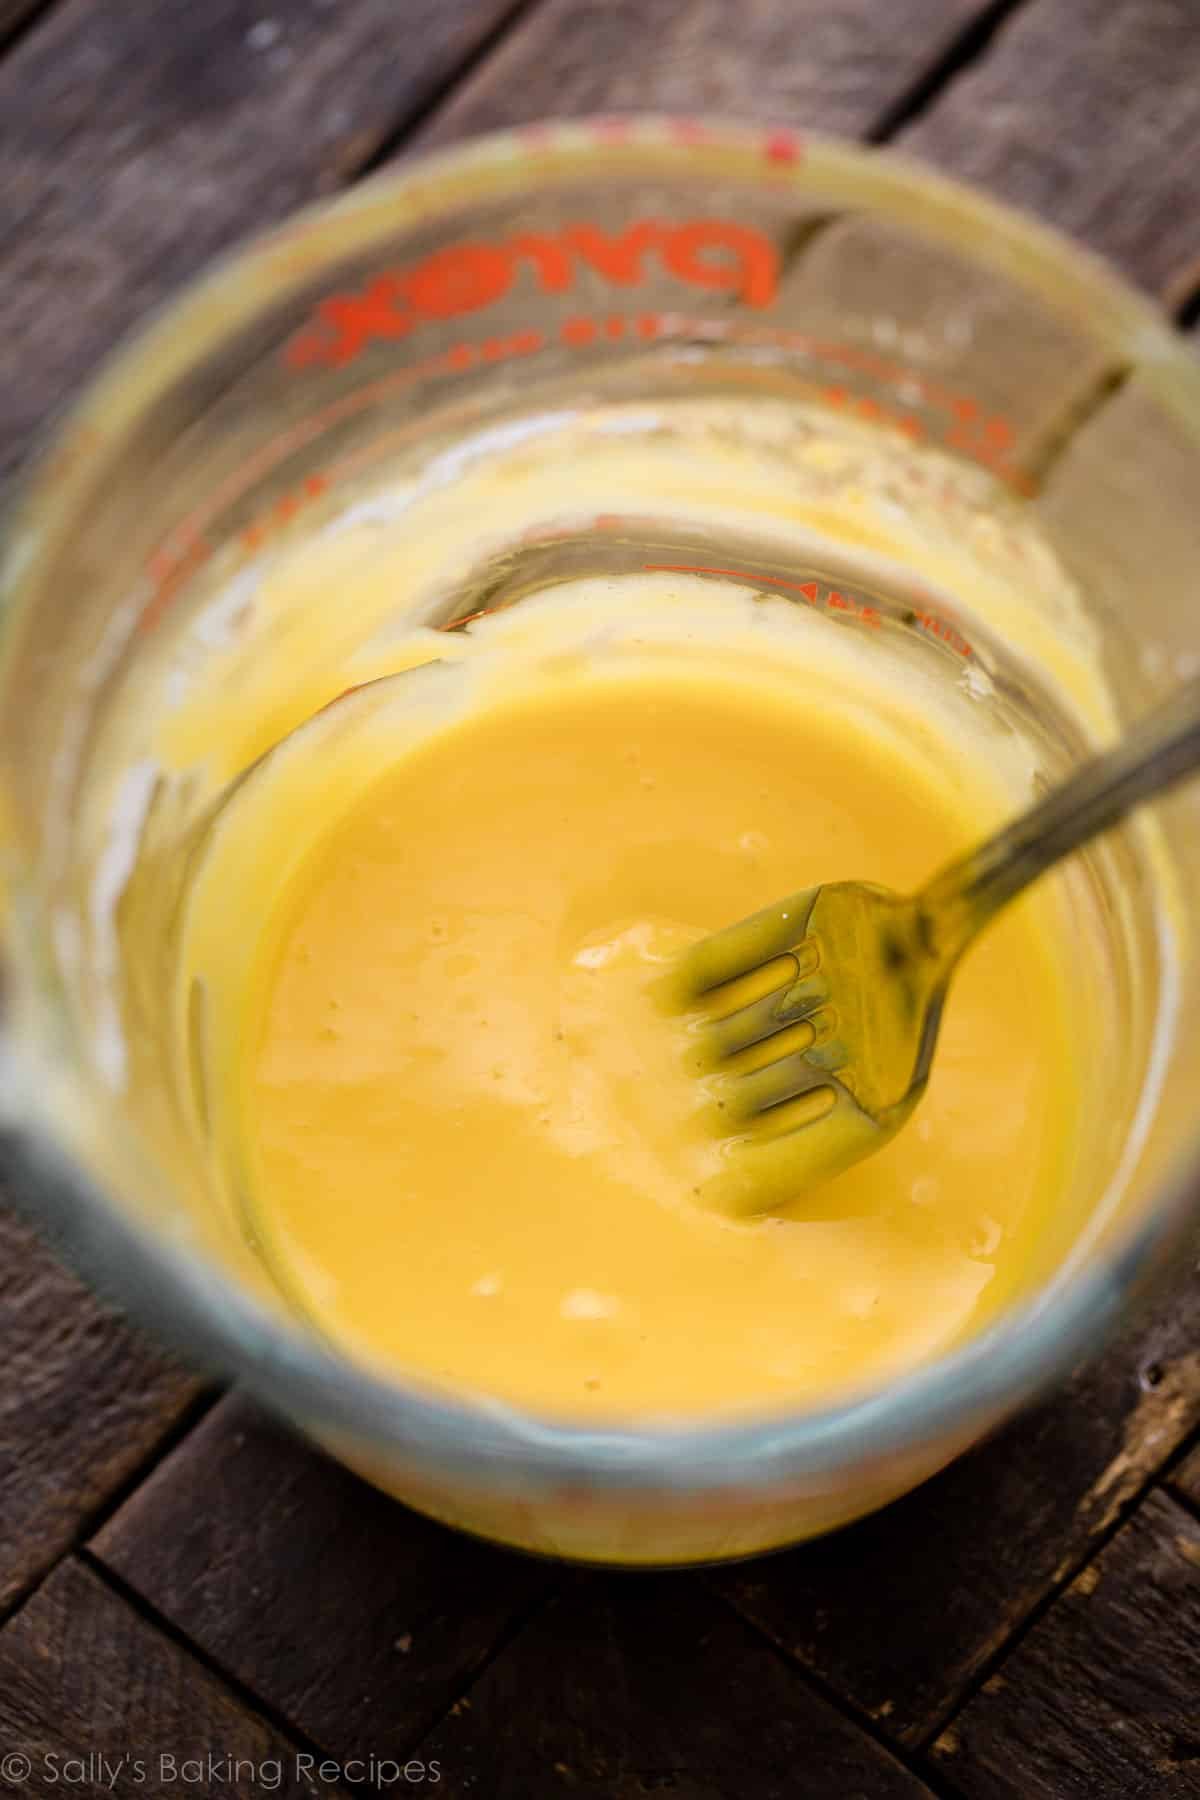
I usually do this with a fork in a liquid measuring cup, because we’ll eventually pour this into the cooking milk mixture.
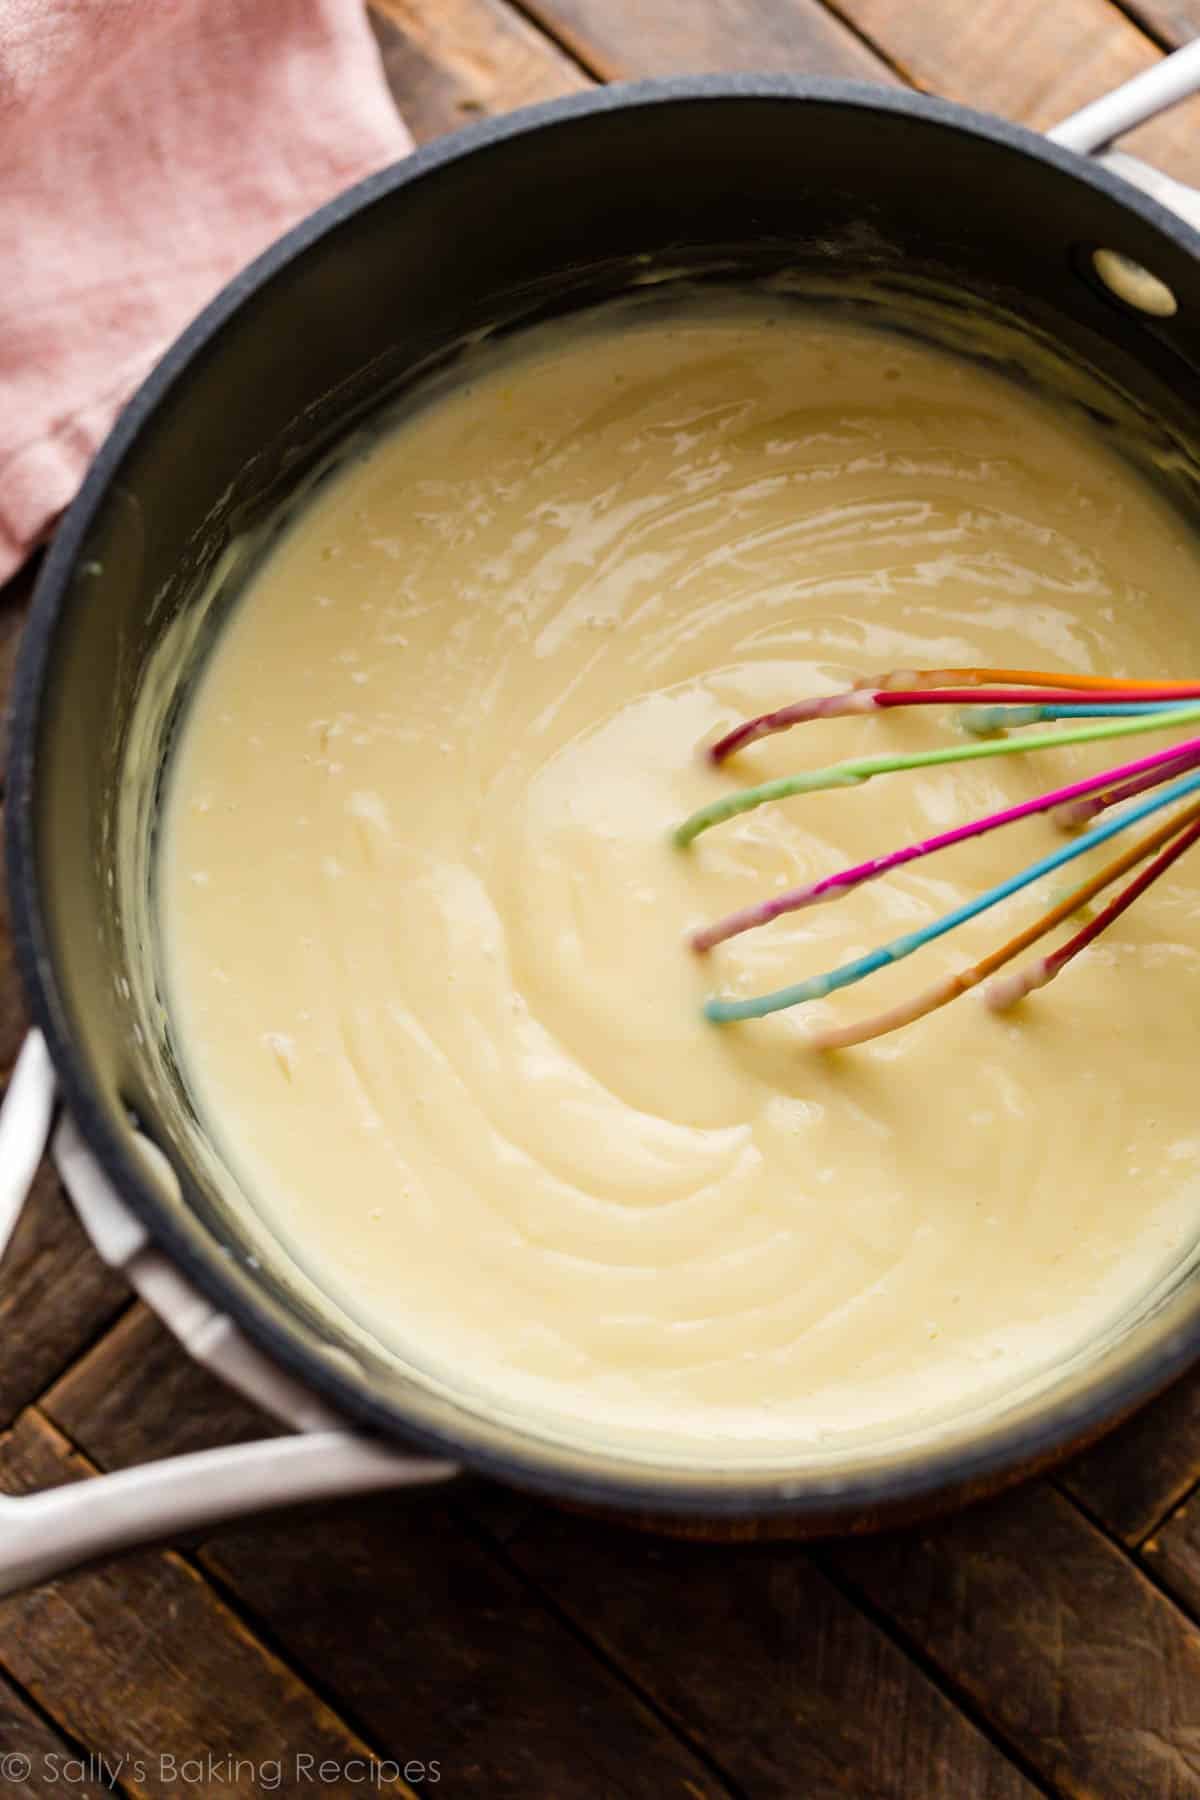
Heat whole milk, cream, sugar, and a little salt on the stove. Once the milk/cream/sugar is gently simmering, slowly stream and whisk a little of this milk mixture into the egg yolk/cornstarch mixture. This is called tempering. The slow and steady stream of warm milk is bringing the egg yolks’ temperature up without scrambling them.
Then stream and whisk the heated egg yolk mixture into the rest of the milk/cream/sugar on the stove. Cook on low, and let it begin to bubble, which happens pretty quickly. Whisk it while it pops and bubbles for just 1 minute. Remove from heat, then stir in the vanilla and butter, and allow to slightly cool.
The custard will be smooth, rich, and silky:
FAQ: Why Isn’t My Custard Smooth?
Do you notice little bits of egg yolks in your custard? You may not have tempered them slowly enough. Remember to *very slowly* stream and whisk some of the cooking milk mixture into the egg yolk/cornstarch mixture, and then *very slowly* stream and whisk it back into the pot. Whisk constantly.
If your best efforts still result in a few chunks, you can strain the finished warm custard through a fine mesh sieve. Or just leave it—you can’t really taste it.
How to Ensure Your Banana Cream Pie Sets
With 4 egg yolks, 4 Tablespoons of cornstarch, and some heavy cream, you can be certain this custard sets into a pretty sliceable texture. Be sure to whisk it on the stove often, and let it bubble and cook long enough for the heat to help bind the cornstarch to the fat. (1 minute is plenty.)
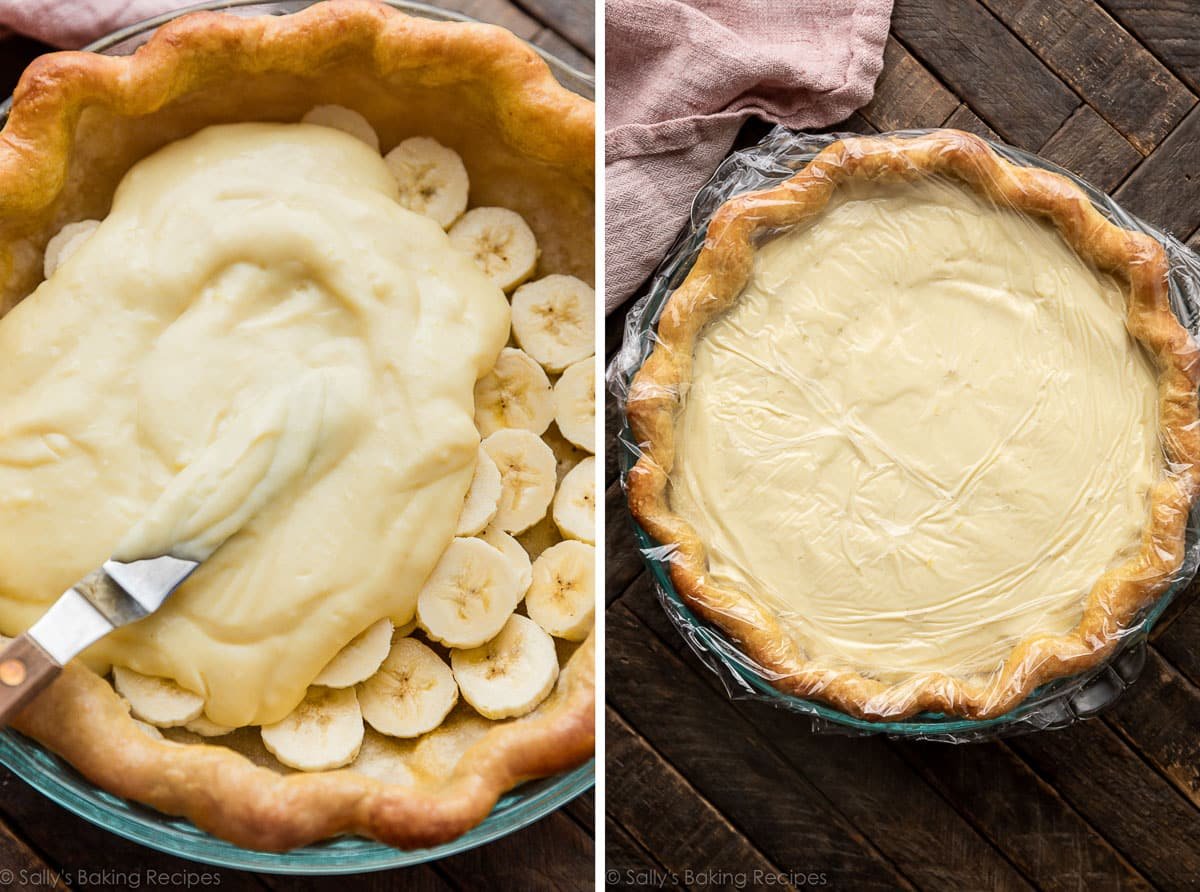
Spread the vanilla custard filling over the banana slices, cover with plastic wrap right on the surface to prevent a skin from forming, then refrigerate the pie for at least 4 hours and up to 1 day.
FAQ: Can I Make Banana Cream Pie in Advance?
This is a make-ahead dessert. You can make the pie dough in advance and bake the pie crust shell in advance. You can also refrigerate your assembled (but not garnished) banana cream pie for up to 1 day, with the plastic wrap right on top of the surface. And you can make the whipped cream topping in advance, but don’t add it until right before, or up to 1 hour before serving. So if you’re looking for Easter dessert recipes or hoping to make this pie for a special celebration, be sure to plan ahead.
You don’t want to decorate the pie with banana slices in advance because they’ll brown. (A brush of lemon juice can extend their freshness by a couple hours, but will affect their flavor.)
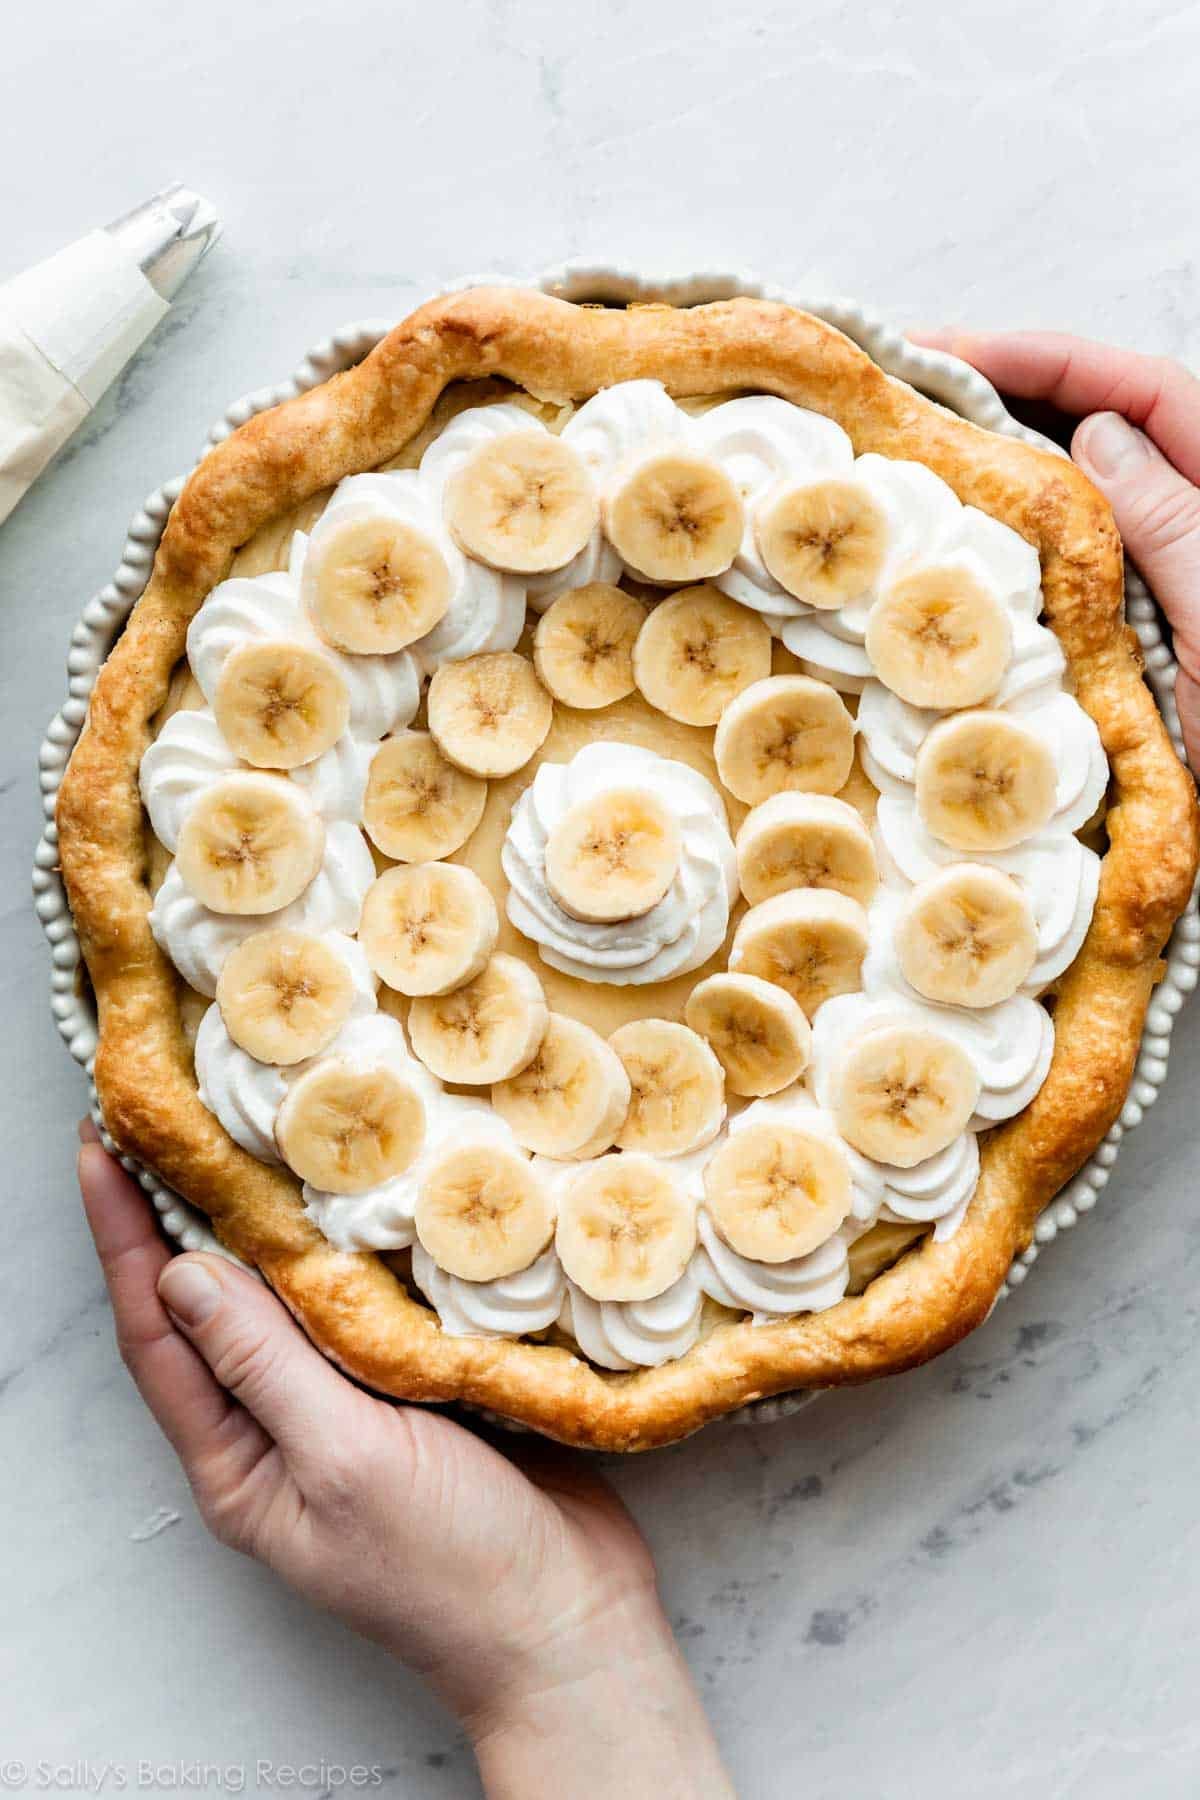
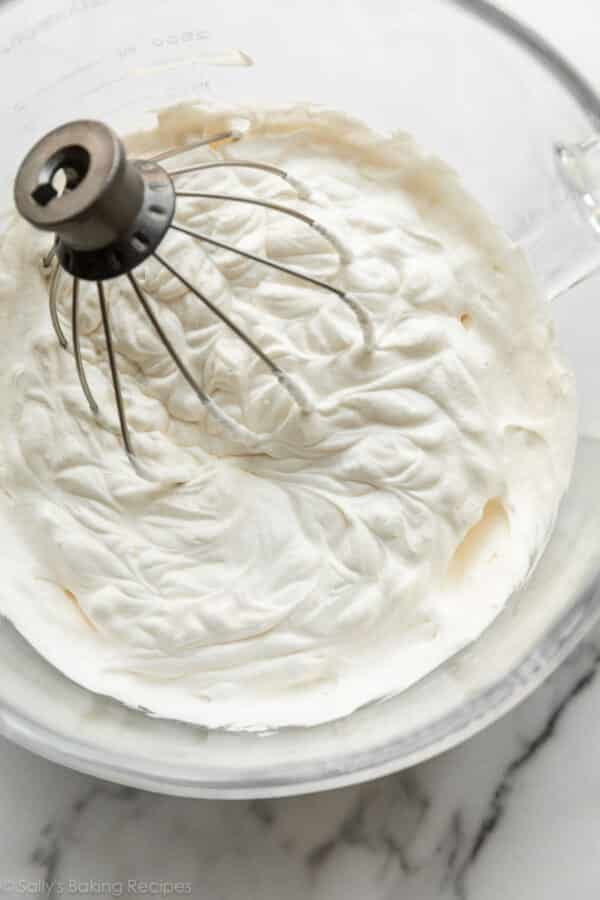
Right before, or up to 1 hour before, serving, top the pie with homemade whipped cream. You can decorate it any which way—a thick layer of whipped cream like this banoffee pie, or pretty piped dollops or swirls like the pictured pie. I use Wilton 1M piping tip to pipe it.
You could also use up your leftover egg whites and top it with this marshmallow meringue topping, and toast it with a kitchen torch!
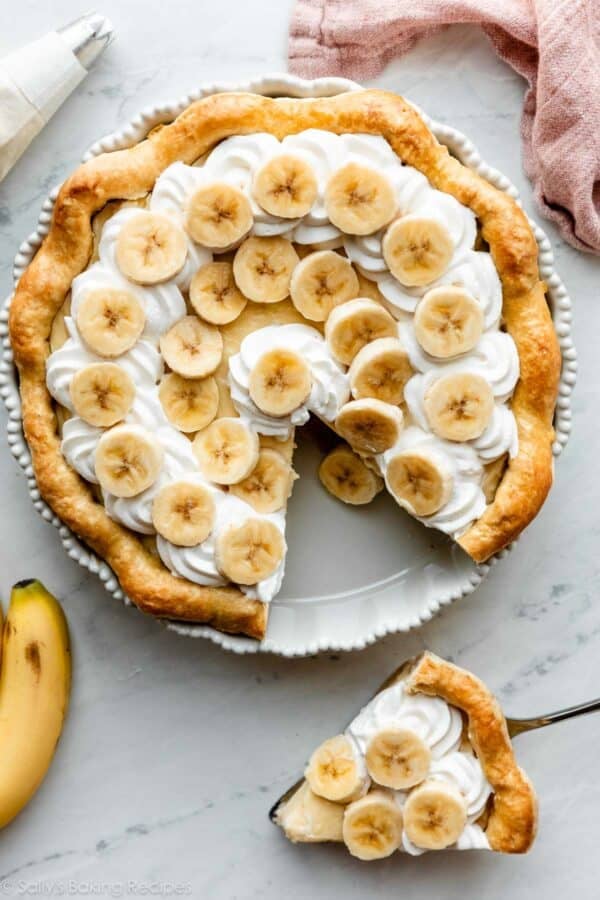
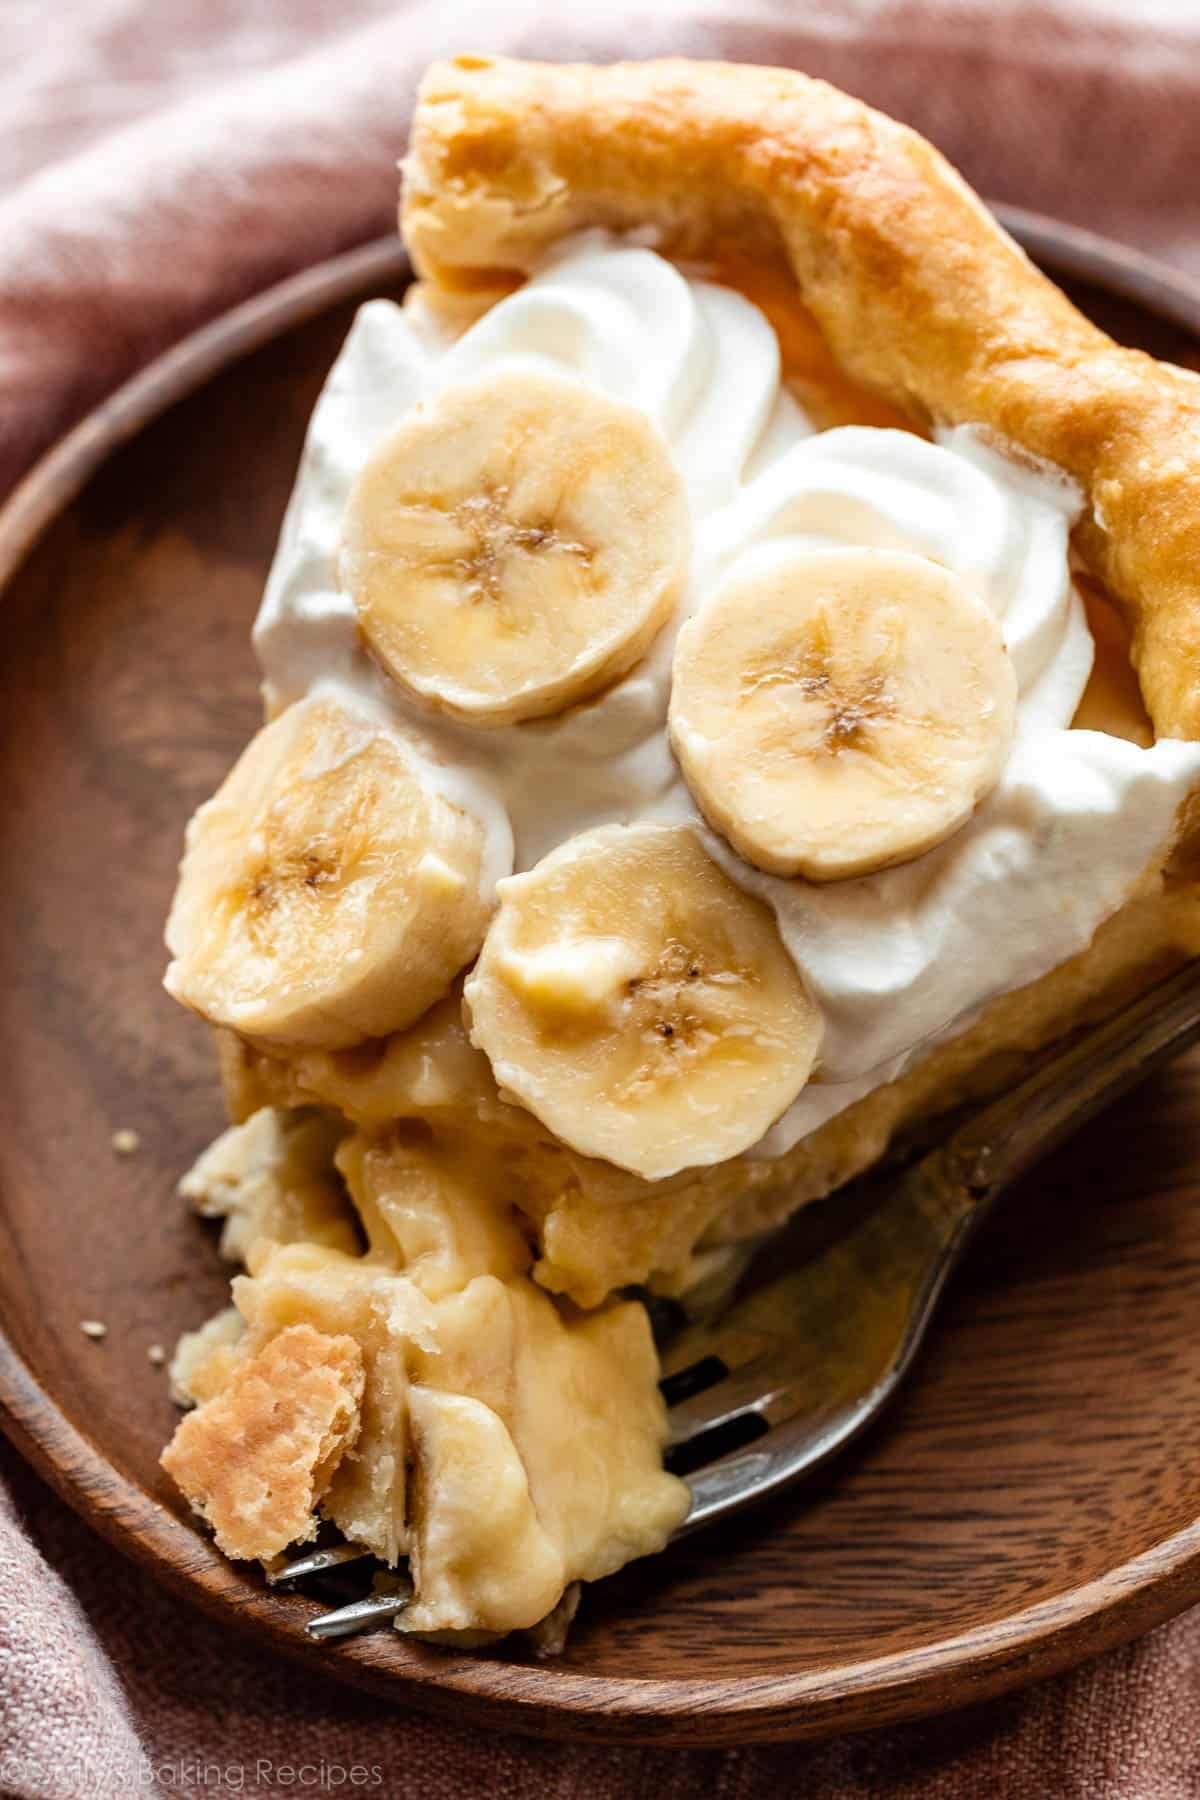
When ready to serve, add banana slices on top. I usually go heavy on the sliced banana garnish. I love texture in desserts, and banana cream pie doesn’t usually deliver on that front. But with lots of banana slices, we’ll get there.
Now savor every flaky, creamy, fluffy bite as it melts in your mouth, because you deserve to. You made this all from scratch!
Print
Homemade Banana Cream Pie
- Prep Time: 4 hours (includes crust)
- Cook Time: 30 minutes
- Total Time: 8 hours (includes chilling)
- Yield: 1 9-inch pie
- Category: Pie
- Method: Baking
- Cuisine: American
Description
Creamy and smooth from-scratch custard joins bananas, whipped cream, and a buttery flaky baked pie crust to make one epic banana cream pie. There are plenty of ways to make this banana cream pie recipe ahead of time. See various steps.
Ingredients
Crust
- 1 unbaked pie crust (what I used) or all butter pie crust*
- optional egg wash: 1 large egg white beaten with 1 Tablespoon milk
Custard Filling
- 4 large egg yolks
- 1/4 cup (30g) cornstarch
- 2 cups (480ml) whole milk
- 1/2 cup (120ml) heavy cream
- 1/2 cup (100g) granulated sugar
- 1/8 teaspoon salt
- 2 teaspoons pure vanilla extract
- 2 Tablespoons (28g) unsalted butter, softened to room temperature
- 4 yellow bananas (not super ripe yet)
- optional: sprinkle of ground cinnamon
Whipped Cream
- 1 cup (240ml) cold heavy cream
- 2 Tablespoons (15g) confectioners’ or granulated sugar
- 1/2 teaspoon pure vanilla extract
Instructions
- At least 2 hours ahead, make the pie dough: Make the pie crust through step 5 according to my directions and video tutorial in my pie crust recipe. Make pie dough in advance because it needs to chill in the refrigerator for at least 2 hours before rolling out (step 2). The recipe makes 2 crusts, and you only need 1 for this pie, so save the other for another pie.
- Roll out the chilled pie dough: On a floured work surface, roll out one of the discs of chilled dough. Turn the dough about a quarter turn after every few rolls until you have a circle 12 inches in diameter. Carefully place the dough into a 9-inch pie dish. Tuck it in with your fingers, making sure it is completely smooth. To make a lovely thick edge, I do not trim excess dough around the edges. Instead, fold the excess dough back over the edge and use your hands to mold the edge into a rim around the pie. Crimp the edges with a fork or use your fingers to flute the edges. (Review this how to crimp and flute pie crust page if you need extra help with this step.) If dough is too warm, fluting/crimping will be difficult, so you can always chill it in the refrigerator for 5–10 minutes first. After fluting/crimping the edges, chill the pie dough in the refrigerator for at least 30 minutes and up to 5 days. Cover the pie crust with plastic wrap if chilling for longer than 30 minutes. Chilling the shaped dough helps prevent the crust from shrinking.
- While the crust is chilling, preheat oven to 375°F (190°C).
- Blind bake the crust: Line the chilled pie crust with parchment paper. (Crunch up the parchment paper first so that you can easily shape it into the crust.) Fill with pie weights or dried beans. (Note that you will need at least 2 standard sets of pie weights to fit.) I like to push the weights up against the sides of the pie crust to help ensure the sides don’t shrink down. Bake until the edges of the crust are starting to brown, about 15–16 minutes. Remove pie from the oven and carefully lift the parchment paper (with the weights) out of the pie. Prick holes all over the bottom crust with a fork. If desired for a shiny golden crust, brush egg wash on edges. Return pie crust to the oven and bake for 14–15 minutes, or until bottom has browned. Remove from the oven, and cool on a wire rack completely before filling. You can blind bake the crust up to 3 days ahead of time. Cover cooled crust tightly and refrigerate until ready to fill. (Review this how to par-bake pie crust page if you need extra help with this blind-baking step.)
- Make the custard filling: Whisk the egg yolks and cornstarch together. (A fork works nicely for this, or a small whisk.) Set aside. Combine the milk, heavy cream, sugar, and salt in a medium saucepan over medium heat. Whisk until all the sugar has dissolved, then bring to a gentle simmer, whisking occasionally. Once simmering, remove about 1/2 cup (120ml) of the milk mixture and, in a slow and steady stream, whisk into the egg yolk and cornstarch mixture. Keep those egg yolks moving so they don’t scramble. In a slow and steady stream, pour and whisk the egg yolk mixture into the pot. The pudding will immediately begin to bubble and thicken. Stand back and use caution as the bubbles may burst. Cook for 1 full minute, whisking constantly.
- Remove the pan from heat and whisk in the vanilla and butter. You will have about 3 cups of filling. If you notice a lot of little chunks of egg yolk, they may not have been tempered properly. To fix, you can run the warm custard through a fine mesh sieve.
- Place a piece of plastic wrap directly on top of the warm pudding to prevent a skin from forming on top. Allow to cool for 15 minutes. I do not recommend any longer than this, as it will be too thick to spread neatly into the crust.
- Slice 2–3 bananas and arrange slices into the cooled pie shell. Sprinkle with cinnamon, if desired. Spread custard on top (it’s ok if it is still slightly warm). An offset spatula is helpful for spreading. Place a piece of plastic wrap directly on top of the custard; again, to prevent a skin from forming. Refrigerate for at least 4 hours and up to 1 day.
- When ready to serve, or up to 1 hour before serving, make the whipped cream: Using a handheld or stand mixer fitted with a whisk attachment, whip the heavy cream, sugar, and vanilla extract on medium-high speed until medium peaks form, about 3–4 minutes. Medium peaks are between soft/loose peaks and stiff peaks and are the perfect consistency for topping and piping on desserts.
- Pipe or spread the whipped cream on top. (I use Wilton 1M tip.) Slice remaining banana and garnish with banana slices and serve pie immediately, or refrigerate for up to 1 hour and then garnish with banana slices and serve. (Best to garnish with banana slices immediately before serving, but whipped cream can go on the pie up to 1 hour in advance.)
- Slice and serve. Cover leftovers and store in the refrigerator for up to 5 days.
Notes
- Make Ahead & Freezing Instructions: The pie dough can be prepared ahead of time and stored in the refrigerator for up to 5 days or in the freezer for up to 3 months. There are plenty of ways to make this recipe ahead of time. See end of step 2, end of step 8, and step 10. This is not the best pie to freeze; the filling’s texture is never quite the same. However, if you have leftover slices and aren’t concerned as much about taste and appearance, you can freeze leftover pie for up to 3 months. Thaw in the refrigerator.
- Special Tools (affiliate links): Rolling Pin | 9-inch Pie Dish | Pie Weights | Pastry Brush | Egg Separator | Whisk | Offset Spatula | Electric Mixer (Handheld or Stand Mixer) | Piping Bag (Disposable or Reusable) and Wilton 1M Piping Tip if piping
- Pie Crust: Both linked pie crust recipes make 2 crusts. You only need 1 crust for this pie, so freeze the 2nd half for another use.
- Crumb Crust Alternative: To cut back on time, try using a graham cracker crust. Make sure you bake it for 10 minutes at 350°F (177°C), then let it cool completely before filling. Or you can use the crust recipe and baking instructions for the peanut butter cookie crust used in this peanut butter banana cream pie.
- Whole Milk & Heavy Cream: These are imperative for the custard to set properly. I do not recommend any substitutions.
- Prevent Bananas From Browning: Feel free to very, very lightly spritz or brush banana slices with lemon juice prior to arranging in pie crust shell, and prior to using as garnish. They will eventually brown, so it’s best to assemble the pie up to 1 day in advance (step 8), and garnish with banana slices right before serving (step 10).
- Update in 2023: Recipe used to call for 1 and 3/4 cups whole milk and 1 and 1/2 teaspoons vanilla extract. For a slightly smoother, more flavorful custard, I now use 2 cups whole milk and 2 teaspoons vanilla, as you can now see in the recipe.


Reader Comments and Reviews
This pie is EPIC. People were licking their plates. I put out a bowl of shaved almonds with it as an optional topping and I LOVED that addition. Thank you for this not-too-sweet (my biggest fear with bananas) gem!
This was really good. I would make the pudding by itself. If I were to substitute chocolate milk for the milk in the pudding, would that work?
Hi Cierra, For chocolate pudding I recommend using the recipe in this Chocolate Pudding Pie.
The filling worked great and was delicious!
Hi Sally! First off I absolutely LOVE all your recipes, but I struggled with this one. It’s not the recipes fault, I just made some silly mistakes. I made this recipe over the the 4th of July weekend and I made several mistakes that I was hoping you could help me with. This was my first time making pudding from scratch so going in I was afraid of curdling the pudding and scrambling the eggs when I added them to the cream mixture. I had everything prepped ahead of time before I started so that when I started tempering, everything would be ready to go. However I for sure scrambled some eggs in the process and overcooked the cream mixture. Here are my questions.
1.) When I was whisking the eggs and cornstarch and then adding the 1 cup of cream to the eggs to temper it, is it okay that the cream mixture is sitting on the stove simmering. I felt like mine was bubbling quite a bit and I was afraid I was overcooking it. I had the stove at medium is that too high? I felt like I curdled the milk, but don’t know how to prevent that.
2.) I definitely scrambled a few of my eggs even though I slowly added the cream to the egg mixture while whisking and then slowing added the eggs backs to the cream mixture. How can I fix this for the future? If this happens again where I scramble eggs, is there a way to fix it? I saw on one tv show that they use a sieve to pour the pudding into the pie crust so that way it catches any scrambled eggs. Is that effective or would you recommend that?
3.) Lastly I followed your recipe and made a pie dough crust, but if I wanted to do a Nilla wafer crust could I use your graham cracker recipe, but sub Nilla wafers? If so, would you recommend keeping the same amount of butter and sugar to mix with the Nilla wafers?
Thanks so much for answering all my questions, I know this was a long post! If possible I would love for you to make a sprinkled episode over this recipe so I can visually see how to do everything 🙂
Thanks again! You are my all time favorite baker and go to for recipes 🙂
Hi Brooke! Thank you so much for trusting and baking my recipes! I’m happy to help troubleshoot with this one. 1) If you find the milk mixture on the stove is bubbling pretty rapidly as you work on the egg yolks/cornstarch, turn down the stove or turn it off. This will help prevent it from over-cooking. Then, turn it back on as you temper in the yolks. 2) Try to add more of the warm milk mixture to the egg yolks before slowly pouring them into the pot of milk mixture. Constantly whisk to help prevent any curdling. You want to slowly raise the yolks’ temperature without scrambling them. If some do end up scrambled/over-cooked, a sieve definitely helps. 3) A vanilla wafer cookie crust would be great, but the slices will be a bit messy– just a warning! You can use the graham cracker crust recipe and swap in the vanilla wafers. Hope all of this is helpful for next time!
I followed the instructions exactly and it turned out perfect! I had never made a pie crust from scratch. The custard was amazing! Definitely a keeper!
Speaking purely from the perspective of someone who never bakes pies, this was a huge success from beginning to end. The pie crust was perfectly flaky and delicious. Side note: I made this crust on an 85-degree day. The vanilla custard was the perfect texture and tasted amazing. I’m so happy with how this pie came out. Thank you so, so much for sharing this recipe. I get a major craving for banana pudding/cream pie several times a year and I can see myself using your recipe for years to come!
I’ve made this recipe several times and it always comes out great!!
This time though, I accidentally purchased salted instead of unsalted butter. Can I use the salted butter and just omit the 1/8 tsp salt for the filling?
Yes, that should work!
I was nervous about homemade pudding. I may have been streaming in my egg mixture a little too slow, it was bubbling and thickening fast and almost curdling it seemed. I took it off the heat and added the butter and vanilla and stirred. It tasted delicious, but didn’t get super smooth looking just wasn’t sure if It’s thicker than it’s supposed to be. It’s in the fridge now can’t wait to try it tomorrow bcp is my husband’s favorite!
So good! I added some almonds and toasted coconut on top and Wow this is the first time I have enjoyed banana cream pie. The pudding is a little tricky, but I found a neat trick. The first time I took it off the burner too early because I was nervous about it becoming eggy. I put it back on after cooling and boiled it and it turned out great. So if it seems runny after it has cooled it can still be saved. Good luck everyone, what a fun recipe. It feels good to make a homemade pudding that turns out good.
This is a great easy recipe. I’ve made many pies before but neber added the cornstarch to the yolk before! I like that method. It turned out great. I used my own crust recipe but yours is good too!
Now I know you said not to add or change the custard but I wanted a bit more banana flavor so I thawed two frozen ripe bananas and squeezed the juice out of them!! Pure banana essence! I added to my custard just after I whisked the yolk mixture back in! It was awesome! And it still set properly. Thanks Sally!!
I’ve made this recipe a few times during quarantine so far except with a biscoff cookie crust. Can’t believe how easy it is to make. Everyone that I’ve done a drop off to has been amazed. Thank you.
Such an easy and delicious recipe! I used the Graham cracker crust version just to make it that much easier on myself.
I will definitely be making this again!
A few years ago I tried to make a pie like this, and the pudding was way too thin, even after chilling the pie it stayed liquid. I plan on making it again using this recipe, anything I can do to be sure it solidifies correctly?
Hi Andrew, I hope you try this recipe! Make sure the pudding thickens on the stove before removing from heat. Make no substitutions in the filling. Big bubbles will burst on top when it’s ready to come off heat. Enjoy!
Hey! I just made this banana cream pie, and it is PHENOMENAL! I made one of your quiches before, so I used the second pie crust in this bake. I had a great time making it, and I’ve never made a pie before, let alone a banana cream pie! Everything went perfectly, thank you so much! I can’t believe I was able to make such a huge dessert as an inexperienced baker, but I truly appreciate your influence and will definitely be using more of your recipes!
I’m not sure what went wrong but I followed the recipe exactly and the custard was like liquid and did not hold when cut into. It was a bit like a pie soup. The taste was delicious but it’s too bad the custard didn’t. After so much effort in following all the steps, and all the time cooling, this was disappointing for my sons birthday.
Hi Sue, thanks so much for the feedback. If the filling is too runny, I fear the stovetop pudding wasn’t thick enough. Did you make any substitutions by chance? Even the smallest? Was it completely cooled and chilled? Make sure it thickens on the stove before removing from heat. Big bubbles will burst on top when it’s ready to come off heat. I actually just made this pudding again for another recipe I’m testing and it thickens each time. So sorry you were disappointed.
I had the same thing happen! I have banana cream soup instead of banana cream pie, even after chilling in the fridge for 9 hours. All liquid with brown banana slices. I did use Half & Half instead of whole milk, but that was the only substitution. So disappointed!
Holy moly. I have made this twice now in the last month because it is THAT good! Not too sweet. Just right. I have shared with neighbors and friends who have all sung it’s praise. I did use a different pie crust: all butter with a little salt, and I love the sweet pie/salty crust combination.
If you are wondering if you should make this recipe the answer is a very easy: Absolutely!!
Thanks for sharing
The pudding was good but the thing I didn’t like was the bananas on the bottom. They turned brown and were bland (I did sprinkle with cinnamon). I think if they had been folded into the pudding before putting in the crust it would have been outstanding.
Hello Sally! I was just wondering if you could tell me if I could easily double this recipe to have it fit into a 12″ pan! I’m really looking forward to trying this.
Thanks in advance
Hi Rees, I recommend sticking with this recipe in a 9-inch pie dish. Doubling for a 12-inch would be too much, though you could try 1.5x the recipe for that size. My cake pan sizes & conversions post should help here if you are interested.
made this for my wife today(4th anniversary). I tasted the custard(chef prerogative) before cleaning the spatula… yummy. Sitting in the fridge chilling for dessert tonight… so far everything looks just perfect. I premade my own whip topping. But I everything else was your recipe. Thanks again.
My husband is the MOST PICKY of eaters and loved this pie, even though it didn’t come out right. I did something wrong…the pudding never got firm; it’s still a pudding. Can you give me suggestions as I want to do it again…and do your lemon meringue and don’t want to make the same mistake. I let it boil until big bubbles like you said.
The recipe is fine but… When i put the crust back in for 5 minutes and went to check to take it out it poofed up in one place, there was a large bubble!! T_T
[Normally I don’t get too upset if I’m the one who made a mistake, but in this case it wasn’t me, I followed the recipe and it still poofed up.. ]
This came out wonderful! It wasn’t hard to make and it was very tasty. Thank you Sally
This is the best banana pie I’ve ever made. Not too sweet, and the cinnamon added the right touch. The texture was perfect, not the sloppy mess that I usually get. My husband and boys LOVED it!! I’m saving this recipe and will certainly be making it again! Thank you!!
My hubby has 2 favorite pies, banana cream and coconut cream. So today, I decided to make your banana cream for him. I have a pretty deep pie dish, so I did 1 1/2 times the recipe and poured in enough pudding to cover the bottom row of bananas, then added more bananas, more pudding, and of course lots of whipped cream. It was simply amazing!!! I wish there was a way to add a picture, because it also looked beautiful. Simply put, this was our dinner tonight.
This recipe is the absolute most amazing. So happy I had an extra bunch of bananas laying around and stumbled upon this recipe. Luscious, well balanced, rich and perfect. I did use the Graham cracker crust and absolutely prefer it to the regular pie crust for this. It adds a great crunch and flavor contrast. Also, the cinnamon is not to be missed, and I did add almond extract to the whip which is A MUST.
lastly, my own personal touch, add a sprinkle of salt to every banana layer to make the flavors pop. This is my go to recipe blog and this has got to be in my top three greatest hits. Love it. Thank you sally!!
Delicious! I topped mine with a chocolate ganache glaze and put sliced banana on the glaze before it set. Heat 1/2 cup cream to boiling. Remove from heat. Add 2/3 cup semisweet morsels and stir until melted. Let cool about 5 minutes before spreading on pie.
Hi there! Well I just finished up with the Banana Cream Pie. After plastic wrap it goes in the fridge. The only thing different that I did was to use a pecan nut crust that we came across at shopping. It sounded too good to pass up. So I haven’t had a chance to try the pie yet. But I have a feeling it will be fantastic! Because there was a bit of the pudding left and some bananas. So I just had to try a little by taking a bit of banana and dipping it in the pudding, and it’s a good thing I didn’t do that earlier. Or there would have been no pie! Really yummy!
A little tip I learned from my grandma: when blind baking a crust, turn your metal pie plate upside down and fit the crust onto the BOTTOM of the pie plate. Bake UPSIDE DOWN. Then flip it over onto another pie plate. comes out perfectly!
I was told it was the best banana cream pie people had ever tried during xmas-eve. So good. Thank you for sharing.
Make one (or 4) of these for my family every holiday…or by request!
It’s always fantastic!
For the folks who don’t like banana I substitute other fruit.
I also use Sally’s Graham Cracker crust if I don’t feel like making pastry…
Thanks Sally for the recipe!!
I don’t normally leave reviews but I made this banana cream pie yesterday for a friend and all I have to say is wow. This is by far THE BEST banana cream pie I’ve ever had. I’ll have to admit I love baking but I always hate making pies since I have a tendency to over work the dough for the crust and it always shrinks in the oven when I blind bake. I followed your crust recipe using your tricks for using shortening in the dough and used your strip technique for the edge of the crust along with chilling for at least two hours before rolling and it was the best crust I’ve ever made (albeit not as beautiful as yours but I’ll take it). I have some left over that I can’t wait to make another pie with. I NEVER thought I’d say that. I really appreciate the detail you go into for your recipes. It really helps us novice bakers learn what went wrong and how to actually troubleshoot it next time, instead of avoiding it altogether.
On to the custard. Now I’ve made some pretty delicious custards before, but this was hands down the creamiest and richest one I have made. I’m guessing due to the extra egg you added. Not to mention the sprinkle of cinnamon on the bananas. It was a pleasant surprise that I would have never thought to put in a banana cream pie. I will definitely be adding this to my recipes to use from now on (the custard and crust recipe). I have routinely used your chocolate cupcake recipe for the base of my many creations along with your easy salted caramel. Please keep making delicious treats!