

It’s surprisingly easy to make homemade cheese bread. This soft buttery yeasted bread is twisted up with cheddar cheese, but you can use any cheese variety you love. Bake the bread in a loaf pan, then slice it to reveal the 2 cups of swirled cheese inside. For a sweet version, try our cinnamon crunch bread.
This recipe is brought to you in partnership with Red Star Yeast.

The inspiration behind this recipe comes from a local bakery, where I’ve picked up DOZENS of cheese bread loaves. Each of us love it, my almost 2 year old being the biggest fan. ♥
Cheese and bread. It’s obviously the greatest loaf of all time.
So I decided to make it myself. Brace yourself for impact!
What is Cheese Bread?
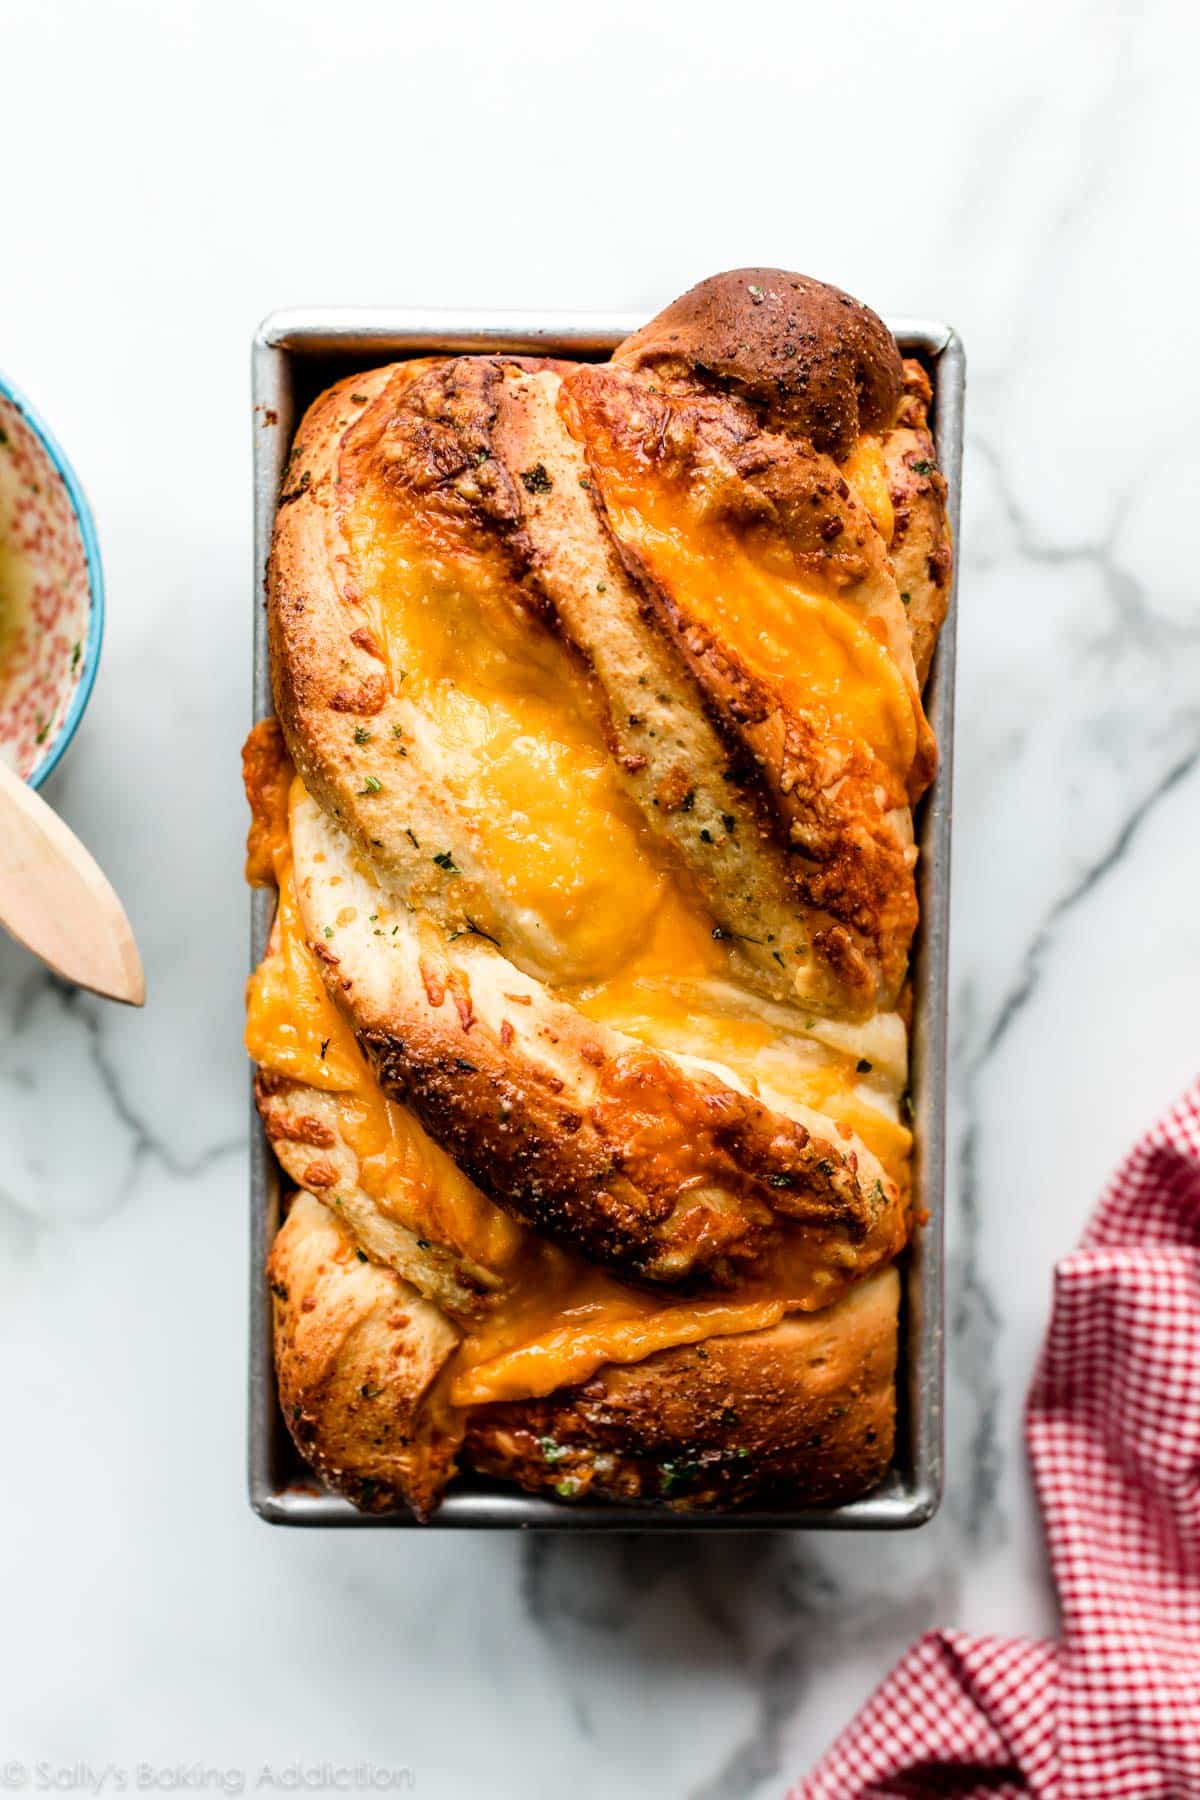
Let’s back up. This cheese bread is homemade bread swirled with real cheese. It’s a simple yeasted dough that I adapted from my sweeter homemade homemade cinnamon swirl bread and my basic sandwich bread. Each slice is extra soft with a chewy crust and ribbons of melted cheese throughout. For extra flavor, brush the top of the unbaked bread with garlic herb butter. The cheese on top crisps up, while the garlic butter infuses down into the bread.
I have 3 loaves in the freezer right now. Things would become dangerous if there wasn’t a constant stash of cheese bread in our house.
Video Tutorial: Cheese Bread
Let’s walk through each step.
Ingredients in Cheese Bread
- Buttermilk: Liquid activates the yeast. For soft, flavorful, and chewy cheese bread, use a combination of buttermilk and water. Nondairy, whole, or low fat milks work too, but buttermilk produces phenomenal flavor and texture.
- Water: Although you could use all milk as the liquid in this dough, I preferred a mix of water and buttermilk. All milk made this taste more like an overly soft dessert bread.
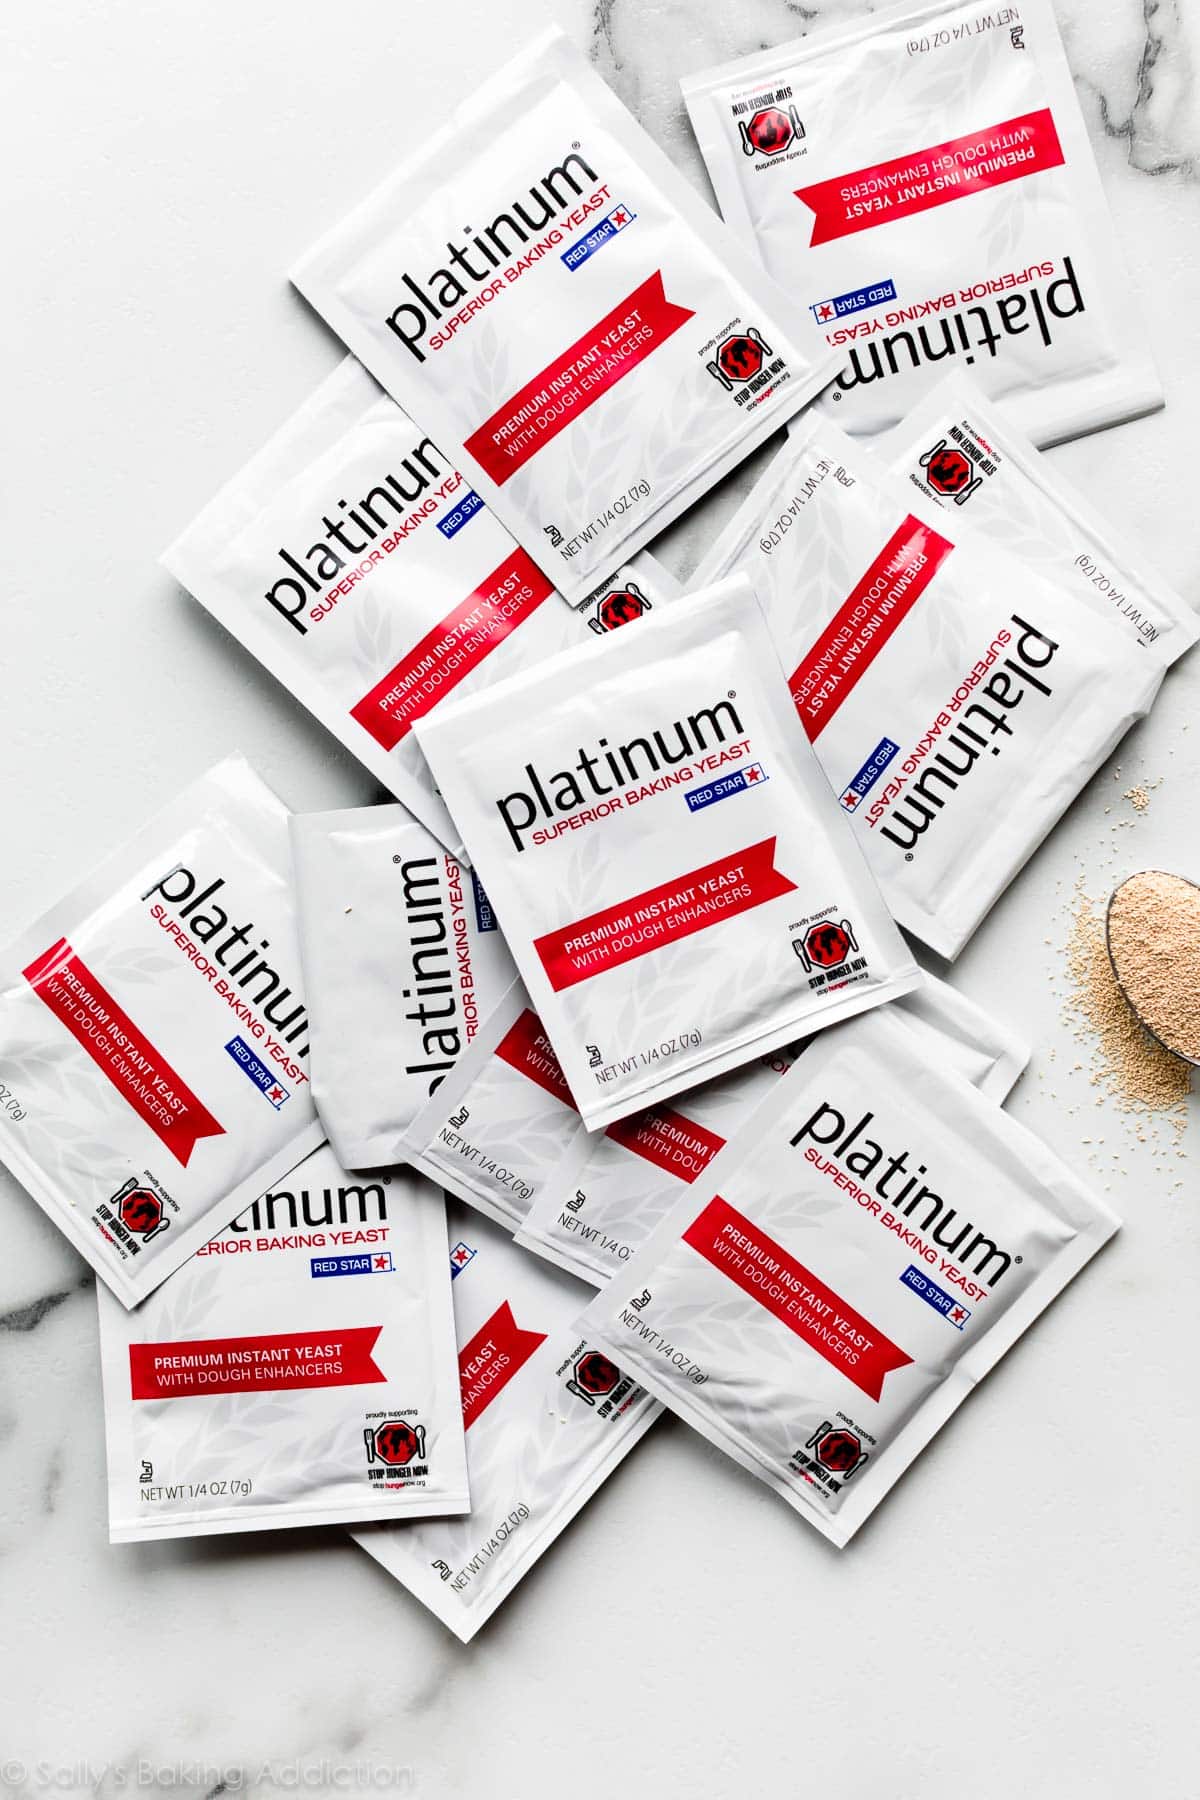
- Yeast: You can use active dry yeast or instant yeast. If using active dry yeast, the rise times will be a little longer. I recommend Platinum Yeast from Red Star, which is an instant yeast that is blended with natural dough improvers.
- Sugar: Sugar feeds the yeast, increases its activity, and tenderizes the dough.
- Melted Butter: Butter promises a soft and flavorful bread. Use melted butter. I found that room temperature butter produced a cakey-er and less flavorful end product.
- Egg: 1 egg provides structure and flavor.
- Salt: Bread would be seriously lacking flavor without salt!
- Garlic Powder: Garlic powder adds incredible flavor to the dough AND to the topping. If using fresh garlic, use 1 finely minced clove in the dough and 1 teaspoon minced garlic in the topping.
- Bread Flour: Higher protein flour like bread flour is best for this bread recipe because of its strong gluten formation and high rise. All-purpose flour will yield a flimsy bread.
- Cheddar Cheese: I recommend cheddar cheese, but you can use another harder cheese such as pepper jack, gouda, or colby cheese. Avoid very soft cheeses. For best taste and texture, shred the cheese off the block yourself with a cheese grater.
Did You Know?
The crustier and chewier the bread, the less fat in the dough—aka a lean dough. Chewy focaccia and my artisan bread are made from lean dough. The softer and richer the bread, the more fat in the dough—aka a rich dough. Monkey bread and cinnamon rolls are made from rich dough. This homemade cheese bread is somewhere in between. It’s chewy, super soft in the center, and a little crisp on top.
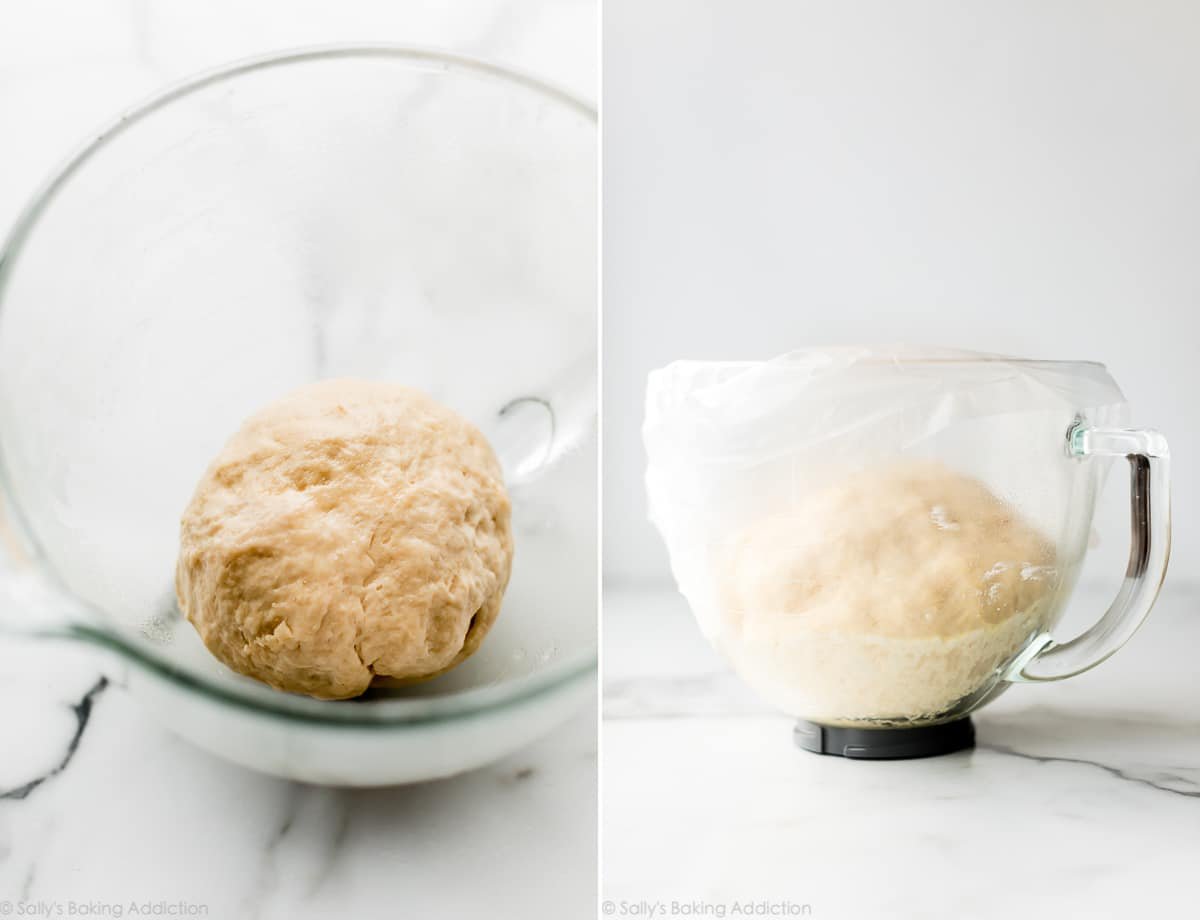
Make and knead the dough, referencing my How to Knead Dough video tutorial if necessary. After the dough comes together, let it rise for about 1 and 1/2 – 2 hours. After that, punch it down and begin assembling the cheese bread.
Baking with Yeast Guide
Reference this Baking with Yeast Guide whenever you work with baker’s yeast. I include practical answers to all of your common yeast questions.
How to Shape & Assemble Cheese Bread
Remember Nutella babka and cinnamon crunch bread? We’re doing the same thing here. Pictures and explanations can only do so much, so make sure you watch the video tutorial above before assembling.
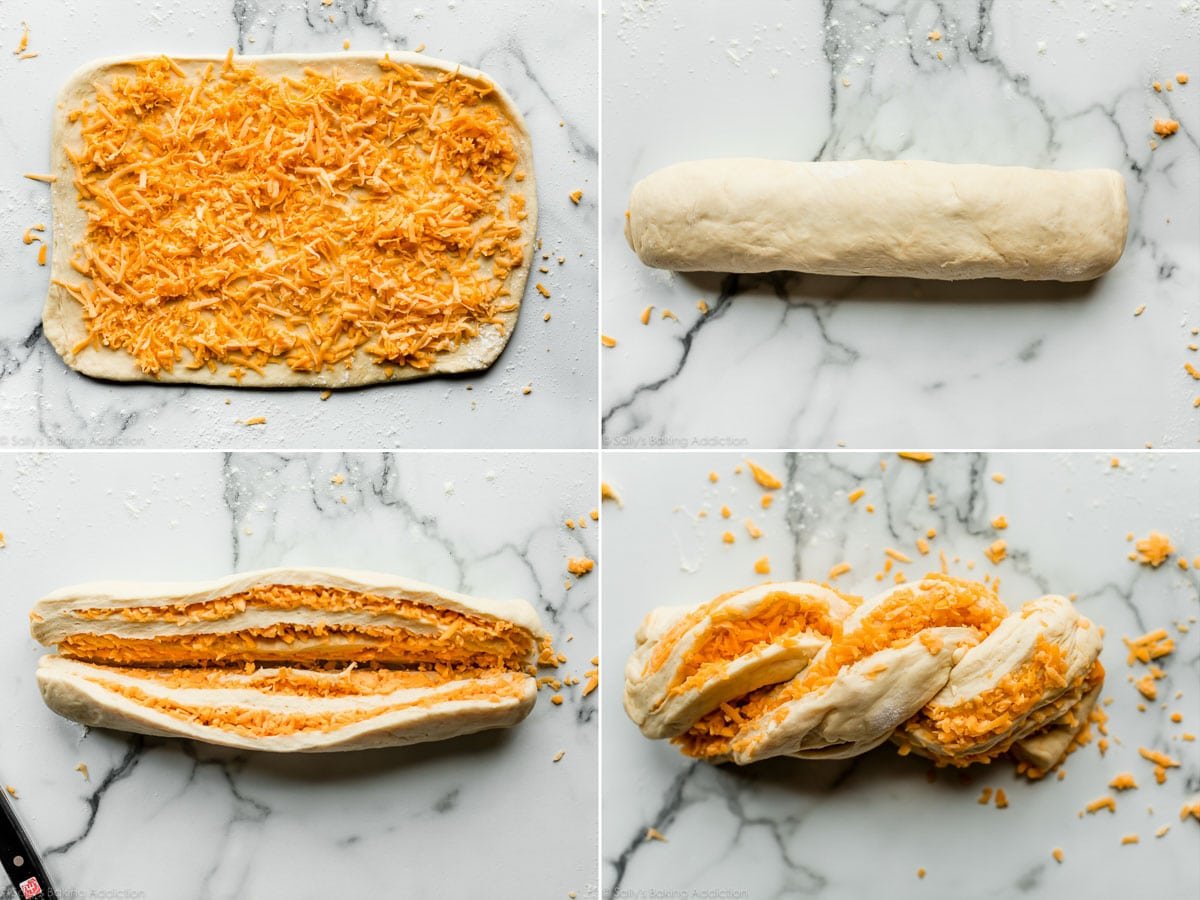
- Punch down the risen dough. Roll out into a 9×15-inch rectangle.
- Sprinkle cheese all over the top.
- Tightly roll the dough into a 15-inch log. Place the log on its seam.
- Using a sharp knife, cut the log in half lengthwise.
- Criss-cross one half, cut side down, on top of the other half– forming an X. Tightly twist the two together.
- Pinch the outer edges to seal as best you can.
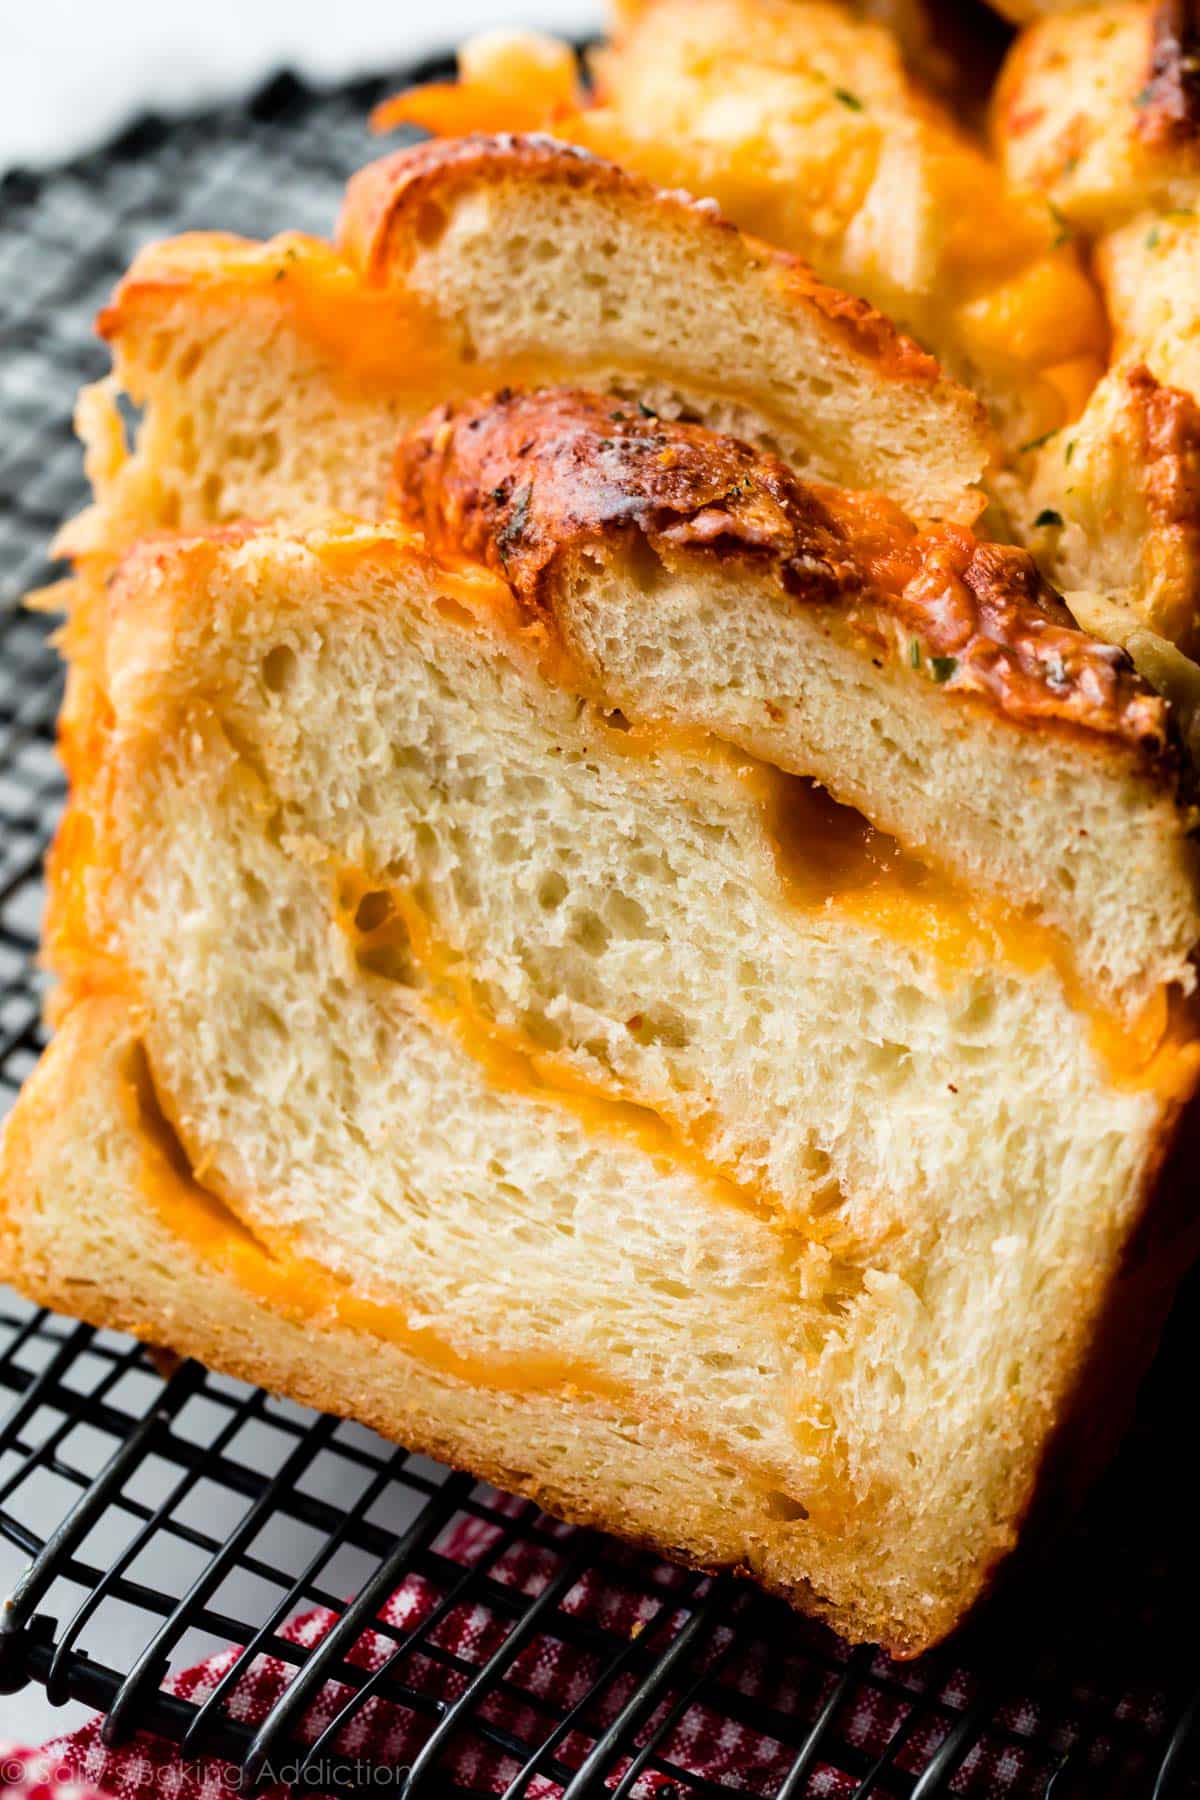
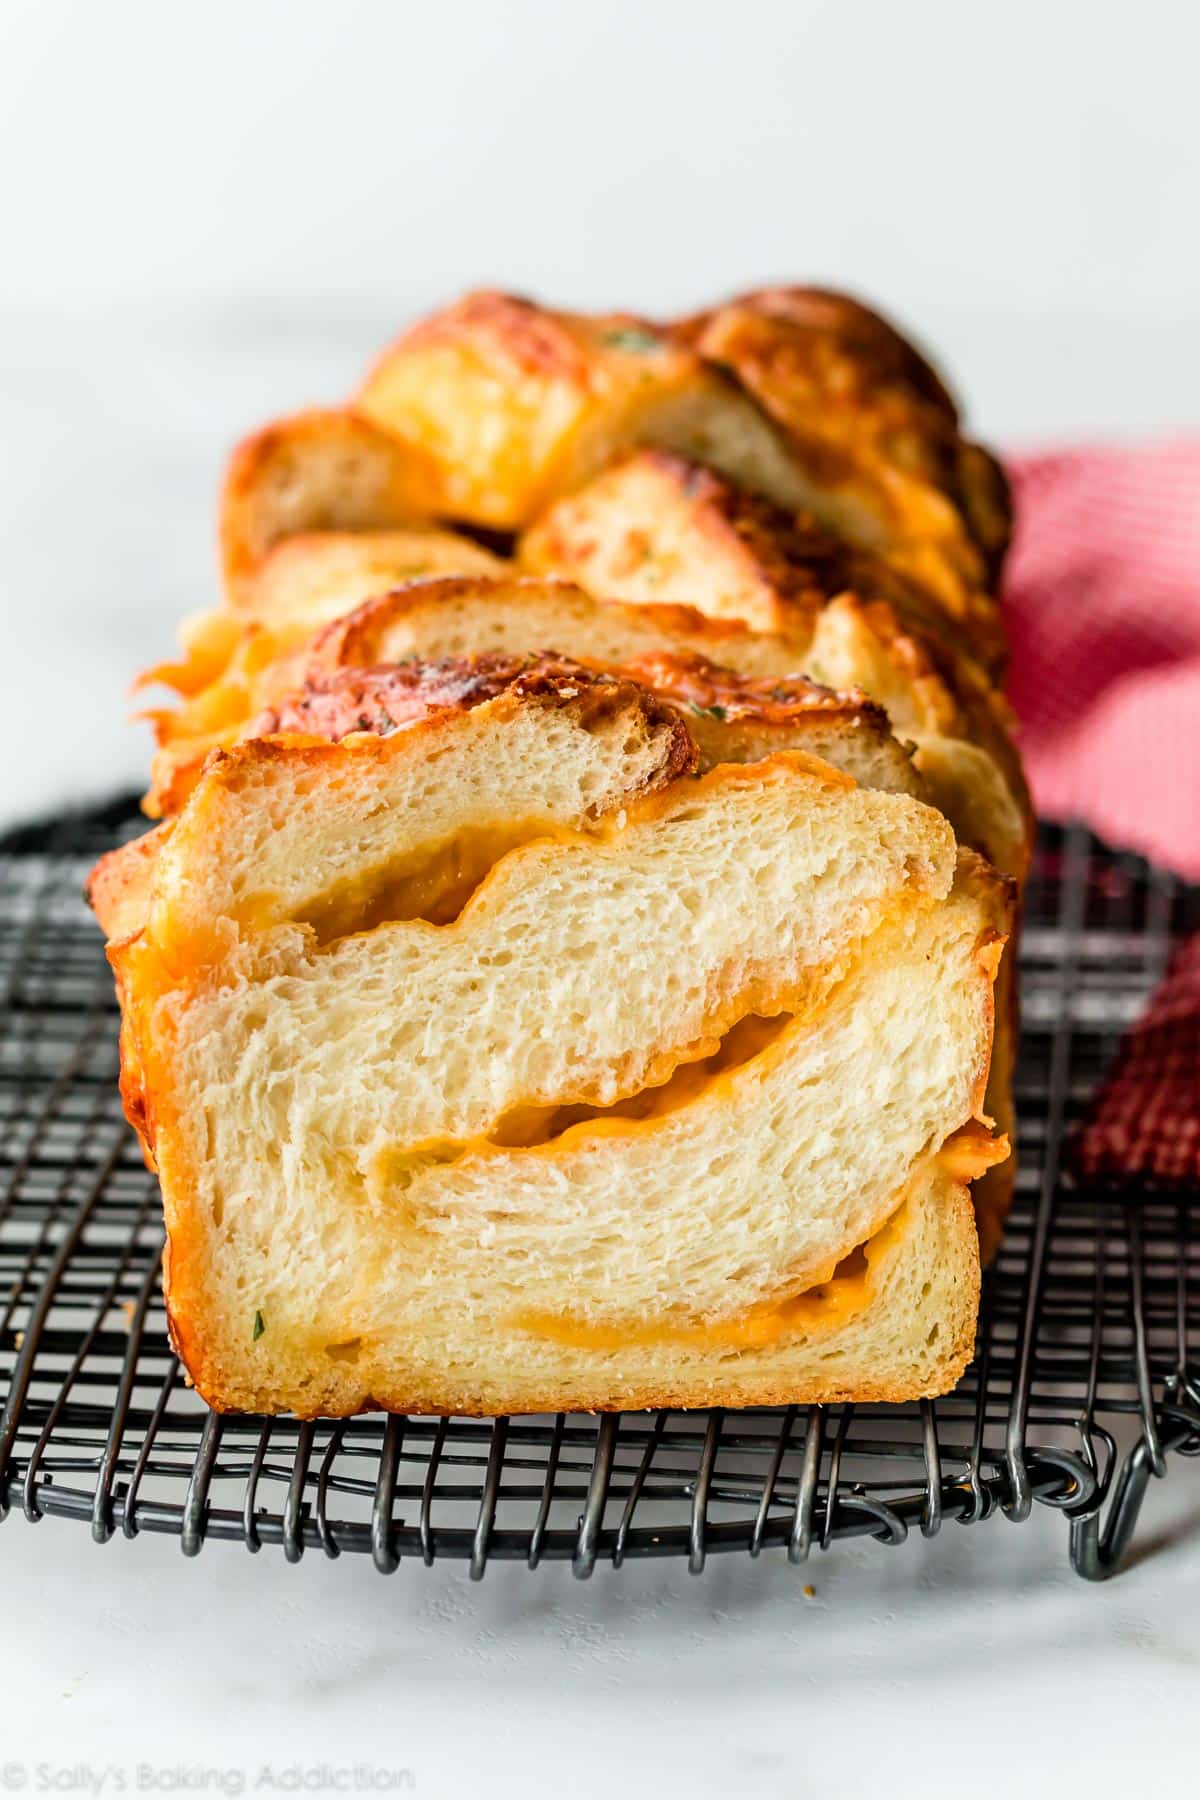
By the way, there’s 2 cups of cheese stuffed inside this bread. 🙂
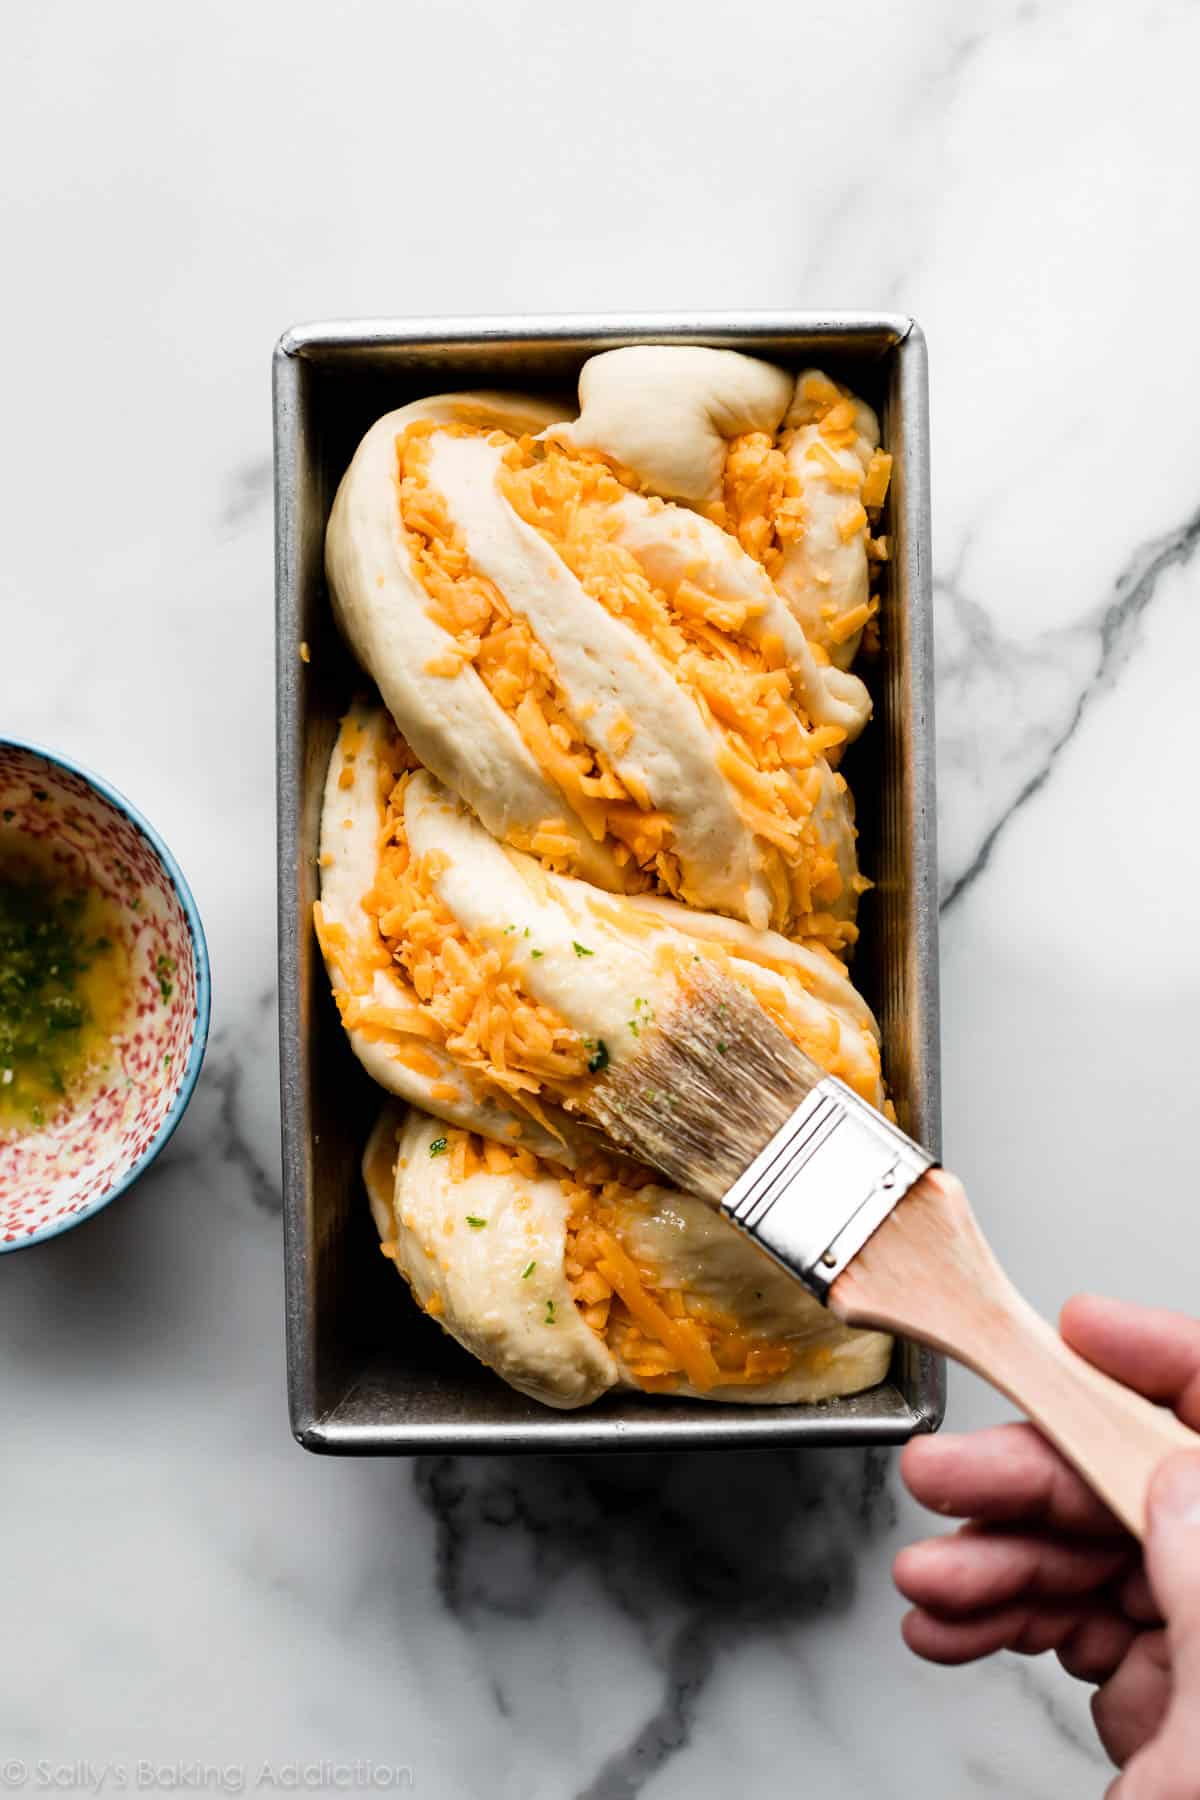
After it’s shaped, loosely cover the bread and let it rest for about 30 minutes. During this time, preheat the oven. Right before baking, brush the shaped dough with melted butter, garlic powder, and chopped parsley. Chopped basil would be excellent, too!
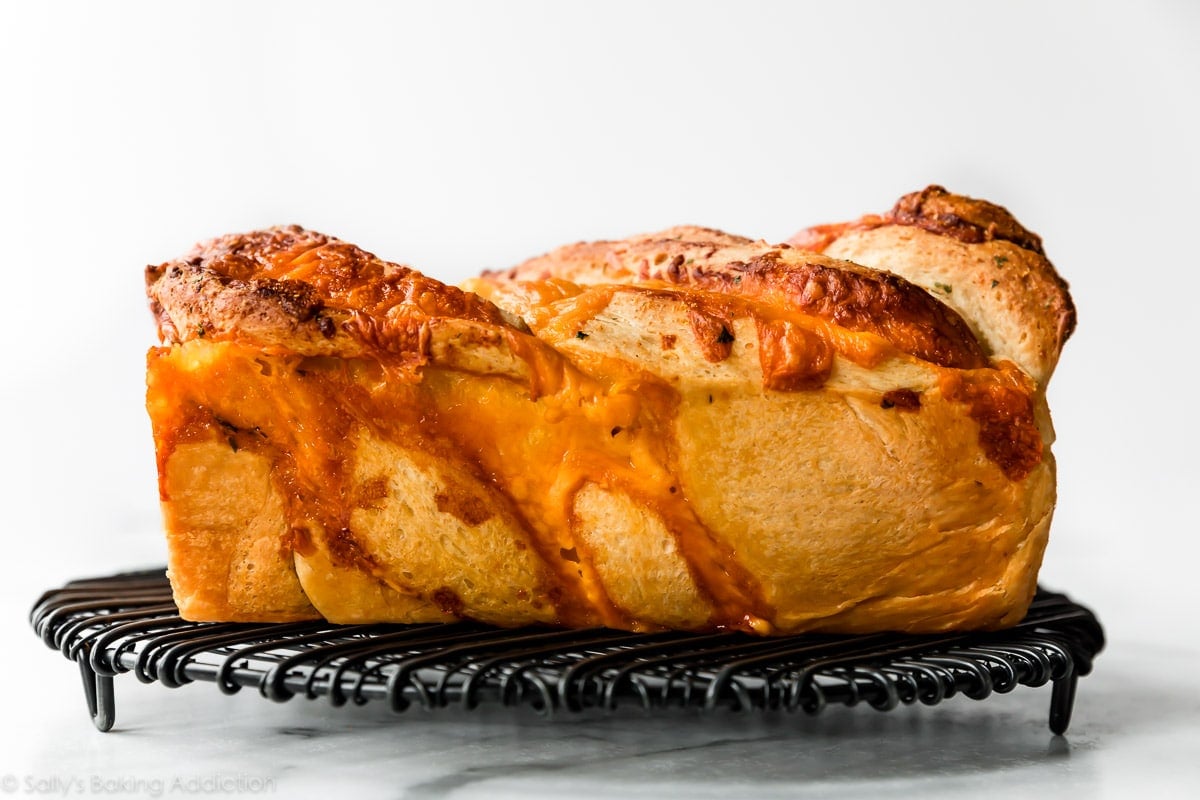
There is no sight more beautiful. No smell more heavenly. No taste more paralleled!
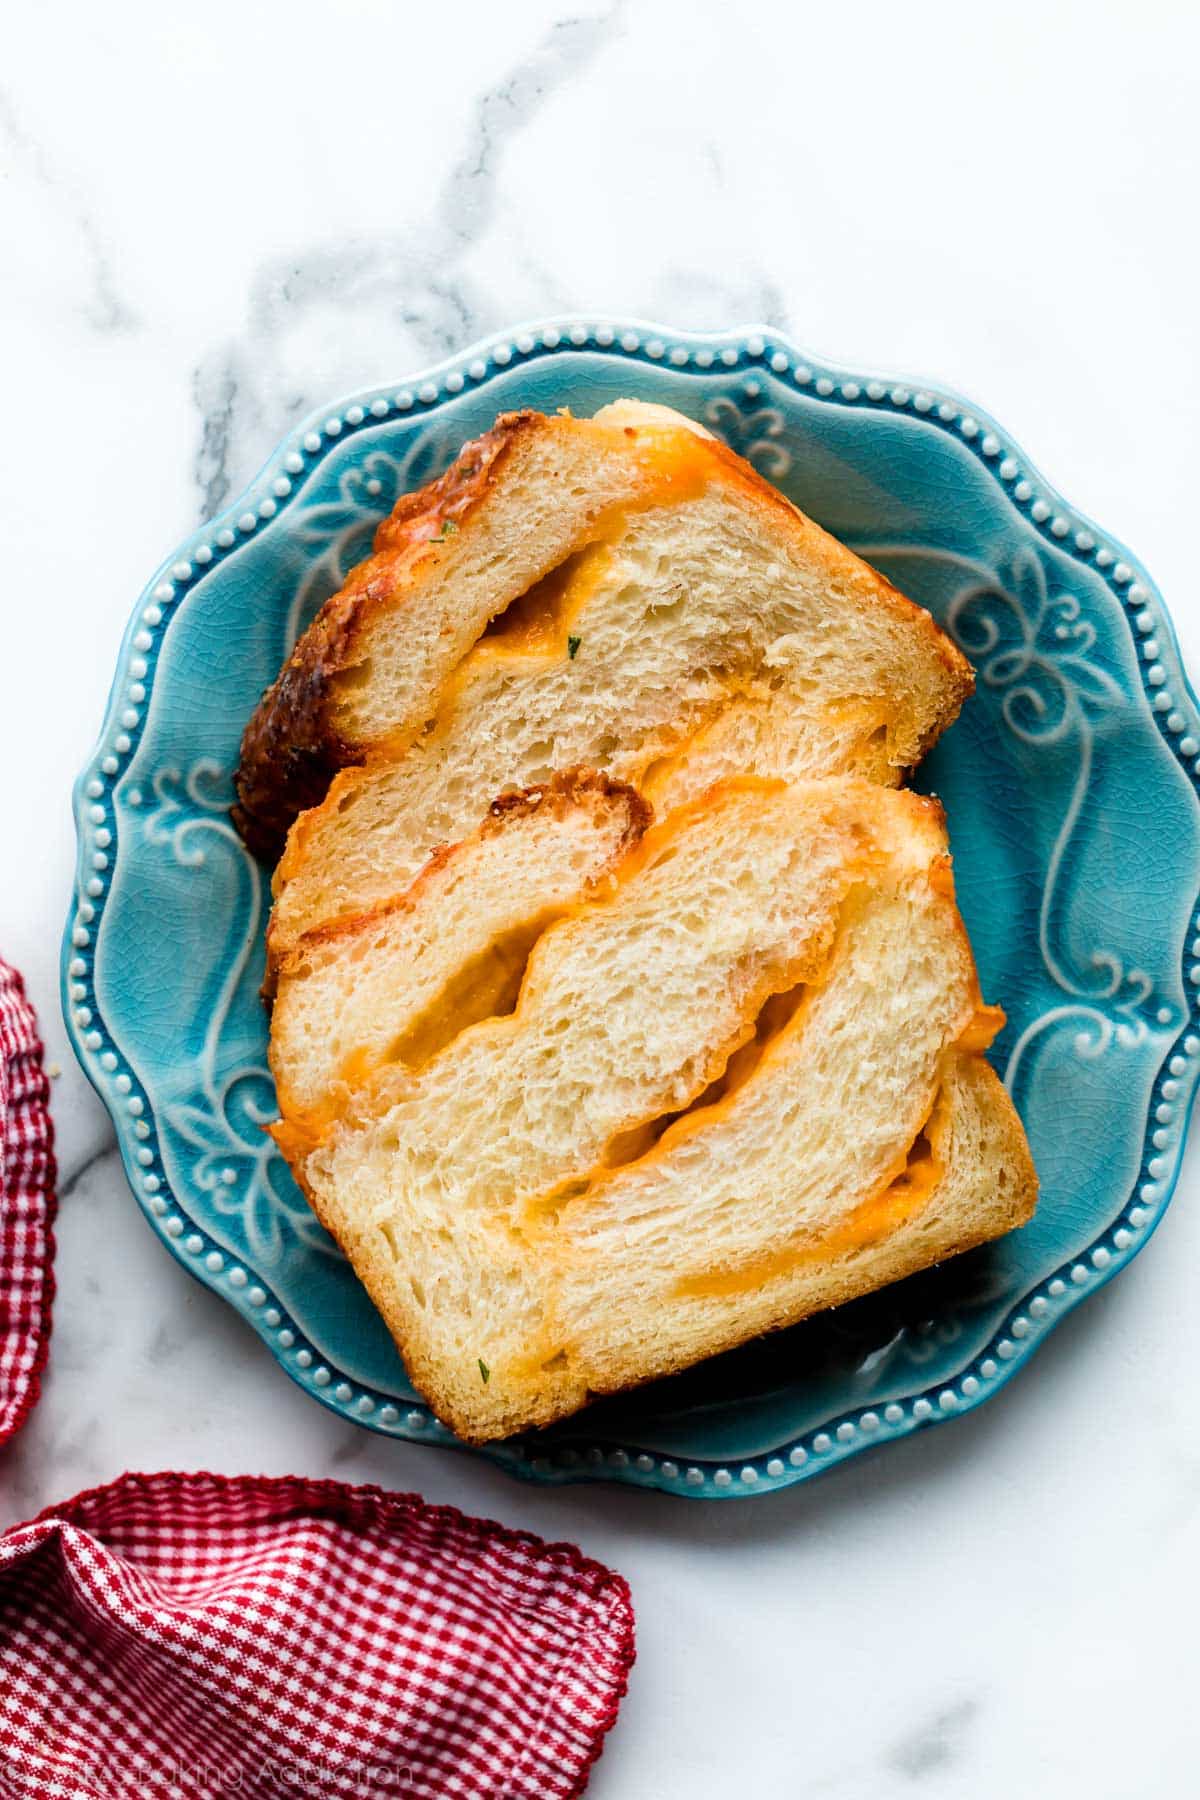
The best part, besides that first cheesy bite, is slicing into the loaf to reveal all those swirls of real melted cheese. Like I said, this is obviously the greatest loaf of all time.
If you’re looking for an equally cheesy bread without any shaping and twisting, try my asiago-crusted skillet bread instead!
More Easy Homemade Bread Recipes
- Focaccia
- Artisan Bread
- Pizza Crust (great for beginners!)
- Homemade Soft Pretzels
- Cinnamon Rolls
- Pizza Pull Apart Rolls
- Cheddar Biscuits
- Sandwich Bread & Whole Wheat Bread
See Your Homemade Cheese Bread!
Many readers tried this recipe as part of a baking challenge! Feel free to email or share your recipe photos with us on social media. 🙂
Print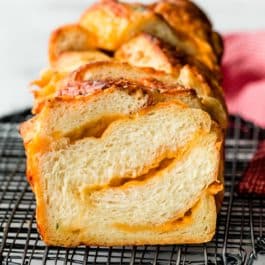
Homemade Cheese Bread – Extra Soft
- Prep Time: 3 hours
- Cook Time: 50 minutes
- Total Time: 4 hours
- Yield: 1 loaf
- Category: Bread
- Method: Baking
- Cuisine: American
Description
You only need a handful of basic ingredients to make homemade cheese bread. This soft buttery yeasted bread is twisted up with cheddar cheese, but you can use any cheese variety you love. Bake the bread in a loaf pan, then slice it to reveal the 2 cups of swirled cheese inside. See recipe notes for make ahead and freezing instructions.
Ingredients
- 1/2 cup (120ml) buttermilk, warmed to about 110°F
- 1/3 cup (80ml) water, warmed to about 110°F
- 2 and 1/4 teaspoons Platinum Yeast from Red Star (1 standard packet)
- 2 Tablespoons (25g) granulated sugar
- 5 Tablespoons (71g) unsalted butter, melted + slightly cooled
- 1 large egg, at room temperature
- 1 teaspoon salt
- 3/4 teaspoon garlic powder
- 3 cups (390g) bread flour (spooned & leveled), plus more as needed and for hands/work surface*
- 2 cups (250g; 8 ounces) shredded cheddar cheese (see note)
Topping
- 2 Tablespoons (28g) unsalted butter, melted
- 2 teaspoons chopped fresh parsley (or your favorite dried or fresh herb)*
- 1/4 teaspoon garlic powder
Instructions
- Prepare the dough: Whisk the warm buttermilk, warm water, yeast, and sugar together in the bowl of your stand mixer fitted with a dough hook or paddle attachment. Cover and allow to sit for 5 minutes.
- Add the butter, egg, salt, garlic powder, and 1 cup flour. Beat on low speed for 30 seconds, scrape down the sides of the bowl with a silicone spatula, then add the remaining flour. Beat on low speed until the dough comes together and pulls away from the sides of the bowl, about 2 minutes. *If you do not own a mixer, you can mix this dough with a large wooden spoon or silicone spatula. It will take a bit of arm muscle!*
- Knead the dough: Keep the dough in the mixer and beat for an additional 5 full minutes, or knead by hand on a lightly floured surface for 5 full minutes. (If you’re new to bread-baking, my How to Knead Dough video tutorial can help here.) If the dough becomes too sticky during the kneading process, sprinkle 1 teaspoon of flour at a time on the dough or on the work surface/in the bowl to make a soft, slightly tacky dough. Do not add more flour than you need because you do not want a dry dough. After kneading, the dough should still feel a little soft. Poke it with your finger—if it slowly bounces back, your dough is ready to rise. You can also do a “windowpane test” to see if your dough has been kneaded long enough: tear off a small (roughly golfball-size) piece of dough and gently stretch it out until it’s thin enough for light to pass through it. Hold it up to a window or light. Does light pass through the stretched dough without the dough tearing first? If so, your dough has been kneaded long enough and is ready to rise. If not, keep kneading until it passes the windowpane test.
- 1st Rise: Lightly grease a large bowl with oil or nonstick spray. Place the dough in the bowl, turning it to coat all sides in the oil. Cover the bowl with aluminum foil, plastic wrap, or a clean kitchen towel. Allow the dough to rise in a relatively warm environment for 1.5-2 hours or until double in size. (I always let it rise on the counter. Takes about 2 hours. For a tiny reduction in rise time, see my answer to Where Should Dough Rise? in my Baking with Yeast Guide.)
- Grease a 9×5-inch loaf pan.
- Shape the bread: Punch down the dough to release the air. Place dough on a lightly floured work surface and with a floured rolling pin, roll the dough out into a 9×15-inch rectangle (approximately). Sprinkle cheese all over the top, leaving a 1/2 inch border uncovered.
- Watch the video above to see exactly how I do this step. Tightly roll the dough into a 15-inch log. Place the log on its seam. Using a sharp knife, cut the log in half lengthwise. I find a serrated knife works best. Criss-cross one half, cut side down, on top of the other half—forming an X. Tightly twist the two together. Pinch the outer edges to seal as best you can. If you have any leftover cheese, cut a few small squares and tuck into the dough as shown in the video above. This is optional and simply for extra cheesy pockets! Place in prepared loaf pan and cover with aluminum foil, plastic wrap, or a clean kitchen towel. (This step can get a little messy.)
- Allow the covered loaf to rest for 30 minutes. It will slightly rise during this time.
- Adjust the oven rack to the lower third position. Place a baking sheet on the lower rack to catch any cheese or butter that may drip down. Preheat the oven to 350°F (177°C).
- Topping: Whisk the melted butter, herbs, and garlic powder together. Drizzle or brush on top of dough.
- Bake: Bake until golden brown and, when gently tapped, the top of the loaf sounds hollow, about 45-55 minutes. If you find the top of the loaf is browning too quickly as it bakes, tent with aluminum foil. (I usually place foil on top after about 25 minutes.) Remove bread the oven and place on a wire rack. Cool for 10 minutes in the pan, then remove from the pan and cool loaf on the wire rack.
- Slice and serve. Cover and store leftovers at room temperature for 2 days or in the refrigerator for up to 1 week. Leftover slices taste delicious when warmed in the microwave for 10 seconds.
Notes
- Make Ahead Instructions – Overnight: Prepare the dough through step 3. Place into a greased bowl as directed in step 4. Cover the dough tightly and place in the refrigerator for up to 15 hours. Remove from the refrigerator and allow the dough to fully rise for 1-2 more hours. Continue with step 5. I don’t recommend shaping the bread the night before as it will puff up too much overnight.
- Make Ahead Instructions – Freezing: Baked bread freezes wonderfully. Wrap the cooled loaf in plastic wrap, then a layer of aluminum foil. Freeze for up to 3 months. Thaw wrapped bread overnight in the refrigerator or at room temperature, then warm to your liking. You can also freeze the bread dough. After punching down the dough in step 6, wrap the dough tightly in plastic wrap, then a layer of aluminum foil. Freeze for up to 3 months. Thaw overnight in the refrigerator, then punch the dough down again to release any air bubbles. Continue with the rest of step 6.
- Special Tools (affiliate links): Stand Mixer or Large Glass Mixing Bowl | Silicone Spatula or Wooden Spoon | 9×5-inch Loaf Pan | Rolling Pin | Whisk | Pastry Brush | Cooling Rack
- Buttermilk: Buttermilk provides the softest texture and unbeatable flavor. In a pinch, you can use whole milk instead. Lower fat or nondairy milks work in a pinch, but the bread won’t taste as moist or rich. Here are other recipes using buttermilk if you purchase a carton and need to use it up.
- Yeast: Platinum Yeast from Red Star is an instant yeast. You can use Red Star Yeast active dry yeast instead. Rise times will be slightly longer using active dry yeast. Reference my Baking with Yeast Guide for answers to common yeast FAQs.
- Bread Flour: Higher protein flour like bread flour is best for this bread recipe because of its strong gluten formation and high rise. All-purpose flour will yield a flimsy bread.
- Cheese: I recommend cheddar cheese in this recipe, but you can use another relatively harder cheese such as pepper jack, gouda, or colby cheese. Avoid very soft cheeses. For best taste and texture, shred cheese off the block yourself with a cheese grater. Pre-shredded cheese is drier than freshly shredded. If you have extra cheese, cut a few small squares to stuff inside the twisted bread, as noted in step 7.
- Herbs in Topping: Use your favorite herb in the topping. If using dried, reduce to 1/2 teaspoon.


Reader Comments and Reviews
Great recipe for a garlicky cheesy bread to accompany soups, chowders, and gumbos. The video was SUPER helpful- thank you Sally!!.
A very easy recipe to follow, with fantastic results, so delicious, looking forward to baking it many more times in the future
This bread was amazing Sally! I will absolutely be making it again. Me, my husband and son all devoured it in a couple of days (and that was with a lot of restraint!). And as if it wasn’t great enough of on it’s own, we also used it for some delicious BLT’s for dinner one night last week. OMG! I highly recommend that to anyone. We’ll be doing that again some time too!
Made it yesterday and it is just delicious. Made it exactly as written, cooled it the prescribed 10 minutes in the pan, moved it to a rack to cool completely but it never got the chance. 15 minutes after it came out of the oven, half of it was gone. My husband kept saying just one more little piece!
I love it!!! So happy this bread was a hit 🙂
This is the BEST bread that my husband and I have ever tasted. Hands down….and we’re not usually the cheese bread types. We have three kids under two, and this did create a few challenges. I had to leave it to prove for an extra two hours to get all the kids in bed. That being so, it was soft and chewy on the inside and crisp on the outside. I chose to use extra old cheddar…what a great decision. Yum yum yum. Thanks for another great recipe, Sally!
I love reading this, Michelle! So glad you and your husband enjoyed this bread 🙂
So easy to make and so dang tasty!
One step closer to not being afraid of yeast thanks to your thoughtful recipes. This one was so fun to make and even more fun to eat. Thank you Sally!
I just finished making this and it is delicious! It has a nice crust on the outside and is perfectly cheesy! The crossing of the dough was difficult. My dough kept wanting to open up and let all the cheese out, but I managed to move quickly enough to get it eventually. Maybe I didn’t roll tight enough? Anyway, I’ve already eaten several slices!! I’m planning on dipping it in chili tonight with dinner!!! 🙂
Your instructions were easy to follow. My house smelled so yummy and wonderful. Everyone in my house loved this bread. Luckily I got a picture before it was gone. So delicious. Thanks so much for another great recipe.
This was so fun to make! Your notes and tips are always so helpful! The only issue I had was when kneading the dough. It was still pretty sticky and hard to handle after mixing it with my KitchenAid stand mixer. Could I be mixing it for too long or not long enough?
How was the finished product? If the dough is super sticky you can and a tiny bit more flour or just coat your hands and your counter in flour when handling it (you can see me sprinkling extra flour on the counter in the video!).
The final product turned out good! I think it may have been a little dense though. I will just have to try to bake it again and play around with the recipe! Thanks so much!
This bread is worth it if for nothing other than how it makes your house smell!! I didn’t roll mine tight enough so my loaf has some air pockets, so definitely roll it TIGHT. (I’ve had this problem doing the same sort of braid with a pesto loaf, maybe I need to do it differently with the high fat content fillings? I dunno)
I kneaded mine for 10 minutes rather than 4, like I do with a similar enriched white bread recipe. The dough was SO nice and workable after the first rise, hardly any spring back when I rolled it! I also tried it last week as well but as a freeform loaf, just because why not make more cheesy bread, and I have to say I prefer it out of the loaf pan because of how it crisps up the sides!
This cheesey bread was so easy to make. Not intimidating at all! Smelled fantastic baking and tasted amazing. Totally recommend you make this bread TODAY! btw…don’t go rogue and skip the suggestion to put a pan under it in the oven to catch drips. There WILL be cheese oozing and dripping into your oven without it.
This recipe turned out amazing! I haven’t had much luck with yeast recipes in the past, so I was a little intimidated, but it was so easy to follow the steps and fun to make. My family loved the bread and I will definitely be making it again!
Just took it out of the oven and it smells delish!
This cheese bread is AMAZING!!! Wow it is so delicious and was such a beautiful dough to work with! I enjoyed it heated a little in the microwave for several days like suggested and then finished it today by toasting slices both sides in a pan, soooo tasty! Thanks Sally for yet another fantastic recipe 🙂 can’t wait to make it for more friends and family!
This bread recipe is excellent! I never have any luck with bread baking, but figured I’d give this a go since none of your other recipes have ever done me wrong, and sure enough, success! I need to work on my swirling technique on my next attempt – all my cheese ended up swirled through the top only. Looking forward to trying with different cheeses and herbs.
You are the only baker whose recipes I can always count on to be a success.
Thank you!
WOWW!! This bread is phenomenal! Among the best things I’ve baked. And the recipe was easy to follow too!
This recipe was a joy to make! I followed your tips, and the texture came out perfectly.
I also found that the bread toasts wonderfully; I made toasted cheese sarmies to serve with tomato soup and my kitchen was filled with the aroma of cheesy goodness 😉
I made this today for a potluck this evening. I was unable to find the type of yeast you recommend but otherwise followed the recipe as written. I used Tillamook Cheddar, and fresh parsley, chives, and thyme from my garden. Your video helped me figure out how to twist the bread; not sure I could otherwise have figured out how to do this step. I served the bread plain and got rave reviews. I will definitely make this recipe again.
I think I’ve tried almost all of your bread recipes- everything with yeast for sure. I made this bread to go with soup for supper tonight. Everyone said it was the best thing I’ve ever baked!
I’ll be making this one on the regular! Thank you Sally!!
What a delicious cheese bread recipe! I actually used a cake/pastry flour by accident (oops) but it STILL turned out amazing. The melted butter and herb topping makes the crust heavenly, and our house smelled awesome for the rest of the day. Swirly cheesy bread for the win!! Thanks Sally 🙂
Finally got to baking this wonderful bread. It was so easy to make ( and I’m no friends with yeast generally ! 🙂 The instructions were so accurate and so helpful, and the end result is stunning. Soft, cheesy, full of flavor, a real hit !
I made this with Yellow English Cheddar BTW, which was a great choice, and use basil for the topping which was also great.
This. Was. Delicious! It’s also a very forgiving recipe… this momma got distracted by fussing kiddos while she was baking so my twist was wonky and I forgot the buttery topping! BUT it was still delicious! It’s a yeast recipe but not intimidating and super easy to work with! Would definitely recommend!
I made this bread today because the weather here is colder today and not sunny- perfect day to bake! Every time I make a yeast bread I become more confident in making it. This bread recipe came together beautifully for me. It was soft and supple and so easy to work with! The finished bread was amazing and I served it with a warm bowl of homemade broccoli soup. Oh, my goodness!! Thank you Sally for challenging us to another great recipe. Its a keeper for sure!
I’ve made cheese bread recipes before, but I’ll make this one again & again. It’s easy & delicious, and the buttermilk makes it incredibly soft. Sally’s directions, tips & the very-helpful tutorial were spot-on! One of the many reasons I’m addicted to Sally’s recipes.
This bread turned out great! Very tasty. I was a bit worried about the shaping part being tricky and/or time consuming but it really wasn’t. The loaf is surprisingly easy to make, with only maybe 30 minutes of hands-on prep time.
Amazing, soft bread! It tastes like it came from a bakery. I like how you can change up the cheese and herbs based on what you have in the fridge or what you are having for dinner.
This was my first monthly baking challenge and I loved this! Two questions though 1) Anyone try this with pre-shredded cheese? Just wondering if that changes the flavor at all. The most annoying part for me was shredding the cheese haha! 2) Mine ended up being a little under cooked in the middle, despite a really nice golden brown hue on top. Obviously I should have cooked it longer but is it true that not kneading the bread can contribute the loaf not cooking properly? I thought I remembered reading that before but I could be wrong. Still really enjoyed it though, we just ate around the slightly doughy parts 🙂
Hi Kayla! I don’t recommend pre-shredded cheese since it’s a little dryer than freshly shredded cheese. However, keeping that in mind, you can make the switch if you wish. Bake the bread for a little longer if you try the recipe again– this ensures the center will cook a little better. You can tent with foil halfway through bake time to protect the top from getting too brown. Hope all this helps! Thank you so much!
I made this recipe with rosemary as the herb for the butter. It was my first time making any kind of bread–it was awesome! Thanks for the great recipe.
Yum, this bread is delicious! I used a mix of mild and sharp cheddar and it turned out great. Had this for dinner tonight with some homemade tomato soup and it was a perfect combo. Thanks for the recipe!