

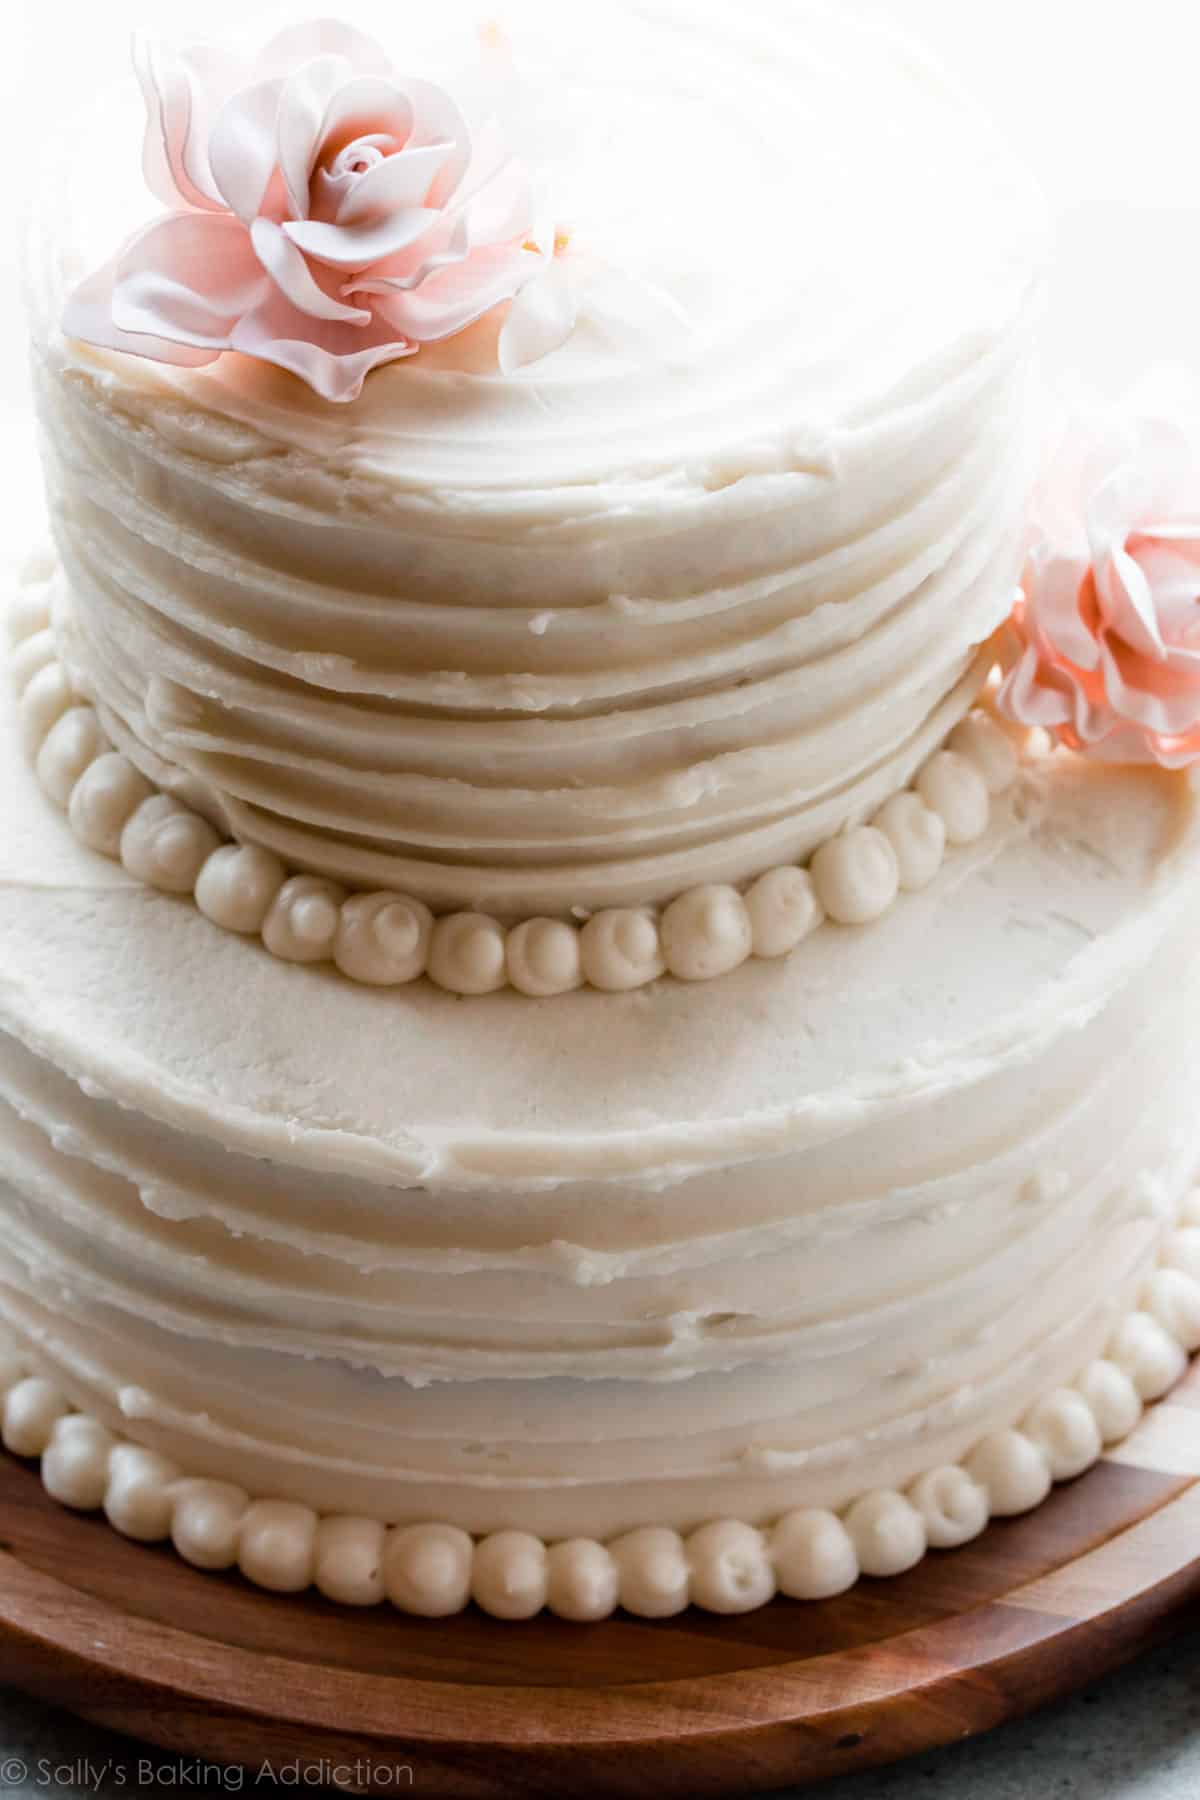
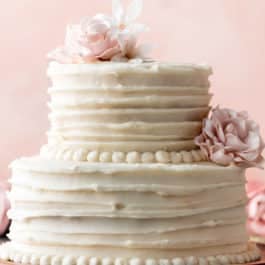
Here you’ll find a full recipe and cake decorating video tutorial for a DIY homemade wedding cake. This simply decorated and elegant vanilla wedding cake has 2 tiers and comes with full assembly instructions. With the help of this carefully detailed post, this wedding cake recipe is perfectly manageable for any home baker.
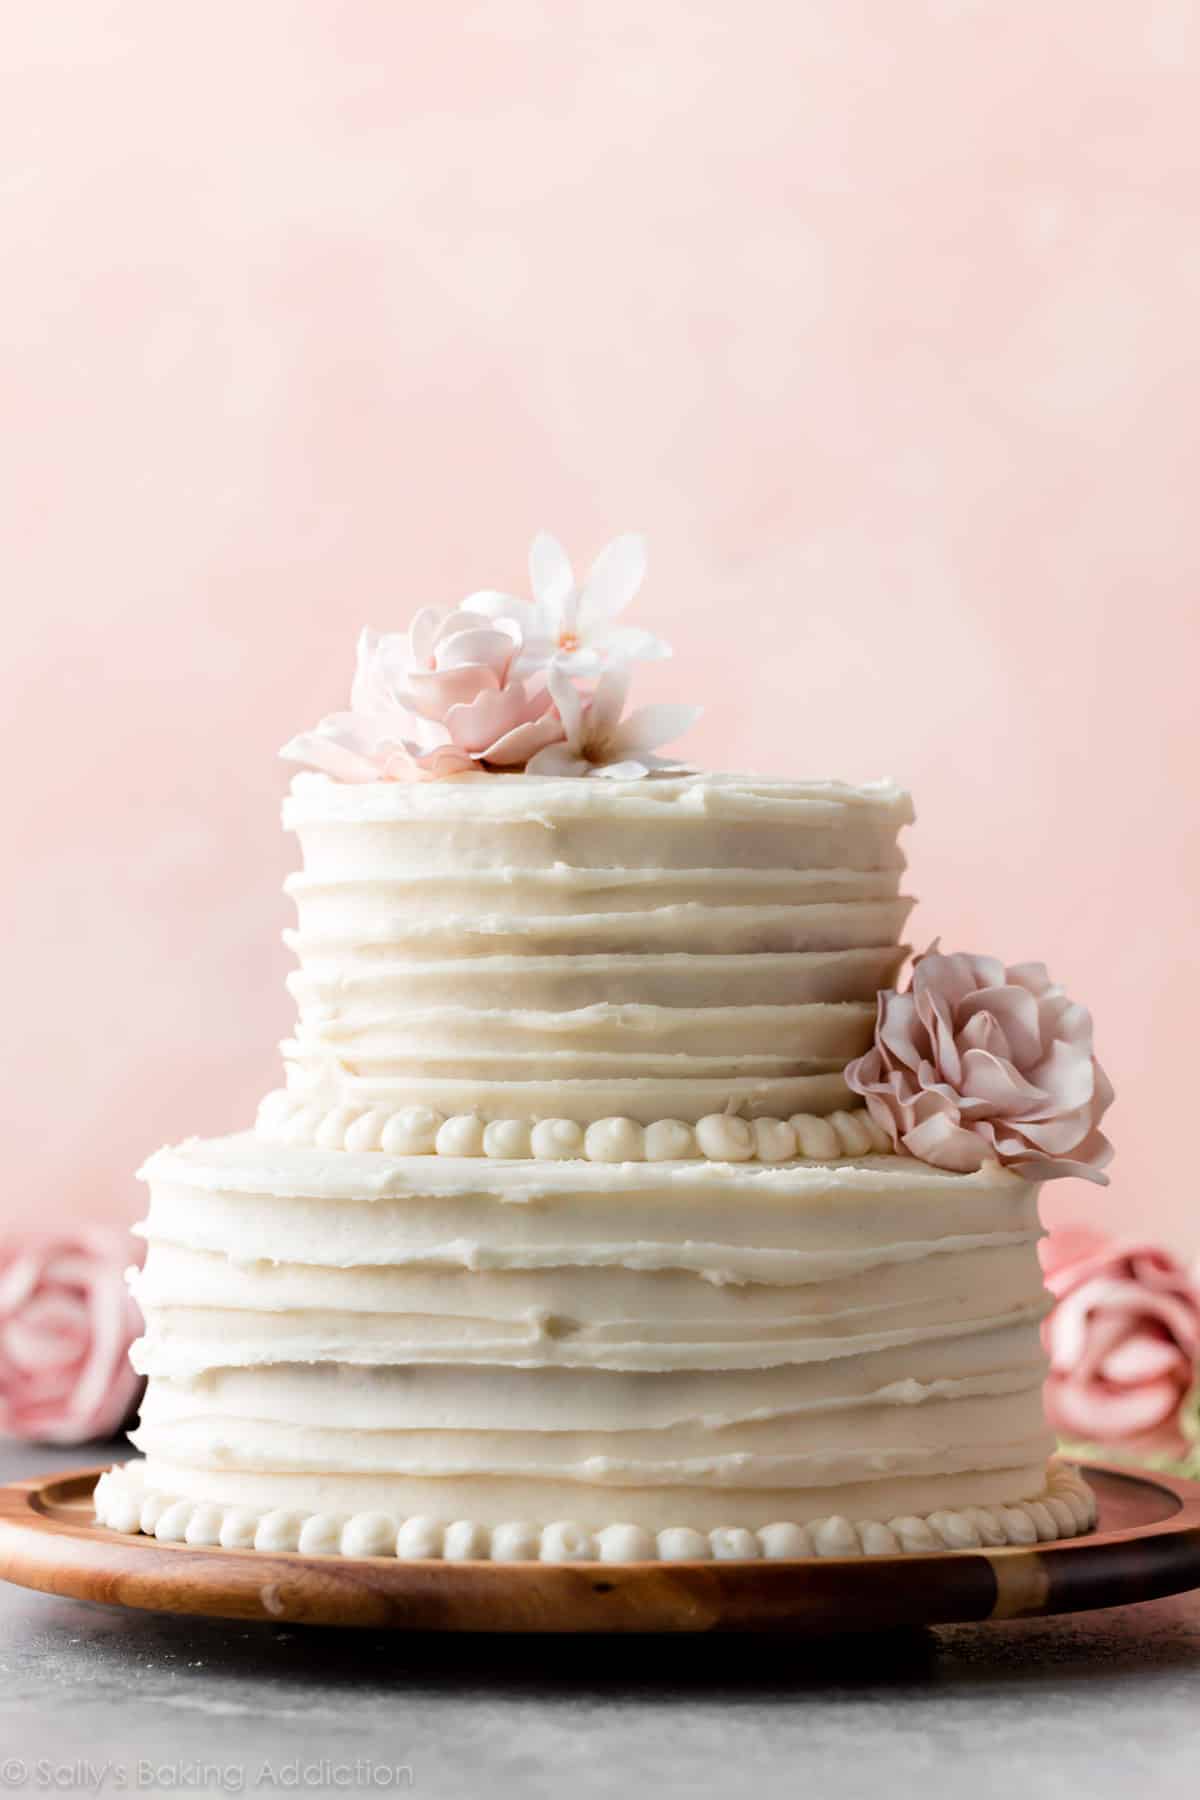
By the request of many readers, let me present you with a homemade 2 tier wedding cake recipe. Adapted from my trusted vanilla cake and 6 inch cake recipes, this from-scratch wedding dessert is not only beautiful—it tastes remarkable, too.
(Isn’t that what counts?)
Fully equipped with complete details and recipe instructions to make this one-of-a-kind dessert, you will wow the happy couple and wedding guests alike. This post has it all.
This DIY Homemade Wedding Cake Is:
- Completely from-scratch
- Manageable for any home baker
- Simple, yet elegant—rustic chic meets traditional
- Complete with a full list of helpful kitchen tools
- Perfect for a small wedding (approximately 30-35 people)
- Wonderful for a larger wedding if other dessert options are available
How to Make a DIY Homemade Wedding Cake
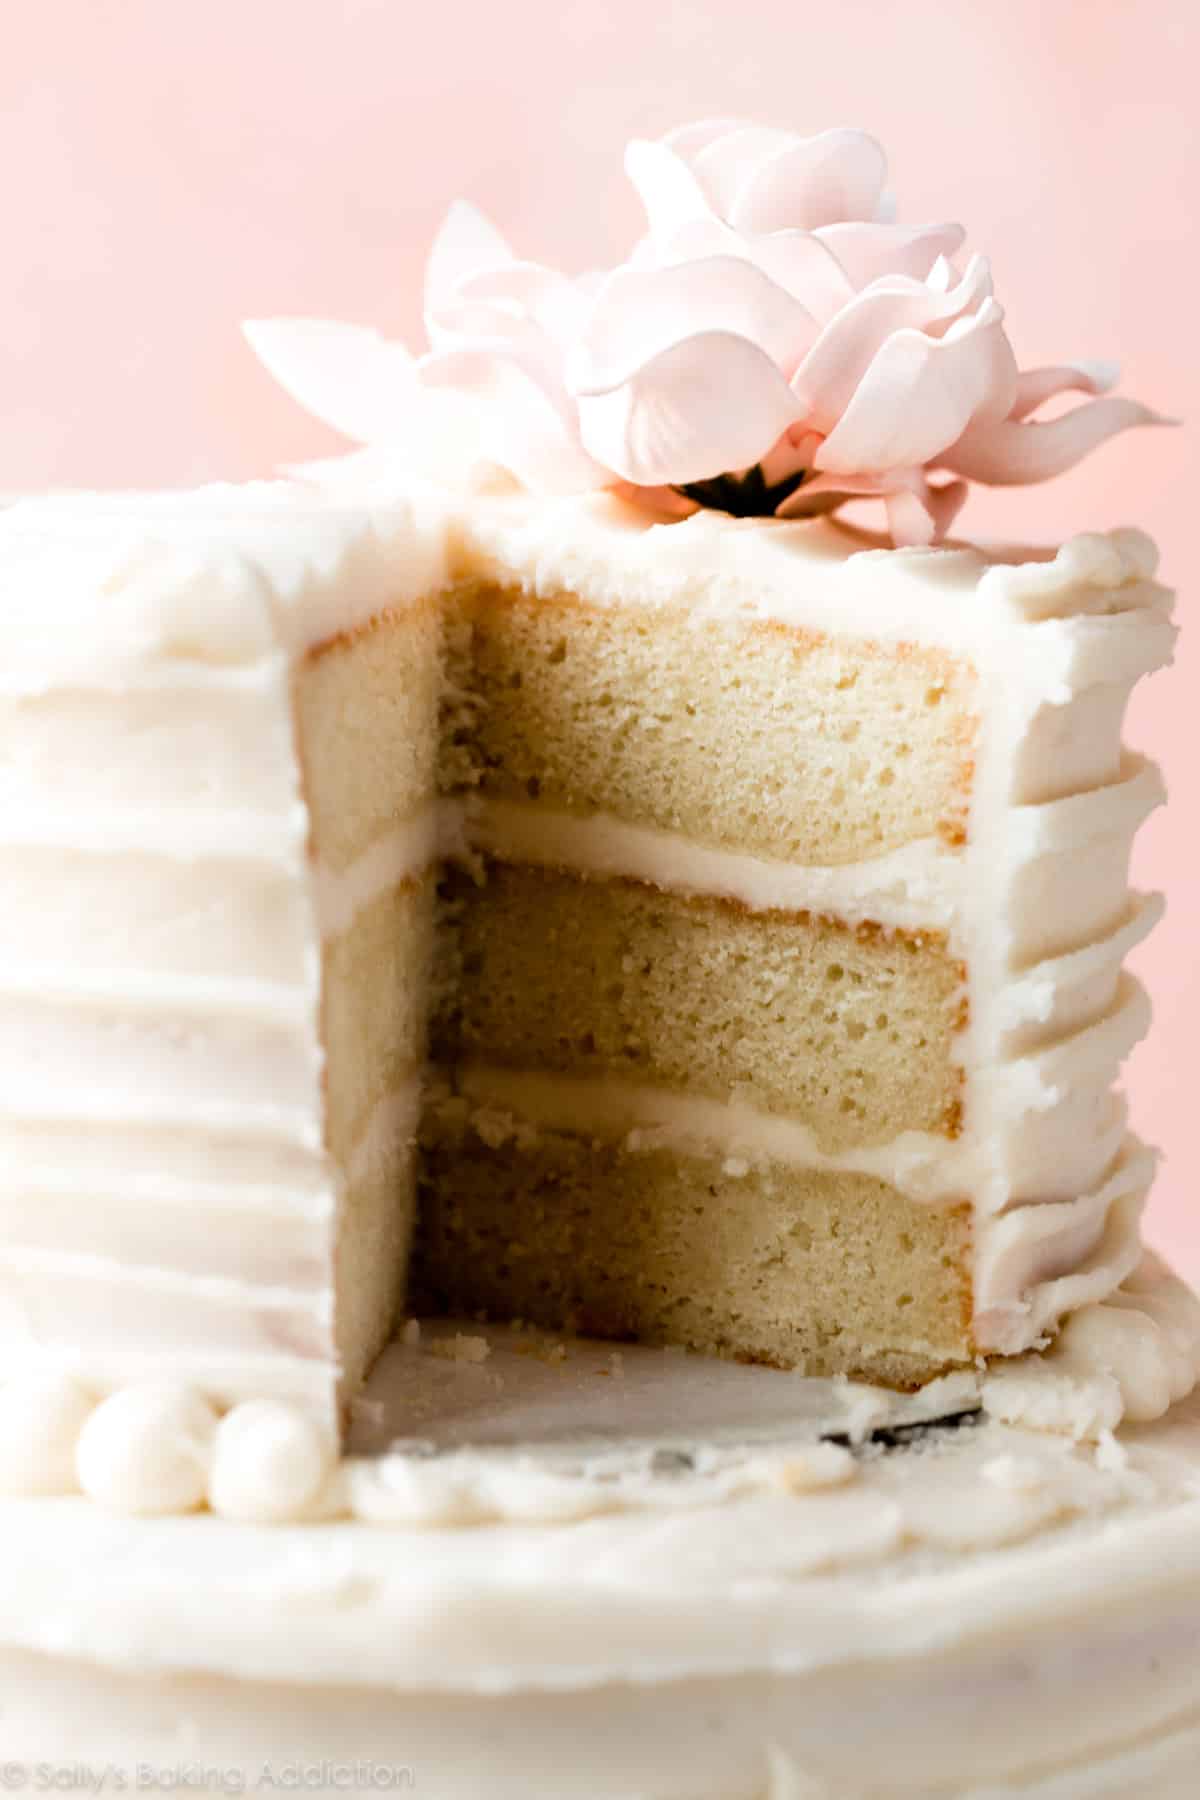
This is a 2 tier wedding cake. Both tiers are buttery, soft, and moist. In lieu of traditional fondant, this homemade wedding cake recipe uses my vanilla buttercream, but in a higher quantity. To avoid (1) overwhelming your mixer with excess cake batter and (2) over-mixing or under-mixing the batter, make each cake separately.
- Make each batch of frosting separately too.
Unless you have extra oven(s) or oven space, prepare the cake batters and bake the layer cakes one at a time. Cool the cakes completely before assembling and decorating, which I cover in a separate section below.
Same Ingredients for Both Tiers
Both cakes use the same exact ingredients and each has a special job, so I do not recommend substitutions. Use sugar, cake flour, egg(s), extra egg whites, sour cream, whole milk, and proper room temperature butter. (Among a few other ingredients.) If needed, use this cake flour substitute. Here are recipes that use leftover egg yolks.
- 2-3 batches of lemon curd, which uses egg yolks, would be fantastic as a filling between these cake layers.
The bottom cake is my vanilla cake recipe, but I swap buttermilk for whole milk and sour cream. I do this so you don’t need any varying ingredients for both tiers. (Because the top tier uses whole milk and sour cream.) Sure, you could use buttermilk to replace both the whole milk and sour cream in the 6 inch cake, but whole milk and sour cream are more readily available to most than buttermilk.
Other Flavor Options
This is vanilla flavored, which is a classic choice to please a variety of wedding guests. You can have fun with frostings, fillings, and flavorings. Here are 5 other cake flavor options:
- Carrot Cake: Use my carrot cake recipe for the bottom tier and make a half batch of the batter for the top tier. Use the same 6 inch cake baking instructions described below.
- Red Velvet Cake: Use my red velvet cake recipe for the bottom tier. You can divide between 3 9-inch cake pans as instructed in the recipe notes. Use my red velvet cupcakes batter for the 6 inch cake. Use the same 6 inch cake baking instructions described below.
- Lemon Cake: Use my lemon cake recipe for the bottom tier. Use my lemon cupcakes batter for the 6 inch cake. Use the same 6 inch cake baking instructions described below.
- Marble Cake: Use my zebra cake for the bottom tier. Use my smaller zebra cake recipe (see this 1st birthday cake) for the 6 inch cake on top.
- Chocolate Chip: After adding the milk in both batters, fold 1 and 1/2 cups (270g) mini chocolate chips into the 9-inch vanilla cake batter and 1 cup (180g) of mini chocolate chips into the 6-inch vanilla cake batter. Regular size chocolate chips would be fine, but mini chocolate chips mean more in each bite.
*These are the only flavors I’ve tested with tiers. At this time, I don’t have a sturdy enough chocolate version to use as the bottom tier.
Want to mix and match flavors? Stick with the vanilla cake on the bottom (or other flavors listed above) and use any cupcake recipes listed in my 6 inch cakes post for the top tier. As explained in that post, cupcake batter yielding between 12-15 cupcakes makes the perfect 3 layer 6 inch cake.
Filling ideas: The filling in my cake is vanilla buttercream, but feel free to use other frosting flavors if desired. You can add extracts to the frosting such as almond, lemon, orange, or coconut. (Start with 1 teaspoon, taste, then add more to taste.) You can even mix a few Tablespoons of raspberry jam into the vanilla buttercream for the filling or use raspberry cake filling.
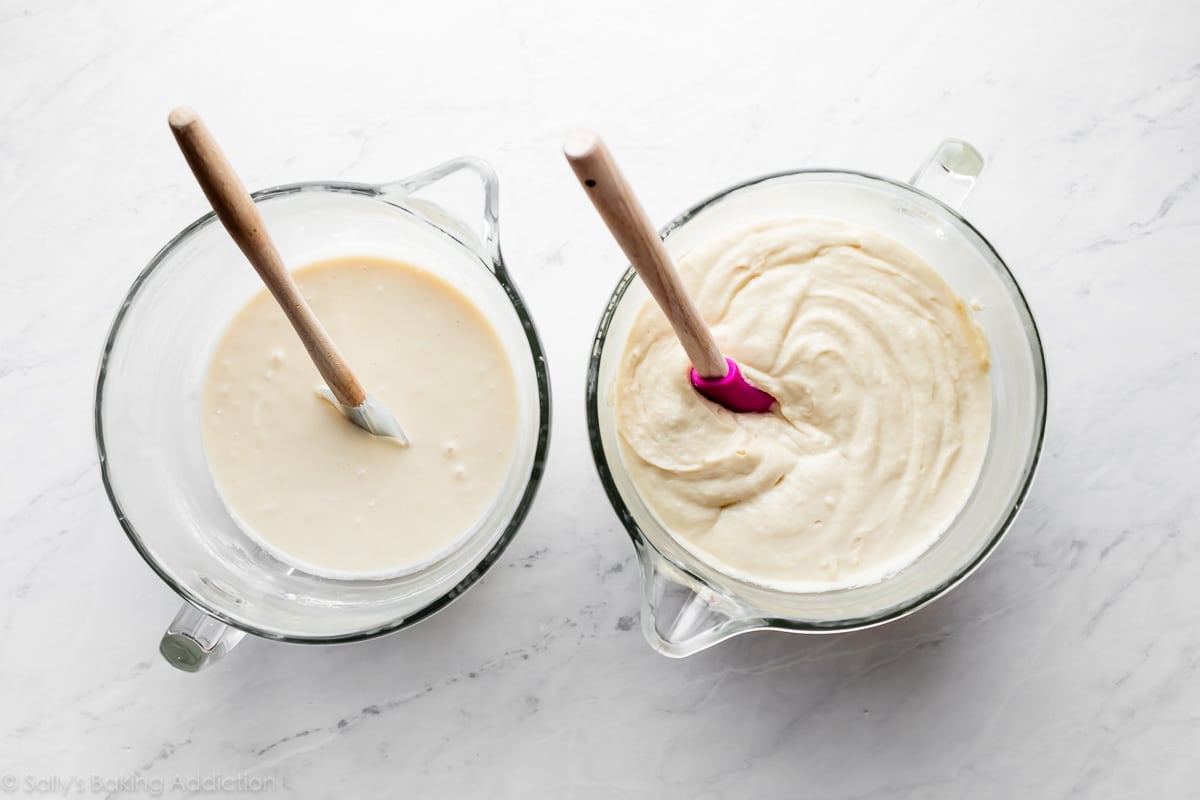
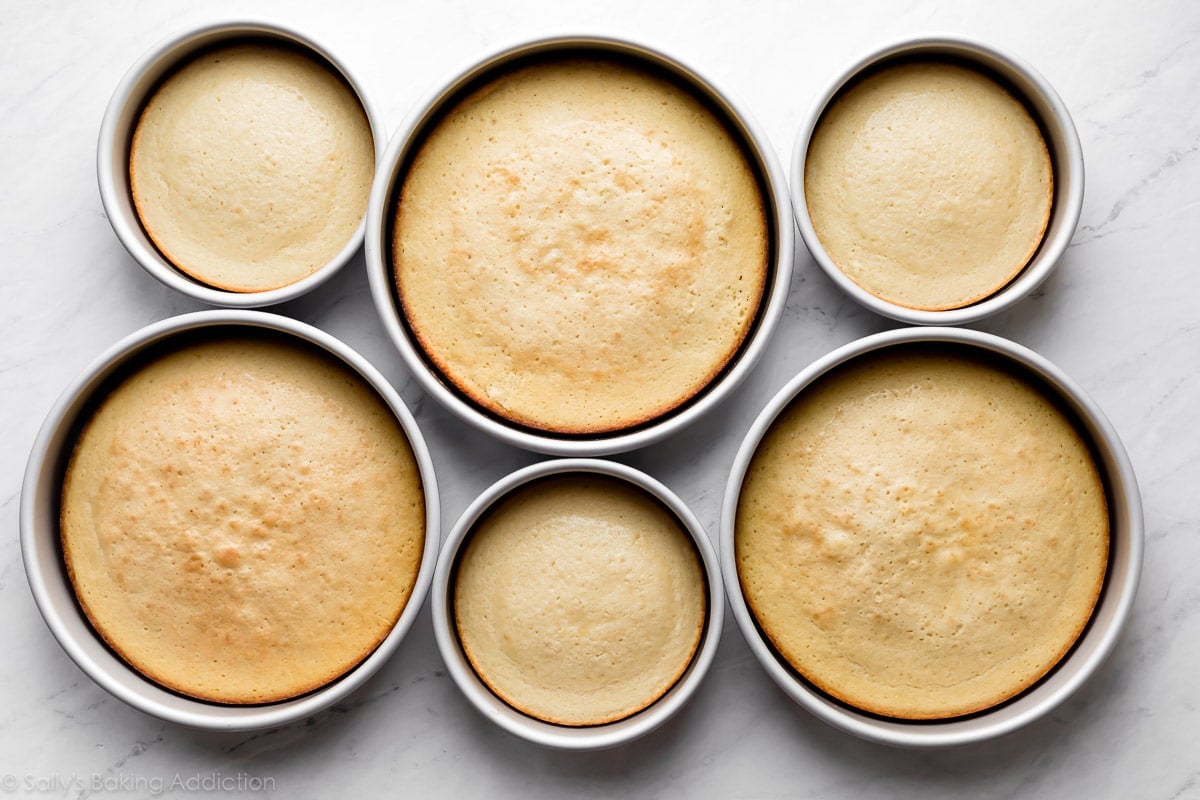
The 6-inch cake batter (left above) is light and creamy. The 9-inch cake batter (right above) is thicker because the bottom tier is a bit denser (for extra support).
Prepare the Wedding Cake Pans
Always line your round pans with parchment paper rounds before adding the batter. Begin by lightly spraying the bottoms and sides of each with nonstick spray or greasing with butter. Add a parchment paper round, then grease the round as well. Parchment paper rounds aren’t something special you need to buy. Simply trace the bottom of your cake pan on regular parchment paper and cut into rounds. Parchment paper rounds guarantee the cooled cakes will seamlessly release from the pans.
See my 10 Cake Baking Tips post for all my advice on baking the BEST cakes.
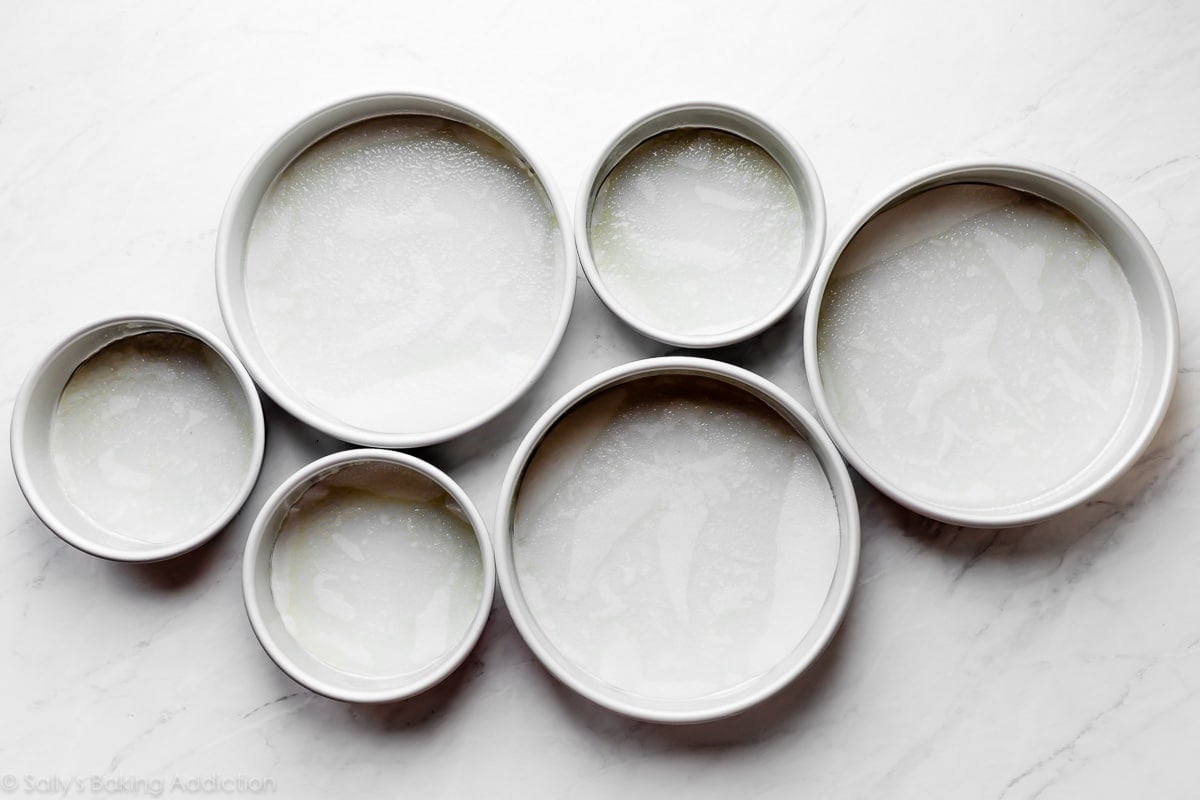
Other Cake Pan Sizes
This recipe uses one 9-inch 3 layer cake and one 6-inch 3 layer cake. The 9-inch cake is 8-9 cups of batter and the 6-inch cake is 4 cups of batter. If you need to substitute other size cake pans, see my Cake Pan Sizes & Conversions post to determine the appropriate amount of batter you need for your desired cake pans.
Wedding Cake Video Tutorial (Decorating)
Give the video a few seconds to load right below this text. It’s a faded horizontal image of the cake. Click on the play button in the center to play it. Make sure any ad blockers are temporarily paused on your browser.
How to Assemble & Decorate a Homemade Wedding Cake
Assembling
You are literally making 2 completely separate cakes and placing one on top of the other. For guaranteed support and stability, place 4 cake dowels in the bottom tier. Cake dowels are sticks that will support the top tier. You’ll have to measure and cut the dowels so they are flush with the surface of the bottom cake. Place the small tier on top. A 6-inch cake board, which I describe next, is crucial between the tiers for added support.
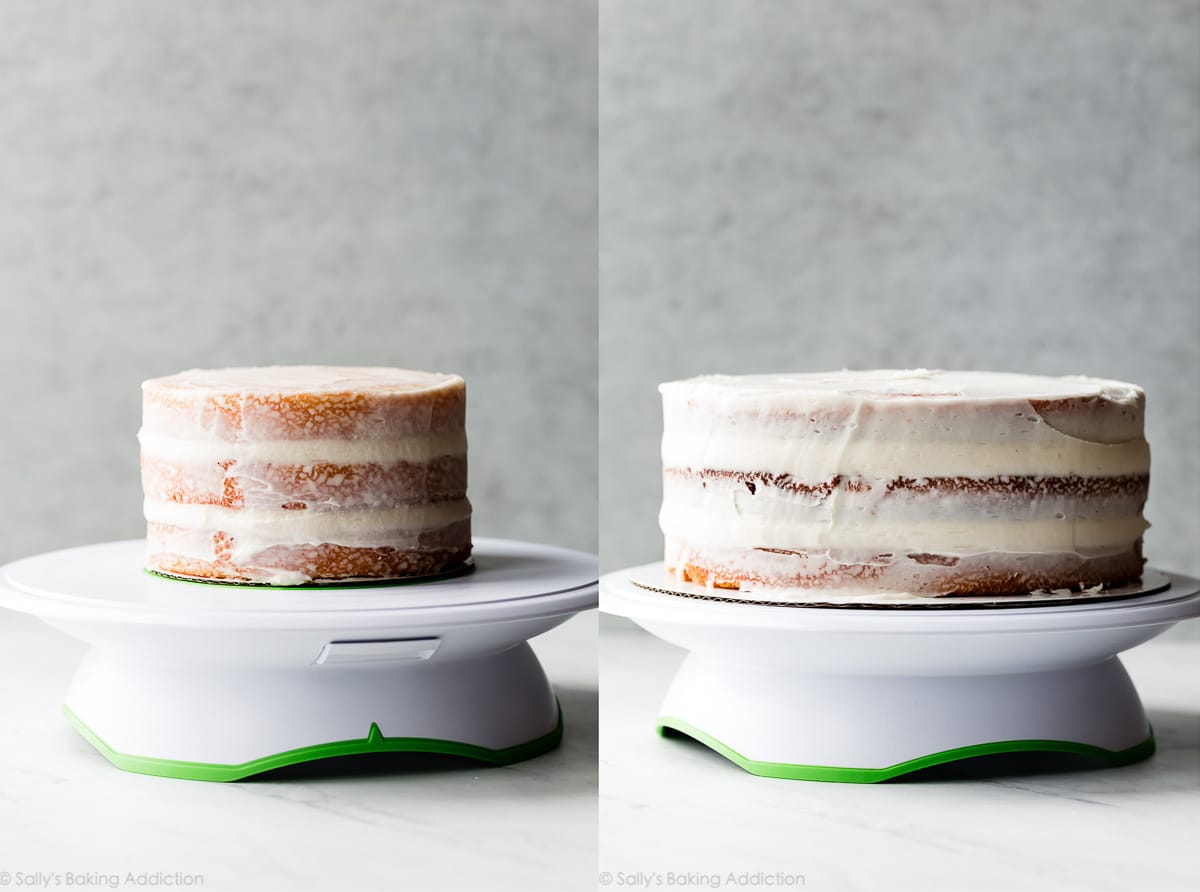
*As shown in the video tutorial, crumb coat and decorate both cakes separately before layering the tiers. Decorating instructions are next.
Decorating
Decorate both tiers on cake boards. You can remove the cake board from the bottom tier, if desired, before placing the cake onto a serving platter or cake stand. (This can be tricky!) However, I usually just leave it. A piped frosting border around the bottom of the cake hides it. Do not remove the cake board from the bottom of the top tier. The cake board sits between both tiers for added support and stability and ensures that when you cut into the top tier, the whole cake doesn’t sink down.
A wedding cake is literally the dessert of a lifetime, so it shouldn’t only taste great—it should look stunning, too. To reduce the possibility of flaws or mistakes, stick with simple decorating. A crumb coat on both tiers is necessary to protect the outer layer of frosting from catching any crumbs.
- What is a crumb coat? It’s basically a very thin layer of frosting around the cake before the beautiful exterior frosting is applied. You can see me crumb coating the cakes (as shown in the video tutorial, photos, and described in the recipe below), refrigerate the cakes to help “set” the crumb coat.
As you can see in the video tutorial above, it’s helpful to use a bench scraper to apply the crumb coat and exterior frosting layer. In fact, I use a bench scraper for decorating all layer cakes. I also like to use an icing spatula for the top of the cakes. (I use a small icing spatula for the small cake and a large icing spatula for the large cake.)
After crumb coating the cakes, they must be refrigerated to help “set” the crumb coat. This is another reason why cake boards are necessary—to help transfer/transport the cakes around.
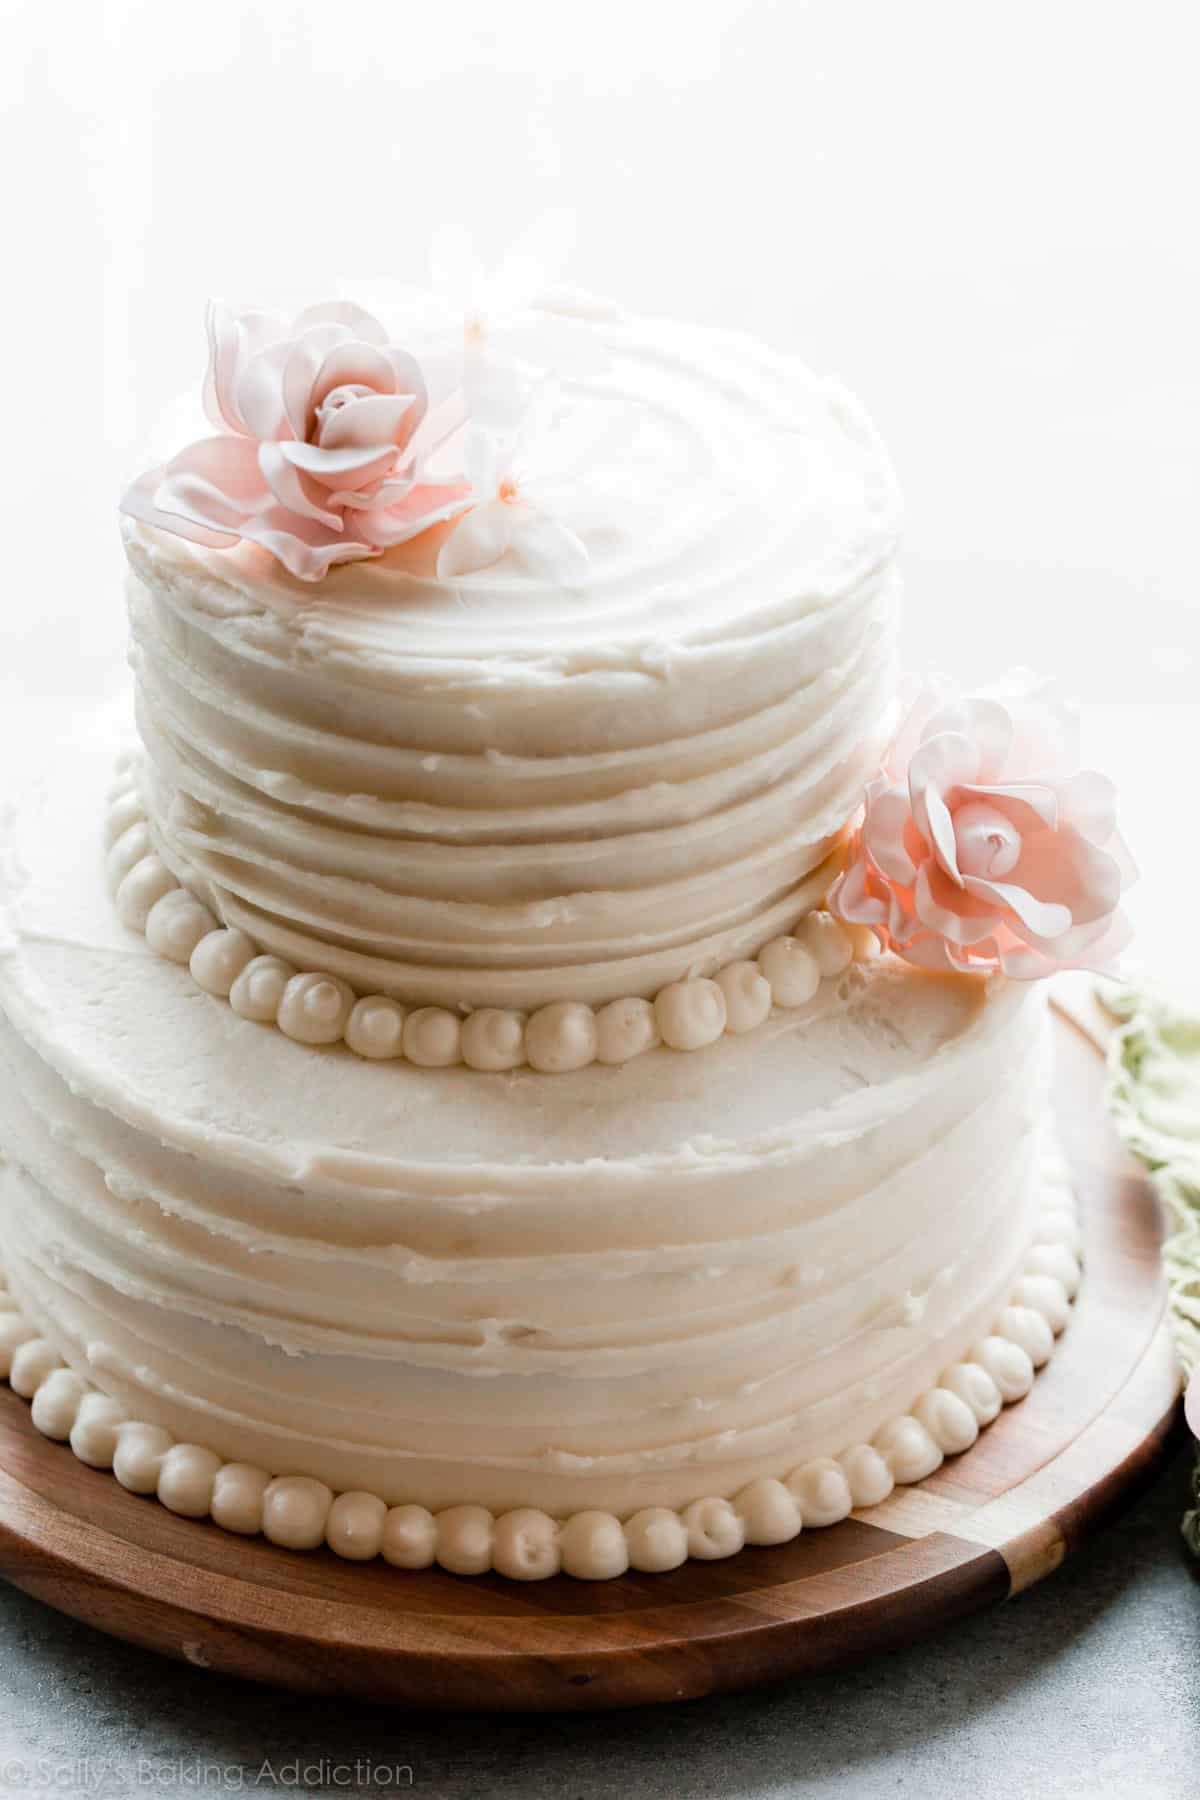
The textured look of the exterior frosting is very easy. (A big shoutout to my assistant, Stephanie, for suggesting this look!) As shown in my video, use a small icing spatula and run it around the cakes while spinning with the cake turner. You will love this look because it’s very easy, but resembles beautiful ruffles.
Piping
After placing the small tier on top, you can pipe frosting around the bottom of it. This covers up any spaces or smears that may have appeared when arranging the top tier. I pipe dots of frosting with a round piping tip between the tiers as well as around the bottom of the whole cake. They resemble pretty pearls. To smooth any peaks on these “pearls,” moisten your fingertip with water and gently press down on the peak.
More Decorating Inspiration
- Naked Cake style with flowers and berries
- Buttercream Flowers
- Two-Toned Frosting Roses
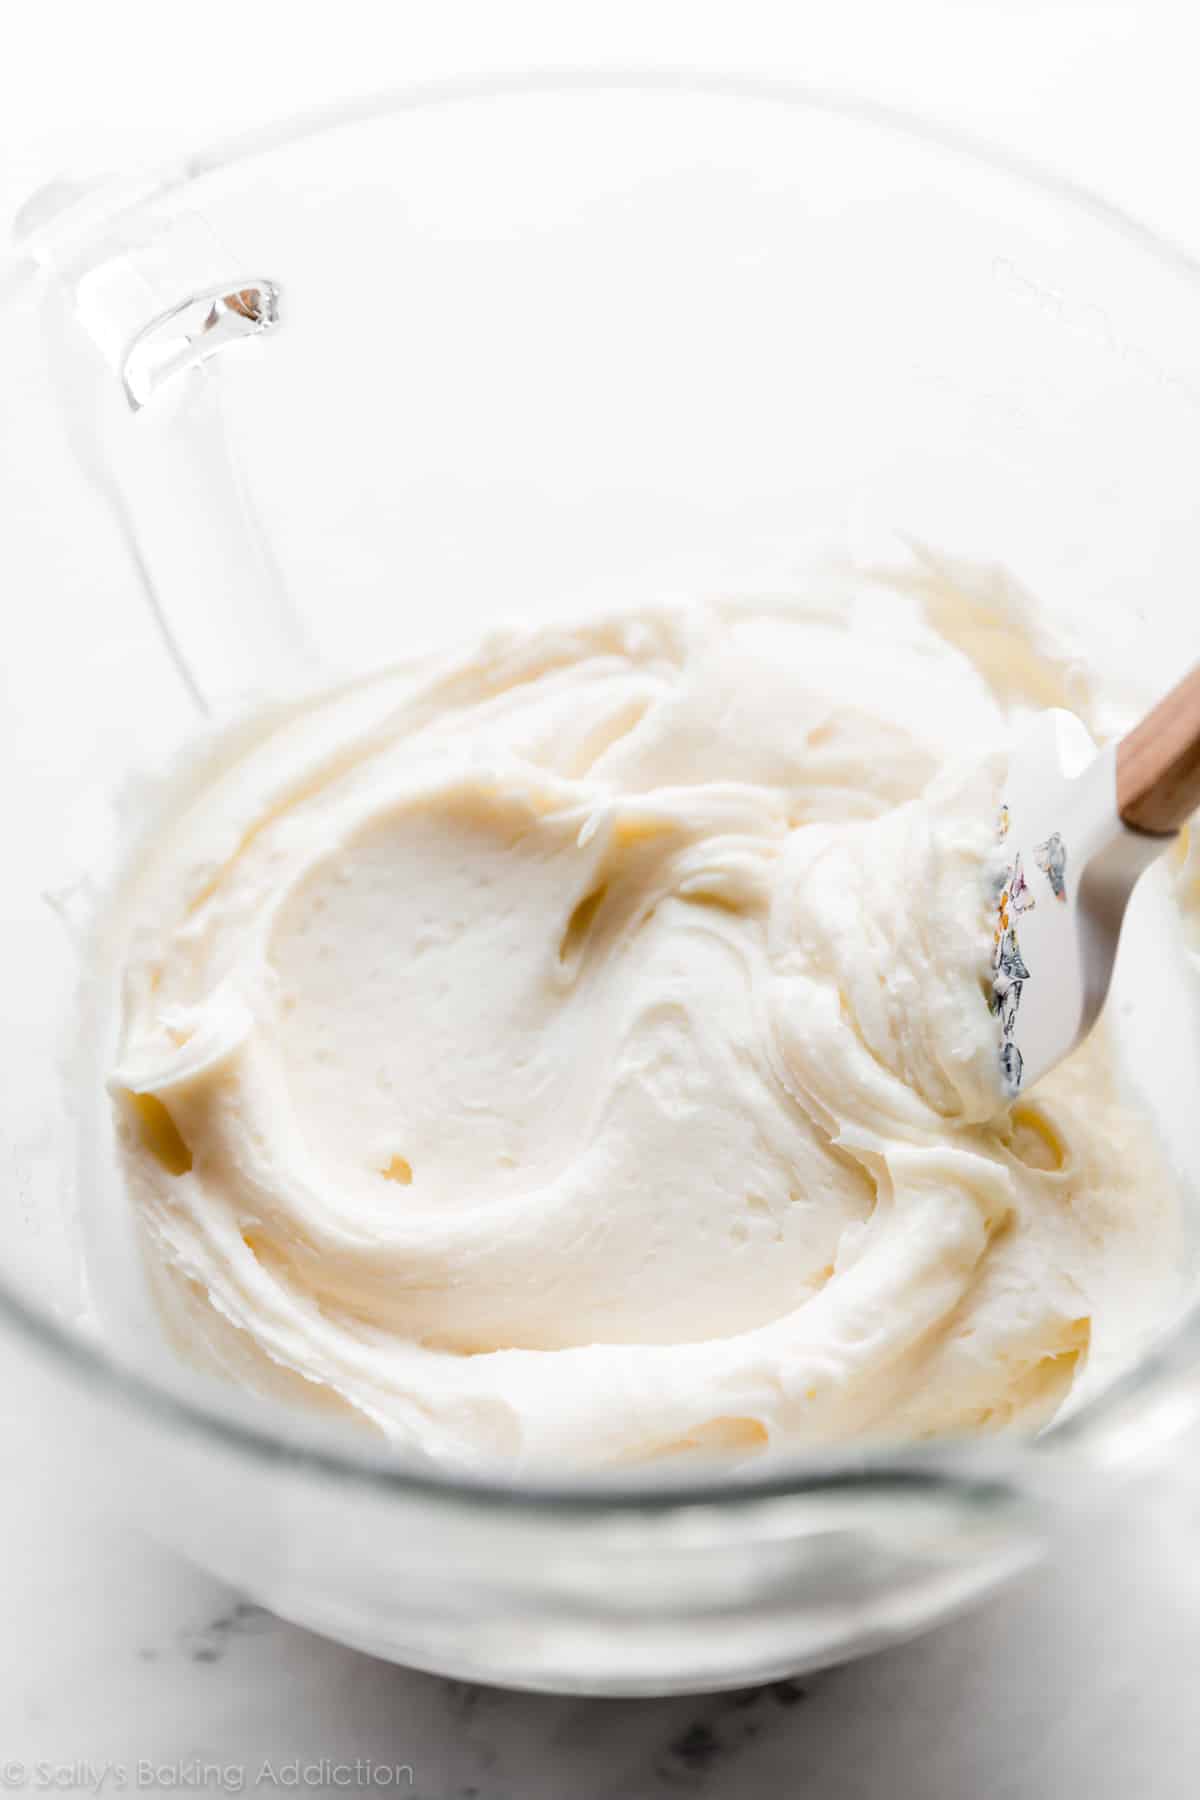
We’ll use my vanilla buttercream recipe (an increased amount, of course) for the decoration. Make two separate batches of frosting, 1 batch for each tier. There’s too much frosting for 1 batch—it will overwhelm your mixer.
You need at least 8-9 cups of frosting total which includes the filling, crumb coat, exterior ruffled frosting, and piping. If you desire other flavors of frosting, be sure to find a recipe that yields or adjust to yield 8-9 cups.
How to Keep Air Bubbles Out of Your Buttercream
Over-whipping vanilla buttercream creates air bubbles. The taste is no different, but the buttercream is no longer smooth and velvety.
Here’s how to get rid of air bubbles in your frosting: Ditch the mixer. Grab a wooden or metal spoon and begin stirring the buttercream by hand. Mash the frosting up against the side of the bowl to “pop” the bubbles. Do this until most of the air bubbles pop, about 1-2 minutes. This trick requires a lot of arm muscle!
Recommended Special Tools
(Affiliate links)
- Mixer (Handheld or Stand Mixer)
- Egg Separator
- 3 9×2 inch Round Cake Pans
- 3 6×2 inch Round Cake Pans
- Cake Boards (I use 1 6 inch and 1 10 inch. A 9 inch board works for the bottom cake, too. Or purchase this set which also includes cake dowels.)
- Cake Dowels (You need 4. You can use plastic cake dowels too. Plastic dowels are easier to cut.)
- Large Icing Spatula (for large cake)
- Small Icing Spatula (for small cake and for ruffled edge)
- Bench Scraper
- Cake Turner
- Piping Bag (disposable or reusable)
- Round Piping Tip
- Artificial Flower Decor (I used “Cozy Blush” color. Love these!)
- Large Serving Platter or Cake Stand (Pictured is a wooden cake stand I found at Target last year. You can see some of my other favorite cake stands in my list of Gift Ideas for Bakers.)
Description
This is a recipe for a completely homemade 2 tier wedding cake. For best taste and texture, and to avoid overwhelming your mixer, make each tier (cake) and each batch of frosting separately.
Ingredients
9-Inch Bottom Tier
- 3 and 2/3 cups (433g) cake flour (spooned & leveled)
- 1 teaspoon salt
- 1 teaspoon baking powder
- 3/4 teaspoon baking soda
- 1 and 1/2 cups (340g) unsalted butter, softened to room temperature
- 2 cups (400g) granulated sugar
- 3 large eggs + 2 additional egg whites, at room temperature
- 1 Tablespoon pure vanilla extract (yes, Tbsp!)
- 3/4 cup (180g) full-fat sour cream, at room temperature
- 3/4 cup (180ml) whole milk, at room temperature
6-Inch Top Tier
- 1 and 3/4 cups (207g) cake flour (spooned & leveled)
- 1/4 teaspoon salt
- 3/4 teaspoon baking powder
- 1/4 teaspoon baking soda
- 1/2 cup (8 Tbsp; 113g) unsalted butter, softened to room temperature
- 1 cup (200g) granulated sugar
- 1 large egg + 1 additional egg white, at room temperature
- 2 teaspoons pure vanilla extract
- 1/2 cup (120g) full-fat sour cream, at room temperature
- 1/2 cup (120ml) whole milk, at room temperature
Frosting for 9 inch cake & piping
- 2 cups (452g) unsalted butter, softened to room temperature
- 8 cups (960g) confectioners’ sugar
- 6 Tablespoons (90ml) whole milk or heavy cream
- 1 and 1/2 teaspoons pure vanilla extract
- 1/8 teaspoon salt
Frosting for 6 inch cake
- 1 cup (16 Tbsp; 226g) unsalted butter, softened to room temperature
- 4 – 5 cups (480-600g) confectioners’ sugar
- 1/4 cup (60ml) heavy cream or whole milk
- 1 teaspoon pure vanilla extract
- salt, to taste
Instructions
- Before beginning this recipe, watch the video tutorial above, read the entire blog post, read the recipe instructions, and review the recipe notes. Make sure you’re prepared with the recommended special tools, which are listed right above this recipe and in the recipe Notes section.
- Make each cake separately. Start with the bottom tier (9-inch cake). Preheat oven to 350°F (177°C). Grease three 9×2 inch round cake pans, line with parchment paper rounds, then grease the parchment paper. Parchment paper helps the cakes seamlessly release from the pans. (If it’s helpful, see this parchment paper rounds for cakes video & post.)
- Whisk the cake flour, salt, baking powder, and baking soda together. Set aside. Using a handheld or stand mixer fitted with a paddle or whisk attachment, beat the butter and sugar together on high speed until smooth and creamy, about 3 minutes. Scrape down the sides and up the bottom of the bowl with a silicone spatula as needed. Beat in the 3 eggs, 2 egg whites, and vanilla extract on high speed until combined, about 2 minutes. (Mixture will look curdled as a result of the egg liquid and solid butter combining.) Beat in the sour cream. Scrape down the sides and up the bottom of the bowl as needed. With the mixer on low speed, add the dry ingredients until just incorporated. With the mixer still running on low, slowly pour in the milk until combined. Do not over-mix. Whisk it all by hand a few times to make sure there are no lumps at the bottom of the bowl. The batter will be slightly thick. You’ll have 8-9 cups of cake batter. Pour batter evenly into cake pans. Weigh them to ensure accuracy, if desired. Bake for around 23-26 minutes or until the cakes are baked through. To test for doneness, insert a toothpick into the center of the cake. If it comes out clean, it’s done. Allow cakes to cool completely in the pans set on a wire cooling rack. The cakes must be completely cool before frosting and assembling.
- Keep the oven on.
- For the top tier (6-inch cake) prepare three 6×2 inch round cake pans just as you did with the 9-inch cake pans in step 2. (Greasing with parchment paper rounds.)
- Prepare the 6-inch cake batter the same exact way as the bottom tier. You’ll have about 4 cups of cake batter. The batter will be thinner than the bottom tier’s cake batter. Pour batter evenly into cake pans. Weigh them to ensure accuracy, if desired. Bake for around 18-22 minutes or until the cakes are baked through. To test for doneness, insert a toothpick into the center of the cake. If it comes out clean, it’s done. Allow cakes to cool completely in the pans set on a wire rack. The cakes must be completely cool before frosting and assembling.
- Using a large serrated knife, slice a thin layer off the tops of all the cakes to create a flat surface. This is called leveling off the cakes. Discard the leveled off piece (or crumble over ice cream!).
- Make the frosting for the 9-inch cake (which is enough for the piping detail, too): In a large bowl using a handheld mixer or stand mixer fitted with a paddle attachment, beat the butter on medium speed until creamy, about 2 minutes. Add confectioners’ sugar, milk, vanilla extract, and salt with the mixer running on low. Increase to high speed and beat for 2 minutes. Add more confectioners’ sugar if frosting is too thin, more milk if frosting is too thick, or an extra pinch of salt if frosting is too sweet.
- You can prepare the rest of the frosting now (step 11), if desired, or begin decorating the 9-inch tier. Place your 9-10 inch cake board on your cake turner. Place 1 cake layer on your cake board. Using a large icing spatula, evenly cover the top with a scant 1 and 1/2 cups of frosting. Top with 2nd cake layer and evenly cover the top with a scant 1 and 1/2 cups of frosting. Top with the third cake layer. Using about 1-1 and 1/4 cups of frosting, spread it all over the top and sides in a thin layer, also called a crumb coat. A large icing spatula and bench scraper are helpful for applying the crumb coat. Set leftover frosting aside at room temperature. If you are decorating this cake in stages over 1-2 days, cover and refrigerate this leftover frosting.
- Using the cake board to pick up the cake (be careful, it’s heavy), place the cake in the refrigerator to help set the crumb coat as you work on the top tier.
- Make the frosting for the 6-inch cake, just as you prepared the 1st batch of frosting. (Step 8.) Before adding any salt, taste the frosting, then add a pinch if desired. I always add a small pinch.
- Place your 6-inch cake board on your cake turner. Place 1 6-inch cake layer on your cake board. Using a small icing spatula, evenly cover the top with a scant 3/4 cup of frosting. Top with 2nd cake layer and evenly cover the top with a scant 3/4 cup of frosting. Top with the third cake layer. Using about 3/4 cup of frosting, spread it all over the top and sides in a thin layer, also called a crumb coat. A small icing spatula and bench scraper are helpful for applying the crumb coat. Set leftover frosting aside at room temperature. If you are decorating this cake in stages over 1-2 days, cover and refrigerate this leftover frosting.
- Using the cake board to pick up the 6-inch cake, carefully place the cake in the refrigerator to help set the crumb coat as you work on the exterior frosting on the top tier.
- Remove the bottom tier from the refrigerator (along with the cake board) and place on the cake turner. Apply the remaining frosting for the bottom tier on the cake, reserving about 6-8 Tablespoons for piping detail. I recommend a large icing spatula and bench scraper to apply the outer layer of frosting. For the decorative textured frosting as pictured, see my video above. As shown in the video, use a small icing spatula and run it around the cake while spinning with the cake turner. You will love this look because it’s very easy, but resembles beautiful ruffles. Carefully lift the cake (with the cake board) and place on your serving platter or cake stand.
- Wash and dry 4 cake dowels. Measure the height of the bottom cake. Measure and cut the cake dowels to match. Staying within a 6 inch circle diameter (you can use another 6 inch cake board to “imprint” a 6-inch circle in the very center of the top of the 9-inch cake), insert the dowels into the cake, spacing them about 2 inches apart to form 4 corners of a square. Push the dowels straight down until each touches the bottom cake board. Set aside.
- Remove the top tier from the refrigerator (along with the cake board) and place on the cake turner. Decorate just as you did the bottom tier, including the ruffled textured frosting. I also turn the cake on the cake turner and apply this ruffled look on top of the 6-inch cake, too. This is optional. Along with the cake board, carefully lift the small cake and gently place it in the very center of the bottom tier.
- Piping: After placing the small tier on top, you can pipe leftover frosting around the bottom of it. This covers up any spaces or smears that may have appeared when arranging the top tier. I pipe dots of frosting with Wilton piping tip #12 between the tiers as well as around the bottom of the whole cake. They resemble pretty pearls. To smooth down pointy peaks on these “pearls,” moisten your fingertip with water and gently press down on the peak.
- Add any decorative pieces, such as artificial flowers.
- Cake is best enjoyed within 3 days. Refrigerate cake until ready to serve. After a few hours, the frosting will “set” and you can lightly cover with plastic wrap.
- Cover any leftover cake tightly and refrigerate for up to 1 week.
Notes
- Make Ahead & Freezing Instructions: Assembled cake is best enjoyed within 3 days. Refrigerate assembled cake until ready to serve. After a few hours, the frosting will “set” and you can lightly cover with plastic wrap until ready to display and serve. You can make the cake ahead of time before assembling it, too. The cake layers can be baked, cooled, and covered tightly at room temperature overnight. Likewise, the frosting can be prepared then covered and refrigerated overnight. Let the frosting sit at room temperature to slightly soften for 20 minutes before assembling and frosting. (You may need to beat the refrigerated frosting in the mixer for 1-2 minutes if it’s particularly solid. Feel free to add a Tablespoon of milk or heavy cream to soften it up as it mixes, too.) Crumb-coated cakes can be frozen up to 2-3 months. Cover with 2 layers of plastic wrap and 1 layer of aluminum foil. Freeze. When ready, thaw overnight in the refrigerator. Unfrosted cake layers can also be frozen up to 2-3 months. Thaw overnight in the refrigerator and bring to room temperature before decorating/serving. See how to freeze cakes for detailed instructions on freezing cake layers.
- Special Tools (affiliate links): 9-inch Round Cake Pans | 6-inch Round Cake Pans | Glass Mixing Bowls | Whisk | Electric Mixer (Handheld or Stand) | Silicone Spatula | Egg Separator | Kitchen Scale (optional) | Cooling Rack | Cake Boards (1 6 inch and 1 10 inch, or this set which also includes cake dowels) | Wooden Cake Dowels or Plastic Cake Dowels | Cake Turner | Large Icing Spatula | Small Icing Spatula | Bench Scraper | Piping Bag (Disposable or Reusable) | Wilton #12 Round Piping Tip | Artificial Flower Decor
- Cake Flour: If you can’t get your hands on cake flour, use this cake flour substitute.
- More flavors, fillings, sizes, decoration ideas, and special tools: See blog post above.
- Why is everything at room temperature? All refrigerated items should be at room temperature so the batters mix together easily and evenly. Read here for more information about the importance of room temperature ingredients.


Reader Comments and Reviews
Hi, how long before can I keep the cake stacked? For example, if my event is in the afternoon can I stack it the evening before? Thanks!
That should be fine!
I wa slanting to use this recipe to make a 10in cake. Could I double the 9in cake recipe and make any extra cake into cupcakes? It is going to be a bottom tier for a 2 tier cake. Pls reply!
Hi Laura, yes, that should work just fine. Rather than doubling, though, we recommend making two separate batches. This helps prevent over and under mixing. This cake pan sizes and conversions guide will be a helpful resource for you as well.
Hi Sally, I love all of the recipes that I have tried from your website. I was planning on making a 9 inch cake using this recipe but do you have a strawberry mousse recipe that I could use to put between the layers?
Thank you in advance.
Hi Cynthia, we do not have a strawberry mousse recipe at this time, but we do have a strawberry buttercream recipe that would be delicious between the layers. Hope the cake is a hit!
Hi, Sally, I am making your Red Velvet wedding cake with the cheese frosting, I can’t get block cream cheese in England, would it work ok with Philadelphia cream cheese,
Hi Eileen! From what we understand, spreadable cream cheese sold in a tub in countries outside of the US is a little different from the spreadable cream cheese in the US. It’s thicker, sturdier, and more solid and should be OK to use in baking and frostings. We have no experience with it, but this is what we’ve heard from other non-US readers. If you try it, let us know how it turns out!
Hi Sally
I tried your best vanilla cake recipe tonight and it was great. You are my go to recipes for anything baking 🙂
I am planning on making a 50th wedding anniversary cake next weekend for 50 people and am
Afraid this will be too small.
Could I adapt to a 12 inch base and 8 inch top layer? Would you recommend 1.5x each recipe for volume?
Also I liked how light the vanilla cake recipe was. Is the adapted recipe with the sour cream quote dense? I am trying to avoid that.
If I use the best vanilla cake recipe only would it support a top layer?
Thanks!!
Hi Laura, so glad you asked these questions and I’m glad to help. You could 1.5x each batter, but you may just have better luck making each batter TWICE (separately) and then using as much as you need. And then make a few cupcakes on the side. The adapted recipe is nearly just as light and I wouldn’t describe it as dense. However, feel free to use the all buttermilk version if you love that. It will still be quite sturdy as the bottom tier.
I will be making this cake for a friend’s wedding next weekend. I made a 6 “ as a trial and am very happy with it.
I noticed that the recipe for the 9 inch layer has a very ratio of butter to sugar: 3 sticks butter to 2 cups sugar for 9 inch an 1 stick butter to 1 cup sugar for the 6 inch.
Does this result in a different texture and sweetness between the two cakes.
Also in comparing the 9 inch wedding cake And your vanilla cake, I see that they are very much the same but the vanilla cake has twice as much baking powder. I assume this makes a lighter texture. Is the vanilla cake too delicate to stack? Thank you very much.
Hi Mary, what great questions and I’m glad to help! The vanilla cake, as written, is perfectly fine to use as the bottom tier for this cake. It’s slightly lighter, but hardly. The texture between the two tiers is quite similar as well, I would say the 6 inch is slightly sweeter though.
Hi Sally, I left a comment this morning but after reading the whole recipe again and again from 8am to 5pm now, I have a few more questions to check with you:
1) For the use of lemon curd, it is recommended for both tier or just top tier? There are 2 replies from your end that are confusing – one say for both tier and one say recommended for top tier only (Or does the recommendation for top tier meant for the lemon curd as “filling” without buttercream?
2) If I would like to use lemon curd as part of my filling, do i apply it after i apply a layer of buttercream on the cake or before? Or it will be one layer of buttercream, then lemon curd then another layer of buttercream? The lemon curd should be in thin layer?
3) I’m interested to make my cake a bit of pinky color to the decoration. I am thinking of using your strawberry buttercream recipe (the one make with freeze dried strawberry) as the outer layer or for pipping some flower around the edge. Does this work? Provided I intend to have lemon curd as my filling. Lemon vs Strawberry
4) My wedding is on Tuesday night. Can I make the cake base on Sunday morning, buttercream on Monday evening and assemble and left the cake in fridge before serving on Tuesday night? I am in Singapore (tropical weather) so I afraid to left it in room temperature will cause the melting of the buttercream
Thanks Sally for reading my comments and questions and really appreciation if I can receive some guidance from your team. This is my very first time making wedding cake and I hope is not a disaster. ** I read all your post on room temperatures ingredient to 10 baking tips etc. All very helpful!
Hi Angela, for the first question from earlier… does your stand mixer have a beater attachment? (Which is the paddle.) If not, you can use a whisk if needed. (1) If using lemon curd, it’s really fine for either the top or bottom tier but I recommend mixing it with a little frosting or layer on top of a frosting layer. It will become squished otherwise and you won’t really have a “layer” between the cakes. (2) One layer of buttercream and layer of lemon curd on top. Then the cake on top of that. (3) Yes, you can use piped strawberry buttercream on the exterior of the cake. (4) That timing should be fine! Hope the cake is a big, big hit and good luck!
Thanks Sally for replying my comments!!! So happy to hear back from you! For my first question earlier, my stand mixer only have the whisk (the one we use to beat egg white) and mixing hook (use this for bread dough). So does it mean I can use the egg whisk for my buttercream?
How much almond extract would I add to this to make this into an almond cake vs. just vanilla? Would you recommend strawberry filling with a recipe like this? I don’t see a recipe on the Sally site.
Hi Jessica, You could absolutely add almond extract to the batters for this tiered cake. We’d recommend starting by replacing half the called for vanilla extract with almond extract. You could also include a strawberry filling on the top tier, or use our strawberry buttercream for a stable way of incorporating real strawberry flavor to the cake. Let us know what you try!
This cake is delicious. Exactly the taste I was looking for. Can either the 9 inch or 6 inch recipes work for cupcakes? If so, how long should they bake? Thank you!
Hi Ellen, here’s our vanilla cupcakes recipe! Same great vanilla flavor.
This recipe is phenomenal! I made it for my anniversary and topped with white sanding sugar. Thank you for listing the amount of time to mix. I’m terrible about over mixing my batter, but I didn’t this time. My daughter is insanely picky about cake, and she asked for seconds. Amazing recipe! This is my new go to recipe for vanilla cake!
Hi! I love this recipe! I used it for my own wedding cake and am now making my friends in a week!!!
Hers is lemon. For hers, I’m attempting a 3rd tier for the first time! My third tier would be 12 in. So 12, 9, 6 altogether.
Do you have a recommendation for adapting the recipe for a 12 incher? (I’ve made the 9 and 6s already)
Hi Madeline, This cake pan sizes and conversions guide will be helpful in scaling the recipe for a 12 inch cake. Happy baking!
I’m practicing this recipe for a friend’s wedding this fall and the first one came out great! I’d prefer to use buttermilk for both cakes, rather than the sour cream and milk. Should I use a buttermilk volume equal to the combined volume of sour cream and milk for each cake (i.e. 1.5 cups of buttermilk for the 9 inch cake and 1 cup for the 6 inch cake)? Since buttermilk is more liquidy than sour cream, I was wondering if I should use less buttermilk? Thanks for all the great reliable recipes!
Hi Ashley, it’s best to follow the recipes as written. They really do turn out best with sour cream and whole milk. I know that the 9-inch cake is great with 1 and 1/2 cups buttermilk (same as this vanilla cake), but I’m unsure about the 6 inch. Let me know if you test it out.
Hello Sally,
I am planning on doing this cake for my wedding next month. I am wondering if I could do a ”naked cake” version, and put more frosting and berries between the layers? Or would it crush under the weight of the top tier?
Thank you!
P.S. I’ve tried many of your recipes, and loved them! Your salted dark chocolate cookies are my favorites!
Hi Beatrice, a naked cake would work just fine here! You may want to create a dam of frosting around the edges to keep the berries between the layers and prevent them from coming out the sides. Hope the cake is a hit at your wedding!
Can I substitute the flour with a gluten free 1-1 blend? I would love to try this recipe, but I’m not able to have gluten unfortunately
Hi Erica, we don’t have much experience with gluten free baking, but please let us know what you try!
I tried using gluten free flour for this on one layer of the 6 inch recipe (scaled down as a test) and it was very dense, but delicious.
So moist and delicious! I used your SMBC recipe instead of American buttercream and the cake was a huge hit. Thank you!
Can I use apple butter as a filling in the wedding cake without causing problems with the integrity of the cake when stackin
Hi Pam, You’ll still want to use a thin layer of frosting before spreading the apple butter so that it doesn’t just get absorbed into the cake. Depending on the cake’s finished look, you may also want to make a dam of frosting around the outside before adding your filling so that your filling doesn’t leak out between layers. Let us know if you give it a try!
Hi,
Do you think I could use your pistachio cake recipe for the bottom tier? Thanks!
Yes, absolutely!
Hi,
With the proper dowelling and support (I would go overboard), do you think a 6 inch and a 4 inch could be supported? I’m planning on 1.5X the bottom recipe to make a 10 inch. So planning on 10, 8, 6 and 4 inches. Thanks in advance!
Hi Nav, a 4 tier cake should hold up just fine with the proper supports. Here is everything you need to know about converting recipes to different Cake Pan Sizes.
Hi Sally! i wanted to add a third larger tier on the bottom (10″ pans) Do you have exact measurement adjustments for a layer that size or would you just double the 6 in pan recipe amount? Also all of my baking pans are quite deep (more like 4″ instead of 2″) will I need to adjust bake time and temp?
I haven’t made this recipe yet but use your website like a bible for all of my baking needs! I’m making my best friends wedding cake and its my first one so any advice is appreciated! <3
Hi Natalie, thank you for asking! First, you shouldn’t have to adjust the bake time of the cakes unless you are using more batter per pan. Even though your cake pans are deeper, you should still be dividing the batter between 3 cake pans per tier. For a 3rd larger tier, will it be 3 layers as well? I do not have an exact recipe for that, however you can use this cake pan size and conversion page to scale the bottom or top tier up.
Hi Sally, I have to make this cake for an event on a Sunday. Would it be ok to make it on a Friday? Can I assemble the entire cake on Friday? Or can I add the filling and assemble the cake on Friday and frost on Sunday? Or should I just assemble and frost the entire thing on Sunday? Sorry lol
Hi Sarah! Once a cake is assembled and decorated, we usually recommend leaving it out at room temperature for up to 24 hours and refrigerating after that. But cakes will dry out in the refrigerator and a cake this large likely wouldn’t fit. Could you bake the cake layers Friday, then leave them covered at room temperature overnight to assemble the cake Saturday? That’s what we’d recommend. Otherwise you could bake the cake layers ahead of time, freeze them, then thaw and assemble the entire cake Sunday. Hope this helps!
Hi Sally! Thank you for your recipe! Can I ask if I only have 1x 9 inch pan and 1x 6 inch pan, would the cake batter be okay on room temperature if I bake on turns? Thank you!
Hi C, absolutely! Simply leave the batter at room temperature covered with a clean towel while waiting for the other layers to bake.
I am an amateur baker (this is the third cake I’ve made EVER, first two off of Sally’s site) and used this recipe! I also read up as much as I could on this website and followed every instruction as best as I could! I ended up making a 4 layer zebra cake with chocolate cream cheese filling for the bottom tier and a 4 layer lemon cake for the top tier with Sally’s vanilla cream cheese frosting all covered with the same frosting for both tiers (it was a cool night so I wasn’t worried about the frosting melting). Oh my word, I was impressed! Not only was the cake delicious, but it was beautiful! Thank you for the detailed recipe! My sister in law loved her wedding cake.
We’re so happy to hear that the wedding cake you made was a hit, Liz! Thank you so much for making and trusting our recipes.
Hello sorry I have another question….could I use Swiss meringue buttercream on the outside instead of normal buttercream or would you not be able to get the same effect? Many thanks Juliet
Hi Juliet, yes, you can use Swiss meringue buttercream here and decorate similarly.
I am anxious to try your 3 tier wedding cake. I am thinking about using a lemon curd filling and I printed out your recipe. Do I need to double the recipe? How much filling should I use on each layer? I plan to make the cake this weekend, so a quick reply would be appreciated. Thanks!
Hi Sue! 2-3 batches of lemon curd would be fantastic as a filling between these cake layers. Our recipe is for two tiers, so if adding a third you may want to make 3-4 batched of lemon curd. You’ll want just a thin layer between each.
Thank you soo much for the advice! I feel much better now. Fingers crossed it actually turns out okay on the day!
Hi Sally, I love your recipes especially your dark chocolate mousse cake. I’m planning to make this recipe for my brothers wedding next weekend (yes I really have left it to the last minute to plan!!). I wanted to do a 3 tier cake. Do you think 3 tiers would stack okay? Also please could you let me know how I would scale the recipe up and down to do a 10inch cake and an 8 inch cake. I am worrying so much about it already!! Thank you
Hi Juliet! This cake will hold up to three tiers. For the 10 inch and 8 inch batters, we’d recommend this: make two separate batches of the 9 inch tier recipe as written. Fill your 8 inch pans 1/2 way, and then save the leftovers to add to the batch of batter for the 10 inch tiers. Fill those half way as well. That should give you just enough batter. Hope this helps!
Thanks for the recipe. This top tier is different than the 6 inch instructions when it comes to eggs. One has 3 eggs the other has 1 egg plus an additional egg white. Can you explain why?
Hi Angie! The bottom tier calls for 3 eggs + 2 additional egg whites and the bottom tier calls for 1 egg + 1 additional egg white.
I’m looking to make an extra sheet cake for wedding guests since this will not serve 200 people…have you tried a 9×13 sheet cake? just curious about baking time. I plan to layer it with a rasberry mousse in the middle
Hi DeAnna, here’s our favorite 9×13 vanilla sheet cake recipe. Hope it’s a hit!
I am making this cake for our daughter’s wedding in 6 days. The first time I made it, the cake was delicious but dense, and I could see how it would support the other layers. I made it again last night, and the density is not the same. The cake is very light and spongy. I’m concerned that they won’t be firm enough to support the other layers. What did I do wrong that the density changed so much? I hope someone will respond, I’m a little stressed about this.
Hi Donna, take a look at this post on how to prevent dry and dense cakes. It may give you some ideas of what made the difference. Sometimes a change in the temperature and humidity in the air can make your cakes turn out differently. When they turned out light and spongy, did you try stacking them to see if the cake held up?
We have not tried stacking them yet. Although the toothpick came out clean the cake tops were still light colored. The cake had pulled away from the sides of the pans, so I pulled them out. The strange thing is that when I touched the top, it did not spring back but left an impression. After the cake had thoroughly cooled, I took them out of the pans and out them on the cooling rack. They actually stuck to my drying rack. So maybe they needed to cook even longer? Have not had that happen before.
Hi Donna, you’re right, usually when a cake is done the toothpick comes out clean, the cake pulls away from the sides of the pan, and the top springs back, so that’s a bit strange that you had two out of three. Did you set the pans on wire racks while they cooled? The recipe recommends using dowels for support, so definitely use them if you’re concerned about the cakes being sturdy enough when stacked. Also check out these cake baking tips.
Thank you so much! I was wondering we could use the cream cheese frosting instead of the buttercream. Or do buttercream for the filling and cream cheese frosting for the outside. Thanks!
Hi Ximena, absolutely. You can use cream cheese frosting instead. Enjoy!