

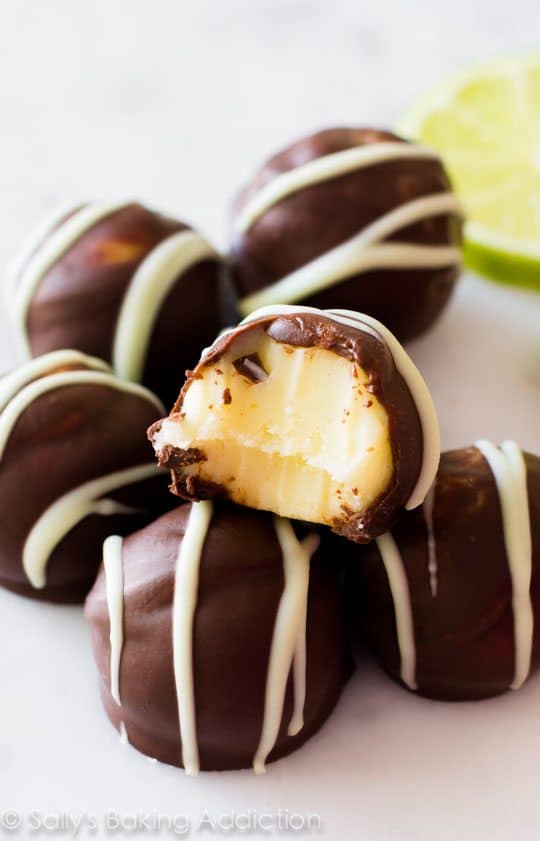
These no-bake chocolate peanut butter balls come together with a simple 5-ingredient filling, just like these peanut butter egg candies. For the coating, chop and melt real chocolate, and follow all my success tips to make dipping easy. These candies are as soft as chocolate truffles and as irresistible as peanut butter cups!
I originally published this recipe in 2019 and have since added new photos and a video tutorial, and I have also made a small change to the peanut butter filling. See recipe Notes for original filling recipe.

While there’s no disputing that peanut butter + chocolate is a winning combination, there is a lot of competition vying for the title of Best Chocolate-Peanut Butter Treat. While I love peanut butter blossoms and these no-bake chocolate peanut butter bars—oh, and this decadent dark chocolate peanut butter cake is a favorite special-occasion indulgence—I think the prize for Best All-Around goes to these simple peanut butter balls.
One reader, Krista, commented: “This recipe has become part of my regular Christmas baking and sometimes in the random moment. Thank you for bringing a new baking tradition to our home. My husband and son love them. ★★★★★”
One reader, Lana, commented: “I made these for my son for Valentine’s Day and he (we!) LOVED them! They are to DIE for! I roasted and salted some Spanish peanuts I had, chopped them fine, and then sprinkled them all over the top. Delish! ★★★★★“
Honestly the Best Peanut Butter Balls
And here’s why:
- Soft + creamy peanut butter filling, similar to the middle layer in this Reese’s peanut butter white chocolate bark
- Smooth + rich chocolate coating
- Easy to make no-bake recipe
- Make-ahead & freeze beautifully
- Recipe doubles easily, and a tin of these makes a wonderful gift
It’s always nice to have an easy no-bake treat to accompany your other Christmas cookies. It’s what I love about Oreo balls, cookie dough truffles, and rum balls, too. And since there’s no flour needed here, peanut butter balls are also a wonderful option when it comes to gluten-free dessert recipes.
Think of these no-bake candies as peanut butter bars in truffle form. My peanut butter bars have a bit more substance from the graham cracker crumbs. These peanut butter balls, on the other hand, have a purely creamy peanut butter filling. (And they’re even more wildly delicious than they sound, I swear.)
Best Ingredients to Use & Why:
- Softened Butter: Start with room-temperature butter. Overly soft or melted butter will sabotage your efforts from the start. Good rule of thumb: let the butter sit out on the counter for 1 hour before beginning the recipe. You can use salted or unsalted butter; if using salted, no need to adjust the added salt in the recipe—I promise these are plenty sweet either way.
- Creamy Peanut Butter: As you can guess, peanut butter is the main ingredient. For the best texture, use processed creamy peanut butter such as Jif or Skippy, the same kind I recommend for peanut butter blossoms and peanut butter frosting. Natural-style peanut butter is wonderful for eating and cooking, but I do not recommend it for this recipe because the filling will be too dry and crumbly.
- Confectioners’ Sugar: Confectioners’ sugar binds everything together and adds sweetness. Without this powdery sugar, the peanut butter filling will be too liquid.
- Vanilla Extract: For a little extra flavor, use vanilla extract.
- Salt: Salt offsets the sweetness.
- Chocolate: Just as if you were making chocolate truffles or chocolate peanut butter pretzel bites, use pure baking chocolate. Do not use chocolate chips because they do not melt properly. I list all of my advice about the chocolate coating below.
- 1 Teaspoon Vegetable Oil: Melted chocolate can be a little too thick to smoothly coat the candies, so add a small splash of vegetable oil to help thin it out.
Optional: festive sprinkles, of course!
How to Make Peanut Butter Balls
Let me show you the process, so you know what to expect when it’s your turn to try these treats. First, when you beat the butter and peanut butter together, the mixture will be quite thin (below, left). After you add the remaining filling ingredients, expect a crumbly dough-like mixture (below, right).

I promise the crumbly dough will come together with your hands as you roll.
Scoop and measure 1 scant Tablespoon (about 18g) each. Roll into balls.
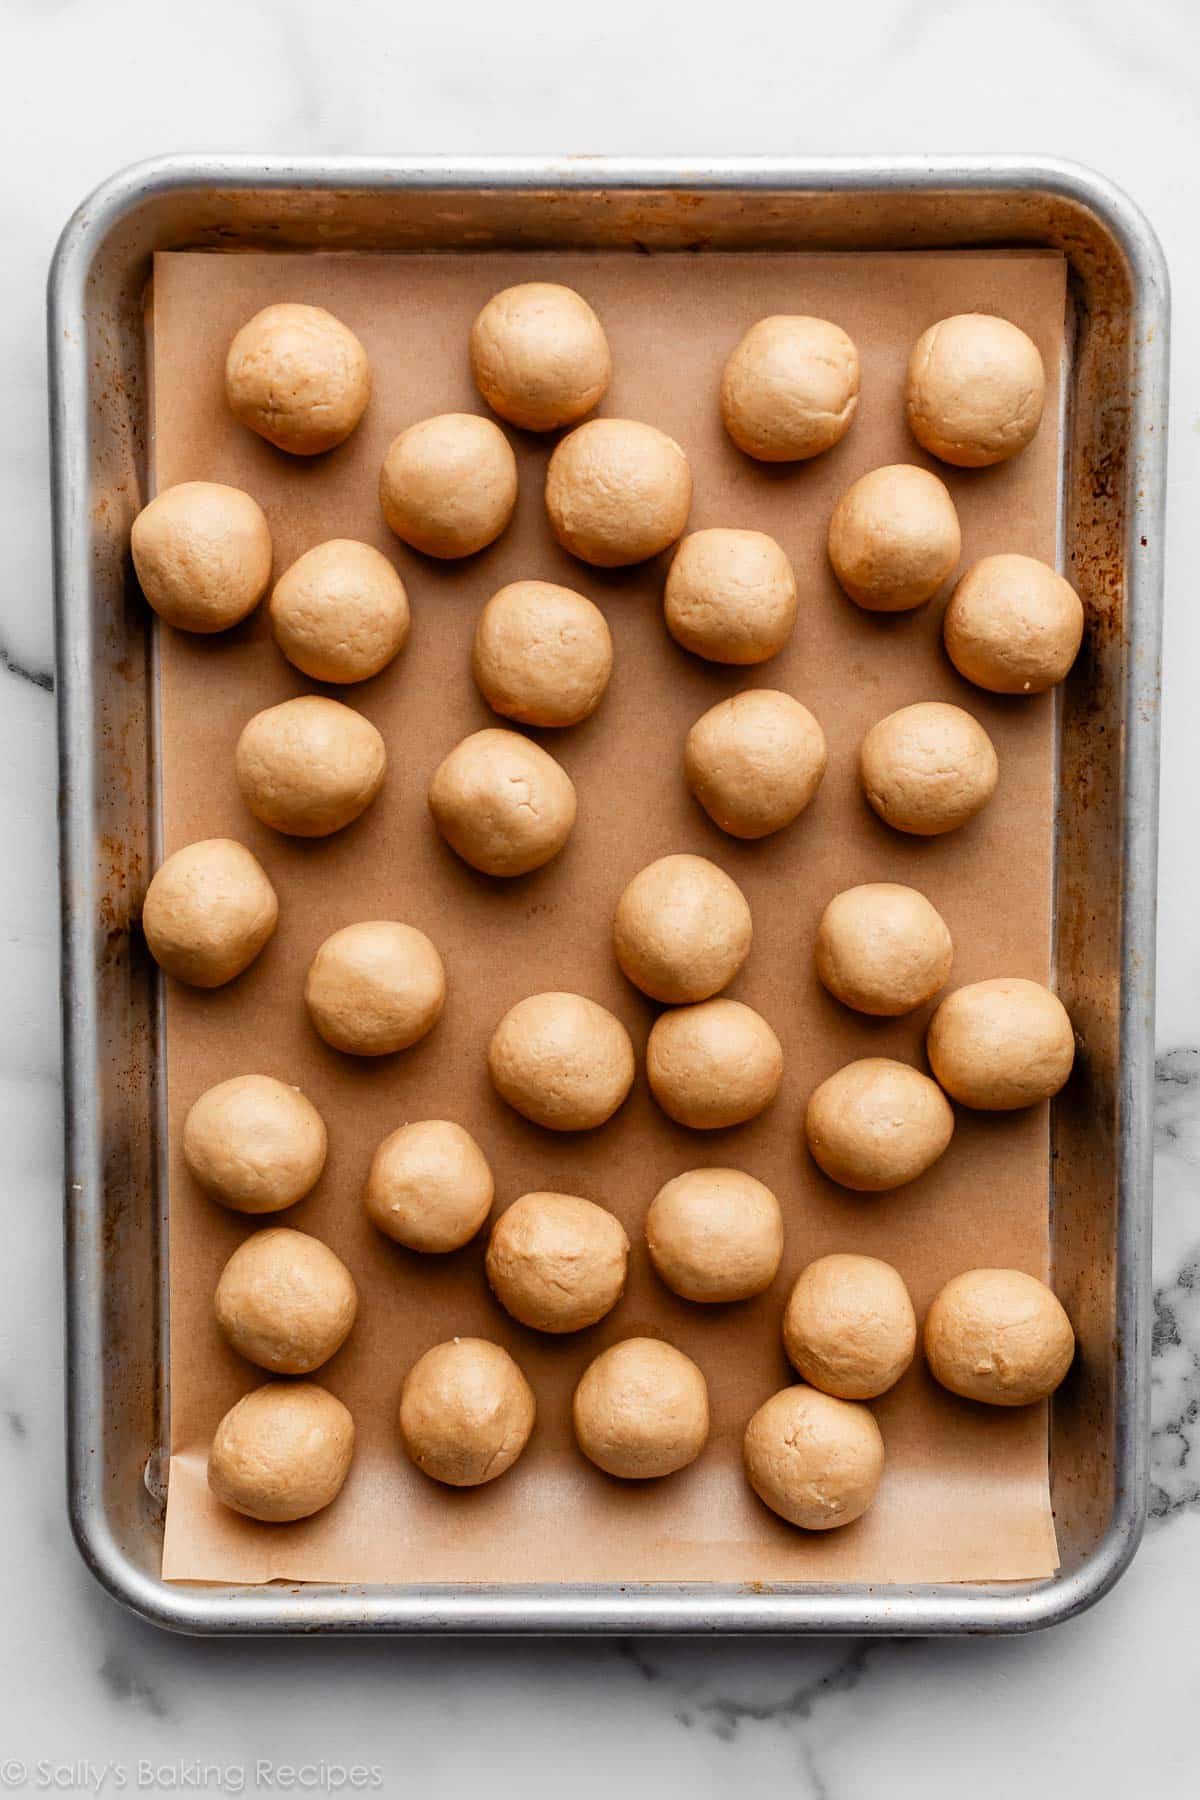
Chill the rolled balls for 1 hour in the refrigerator. Freezing them works too, but frozen peanut butter balls are difficult to coat in chocolate because the chocolate will slide off or crack. No shortcuts here, just refrigerate for 1 hour or up to 1 day.
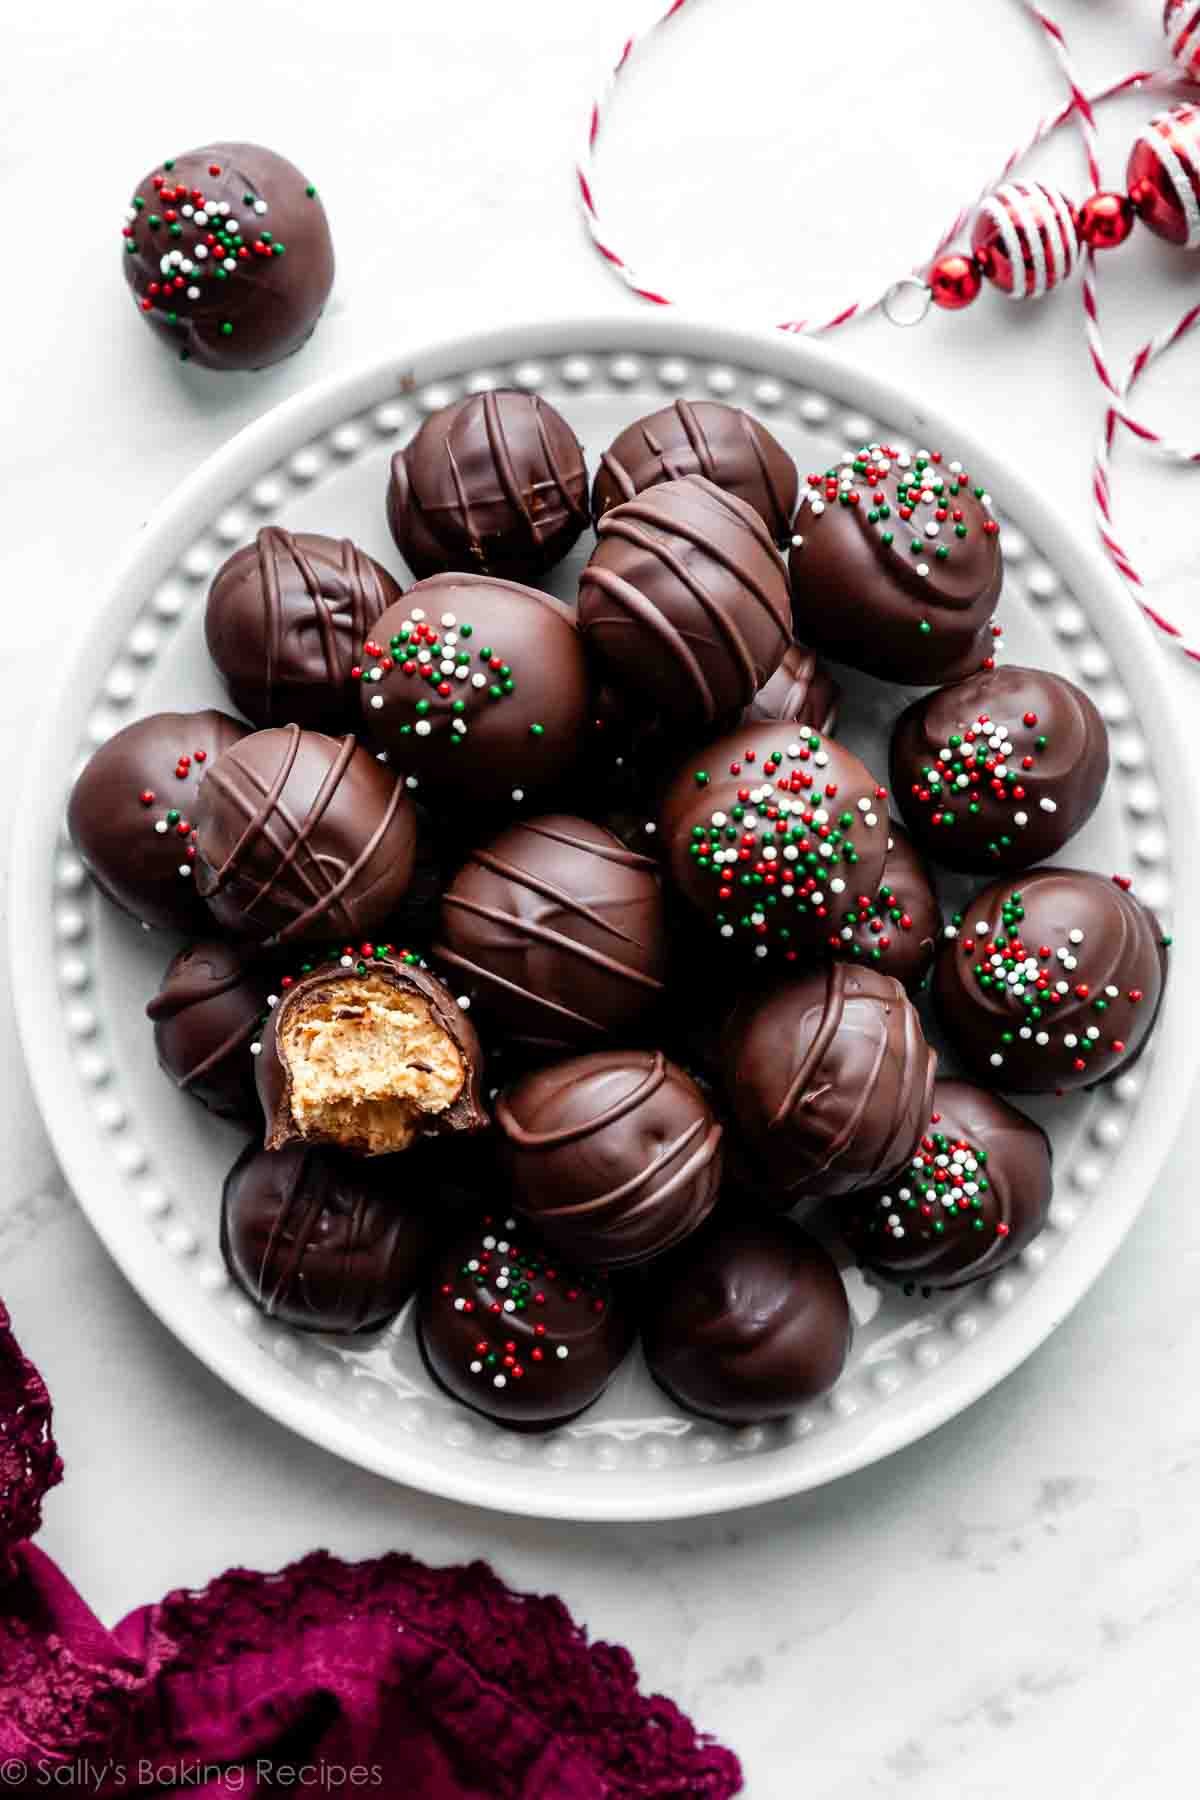
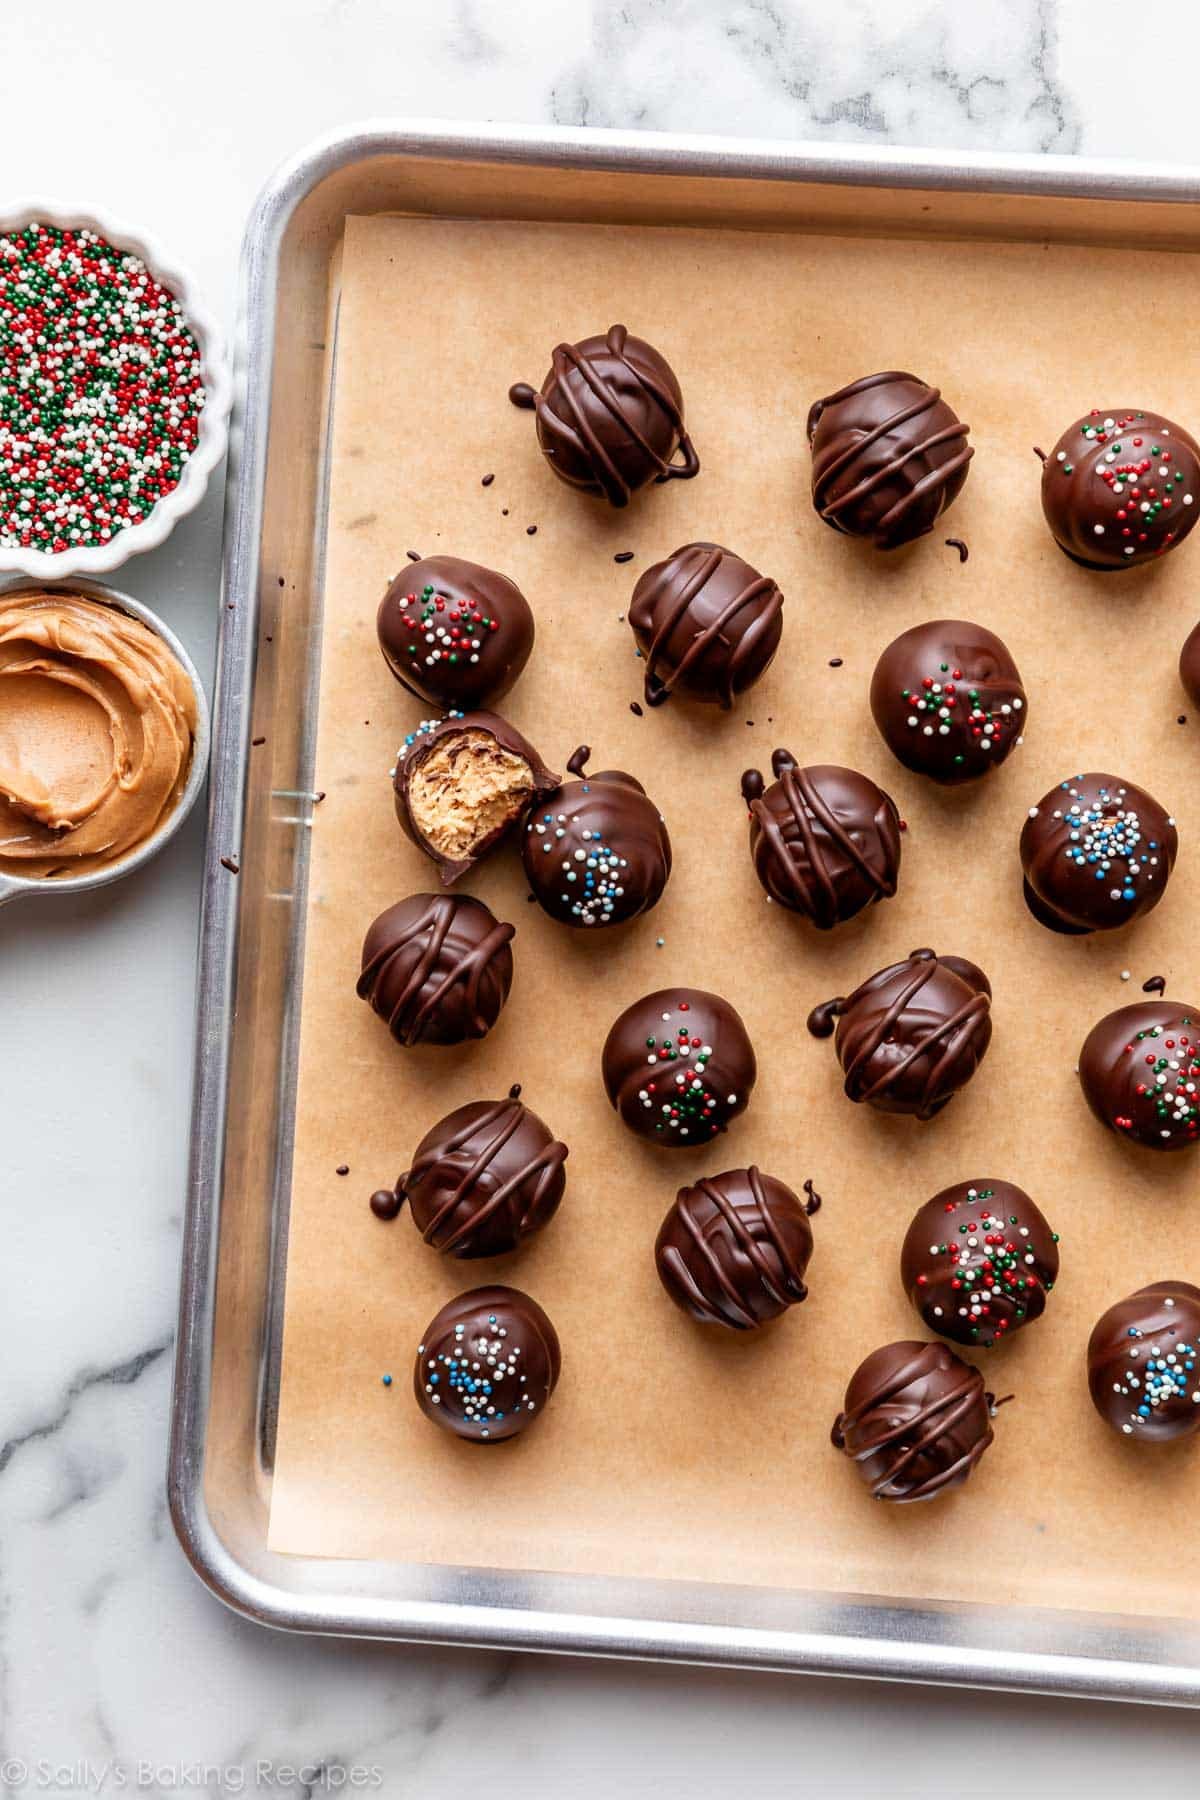
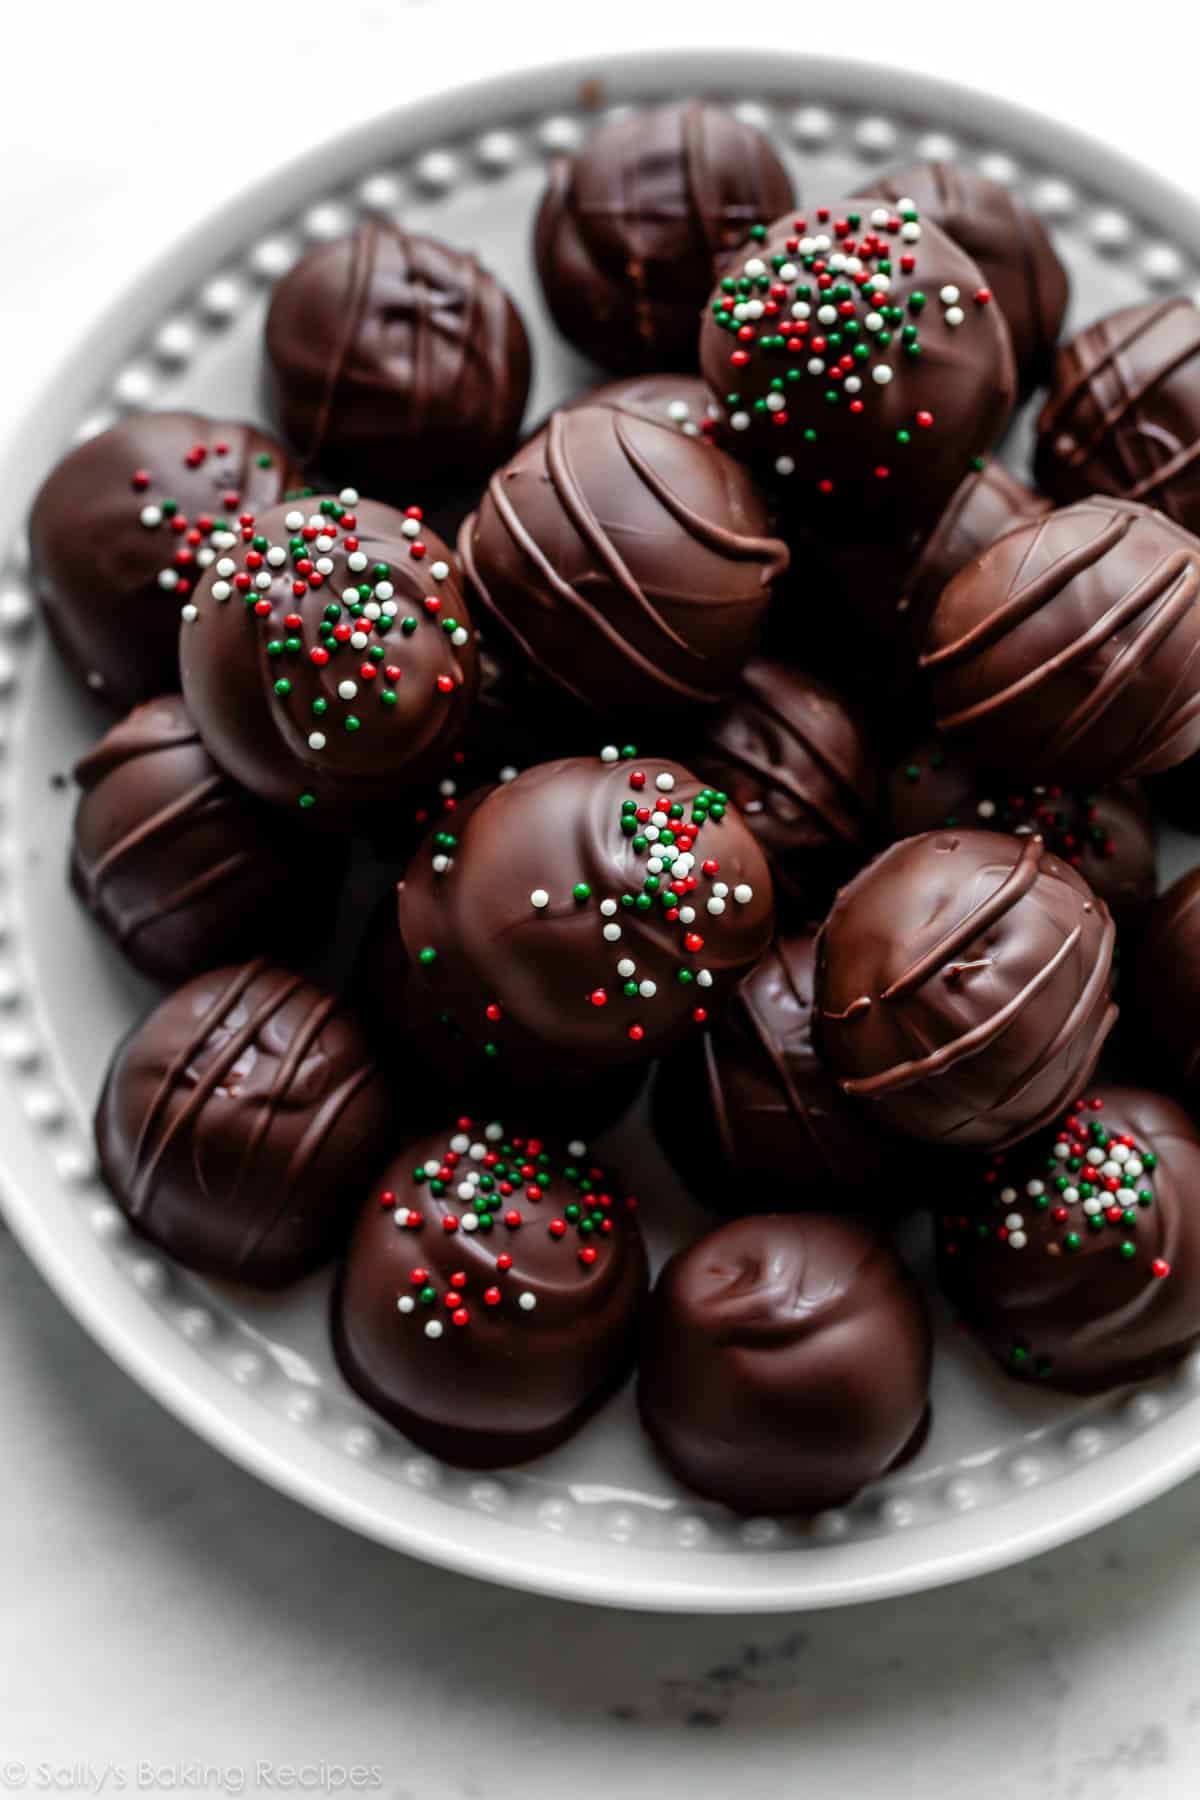
Dip in melted chocolate. If you have any chocolate leftover, drizzle on top. Add sprinkles, if desired, and then let the chocolate set.
These peanut butter balls keep well for up to 2 weeks in the refrigerator and even longer in the freezer, but that’s honestly a joke. There’s no possible way they will last!
5 Success Tips for Dipping in Chocolate
I have made a lot of coated candies, and even have an entire cookbook dedicated to candy-making. In my experience, I have learned some *key* success tips for coating various candies. See below, apply these tips, and the process should be a breeze.
- Use real chocolate. For the BEST looking and tasting candies, start with real chocolate. Use the 4-ounce “baking chocolate” bars you can find in the baking aisle of the grocery store. I prefer Baker’s or Ghirardelli brands. You need to chop up three 4-ounce (113g) bars for this recipe, or 12 ounces (339g) total. Melting wafers also work, and for those, I recommend Ghirardelli brand. You can use milk, semi-sweet, dark, or even white chocolate. Be warned that using all white chocolate will produce a VERY sweet candy. Instead, I recommend dark/bittersweet or semi-sweet chocolates. Do not use chocolate chips. Save them for your chocolate chip cookies!
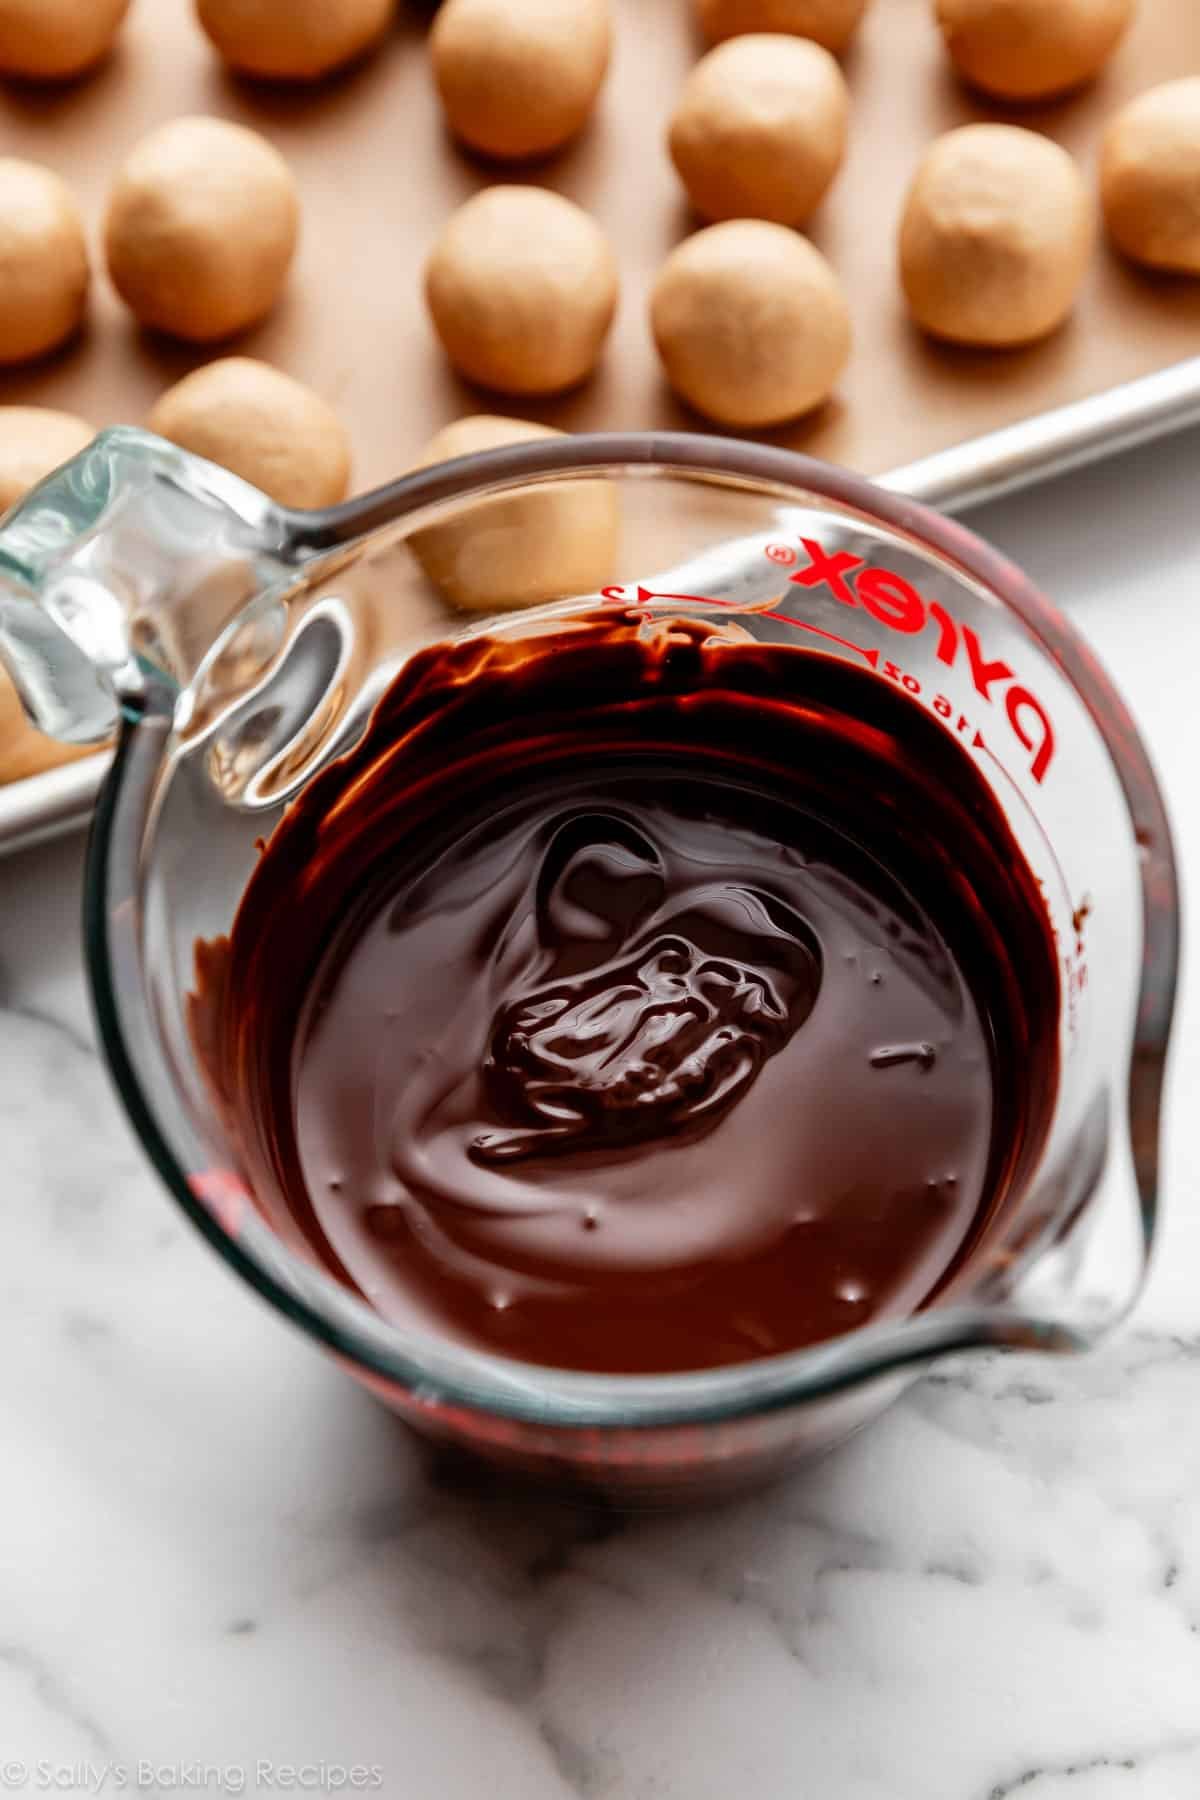
- Melt the chocolate properly. You can use a double boiler, but I usually just use the microwave. Place the chopped chocolate in a microwave-safe bowl or glass liquid measuring cup. Microwave in 20-second increments, stirring after each. Chocolate is temperamental, so always melt with care. I do not recommend tempering the chocolate for this recipe. Tempered chocolate isn’t refrigerated, and due to the butter in the filling, these candies should be refrigerated.
- Let the chocolate cool down for a few minutes. Otherwise it will melt the cold filling.
- Use a dipping tool to help. I use this spiral dipping tool for dipping chocolate truffles and Oreo balls, and it works just as well here. Place a peanut butter ball in the melted chocolate, and lift it back out again with the dipping tool. Quickly flip it upside down onto a lined baking sheet. If you don’t have a dipping tool, simply use a fork to lift the dipped ball out of the chocolate and use a toothpick (or another fork) to slide the ball onto the lined baking sheet.
- Allow the chocolate to set. Top the still-wet chocolate with sprinkles, if using, and if you have leftover chocolate, feel free to drizzle it on top—you can use a spoon or squeeze bottle for that. Place the baking sheet with the chocolate-covered peanut butter balls in the refrigerator to set the chocolate.
If your butter was too soft or if the peanut butter you’re using is too thin, the filling can get a little soft and sticky as you’re rolling. The refrigerator can fix that—stop what you’re doing and chill the bowl of filling for 15 minutes in the refrigerator before trying again to roll into balls.
If the filling gets a little crumbly, keeping molding it and mashing it between your hands. The warmth of your hands can help bring it back together.
1 teaspoon of vegetable oil thins out the chocolate so it’s the best consistency for dipping. If you find your chocolate is still too thick, add a little more vegetable oil. Coconut oil works too, but I recommend vegetable oil for best results.
It’s too thick. You want thinned-out melted chocolate. See above.
This is an easy fix! First, make sure you are working quickly. Second, keep the chocolate fluid by re-heating in the microwave for 10 seconds or use a double boiler. If you don’t have a double boiler, spoon the chocolate into a heatproof glass bowl set over a pot of simmering water. This keeps the chocolate slightly warm. Don’t let the water touch the bottom of the bowl.
The chocolate is too hot. Let it sit for a few minutes to slightly cool down.
If the peanut butter balls are softening and losing their shape as you’re dipping, put them back in the refrigerator (on the lined baking sheet) for 5–10 minutes and then try again.
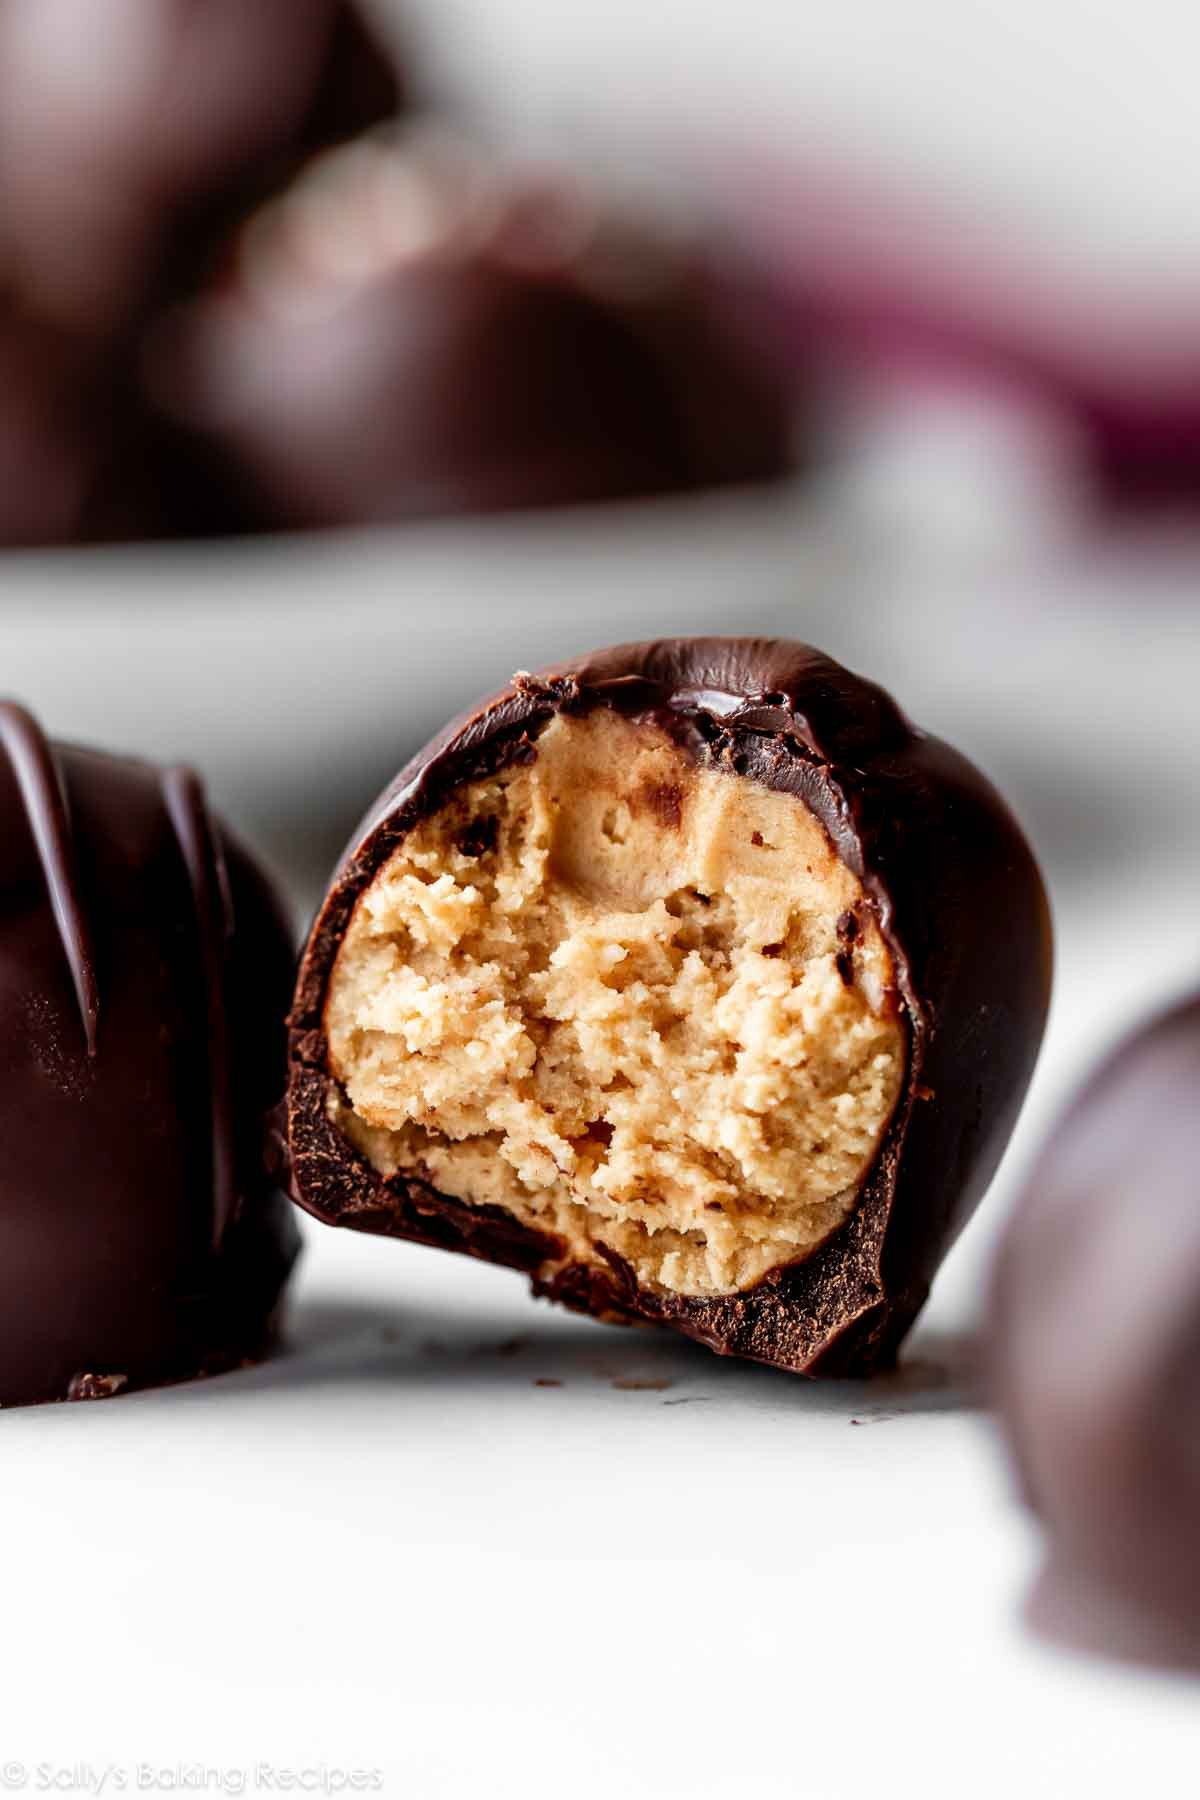
Wait until you taste them straight out of the refrigerator. Have you ever had a cold Reese’s peanut butter cup? It’s like that, but better.
More Peanut Butter + Chocolate Recipes
- Peanut Butter Blossoms
- Scotcheroos
- Peanut Butter Cup Tart
- No-Bake Cookies
- Peanut Butter Chocolate Chip Cookies
- Soft & Thick Monster Cookies
- Peanut Butter Cupcakes
- Peanut Butter Fudge Puddles
Peanut Butter Balls (Truffles)
- Prep Time: 30 minutes
- Cook Time: 0 minutes
- Total Time: 1 hour, 30 minutes
- Yield: 32-35 balls
- Category: Desserts
- Method: No Bake
- Cuisine: American
Description
Using only a few simple ingredients, these peanut butter balls come together in a snap. Follow the recipe closely and review the chocolate dipping success tips, as well as the recipe notes below before beginning.
Ingredients
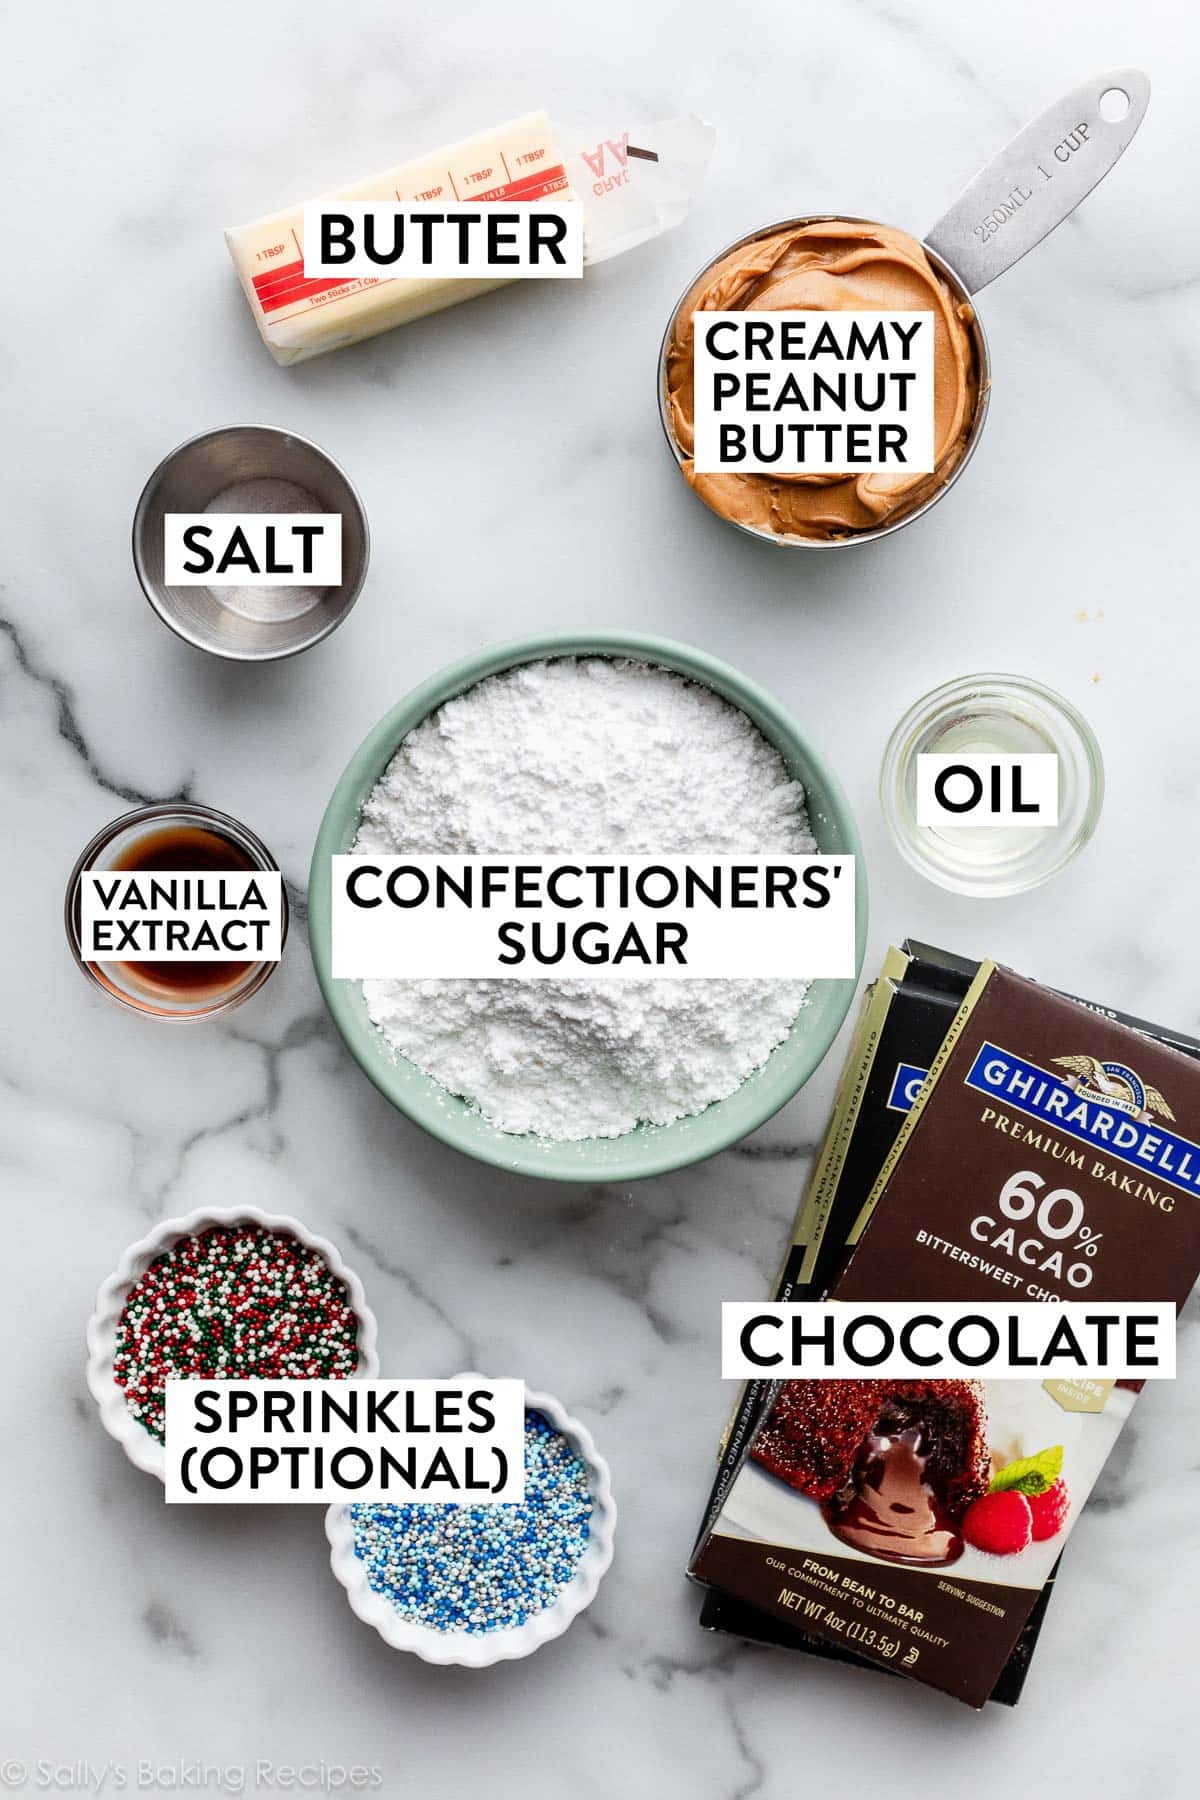
- 6 Tablespoons (85g) unsalted butter, softened to room temperature
- 1 cup (250g) creamy peanut butter (not natural style)
- 2 and 1/2 cups (300g) confectioners’ sugar
- 1/2 teaspoon pure vanilla extract
- 1/8 teaspoon salt
- 12 ounces (three 4-ounce bars) semi-sweet chocolate bars (339g), coarsely chopped*
- 1 teaspoon vegetable oil (see Note)
- optional: sprinkles for topping
Instructions
- Line a large baking sheet with parchment paper or a silicone baking mat. Set aside.
- With a handheld or stand mixer fitted with a paddle attachment, beat the butter on medium-high speed until creamy and smooth, about 2 minutes. Add the peanut butter and beat until combined, about 1 minute. If you notice any small chunks of butter, don’t worry—the mixture will smooth out. Add the confectioners’ sugar, vanilla extract, and salt, and beat on low speed for 2 minutes until everything is combined. The mixture will be a little soft and crumbly.
- Roll peanut butter dough into 1-inch balls (about 1 scant Tablespoon or 18g of dough each) and place on the baking sheet. Keep working and rolling the dough in your hands until the peanut butter balls come together. You should have about 32–35 balls total. The mixture can be a little crumbly, but the warmth of your hands will bring it together. If you find the peanut butter mixture becoming too soft to handle, chill in the refrigerator for 15 minutes. Alternatively, you can powder your hands with confectioners’ sugar, which helps prevent the filling from sticking to your hands.
- Chill the shaped peanut butter balls in the refrigerator for at least 1 hour and up to 1 day. During the last few minutes of the chilling time, begin melting the chocolate and oil together. You can melt it in a double boiler or the microwave. If using the microwave: place the chocolate and oil in a medium heat-proof bowl. I recommend using a liquid measuring cup because its depth makes dipping really easy. Melt in 20-second increments in the microwave, stirring after each increment, until completely melted and smooth. Let the warm chocolate sit for 6–8 minutes to cool slightly before dipping, otherwise it will melt the shaped peanut butter balls.
- Coat with chocolate: Remove peanut butter balls from the refrigerator. Working with 1 at a time, submerge into the chocolate, then carefully lift out using a fork or the spiral candy dipping tool. Tap the fork/tool gently on the side of the bowl/measuring cup to rid excess chocolate. If you used a fork, use a toothpick or a 2nd fork to help you slide the ball off of the fork and onto the baking sheet. If you used the dipping tool, just invert the ball onto the baking sheet. (See video tutorial for how I do this.) I reheat any leftover chocolate and use a spoon or squeeze bottle to drizzle on top of the coated balls. If desired, lightly sprinkle each with sprinkles while chocolate is still wet.
- Refrigerate coated peanut butter balls for 30 minutes or until chocolate has completely set before serving.
- Store in an airtight container at room temperature for 2 days or in the refrigerator for up to 2 weeks. The filling can get a little soft, so they taste best right out of the refrigerator. We love them right out of the freezer, too!
Notes
- Make Ahead & Freezing Instructions: You can start this recipe 1 day ahead of time. The shaped filling can be chilled in the refrigerator for up to 1 day prior to coating. The coated peanut butter candies can be frozen. Freeze the coated candies for up to 3 months. Thaw overnight in the refrigerator.
- Special Tools (affiliate links): Electric Mixer (Handheld or Stand) | Baking Sheet | Silicone Baking Mat or Parchment Paper | Medium Cookie Scoop or Digital Scale | Double Boiler or Liquid Measuring Cup | Candy Dipping Tool | Squeeze Bottle
- Butter: I use unsalted butter in this recipe, though I’ve made them plenty of times before with salted butter. No need to adjust the salt in the filling, though feel free to taste the filling before adding the salt and only add a pinch if desired. Because the filling and coating are so sweet, I never adjust the salt if using salted butter.
- Can I Use Crunchy Peanut Butter? Creamy/smooth is best because crunchy yields a very crumbly filling that’s difficult to mold. If crunchy is all you have, you can make it work in a pinch—just be warned the filling mixture will be super crumbly and you’ll really have to work it with your hands to mold into balls.
- Chocolate: For the best looking and tasting candies, use 4-ounce “baking chocolate” bars found in the baking aisle. I prefer Baker’s or Ghirardelli brands. You need three 4-ounce bars for this recipe, 12 ounces total. You can use milk, semi-sweet, or bittersweet chocolates. You could also use chocolate melting wafers, such as Ghirardelli brand. Candy melts or almond bark work too, but they don’t taste like real chocolate. Do not use chocolate chips because they contain stabilizers preventing them from melting into the correct consistency for coating.
- Coating/Melting Chocolate: See all my troubleshooting tips above in the post.
- Oil: Vegetable oil helps thin out the chocolate so it easily coats the candies. If you’re using chocolate melting wafers, you do not need to add oil. Coconut oil works, but the chocolate isn’t quite as thin. I’ve found vegetable oil is the best choice. Do not use butter.
- Do Not Temper: I do not recommend tempering the chocolate for this recipe. Tempered chocolate should not be refrigerated and due to the fresh ingredients in the filling, these candies must be refrigerated.
- Update in 2023: I slightly updated the filling in 2023. The recipe used to call for 8 Tablespoons butter (113g) and 3 cups confectioners’ sugar (360g). I reduced both slightly to the amounts you see above, for less sweetness, and more peanut butter flavor. The filling now matches my popular peanut butter eggs.


Reader Comments and Reviews
This is the best recipe I have made so far!!!
Love all your recipes! Can I turn them into protein balls and substitute protein powder for the powdered sugar?
Hi Cheyenne, we haven’t tested it, but we’d love to know how they turn out if you try anything!
this recipie was AMAZING, but i forgot to soften the butter, so it was stuck to the bottom of the mixer. When this happens, a easy tip is to add melted butter, and it will be ready in no time!
what do i do if my mix is soft and fluffy and sticky
Hi Jayda! Does it look much different from the consistency in the video tutorial above? Did you make any changes/substitutions?
This recipe has become part of my regular Christmas baking and sometimes on the random moment. Thank you for bringing a new baking tradition into our home. My husband and son love them.
Other butters?
Hi Christine, As long as it’s a creamy and you stir it up extra well before using – almond butter should work!
My kids love it when I make this recipe. My kids hated peanut butter and now I make these every weekend for them. Snack and child approved.
I love this tecipue but do not fret – I only had natural crunchy peanut butter – very crunchy. I stired it very well & used it and it turned out GREAT ! Actually I love the crunch inside!
This recipe is delicious my friend made it. I got the recipe and plan to make it her ball looked more like funny looking eggs ha ha.
These are great!!
These are so easy and delicious. Great addition to my holiday cookie trays!
Easy to make and received glowing compliments!
Sally, I love your recipes and the suggestions included. I was wondering if I could press the pb mixture into a 9×13 pan and pour the melted chocolate on top. I think I would cool the chocolate slightly. Love the balls but need to have a quick version too.
I’ve not made this version but I did that once with a similar recipe in Nigella’s Christmas. It works fine although the chocolate layer can crack when you cut it. I’ve made those A LOT (very addictive!) and rolling the balls is strangely therapeutic – a nice Christmas tradition making them for friends and family!
Good base but made some modifications to suit my taste. I used 1.5 coups of Jif crunchy no-stir “natural” peanut butter. I added 1 teaspoon of Lyle’s golden syrup and upped the salt to one teaspoon to offset a bit of the sweetness. The dipping chocolate was Ghirardelli; half semisweet and half bittersweet. Dipping went well and they looked remarkably good. Everyone loved them at the party. This recipe is definitely on the annual holiday “to make” list!
I made these for a pot luck desert party and they were a HUGE hit! Then I decided to make them again, but got a little too cocky. I thought I remembered the recipe but didn’t and added more butter than the recipe called for. Not as good as the first round. 🙁 Nonetheless, these are the best!!!!!
I look forward to making these
These peanut butter truffles are fabulous and the most work is dipping them in the chocolate. I had to put my peanut butter balls back into the refrigerator while halfway dipping them in the chocolate. They were getting too soft and difficult to get off of the fork. I like Sally’s recipes because she gives great notes and suggestions and I also like that she put the measurements in grams.
First time making this recipe, and it did not disappoint. I will certainly make it again next Christmas! Thank you Sally.
I have made a very similar recipe. But I always MELT my butter & peanut butter together. Then add the confectioners sugar. Also, I never add vanilla or salt. The dough is much easier to work with… I use a small cookie scoop, then roll into balls. And then Dip into Choc .. I put the melted Choc into my crockpot on warm setting. If the Choc gets warm to touch, turn the Choc off for awhile. & continue dipping. This is everyone’s favorite at Christmastime!
delicious! I also add rice crispy cereal for a little crunch inside
Peanut butter balls have been a family tradition for a couple of generations. This year I made them vegan because some of the family are vegans and it is an easy adaptation. Just sub plant based butter for the real butter and all is a go. I actually used crunchy peanut butter and some vegan puffed rice cereal for more crunch. I tempered the chocolate for the first batch but will use your suggestion for the second batch.
Made this on my annual baking day. They were amazing! I could have eaten every last bite!
Can I use coconut oil instead of the vegetable oil? Or melted butter?
Hi Havah, Coconut oil works too, but we recommend vegetable oil for best results.
I definitely did not get 32-35 of these. Maybe more like 14-16. But it was my first successful time making these!
Hi Valerie, how large are you making them? They should be a scant Tablespoon each. I wonder if yours are larger.
Apologies if this has been asked before – can I add some rice krispies to the recipe to give it some crunch? Or, would it be preferable to use chunky peanut butter? Thanks!
Hi Jennifer! We can’t see why not! We would slightly reduce the confectioners’ sugar. Otherwise, the filling will be too dry.
Thanks for the feedback. In case anyone is wondering, I did as suggested and reduced sugar slightly and used about a cup of rice krispies. They were delicious and made them a second time with more rice krispies added!
Hey Jennifer, my family’s made a variation of what you’re talking about for decades. We’ve always used 2c extra chunky pb (skippy or jiff), ~12-14 oz confectioner’s sugar, 1c melted butter & once it’s mixed, folded in 2.5-3 cups of rice krispies. At 3 cups, it can be a bit hard to make the balls stick together, but once they’re rolled & frozen, they still dip just fine. That was always our traditional family buckeye recipe, but you can easily coat the whole thing and turn them into crispy truffles instead. Given the amount of powdered sugar, I always preferred a bittersweet chocolate coating.
Cheers & Happy Holidays!
Thanks for sharing your family recipe! Will try this one too. Have chocolate in the cupboard to use up from the holidays 🙂
Thanks for sharing your family recipe! Will try this one too!!
I just put these finished truffles back in the fridge to chill. I know they will be delicious, but I had trouble getting them to release from the dipping tool and they look a bit messy. Do you have any idea why this happened? I’m thinking either the balls weren’t chilled enough (4hours) or the chocolate was not warm enough? Any advice you can give would be appreciated because I would love to add these to my yearly Christmas baking gifts, but would want them to look a little nicer. I had to kind of bang the tool on the side of the baking pan to get them to release.
Hi Patti! Sounds like the chocolate was a little too cool/thick. You can reheat it as you go if it is thickening up too much.
This is the BEST peanut butter ball recipe! I made them last year and decided not to tell my family I was no longer using my mom’s recipe. However, after receiving so many compliments, I admitted to using a different recipe. I had to remind my family that Mimaw had used the recipe I had given her, so it wasn’t HER recipe I had substituted with a much better one! (However, my youngest son did say he missed the Rice Krispies in her peanut butter balls 🙂 ) Thank you, Sally, for being my go-to resource for baking recipes.
I always use graham cracker crumbs in mine.
Thank you for the truffles recipe! Am I able to use Walnut Oil instead of Vegetable Oil, to impart a nuttier flavor?
Hi Aria, that would be just fine for the coating.
Can I use a fondue pot to melt chocolates. It has a temperature control.
Hi Donna, that should be fine.
This looks so good! Could I dip these chocolate balls in crushed pretzels? Thank you so much. Judy
Hi Judy! We recommend sprinkle some crushed pretzels on top of the balls while the chocolate is still melted.
I don’t like peanut butter and my husband doesn’t like truffles so I made this recipe to take to my coworkers (I always take a “Sally” recipe in!) but they didn’t make it to the office – we both loved them! Thanks for all the recipes that never fail