

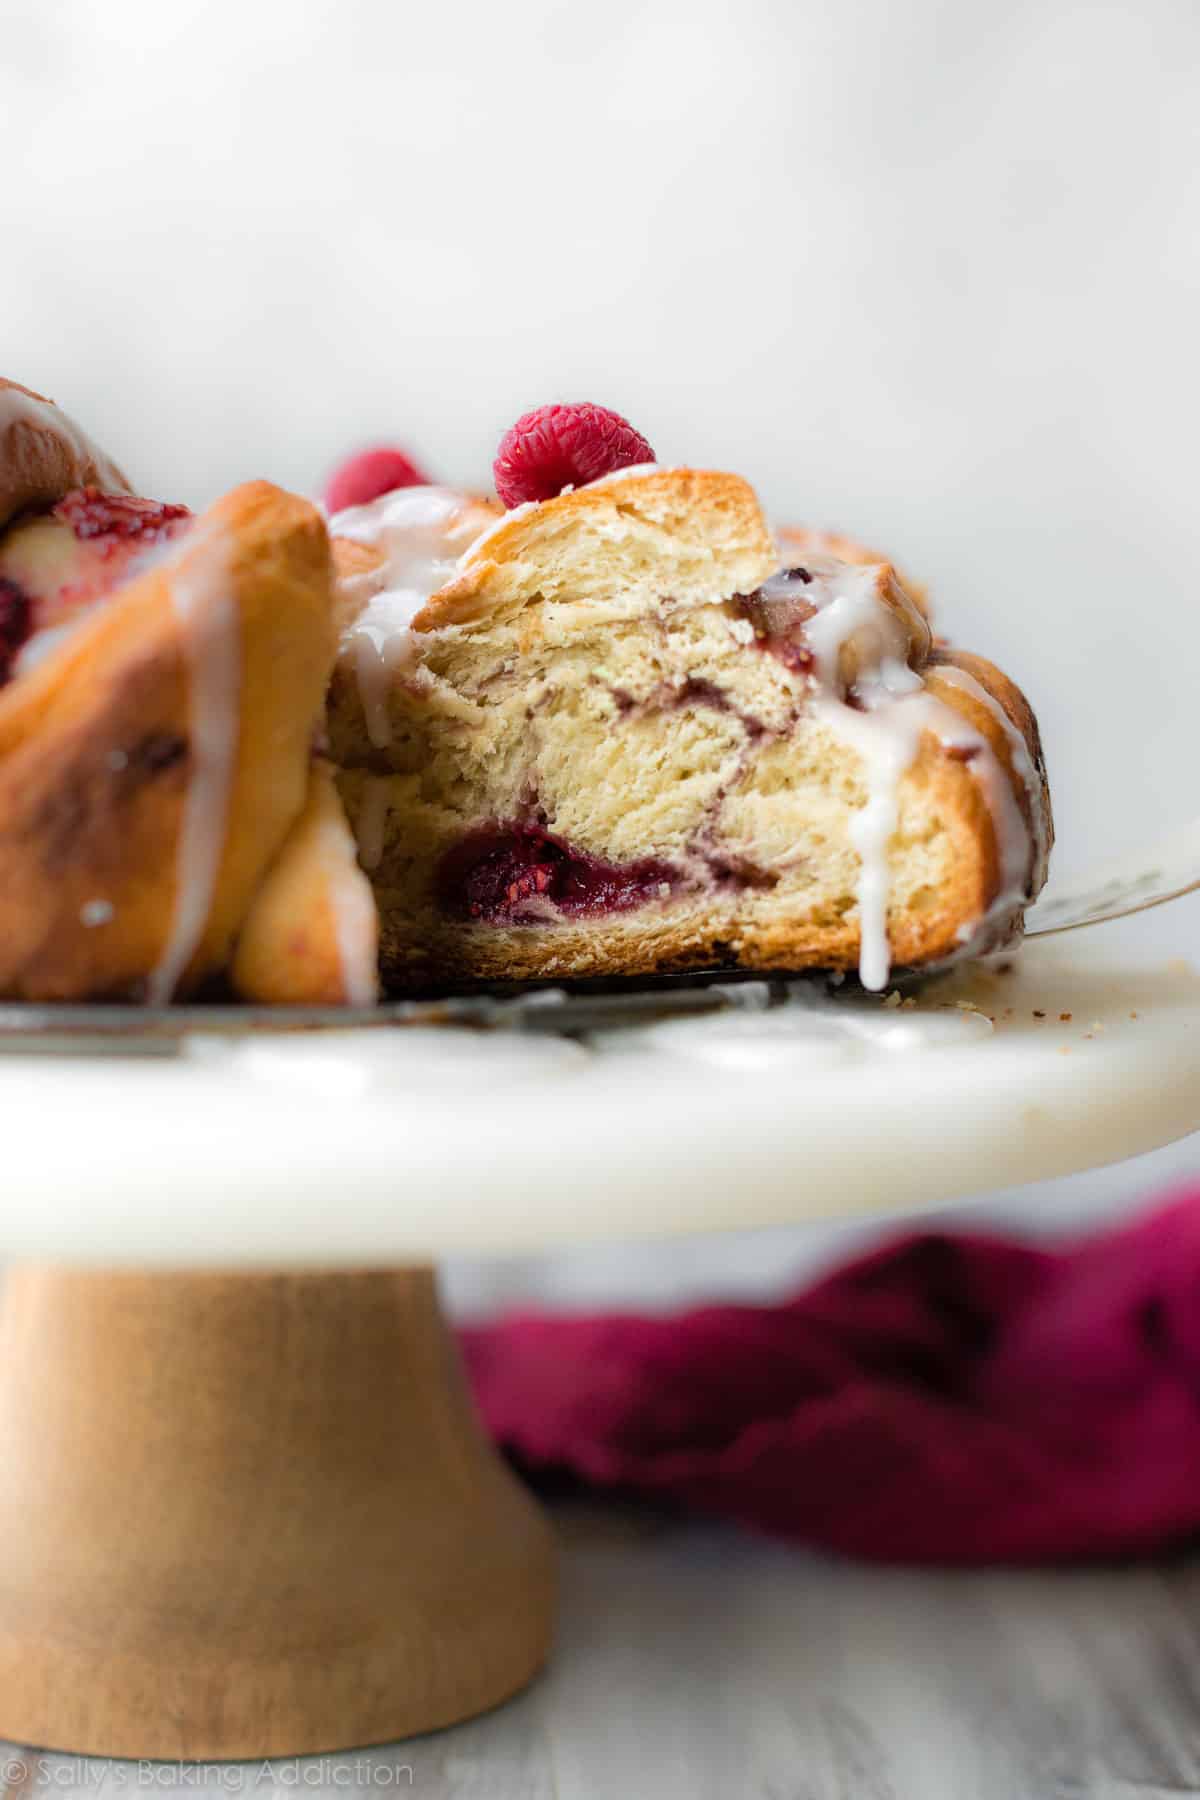
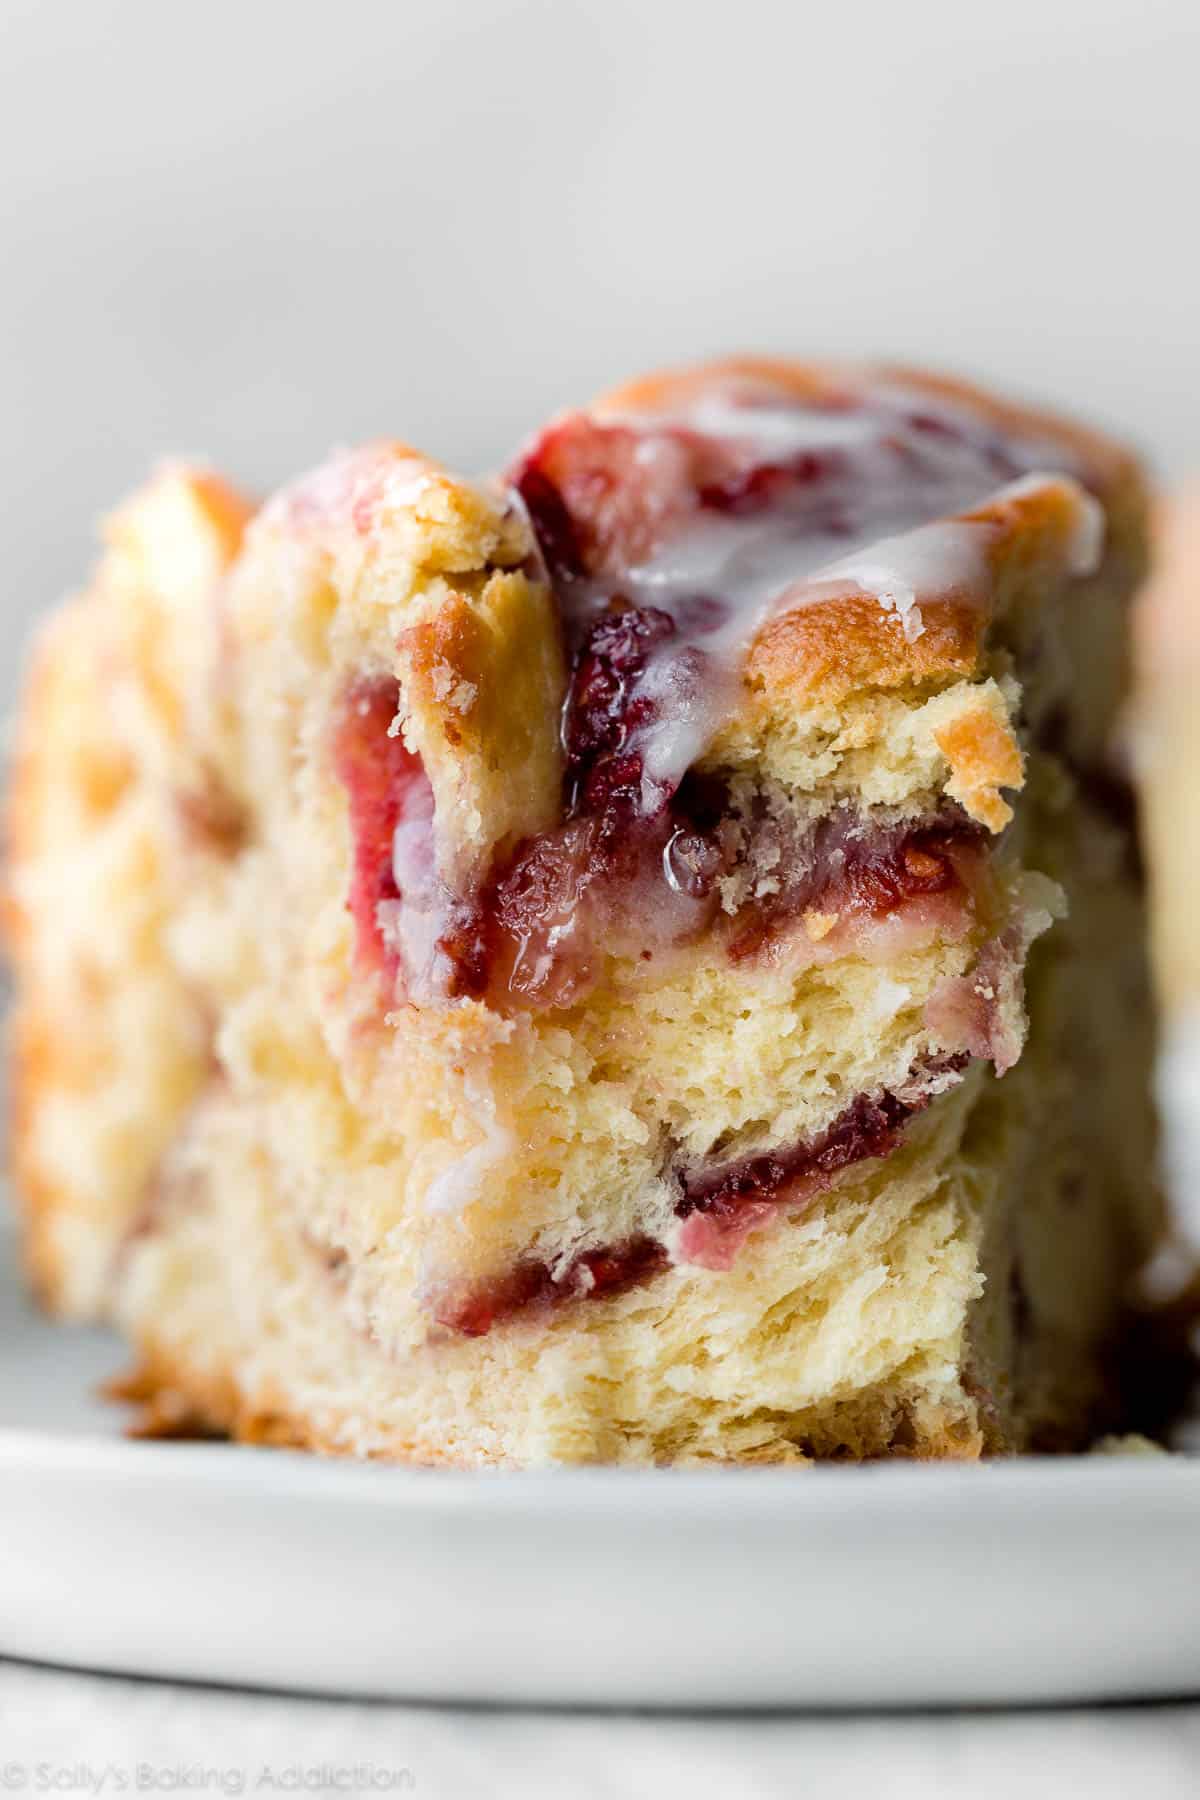
This raspberry twist bread comes together with a rich brioche-style dough, raspberry jam, and sweet vanilla icing. The simple way we twist up the dough results in multiple buttery flaky layers. It tastes like fruity breakfast danish pastries!
This recipe is brought to you in partnership with Red Star Yeast.

Some mornings are for granola bars and some mornings are for THIS.
Welcome to the billionth way to twist up dough and call it breakfast. But unlike all the other sweet rolls on my blog, this melt-in-your-mouth raspberry twist bread combines flaky, crispy, and fruity with buttery, soft, and sweet. A generous drizzle of creamy vanilla icing seeps into every delicious pocket. Sliced warm and served cake-style, this twist impresses everyone who’s lucky enough to steal a taste. It is, without a doubt, always the prettiest treat in my annual spread of Easter brunch recipes.
This breakfast bread is texture paradise channeling the flakiness of breakfast pastries but with half the work. How’s it possible? The secret is in the way we twist the dough. And even though that hypnotizing twist looks complicated to replicate, I swear it COULD NOT BE EASIER. And today I’m showing you how. Let’s start with a super quick video tutorial!
Video Tutorial: Raspberry Twist Bread
This Requires a Rich Dough
There are two main types of dough: lean dough and rich dough. We distinguish between the two based on the amount of fat present. Dough that’s prepared with less fat is called lean dough and yields crusty bread like homemade bagels and pizza dough. There’s less fat in these recipes, so they aren’t as soft. Rich dough incorporates fats like eggs, milk, and butter which guarantee a soft and supple dough, one that promises indulgent cinnamon rolls and breakfast pastries. For even more information about baking with yeast be sure to reference my Baking with Yeast Guide before you begin.
Raspberry Twist Bread Ingredients
The dough we’re using for this raspberry bread is a scaled down version of my overnight cinnamon rolls and my Nutella babka. Use the same 7 ingredients that most rich dough requires.
- Milk: Liquid activates the yeast. For the softest twist bread, use whole milk. Nondairy or low fat milks work too, but whole milk produces phenomenal flavor and texture.
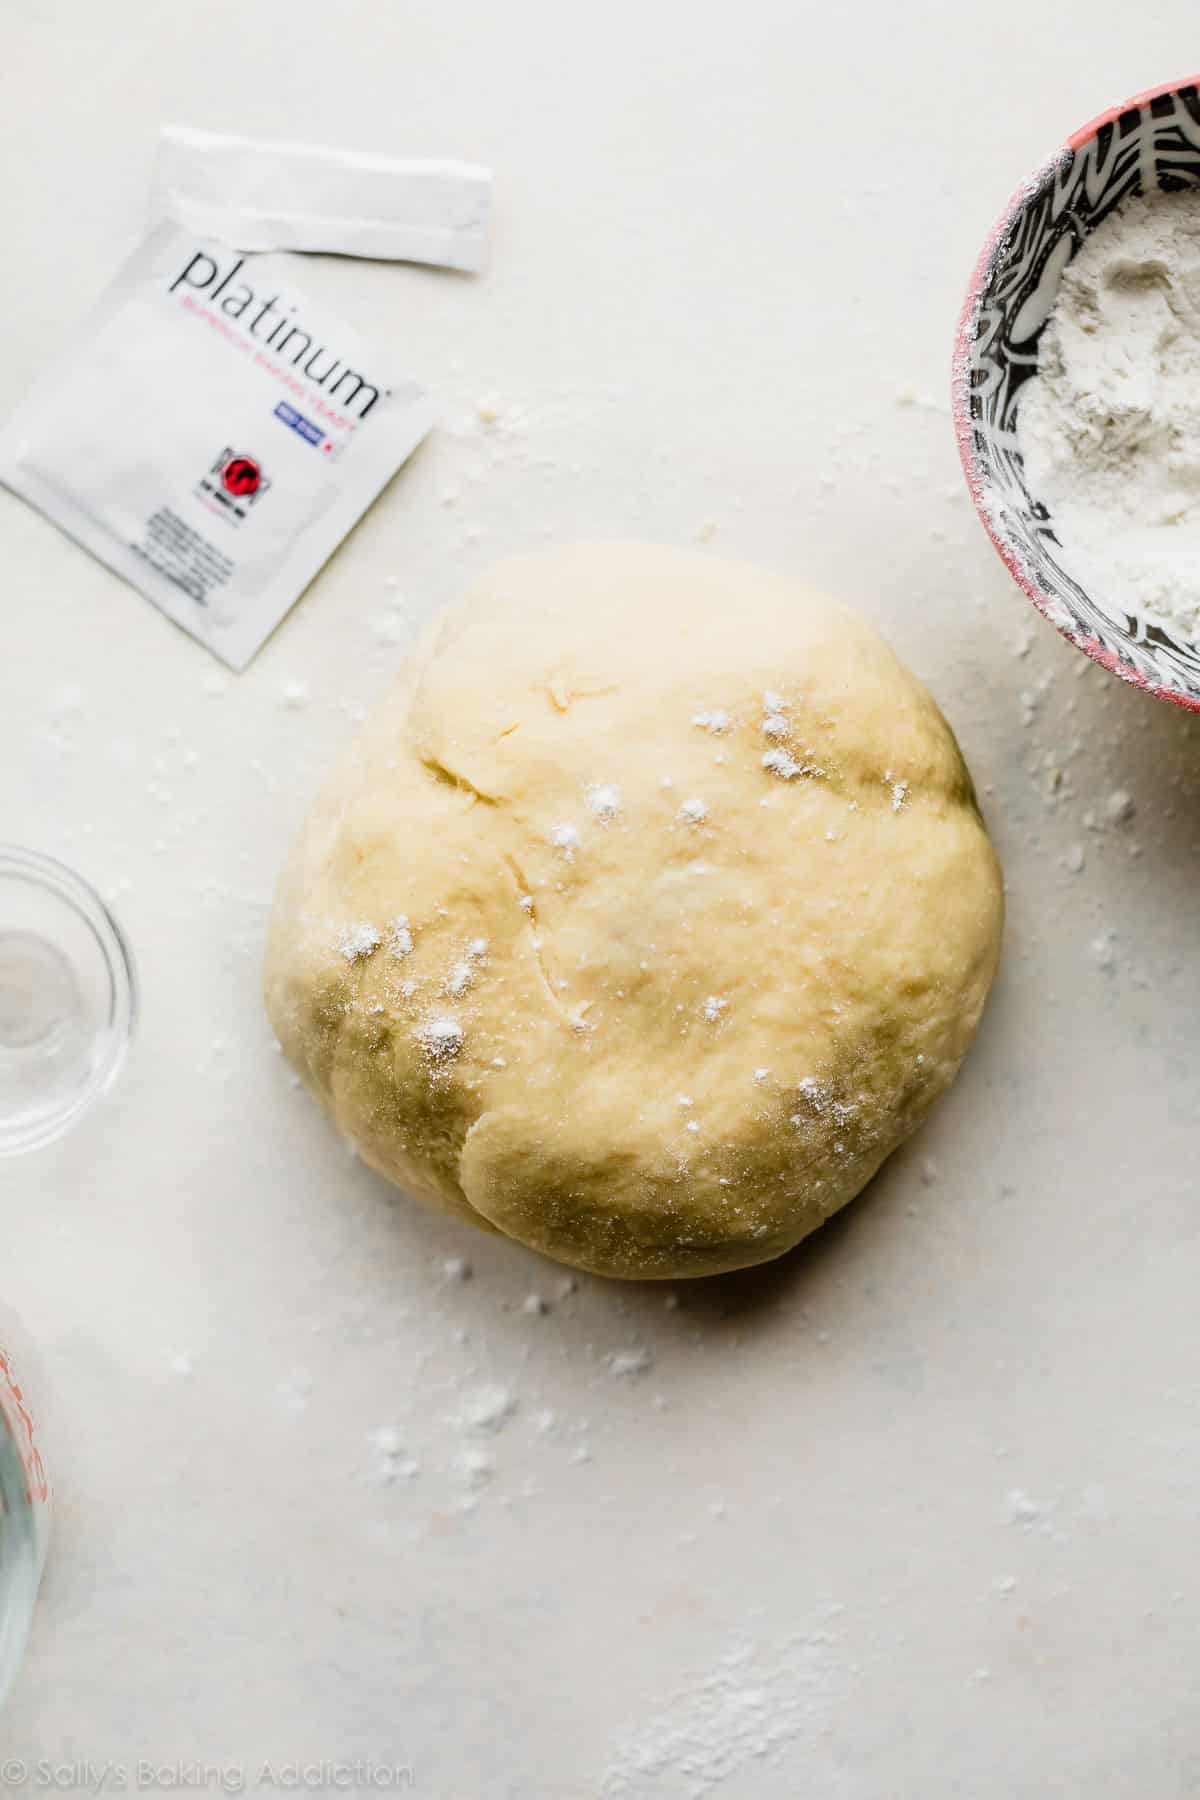
- Yeast: You can use active dry yeast or instant yeast. If using active dry yeast, your dough might take a little longer to rise. I recommend Platinum Yeast from Red Star, which is an instant yeast blended with natural dough improvers.
- Sugar: Sugar feeds the yeast, increases its activity, and tenderizes the dough.
- Eggs: 2 eggs provide structure, richness, and flavor.
- Butter: Butter promises tender bread and creates flaky layers. Make sure you are using room temperature butter.
- Salt: A little salt balances the sweetness.
- Flour: You can use all-purpose flour or bread flour in this recipe. All-purpose flour is convenient for most, but bread flour produces a chewier twist. There are no other changes to the recipe if you use bread flour.
For today’s raspberry bread, we’ll also use raspberry preserves or jam and fresh raspberries. If using frozen raspberries, do not thaw before using.
What Kind of Yeast to Use?
Behind every great bread dough is a great yeast—it’s simply the workhorse behind this whole recipe. Like usual, I use Platinum Yeast from Red Star. Platinum is an instant yeast that builds a stronger, taller, more voluminous dough. If you don’t have Platinum, Red Star Active Dry or Quick Rise Yeast works too! If using active-dry, your dough may take a little longer to rise.
Whether you’re a beginner baker or pro, it’s important to understand how yeast works. I urge you to read through my Baking with Yeast Guide where I answer many common yeast questions.
Baking with Yeast Guide
Reference this Baking with Yeast Guide whenever you work with baker’s yeast. I include practical answers to all of your common yeast questions.

How to Make Raspberry Twist Bread
Our raspberry twist bread requires 2 rises:
- 1st rise: after the dough is made – 90 minutes
- 2nd rise: after the dough is shaped/twisted – 45 minutes
Here’s an overview of the steps:
- Make the dough.
- Knead the dough for 1 minute. Reference my How to Knead Dough video tutorial if you need extra help with this step.
- Cover the dough and let it rise. The dough rises in about 1-2 hours in a relatively warm environment.
- Punch down the dough to release the air. At this point you can freeze the dough and save for a raspberry twist bread sort of morning. Or you can shape into a rectangle, spread a thin layer of raspberry jam on top, roll it up cinnamon roll-style, then slice in half, twist, and coil into a circle. Remember Nutella babka? Similar to that.
- Shape the twist. Watch the video above before continuing with this step. The visual guide will help! The trick is to use a thin layer of jam. The more jam, the bigger mess you’ll need to clean up. I forgot to do it in the video, but for added raspberry goodness, dot a few fresh raspberries on top of the jam.
- Cover the twist and let it rise. Allow the dough to rise once again in a slightly warm environment until puffy, about 45 minutes. After this rise, it’ll be big, beautiful, and ready to bake. Sneak more raspberries in there if you can!
- Bake for 40-45 minutes until golden brown.
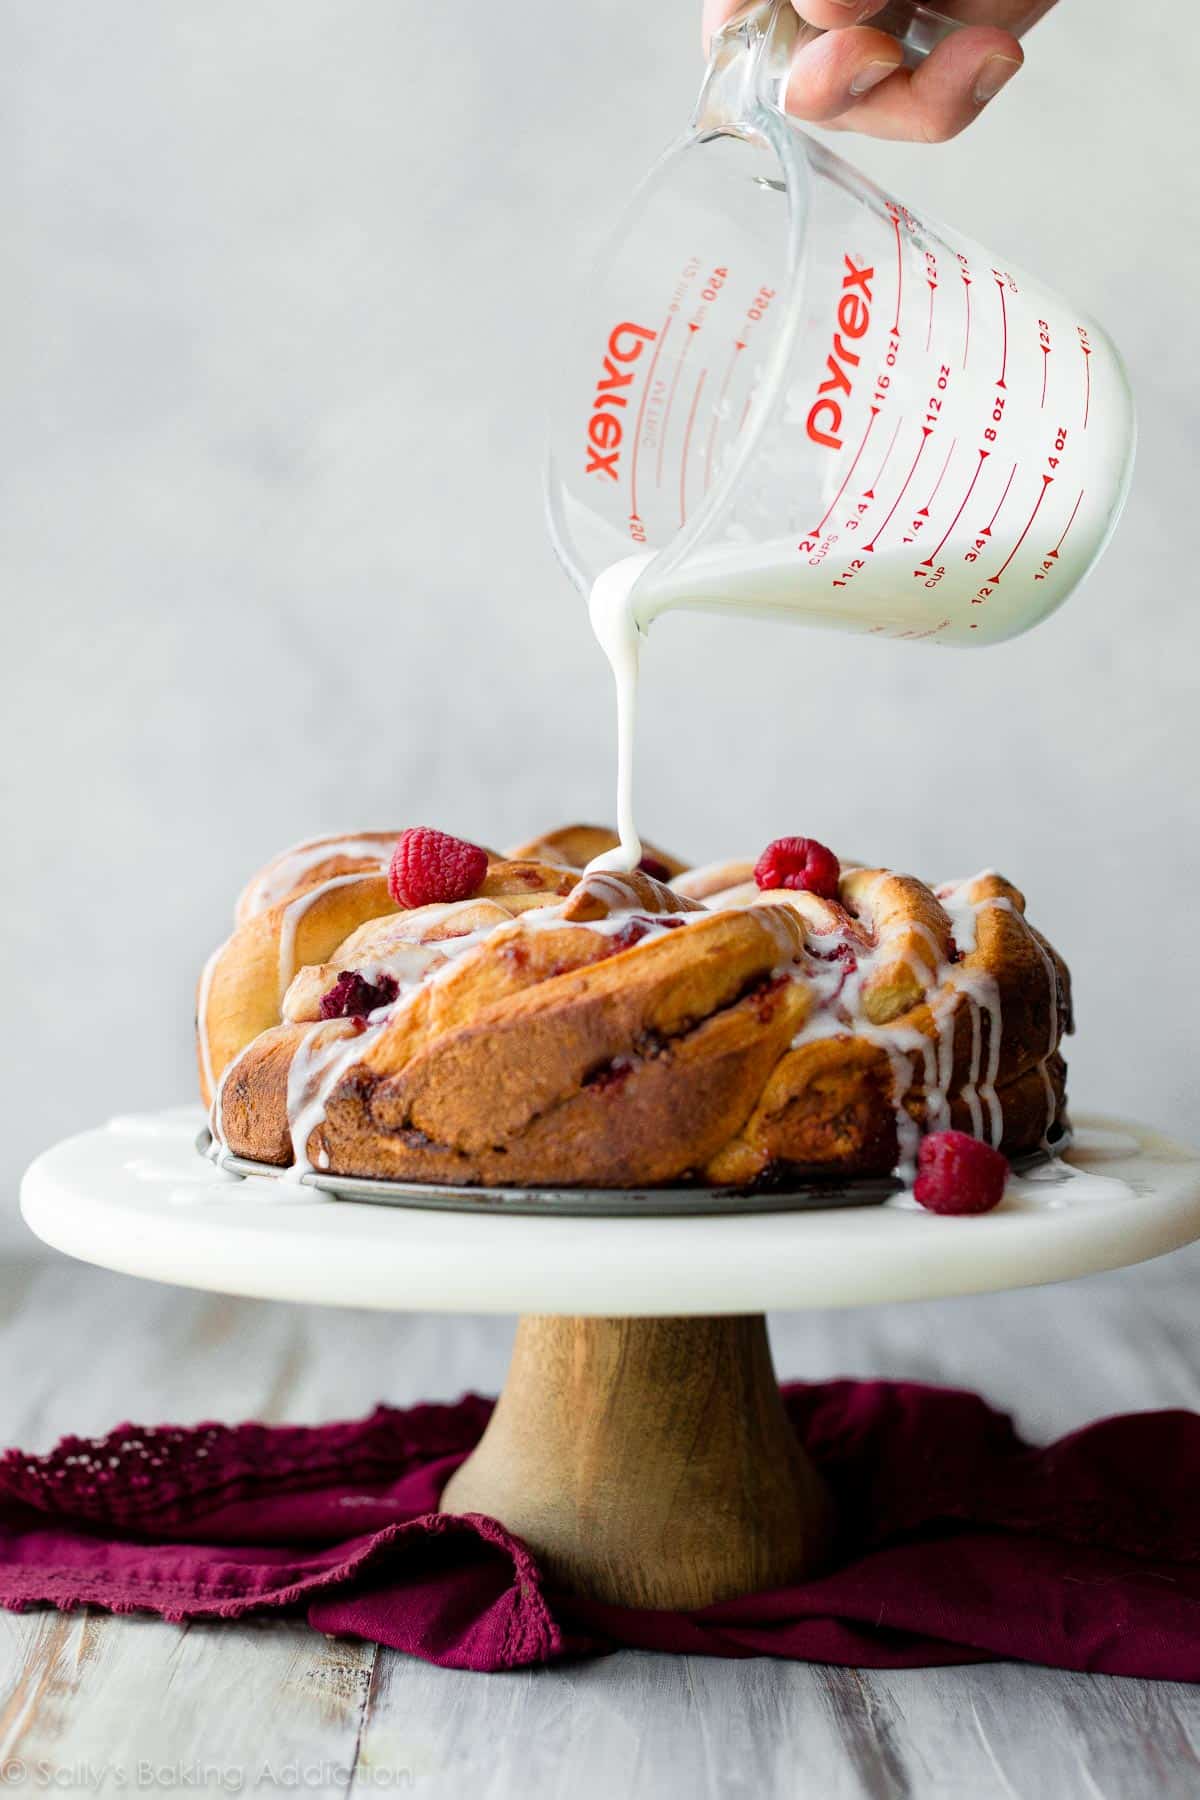
- Make the vanilla icing. Do this while the twist cools.
- Drizzle icing, slice, and serve warm.
The Best Pan to Use
We’re baking the raspberry twist bread in a springform pan; its high sides confine the twist so it rises straight up instead of straight out. When finished baking, carefully remove the rim of the springform pan for seamless serving.
No springform pan? No problem! A cast iron skillet with tall sides could work too. We want to make sure the twist maintains its coiled shape!
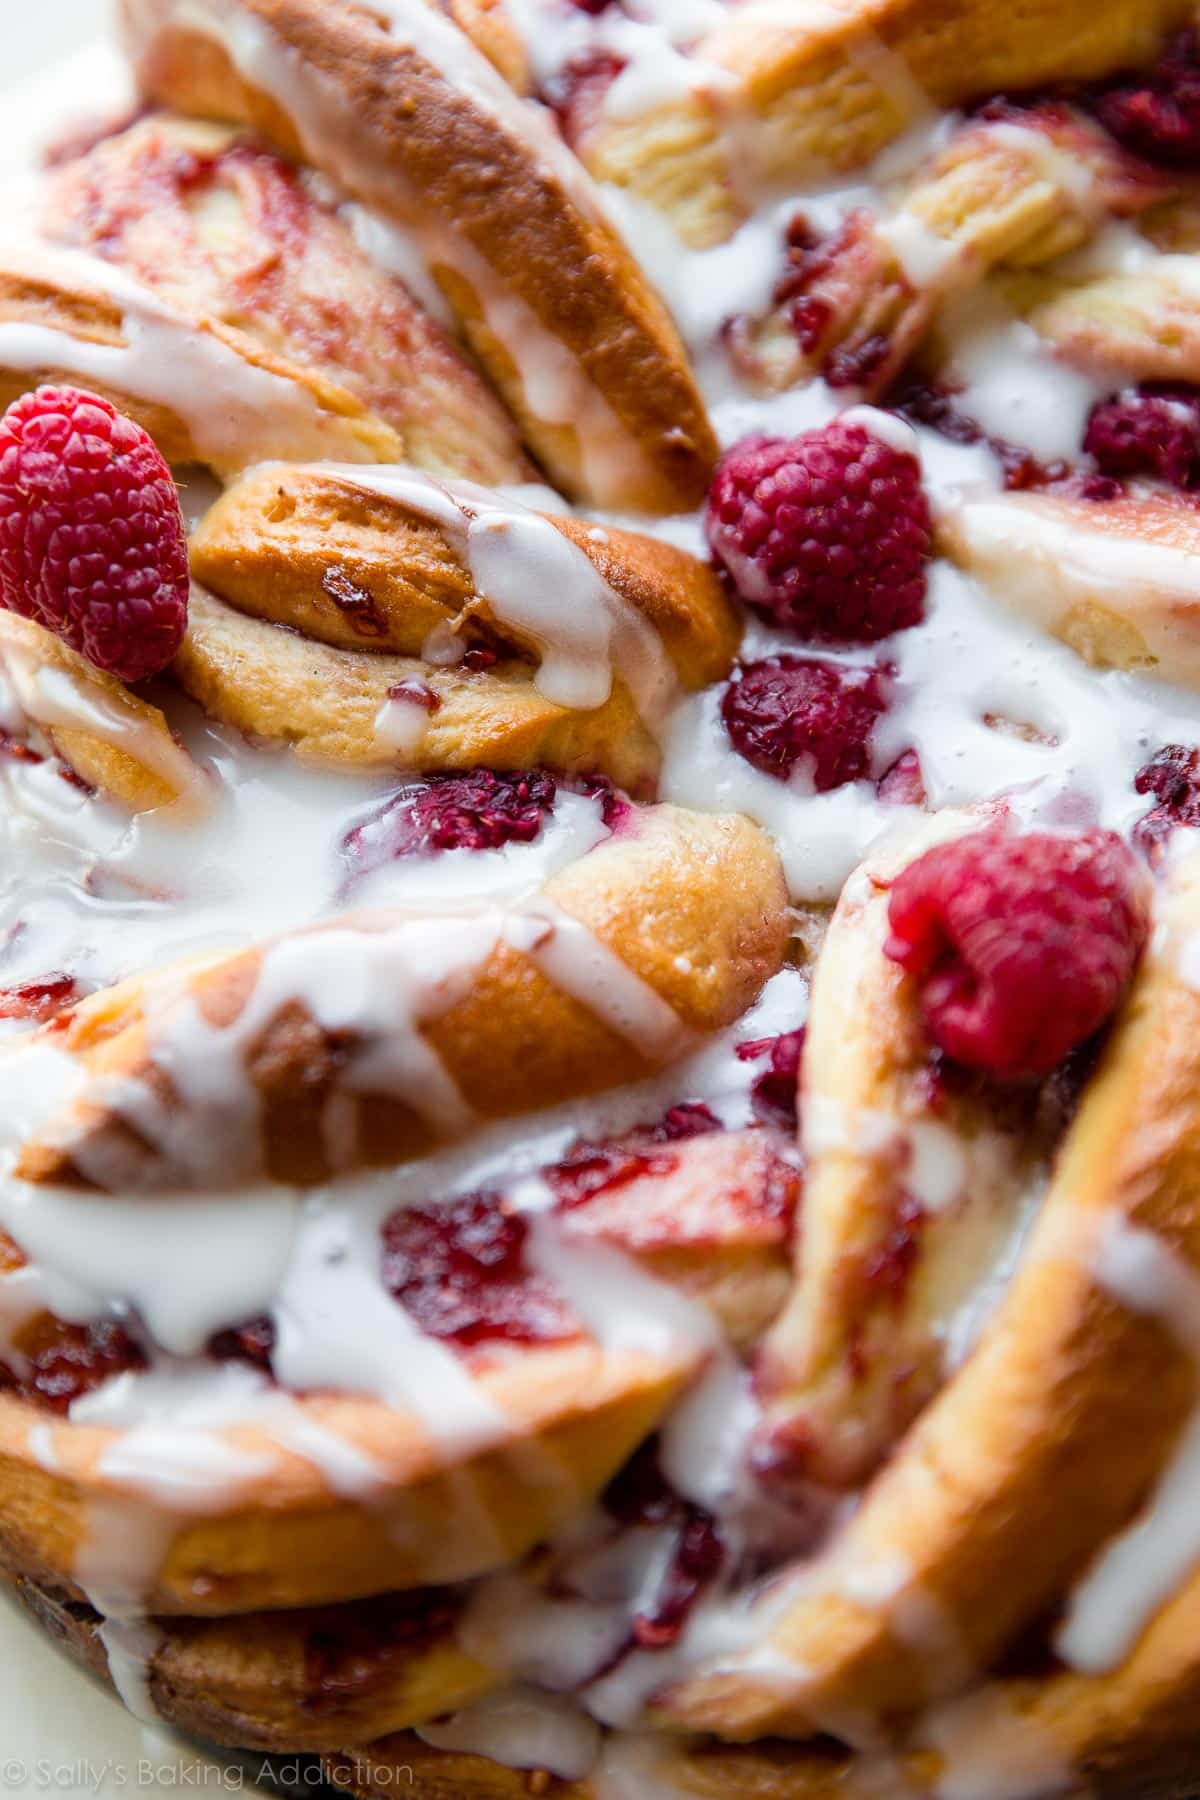
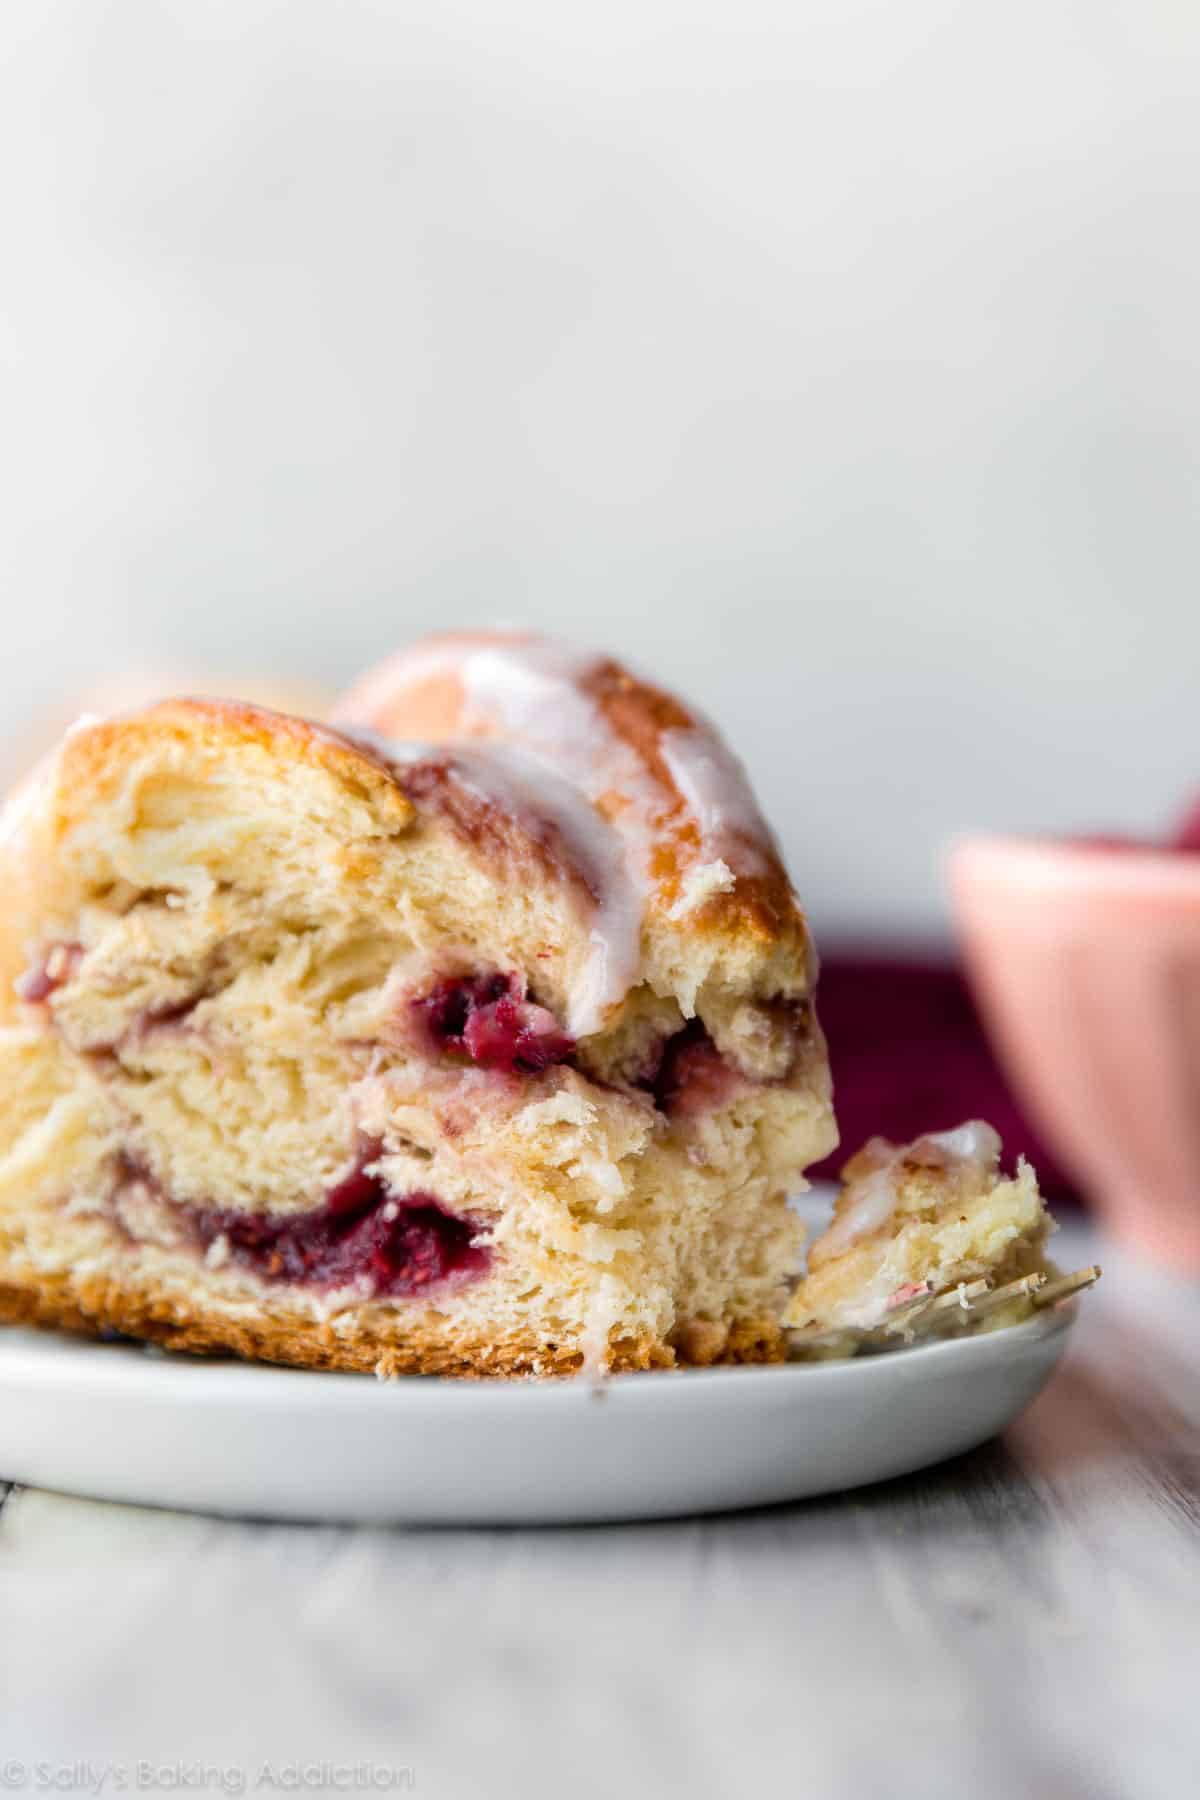
You’ll live for those pockets of raspberry between the flakes of buttery dough.
And for your next raspberry breakfast treat, try my raspberry sweet rolls!
More Indulgent Breakfast Treats
- Nutella Babka
- Star Bread
- Maple Pecan Sticky Buns
- Croissants
- Glazed Doughnuts
- Cinnamon Rolls
- Iced Raspberry Danish Braid

Raspberry Danish Twist Bread
- Prep Time: 3 hours, 15 minutes
- Cook Time: 45 minutes
- Total Time: 4 hours
- Yield: serves 8-10
- Category: Breakfast
- Method: Baking
- Cuisine: American
Description
This melt-in-your-mouth raspberry danish twist bread combines flaky and crispy, fluffy and soft, buttery and fruity. A generous drizzle of creamy vanilla icing seeps into every delicious pocket.
Ingredients
- 2 and 1/4 teaspoons Platinum Yeast from Red Star instant yeast* (1 standard packet)
- 3 Tablespoons granulated sugar
- 3/4 cup (180ml) whole milk
- 1/4 cup (4 Tablespoons; 56g) unsalted butter, softened to room temperature
- 2 large eggs
- 3 and 1/2 cups (438g) all-purpose flour (spooned & leveled), plus more as needed
- 1 teaspoon salt
- 3/4 cup (240g) raspberry preserves/jam
- optional: 1/2 cup (80g) fresh or frozen raspberries
Vanilla Icing
- 1 cup (120g) confectioners’ sugar
- 3 Tablespoons (45ml) heavy cream (or half-and-half or milk)
- 1/4 teaspoon pure vanilla extract
Instructions
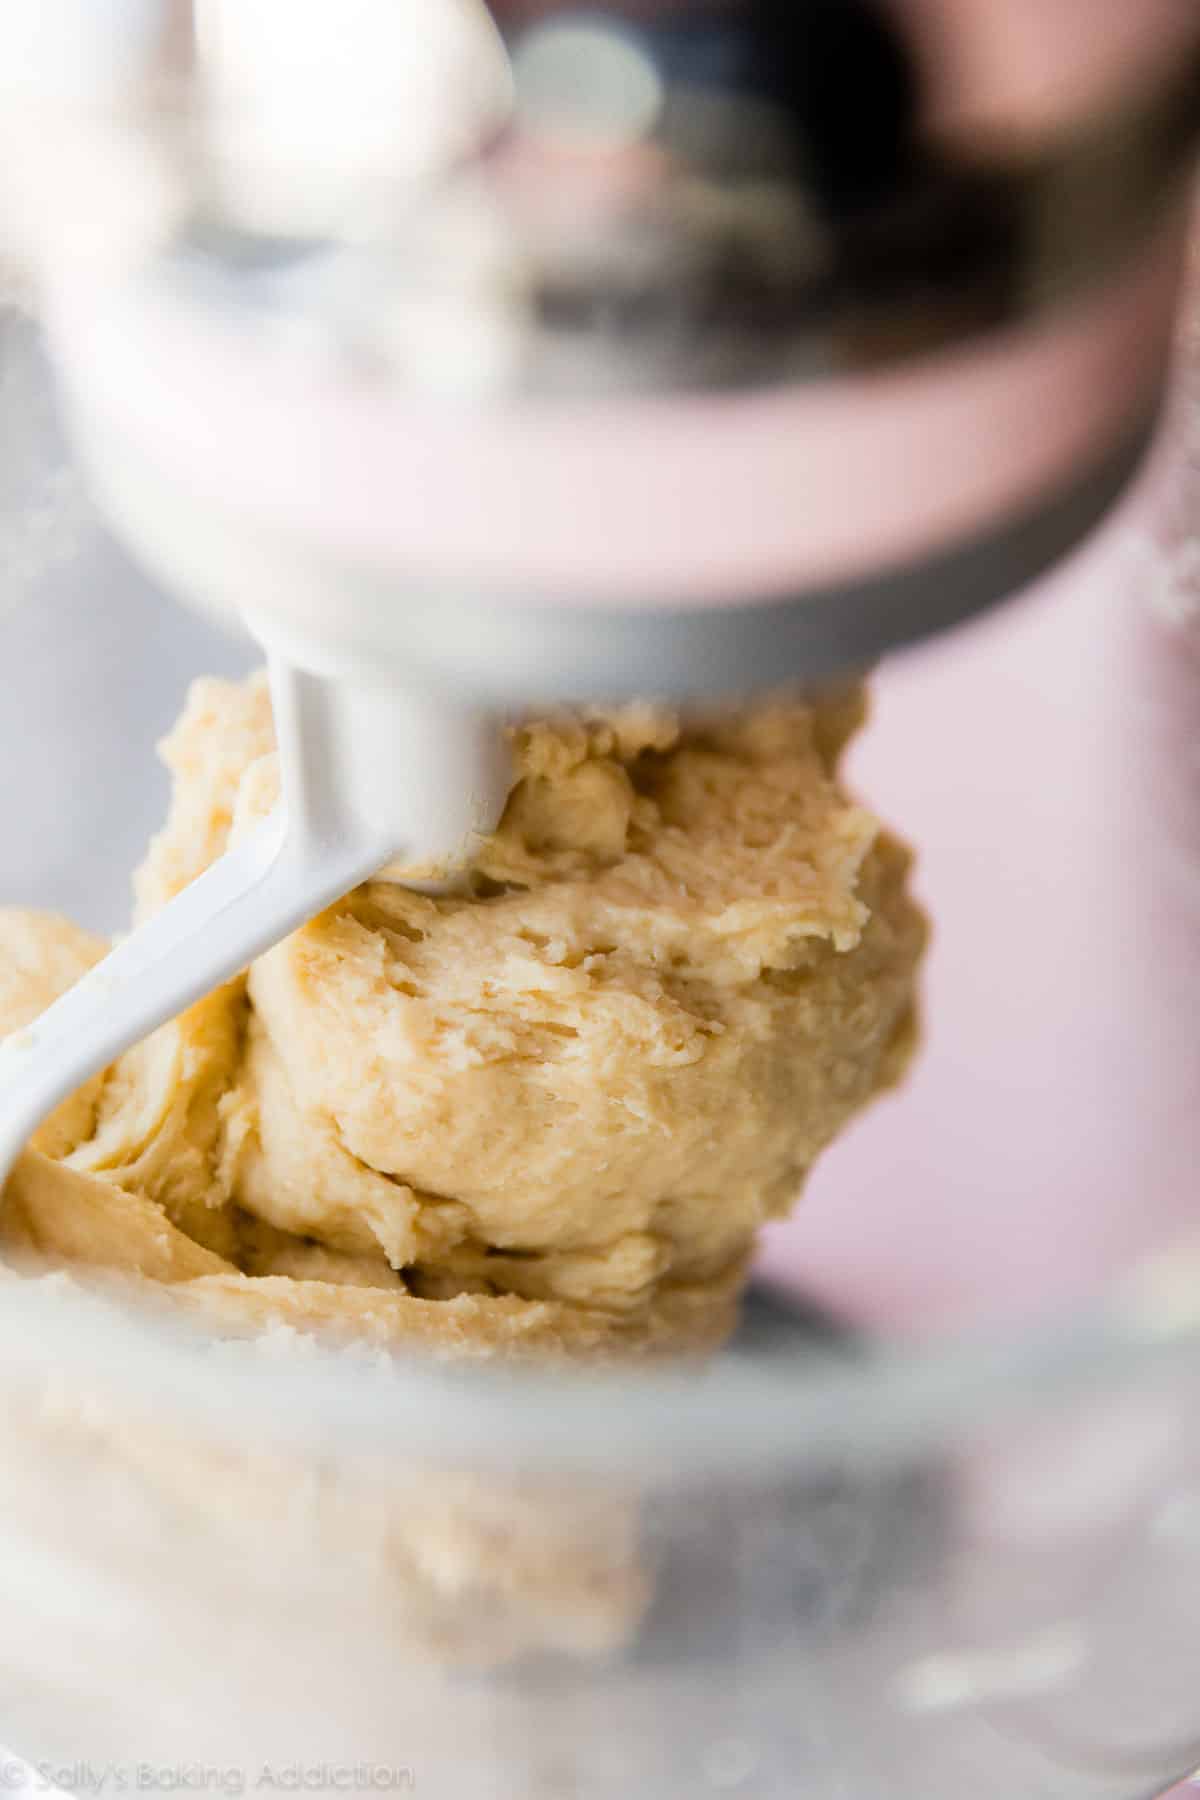
- Make the dough: Place the yeast and sugar in the bowl of a stand mixer fitted with a dough hook or paddle attachment. Or, if you do not own a stand mixer, a regular large mixing bowl. Heat the milk on the stove or in the microwave until warm to touch, about 110°F (43°C). Pour warm milk on top of yeast/sugar. Whisk gently to combine, then loosely cover with a clean kitchen towel and allow to sit for 5-10 minutes. The mixture will be frothy after 5-10 minutes.
- If you do not have a mixer, you can mix by hand in this step. Add the butter, egg, flour, and salt. Beat on low speed for 4 minutes. Dough will be soft.
- Knead the dough: Keep the dough in the mixer and beat for an additional 5 full minutes, or knead by hand on a lightly floured surface for 5 full minutes. (If you’re new to bread-baking, my How to Knead Dough video tutorial can help here.) If the dough becomes too sticky during the kneading process, sprinkle 1 teaspoon of flour at a time on the dough or on the work surface/in the bowl to make a soft, slightly tacky dough. Do not add more flour than you need because you do not want a dry dough. After kneading, the dough should still feel a little soft. Poke it with your finger—if it slowly bounces back, your dough is ready to rise. You can also do a “windowpane test” to see if your dough has been kneaded long enough: tear off a small (roughly golfball-size) piece of dough and gently stretch it out until it’s thin enough for light to pass through it. Hold it up to a window or light. Does light pass through the stretched dough without the dough tearing first? If so, your dough has been kneaded long enough and is ready to rise. If not, keep kneading until it passes the windowpane test.
- 1st rise: Place the dough in a greased bowl (I use nonstick spray to grease) and cover with plastic wrap or aluminum foil. Place in a slightly warm environment to rise until doubled in size, about 90 minutes. For this warm spot, I suggest using the oven. Preheat to 200°F (93°C), then turn the oven off after preheating. Place the covered bowl inside and shut the oven door. This is your warm environment.
- Grease a 9-inch springform pan. Turn the risen dough out onto a lightly floured work surface, punch it down to release the air.
- Shape the twist & 2nd rise: Using a rolling pin, roll into a 12×16 inch rectangle. Spread jam evenly on top. If desired, dot randomly with raspberries. Tightly roll up the dough to form a 16-inch long log. Place the log on its seam. Using a sharp knife, cut the log in half lengthwise. I find a serrated knife works best. Criss-cross one half on top of the other half—forming an X. Twist the two together then coil into a circle. Carefully transfer to prepared springform pan. (I carefully pick it up using two flat spatulas!) Cover the twist with plastic wrap or aluminum foil, then allow to rise once again in a slightly warm environment until puffy, about 45 minutes.
- Adjust the oven rack to the lower third position then preheat oven to 350°F (177°C).
- Bake until golden brown, about 40-45 minutes. If you find the top is browning too quickly, tent with aluminum foil. Remove from the oven and allow to cool for 5 minutes. Meanwhile, make the vanilla icing by whisking the icing ingredients together until smooth.
- Carefully remove the rim of the springform pan. Drizzle with vanilla icing. Slice and serve. Cover and store leftovers in the refrigerator for up to 1 week.
Notes
- Make Ahead Instructions: You can freeze the baked and cooled twist bread for up to 3 months. Thaw at room temperature or overnight in the refrigerator and warm in the oven to your liking, then top with icing. The dough can be prepared through step 3, then after it has risen, punch it down to release the air, cover tightly, then place in the refrigerator for up to 2 days. Continue with step 5. To freeze the dough, prepare it through step 3. After it has risen, punch it down to release the air. Wrap in plastic wrap and place in a freezer-friendly container for up to 3 months. When ready to use, thaw the dough overnight in the refrigerator. Then let the dough sit at room temperature for about 30 minutes before continuing with step 5. (You may need to punch it down again if it has some air bubbles.)
- Special Tools (affiliate links): Stand Mixer or Glass Mixing Bowl and Silicone Spatula | 9-inch Springform Pan | Rolling Pin
- Yeast: I always use Platinum Yeast from Red Star, an instant yeast. If you don’t have Platinum, Red Star Active Dry or Quick Rise Yeast works too! If using active-dry, your dough may take a little longer to rise. Reference my Baking with Yeast Guide for answers to common yeast FAQs.


Reader Comments and Reviews
Hello there!
I’m looking forward to baking this as a valentine’s day treat!
I do have a few questions though. I’m lactose intolerant and so would normally replace the butter with margarine and the whole milk with either cashew/almond milk or canned coconut milk. Does anybody know if that would work or impact the recipe in a significant way?
Thanks for the help!
This is my second time making this recipe. First time my twist was not tight and i used too much jam. This time my twist was much better and the jam thinner. Both times the finish product tasted wonderful. Terrific recipe and the video made a huge difference. Thanks Sally
I have been baking bread for quite some time now and I am a bit disappointed with this recipe. I followed the recipe to a T & baked for the recommended 40 min, covered with foil last 20 min and still my bread got burned at the bottom and on the sides. Some parts where dry and crunchy. It’s my first time trying a recipe from this website and probably the last 🙁
Since the quarantine I’ve been baking a lot and had been looking for recipes just like this. This was so delicious and your step by step instructions so clearly written that even a novice yeast baker could be rewarded with a terrific bite. I had looked at recipes on King Arthur’s website and was totally intimidated. Yours coupled with the video was just what I needed. I will definitely make this again. Thanks, Sally.
It came out pretty dry, even after adding an extra tablespoon butter and baked it for only 35 minutes. It looks very nice though!
O.M.G.
This was heaven on a plate!!!
My family and I ate it in minutes with everyone reaching for seconds.
Not only that, but with Sally’s step by step instructions and video tutorial, it was also incredibly simple to put together. And what a showstopper it turns out to be.
Thank you Sally for another wonderful recipe.
Hi Sally,
Do you think this recipe will work out with chocolate spread instead of jam?
Definitely!
The dough is on its first rise. So easy to work with, not sticky at all. But, I had to run to the group, for an answer. Measuring the milk. You have trained me to weigh ingredients. I was stumped when I saw 180g, not mil. I ended up using my glass measuring cup and went with 3/4 cup.
What is the correct way to go? Thanks.
Yes, that was correct! You can see exactly how I measure ingredients!
Made the dough last night and baked this morning. I ended up partially substituting coconut sugar for some of the granulated and it still worked. Also used mango preserves and raspberries/blueberries as the filling. Turned out wonderfully!
Hi Sally, it is so much fun trying Out your recipes. The best part is that all of them are delicious! Yesterday I made the raspberry twist bread and only a small piece is left which is hidden for me!! I love making bread so much thanks to you. This bread will be featured in my valentine breakfast.
I made this today and it was delicious and the end result was a showstopper!
The red star platinum yeast gave such an amazing rise to the dough!
I am bringing the remainder to work tomorrow to share.
Thank you!
Made this today for brunch tomorrow. Had to try a slice early it smelled so good! I added a little almond extract to the raspberry jam and it was fantastic! Next time I’m going to add some flaked almonds on top. Thank you! So delicious!
Slowly making my way through each of your recipes while I await the delivery of your cookbook. This was such a beautiful bake, thanks Sally!
I didn’t check halfway through and the top browned a bit more than I would like. Looking forward to making this again and again.
Hi Sally,
In case anyone is wondering if this works as half recipe – yes it does! I made it this weekend using half the ingredients in my 6inch loose base cake pan (3inch deep) as I don’t have a spring form pan, and it worked wonderfully!
Filled mine with Apricot Jam ands 1/2 peach sliced and chopped. And then cut and coiled it (great visuals and video was so helpful!) and squeezed in the other 1/2 peach slices when inside the cake pan to the crevices. Covered and 2nd rise 25-30 mins and baked 25-30 minutes. And I topped with brown butter icing with some chai spices mixed in. So delicious – soft and fluffy brioche-like interior and crisp and flaky danish exterior.
Look forward to trying it with raspberries or other fruits and preserves/butter or a mix of cinnamon spices next time, thank you Sally!
Loved this recipe…easy to make, instructions on how to make the twist were fantastic. I have made for brunch and as gifts at Christmas for my neighbors. It is so versatile. Change the raspberries for strawberries and strawberry jam or peach jam and peach slices. Whatever you fancy.
This turned out lovely – I made the dough in my bread machine – FYI, easy !
then rolled, filled, twisted and baked. very pretty
Do you prefer store brought preserves for this? I’m wondering how your homemade raspberry filling from your raspberry danish braid would work in this. Thoughts?
You can absolutely use the homemade raspberry jam for this!
Could this recipe be made using other berries as well? I have a ton of frozen strawberries, blueberries and blackberries that i want to use up.
Yes, you can use a different berry, Sofie! Enjoy 🙂
Should I still use raspberry preserves? I’m planning to do a “mixed berry” danish twist bread with all of the berries together.
Feel free to use a different flavor of preserves if you wish!
Hi I wondering if you could make the whole recipe one day and then pull it out of the fridge as serve it the next day?
Yes! You can cover and store in the refrigerator for up to 1 week.
Made this on Sunday and brought it to work, it was gone in 5 minutes! I will have to make another because apparently not everyone got a piece. I added lemon zest to the glaze!
It’s in my oven right now, I added almond paste. Thank you so much for your time and great recipes. GB!!!
Hello dear Sally ! I wanted to know … can I make the dough today in the afternoon and freeze it to bake it tomorrow ? And how ? …
Hi Emilie, The dough can be prepared through step 3, then after it has risen, punch it down to release the air, cover tightly, then place in the refrigerator for up to 2 days. Continue with step 5. See the make ahead directions at the end of the recipe!
YUM!!! Yes yes yes, that creation would be absolutely delicious. Don’t see any issue using apple butter as the filling. Spread it on lightly so the dough is easy to twist. Let me know how it turns out. I want to try it now!