

Flaky, buttery croissant bread requires time, precision, and patience, but is a very rewarding baking project that will make your kitchen smell like a French boulangerie. (And is there any better smell than fresh bread?) I know making homemade pastry can seem intimidating, but I thoroughly break down the process for you, step by step, in the tutorial below. Any home baker—like me or you—can accomplish this.
One reader, Maggie, commented: “This is so good! Laminating dough is a little intimidating, but the video, photos, and detailed instructions and tips made it super easy. It’s well worth the time and effort. ★★★★★“
What is Croissant Bread?
Croissant bread is exactly what it sounds like: croissant dough baked as bread. My inspiration for this recipe was this croissant loaf on Food52, but I used a scaled-down version of my own homemade croissants dough to produce just 1 loaf. Though I can’t promise how long your loaf will last… it doesn’t last long in my house! The other difference in my croissant bread recipe is we’re going to roll up the dough first, and then cut into rolls, instead of cutting strips and individually rolling them.
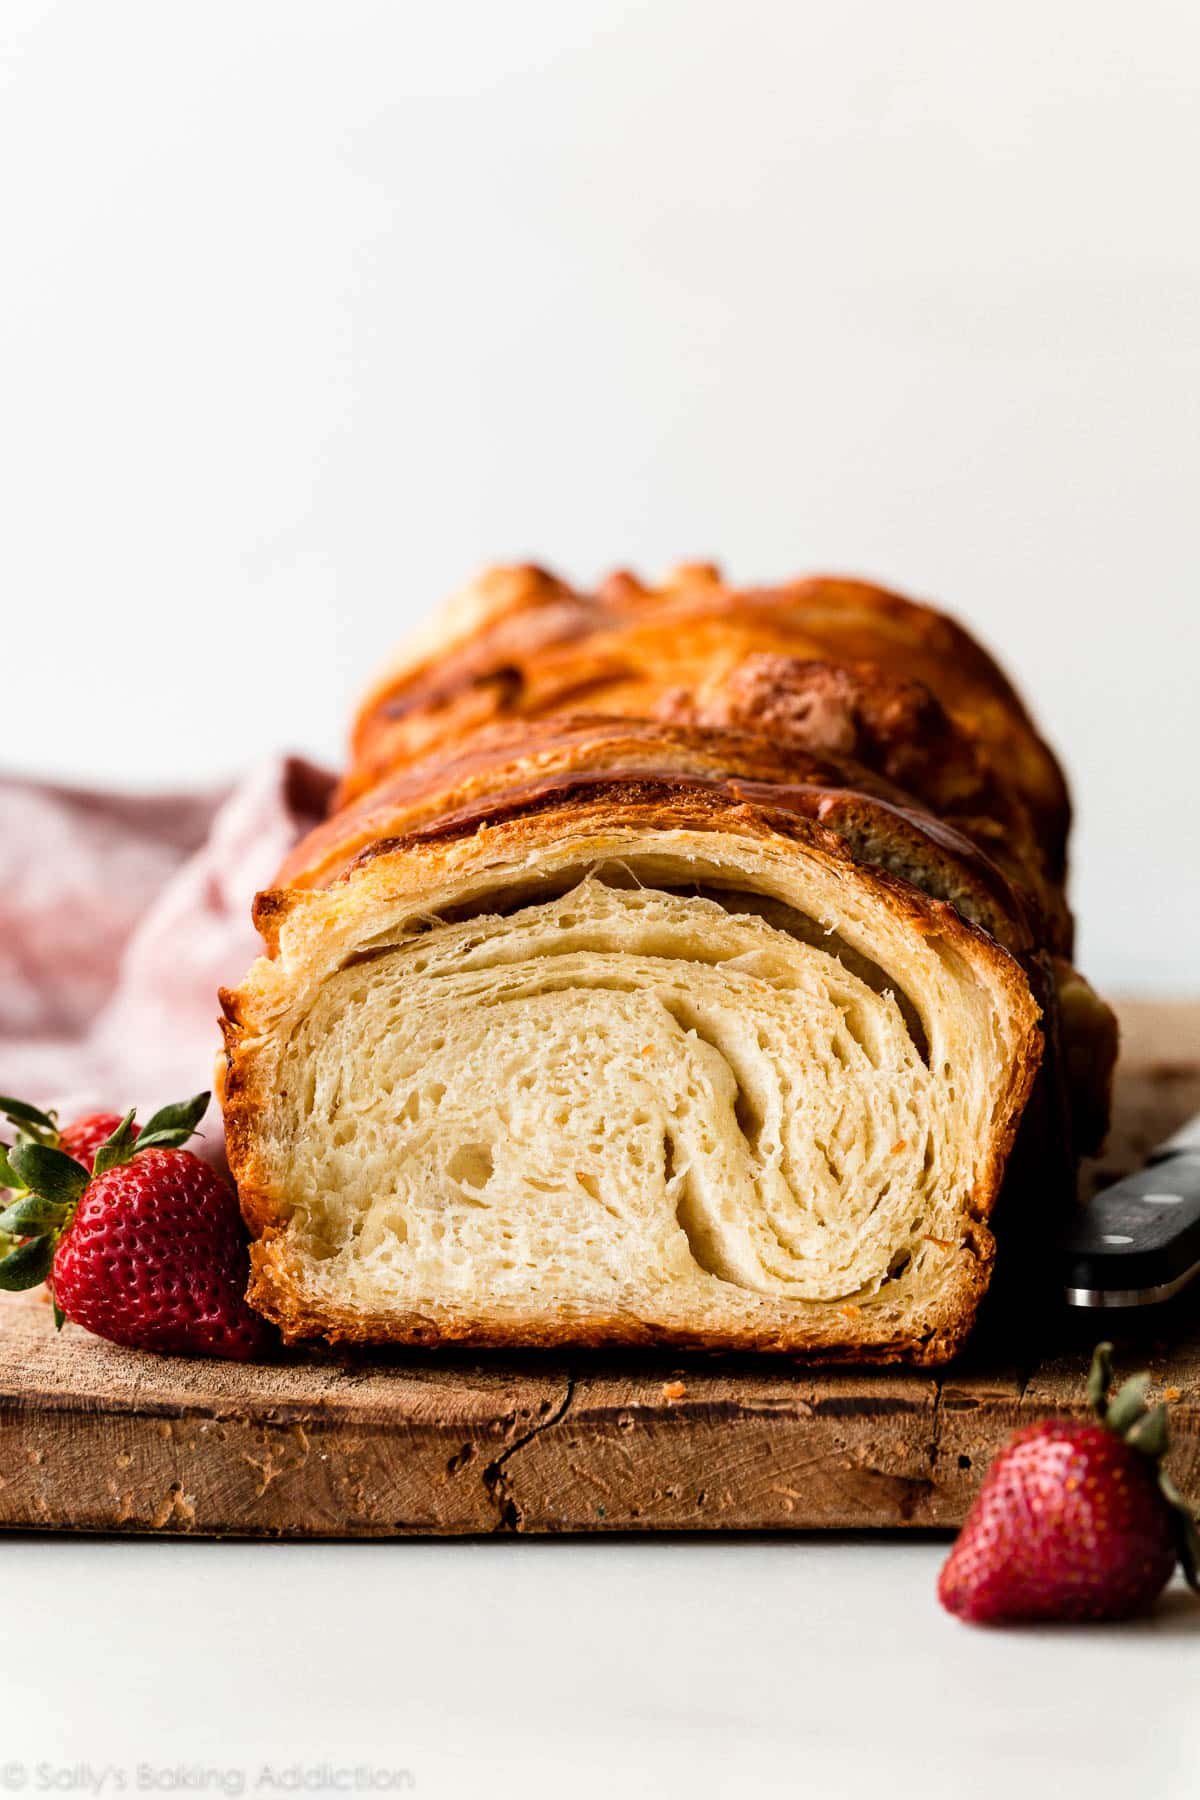
The result is an impressive loaf version of everyone’s favorite yeasted pastry, which smells and tastes like a croissant, but slices like bread. Incredible on its own, but try it as a grilled cheese, BLT, toasted with jam or honey butter, or in your favorite breakfast strata recipe or French toast casserole!
Croissant Bread Details
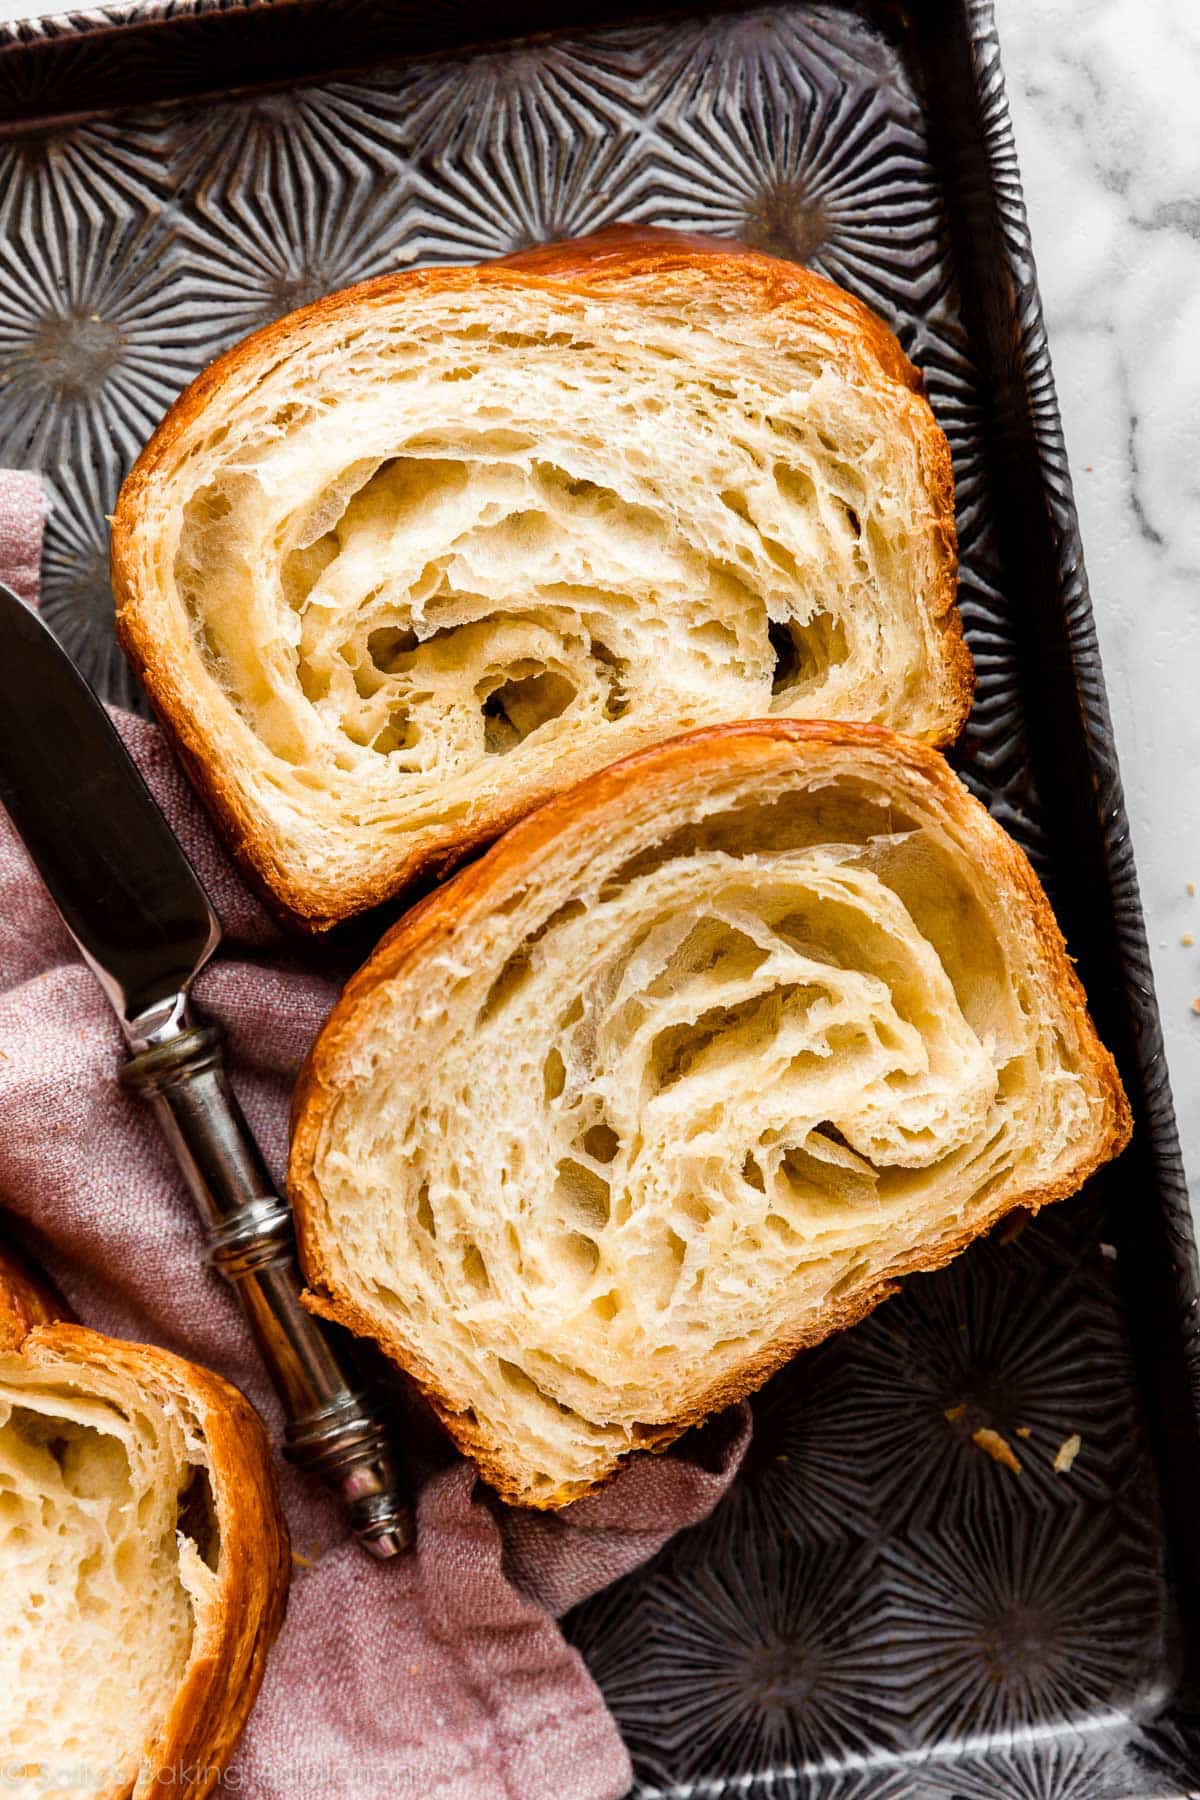
- Texture: The texture of this croissant bread is melt-in-your-mouth soft and tender, with a crispy, flaky crust. Because it’s baked as bread in a loaf pan, it’s not quite as layered and crust-shattery (technical terms) as croissants, but it’s still very airy.
- Flavor: Blissfully buttery and slightly sweet—just try to keep your eyes from closing when you taste this, I’m not sure it’s possible!
- Ease: The great news is that making croissant bread is easier than making individual croissants. It requires no special ingredients, but it does require 3 rounds of 20-minute refrigerations and 2 rises. For these reasons, I categorize this as an advanced baking recipe. But I’m here to walk you through each step. You can absolutely make this!
- Time: Plan for this recipe to take just under 6 hours, plus some cooling time, which is considerably shorter than 12+ hours for my individual croissants. There’s resting time between most steps, which means most of the time is hands off. To develop all those flaky pastry layers, croissant dough needs to rest in the refrigerator often. It likes to nap, if you will.
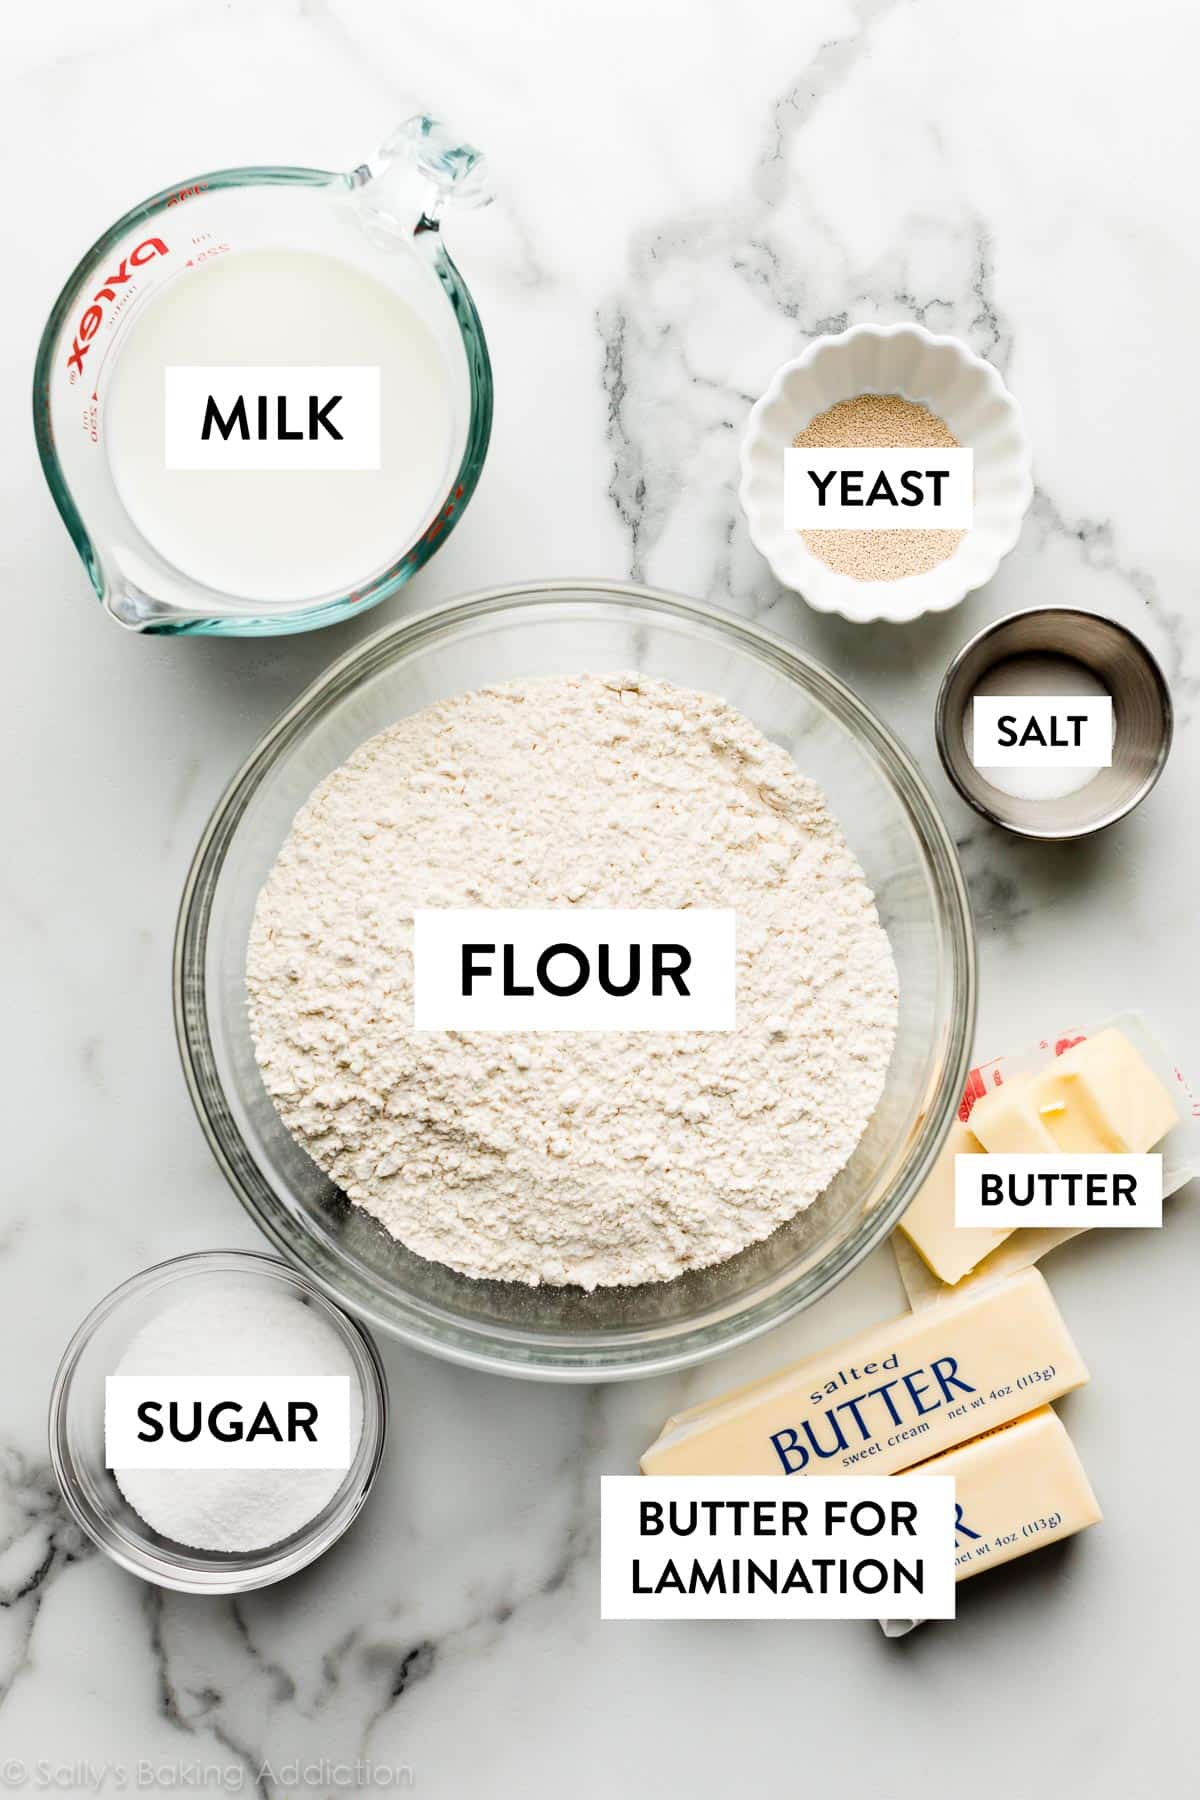
Only 7 Ingredients Total
You need just 6 simple ingredients for the croissant bread dough: flour, butter, salt, yeast, milk, and sugar. The 7th ingredient is an egg to make an egg wash for brushing over the top to get that glossy golden sheen on the top of the loaf—much like pie crust, brioche, and stromboli.
What is Laminated Dough?
Laminating dough is the process of folding butter into dough many times, which creates multiple alternating layers of butter and dough. (Similar to how we make biscuits, cheddar biscuits, and rough puff pastry, though today’s dough includes yeast.) When the laminated dough bakes, the butter melts and creates steam. This steam lifts the layers apart, giving us dozens of flaky, airy, buttery layers.
In my regular croissants, chocolate croissants, and homemade cruffins recipes, we mix butter and flour together to make a butter block. With today’s croissant bread recipe, however, we’re lining pieces of butter down the dough so there’s no compact butter block needed.
4 Tips for Laminating This Dough
- It’s OK if there are air bubbles in the dough; your rolling pin will pop them.
- If the dough tears and butter is exposed, just sprinkle the exposed butter with flour.
- If the dough is impossible to roll, try flipping it over. If it’s still impossible to roll, cover and let it rest for 5 minutes before trying again, to let the gluten relax.
- There are 3 rounds of 20-minute refrigerations. Do NOT extend these times because the yeasted dough will puff up too much. The timer is your friend here!
Video & Photos: How to Make Croissant Bread
The full printable recipe is below, but this recipe involves quite a few steps, so I’m going to walk you through it with step-by-step photos. I’m leaving out photos of preparing the dough because you can see it come together in the video tutorial. I also have a separate video tutorial for How to Knead Dough, if you need extra help with that step.
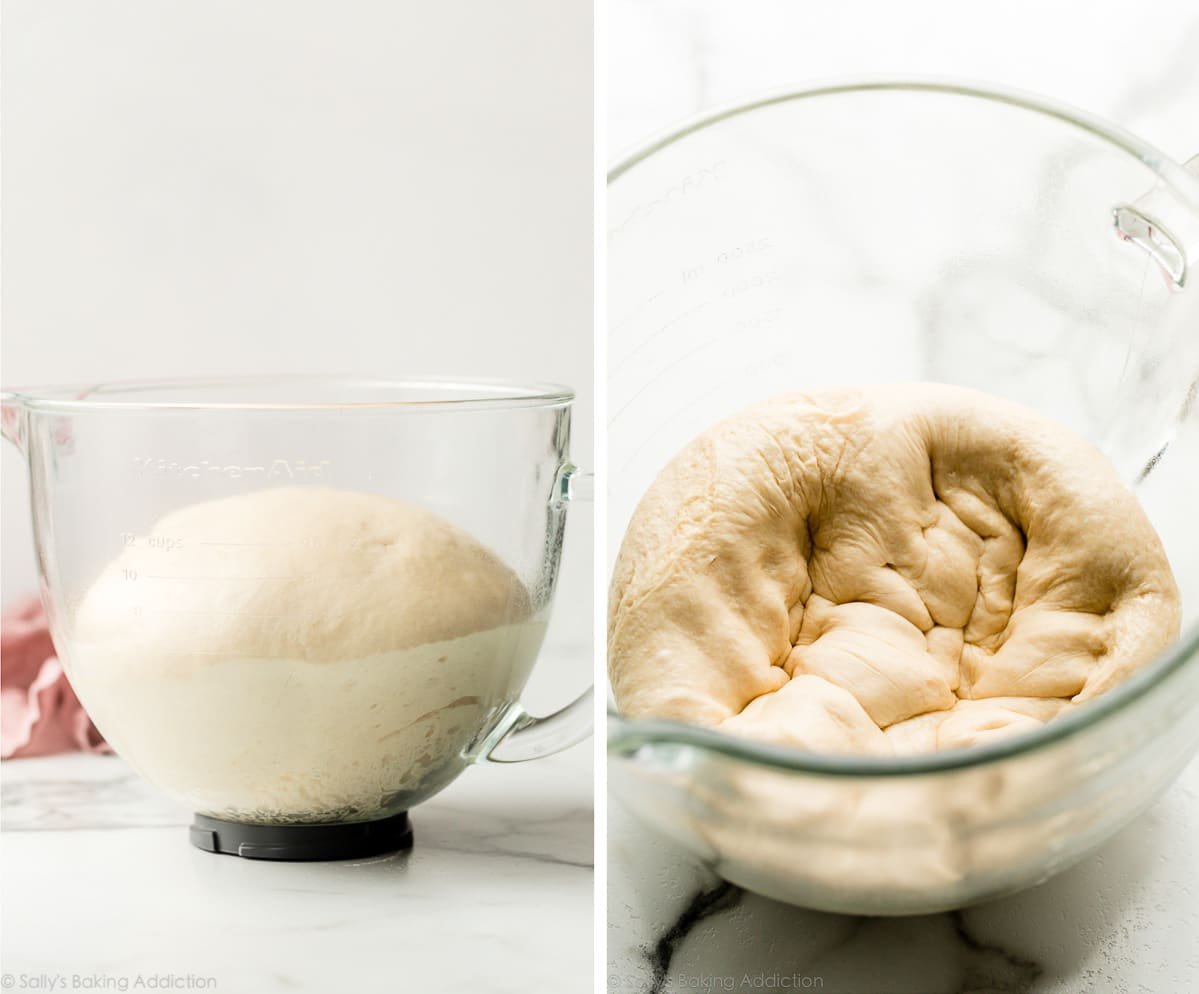
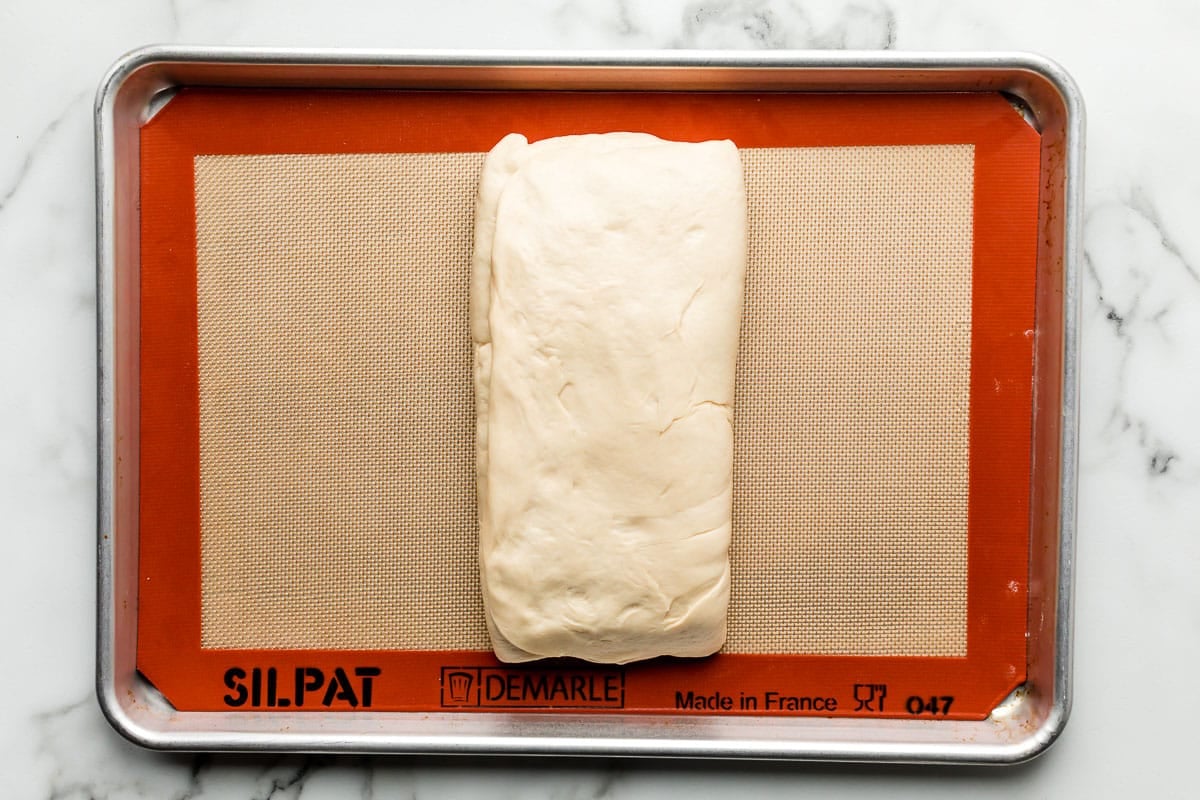
Here is the dough after the 1st rise and then after you punch it down:
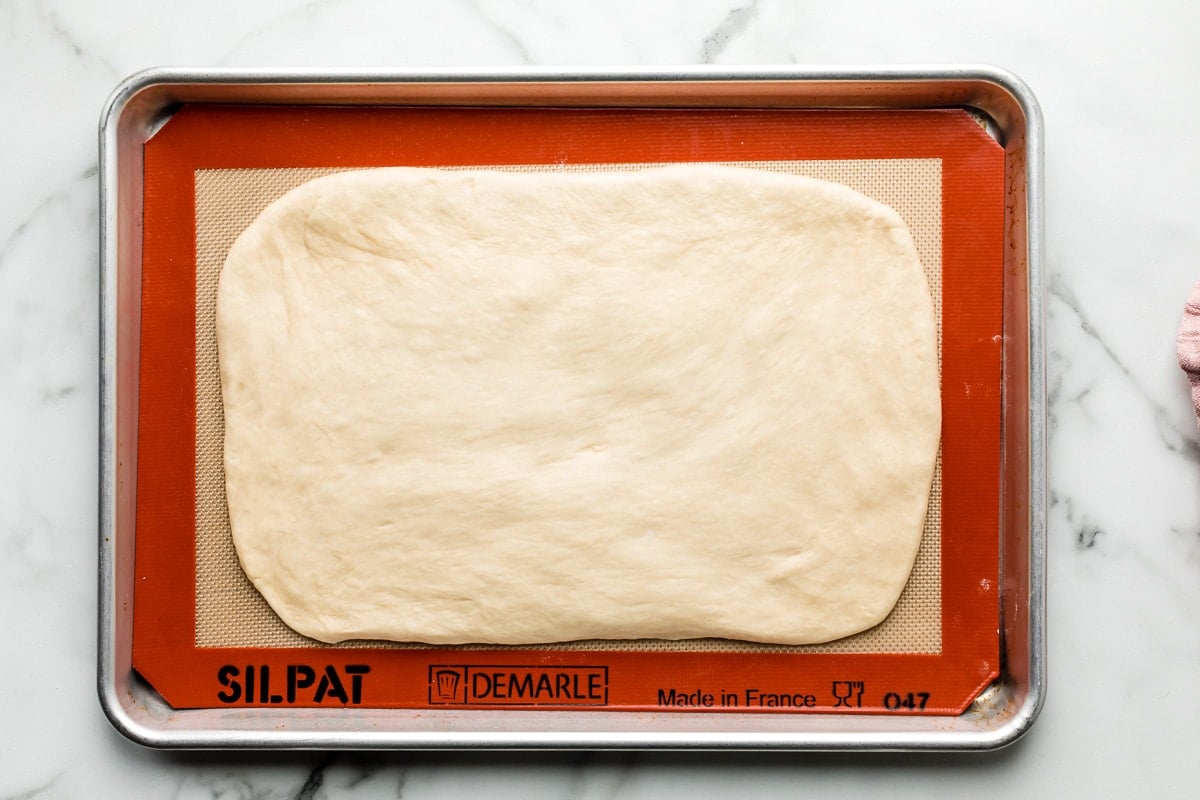
Now it’s time to flatten the dough and prepare it for lamination. Gently flatten the dough out into a 10×14-inch (25x35cm) rectangle using lightly floured hands to carefully stretch the dough. I recommend flattening it right onto a nonstick surface so you can literally pick it all up without the dough losing shape. Refrigerate this flattened dough for 20 minutes:
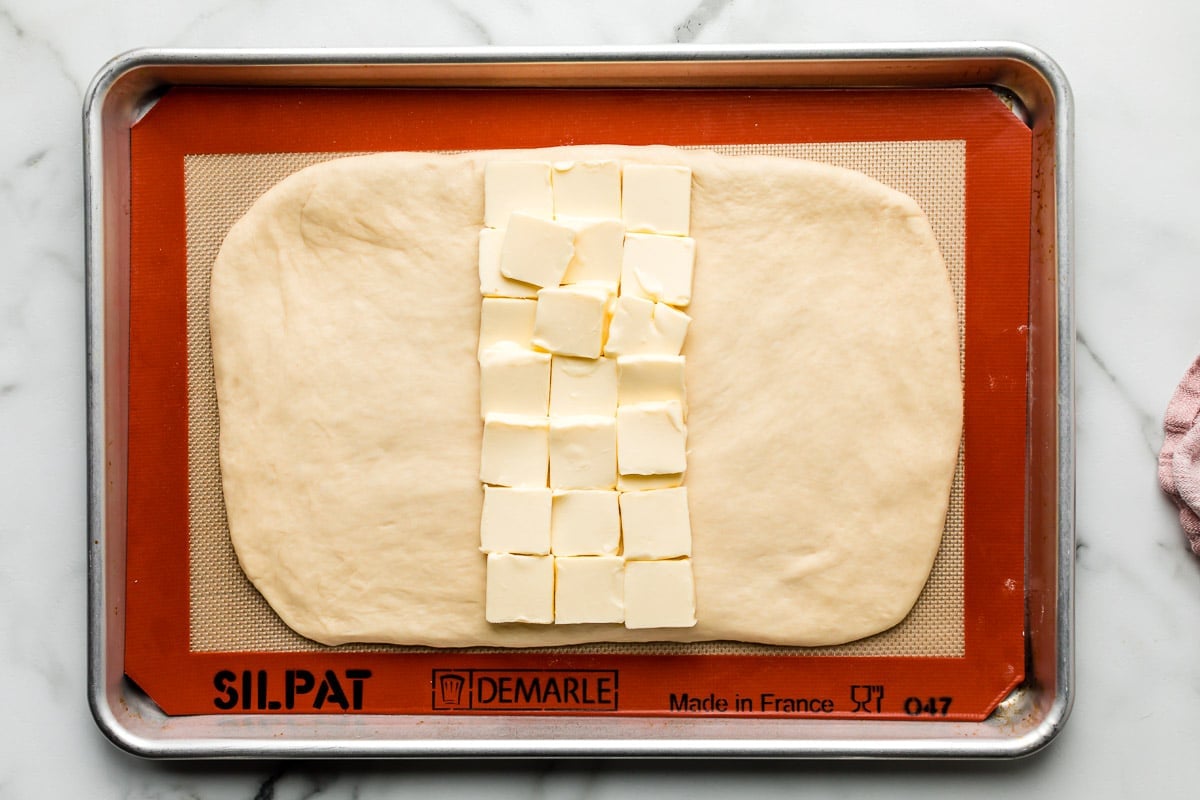
After 20 minutes in the refrigerator, the dough is about as pliable as the butter. Line the butter down the center third of the dough as pictured:
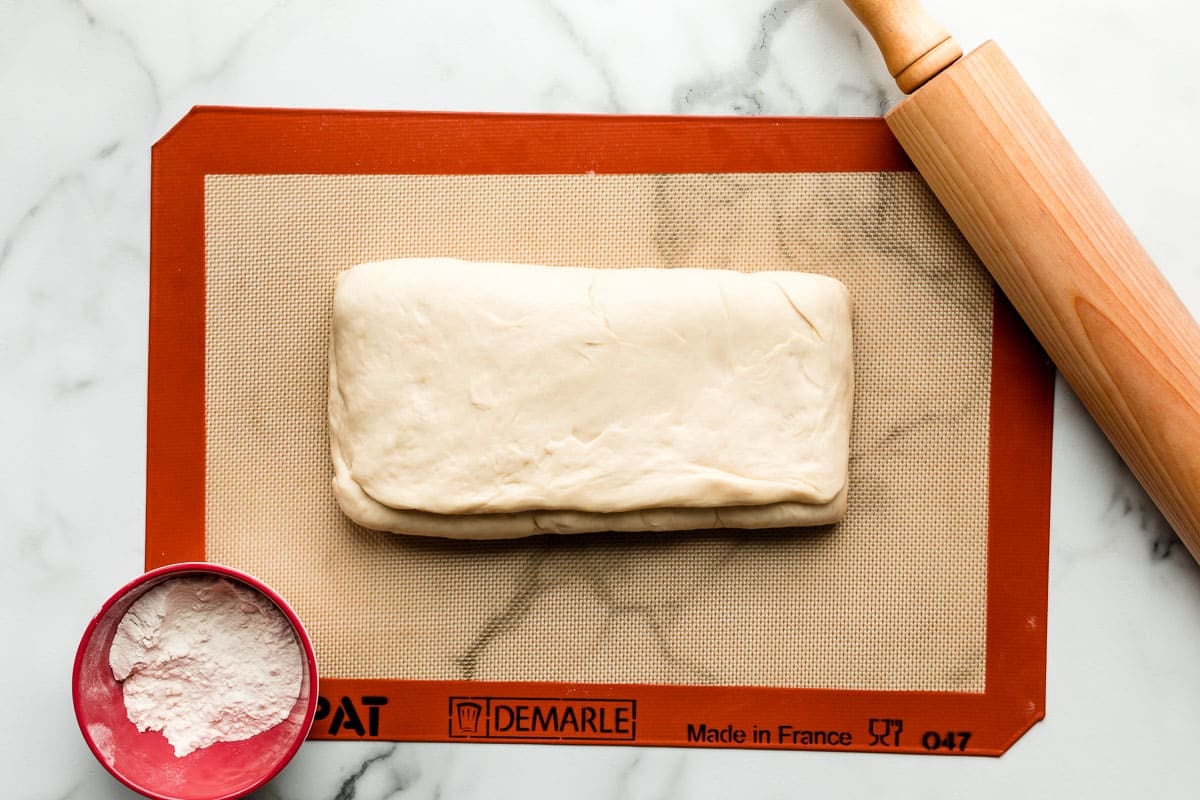
1st lamination: Fold one side over the butter:
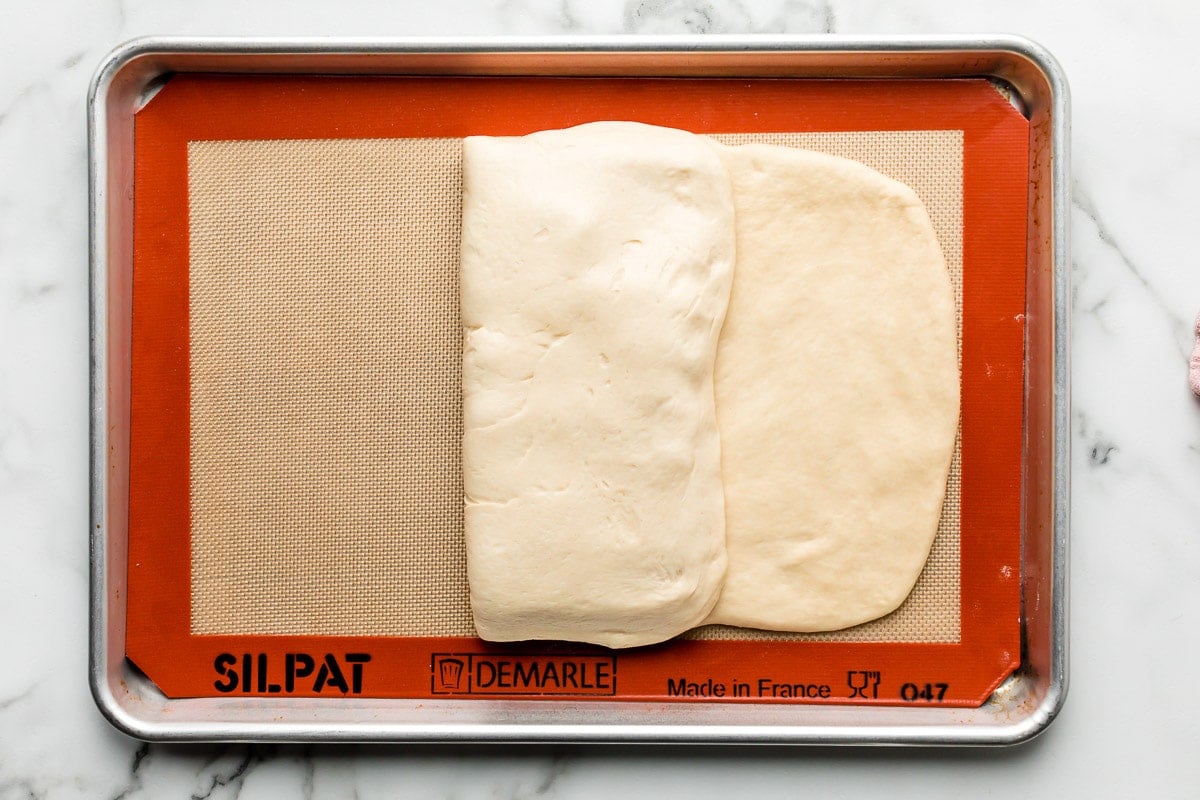
Fold the other side over that, like you would fold a business letter:
Rotate the dough so the long edge is facing you:
Roll out into a 9×12-inch (23x30cm) rectangle. You can see the butter hiding in there:
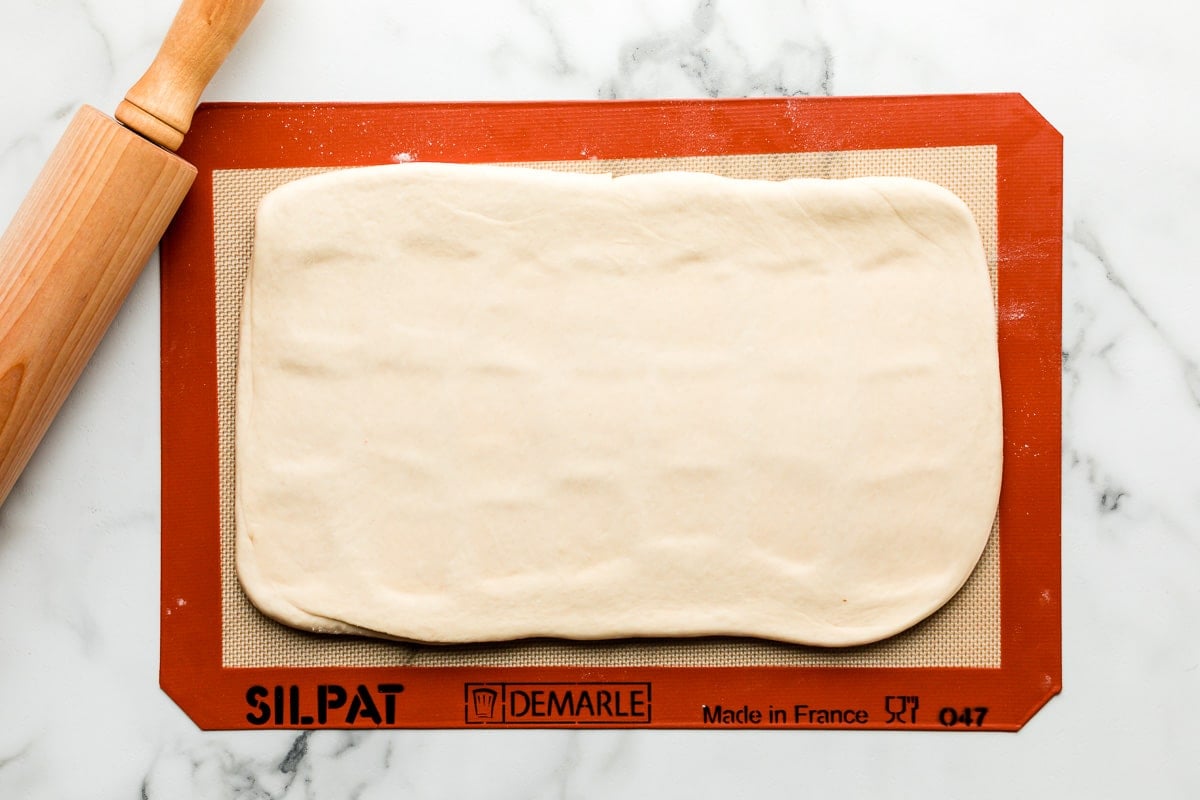
Fold up like a business letter, cover, and then chill for 20 minutes:
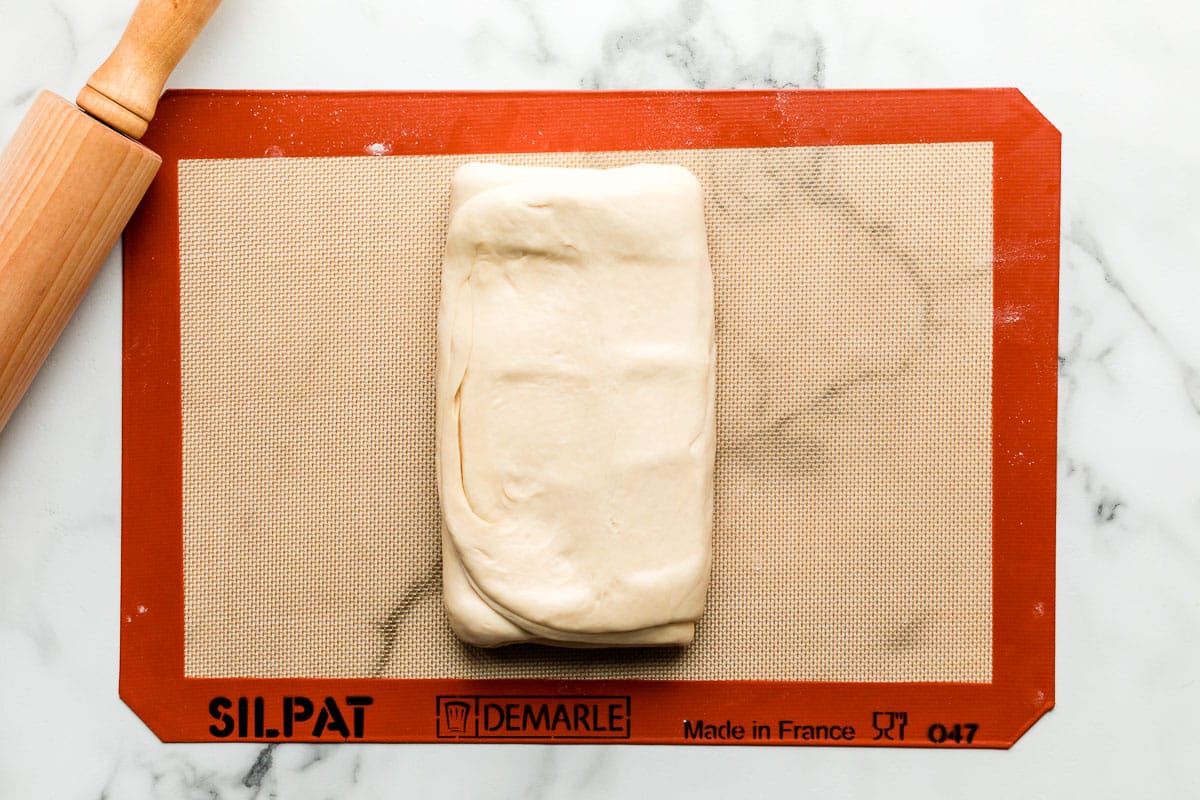
2nd & 3rd lamination: After refrigerating, repeat lamination process above 2x with no dough chilling between each—rotate dough, roll out, fold like business letter, rotate dough, roll out, fold like a business letter. And then chill 1 last time for 20 minutes.
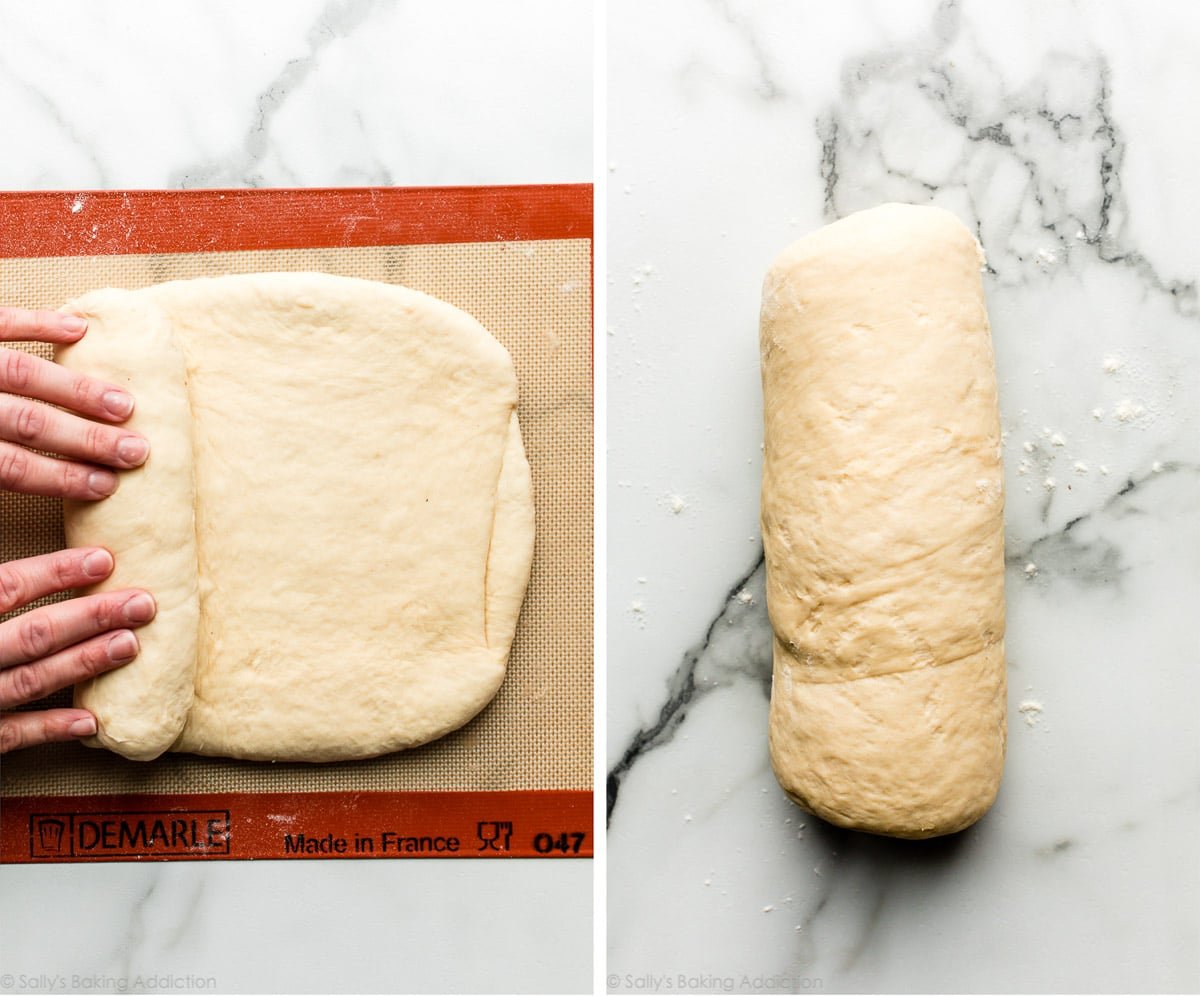
Final lamination: After that final refrigeration, repeat lamination 1x. Then roll out the dough into a 9×12-inch (23x30cm) rectangle for the last time:

Roll it up like a jelly roll cake or cinnamon rolls dough, starting from the shorter end:
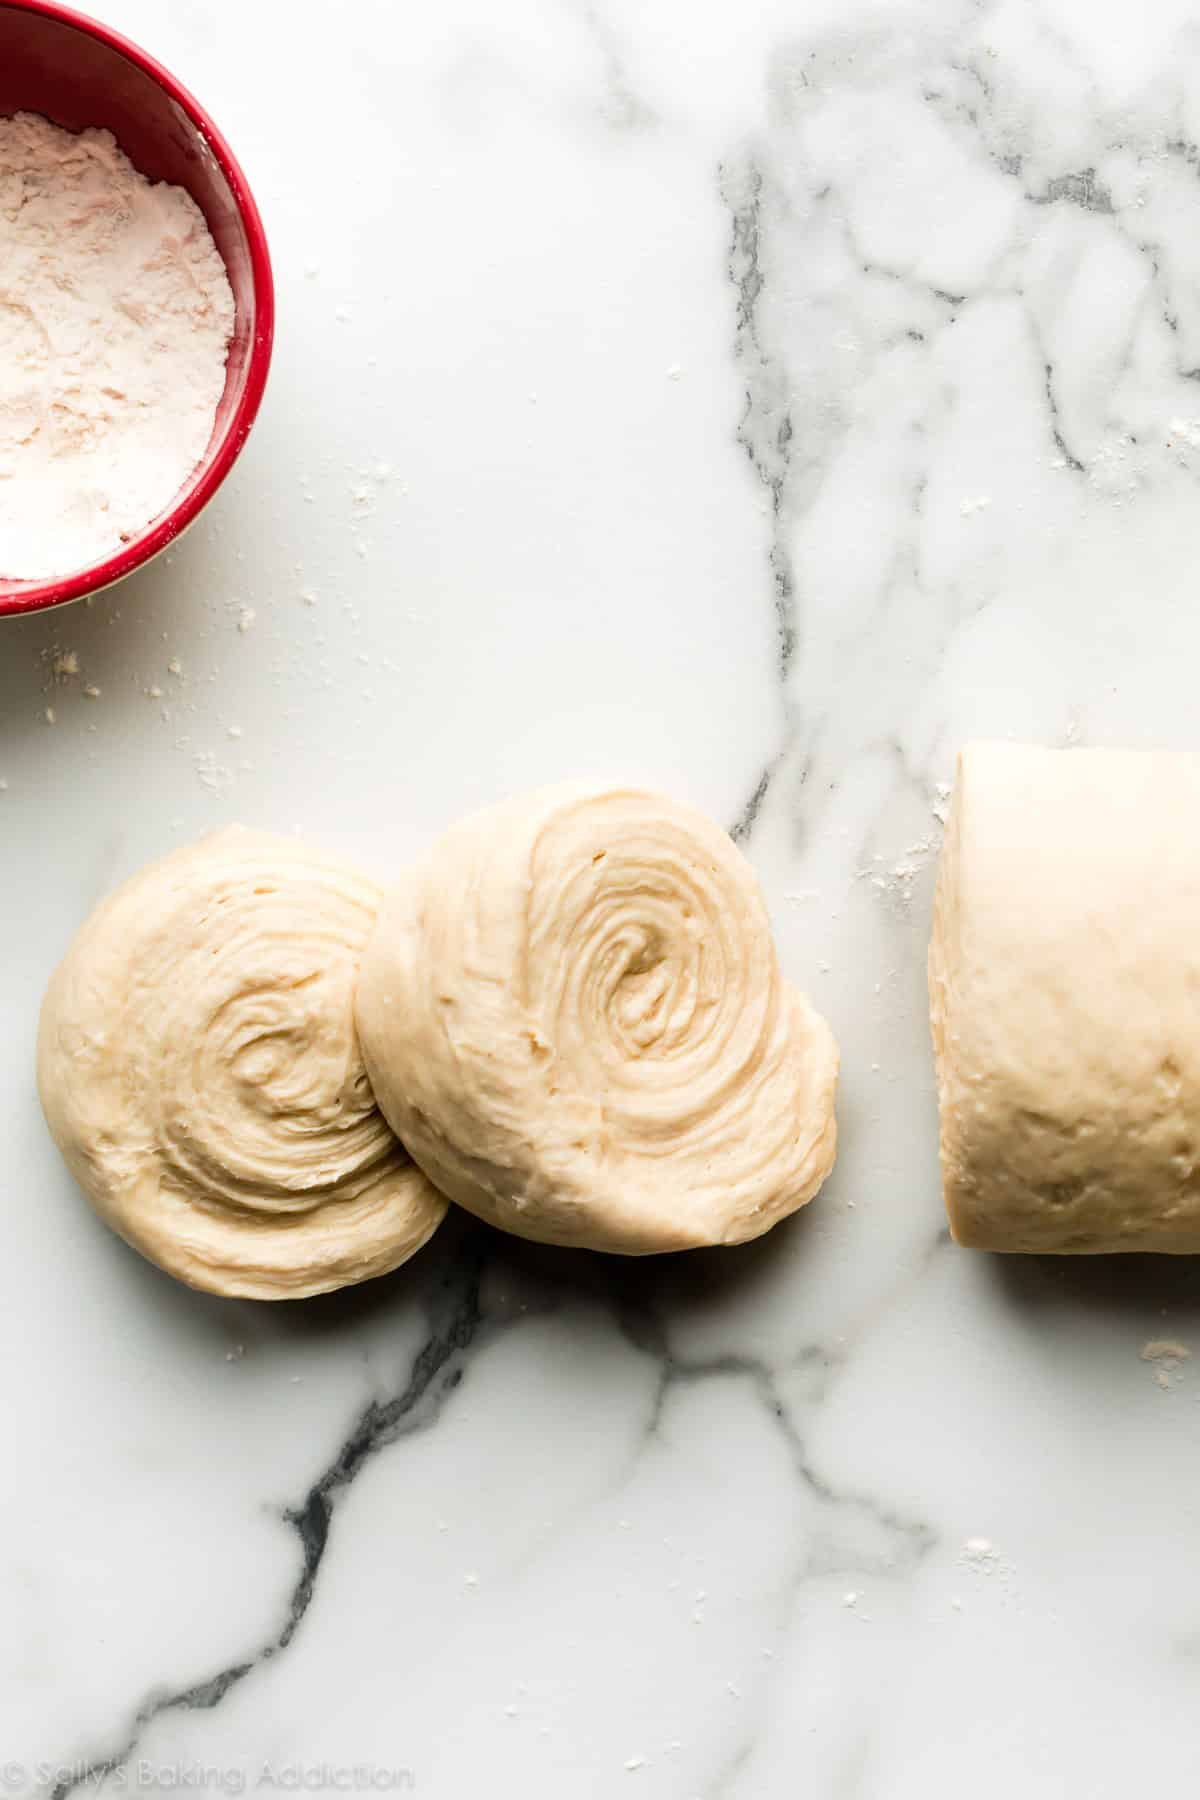
Slice into 5 thick rolls. Look at all those layers!
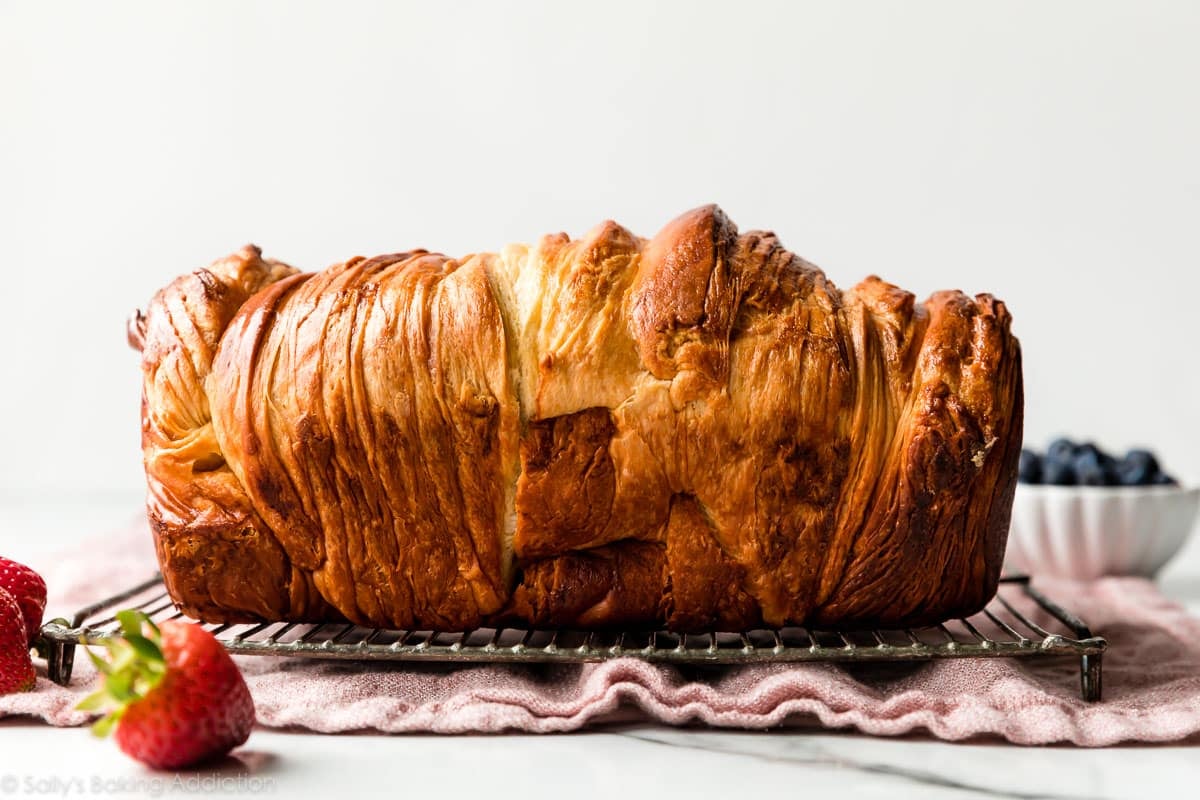
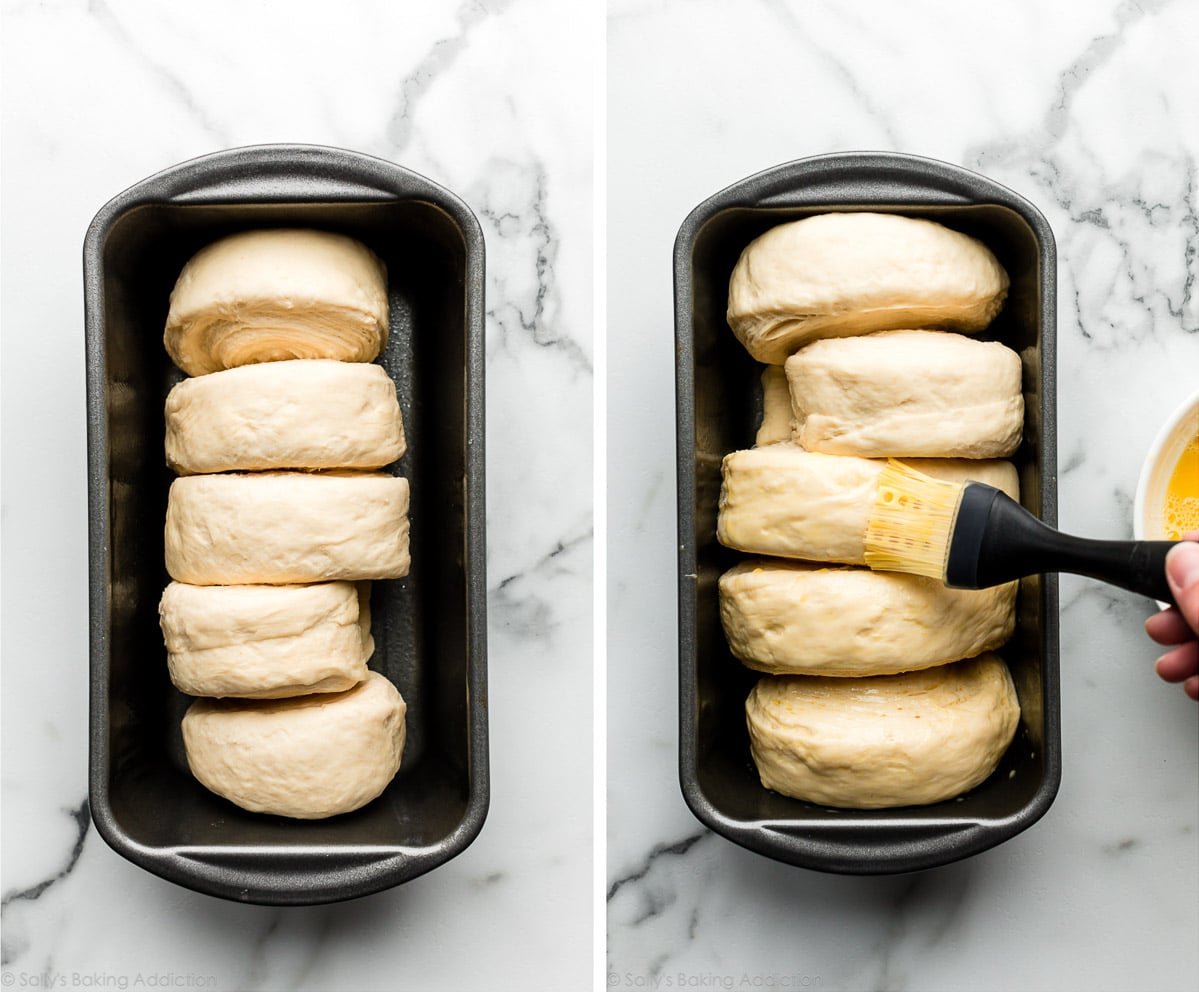
Arrange in a greased loaf pan, cover, and let rise until puffy. Then brush with egg wash before baking:
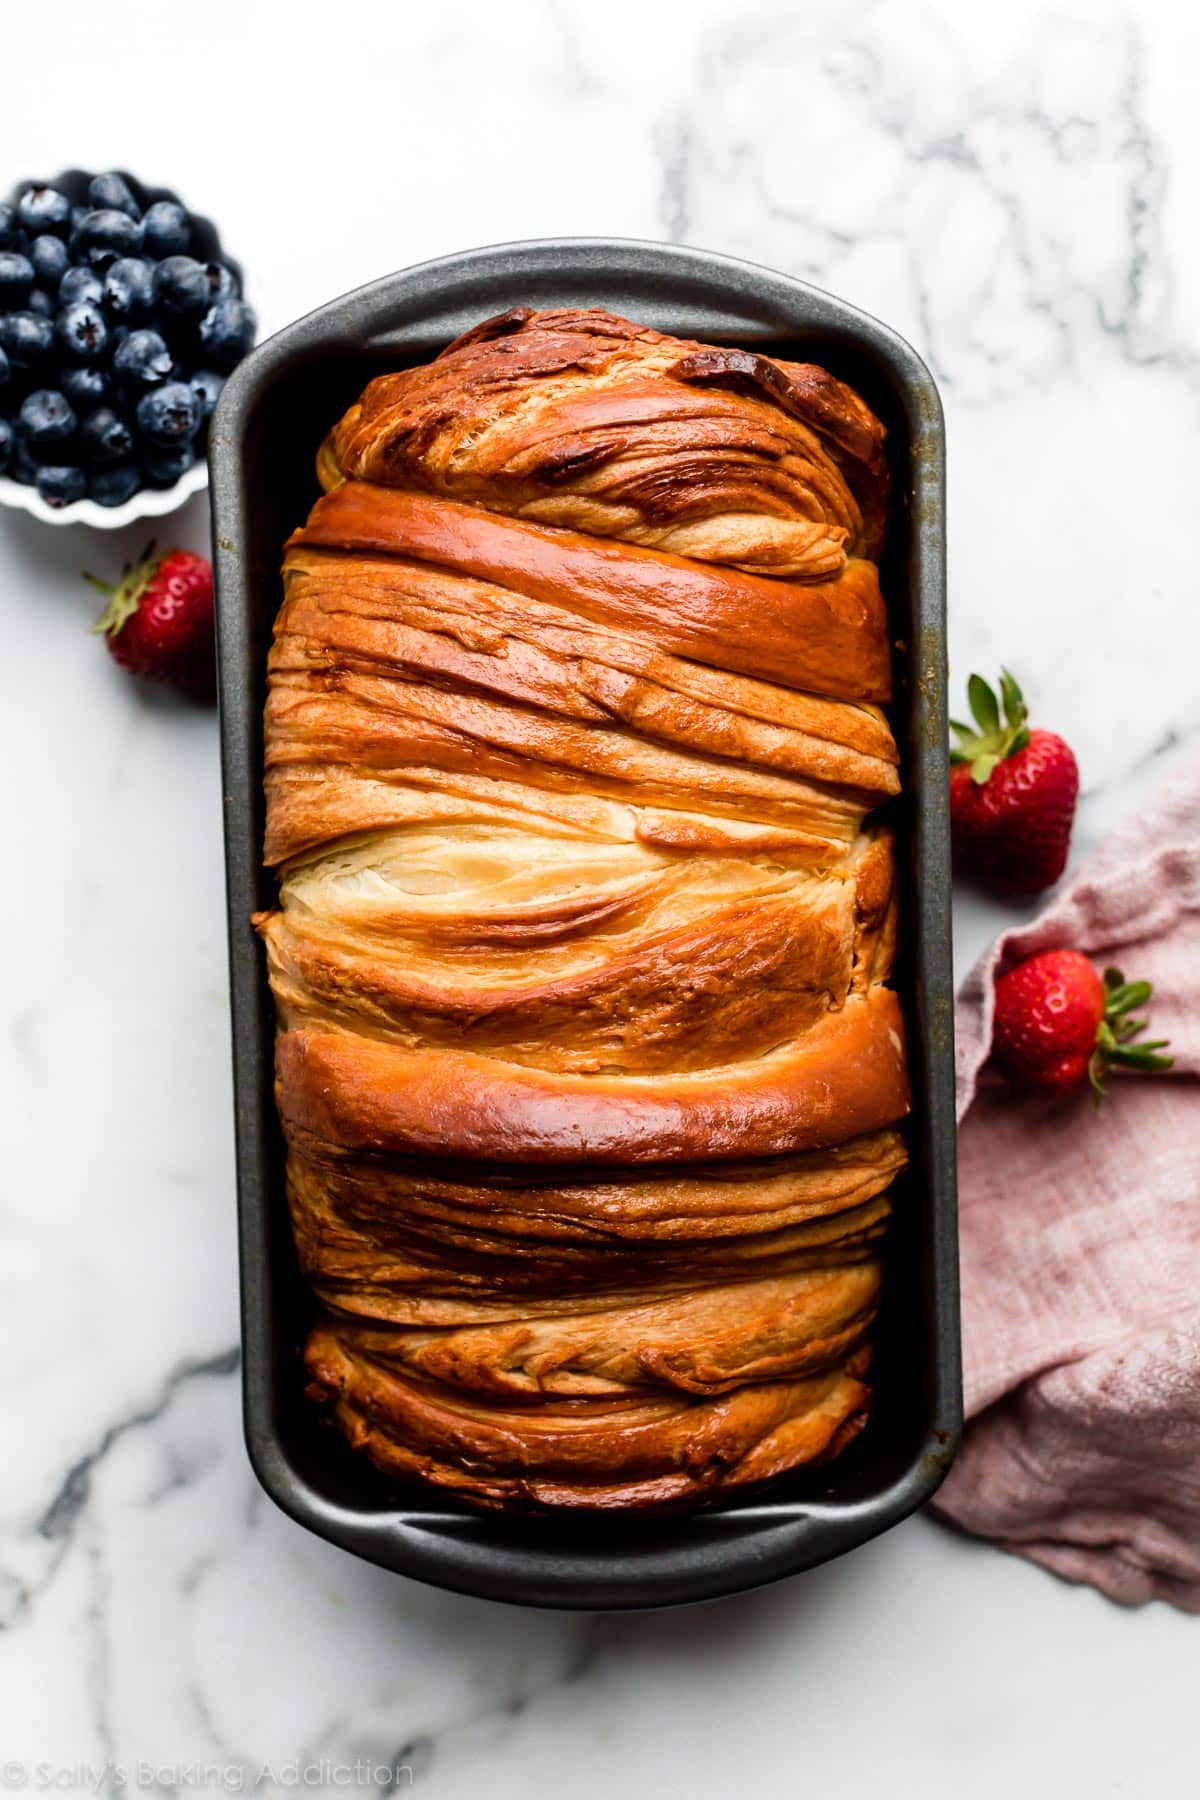

No Two Loaves Look the Same
Keep in mind that your loaf may look exactly like or slightly different from these photos. Despite following the exact same recipe and directions, some of my test loaves looked more airy, or less flaky, or more layered. You can see the variety in these photos. So don’t be discouraged if yours looks different… just wait until you TASTE it!
Print
Croissant Bread (Loaf)
- Prep Time: 4 hours, 45 minutes
- Cook Time: 1 hour
- Total Time: 6 hours, 30 minutes (includes cooling)
- Yield: 1 loaf
- Category: Bread
- Method: Baking
- Cuisine: French
Description
Bakers of any skill level can use this thoroughly detailed recipe to make a beautifully flaky and golden brown loaf of homemade croissant bread. There are 3 rounds of 20-minute refrigerations. Do not break up the lamination steps and do not extend the refrigeration times because the dough will begin to over-expand.
Ingredients
Dough
- 1 cup (240ml) whole milk, warmed to about 110°F (43°C)
- 2 and 1/4 teaspoons (7g) instant or active dry yeast (1 standard packet, see Notes)
- 3 Tablespoons (38g) granulated sugar
- 1 and 1/4 teaspoons salt
- 3 Tablespoons (43g) unsalted or salted butter, softened to room temperature and cut into 3 equal pieces
- 3 cups (375g) all-purpose flour (spooned & leveled), plus more as needed and for lamination
Lamination
- 3/4 cup (12 Tbsp; 170g) salted butter, slightly softened (see Notes)
Egg Wash
- 1 large egg, cold or room temperature
- 1 Tablespoon (15ml) water
Instructions
- Preliminary notes: Watch the video tutorial and use the step-by-step photos before you begin. Read the recipe instructions and notes before beginning. Make room in the refrigerator for your half baking sheet for steps 6–9.
- Prepare the dough: Whisk the warm milk, yeast, and sugar together in the bowl of your stand mixer fitted with a dough hook attachment. Cover and allow mixture to sit for about 5 minutes or until foamy on top. *If you do not own a mixer, you can do this in a large mixing bowl and in the next step, mix the dough together with a large wooden spoon/silicone spatula. A hand mixer works, but the sticky dough repeatedly gets stuck in the beaters. Mixing by hand with a wooden spoon or silicone spatula is a better choice.*
- Add the salt, butter, and 2 cups (250g) of flour. Beat on medium speed for 2 minutes, stopping and scraping down the bowl as needed to help the mixture combine. There may still be chunks of butter—that’s ok. Add remaining flour, scrape down the bowl as needed, and beat on low speed until a soft dough forms and pulls away from the sides of the bowl. Dough will be very soft, but not overly sticky. Beat in 2–3 more Tablespoons of flour if dough seems very sticky. Avoid adding more flour than you need.
- Knead the dough: Keep the dough in the mixer and beat for an additional 5 full minutes, or knead by hand on a lightly floured surface for 5 full minutes. (If you’re new to bread-baking, my How to Knead Dough video tutorial can help here.) If the dough becomes too sticky during the kneading process, sprinkle 1 teaspoon of flour at a time on the dough or on the work surface/in the bowl to make a soft, slightly tacky dough. Do not add more flour than you need because you do not want a dry dough. After kneading, the dough should still feel a little soft. Poke it with your finger—if it slowly bounces back, your dough is ready to rise. You can also do a “windowpane test” to see if your dough has been kneaded long enough: tear off a small (roughly golfball-size) piece of dough and gently stretch it out until it’s thin enough for light to pass through it. Hold it up to a window or light. Does light pass through the stretched dough without the dough tearing first? If so, your dough has been kneaded long enough and is ready to rise. If not, keep kneading until it passes the windowpane test.
- 1st rise: Lightly grease a large bowl with oil or use nonstick spray. Place the dough in the bowl, turning it to coat all sides of the dough in the oil. Cover the bowl with aluminum foil, plastic wrap, or a clean kitchen towel. Allow the dough to rise in a relatively warm environment for 1.5–2 hours or until nearly double in size. (For a tiny reduction in rise time, see my answer to Where Should Dough Rise? in my Baking with Yeast Guide.)
- Flatten dough: Punch down the dough to release the air. Place dough on a silicone baking mat-lined, parchment paper-lined, or lightly floured baking sheet. (I highly recommend a silicone baking mat because you can roll the dough out in the next steps directly on top and it won’t slide all over the counter.) Gently flatten the dough out into a 10×14-inch (25x35cm) rectangle using lightly floured hands to carefully stretch, but not tear, the dough. Lightly cover and place the entire baking sheet in the refrigerator, and allow the covered dough to rest and chill for 20 minutes. Do not extend this time.
- Meanwhile, prepare for lamination: Cut the salted butter into 1/4-inch thick slices and, as explained in the recipe note below, make sure the butter is not overly soft. It’s important to note the following 4 tips before you begin laminating in steps 8, 9, & 10: (1) It’s OK if there are air bubbles in the dough because your rolling pin will pop them. (2) If the dough tears and butter is exposed, just sprinkle the exposed butter with flour. (3) If the dough is impossible to roll, try flipping it over. If it’s still impossible to roll, cover and let it rest for 5 minutes before trying again, to let the gluten relax. And (4) Do not extend the refrigeration times, because the folded dough will begin to over-expand.
- 1st lamination: Remove dough from the refrigerator and set baking sheet aside. I like to keep the dough on the silicone baking mat when I’m rolling it because the mat is nonstick. Working with the longer (14-inch) edge in front of you, line butter down the center of the dough, covering the center third of the dough. Fold one dough edge over on top of butter, and fold other edge on top of that (like folding a business letter). Pinch/seal the two short ends to enclose butter inside. Rotate dough so the long edge is horizontally in front of you. Lightly flour the top of the folded dough and, using a lightly floured rolling pin, roll out to a 9×12-inch (23x30cm) rectangle. Fold dough edges over on top like folding a business letter. Cover dough, place back on baking sheet, and refrigerate 20 minutes. Do not extend this time.
- 2nd & 3rd laminations: Remove dough from the refrigerator and set baking sheet aside. Rotate dough so the long edge is horizontally in front of you. Lightly flour the top of the folded dough and, using a lightly floured rolling pin, roll out to a 9×12-inch rectangle. Fold dough edges over on top like folding a business letter. Rotate dough horizontally and repeat rolling out to 9×12 inches and folding like a business letter. Cover dough, place back on baking sheet, and refrigerate 20 minutes. Do not extend this time.
- Final lamination & shaping: Remove dough from the refrigerator and set baking sheet aside. Rotate dough so the long edge is horizontally in front of you. Lightly flour the top of the folded dough and using a lightly floured rolling pin, roll out to a 9×12-inch rectangle. Fold dough edges over on top like folding a business letter. For the last time, rotate horizontally and roll out to 9×12 inches. Working from a 9-inch side, roll dough up like you would roll up a jelly roll cake or cinnamon rolls. Place 9-inch log on a cutting board and cut into 5 even rolls (just eyeball it, they don’t need to be perfectly even).
- 2nd rise: Grease a 9×5-inch (23x13cm) loaf pan. Place rolls, seam side down, in loaf pan. Cover tightly and allow to rise until slightly puffy, about 45–60 minutes.
- Preheat the oven to 350°F (177°C).
- Whisk egg wash ingredients together. Generously brush risen rolls/loaf with egg wash. Bake loaf for 1 hour until golden brown on top, loosely tenting with aluminum foil after 25 minutes to prevent the top from over-browning before the center can cook. For an accurate test of doneness, the bread is done when an instant-read thermometer reads the center of the loaf as 195°F (90°C). (Tip: Keep in mind that the bread will continue to cook for a few minutes as it cools.)
- Remove from the oven and place loaf pan on a wire rack. Cool for 30 minutes in the loaf pan. Run a knife around the edges of the pan to release the bread, and then remove bread from loaf pan and cool at least 15 more minutes directly on a wire rack before slicing and serving. (Bread tends to fall apart when sliced warm.) Bread may slightly deflate as it cools.
- Storing & freezing baked bread: Cover and store leftover croissant bread covered at room temperature for up to 3 days or in the refrigerator for up to 1 week. You can also freeze it for up to 3 months and then thaw on the counter or overnight in the refrigerator. Warm up to your liking.
Notes
- Overnight Dough Instructions: After step 10, cover the shaped rolls in the loaf pan tightly and refrigerate for up to about 15 hours. At least 3 hours before you need the bread the next day, remove from the refrigerator, keep covered, and allow to rise on the counter for about 1–2 hours before baking. Alternatively, you can let the dough have its 1st rise (step 5) in the refrigerator overnight. Cover the dough tightly and place in the refrigerator for up to 12 hours. Remove from the refrigerator and allow the dough to fully rise for 2 more hours. Continue with step 6.
- Freezing Dough Instructions: The best way to successfully freeze and thaw this dough is after step 10. (Freezing/thawing before makes lamination difficult.) Cover and freeze shaped dough loaf (after step 10) for up to 3 months. Thaw in the refrigerator at least 3 hours before you need the bread, remove from the refrigerator, keep covered, and allow to rise on the counter for about 1–2 hours before baking.
- Special Tools (affiliate links): Stand Mixer or Large Mixing Bowl and Wooden Spoon/Silicone Spatula | Ruler or tape measure | Silicone Baking Mat (optional but recommended) | Rolling Pin | 12×17-inch Half Sheet Pan | 9×5-inch Loaf Pan | Pastry Brush | Instant-Read Thermometer | Cooling Rack
- Milk: Whole milk is ideal, but you can swap a lower-fat or non-dairy milk. Avoid nonfat milk.
- Yeast: You can use active dry or instant yeast in this recipe. Follow all of the same instructions. If using active dry yeast, the rise times are usually *slightly* longer, but not much. Reference my Baking with Yeast Guide for answers to common yeast FAQs.
- Butter: You can use either unsalted or salted butter in the dough, but be sure to use salted butter in the lamination step. The butter in the dough can be softened to room temperature, even overly softened is fine. However, the butter for the lamination does require your attention. It’s important to make sure your lamination butter is not too cold/hard and you don’t want it too greasy/soft either, because it needs to be about as pliable as the dough to incorporate into it. Sometimes I use a cooking thermometer just to check what temperature my butter and dough are for the lamination step, and it’s ideal they both register *around* 60°F (15°C). Being about the same temperature helps the butter and the dough laminate easily.
- Can I Halve or Double This Recipe? No. Follow the dough recipe precisely as written. If 1 loaf is too much, freeze any extras. If you want 2 loaves, make the dough 2x separately.
- Can I Add a Filling? I tried jam and cinnamon sugar (1/4 teaspoon cinnamon with 2 Tbsp granulated sugar). The only one that worked fairly well was the cinnamon sugar. Anything wet like jam will create too much moisture and the bottom of the loaf doesn’t bake very well. Plus, you need quite a lot to really taste it, which makes rolling up the dough fairly messy and difficult. You can absolutely try adding something dry like the cinnamon sugar, chopped nuts, or even chocolate chips! Spread a thin layer on the dough before rolling it up into a log in step 10.


Reader Comments and Reviews
Thank you for this challenge! I was intimidated by just the thought of it but I took my time, read and re-read your instructions, and watched your video multiple times. The result was fantastic and delicious! I’m beginning to believe that maybe I can bake afterall. Provided I have such great instructions as you provided.
This is my first time doing the monthly challenge. Fantastic recipe, spot on instructions and absolutely delicious – this is definitely a keeper.
This recipe is time consuming but SO worth it! My family said it was the best bread I’ve ever made. Thank you!
So easy! Love this bread, I added in the chai spice mix from the donut recipe before I rolled the bread up. You can see the line of the chai mix in the bread. Will use a little more mix when I make this again. Definitely worth the time!
This was a straightforward recipe, great for entry level lamination — the loaf turned out light and delightfully buttery! I would definitely make this again.
This laminated croissant bread loaf was really fun to make – and resulted in producing ONE FABULOUS loaf of deliciousness! Yes, it took a bit of time and planning, but wasn’t complicated at all. I ended up resting the dough in the fridge overnight between the first rise and the lamination process. I also used French salted butter, since it’s what had on-hand. Neither of these steps had a negative impact on the final product, thankfully. When I checked the bread after 25 minutes of baking, I did notice butter bubbling over the edges of the pan, spilling onto the oven floor, so I placed the loaf pan on a separate sheet pan to catch the butter drips. I also finished the loaf with Maldon sea salt flakes, because it would look pretty and taste even yummier! The taste is delicious and versatile – basic or fancy toasts, delicate sandwiches, rustic sandwiches. Recipe options are endless. It also looks quite impressive. I will definitely make this again. Thank you Sally for sharing this recipe with us!
I made two delicious loaves today. One regular and one filled with cinnamon sugar. The instructions were clear and so easy to follow. They turned out great. Thank you for giving the casual baker the confidence to step out of our comfort zone and try something different. Looking forward to May’s challenge!
I live in the tropics and it is hot and humid here. The butter started oozing out at the last lamination and it was a greasy mess. Despite this, the loaf was yummy. Next time I will proof overnight in the fridge and sprinkle cheese before rolling it up.
I made this today and it is amazing! Thanks so much for the recipe and for challenging me!
Great recipe! Loved the step by step directions and video. Easy to follow and not intimidating. Smells so good and looks amazing. Thanks Sally!
Loved this recipe. A bit of work and a time investment for sure, but 100% delicious outcome.
What a great recipe! It was way easier than I thought it would be and the directions were super easy to follow. The end result is delicious! Thanks for another great recipe!
This recipe was such a delight to make, and even more delightful this morning when I sliced into it for breakfast! The instructions are clear and easy to follow and my bread turned out beautifully. I made traditional croissants last year and I can attest that this loaf is MUCH easier/faster, but with the same buttery, delicious results.
This recipe is phenomenal! Every step is explained with careful detail, and the bread came out perfectly. I appreciate that you can use dairy alternatives in this recipe. I personally used goats milk, and did not run into any issues.
This recipe may take awhile and be involved, but the outcome is so delicious I could easily see myself making this bread every month.
Made a first attempt at this yesterday and the result was pretty good, the lamination process went very well, lots of layers and a crispy top 🙂
But I’ve got questions: after baking there was a lot of melted butter bubbling all around between the bread and the pan. Is this to be expected? After cooling in the pan, the bottom of the loaf was pretty drenched in melted butter, but stuck to the pan nonetheless. Over all, the bread had a buttery-oily and somewhat tough texture to it. It looks different in your pictures and I wonder what caused this. Any ideas?
Also, the five sections of the bread practically fell apart when I took it out of the pan. It was like pull-apart bread. I expected them to grow more together during baking. What is your experience?
Thanks a lot!
Hi Sina, I had similar experiences when laminating with European-style butter, typically a butter with a high fat percentage. It’s never ruined the bread, just made it bake up a little differently. What type of butter did you use for lamination?
Hi Sally,
thanks a lot for the reply, this and your answer to a previous comment explains a lot. I honestly didn’t think about the style of butter. Because I’m in Germany, “European style butter” would be the kind I would normally find in the store. I don’t know if I can get different butter. What would I be looking for?
I’ve made croissant dough before and that recipe called for mixing the butter which is layered into the dough with a certain amount of flour. This mixture is formed into a kind of log that has to firm up in the fridge before layering into the dough. Maybe I could try that for this recipe, what do you think?
Thanks you for your help! It is very much appreciated. 🙂
Sina, the kind of butter you normally find at the store is SO GREAT for cooking and other baking recipes! You may not have other butter options available and that’s OK! So I think mixing it with the flour for this recipe would be a great idea. (That’s what I do when making these croissants— so you can follow a similar process. You want it to cover the center third of the 10×14-inch (25x35cm) rectangle dough, so the flour/butter block should be *about* 10×4.5 inches (roughly 25×11.5cm).)
Thank you so much – I will definitely try this again with the butter block method!
I was intimidated by this recipe at first but it was pretty easy! A great baking project for a Saturday when you don’t have lots going on. It turned out delicious and I’ll be eating a slice every day for breakfast this week.
This was so much fun to make and came out absolutely delicious! Will be a favorite and frequent recipe in our home.
So good! I will never buy croissants again. Easy to follow recipe as usual and it turned out perfect.
Super delicious, whole family loved it
It was well worth the effort!! Detailed instructions are key to success.
I love this! Not that difficult!
I laminated before. Laminated my COVID vaccination card, keepsake art work. Never heard of lamination in regards to baking. Well, this is art!!!
I never made croissants before but I thought I can handle making this bread. Thanks to the easy step-by-step directions and video the process was so easy. The bread baked to a beautiful golden brown and tasted to die for. Just like butter! Thanks again for another winning recipe!
Sally first off thank you for creating and sharing your recipes. I use most of your yeasted bread recipes since they actually work out so much better than others! I actually love making the overnight cinnamon rolls and the sandwich bread ones!!!
So let’s talk European butter… when I’ve made croissants in the past, recipes always call for 85% butter. I know that the regular brand at the grocery store is way less in the fat content because if the water. I have plenty of ‘European style’ butter to hand, wondered if this would make any difference to the layers. My first rise of this bread is off and running and excited to try it.
Wendy, thank you for the thoughtful comment! Using European-style butter in this recipe seems like a great idea, however I did find that it made the dough a bit more fragile during lamination and when baked, the bread leaked a lot more butter. Also, after cooling, the bread fell apart easier. You can absolutely use it, just keep these things in mind.
I loved making it and eating it. The dough handles beautifully, and it is absolutely delicious – so flaky and buttery. Thank you for the detailed instructions, photos, and video. I will definitely make this again, and again, and…
Wow, those layers!!! Lamination has always intimidated me, so I have stayed away from recipes that require that step, until now. Thank you for the easy-to-follow directions and video; they made the process so easy. It was very satisfying to slice into the dough and see the many beautiful layers. The bread baked up beautifully golden brown and tasted as amazing as it smelled during baking. I will definitely be making this again.
Thank you for sharing your talent with us. Your recipes have inspired me to step out of my comfort zone and greatly improved my baking abilities.
Quick Q… why slice into 5 before baking?
So the laminated layers inside aren’t enclosed and can rise up, making the loaf look just as layered as it tastes. And, really, without doing so, the layers inside won’t have as much “breathing room” to expand. You could also cut into 4 or 6 rolls but I found 5 just enough.
I love how easy this recipe is to follow. I bake fairly often but have always stayed away from any recipes that require lamination because I was so intimidated. This recipe’s step-by-step instructions along with the video helped me feel pretty confident when making this loaf. So glad I decided to take a step out of my comfort zone to make this delicious croissant bread!
If your oven has regular bake or convection bake which option should you choose? And if you use convection do you alter the temperature? Was also wondering at what temperature you think is best to leave dough to proof. Thank you. I am excited my loaf is in the oven and so far looks great
Hi Beth! We always recommend conventional settings for baking (not convection/fan). The flow of air from convection heat can cause baked goods to rise and bake unevenly and it also pulls moisture out of the oven. If you do use convection/fan settings for baking, lower your temperature by 25 degrees F and keep in mind that things may still take less time to bake.
This recipe was delicious! First time making a croissant of any sort, and I was quite nervous. It was a huge hit with the family and I will be making again.
Do we layer butter down the middle in all 3 laminating steps or only the first time?
Thank you!
Hi Pamela, only the first time. Use all of the 3/4 cup (1.5 sticks; 170g) salted butter in the beginning of step 8. And then it’s all inside the dough after you begin folding.
If you don’t have whole milk on hand, can you use evaporated milk as a substitute?
Hi Bonnie, while I’ve tested the dough with lower fat and non dairy milks, I have not tried evaporated milk. I do not think it would be an issue, but again, I have not tested it.
I used evaporated milk and it turned out GREAT!
Can you add cinnamon and sugar and make a delicious sweet pastry? And it what stage would you add the sugar and cinnamon?
Hi Stephanie, see recipe notes — “Can I Add a Filling?” — for more information on how to do a cinnamon sugar version.
Can’t wait to make this! Can I use unsalted butter and if so, do I need to add salt?
Where do I add salt and when?
Thank you!
Hi! Add the salt to the dough in step 3. See Note about butter– I strongly recommend salted butter for the lamination. Unsalted butter is fine in the dough.
Thnak you!
! more question. I just put the yeast and sugar together in the bowl together when I got a call letting me know I need to leave right now. I did not add the milk yet. Will I need to start over or can I put the yeast and sugar in the fridge until tomorrow? Thanks, Tsili
Time consuming for sure, but so worth it! Not only does it taste fabulous, it’s gorgeous!
Can I use bread flour instead of AP flour in this recipe?
Absolutely! Same amount.