

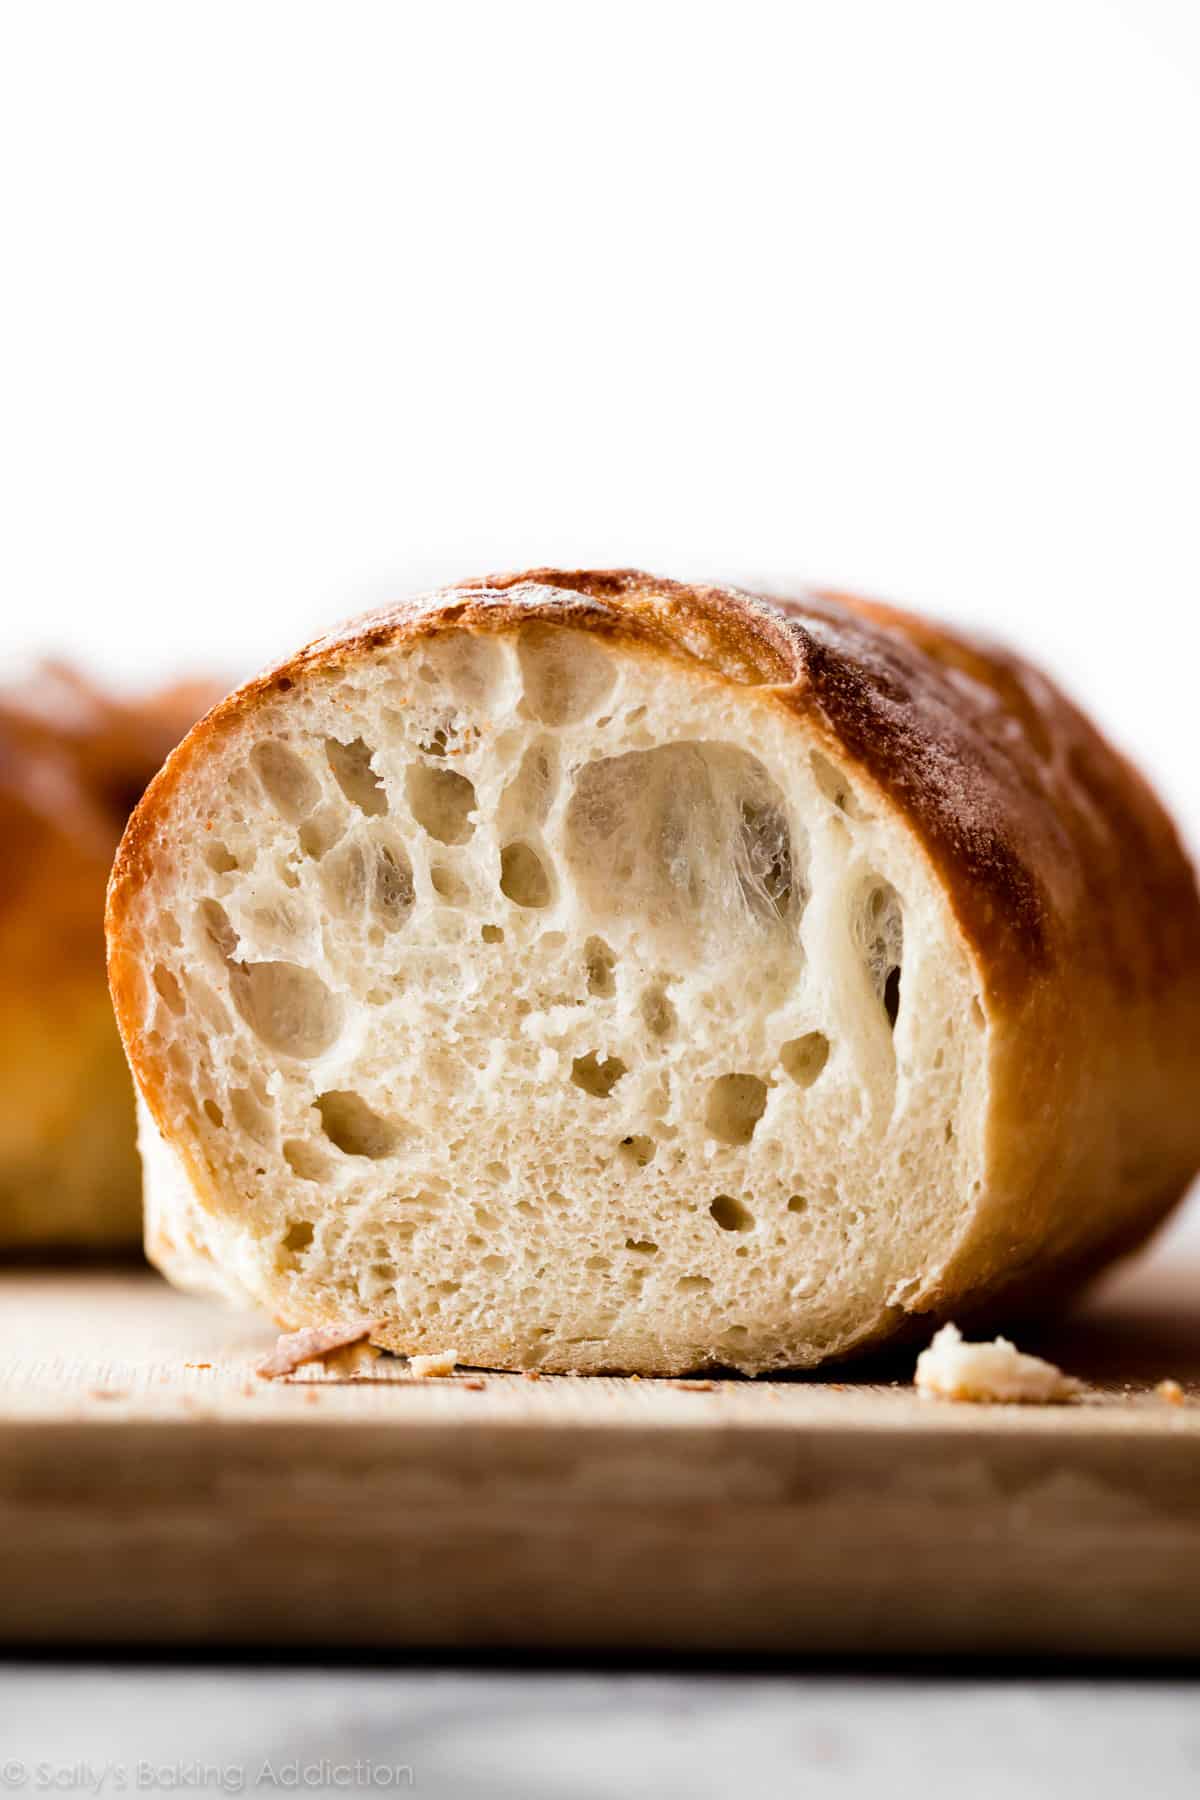
Even if you’ve never made homemade bread or worked with yeast before, this homemade crusty artisan bread is for you. It’s the perfect beginner recipe because it only requires 4 ingredients without any special pans or mixer, there’s no kneading or complicated shaping involved, and 95% of the work is hands-off. Bread masters will appreciate this recipe too because it delivers with delicious flavor, a slightly crisp and mega chewy crust, and those signature soft holes inside like ciabatta or French bread.
Bread Beginners—Start Here
Have you ever wanted to master homemade bread? Real, crusty, chewy, delicious bakery-style loaves that taste incredible with dips, soups, sauces, and comforting dinners? This is where you start. This artisan bread recipe is for beginners, but even bread masters will appreciate its flavor and ease. It’s so fresh, so flavorful, and so surprisingly easy because it basically makes itself.
You only need 4 ingredients without any special pans or mixer, there’s no kneading, no poolish or dough starter required, and you can add herbs, cheeses, and spices to make a variety of bread flavors.
This base recipe will soon be on repeat in your kitchen. After you realize how easy it is to make real homemade bread, you’ll find any excuse to bake a loaf. You can even turn it into garlic bread and homemade croutons.

What is Homemade Artisan Bread?
When it comes to bread, the term “artisan” doesn’t mean 1 particular thing. But, generally, artisan bread is homemade, fresh, crusty, and deliciously rustic-looking. An artisan is a skilled worker, one who works with their hands. But ironically, there isn’t much “work” involved with this recipe.
Why You’ll Love This Bread Recipe
- Easier than you ever imagined
- Soft + flavorful
- Chewy, slightly crisp crust
- Shape however you want
- No special pans, poolish, or dough starter required
- Only 4 ingredients
- You decide the length of time it rests
One reader, Mena, commented: “Wow! I had never made bread until I tried this recipe. Followed instructions carefully and watched the video. Beautiful golden crust and airy center. It was delicious! Thank you, Sally! ★★★★★”
Another reader, Marliz, commented: “Love the bread and I really enjoy the flexibility of leaving the dough in the refrigerator. Will definitely make this on the regular! No need to carefully plan rising times with cooking and eating times. Just prepare a few days ahead and put it in the refrigerator. Works so well! Very easy and tasty. I kept it as one big loaf. ★★★★★”
Another reader, ACM, commented: “One word: Outstanding! Fantastic recipe and can accommodate your favorite herbs and spices, nuts and fruit, or cheese. Make one! ★★★★★”
Like sandwich bread, whole wheat bread, focaccia, homemade English muffins, seeded oat bread, and homemade bagels—the process is surprisingly easy. If you’re new to yeast, reference my Baking with Yeast Guide for answers to common yeast FAQs.
Only 4 Ingredients
The crustier and chewier the bread, the less fat in the dough—also known as a “lean dough.” We’re using a lean dough for our artisan loaf today. (If you’re curious, a “rich dough” is a soft bread dough with the presence of fat, such as butter and eggs—the kind we need for overnight cinnamon rolls, sweet potato dinner rolls, brioche, and honey butter rolls.) Without fat, we’re left with the basics.
- Bread Flour: While you can use all-purpose flour in this recipe, I strongly recommend using bread flour. Just like when we make olive bread, pizza bread, and asiago-crusted skillet bread, bread flour produces a stronger, chewier bread and that makes a big difference in a recipe with only 3 other ingredients.
- Instant Yeast: Instant yeast is key in this recipe. While you can use active dry if that’s all you have, any quick rise or instant yeast will produce flavorful results in less time. I use more yeast in this recipe compared to my cranberry nut no-knead bread and no-knead jalapeño cheddar bread. Why? Those doughs rest and rise at room temperature. However, for more flavor and just as much rise, I use more yeast and let this dough rest in the refrigerator. (Cool air slows the fermentation process.)
- Salt: You can’t make good bread without salt and for best flavor, I recommend a coarse salt, such as coarse sea salt. I find the bread’s flavor lacking with regular table salt.
- Water: I normally encourage you to use warm liquid with yeast because warm liquid helps the yeast work faster. However, use cool or room temperature water here. Not freezing cold, not super warm—cool to touch. 70°F (21°C) is great, but the exact temperature doesn’t matter as long as it’s not hot or warm. The cooler the water, the longer the dough takes to rise and, usually, the better the bread’s flavor. (This is important since there are so little ingredients to add substantial flavor!) We use the same cool water method for no knead honey oat bread.
- Optional Cornmeal: Dusting the pan with cornmeal adds a pop of flavor and a little crunch to the bottom crust. This is completely optional. If you have it, use it. If you don’t have it, don’t worry about it.
You can also add herbs and seasonings such as garlic, rosemary, dill, chopped onion, jalapeño, shredded cheese, chopped nuts, dried cranberries, etc. My no yeast bread is the quick bread alternative here—you can add flavors to that loaf, too!
Baker’s Tip: Avoid adding too much flour to the dough as you work with it. The stickier it is—and the longer it sits in the refrigerator—the more likely you’ll have those big airy pockets of air in the crumb.
How to Make Homemade Artisan Bread in 5 Steps
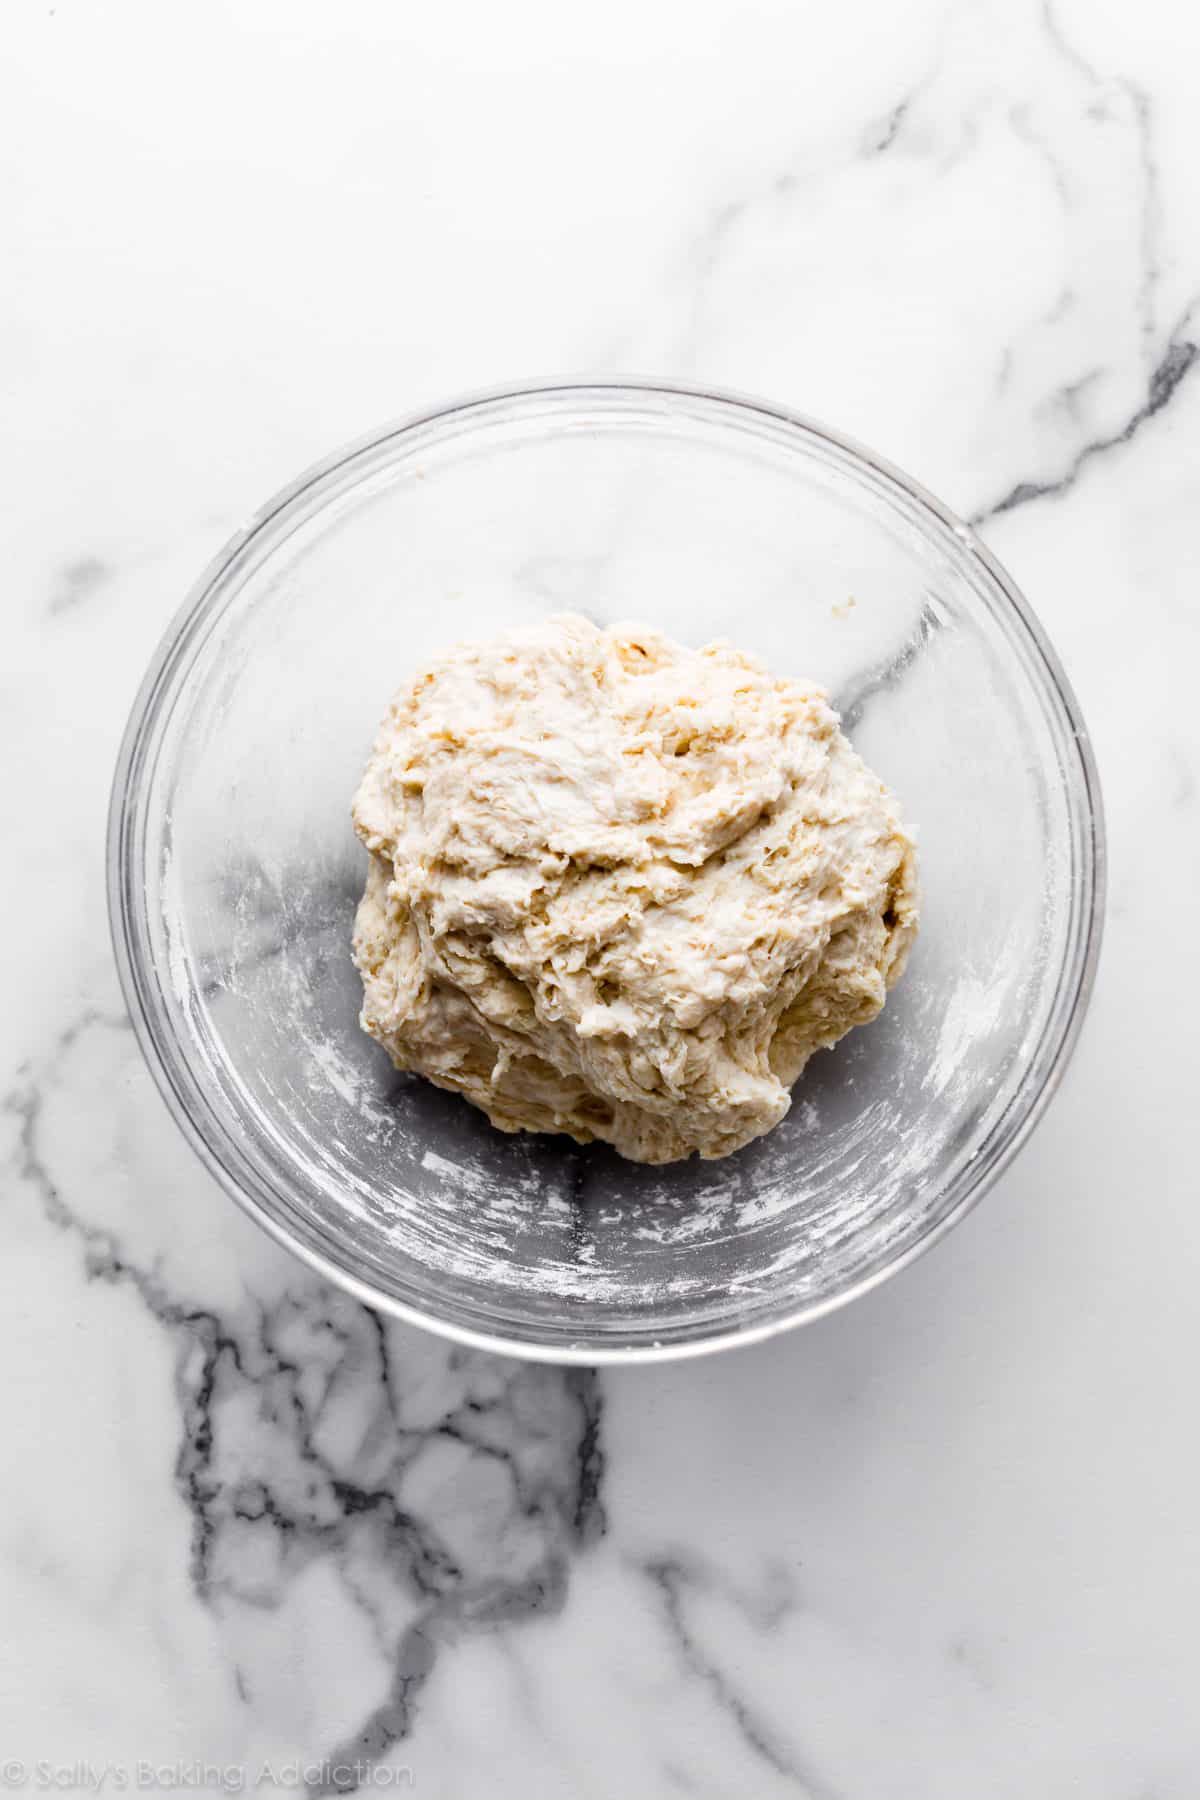
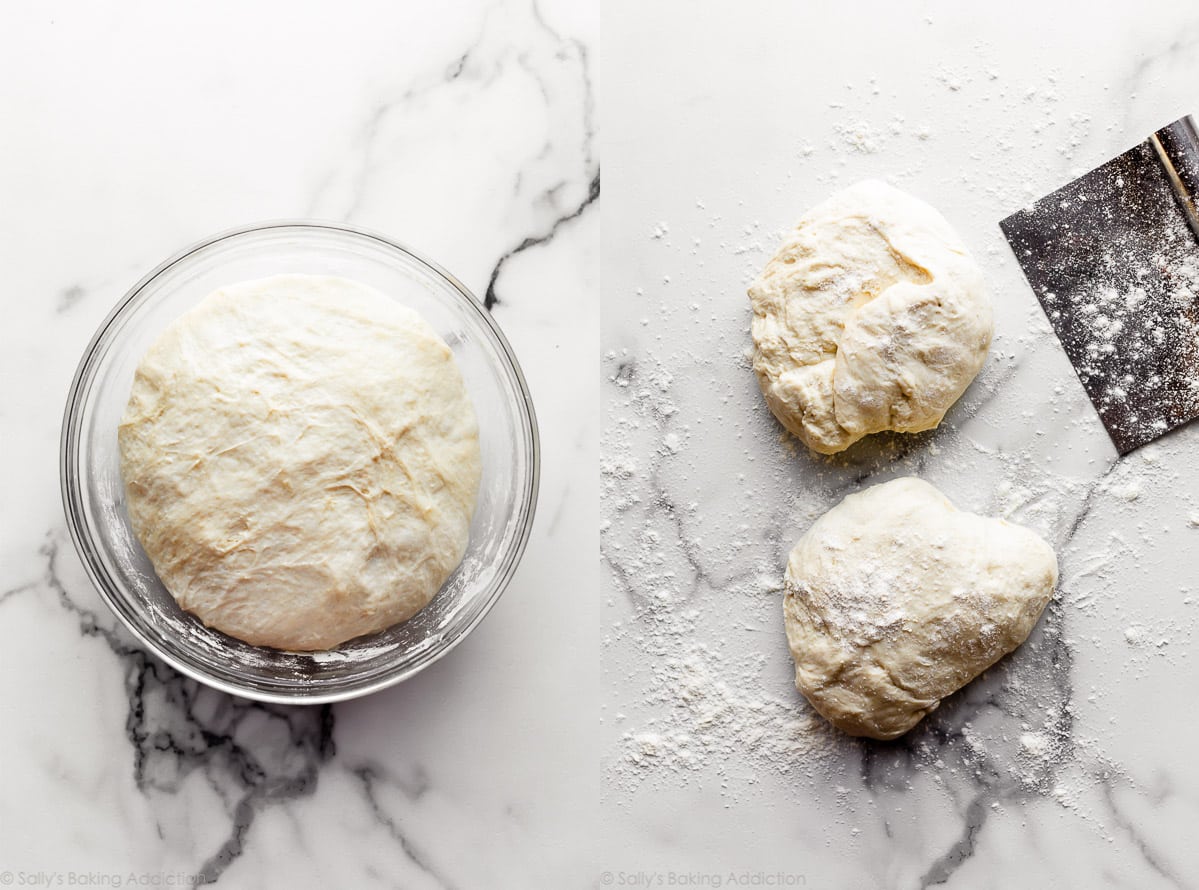
- Mix the dough ingredients together. At first the dough will seem very dry and shaggy and you’ll question if it will even come together. But it will. Use a spatula at first, then switch to your hands to ensure all of the flour is moistened. The dough is actually a little sticky after it’s thoroughly mixed.
- Let it rise at room temperature for 2-3 hours. Cover the dough and let it rise at room temperature for about 2-3 hours until doubled in size.
- Use right away or refrigerate. After 2-3 hours, you can immediately continue with the next step. However, for ideal flavor and texture, I strongly recommend letting the dough sit in the refrigerator for at least 12 hours and up to 3 days. Yes, 3 full days! I usually only let it rest for about 18 hours. During this crucial step, the cold air slows the fermentation process and adds so much flavor and texture. So, you can bake bread in 2-3 hours or in 3 days. The longer it sits, the better it tastes. 🙂
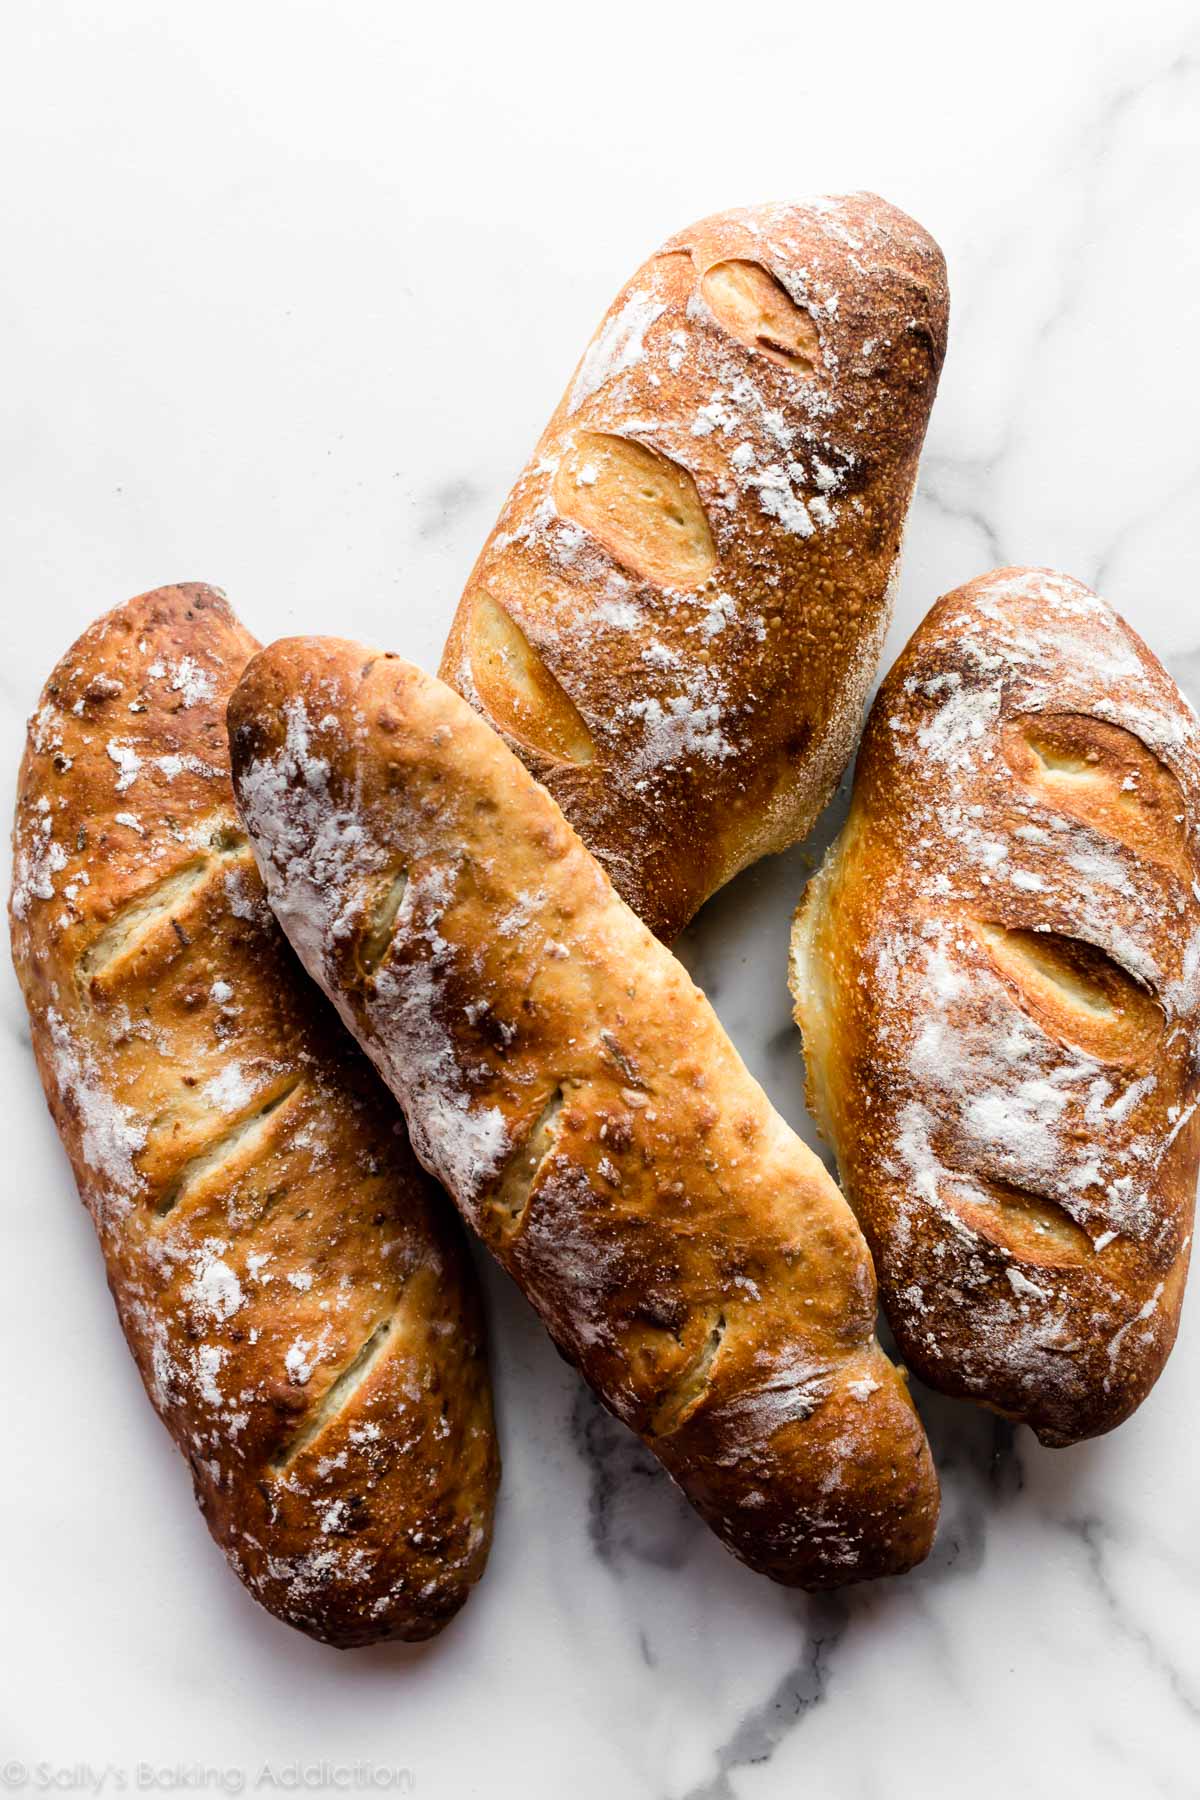
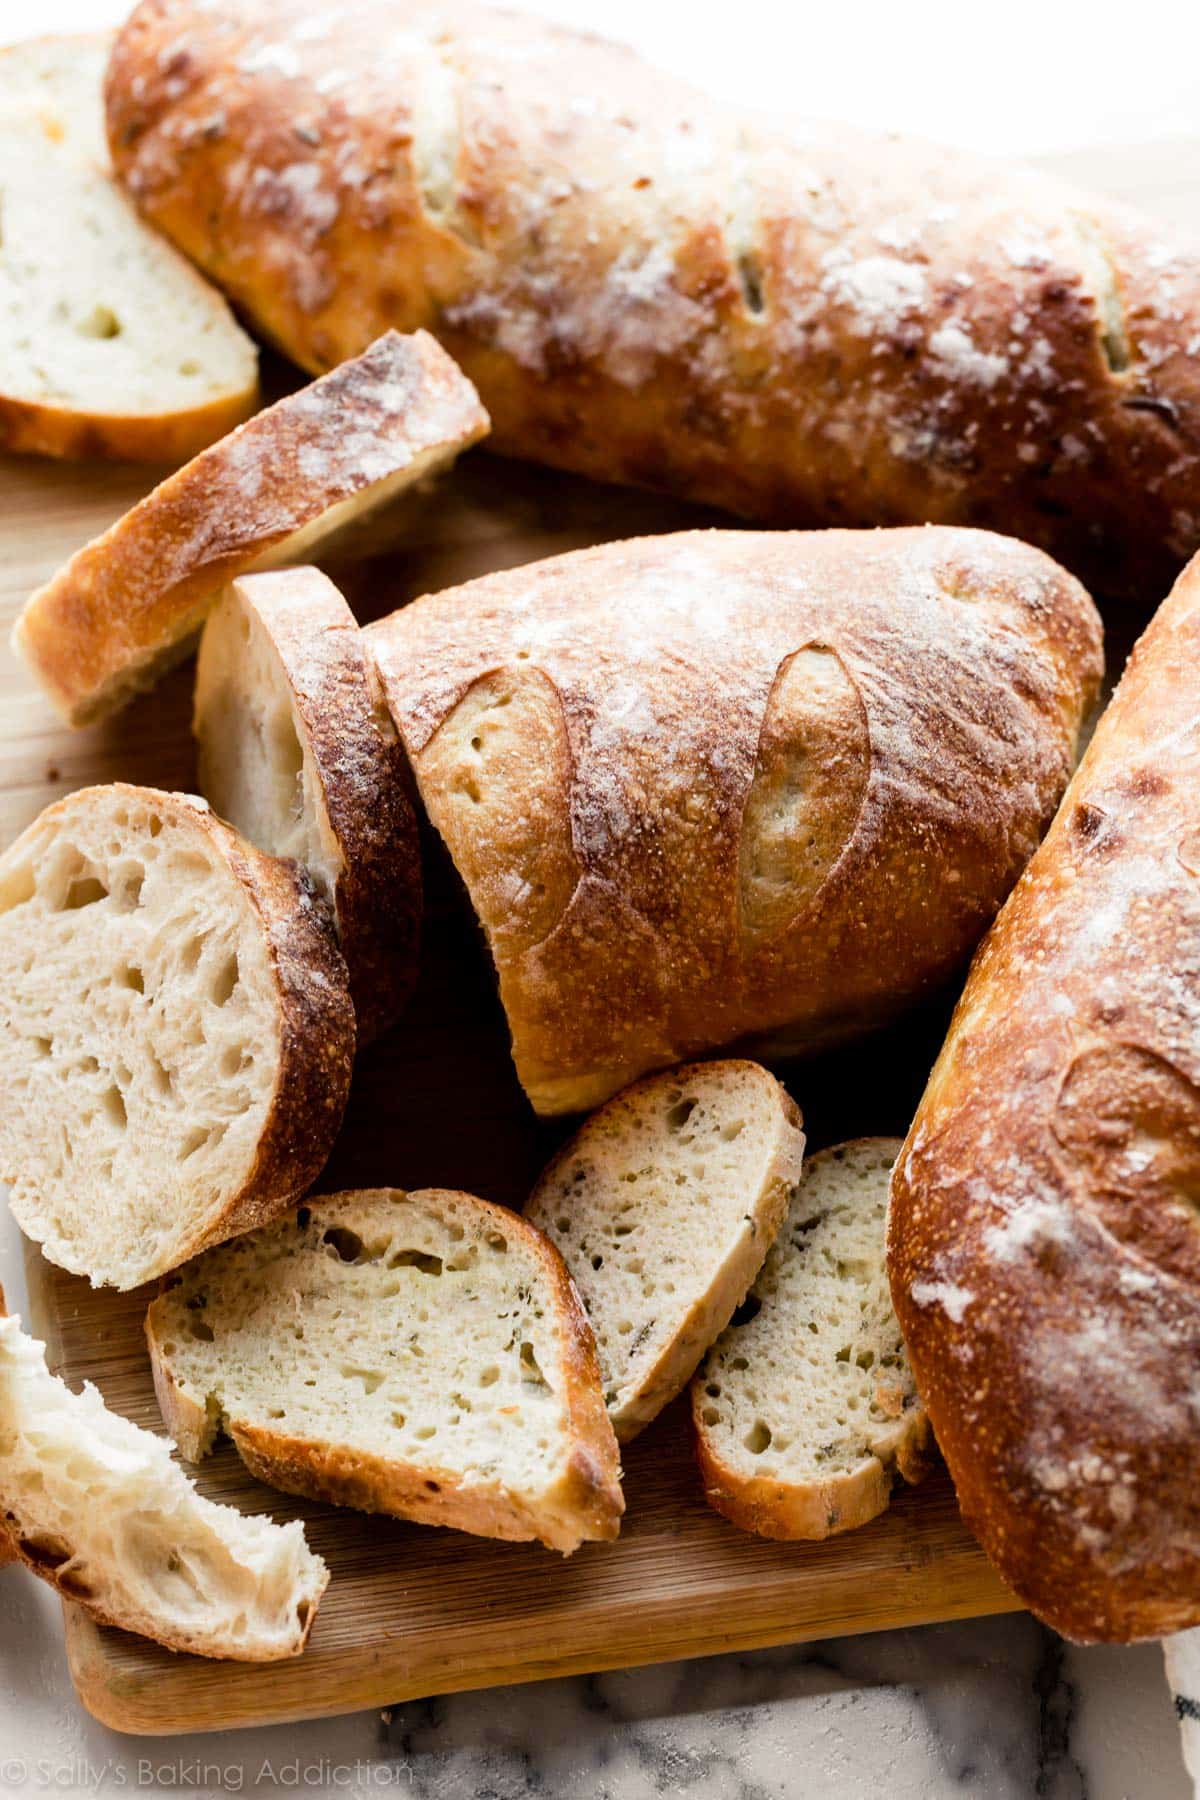
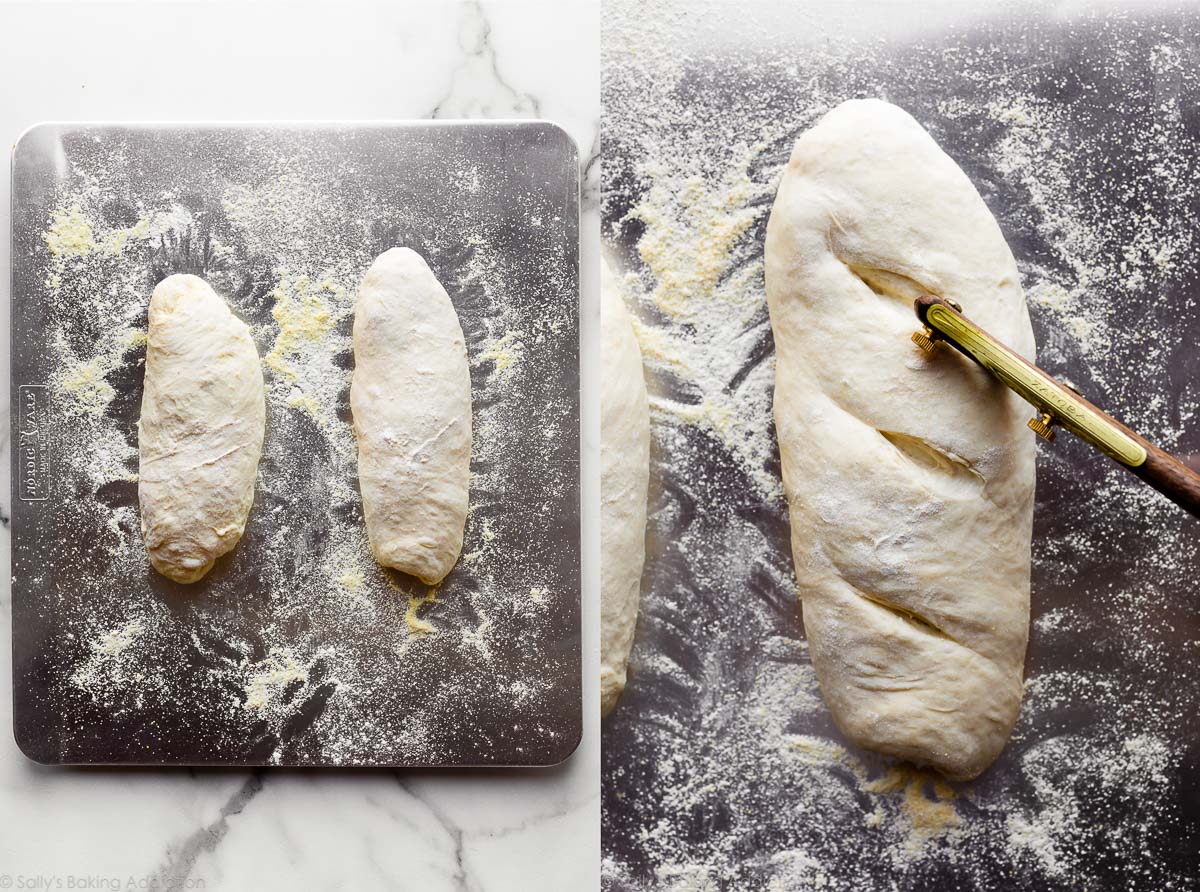
- Shape into 2 loaves or 1 boule. Rest as oven preheats. You can shape the bread into a round loaf (boule) or two longer loaves. I usually make two longer loaves side-by-side on a flat baking sheet, about 9×3 inches each. Preheat the oven to a very hot 475°F (246°C). The extremely hot air will immediately set the crust so the bread rises up instead of spreading all over. Score the loaves on top right before baking. Scoring also helps control the bread’s expansion. To help ensure a crispier crust, after the oven preheats, pour boiling water into a metal or cast iron baking pan on the bottom oven rack. Immediately place the baking sheet inside and shut the oven door to trap the steam. The steam will help create that coveted crisp crust.
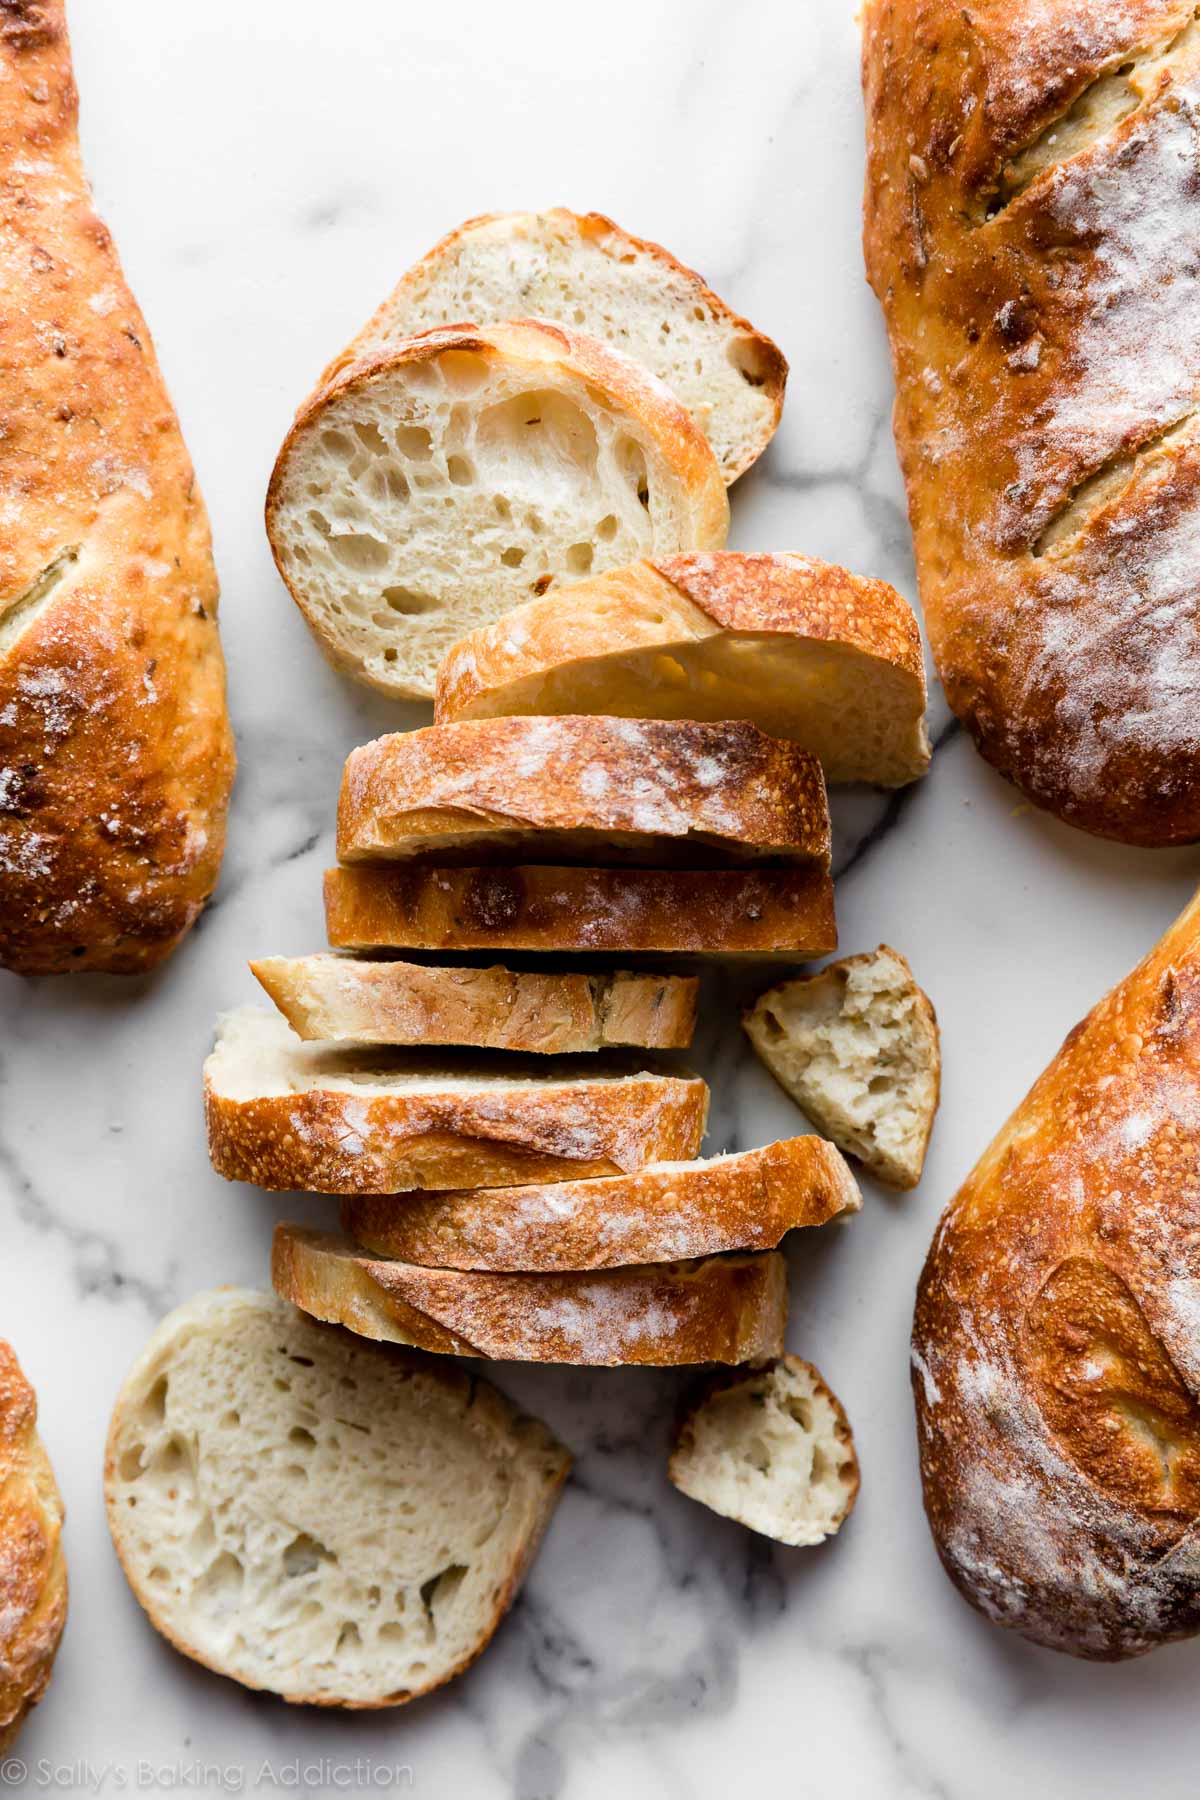
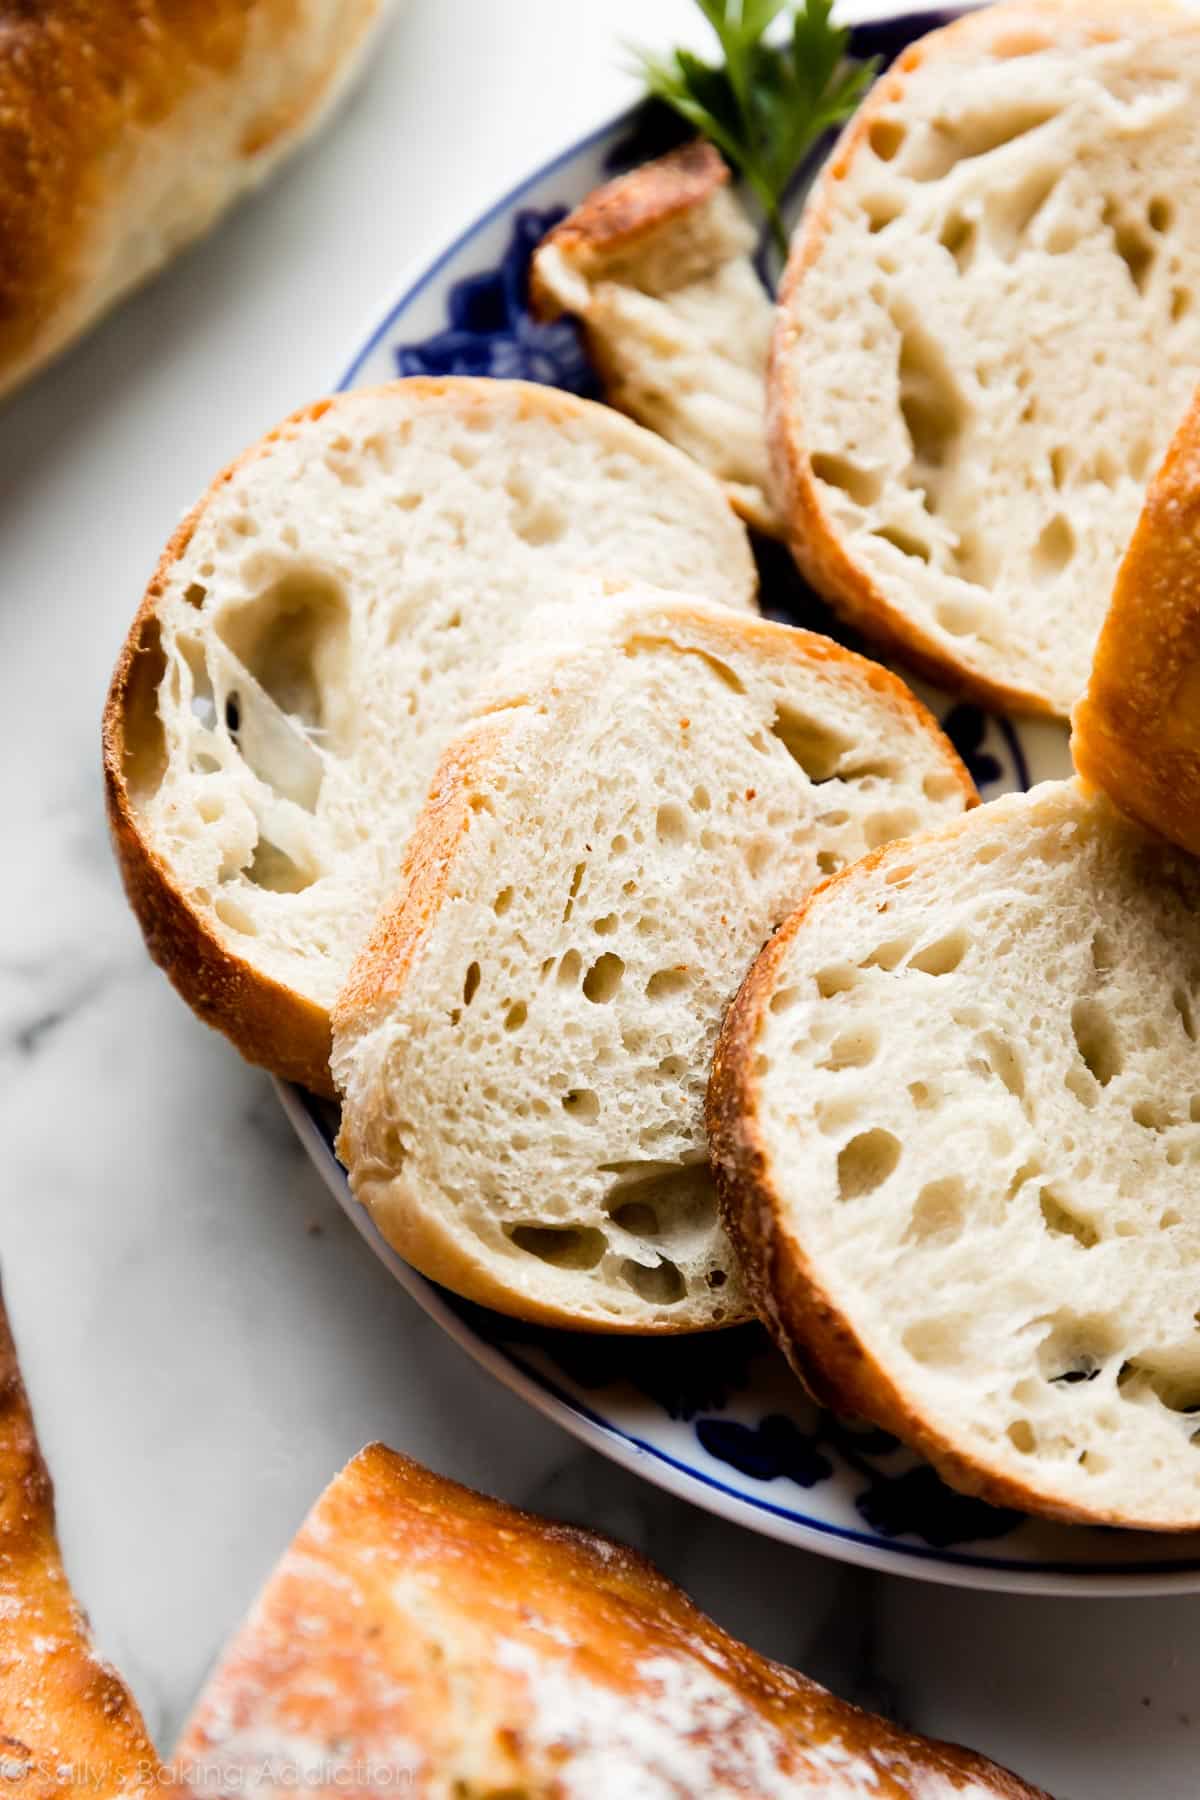
- Bake until golden brown, about 20-25 minutes. Gently tap the loaves because if they sound hollow, they’re done.
Look at those deliciously soft holes inside! Reminds me of ciabatta or a French baguette, both of which can be a little more complicated to make.
Serve Artisan Bread With
- Slather with homemade honey butter or cinnamon butter
- Slice and dunk in crab dip, beer cheese dip, garlic & bacon spinach dip, or even homemade Italian dressing
- Serve alongside slow cooker chicken chili or pumpkin chili
- As a dunker for homemade tomato soup, creamy cauliflower potato soup, minestrone soup, creamy chicken noodle soup, crab soup, or slow cooker creamy chicken & corn soup
- With a big bowl of mac & cheese or spaghetti with slow cooker turkey meatballs
- It’s the perfect starch in breakfast casserole or baked apple cider French toast
- Use it to make homemade garlic bread or homemade croutons
- With anything because homemade bread is everything’s best friend
No, this recipe works well with and is written for a standard baking sheet. If you would like to use a Dutch oven, see recipe Notes for details.
When bread fails to rise, it’s usually due to inactive yeast or insufficient rest time. See my Baking with Yeast Guide for more helpful yeast troubleshooting tips.
Artisan bread will form a crispy crust when it is baked in a steamy oven. See step 7 in the recipe instructions for details on using a pan of hot water in the oven to create a steamy baking environment.
Yes, the same amount of all-purpose flour will work in a pinch, but I strongly recommend using bread flour for a chewier texture.

Homemade Artisan Bread Recipe
- Prep Time: 4 hours
- Cook Time: 25 minutes
- Total Time: 4 hours, 25 minutes
- Yield: 2 8-inch loaves
- Category: Bread
- Method: Baking
- Cuisine: American
Description
Even if you’ve never made homemade bread or worked with yeast before, this homemade artisan bread is for you. Watch the video tutorial below and review the recipe instructions and recipe notes prior to beginning. If you’re new to working with yeast, reference my Baking with Yeast Guide for answers to common yeast FAQs.
Ingredients
- 3 and 1/4 cups (about 430g) bread flour (spooned & leveled), plus more for hands and pan
- 2 teaspoons (about 6g) instant yeast
- 2 teaspoons (about 9g) coarse salt (see note)
- 1 and 1/2 cups (360ml) water, close to room temperature at about 70°F (21°C)
- optional: cornmeal for dusting pan
Instructions
- In a large ungreased mixing bowl, whisk the flour, yeast, and salt together. Pour in the water and gently mix together with a silicone spatula or wooden spoon. The dough will seem dry and shaggy, but keep working it until all the flour is moistened. If needed, use your hands (as I do in the video tutorial below) to work the dough ingredients together. The dough will be sticky. Shape into a ball in the bowl as best you can.
- Keeping the dough in the bowl, cover the dough tightly with plastic wrap or aluminum foil and set on the counter at room temperature (honestly any normal room temperature is fine!). Allow to rise for 2-3 hours. The dough will just about double in size, stick to the sides of the bowl, and have a lot of air bubbles.
- You can continue with step 4 immediately, but for absolute best flavor and texture, I strongly recommend letting this risen dough rest in the refrigerator for at least 12 hours and up to 3 days. Place covered dough in the refrigerator for 12 hours – 3 days. I usually let it rest in the refrigerator for about 18 hours. The dough will puff up during this time, but may begin to deflate after 2 days. That’s fine and normal—nothing to worry about.
- Lightly dust a large nonstick baking sheet (with or without rims and make sure it’s nonstick) with flour and/or cornmeal. Turn the cold dough out onto a floured work surface. Using a sharp knife or bench scraper, cut dough in half. Some air bubbles will deflate as you work with it. Place dough halves on prepared baking sheet. Using floured hands, shape into 2 long loaves about 9×3 inches each (doesn’t have to be exact) about 3 inches apart. Loosely cover and allow to rest for 45 minutes. You will bake the dough on this prepared baking sheet.
- During this 45 minutes, preheat the oven to 475°F (246°C).
- When ready to bake, using a very sharp knife or bread lame (some even use kitchen shears), score the bread loaves with 3 slashes, about 1/2 inch deep. (“Score” = shallow cut.) If the shaped loaves flattened out during the 45 minutes, use floured hands to narrow them out along the sides again.
- Optional for a slightly crispier crust: After the oven is preheated and bread is scored, place a shallow metal or cast iron baking pan or skillet (I usually use a metal 9×13-inch baking pan) on the bottom oven rack. Carefully and quickly pour 3-4 cups of boiling water into it. Place the scored dough/baking pan on a higher rack and quickly shut the oven, trapping the steam inside. The steam helps create a crispier crust.
- Place the shaped and scored dough (on the flour/cornmeal dusted pan) in the preheated oven on the center rack. Bake for 20-25 minutes or until the crust is golden brown. Gently tap the loaves—if they sound hollow, the bread is done. For a more accurate test of doneness, the bread is done when an instant read thermometer inserted in the center reads 195°F (90°C).
- Remove the bread from the oven and allow to cool for at least 20 minutes before slicing and serving. Store leftovers loosely covered at room temperature for up to 5 days or in the refrigerator for up to 1 week.
Notes
- Make Ahead & Freezing Instructions: The dough can sit in the refrigerator for up to 3 days, so this is a wonderful recipe to begin ahead of time. You can also bake the bread, allow it to cool, and freeze for up to 3 months. Thaw at room temperature before serving. You can also freeze the dough. Complete the recipe through step 3. Wrap in plastic wrap and place in a freezer-friendly container. To bake, allow dough to thaw overnight in the refrigerator, or for 2-3 hours at room temperature. Continue with step 4 and the rest of the recipe instructions.
- Special Tools (affiliate links): Glass Mixing Bowls | Silicone Spatula or Wooden Spoon | Baking Sheets | 2-cup Measuring Cup | Bread Lame | Instant Read Thermometer
- Flour: For absolute best flavor and chewy texture, I strongly recommend using bread flour. You can use a 1:1 substitution of all-purpose flour in a pinch with no other changes to the recipe. I recommend avoiding whole wheat flour in this dough. If necessary, use half bread flour and half whole wheat flour. The bread will taste dense.
- Yeast: You can use instant or active dry yeast, but I highly recommend an instant (aka “rapid rise” or “quick rise” yeast). The bread will rise faster. I usually use Platinum yeast by Red Star, which is an instant yeast. 2 teaspoons is a little less than 1 standard packet. If using active dry yeast, there are no changes needed to the recipe. The rise time in step 2 may take longer.
- Salt: Use a coarse salt, such as coarse sea salt, in this bread. I find the flavor slightly lacking when using regular table fine salt. If you only have fine salt, reduce to 1 and 1/2 teaspoons.
- Water: Use cool water. 70°F (21°C) is great, but the exact temperature doesn’t matter as long as it’s not hot or warm.
- Round Loaf: If you want to shape the dough into a boule (round loaf) simply shape into a round ball instead of 2 loaves in step 4. Baking instructions are the same, but the loaf will take a few extra minutes in the oven. If you want to bake the boule in a dutch oven, see next note.
- Using a Dutch Oven: Follow this dough recipe through step 3, then follow the simple shaping/baking instructions (steps 2-5) in my Cranberry Nut No Knead Bread recipe including using the parchment paper. If your parchment paper can’t withstand heat this high, you can either lower the oven temperature and bake the bread for longer or grease the Dutch oven instead.
- Using a pizza stone: If you want to bake your bread loaves on a pizza stone, place pizza stone in the preheating oven. In step 8, place the shaped and scored dough on your preheated pizza stone. If the bottom of the shaped dough is pretty sticky, dust the hot pizza stone with some extra cornmeal. Bake as directed.
- No Nonstick Pan: If you don’t have a nonstick baking sheet, line it with parchment paper instead. Coat with a dusting of flour and/or cornmeal before placing the dough on top. Parchment paper can burn, so it’s best to check the box to see how much heat yours can tolerate. Lower your oven heat if necessary and bake the bread for longer until golden brown and when gently tapped, sound hollow.
- Flavor ideas: Before pouring in the water in step 1, add any of the following ingredients/combination of ingredients to the dry ingredients in the bowl: 4 cloves minced garlic + 3 Tablespoons chopped rosemary, 3 Tablespoons your favorite fresh herb (chopped), 1 cup your favorite shredded cheese, a diced jalapeño, 3/4 – 1 cup dried cranberries and/or chopped nuts, 2 teaspoons garlic powder, etc.
- Reference my Baking with Yeast Guide for answers to common yeast FAQs.
- Recipe adapted from King Arthur Flour & Red Star Yeast, similar method originally from Jim Lahey.
Nutrition
- Serving Size: 2 slices
- Calories: 136
- Sugar: 0.1 g
- Sodium: 389.8 mg
- Fat: 0.7 g
- Carbohydrates: 27.2 g
- Protein: 4.7 g
- Cholesterol: 0 mg


Reader Comments and Reviews
This recipe is super easy. Like other readers, I also like the corn meal/flour dusting. I tried everything bagel seasoning and it didn’t work as well. Nor did adding cheese and garlic. I liked the bread quite a bit but something didn’t seem right. The dough was great to work with, the ease was fantastic, but I found the bread just too dense. I followed all instructions and left the dough in the fridge for up to 2 days. Suggestions?
Hi Deandra, Scoring the bread helps it cook in the center and expand. Use a very sharp knife, kitchen shears, or a bread lame (recommended) to make a few large slashes. This is key! It could be dense from over-baking and adding too much flour as well. I hope all this helps for next time!
I came back to repair my review. I was frustrated because my dough was so liquid it wouldn’t hold shape. but my kids begged me for bread so I removed it from the fridge and baked it in a bread pan. It was perfect.
I have to agree with other comments that the dough doesn’t hold its shape at all. I have it in the fridge for now, but I might have to add a lot more flour.
DELICIOUS and easy! We ate all of it in 1 day. It was my first time baking bread and I appreciate all the advice and guidance. I can’t wait to try your other bread recipes.
Love this recipe! It is so good and easy! My dough always seems really sticky and wet compared to what I see in the video. Do I need to adjust for elevation?
Hi Kristen, Some readers have found this chart helpful for baking at elevation: https://www.kingarthurflour.com/learn/high-altitude-baking.html There are a lot of variables that go into the consistency of dough, even down to the weather and humidity in the air. There’s nothing wrong with adding just a little more flour to bring the dough into a less sticky consistency.
Holy cow this bread is amazing. I made it exactly as written, letting the dough rise in the fridge for about 30 hours, used cornmeal on the pan, and added water to the pan on the bottom rack for steam. I am new to baking bread and it still blows my mind that 4 simple ingredients can make something so delicious. I will definitely be making this one again soon.
This recipe is great too as it is very easy to follow and gives great tips.
I am SO glad I found this recipe! This was my first time making bread and it could not have gone better. I used the tip of putting a pan of boiling water on the lower rack and I definitely recommend it, the crust is crunchy and the bread is soft and chewy. Thank you!
This was my first time making bread and it definitely won’t be my last!! Already planning on making it again for the second time this week. The only thing was i didn’t get that crispy golden brown color on the outside of the loaf.. i am unsure whether it wasn’t baked long enough? Also, i had the dough sitting in the fridge for 2 days and followed the recipe step by step and i couldn’t get the shape of the loaf to stay. Overall still tasted amazing and this is now my go to recipe
I’ve read that your bread should reach an internal temp of at least 195 degrees F. I start testing around the 25 minute mark to see how close my loaves are to this temp. This eliminates the guess work and allows me to make sure to leave them in the oven long enough to reach that golden brown color.
I really want to try this recipe, but was wondering, could I do a cool-rise overnight for the rest in step #4? I want to make this with my Foods III class (I teach Family and Consumer Sciences) and would need to make it over multiple days. So I was thinking:
Day 1-Steps 1-3; allow to cool-rise overnight
Day 2-Step 4; allow cool-rise overnight
Day 3-Bake, eat, & enjoy!
Do you think that would work?
Hi Katherine, that *should* be fine, but the shaped dough may begin to expand and rise overnight. Not much, so I think it would still be OK.
I made this dough exactly to the instructions, however my dough was not very wet or sticky at all, as others have mentioned. It also didn’t rise hardly at all. The bake is done now, and it came out very small and extremely tight packed and dense.
Thoughts?
Hi Michael, is it possible that your yeast was expired? If the dough did not rise, it sounds like it was an issue with the yeast — our Baking with Yeast Guide may be helpful to review. If the dough seemed overly dry as well, be sure to spoon and level or weigh your flour to ensure just the right amount — too much can result in a dry, dense bread. Thank you for giving this recipe a try, and hope these tips are helpful for next time!
I love this recipe a ton, I make it nearly every week!
One question, could I use this to make rolls? Just shape them into rolls and bake them? I am vegan so I cannot bake other traditional roll recipes that include milk / eggs
Hi Alexander, we’re so glad you love this recipe! You can make smaller loaves/rolls, yes. Bake time will depend on the size you make them. Bake until the crust is golden brown and when you tap the loaves– they will sound hollow when done.
We absolutely love this recipe! I have never made bread before and this was a game changer for our bread loving family! Thank you!!
Is it possible to double or triple this recipe?
Hi Adele, for best results, we recommend making separate batches. So glad your family loves this recipe!
help! my oven can only go up to 230C! what should i so
Hi Tom, you can bake the bread as close to the suggested temperature as you can get, and extend the bake time to ensure it is fully baked. Keep a close eye on it. Hope you enjoy the bread!
(not a review yet) could i make frog bread with this? would i have to bake it for longer?
Just made this – fantastic! No kneading was the selling point. So easy and we had it still warm for dipping in olive oil and herbs – then switched to just butter. Corn meal on the pan is a game changer – the loaves were crispy outside and soft inside. Thank you for this great recipe!
I love this recipe. It’s my go too when I need a crusty loaf. My love of bread making started faster baking this loaf. Thank you so much!
This isn’t a review (yet)
I need to ask a question but couldn’t find where to do it. I have a sour dough starter. Could I use this in place of the yeast?
I haven’t tested it, so I can’t say for certain. But let me know if you try it!
I think you definitely could! There is a blogger, farmhouse on Boone, that explains how to add starter to almost any bread recipe!
Also, LOVED making this bread! I didn’t have time to spend a whole day making bread like usual and it was a HIT at my house!
Can I just put all in one loaf pan?
Hi Jon, There is a little too much dough for a standard size (9×5 inches) loaf pan, so you could try dividing the dough in half and using 2 loaf pans. The edges should still crisp up and the bake time may vary.
Hi! I’m trying to wrap my mind around what went wrong I followed the recipe to a ml and a gram (Europe here). And since I usually don’t look at the video I just assumed it was supposed to be THAT sticky. I was unable to shape it after the 18hr in the fridge and had to add a lot of flour more and knead. It’s in the oven now.
Any suggestions?
Thank you
Hi Nela, a dough’s consistency relies on many variables including how you measure the flour, brand of flour, even the weather and humidity in the air. While this should be a sticky dough, yours may be a little too sticky. Don’t be afraid to add 1/4 – 1/2 cup more flour to the dough next time before letting it rest at room temperature.
I’m trying to figure out what I did wrong. I let it rise for 2 hrs and when I put it on the nonstick pan with cornmeal and flour to rest it was still super sticky. I didnt refrigerate because I wanted this to go with our dinner tonight. When I tried to reshape after 45mins still super sticky. I put it in the oven for 20mins and the bottom stuck to the pan and the inside is kinda doughy still.
Hi Sam! This is a sticky dough and will still be sticky after rising. Use lightly floured hands and handle with care to keep the air bubbles in! Baking for a few more minutes next time will help it bake through. Make sure to generously dust the pan with cornmeal or flour to prevent sticking. Thank you for giving this recipe a try!
I also used metric measurements and I think there might be something a little off! I added an extra 100g or so of flour and it was much better.
Can I use my kitchenaid mixer to mix or there something magical about doing it by hand?
Hi Elaine, We do not recommend a mixer for this particular dough– it’s very loose and sticky. A mixer wouldn’t be doing you (or the dough!) any favors. Luckily, it only requires a really quick mix with a wooden spoon or rubber spatula. Not much work involved!
Sally!!! I’ve been looking for a great easy bread recipe for what seems like forever. I found this recipe Sunday . I wanted to make it to go with dinner that night, so I let it rest for about 4 hours on the counter.
I wanted to do a side by side test of the 4 hour version and the rest in the fridge version, so I split the dough and baked half of it. The bread I baked Sunday was really yummy, but the bread which was rested in the fridge was dynamite! I actually said out loud “I’m never buying bread again!”
Thank you, thank you, thank you!!!
I love this recipe. I made it using my gas oven and it turned out great. But when baking in my electric oven the steam broke my stone sheet pan. We love the chewy crust but it wasn’t worth loosing my pan over. I use the stone because nothing sticks. I will have to purchase something different to bake bread on.
I love this recipe so much!! Living in Indonesia, it’s so hard to find good bread (as it’s not part of local cuisine) so it’s amazing to find an easy and wonderful bread recipe. Due to our humid climate, I reduce the water to 300ml and it works really well.
One question, my bread bakes up very yummy with lots of holes and nice texture, BUT they always turn out misshapen. I try to shape them into two oval loaves or one big oval loaf but they don’t bake up evenly. One end might be thicker. Do you have any tips? Thank you
Hi Christine, we’re so glad you love this artisan bread recipe! Every artisan loaf is unique and may not be uniform in size — but that’s okay! You can shape them up again right before they go into the oven to try and get your desired shape.
I really love this bread but when I made at my daughters in Denver it was really flat and baking took a lot longer. Is there recipe to adjust this for higher altitude as I think that was the problem.
Hi Pops, We wish we could help, but we have no experience baking at high altitude. We know some readers have found this chart helpful: https://www.kingarthurflour.com/learn/high-altitude-baking.html
my dough is too sticky. Why?
Hi Ken, A dough’s consistency relies on many variables including how you measure the flour, brand of flour, even the weather and humidity in the air. While this should be a sticky dough, yours may be a little too sticky. Don’t be afraid to add 1/4 – 1/2 cup more flour to the dough before letting it rest at room temperature.
My first time ever making bread and it was sooo delicious. My second batch just came out of the over and my third is about to go into the fridge. A few questions… The loaves are sticking slightly to the pan. I’m using a nonstick pan with a generous amount of flour and cornmeal. (For my first batch I only used flour and they stuck like superglue!) Is there something I’m possibly doing wrong? Also, the flour and cornmeal on the pan that surround the loaves burn pretty badly. Doesn’t affect the bread but it makes kind of a bitter/burnt smell in the house. I’m wondering if maybe I should try 450 instead of 475? My loaves are completely cooked (and even a little bit overly browned) after 20 min at 475. Thank you!!
Hi Colleen, We are so happy you enjoy this recipe! If you don’t have a nonstick baking sheet, line it with parchment paper first, and then add a dusting of flour and/or cornmeal before placing the dough on top. You may simply be using too much flour and cornmeal if it’s burning (and the parchment should help with the sticking so you don’t have to use as much!).
Could I double this recipe and make two bigger loaves? If so how long would bake time be, ty.
Hi Paul, Sure can! For the shaping step, divide into 2 boules or 4 loaves.
The bread turned out rustic and beautiful. My wife couldn’t believe I made it. I followed all the steps, used parchment paper without the corn meal. Definitely going to be making more. Thanks for another killer recipe.
Isn’t 2 teaspoons of yeast too much? I have a recipe that I have been using for
4 years and It calls for 61/2 cups of flour and 1 teaspoon of yeast.
Hi Joseph, All recipes are different, but these are the ratios that we find works best for this particular method and outcome. Let us know if you give it a try!
Great easy recipe! I modified it and used 1 c. rye flour, 1 c. fine semolina, 1 1/4 c. bread flour. Poured in a little maple syrup, used 1.5 c. room temp water, 2+tsp. sea salt, 2 tsp. instant yeast. Stirred all together. Olive oiled ball and let rise as per instructions, then 2 days in fridge. Instructions, then used cornmeal dusted baking sheet. Baked for 20 minutes and attacked first loaf with honey butter, raspberry jam and plain, yum! but probably needed a few minutes to set up. set other uncut loaf back in oven (turned off) for 5 min and letting it rest now. I find bread to be very forgiving. People have been making it for centuries! Would absolutely make this again! Thanks!
Love this recipe. Thinking of shaping dough into mini breads/rolls . Do you think it will work.
Hi Diane, so glad you love this recipe! You can make smaller loaves/rolls, yes. Bake time will depend on the size you make them. Bake until the crust is golden brown and when you tap the loaves– they will sound hollow when done.
I love this recipe but since I use a Dutch oven I get a little confused with the directions. It directed me to the cranberry bread to follow those baking steps. I baked the Dutch oven to 475 and then added the prepped dough with parchment into the Dutch oven with lid on and baked for 25 minutes then took to the lid off for 10. The parchment baked into the bottom of the bread. How do I prevent that from happening?
Hi Megan! Some extra flour or cornmeal on the bottom of the loaf will help keep it from sticking. Make sure you’re using parchment paper (not wax paper) as well!
OMG. I am new to breadmaking and this one was AMAZING! I added 4 tsp chopped garlic, rosemary, and caraway seeds. We ate one loaf with oil and balsamic vinegar immediately!! Thank you so much for this recipe! I kept it in the fridge for 2 days and the elasticity was perfect!
Can I bake this in loaf pans rather than shaping them on the sheet pan? Looking to make sandwiches from it.
There is a little too much dough for a standard size (9×5 inches) loaf pan, so you could try dividing the dough in half and using 2 loaf pans. The edges should still crisp up and the bake time may vary.