

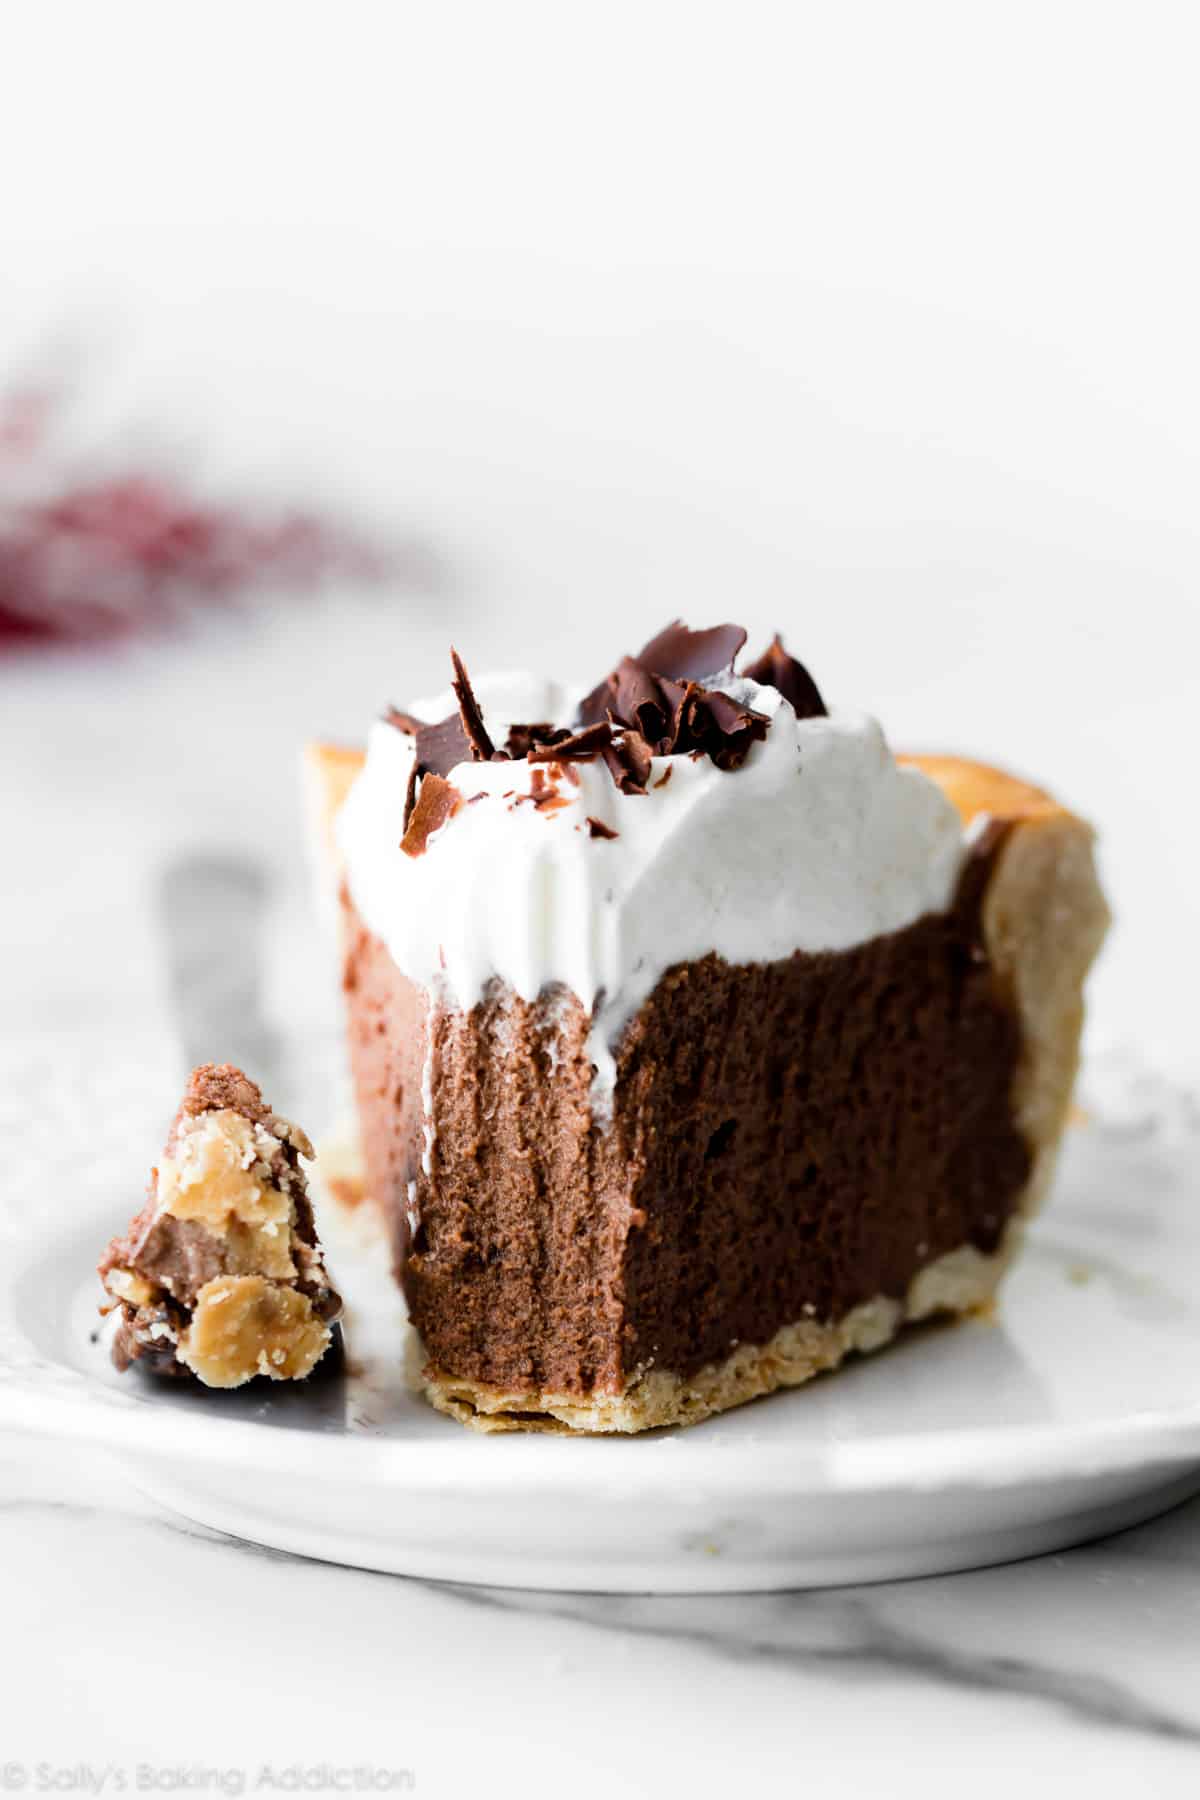
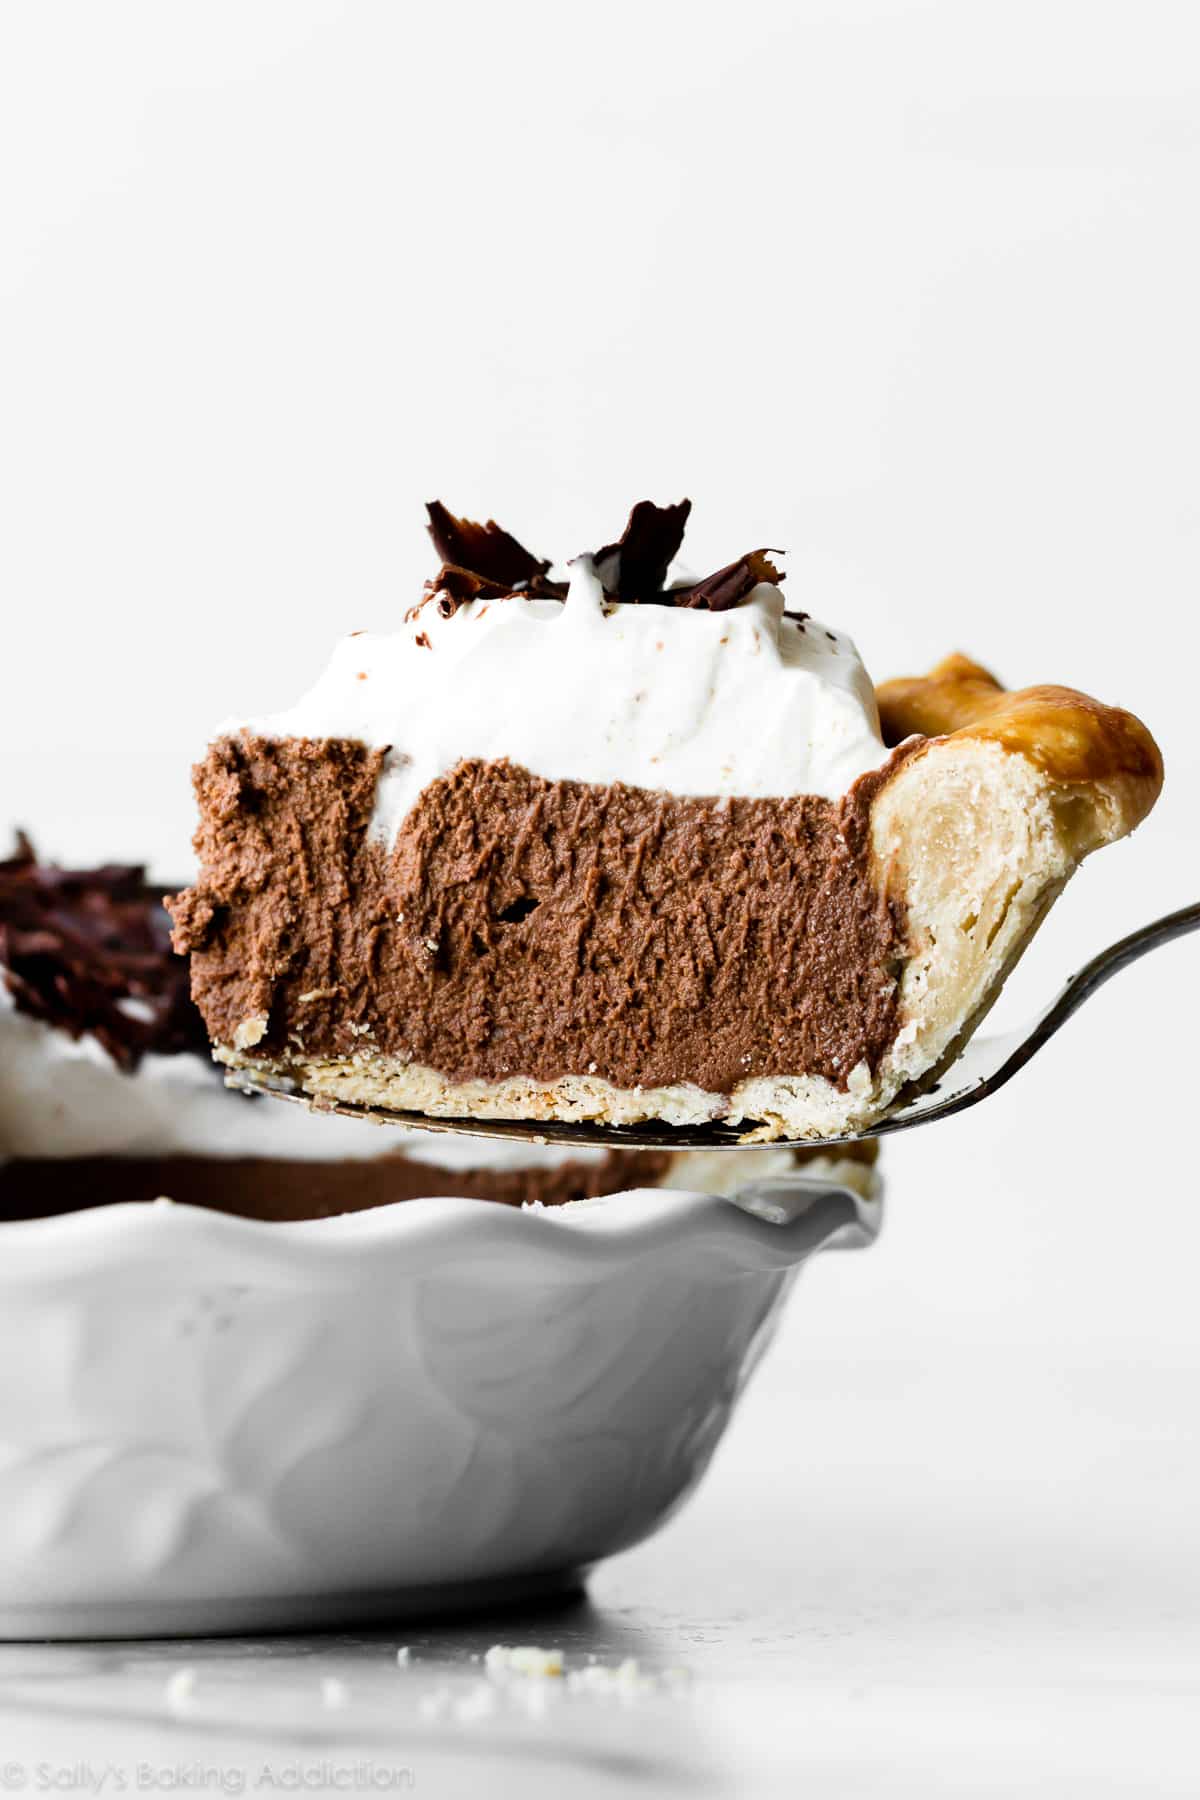
This creamy and indulgent French silk pie combines my best flaky pie crust, smooth-as-silk chocolate filling, and fresh whipped cream on top. This recipe uses cooked eggs, so you don’t have to worry about consuming raw eggs.
After many requests, I’m unveiling a favorite French silk pie recipe. I’ve tried a lot of French silk pies and have made several in my own kitchen, but this is definitely my best one yet and I’m thrilled for you to finally try it! Perhaps you’ll even consider adding it to your menu of Thanksgiving pies… alongside your apple pie and pumpkin pie, of course 🙂
Why This Is My Best French Silk Pie
- Uses my tried-and-true flaky pie crust
- Light as mousse, but much smoother
- Unlike other recipes, there’s no raw eggs
- Filling sets up perfectly
- Garnished with my favorite fresh whipped cream
No Raw Eggs
This characteristic is definitely worth highlighting. Most French silk pie recipes call for raw eggs, but I gently cook them first. This requires an extra step on the stove, but it cancels out any worries of serving raw eggs. Even with this step, we still have the same smooth-as-silk texture—nothing is compromised! So if you’re looking for a classic French silk pie recipe without raw eggs, this is it.
How to Fully Blind Bake Pie Crust
Like my banana cream pie and coconut cream pie, this French silk pie filling isn’t baked, so it requires a fully baked pie crust. “Blind baking” means that we bake a pie crust without a filling inside. Do you know how to blind bake pie crust? Let’s review:
- Make pie dough ahead of time, then refrigerate or freeze until you’re ready to make the pie. Pie dough must chill for at least 2 hours before rolling out. You can use my favorite pie crust or my all-butter pie crust recipe. I prefer the shortening/butter blend in my pie crust, because the shortening promises that prized flaky texture. If needed, you can use a graham cracker crust or even an Oreo cookie crust instead. See recipe Note.
- Roll the dough out, then fit into a 9-inch pie dish. Crimp or flute the edges. Want to know my trick for beautiful pie crust edges? Don’t trim the excess pie dough. See step 2 in the recipe below. My how to crimp and flute pie crust tutorial is helpful, too.
- To prevent shrinking, chill the shaped pie crust for at least 30 minutes. Remember that pie dough must be cold when it hits the oven. You can do this before or after you fill with pie weights (next step).
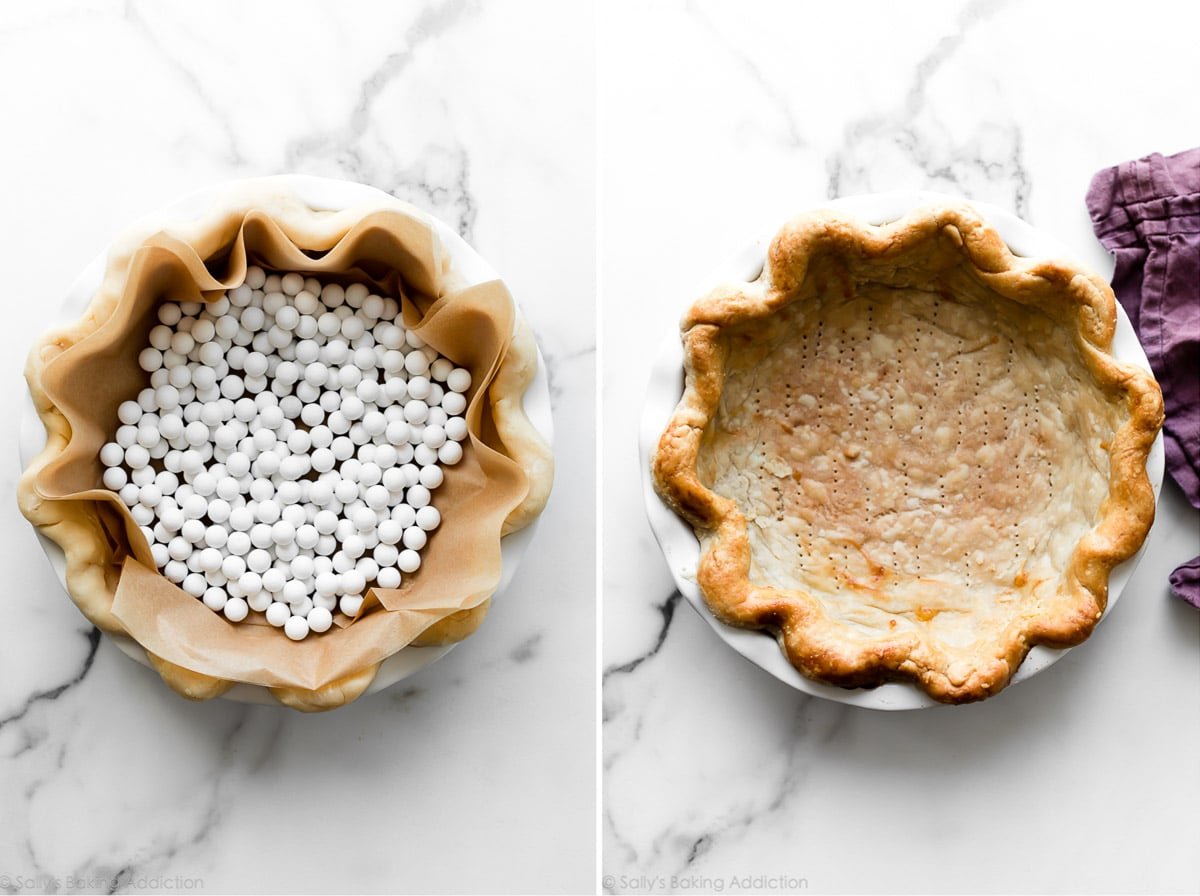
- Fill with pie weights. As the pie dough bakes, its fat will melt. The melting fat causes the pie crust to shrink down the sides of the pie dish. To prevent the pie dough from completely losing its shape, weigh it down with pie weights. Carefully line the pie dough with parchment paper first, then pour in pie weights or even dry beans. (Note: 2 packs of these pie weights is needed.)
- Bake until the edges are relatively set, about 15 minutes.
- Remove pie weights and parchment, dock the crust with a fork, and then return to the oven until the crust is golden brown (about another 15 minutes). See photo on the right below.
- Cool completely before adding the filling.
Some recipes, like my pumpkin pie and lemon meringue pie, require a partially blind-baked pie crust—this means that the filling is baked, but the crust requires a pre-bake.
4 Parts to Chocolate Pie Filling
Let’s make the chocolate filling as the blind-baked pie crust cools. There’s a few different things going on here. You need 4 separate bowls for different components.
- Heavy Cream: Whip heavy cream into stiff peaks.
- Melted Chocolate: Use two 4-ounce bars of pure chocolate in this recipe. Do not use chocolate chips, which don’t melt into the proper consistency. I prefer and recommend semi-sweet chocolate, but you can use bittersweet or unsweetened chocolate for a darker flavor.
- Eggs + Sugar: I like to whip the cream and melt the chocolate first, so both are ready as I need them. For the eggs, whisk them with the sugar and gently cook them on the stovetop. Use a double boiler or a heatproof bowl over a pot of simmering water. While constantly whisking, cook until they reach 160°F (71°C), a temperature that kills all possible bacteria. You need an instant-read thermometer for this step. Let this cool for 10 minutes, then stir in the melted chocolate.
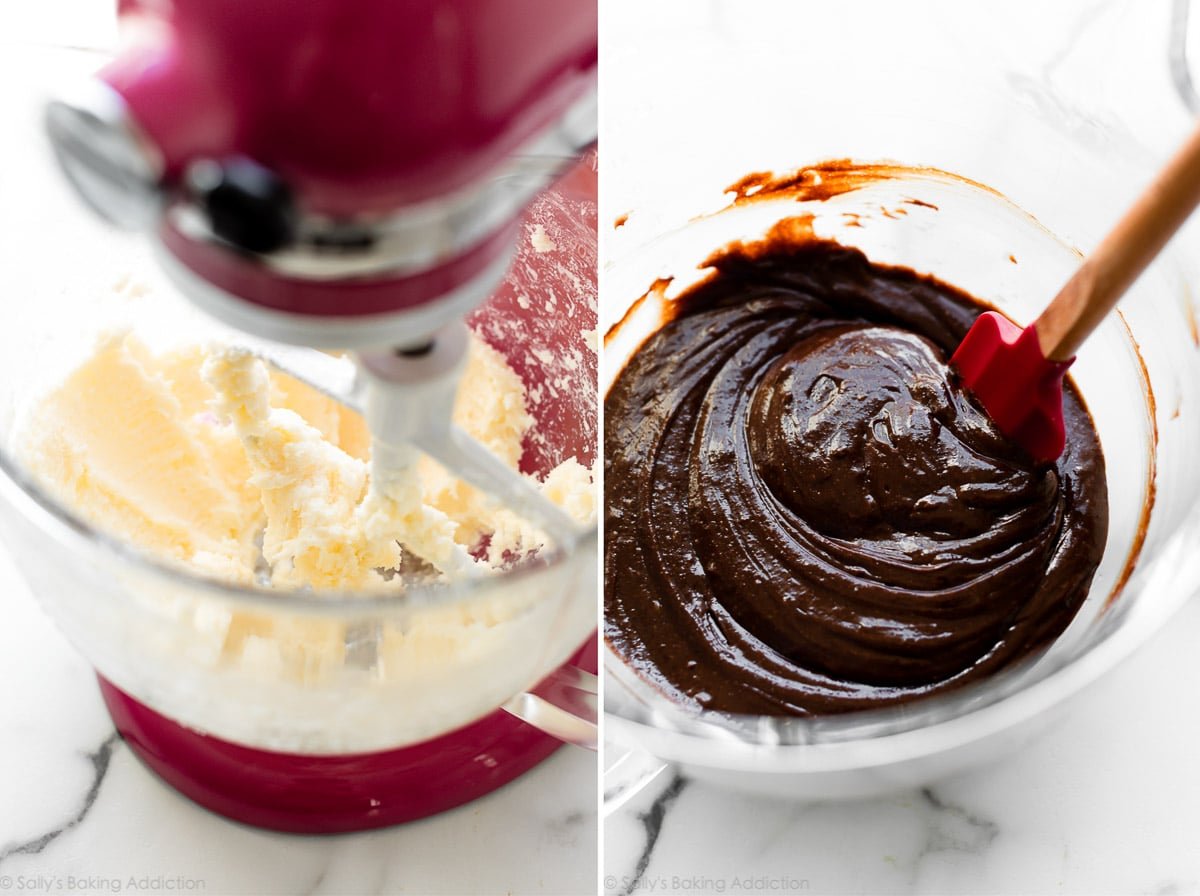
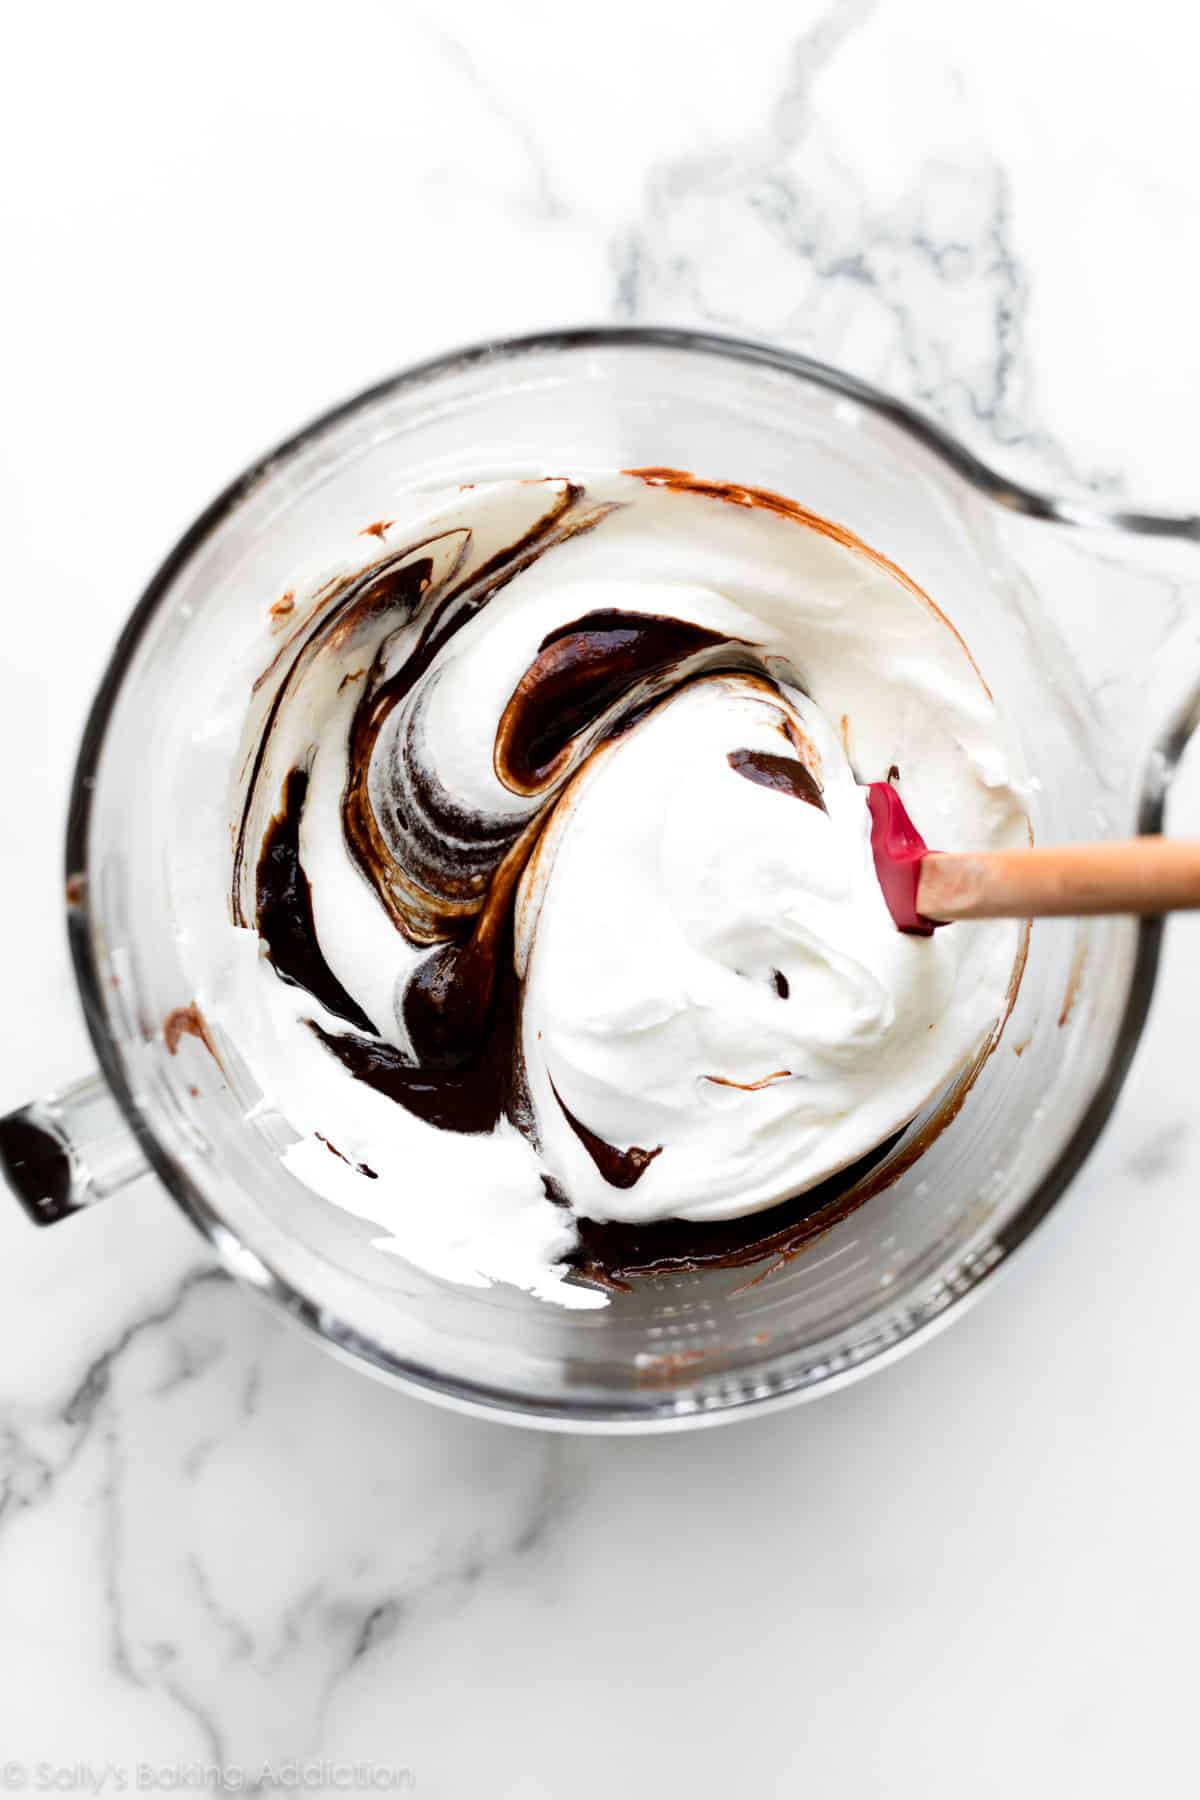
- Creamed Butter: Finally, cream room-temperature butter for a couple minutes with a mixer. While this is the last part listed, it’s actually the base of the entire filling. Mix vanilla extract into the creamed butter, then add the chocolate/egg mixture to the bowl, and beat for 3 minutes. Turn off the mixer and gently fold in the unsweetened whipped cream with a spatula.
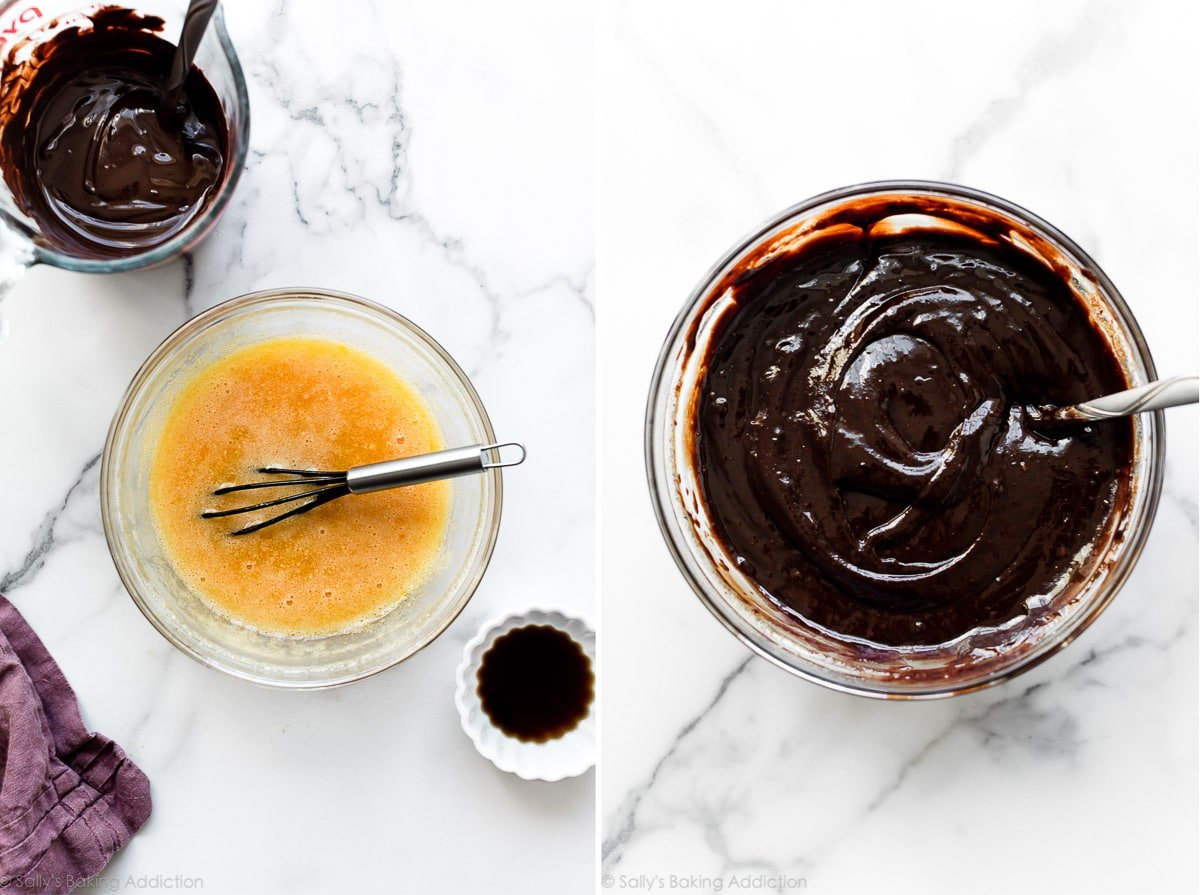
Above left: cooked eggs + sugar. Above right: combined melted chocolate and eggs.
Below left: creamed butter. Below right: creamed butter with the chocolate/eggs.
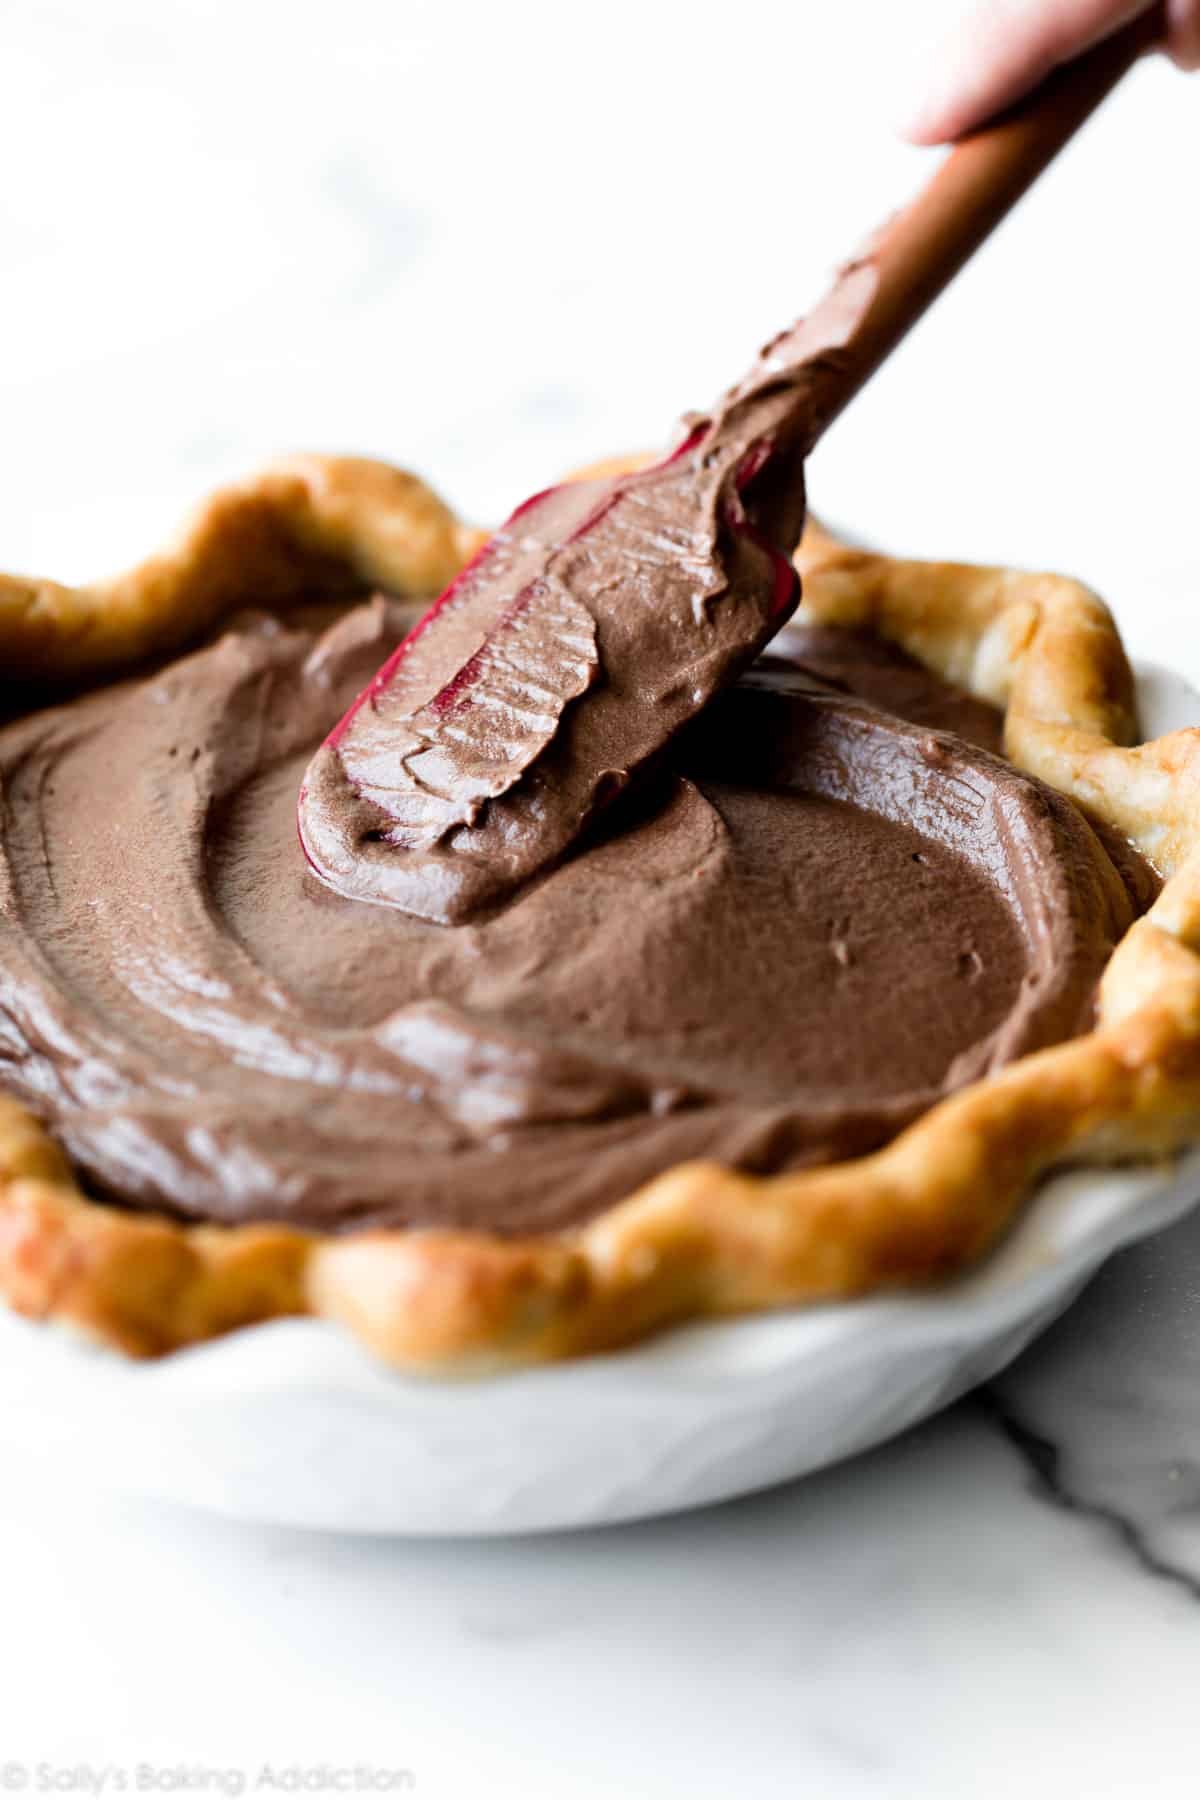
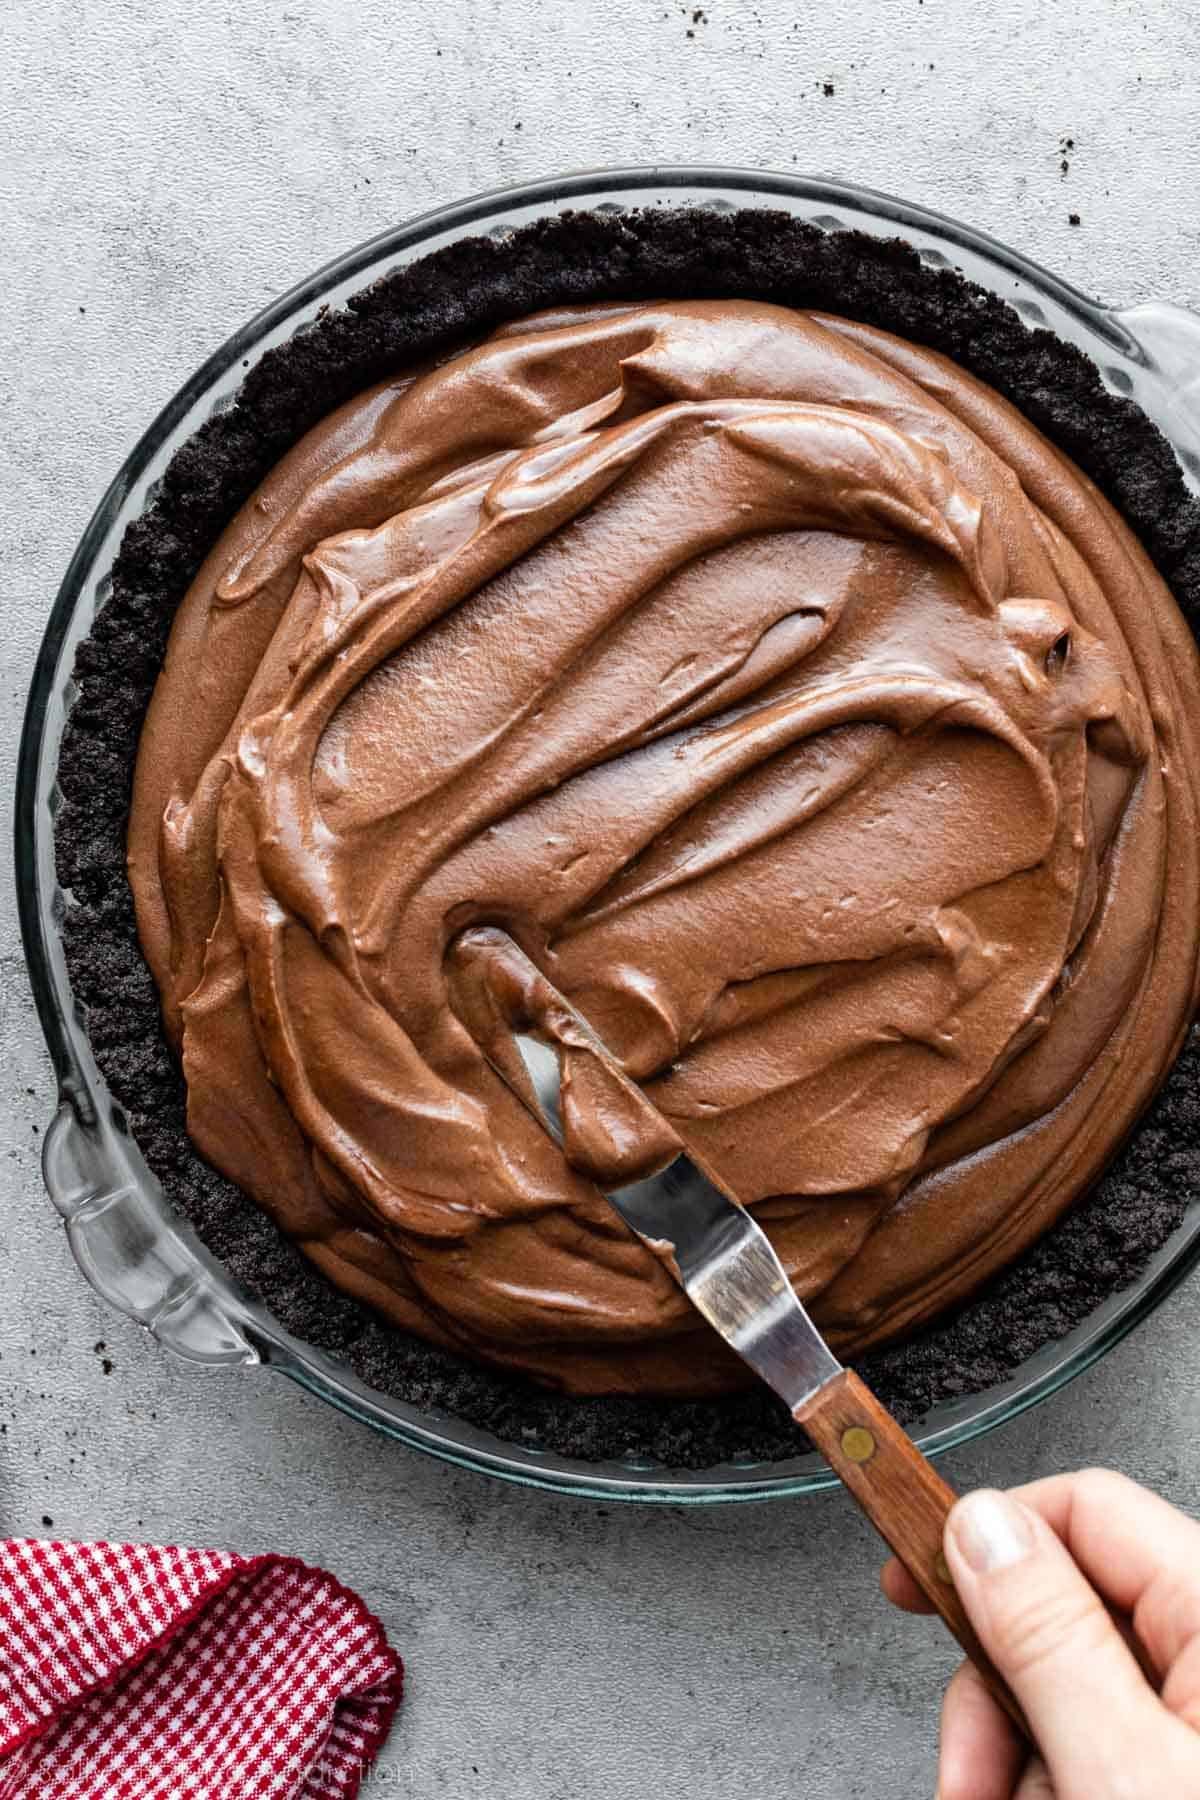
Finally, fold in the unsweetened whipped cream and spread into the cooled pie crust. Place the pie in the refrigerator and chill until the filling sets, about 4–6 hours.
This is an excellent pie to make a day ahead of time!
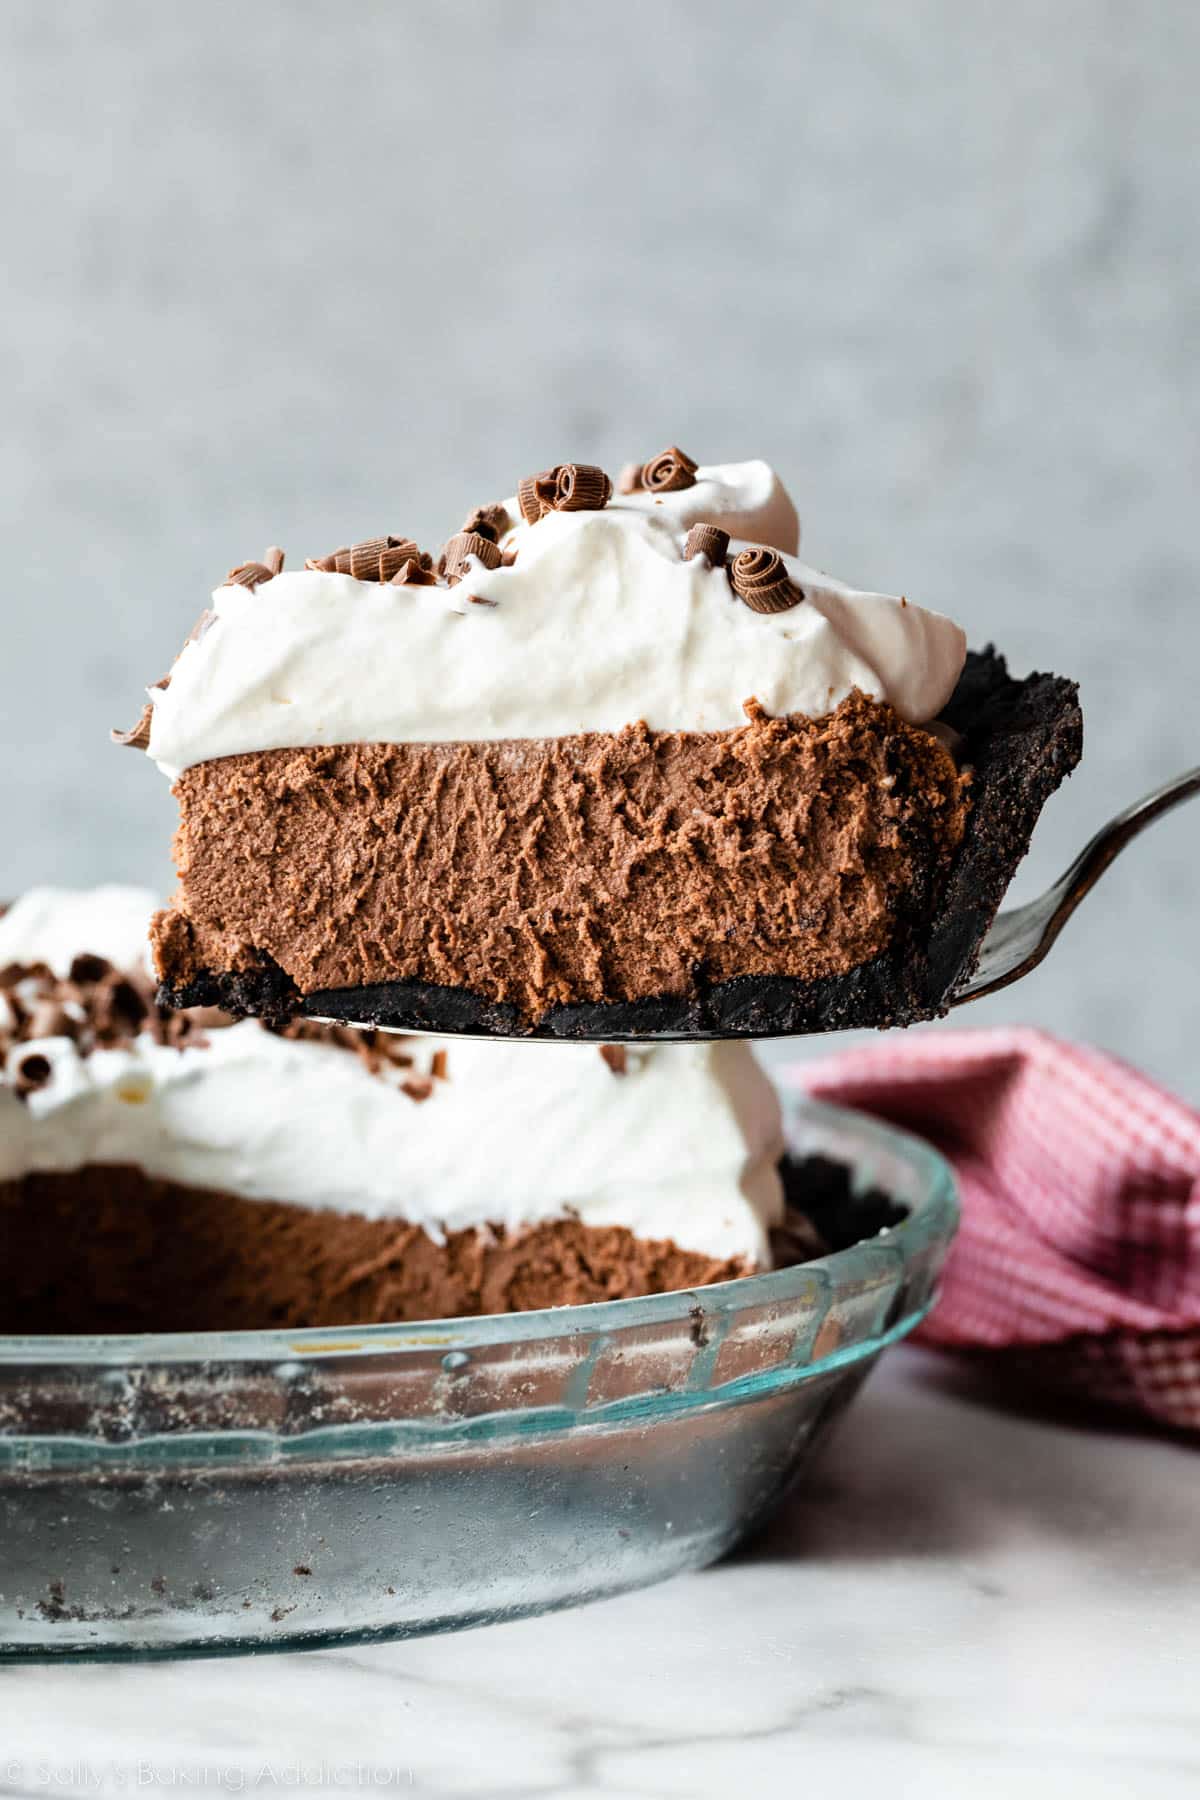
While I have a chocolate mousse pie recipe in my archives, I wanted to share a classic French silk pie. What’s the difference? The mousse pie sits in a delicious Oreo cookie crust and has a sky-high, super thick, airy mousse filling. This French silk pie, however, is served in a traditional pie crust and has a much richer, smoother filling. (Truthfully though… you can’t go wrong with either chocolate pie!)
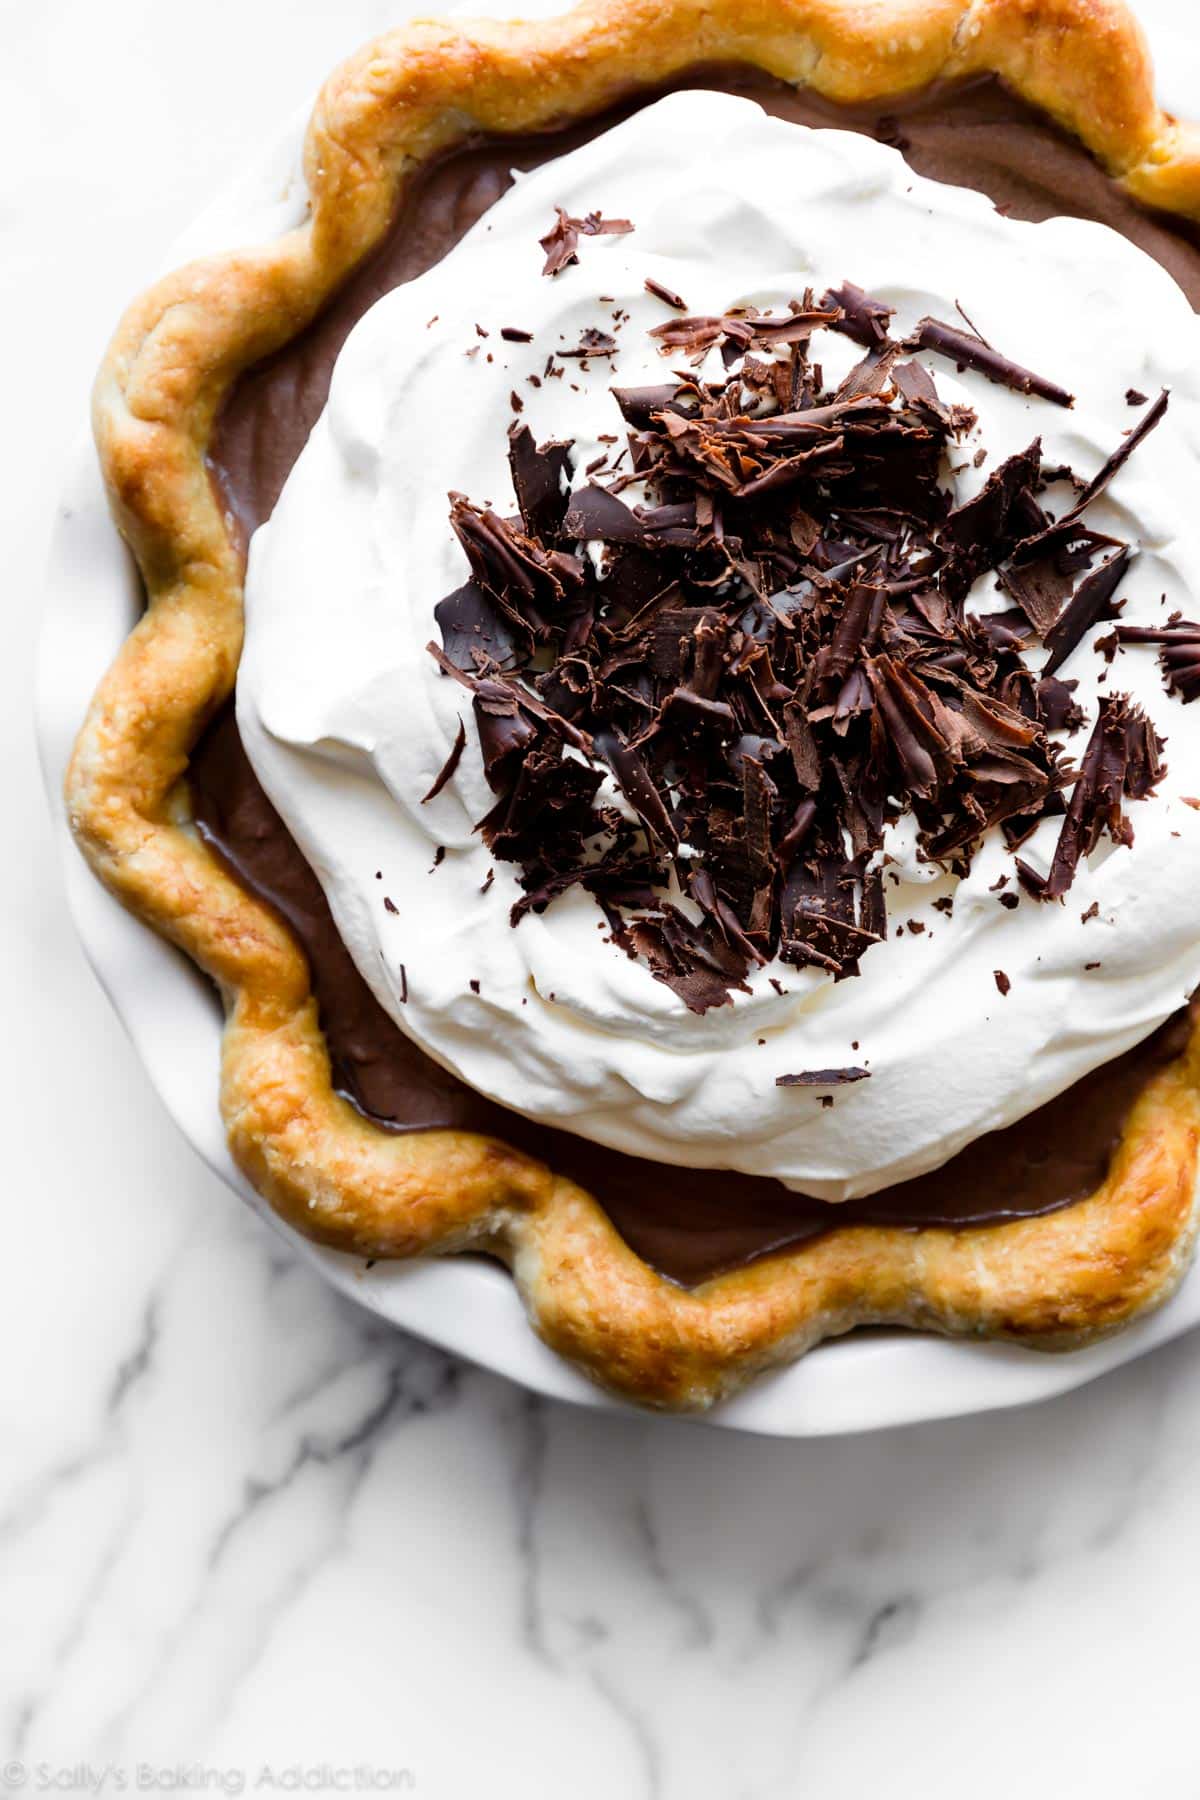
Use Heavy Cream Again for Whipped Cream Topping
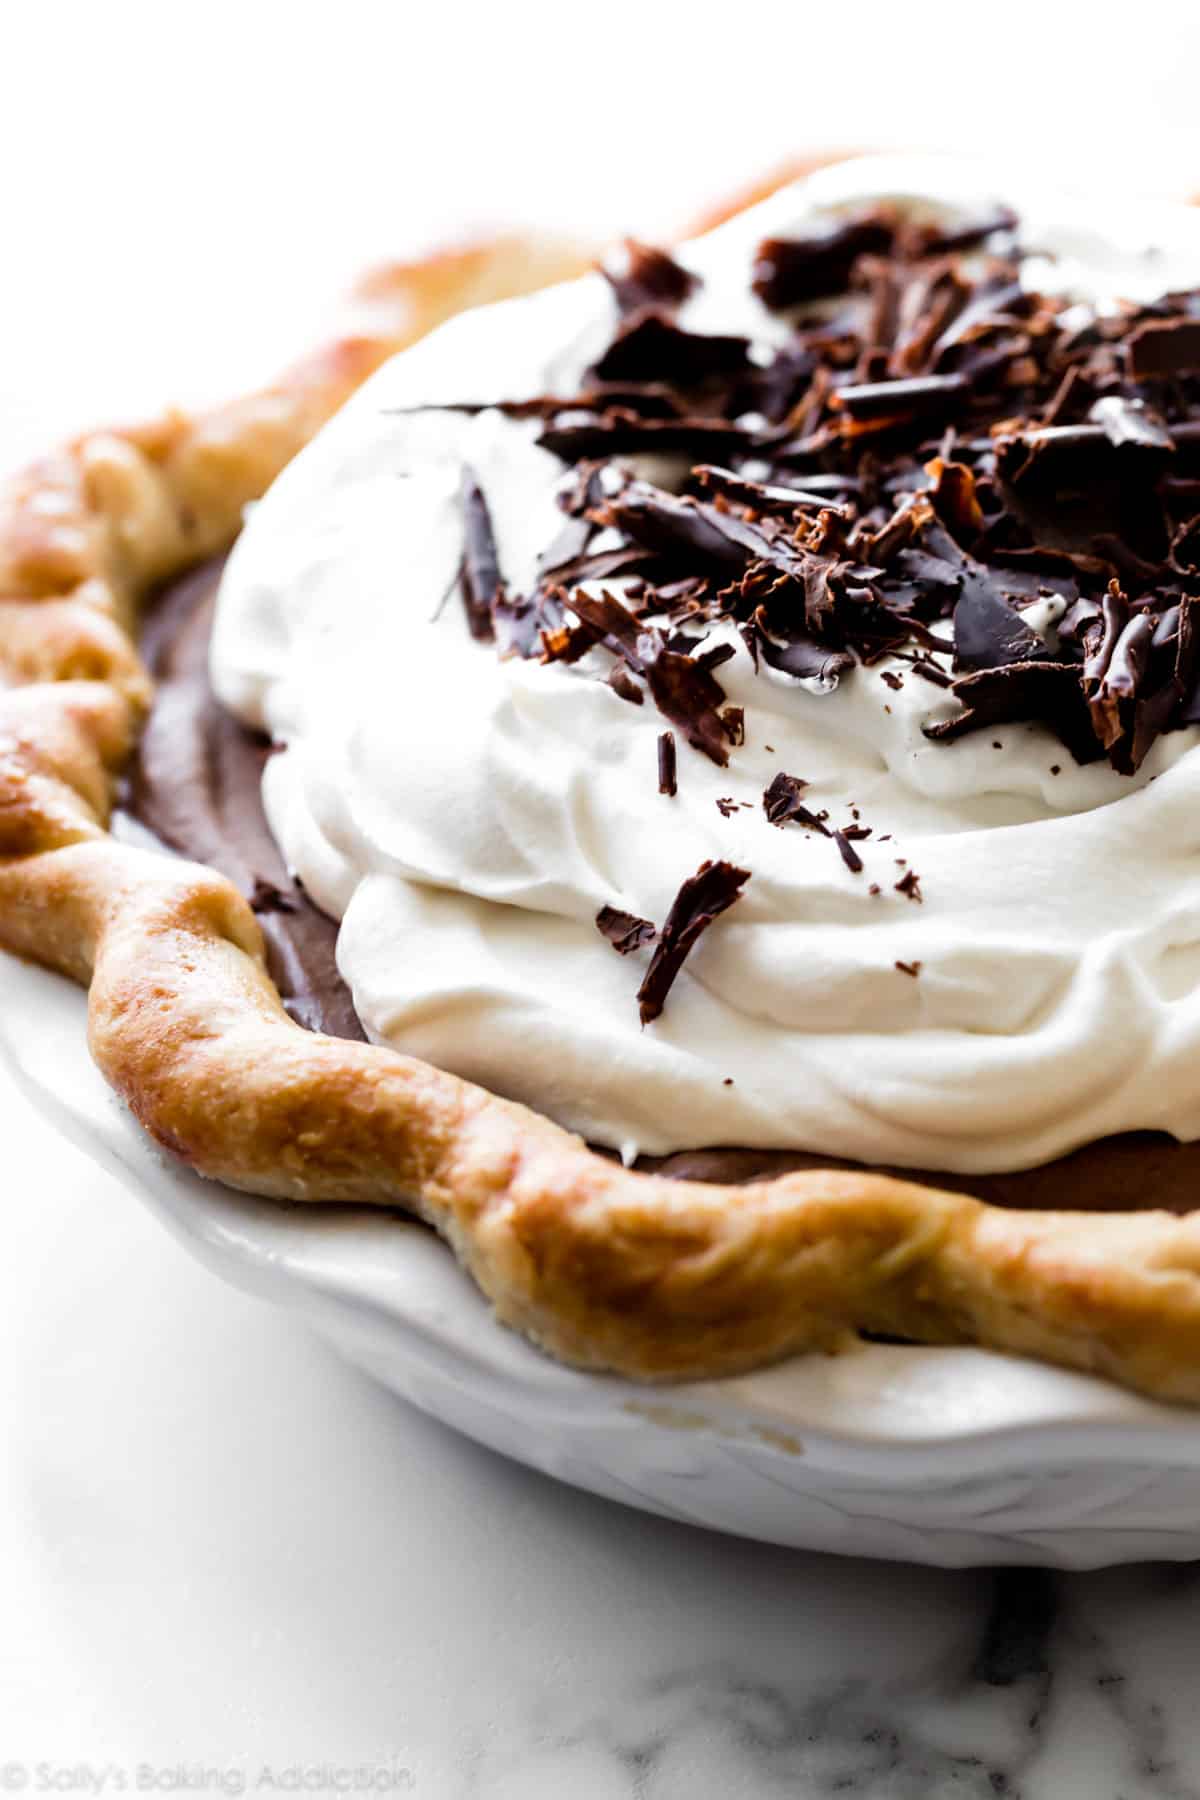
You need heavy cream for the filling AND the whipped cream garnish on top. Pick up a pint of heavy cream or heavy whipping cream and use 1 cup for the filling and 1 cup for the whipped cream on top. (We’re using my favorite vanilla whipped cream!) Finish it off with chocolate curls, mini chocolate chips, or even toasted coconut.
Today’s French silk pie is richer and sweeter, built on a traditional pastry pie crust with a velvety chocolate filling made from whole eggs and plenty of butter. My Sky-High Chocolate Mousse Pie is lighter and less sweet, made with an Oreo crust and an airy mousse structured with cooked egg whites and whipped cream.
Success Tips
- Review the recipe and notes: Since there’s a few different steps, my #1 success tip is to review the written instructions and recipe notes before you begin. Take your time with each step and you’ll be rewarded with chocolate pie perfection.
- Maintain a smooth filling: Make sure the egg mixture cools down before stirring in the chocolate. Then, make sure the chocolate/egg mixture cools down before mixing into the creamed butter. If these ingredients are still warm, the filling could curdle.
- No substitutions: To ensure the filling sets up properly and maintains the silky texture, I do not recommend any ingredient substitutions.
Or Try This With an Oreo Cookie Crust
Swap the pie dough for an Oreo cookie crust. No pie weights required! See recipe Note below for specific instructions.
This recipe is part of Sally’s Pie Week, an annual tradition where I share a handful of new recipes that fit into the pie/crisp/tart category. Join the community below!
Print
French Silk Pie
- Prep Time: 4 hours (includes dough)
- Cook Time: 40 minutes
- Total Time: 8 hours (includes chilling)
- Yield: one 9-inch pie
- Category: Desserts
- Method: Baking
- Cuisine: American
Description
This French silk pie features my perfectly flaky pie crust, a smooth chocolate filling, and whipped cream on top. Read through the recipe and helpful notes before beginning.
Ingredients
Crust
- 1 unbaked Flaky Pie Crust (what I used) or All Butter Pie Crust*
- egg wash for pie crust: 1 large egg beaten with 1 Tablespoon milk or heavy cream
Filling
- 1 cup (240ml) heavy cream or heavy whipping cream
- two 4-ounce quality bittersweet or semi-sweet chocolate bars (113g each), finely chopped*
- 4 large eggs
- 1 cup (200g) granulated sugar
- 3/4 cup (12 Tbsp; 170g) unsalted butter, softened to room temperature
- 1 and 1/2 teaspoons pure vanilla extract
Topping
- 1 cup (240ml) heavy cream or heavy whipping cream
- 2 Tablespoons confectioners’ sugar or granulated sugar*
- 1/2 teaspoon pure vanilla extract
- optional for garnish: chocolate curls*
Instructions
- Pie crust: I like to make sure my pie dough is prepared before I begin making this pie. Make pie dough the night before because it needs to chill in the refrigerator for at least 2 hours before rolling out and blind baking.
- Roll out the chilled pie dough: On a floured work surface, roll out one of the discs of chilled dough (use the 2nd pie crust for another recipe!). Turn the dough about a quarter turn after every few rolls until you have a circle 12 inches in diameter. Carefully place the dough into a 9-inch pie dish. Tuck it in with your fingers, making sure it is completely smooth. To make a lovely thick edge, I do not trim excess dough around the edges. Instead, fold the excess dough back over the edge and use your hands to mold the edge into a nice thick rim around the pie. Crimp the edges with a fork or use your fingers to flute the edges. (Review my how to crimp and flute pie crust tutorial if you need extra help with this step.) Chill the dough in the refrigerator or freezer for at least 30 minutes—this helps prevent the crust from shrinking.
- Preheat oven to 375°F (191°C).
- Blind bake the crust: Line the chilled pie crust with parchment paper. (Crunch up the parchment paper first so that you can easily shape it into the crust.) Fill with pie weights or dried beans. (Note that you will need at least 2 standard sets of pie weights to fit.) I like to push the weights up against the sides of the pie crust to help ensure the sides don’t shrink down. Bake until the edges of the crust are starting to brown, about 15–16 minutes. Remove pie from the oven and carefully lift the parchment paper (with the weights) out of the pie. Prick holes all over the bottom crust with a fork. If desired for a shiny golden crust, brush egg wash on edges. Return pie crust to the oven and bake for 14–15 minutes, or until bottom has browned. Remove from the oven, and cool on a wire rack completely before filling. You can blind bake the crust up to 3 days ahead of time. Cover cooled crust tightly and refrigerate until ready to fill. (Review this how to par-bake pie crust page if you need extra help with this blind-baking step.)
- Start the filling: Using a hand mixer or a stand mixer fitted with a whisk attachment, whip the heavy cream on medium-high speed until stiff peaks form, about 4 minutes. Stiff peaks hold their peak shape and do not droop. Set whipped cream in the refrigerator (covered or uncovered, doesn’t matter) until step 8. Melt the semi-sweet chocolate. You can melt it in a double boiler or the microwave. If using the microwave: place the chopped chocolate in a medium microwave-safe bowl. Microwave in 20-second increments, stopping and stirring after each increment until completely melted and smooth. Set aside until the end of the next step.
- Cook the eggs: Whisk eggs and sugar together in a heatproof bowl or the top piece of a double boiler. Place over a pot of simmering water (or the bottom part of your double boiler) on medium heat. Do not let the surface of the simmering water touch the bottom of the heatproof bowl. Whisking constantly, cook the egg mixture until it reaches 160°F (71°C) on an instant-read thermometer, about 10–11 minutes. If the steam gets too hot over your hand, use an oven mitt. (If you do not have an instant read thermometer, lightly and quickly dip your finger—it’s very hot, be careful—and rub the mixture between your thumb and finger. You shouldn’t feel any sugar granules.) Carefully remove from heat and allow to cool for 10 minutes. After cooling, slowly stir in the melted chocolate. To prevent curdling, cool for another 10 minutes before using in the next step.
- Using a handheld or a stand mixer fitted with a paddle attachment, beat the butter on medium-high speed until creamy, about 1–2 minutes. Add the vanilla and beat on medium-high speed for 30 seconds. Scrape down the sides and up the bottom of the bowl. With the mixer running on low speed, pour in the chocolate/egg mixture and then increase to medium-high speed and beat for 3 minutes. With a silicone spatula, fold in the whipped cream until combined.
- Spread filling into cooled pie crust. (A small offset spatula is helpful for this.) Cover tightly with plastic wrap and refrigerate for at least 4–6 hours or overnight, until chilled and thickened. Pie may be refrigerated for up to 2 days before serving.
- For the whipped cream topping: Using a handheld or a stand mixer fitted with a whisk attachment, whip the heavy cream, sugar, and vanilla extract on medium-high speed until medium peaks form, about 3–4 minutes. Medium peaks are between soft and stiff peaks, and are the perfect consistency for topping and piping on desserts. Pipe or spread the whipped cream on top. Garnish with chocolate curls (see Notes), if desired. Serve immediately, or chill the pie uncovered for up to a few hours.
- Cover leftovers and store in the refrigerator for up to 5 days.
Notes
- Make Ahead & Freezing Instructions: The pie dough can be prepared ahead of time and stored in the refrigerator for up to 5 days or in the freezer for up to 3 months. There are plenty of ways to make this recipe ahead of time. See end of steps 5 and 9. You can also freeze the pie after step 8. Cover with an extra layer of plastic wrap before freezing. Freeze for up to 3 months. Thaw in the refrigerator prior to topping with whipped cream and serving.
- Special Tools (affiliate links): Rolling Pin | 9-inch Pie Dish | Parchment Paper | Pie Weights | Pastry Brush | Cooling Rack | Electric Mixer (Handheld or Stand) | Double Boiler | Whisk | Instant Read Thermometer | Silicone Spatula | Small Offset Spatula
- Update in 2022: This recipe used to call for 1 cup of butter as well as creaming half of the sugar with the butter. After further testing and feedback from readers, the recipe now uses 3/4 cup (170g) butter in the filling and all of the sugar is now cooked with the eggs.
- Pie Crust: Both linked pie crust recipes make 2 crusts. You only need 1 crust for this pie, so freeze the 2nd half for another use. If using store-bought pie dough, you still need to blind-bake it. If needed, you can use a graham cracker crust or Oreo cookie crust instead of traditional pie crust. Pre-bake either cookie crust at 350°F (177°C) for 12 minutes. No need for pie weights if using a cookie crust. Cool completely before filling.
- Chocolate: Filling will only set if the correct chocolate is used. I recommend using pure chocolate baking bars. You can find them right next to the chocolate chips in the baking aisle. They are sold in 4-ounce bars. I like Baker’s or Ghirardelli brands. I use and recommend semi-sweet chocolate, but you can use bittersweet or even unsweetened chocolate for a darker flavor.
- Sugar in whipped cream: Some bakers swear by granulated sugar in whipped cream; others swear by confectioners’ sugar. If you’re only working with a couple Tablespoons of sugar as listed in the recipe above, it doesn’t really make a difference. Use either.
- Garnish: You can leave the whipped cream on top plain or sprinkle with chocolate curls or shavings, mini chocolate chips, or chocolate sprinkles. To make chocolate curls, run a vegetable peeler down the side of a Hershey’s milk chocolate bar (or similar chocolate bar).


Reader Comments and Reviews
I added just a 1/4 tsp of espreaso powder to boost the chocolate flavor, and wow! Absolutely delicious.
My only quibble is the sugar/butter mixture. I followed the instructions exactly, but the sugar didn’t really disperse fully into the butter, so the final pie had a little bit of grit. I’ll definitely make this recipe again, but I might try some agave or corn syrup in place of some of the sugar.
4/5 stars, and it’ll definitely be a 5/5 once I’ve figured out how to solve the texture issue 🙂
I did the same thing with the sugar. Came out so silky and delicious
Worked great when I did this.
Husband said “best ever”! Lot of work but I don’t mind if its good.
Hi! I made your mini quiches, they were amazing. It it possible to make mini French silk pies? Preparing the crust in a similar manner to the mini quiche?
Hi Una, This recipe should work well as mini pies!
Could I may the chocolate filling and freeze it. Then defrost after step 8?
Hi Kimberly, We recommend freezing the pie after step 9 and making sure to cover with an extra layer of plastic wrap before freezing. You can freeze the pie for up to 3 months, thaw in the refrigerator prior to topping with whipped cream and serving.
My eggs took 25 mins to reach 160*F — I started off with a simmer but soon realized that wouldn’t work and brought it to a boil. I started with an electric mixer, but that overheated and shut off from the steam. I’m wondering how yours heated up so fast?
Hi Steven, I’m glad to help. Are you using an electric or gas stove? Were you sure to wait the 10 minutes before adding chocolate, then another 10 minutes before beating? Was it still that steamy and hot after that time?
I made this last thanksgiving and again today for my 15th birthday! My coworkers and family loved it Thanks for the great recipe!!!
Just wanted to hop on here and say I made this dairy free, since I’m lactose intolerant. It still turned out amazing! I used Silk heavy whipping cream alternative and Earth Balance butter. This is exactly what I was craving! Will definitely try with an Oreo crust next time.
Definitely worth the trouble very impressive dessert. It’s a to die for desert I definitely will make it again.
Thank you for publishing this recipe Sally! I tried this pie for very first time in my life, and even though I am not experienced in baking and live in other part of world where some ingredients are of a different quality, it turned out really well and I can’t wait to bake it again
Can I use ghirardelli semi-sweet chocolate chips the store by me does not carry the semi sweet bars
Hi Sharon! Pure baking chocolate is best- you can use bittersweet or even unsweetened chocolate for a darker flavor (see recipe note). Chocolate chips do not melt properly for this filling.
Thanks for answering Will try the bittersweet or unsweetened chocolate will let u know how it turns out
Did you use a deep dish pie pan for this? Thanks in advance
Hi Amy, we used a standard pie dish. If you want to use a deep dish pie pan, it will require a bit more than half of the crust recipe to reach all the way up the sides. There are a couple links to the exact products listed in the recipe notes below the recipe if that helps!
This was amazing! It took forever, and now I understand why French Silk Pies cost so much to buy! This is the second time I’ve made Sally’s crust, and although I follow the recipe, haven’t had great luck with it turning out (crumbly) – but it tasted great!
Hi Beth! We’re so happy to hear that you loved this pie! If you are experiencing a crumbly crust, the dough may have been over-worked and/or it was too dry. Don’t be afraid to add more ice water until the dough clumps together and feels a little moist. Keep the fats as cold as possible, use a pastry cutter to cut in the fats by hand, and don’t overwork them. You want little pieces of cold butter throughout. Hope this helps!
So what is the difference between the semi chocolate chips and the bars?
Hi Sue, chocolate chips contain stabilizers that prevent them from melting, which isn’t ideal for this recipe. The filling won’t set without using quality pure chocolate (without the stabilizers). See recipes notes for more details!
Can I use butter flavored shortening for the French silk pie?
For the crust? We haven’t tested it but don’t see why not. Let us know how it goes!
I went ahead used the original. Wanted to follow the recipe exactly for my first time. Thanks!
I made this yesterday to serve today. When I was filling the pie crust, I sampled the filling which was delicious and the perfect air filled texture. By serving time today, the filling had hardened almost to the point of making it difficult to cut. Did I do something wrong ? I almost feel like there should be less butter and more whipped cream. It tasted good but had a much dryer dense texture than I would consider as mousse-like. Your thoughts?
Hi Nancy, Thank you for trying this recipe! I wonder if your pie simply wasn’t covered and dried out since you thought the filling was perfect after you made it. If you try it again, be sure to completely and tightly wrap the pie with plastic wrap while it’s in the refrigerator.
ONE WORD…PHENOMENAL! The ONLY French silk pie recipe you’ll ever need. It didn’t last 2 days, LOLL it’s become my absolute favorite! Thank you Sally for a wonderful recipe!
I enjoyed making this pie. It presented enough of a challenge for my inexperienced self LOL. The filling is really delicious and rich but it’s pretty dense. I’m not sure if it’s supposed to be like that or if I have taken a misstep somewhere along the way. It didn’t make it any less yummy though my friends devoured it . I welcome your comments
Hi Sue, I’m so glad to read that you tried this pie recipe. Thinning out the filling could help if you decide to try the recipe again. Make the whipped cream as directed, then stir in 2 Tablespoons of heavy cream. Basically, you are thinning out the whipped cream itself by folding in liquid. (Whipping into soft peaks instead of stiff peaks could work too, but I recommend this method.)
Thank you I’m be sure to try that next time!
There was a lot of steps to make this pie…. totally true it was worth all
Of them!!! Rave reviews from my family and I will be making this again and again and again! Incredible texture
Delicious!
So good! And mad respect to people who bake pies for a living. A lot of work went into this
Just made 3 of these in a cookie pie crust for my son’s tenth birthday party. All I heard were raves – these kids loved this pie! And I loved that the eggs were cooked so I felt better about serving to a bunch of fourth grade boys. Thank you Sally – we trust you for all of our special event treats!
Excellent recipe. I did use chocolate chips, Ghirardelli Bittersweet which high cocoa fat content works. I added a T. of dry cocoa and a tiny pinch of salt to the warm eggs for extra zing. I also ran the cooked egg mix thru a sieve, which I think is always a good idea so there are no scrambled bits to ruin the silky texture. Overall, a very good recipe.
Hi Sally, I’ve made your French silk pie twice now. The first time, I whipped the eggs + sugar while cooking, with a fork and I think it wasn’t vigorous enough so the filling was super dense but not silky. The 2nd time I used an electric hand mixer to cook and whip the eggs + sugar. Oh! What a difference! Beautiful silk! I notice you use a whisk (I don’t have one) but does your mixture double-triple in volume? I had to change to a bigger bowl while whipping. Also I wanted to ask, chemistry – wise, what is the purpose of the whipping cream in filling? I decreased it a bit for the 2nd pie and not sure if it the outcome was silky bc of less cream or bc of the way I whipped the eggs?
I followed the recipe exactly as followed and while the pie is delicious, the French Silk filling is SO dense. There was a local chain in the Midwest called Tippin’s that I worked at in high school and their French Silk was so smooth and creamy which is what I envisioned and this pie is not even close. The pie I made is SO dense and when pulled from the fridge is hard to cut and challenges any fork. The flavor is good but overall, not what I was hoping for.
Although I did not get to eat any of the pie once completed, I did taste along the way. I have my own crust recipe that I use but changed nothing else. It looks beautiful and I was happy to give this pie. I tried to post a picture but I can’t seem to do it.
This tasted really good!! And appreciated the detailed instructions and tips. Would love to make this again if I can figure out how to troubleshoot my one issue with it. When I cut slices, the chocolate cream part separated from the pie crust. Any ideas on what I may have done wrong? The one thing I could think of was I ended up cooking the egg mixture longer than maybe it should’ve been because I was following the 10 min mark and when I checked the temp it was already over 160F. This then made the final chocolate mixture look thicker than the pictures shown here, so I didn’t really need time for it to “set” like the instructions noted. Otherwise, it looked beautiful and tasted delicious!
Wow this Silk pie is amazing !
I did use honey instead of sugar and it worked beautifully!!!
AMAZING pie, as usual! Thank you for such an amazing recipe. I’m considering making another with my extra crust! I’m sad it’s gone. Would this recipe be able to work on mini bite sized pies?
Hi Madeline, We are so happy you enjoyed this recipe! Yes, it should work as mini pies!
SallEEEEE!! This pie exceeded my expectations!!!! In fact, my stepdad (the French Silk connoisseur who loves Bakers Square pies) said he would choose your recipe over Bakers Square!! Now, the pie does require several steps so I only made one for Thanksgiving, but that explains why it was gone in less than 24 hrs…! *For those who are worried about the filling having crunchy sugar crystals: yes, right after mixing the filling, the sugar is detectable/crunchy BUT after chilling the pie, the sugar will have dissolved and WILL be silky smooth. I have had this same experience when I make Tiramisu filling. I used your crust recipe although I reduced the shortening/lard by 2 tbsp and added 1 tbsp sugar, and my son proclaimed it was delicious (and he doesn’t like crust!)
Thanks so much!
This pie was amazing! I made it with a home made Oreo crust in a 9.5 pie dish. Everyone chose this pie over the others at Thanksgiving! One note I saw from another reviewer was that the pie was a bit grainy in texture. When I completed making the pie filling and put it in the crust I did taste some of that grainy texture-BUT I let it sit in the fridge overnight and once we ate it it was smooth as silk! I think the sugar dissolves in the rest of the filling once you let it set overnight. It was silky and delicious…thank you, Sally!
Made this for thanksgiving this year. Perfect recipe. Everyone loved it and will definitely be asking for it for many holidays to come!