

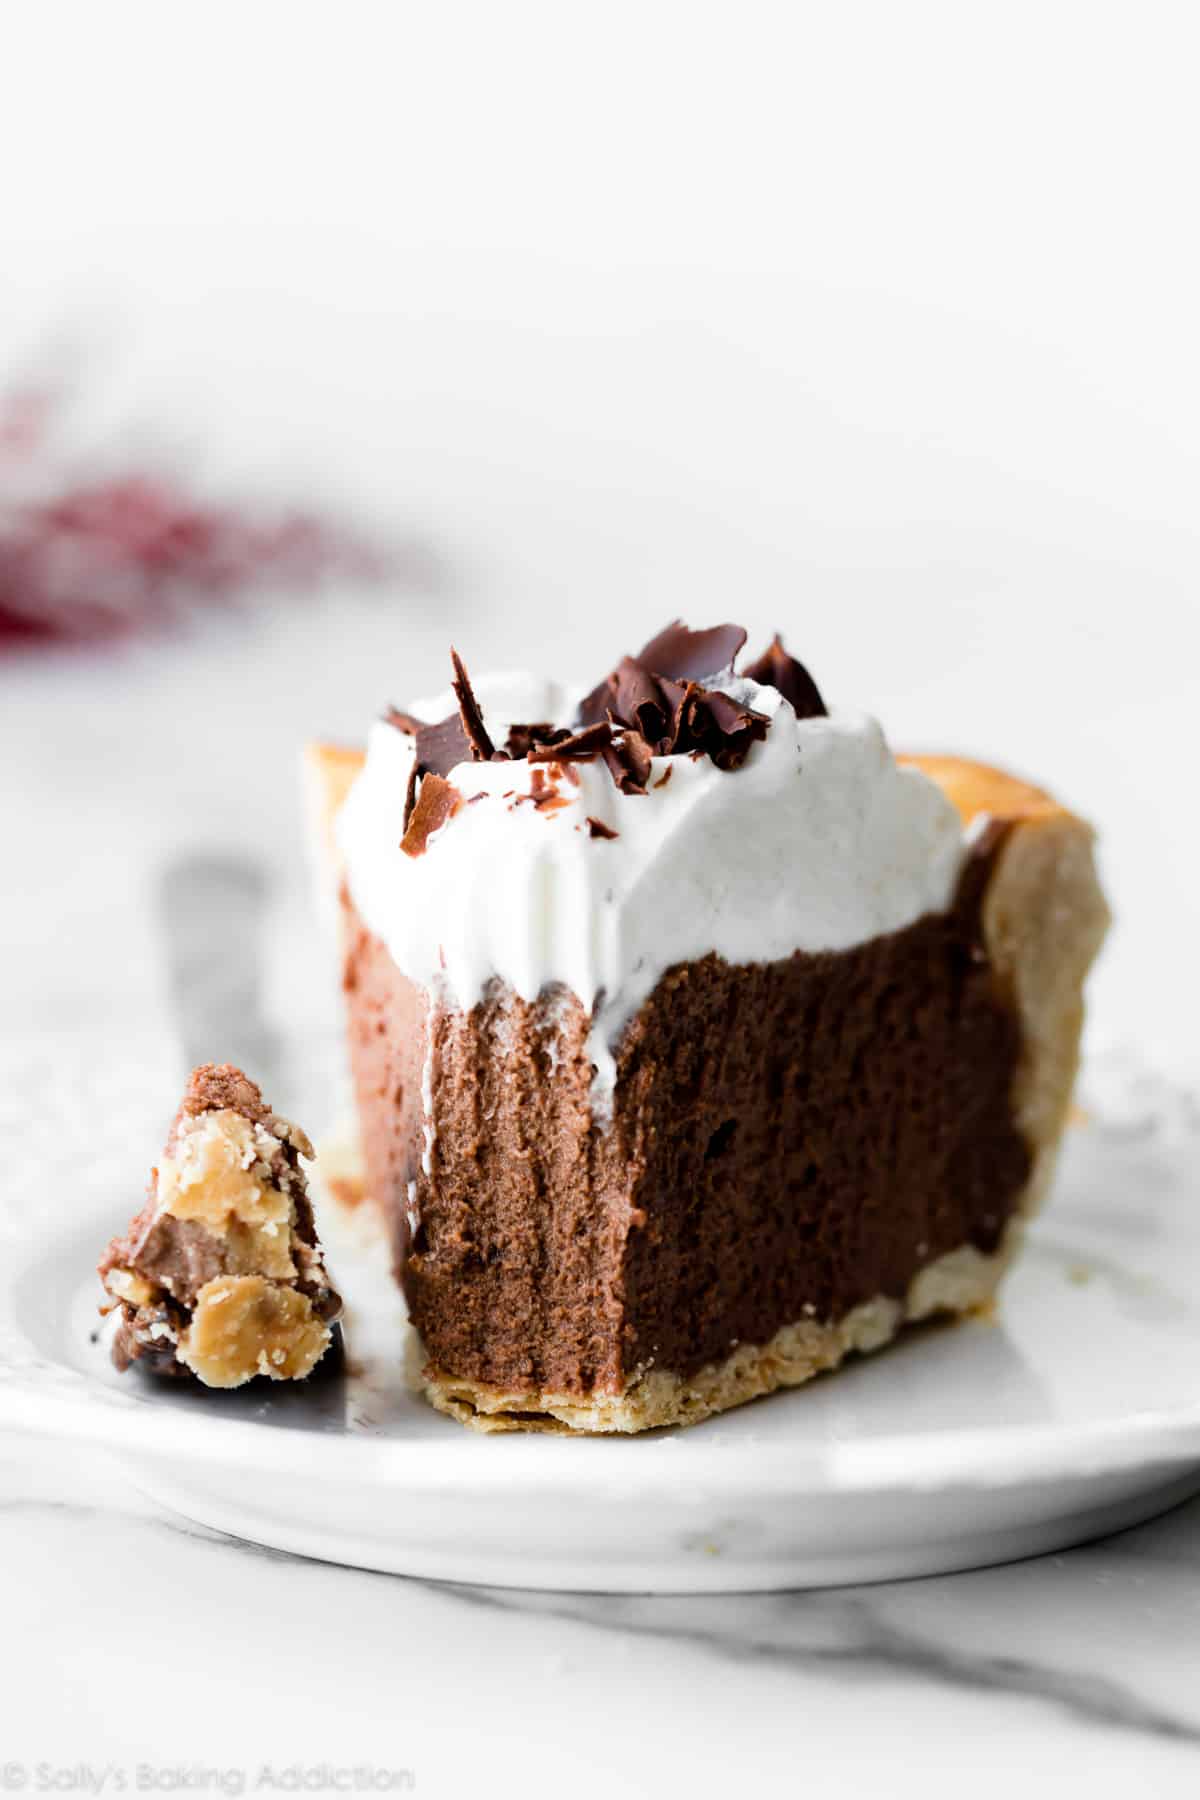
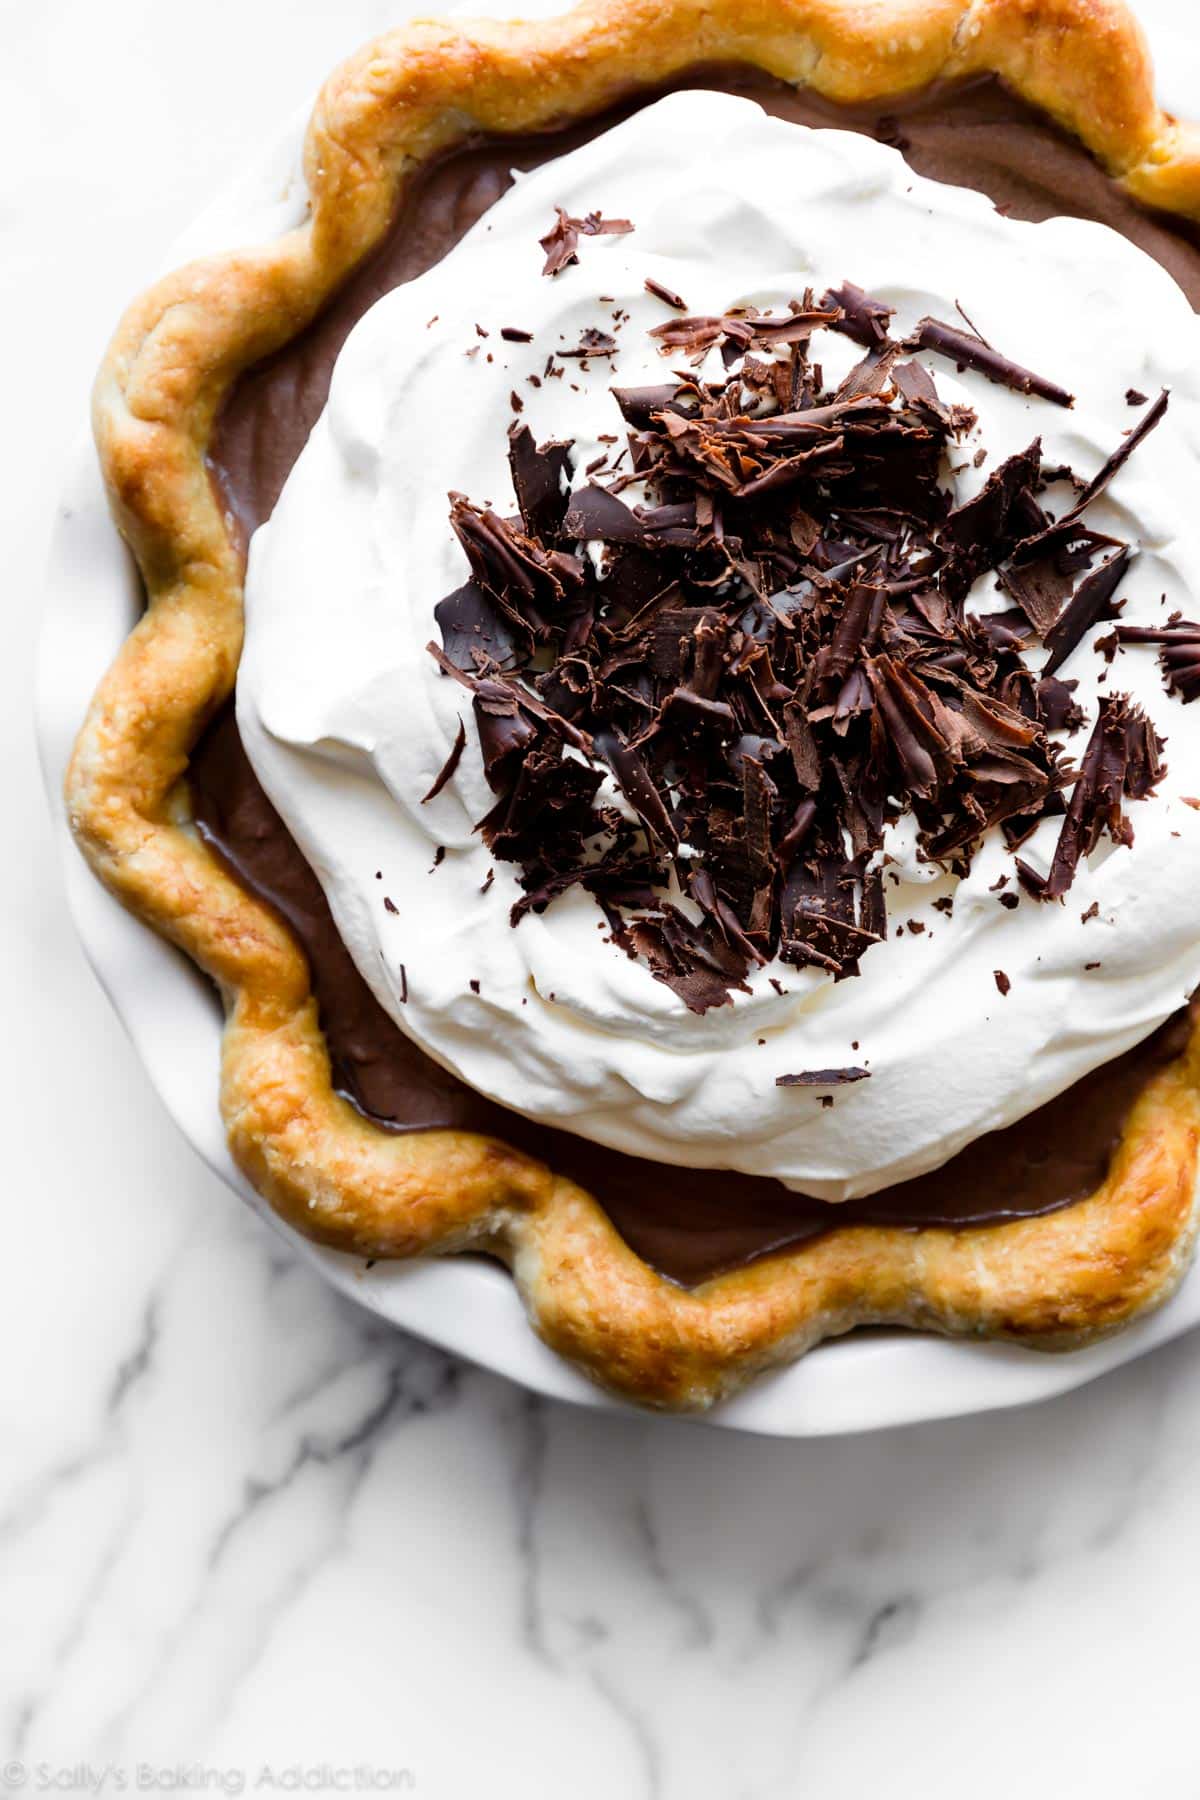
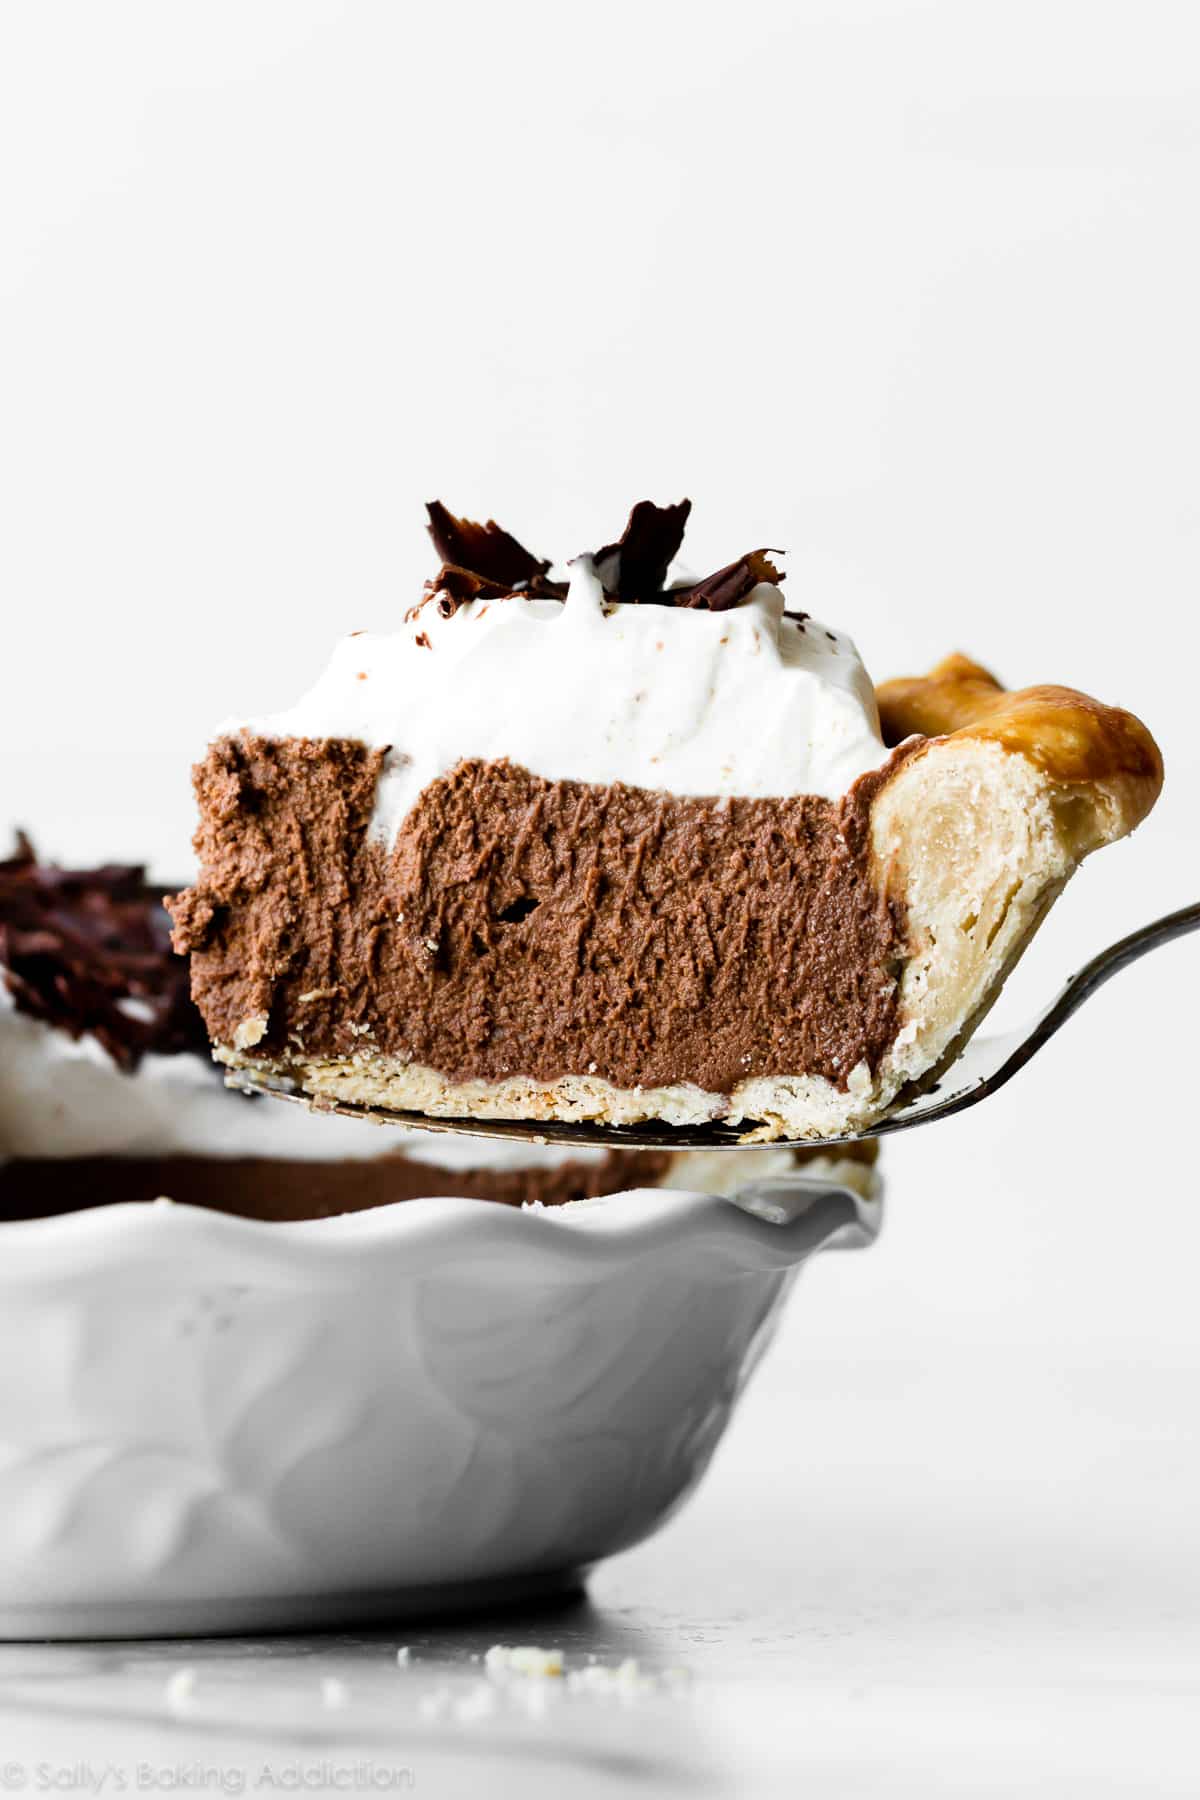
This creamy and indulgent French silk pie combines my best flaky pie crust, smooth-as-silk chocolate filling, and fresh whipped cream on top. This recipe uses cooked eggs, so you don’t have to worry about consuming raw eggs.
After many requests, I’m unveiling a favorite French silk pie recipe. I’ve tried a lot of French silk pies and have made several in my own kitchen, but this is definitely my best one yet and I’m thrilled for you to finally try it! Perhaps you’ll even consider adding it to your menu of Thanksgiving pies… alongside your apple pie and pumpkin pie, of course 🙂
Why This Is My Best French Silk Pie
- Uses my tried-and-true flaky pie crust
- Light as mousse, but much smoother
- Unlike other recipes, there’s no raw eggs
- Filling sets up perfectly
- Garnished with my favorite fresh whipped cream
No Raw Eggs
This characteristic is definitely worth highlighting. Most French silk pie recipes call for raw eggs, but I gently cook them first. This requires an extra step on the stove, but it cancels out any worries of serving raw eggs. Even with this step, we still have the same smooth-as-silk texture—nothing is compromised! So if you’re looking for a classic French silk pie recipe without raw eggs, this is it.
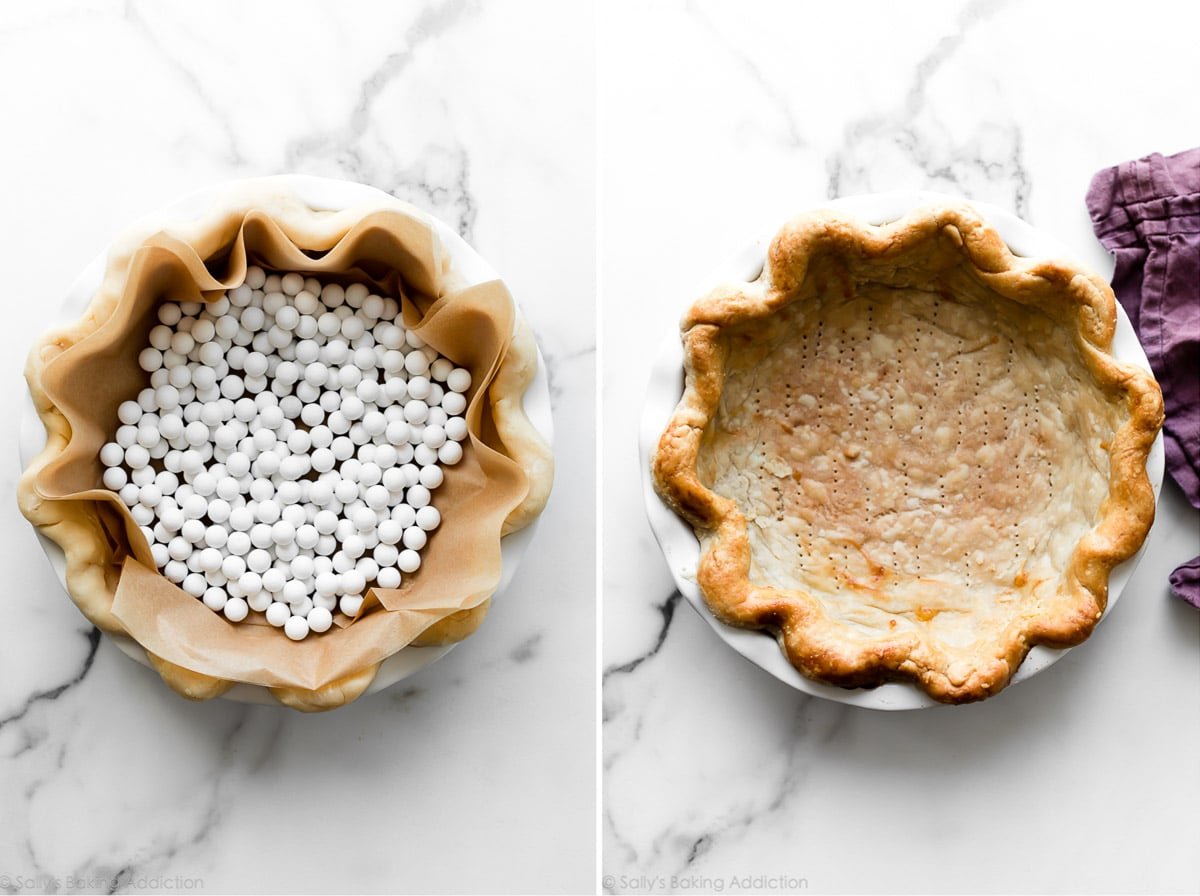
How to Fully Blind Bake Pie Crust
Like my banana cream pie and coconut cream pie, this French silk pie filling isn’t baked, so it requires a fully baked pie crust. “Blind baking” means that we bake a pie crust without a filling inside. Do you know how to blind bake pie crust? Let’s review:
- Make pie dough ahead of time, then refrigerate or freeze until you’re ready to make the pie. Pie dough must chill for at least 2 hours before rolling out. You can use my favorite pie crust or my all-butter pie crust recipe. I prefer the shortening/butter blend in my pie crust, because the shortening promises that prized flaky texture. If needed, you can use a graham cracker crust or even an Oreo cookie crust instead. See recipe Note.
- Roll the dough out, then fit into a 9-inch pie dish. Crimp or flute the edges. Want to know my trick for beautiful pie crust edges? Don’t trim the excess pie dough. See step 2 in the recipe below. My how to crimp and flute pie crust tutorial is helpful, too.
- To prevent shrinking, chill the shaped pie crust for at least 30 minutes. Remember that pie dough must be cold when it hits the oven. You can do this before or after you fill with pie weights (next step).
- Fill with pie weights. As the pie dough bakes, its fat will melt. The melting fat causes the pie crust to shrink down the sides of the pie dish. To prevent the pie dough from completely losing its shape, weigh it down with pie weights. Carefully line the pie dough with parchment paper first, then pour in pie weights or even dry beans. (Note: 2 packs of these pie weights is needed.)
- Bake until the edges are relatively set, about 15 minutes.
- Remove pie weights and parchment, dock the crust with a fork, and then return to the oven until the crust is golden brown (about another 15 minutes). See photo on the right below.
- Cool completely before adding the filling.
Some recipes, like my pumpkin pie and lemon meringue pie, require a partially blind-baked pie crust—this means that the filling is baked, but the crust requires a pre-bake.
4 Parts to Chocolate Pie Filling
Let’s make the chocolate filling as the blind-baked pie crust cools. There’s a few different things going on here. You need 4 separate bowls for different components.
- Heavy Cream: Whip heavy cream into stiff peaks.
- Melted Chocolate: Use two 4-ounce bars of pure chocolate in this recipe. Do not use chocolate chips, which don’t melt into the proper consistency. I prefer and recommend semi-sweet chocolate, but you can use bittersweet or unsweetened chocolate for a darker flavor.
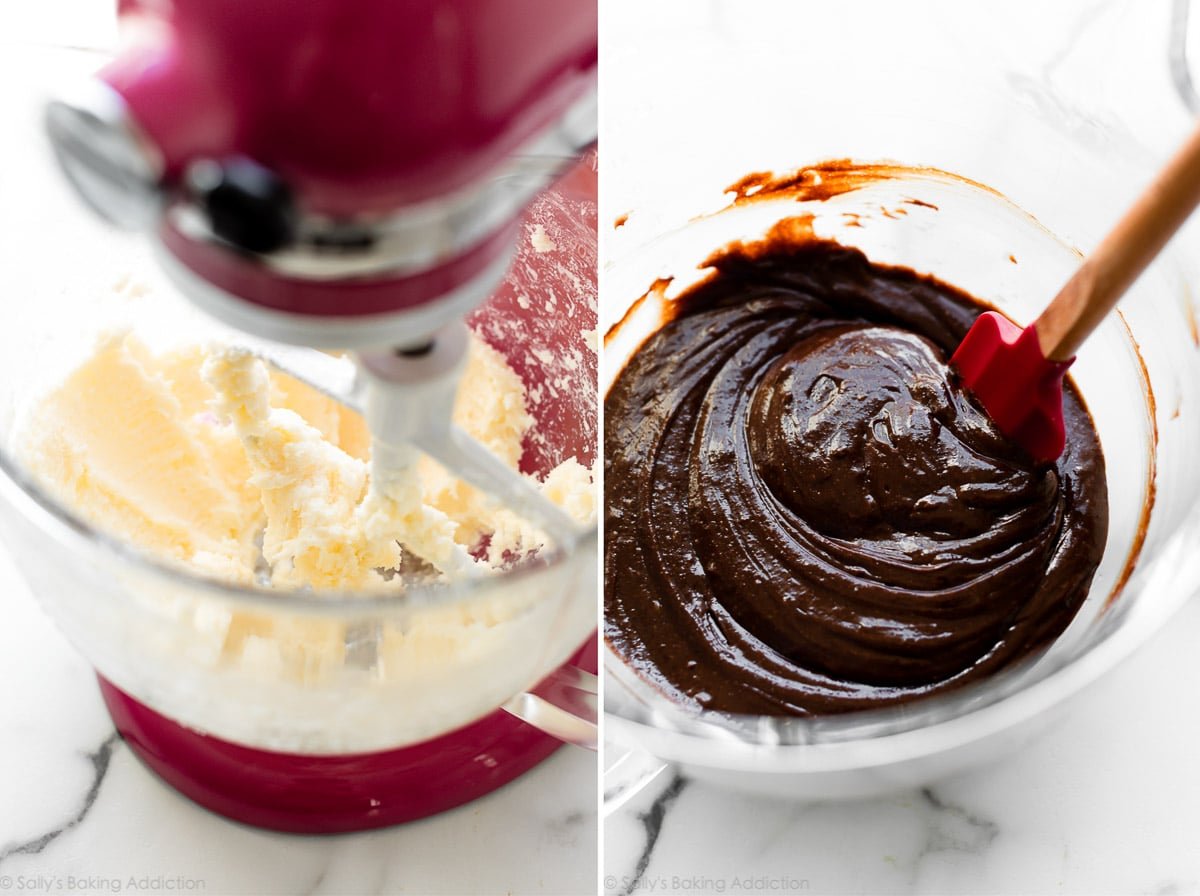
- Eggs + Sugar: I like to whip the cream and melt the chocolate first, so both are ready as I need them. For the eggs, whisk them with the sugar and gently cook them on the stovetop. Use a double boiler or a heatproof bowl over a pot of simmering water. While constantly whisking, cook until they reach 160°F (71°C), a temperature that kills all possible bacteria. You need an instant-read thermometer for this step. Let this cool for 10 minutes, then stir in the melted chocolate.
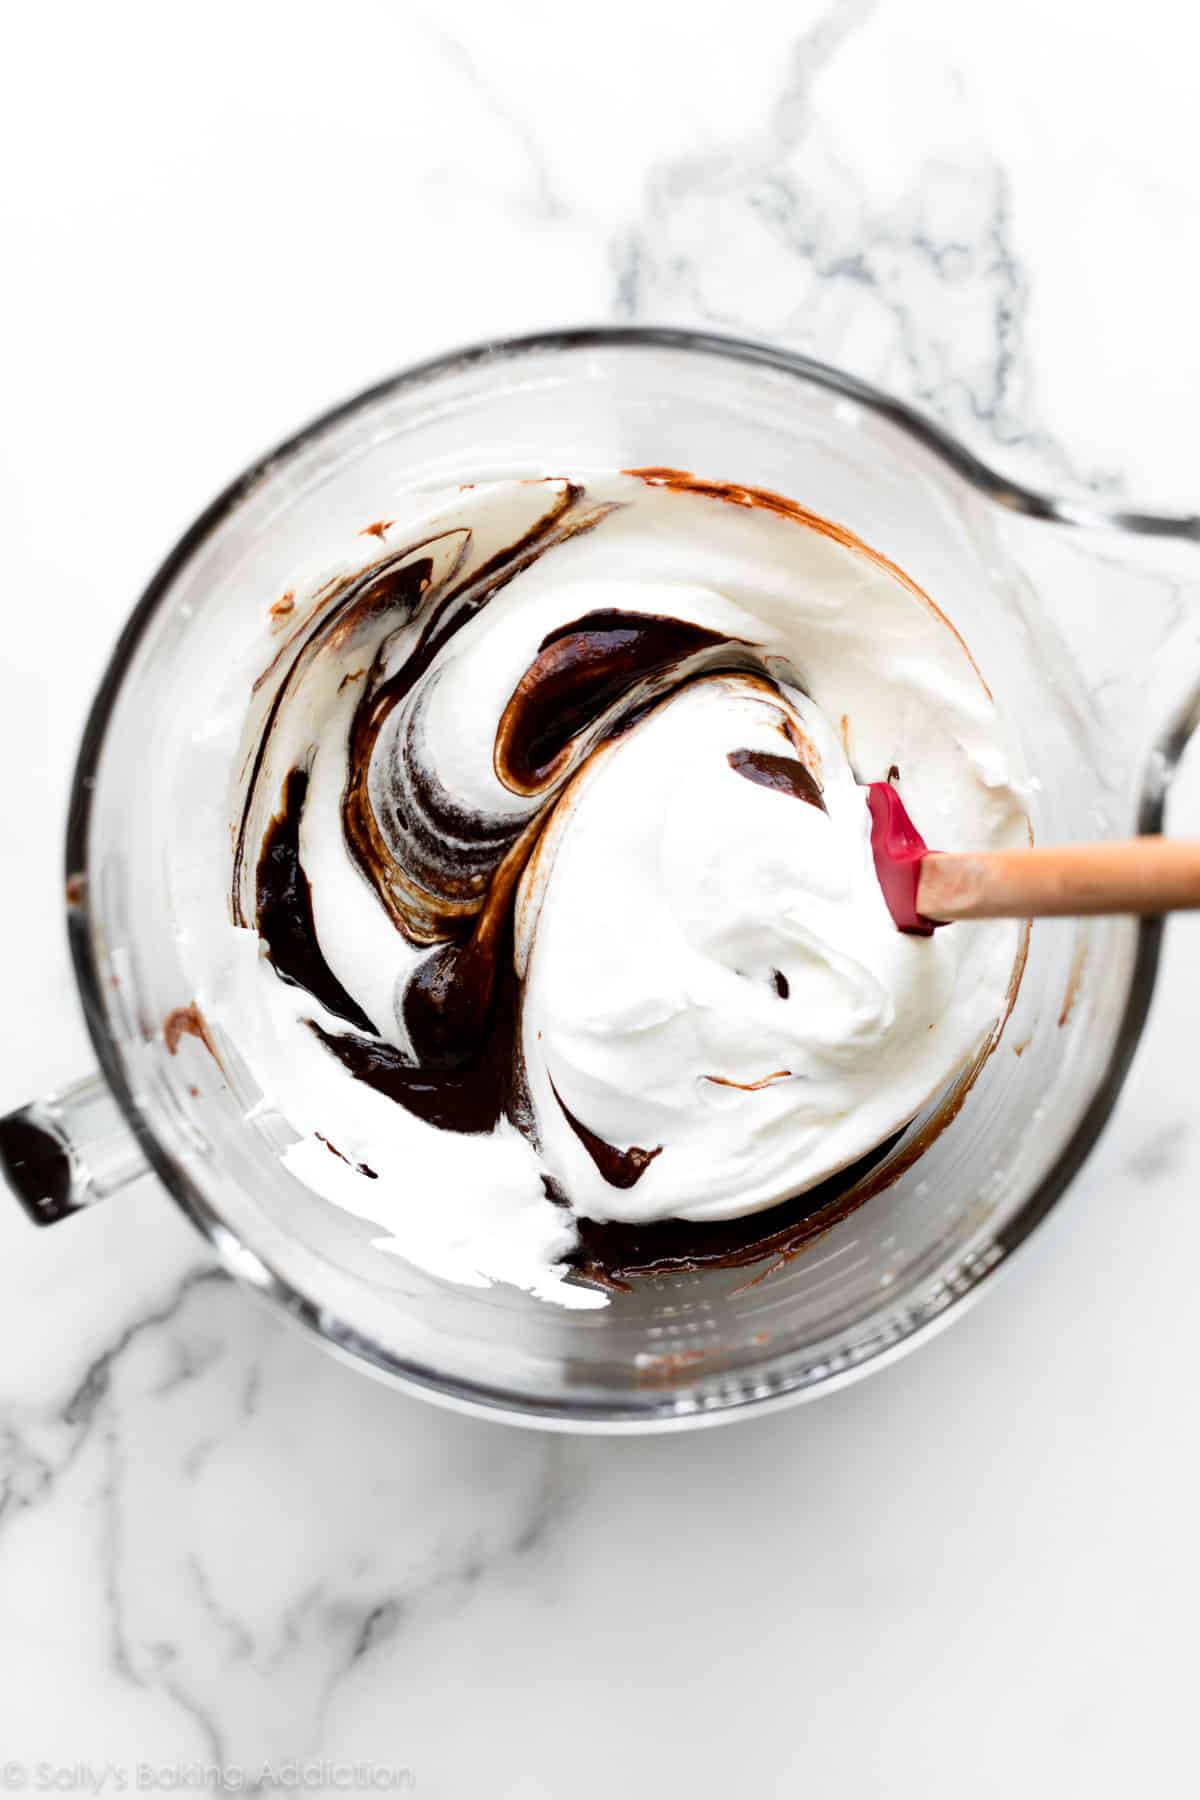
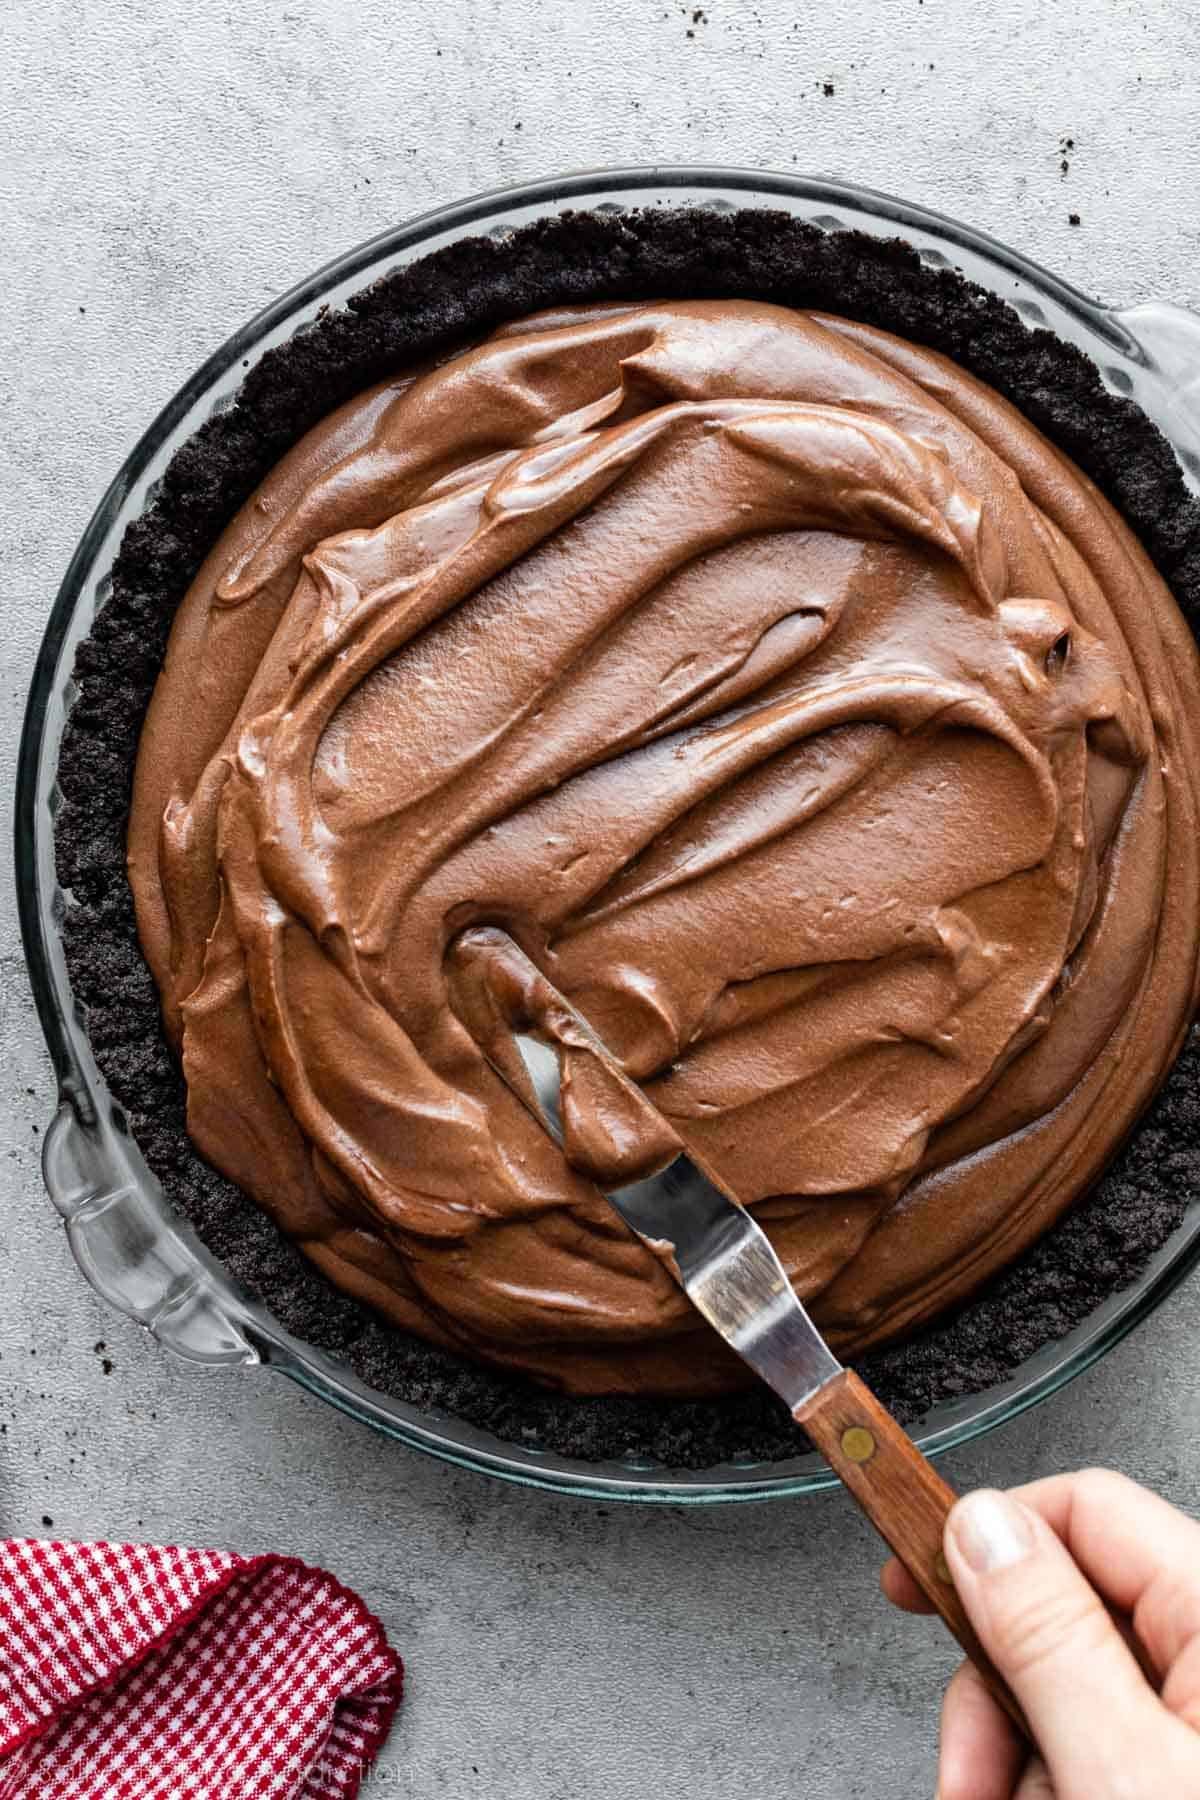
- Creamed Butter: Finally, cream room-temperature butter for a couple minutes with a mixer. While this is the last part listed, it’s actually the base of the entire filling. Mix vanilla extract into the creamed butter, then add the chocolate/egg mixture to the bowl, and beat for 3 minutes. Turn off the mixer and gently fold in the unsweetened whipped cream with a spatula.
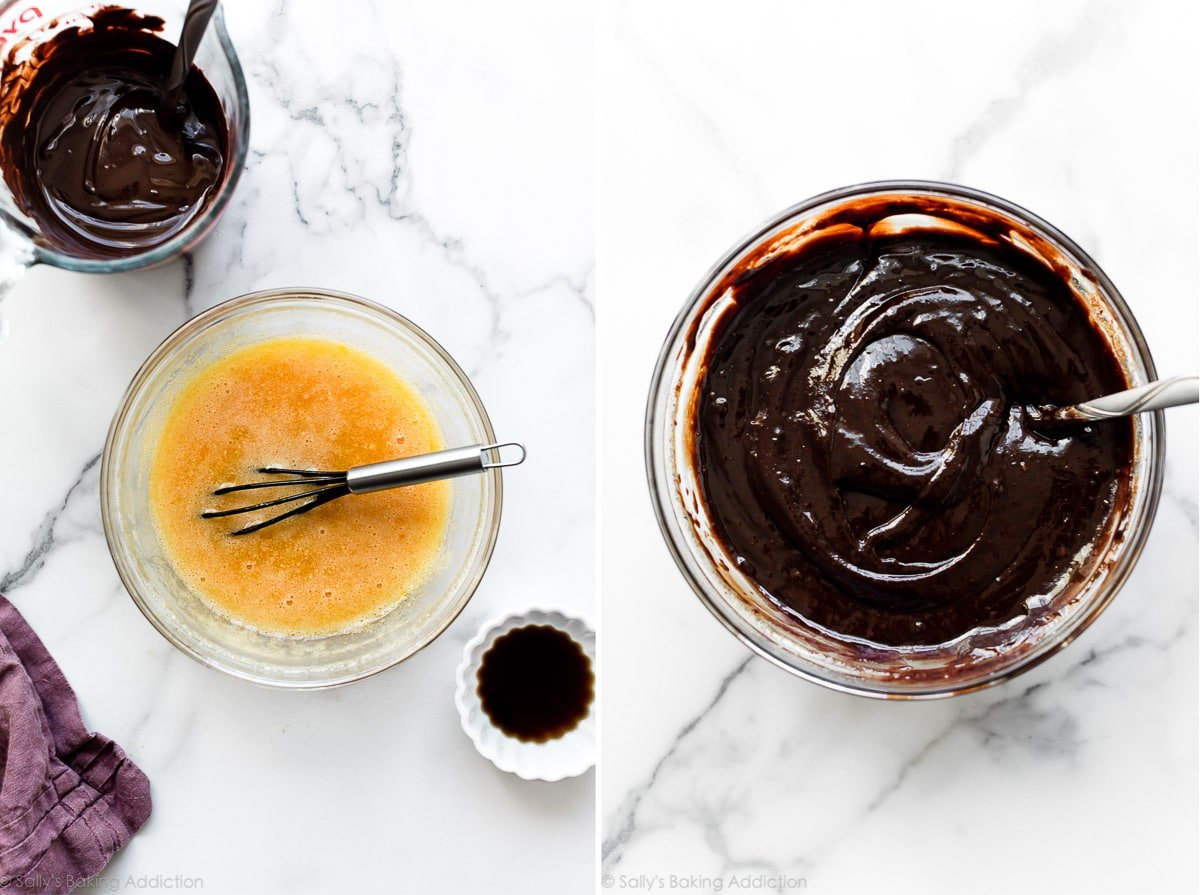
Above left: cooked eggs + sugar. Above right: combined melted chocolate and eggs.
Below left: creamed butter. Below right: creamed butter with the chocolate/eggs.
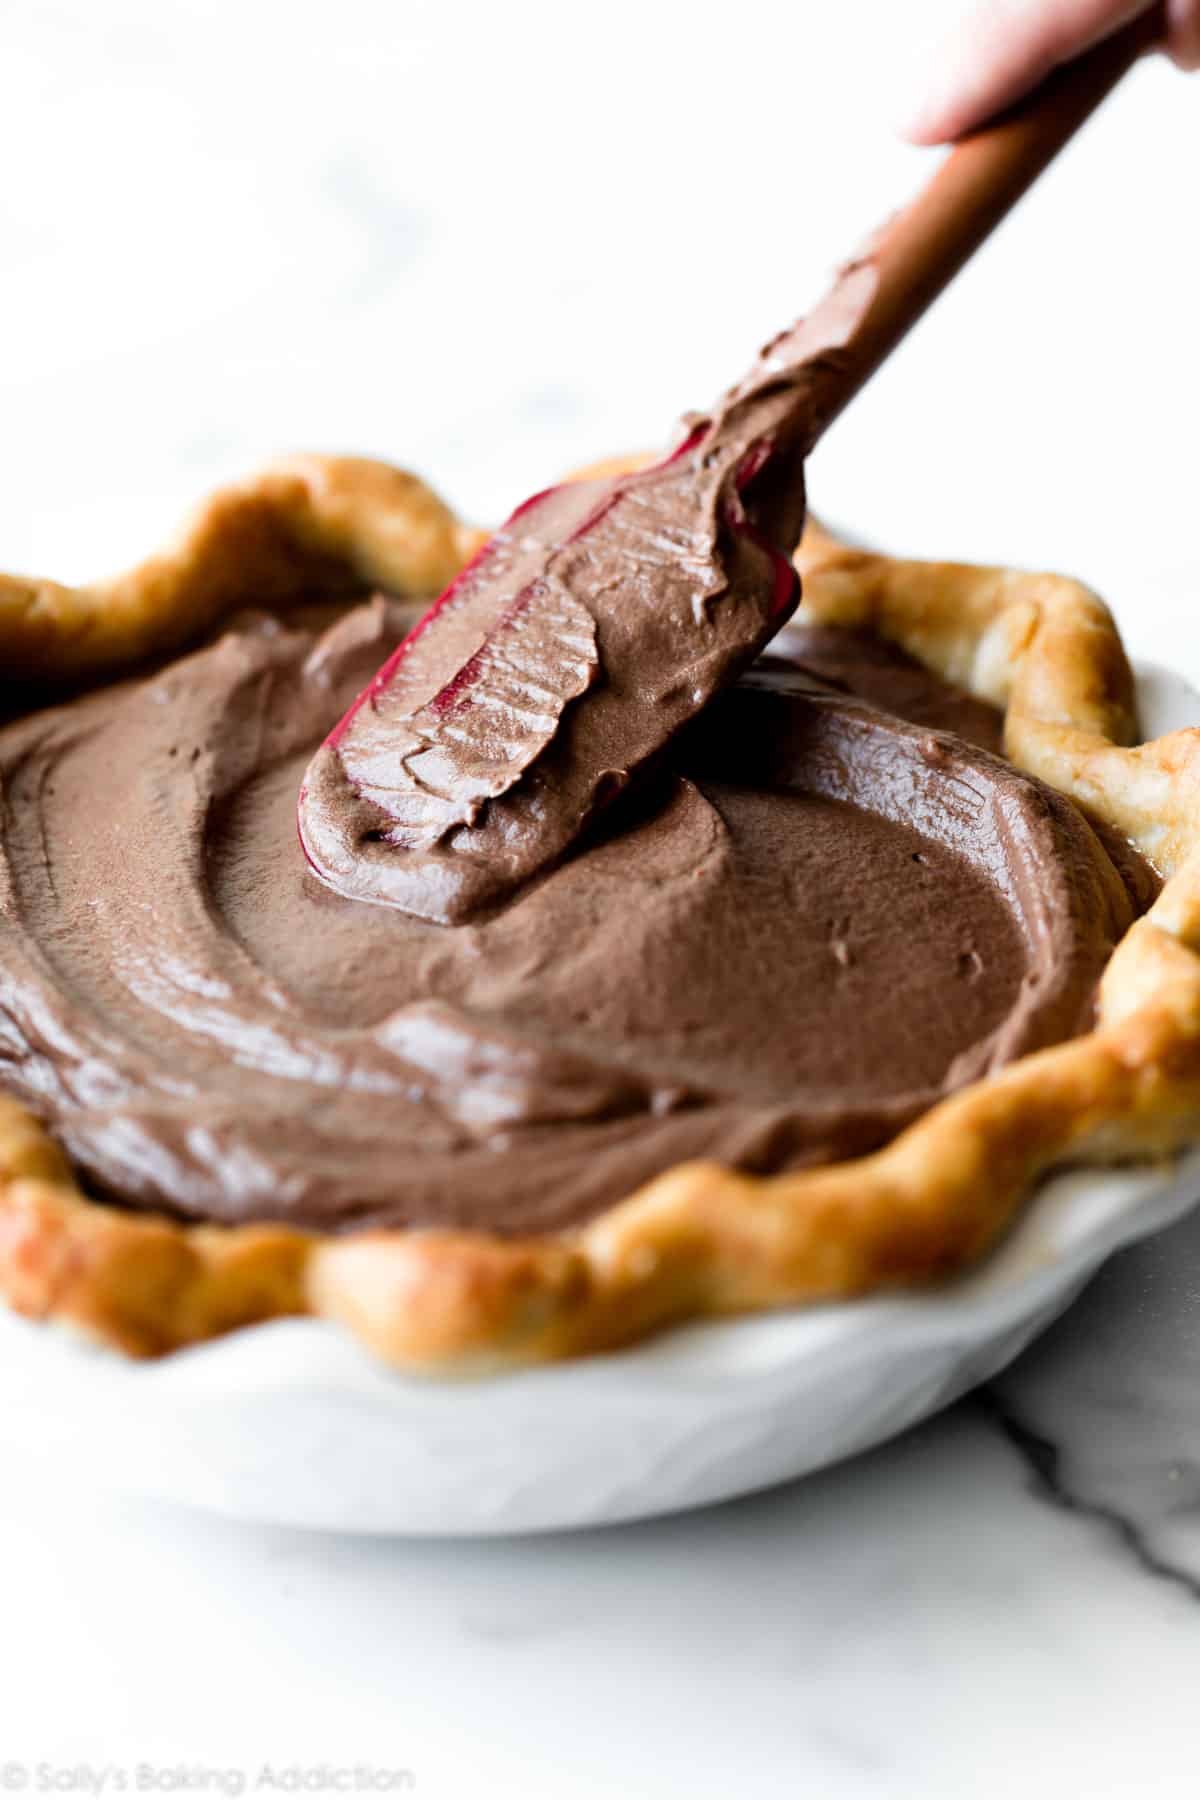
Finally, fold in the unsweetened whipped cream and spread into the cooled pie crust. Place the pie in the refrigerator and chill until the filling sets, about 4–6 hours.
This is an excellent pie to make a day ahead of time!
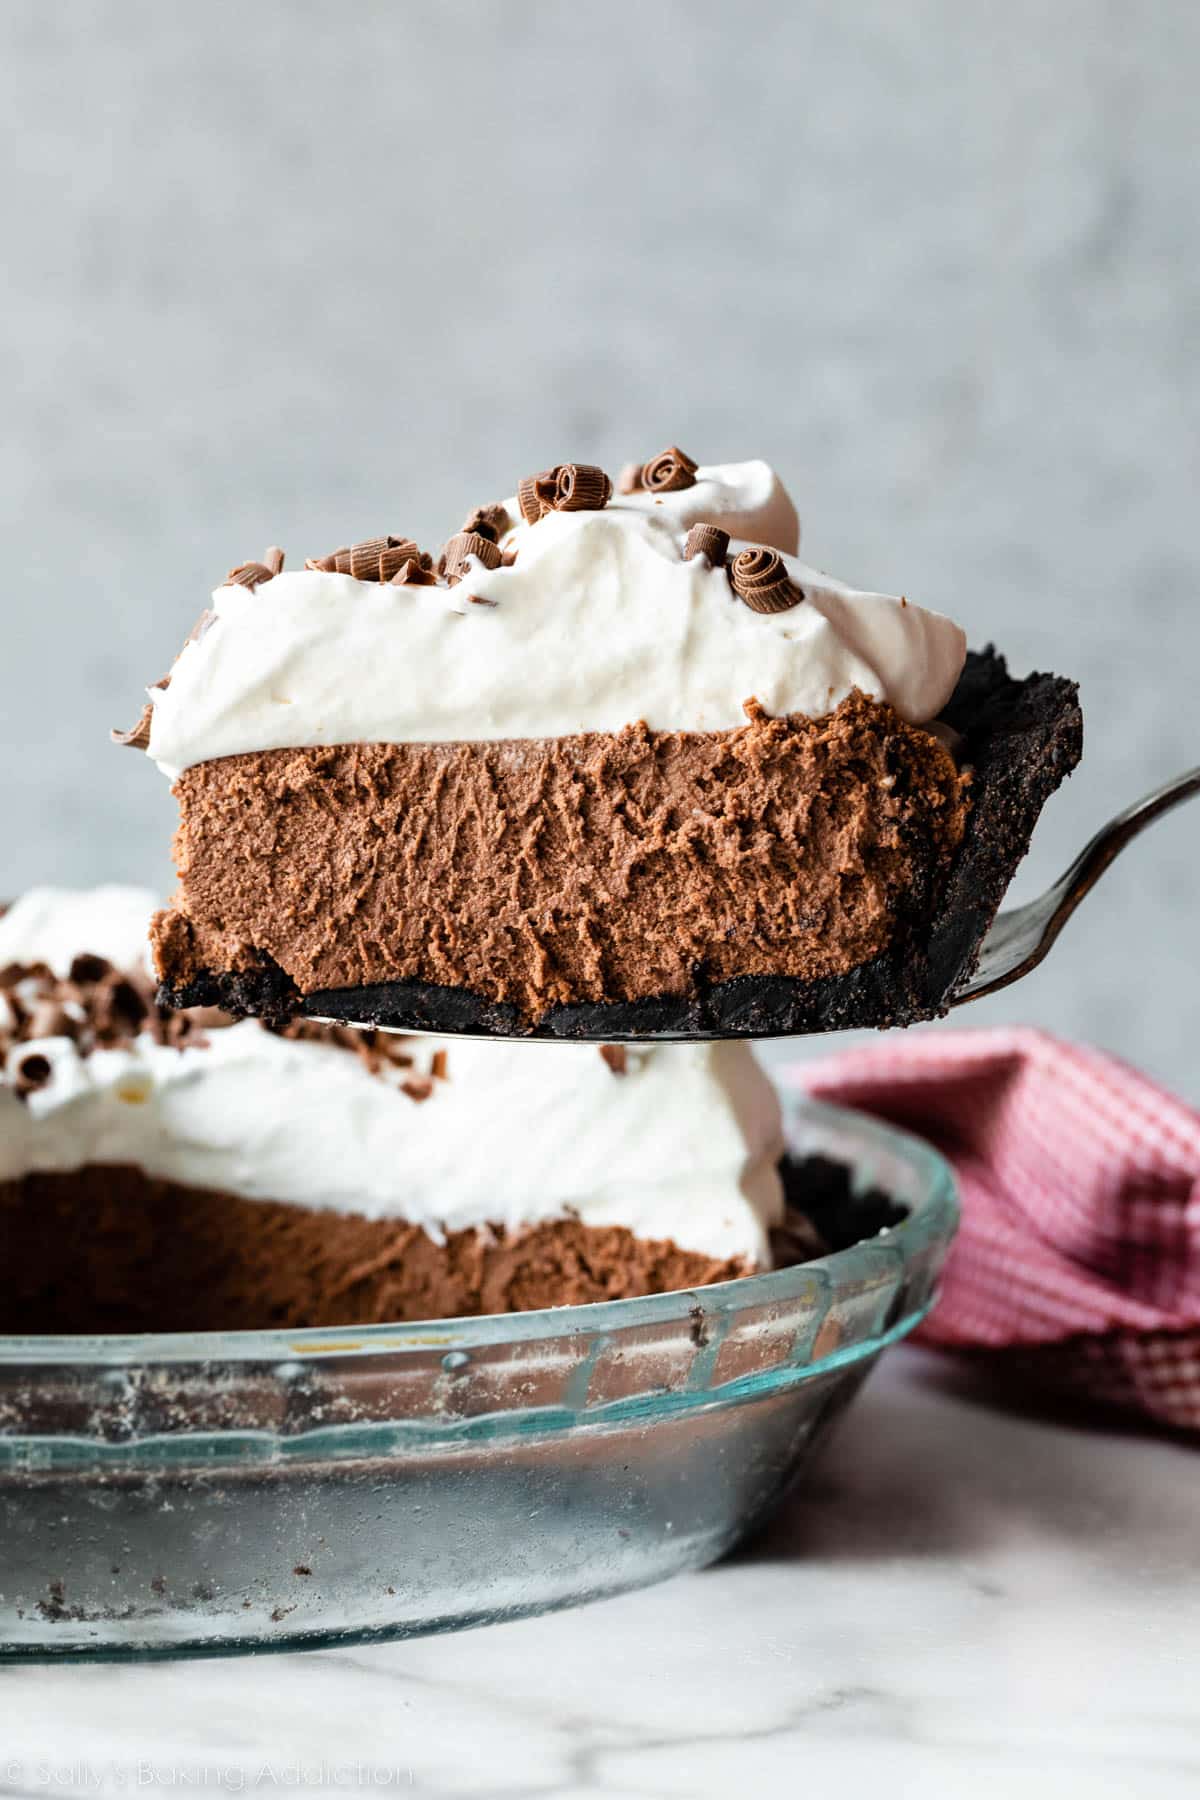
While I have a chocolate mousse pie recipe in my archives, I wanted to share a classic French silk pie. What’s the difference? The mousse pie sits in a delicious Oreo cookie crust and has a sky-high, super thick, airy mousse filling. This French silk pie, however, is served in a traditional pie crust and has a much richer, smoother filling. (Truthfully though… you can’t go wrong with either chocolate pie!)
Use Heavy Cream Again for Whipped Cream Topping
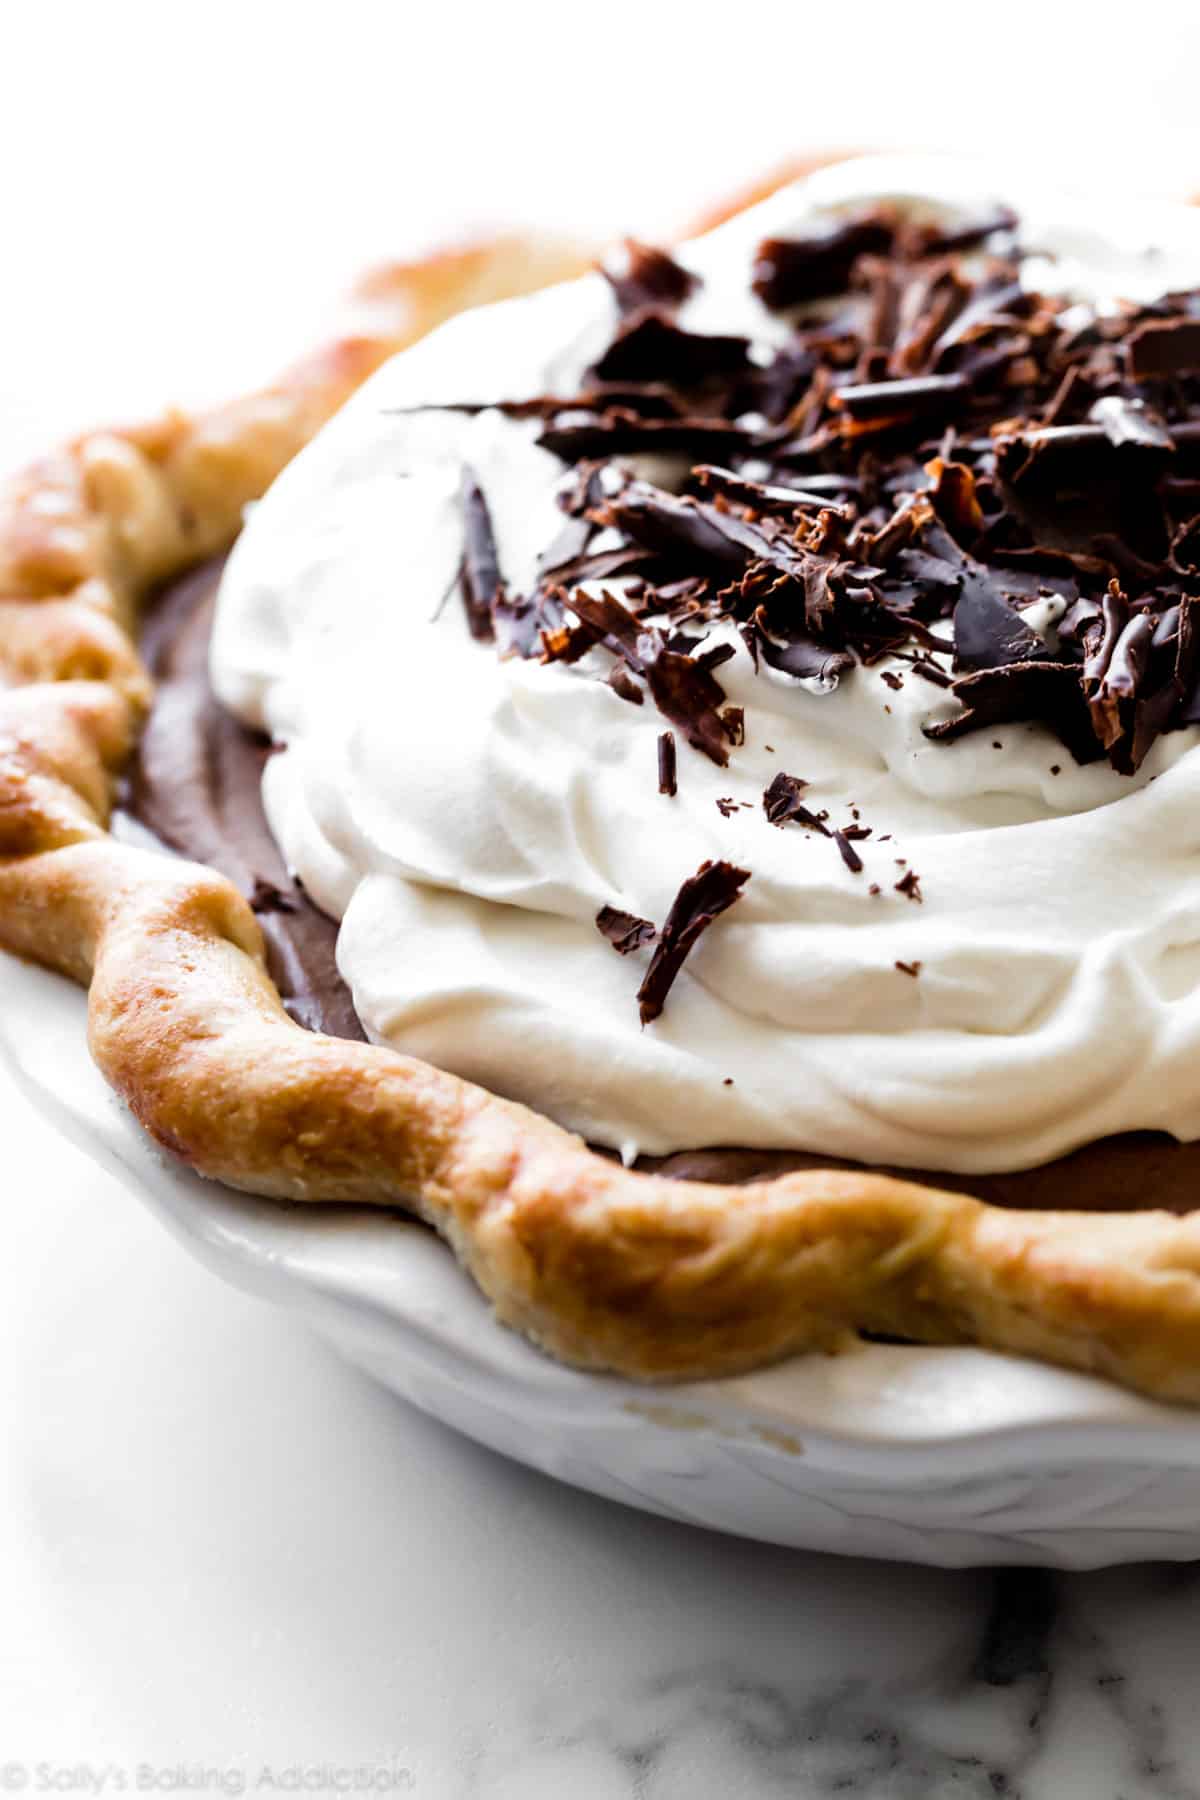
You need heavy cream for the filling AND the whipped cream garnish on top. Pick up a pint of heavy cream or heavy whipping cream and use 1 cup for the filling and 1 cup for the whipped cream on top. (We’re using my favorite vanilla whipped cream!) Finish it off with chocolate curls, mini chocolate chips, or even toasted coconut.
Today’s French silk pie is richer and sweeter, built on a traditional pastry pie crust with a velvety chocolate filling made from whole eggs and plenty of butter. My Sky-High Chocolate Mousse Pie is lighter and less sweet, made with an Oreo crust and an airy mousse structured with cooked egg whites and whipped cream.
Success Tips
- Review the recipe and notes: Since there’s a few different steps, my #1 success tip is to review the written instructions and recipe notes before you begin. Take your time with each step and you’ll be rewarded with chocolate pie perfection.
- Maintain a smooth filling: Make sure the egg mixture cools down before stirring in the chocolate. Then, make sure the chocolate/egg mixture cools down before mixing into the creamed butter. If these ingredients are still warm, the filling could curdle.
- No substitutions: To ensure the filling sets up properly and maintains the silky texture, I do not recommend any ingredient substitutions.
Or Try This With an Oreo Cookie Crust
Swap the pie dough for an Oreo cookie crust. No pie weights required! See recipe Note below for specific instructions.
This recipe is part of Sally’s Pie Week, an annual tradition where I share a handful of new recipes that fit into the pie/crisp/tart category. Join the community below!
Print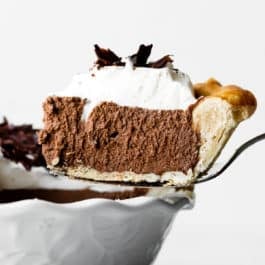
French Silk Pie
- Prep Time: 4 hours (includes dough)
- Cook Time: 40 minutes
- Total Time: 8 hours (includes chilling)
- Yield: one 9-inch pie
- Category: Desserts
- Method: Baking
- Cuisine: American
Description
This French silk pie features my perfectly flaky pie crust, a smooth chocolate filling, and whipped cream on top. Read through the recipe and helpful notes before beginning.
Ingredients
Crust
- 1 unbaked Flaky Pie Crust (what I used) or All Butter Pie Crust*
- egg wash for pie crust: 1 large egg beaten with 1 Tablespoon milk or heavy cream
Filling
- 1 cup (240ml) heavy cream or heavy whipping cream
- two 4-ounce quality bittersweet or semi-sweet chocolate bars (113g each), finely chopped*
- 4 large eggs
- 1 cup (200g) granulated sugar
- 3/4 cup (12 Tbsp; 170g) unsalted butter, softened to room temperature
- 1 and 1/2 teaspoons pure vanilla extract
Topping
- 1 cup (240ml) heavy cream or heavy whipping cream
- 2 Tablespoons confectioners’ sugar or granulated sugar*
- 1/2 teaspoon pure vanilla extract
- optional for garnish: chocolate curls*
Instructions
- Pie crust: I like to make sure my pie dough is prepared before I begin making this pie. Make pie dough the night before because it needs to chill in the refrigerator for at least 2 hours before rolling out and blind baking.
- Roll out the chilled pie dough: On a floured work surface, roll out one of the discs of chilled dough (use the 2nd pie crust for another recipe!). Turn the dough about a quarter turn after every few rolls until you have a circle 12 inches in diameter. Carefully place the dough into a 9-inch pie dish. Tuck it in with your fingers, making sure it is completely smooth. To make a lovely thick edge, I do not trim excess dough around the edges. Instead, fold the excess dough back over the edge and use your hands to mold the edge into a nice thick rim around the pie. Crimp the edges with a fork or use your fingers to flute the edges. (Review my how to crimp and flute pie crust tutorial if you need extra help with this step.) Chill the dough in the refrigerator or freezer for at least 30 minutes—this helps prevent the crust from shrinking.
- Preheat oven to 375°F (191°C).
- Blind bake the crust: Line the chilled pie crust with parchment paper. (Crunch up the parchment paper first so that you can easily shape it into the crust.) Fill with pie weights or dried beans. (Note that you will need at least 2 standard sets of pie weights to fit.) I like to push the weights up against the sides of the pie crust to help ensure the sides don’t shrink down. Bake until the edges of the crust are starting to brown, about 15–16 minutes. Remove pie from the oven and carefully lift the parchment paper (with the weights) out of the pie. Prick holes all over the bottom crust with a fork. If desired for a shiny golden crust, brush egg wash on edges. Return pie crust to the oven and bake for 14–15 minutes, or until bottom has browned. Remove from the oven, and cool on a wire rack completely before filling. You can blind bake the crust up to 3 days ahead of time. Cover cooled crust tightly and refrigerate until ready to fill. (Review this how to par-bake pie crust page if you need extra help with this blind-baking step.)
- Start the filling: Using a hand mixer or a stand mixer fitted with a whisk attachment, whip the heavy cream on medium-high speed until stiff peaks form, about 4 minutes. Stiff peaks hold their peak shape and do not droop. Set whipped cream in the refrigerator (covered or uncovered, doesn’t matter) until step 8. Melt the semi-sweet chocolate. You can melt it in a double boiler or the microwave. If using the microwave: place the chopped chocolate in a medium microwave-safe bowl. Microwave in 20-second increments, stopping and stirring after each increment until completely melted and smooth. Set aside until the end of the next step.
- Cook the eggs: Whisk eggs and sugar together in a heatproof bowl or the top piece of a double boiler. Place over a pot of simmering water (or the bottom part of your double boiler) on medium heat. Do not let the surface of the simmering water touch the bottom of the heatproof bowl. Whisking constantly, cook the egg mixture until it reaches 160°F (71°C) on an instant-read thermometer, about 10–11 minutes. If the steam gets too hot over your hand, use an oven mitt. (If you do not have an instant read thermometer, lightly and quickly dip your finger—it’s very hot, be careful—and rub the mixture between your thumb and finger. You shouldn’t feel any sugar granules.) Carefully remove from heat and allow to cool for 10 minutes. After cooling, slowly stir in the melted chocolate. To prevent curdling, cool for another 10 minutes before using in the next step.
- Using a handheld or a stand mixer fitted with a paddle attachment, beat the butter on medium-high speed until creamy, about 1–2 minutes. Add the vanilla and beat on medium-high speed for 30 seconds. Scrape down the sides and up the bottom of the bowl. With the mixer running on low speed, pour in the chocolate/egg mixture and then increase to medium-high speed and beat for 3 minutes. With a silicone spatula, fold in the whipped cream until combined.
- Spread filling into cooled pie crust. (A small offset spatula is helpful for this.) Cover tightly with plastic wrap and refrigerate for at least 4–6 hours or overnight, until chilled and thickened. Pie may be refrigerated for up to 2 days before serving.
- For the whipped cream topping: Using a handheld or a stand mixer fitted with a whisk attachment, whip the heavy cream, sugar, and vanilla extract on medium-high speed until medium peaks form, about 3–4 minutes. Medium peaks are between soft and stiff peaks, and are the perfect consistency for topping and piping on desserts. Pipe or spread the whipped cream on top. Garnish with chocolate curls (see Notes), if desired. Serve immediately, or chill the pie uncovered for up to a few hours.
- Cover leftovers and store in the refrigerator for up to 5 days.
Notes
- Make Ahead & Freezing Instructions: The pie dough can be prepared ahead of time and stored in the refrigerator for up to 5 days or in the freezer for up to 3 months. There are plenty of ways to make this recipe ahead of time. See end of steps 5 and 9. You can also freeze the pie after step 8. Cover with an extra layer of plastic wrap before freezing. Freeze for up to 3 months. Thaw in the refrigerator prior to topping with whipped cream and serving.
- Special Tools (affiliate links): Rolling Pin | 9-inch Pie Dish | Parchment Paper | Pie Weights | Pastry Brush | Cooling Rack | Electric Mixer (Handheld or Stand) | Double Boiler | Whisk | Instant Read Thermometer | Silicone Spatula | Small Offset Spatula
- Update in 2022: This recipe used to call for 1 cup of butter as well as creaming half of the sugar with the butter. After further testing and feedback from readers, the recipe now uses 3/4 cup (170g) butter in the filling and all of the sugar is now cooked with the eggs.
- Pie Crust: Both linked pie crust recipes make 2 crusts. You only need 1 crust for this pie, so freeze the 2nd half for another use. If using store-bought pie dough, you still need to blind-bake it. If needed, you can use a graham cracker crust or Oreo cookie crust instead of traditional pie crust. Pre-bake either cookie crust at 350°F (177°C) for 12 minutes. No need for pie weights if using a cookie crust. Cool completely before filling.
- Chocolate: Filling will only set if the correct chocolate is used. I recommend using pure chocolate baking bars. You can find them right next to the chocolate chips in the baking aisle. They are sold in 4-ounce bars. I like Baker’s or Ghirardelli brands. I use and recommend semi-sweet chocolate, but you can use bittersweet or even unsweetened chocolate for a darker flavor.
- Sugar in whipped cream: Some bakers swear by granulated sugar in whipped cream; others swear by confectioners’ sugar. If you’re only working with a couple Tablespoons of sugar as listed in the recipe above, it doesn’t really make a difference. Use either.
- Garnish: You can leave the whipped cream on top plain or sprinkle with chocolate curls or shavings, mini chocolate chips, or chocolate sprinkles. To make chocolate curls, run a vegetable peeler down the side of a Hershey’s milk chocolate bar (or similar chocolate bar).


Reader Comments and Reviews
This was incredible!!
I’m glad I didn’t read the comment – I didn’t have any trouble whatsoever with graininess or crunchy sugar. I trust Sally’s well thought out recipes 100% and this was no different. Silky smooth melt in your mouth texture that got rave reviews and was the stand out at a pie themed get together.
Made with her all butter pie crust. Thank you!!!
I made this for Father’s day yesterday, it was big a hit! Thanks again Sally for yet another great recipe with easy to follow steps. We did find it a bit too sweet and I also had the same problem as another reviewer with a subtle crunch in from the granulated sugar . I’m assuming as well it was from whipping the room temp butter with the granulated sugar. Mine whipped up nice an fluffy but I guess I should have checked it before adding everything else to it. That being said nobody else noticed or said anything. I’ll make it again for sure, maybe less sugar next time.
Did you use room temperature butter? It has to be soft enough to cream and fully process the sugar, that’s the key. Otherwise there could be that graininess. This takes more than just mixing together
I made this exactly as the recipe shows. I found this pie to be very creamy and rich. It’s a few steps but well worth it. I will keep this recipe.
I accidentally used half the chocolate called for but the filling was fabulous and enough chocolate flavor for everyone who ate it. I also, by mistake, added all the sugar to the egg mixture. The filling was very smooth and creamy! Sometimes mistakes pay off!
The filling is all I can comment on because I used a different crust recipe. The filling was a huge hit! I made it for Easter and everyone loved it. It is a very advanced recipe but it’s doable if you have some experience and patience. Very rich also. Only need a small piece. I will make it again.
I have a 12″ pie plate that is 2.5″ deep. What adjustments to your recipe do i need to make to fill it up with the chocolate filling??
It took a while to make, but it was worth it! I made it for my little sister for her birthday and she liked it 🙂
I am so sorry for the above comment.. I realized that the grittiness goes completely away once the pie is set! Folks said it was the best French silk pie they’d ever had. Excellent recipe! Thank you!
The pie filling looked good at first but then started to look oily or separate – wonder which step I messed up?
Hi Sandra, We are happy to help troubleshoot. Did you make any ingredient substitutions or stray from the directions in any way? Be sure you are using heavy cream whip until stiff peaks (don’t over beat or it will look broken and curdled). Also be sure to use real chocolate (not chocolate chips) and give yourself enough time to let your melted chocolate and cooked eggs cool down enough before combining them.
Impressive and delicious! I overwhipped the heavy cream for the filling so that component was a little dense (I put the whisk and bowl of my Kitchenaid stand mixer in the freezer for a while before whipping and cranked it up to seven for four minutes), but it was still so, so good. The eggs cooked much faster than I anticipated (about four minutes; I used a metal mixing bowl over simmering metal pot on a gas stove that runs hot), but I had my food thermometer close by so it was not an issue. Will definitely make again and keep a close eye on the cream and eggs! Thanks Sally!
I have made this 4 times now! We love it. I will say that after the first time I started making it with a pretzel crust that I think REALLY takes it to the next level and adds a nice salty crunch with it. Because I saw some people comment about having some grit problems I have always to make heated the full cup of sugar with the eggs in step 7 (instead of a half a cup). That way all of the sugar is dissolved with the heating and there is no grit. It’s always turned out perfectly smooth for me using this method.
I think overall the taste of this pie is spectacular. My only observation is that personally, I prefer to leave the pie at room temperature for 20 min or so, prior to serving. I find the pie is too firm right after chilling and too “ice cream like”. Now, my husband kind of prefers that ice cream texture but I find the pie is much more smooth and creamy if the filling is allowed to warm up, and actually mimics the pies we have had from Bakers Square (who make a fabulous French Silk)
Would it be possible to reduce the butter amount so the chilled texture of the pie is not so firm…? Would the pie still retain its shape…? Thx!
Hi Paula, thank you for the feedback– reducing the butter will absolutely help soften the filling. I would try 3/4 cup (1 and 1/2 sticks; about 170g).
We made this for Thanksgiving and loved it! We wanted to make it more chocolatey and less sweet, but don’t want to mess with the amazing texture…any suggestions?
Hi Laura, for next time, you can use bittersweet or even unsweetened chocolate for a darker flavor. So glad you enjoyed this one!
I am an experienced home baker and loved this recipe. You do need to follow the steps carefully. I was making two pies for Thanksgiving ( I made eight total pies for TD, several kinds. Made all the crusts week before and froze).
I used Trader Joe’s chocolate in the big bar.
As I was reading and rereading ingredients on my phone I mistakenly only used 1/2 the amount of chocolate. However the pies were fabulous, texture perfect and my friends and husband loved them.
Definitely a keeper recipe. Thanks
This was very fun to make and everyone at thanksgiving absolutely loved it. Thanks so much for sharing your recipe!
Excellent recipe! The pie turned out great and got rave reviews. As others have noted, the filling tasted grainy from undissolved sugar granules at first but after chilling overnight the graininess was completely gone leaving a silky smooth filling.
I made this pie exactly to directions and used Sally’s pie crust recipe. The pie crust gets five stars. Family loved this pie. It certainly is a great deal of work. For me, it was a little sweet, I would probably put a little less sugar in if I made it again.
Same issue with granulated sugar not dissolving. For amount of effort it’s not perfect and won’t make again.
Hi Sally! I’m making this recipe for thanksgiving and I bet it’ll be delicious! What can I use instead of pie weights?
Hi Jill, we recommend doing a quick google search for some alternatives. Some common ones I’ve seen are dried beans or dry rice. Enjoy!
Great recipe!! Easy and fun to make, sets up beautifully! Also thanks for a recipe without the raw eggs!!
Can you use Splenda instead of granulated sugar?
Hi Diane! We’d love to help but we are not trained in baking with sugar substitutes. For best taste and texture (and so you don’t waste your time trying to adapt this recipe since it may not work properly), it may be more useful to find a recipe that is specifically formulated for sugar substitutes. Thank you!
I have a prepared graham cracker crust that I need to use. Do you think I could make the filling and put in that crust?
Hi Michelle, this should work just fine in a graham cracker crust. You may have a little bit of excess filling, since prepared crusts are usually in smaller pie pans. Hope you enjoy it!
I only have a 9.5 inch pie pan. Will this recipe still work for me?
Hi Ana, that should work just fine. Hope you enjoy this pie!
Hi Sally!!
What depth pie pan do you recommend for this filling amount?
2”? 1.5”?
Thanks,
Morgan
Hi Morgan, Our favorite pie dish is about 1 and 3/4 inches deep – 1 and 1/2 or 2 inches should all work as well!
In other recipes I’ve seen, they whip the eggs until fluffy, then mix in the melted chocolate. Does this make it lighter? Would it do the same in your recipe considering the eggs are cooked?
Hi Sarah, we recommend following the recipe as written for our tried and tested results!
Hi! I’ve made this a few times and it’s DELICIOUS however I can’t quite get the sugar to dissolve so there’s always a little crunch from the granulated sugar. Is it possible to use powdered sugar instead to make the texture smoother? Thanks for any feedback!
Hi Lindsey, powdered sugar wouldn’t be ideal for this recipe. You could try making your own superfine sugar by pulsing granulated sugar in a food processor before using in this recipe. The smaller granules will dissolve easier. Hope this helps!
For this to be a “silk” pie I need the sugar to dissolve! The tip about using a food processor to make the granules smaller should be included in recipe.
I followed the recipe as written and there was no graininess at all when it had set.
I put all the sugar in the eggs by accident and heated it and it worked out great. No grittiness.
Excited to try this for Thanksgiving! Should this be taken out of the fridge for any amount of time before serving? It’s my first time trying this pie and I would hate for it to be too hard (or soft) at dessert time.
Hi Krista, you can serve the pie immediately from the refrigerator (after the mandatory chill time in step 9). Hope it’s a hit!
The pie turned out very well for me. I thought taking the risk out of raw eggs was well done, and I’m planning use that method on other recipes. A thought, I would prefer a more optimized recipe. For example, beating the cream and putting that in the refrigerator first, but after you cook the eggs to 160 degrees, there are two 10 minute cool down waits. Far better to fit in the other tasks, like beating eggs in those 10 minute windows.
I made this with a mix of Bakers unsweetened chocolate and Trader Joe’s milk chocolate from the big bar. Came out great but was wondering if I could use Lindt 70% bars?
Worth the many steps. Planning to add this to the standard Thanksgiving pies.
I used the 70% Lindt chocolate and it worked beautifully
Question: is the purpose of cooking the eggs to make this pie safe or is it necessary for the pie’s consistency? I was wondering if I could simply use pasteurized eggs and not cook them. What is your advice? Thanks!
Hi Chelsea, You can use pasteurized eggs and skip the cooking step! Enjoy.