

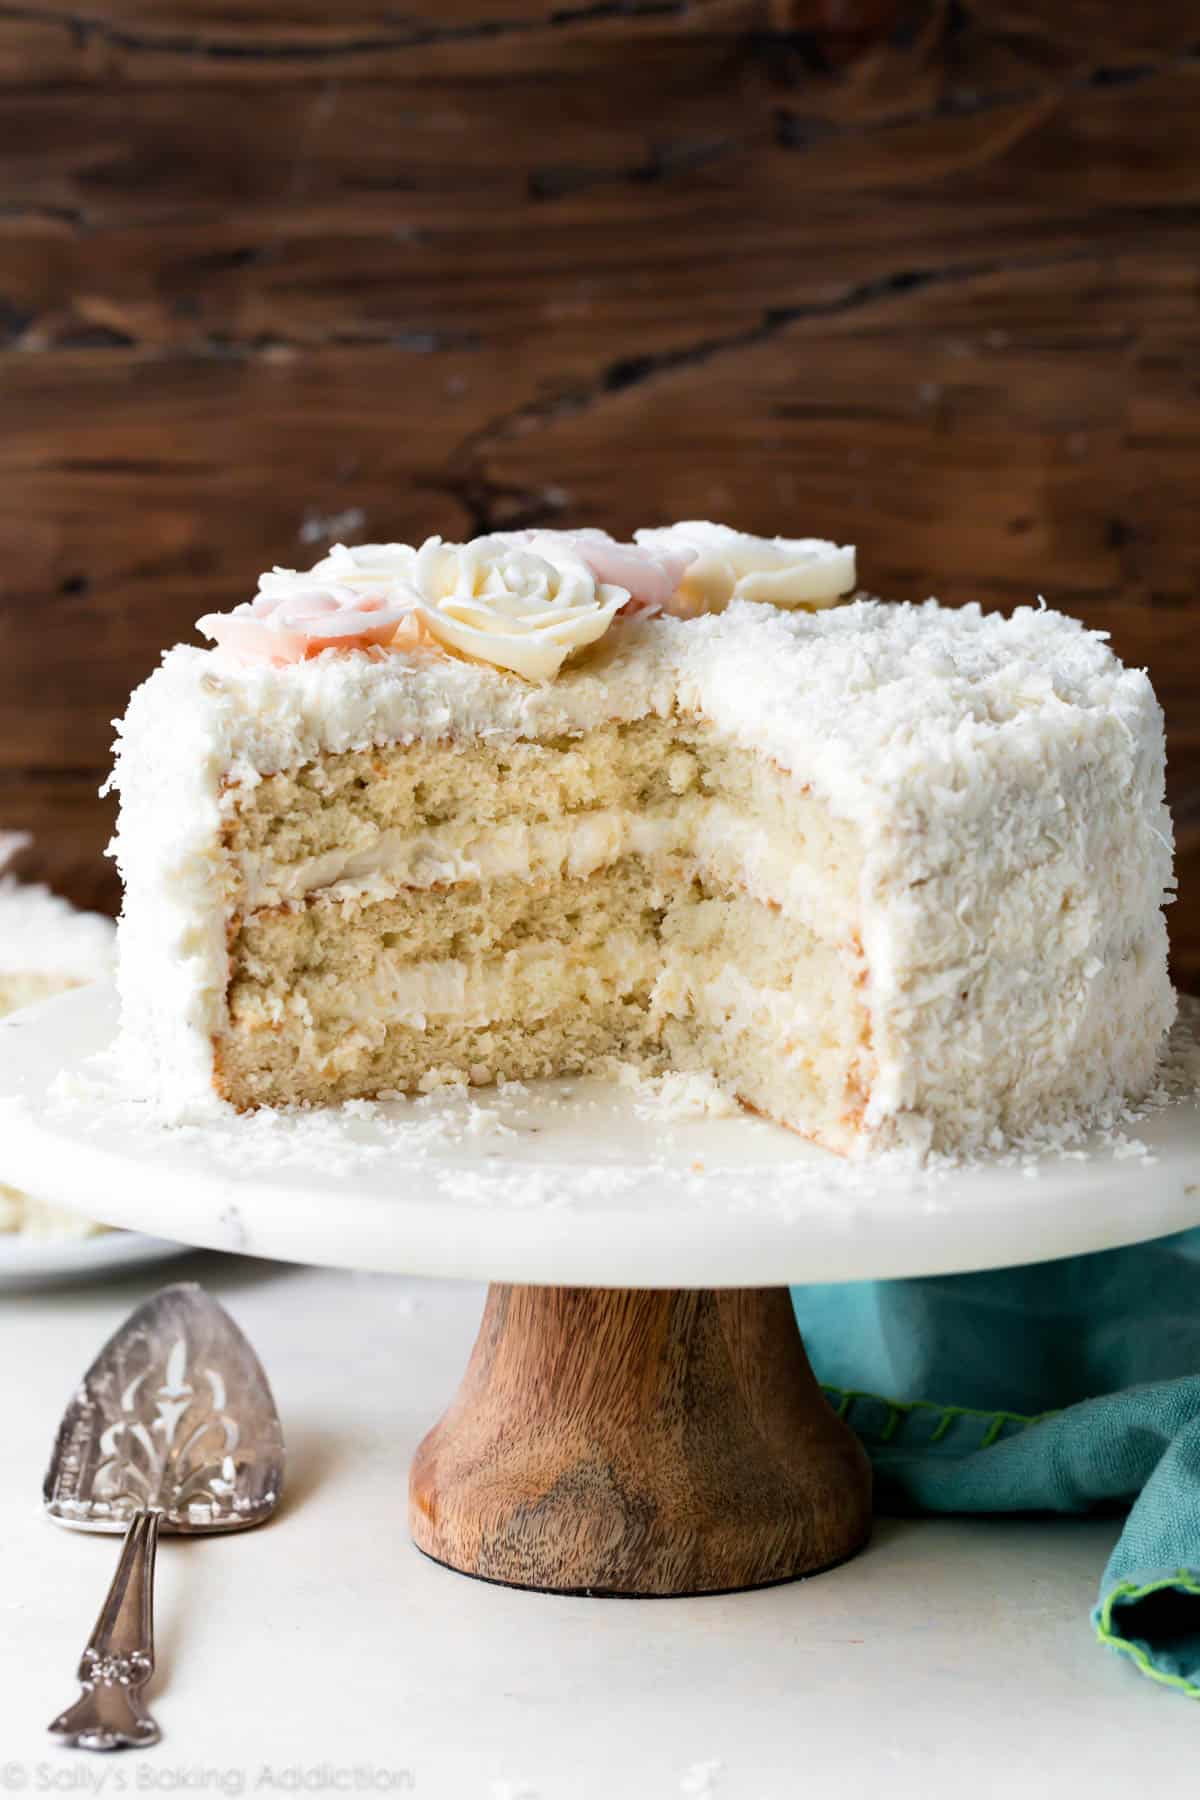
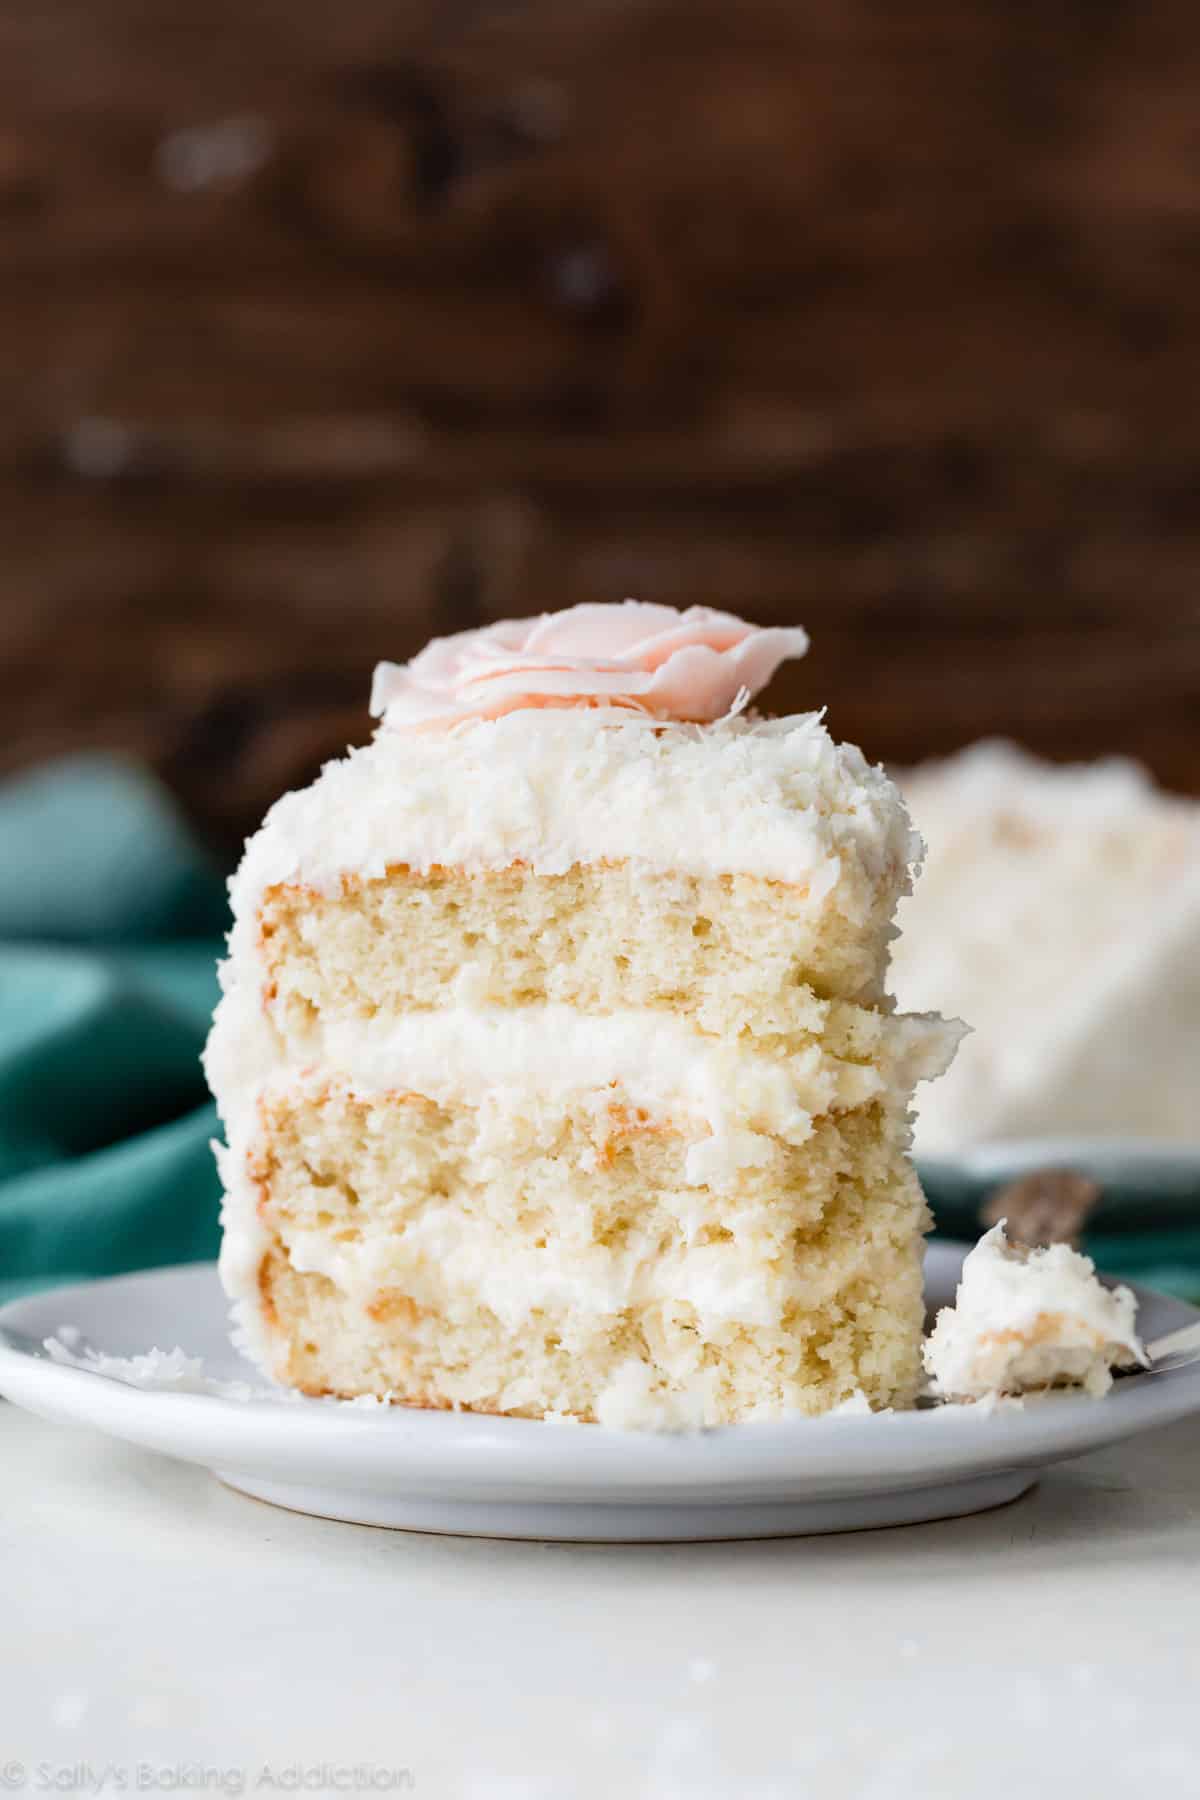
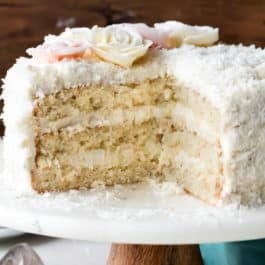
This perfect coconut cake sets the bar for homemade cakes everywhere. It’s supremely moist with a soft fluffy crumb and intense coconut flavor. To ensure success, follow this recipe carefully including using cake flour, egg whites, sour cream, and canned coconut milk.
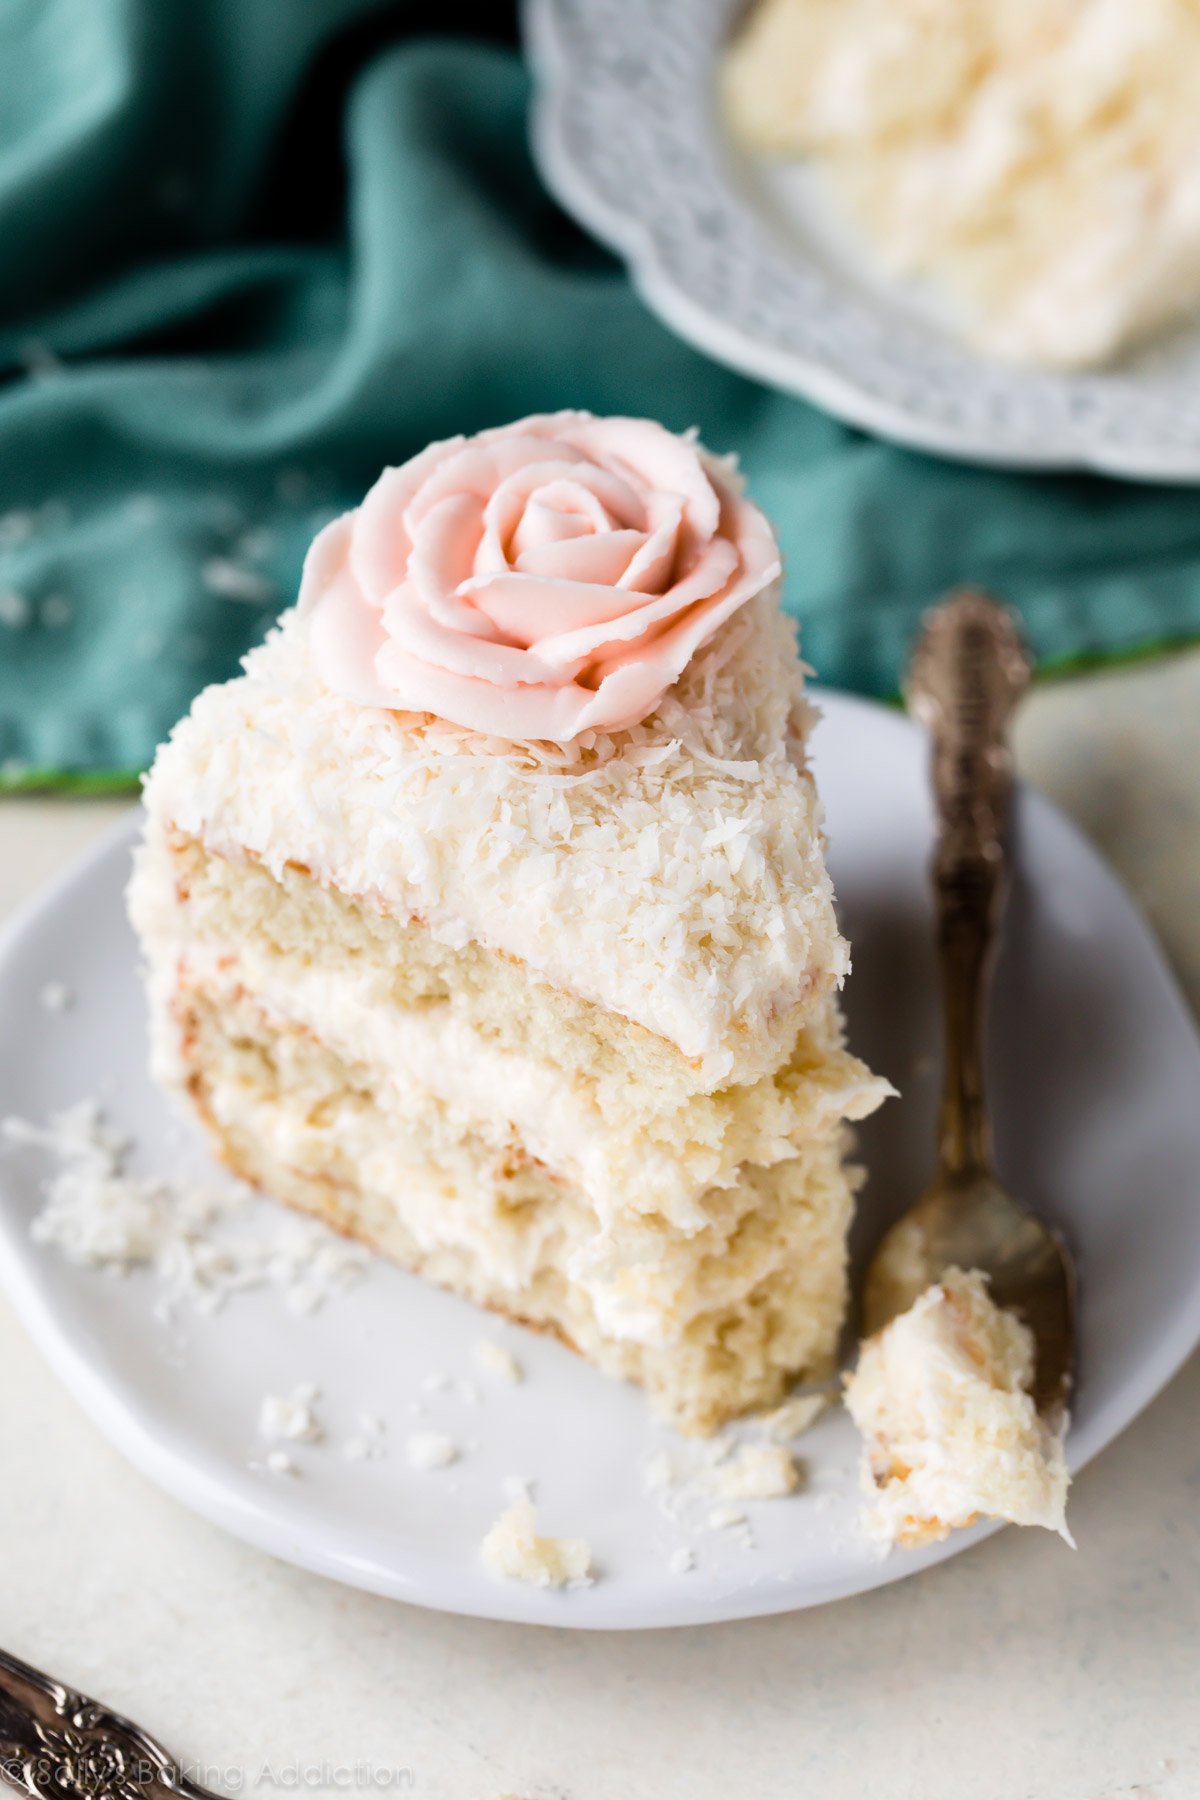
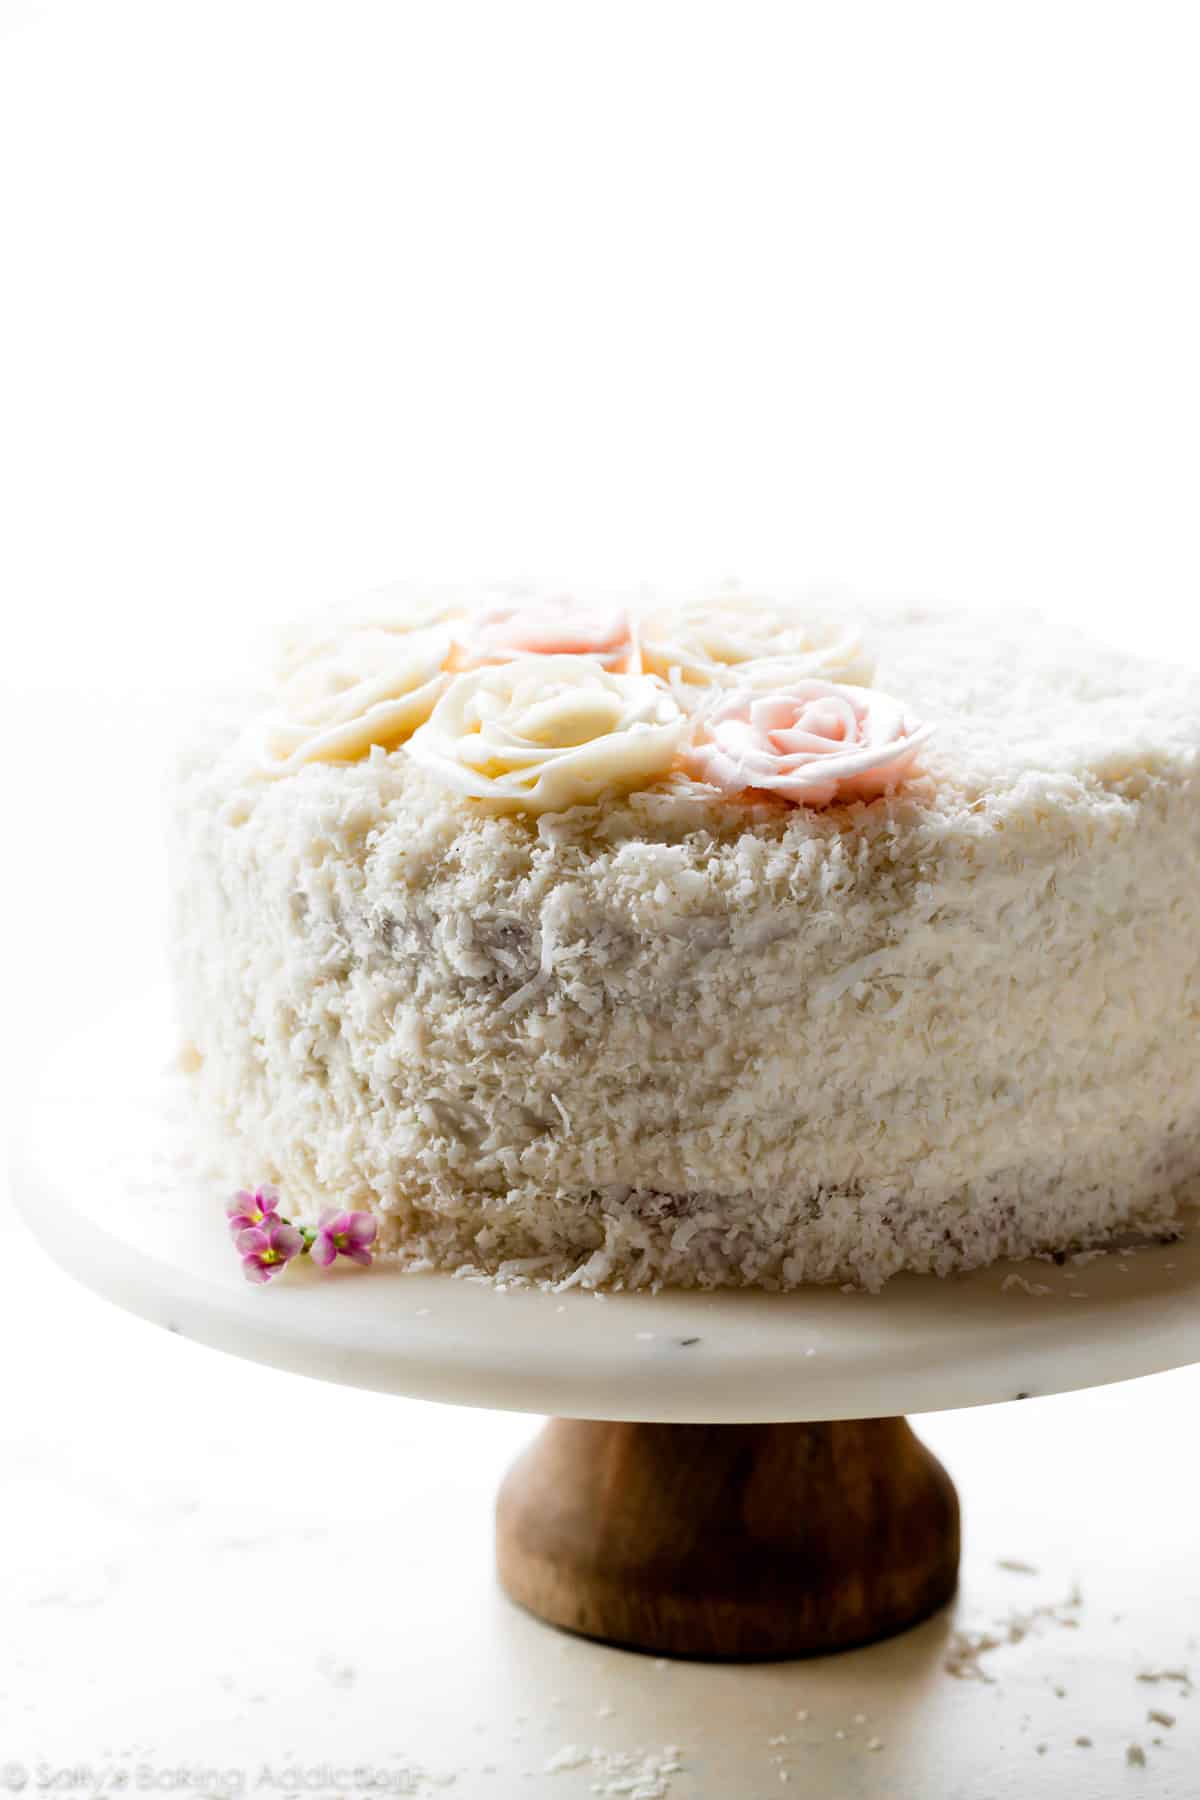
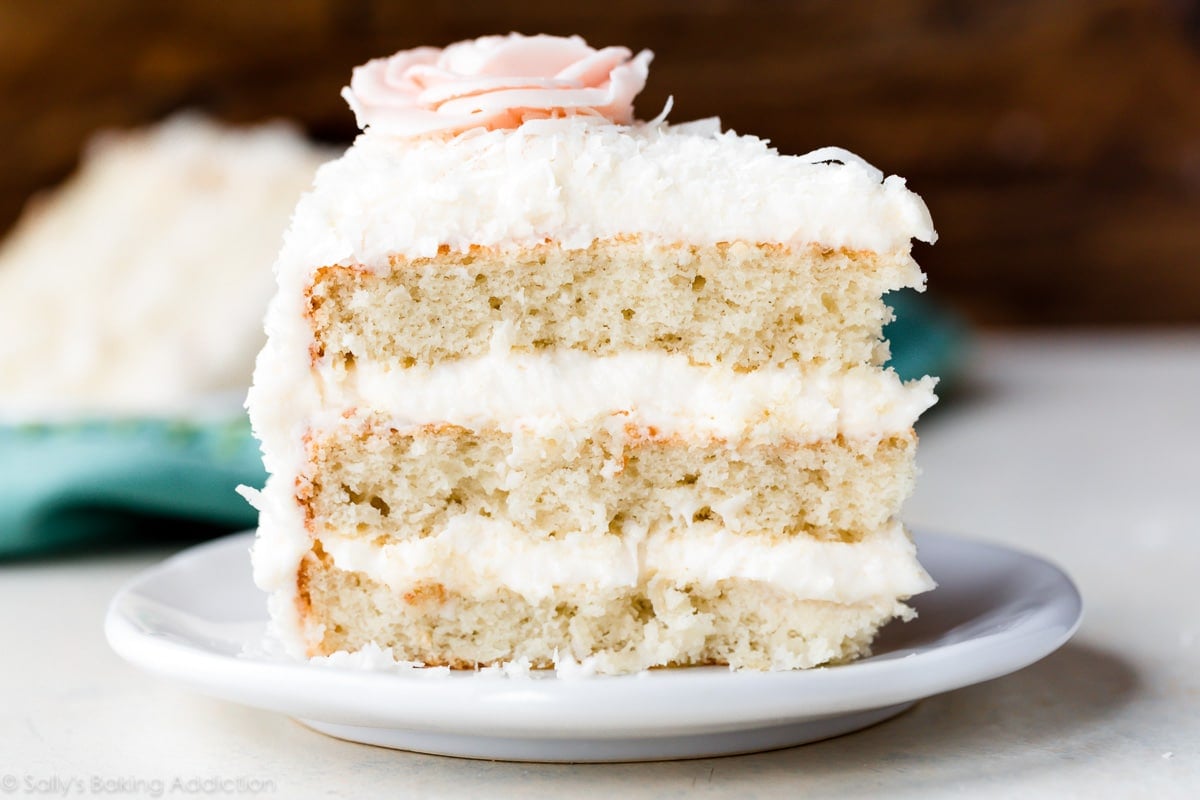
At the request of many readers, let me introduce you to the best coconut cake I’ve ever had. Homemade with love for coconut lovers everywhere, this cake exceeds my expectations. Complete with silky coconut cream cheese buttercream, she’s absolutely perfect and juxtaposes bold flavor with a light crumb.
I endlessly tested this cake recipe. In fact, I’m pretty sure my head turned into an actual coconut during the process. Is there shredded coconut caked into the crevices of my kitchen floor and backsplash? Yes.
5 Reasons to Love This Coconut Cake Recipe
- Not Dry: This coconut cake is mega moist. There’s no point wasting your time (or calories!) on dry cakes.
- Intensely Flavorful: Using coconut milk, shredded coconut, and coconut extract, you are guaranteed an intensely flavorful coconut cake.
- Soft & Fluffy: By following the recipe carefully, as well as using the power ingredients described below, you are guaranteed a soft-as-silk coconut cake crumb.
- Any Shape: Use this cake batter for coconut Bundt cake, coconut cupcakes, a 2-layer cake, 3-layer cake, or a coconut sheet cake.
- Gets Along With Everyone: Use the frosting recipe below or try strawberry frosting, lemon frosting, brown butter cream cheese frosting, champagne frosting, or chocolate buttercream. Add raspberry cake filling between the layers or drizzle salted caramel on top! With so many ways to customize, this coconut cake is always a crowd-favorite when looking for Easter dessert ideas.
Coconut Cake Video Tutorial
This recipe sets the bar for homemade cakes everywhere. It’s simply exquisite and is sure to be one of your favorite spring dessert recipes and Easter brunch recipes. Talk about a show stopper!
How to Make Coconut Cake
I adapted this recipe from my favorite white cake. Its pristine crumb, fluffy texture, and stick-to-your-fork moisture guarantee cake success. In fact, I have the recipe memorized and even used it as the base of pistachio cake, cookies & cream cake, espresso cake, burnt sugar caramel cake, and strawberry cake. The recipe is cake gold and I knew it would be the perfect starting point for a fluffy and moist coconut cake.
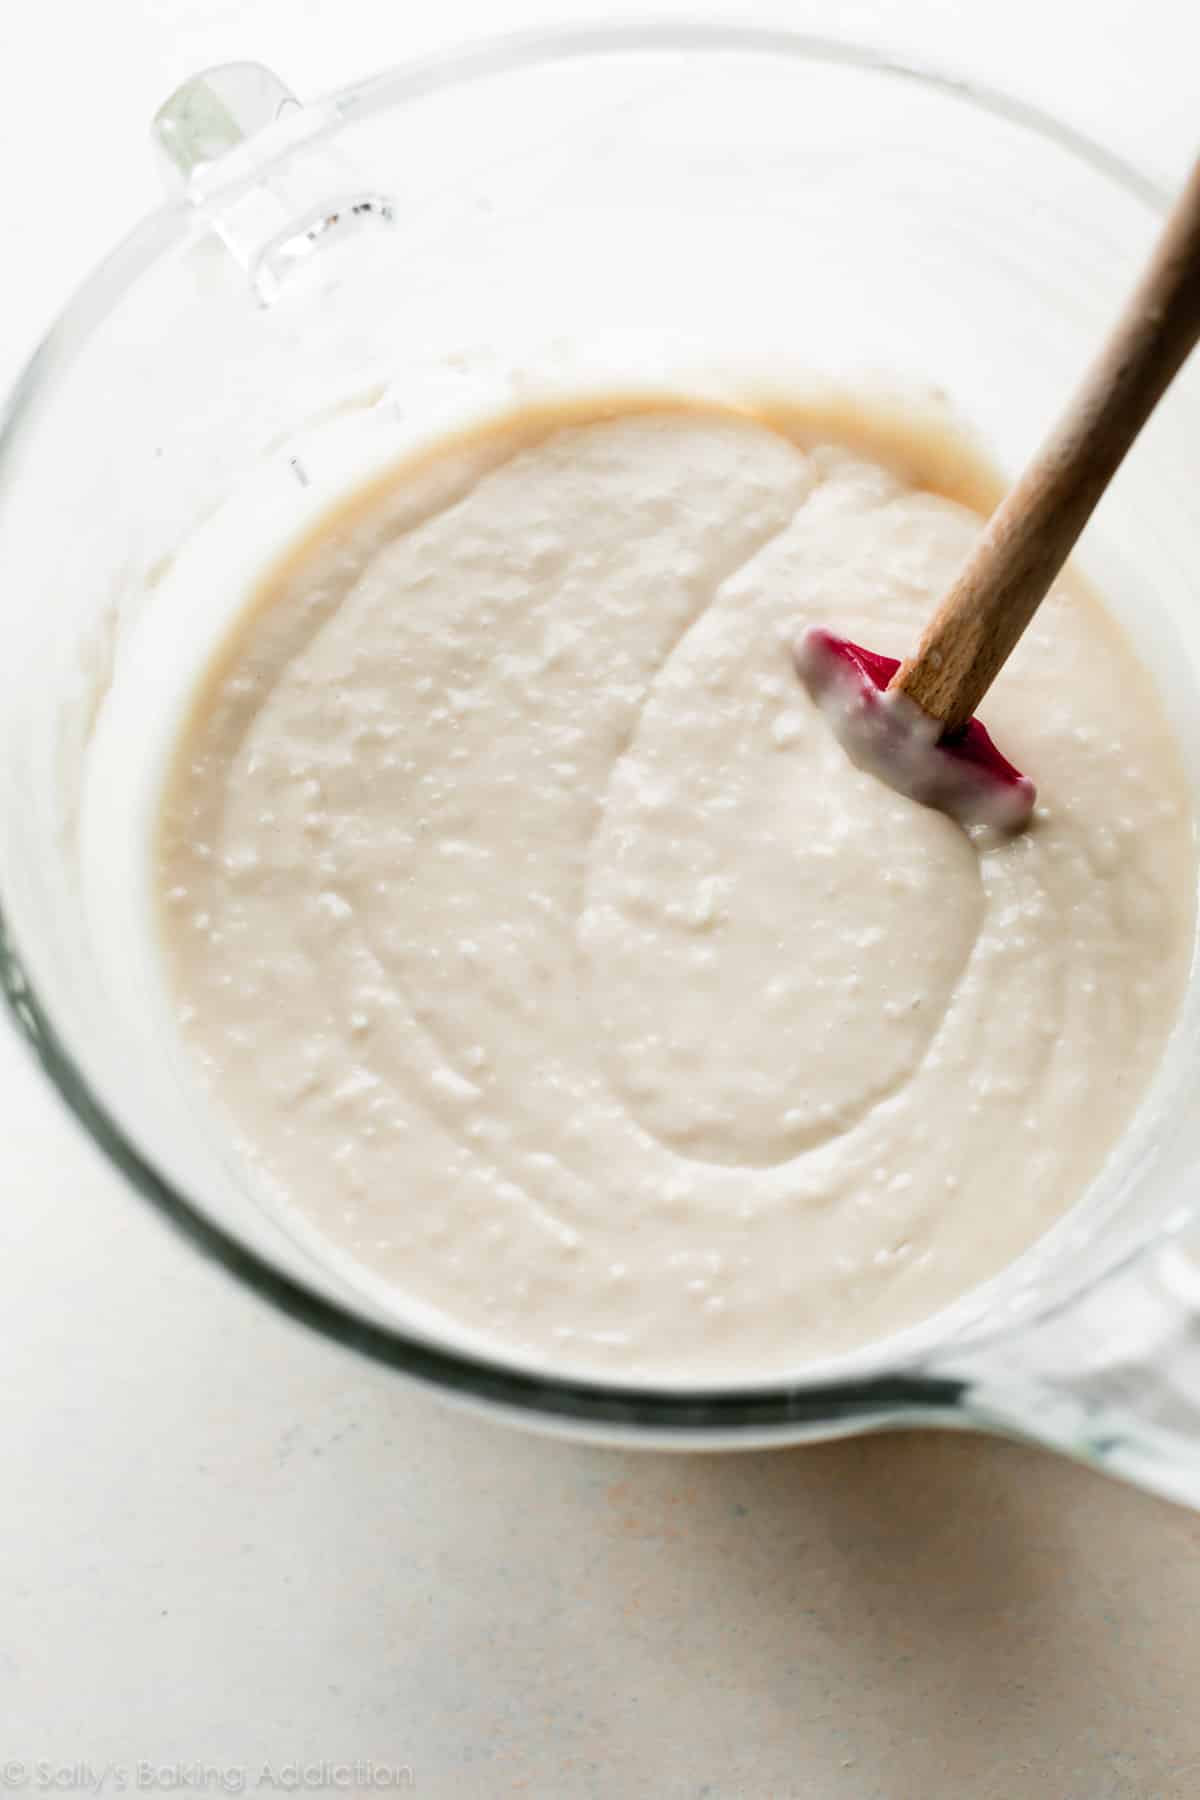
Your coconut cake journey begins with two mixing bowls. Dry ingredients in one and wet ingredients in another (see full recipe instructions below). Combine the two in your mixer, along with coconut milk and sweetened shredded/flaked coconut. That’s it! Your coconut cake batter is ready to bake.
Creamed butter and sugar provide a solid base for this cake recipe. Use room temperature butter, and remember that room temperature is cooler than you think.
Another tip: Use all room temperature ingredients, including the eggs and sour cream. Why? Ingredients bond together very easily when they’re warmer, which creates an evenly textured baked good. Cold ingredients do not emulsify together. Period.
Use These 6 Power Ingredients
Cake is literally nothing without its ingredients and these power players are the difference between dense dry cake and light moist cake.
- Cake Flour: Cake flour produces the softest cake. If you don’t usually buy cake flour, make the exception here. It’s sold in the baking aisle with the other flours. You can use leftovers in any of these cake flour recipes. If you can’t find it, try making this cake flour substitute.
- Egg Whites: Egg yolks are wonderful for moisture, but they’re heavy and weigh down cakes. We use whole eggs in my coconut Easter cake which is much more dense, like a pound cake. To keep this coconut cake light and fluffy, use only egg whites. We’ll add the moisture back in with sour cream.
- Sour Cream: The moist maker! This cake melts in your mouth.
- Coconut Extract: I tested this recipe with and without coconut extract. We loved it both ways, but coconut extract is necessary for best coconut flavor. It’s in the baking aisle near the vanilla extract.
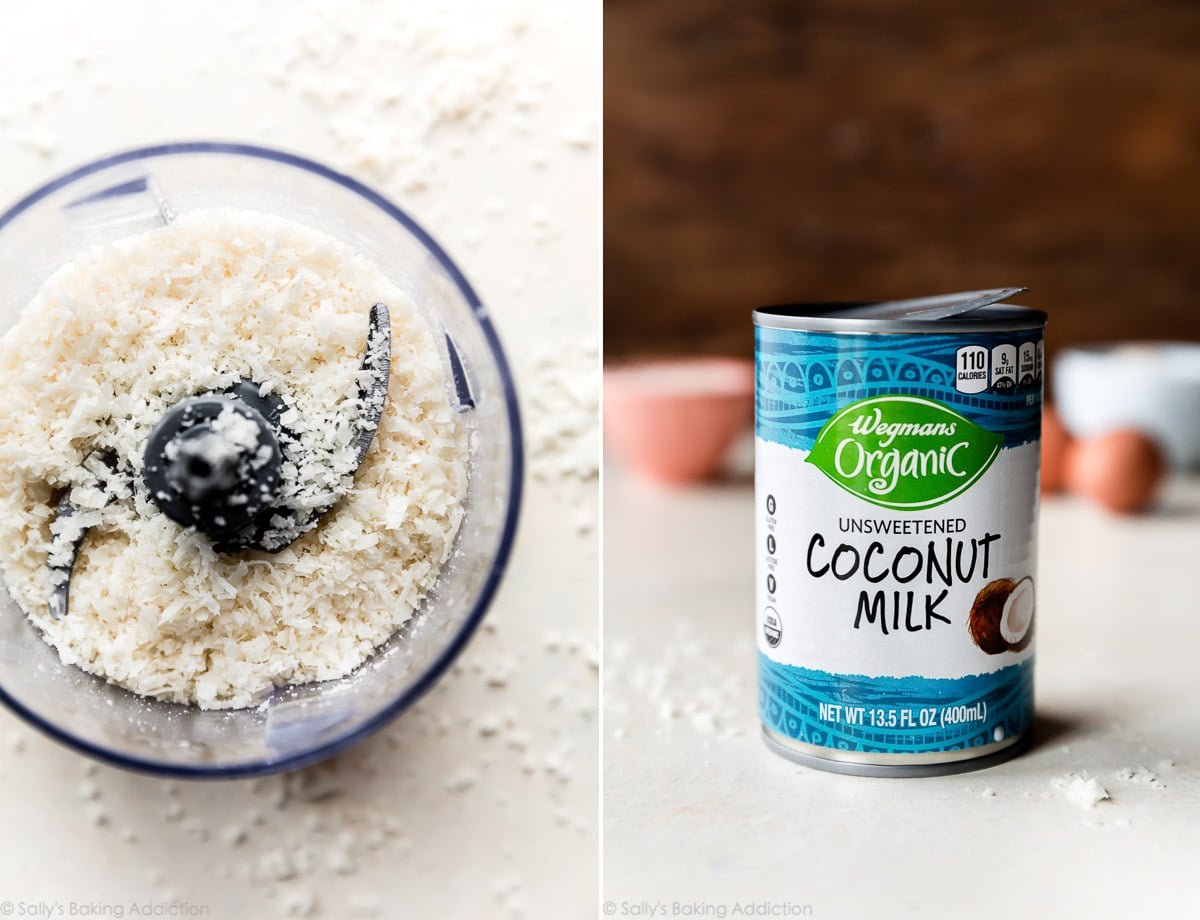
- Canned Coconut Milk: Canned coconut milk is a cooking ingredient, not a beverage. It’s creamier and thicker than regular milk and usually found near the Thai food products. Do not use the refrigerated coconut milk beverage that comes in a carton, because the two are very different.
- Sweetened Shredded Coconut: I recommend using sweetened shredded coconut, also called sweetened flaked coconut. It’s moister than unsweetened coconut and that makes a big difference in the cake’s texture. I reduced the added sugar in the cake batter to make up for the sweetness. Sweetened coconut is sometimes sold as long skinny shreds, a size some find off-putting in cake. Therefore, I recommend pulsing them in a food processor so they’re smaller.
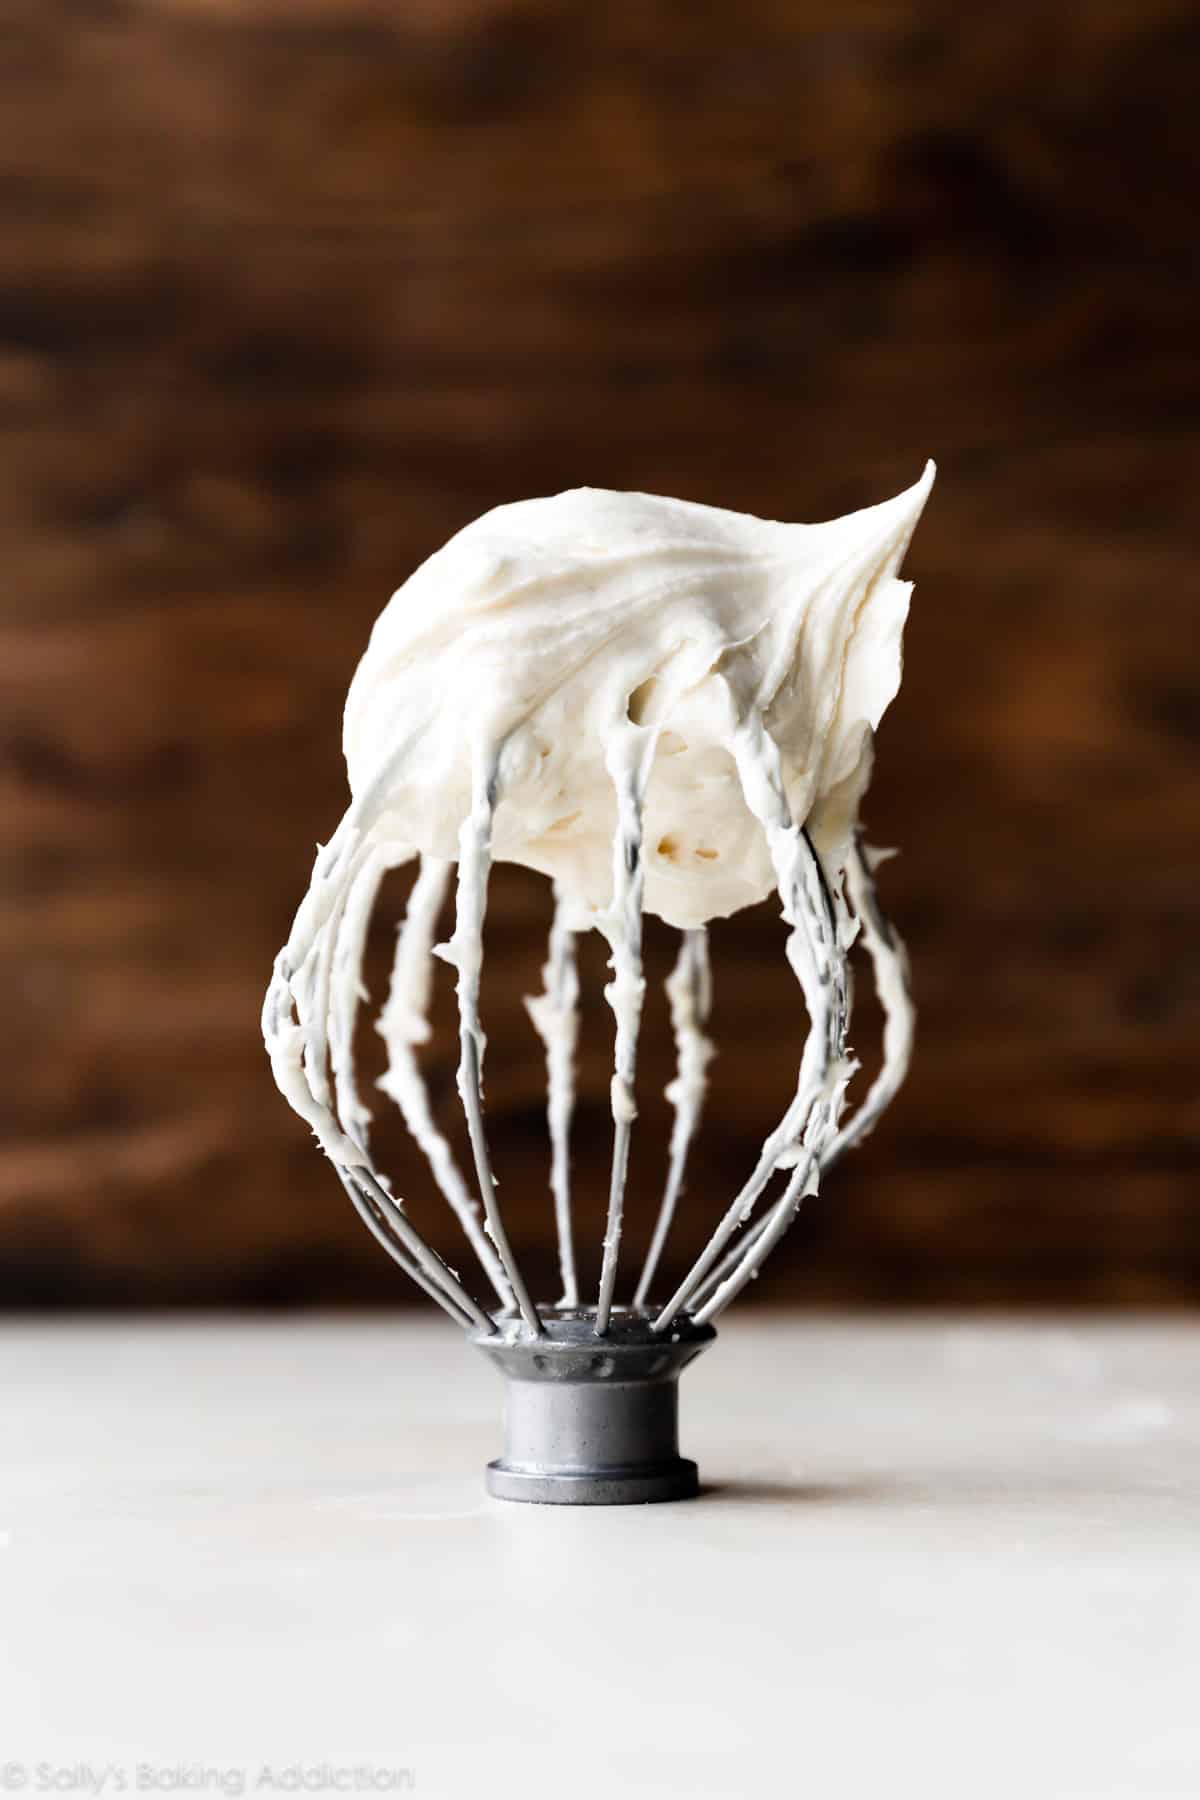
Coconut Cream Cheese Buttercream Frosting
What do you love about vanilla buttercream? It’s buttery, sweet, and smooth.
And what about cream cheese frosting? It’s creamy, silky, and tangy.
Let’s combine the two, then add coconut milk and coconut extract. It’s even creamier and silkier than the coconut frosting on these coconut chocolate Easter cupcakes so that glides onto the cake seamlessly. (Which is a happy bonus because decorating a layer cake can be quite the task. See more below.)
If you prefer a non-cream cheese option, use my vanilla buttercream instead—use canned coconut milk instead of milk and add 1/2 teaspoon coconut extract.
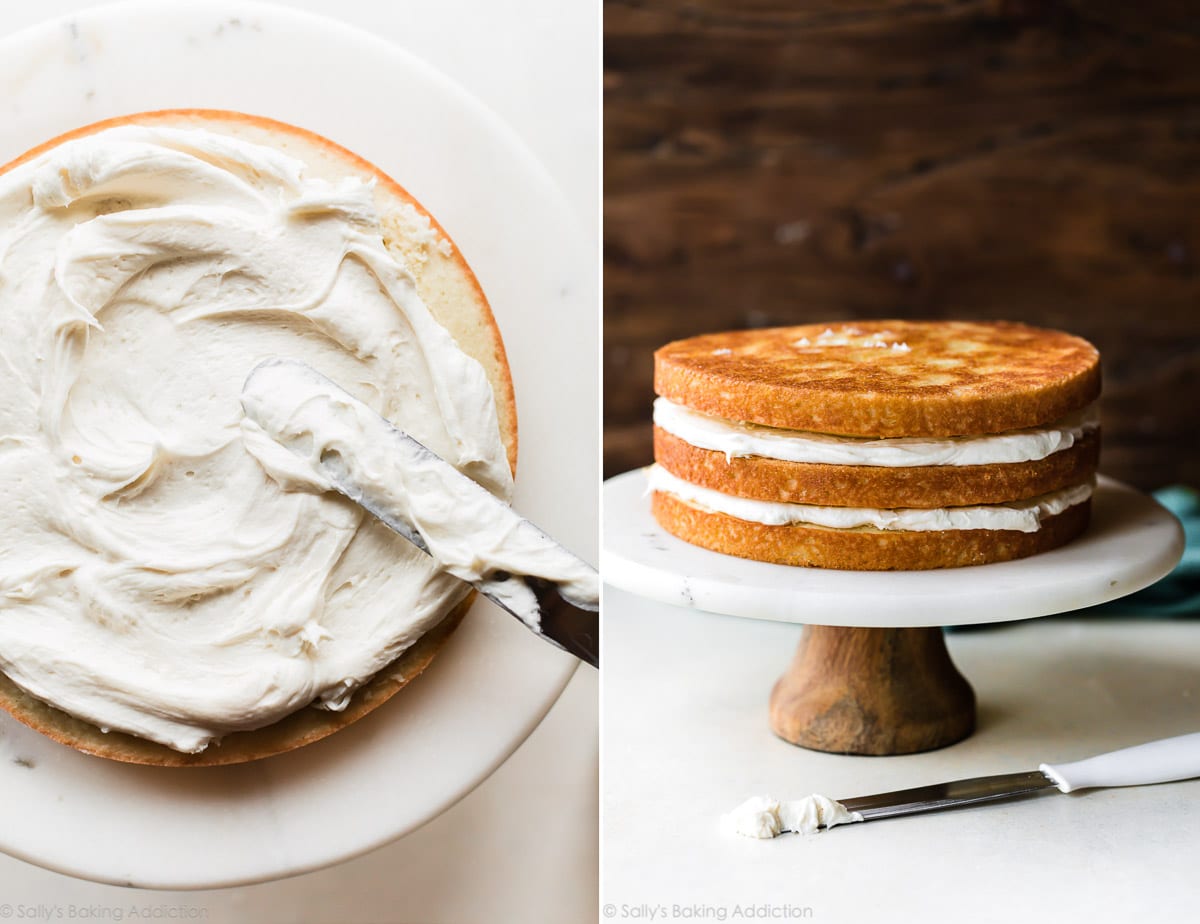
How to Frost a Layer Cake
Alright, let’s do this.
- Cool cakes completely. Sounds obvious, but even the tiniest bit of warmth will melt the frosting. As a result, the layer cake will slip, slide, or even cave in!
- If your cakes have a dome on top, level them off with a cake leveler or serrated knife. Flat-topped cakes ensure a straight and sturdy layer cake.
- Choose a serving plate, cake turntable, or cake stand. The exact cake stand I use in these pictures is no longer available, but here is a similar option.
- Place the bottom layer on the cake stand. Using an icing spatula, spread 1 and 1/2 cups of frosting in an even layer on top. Bring the frosting just over the edge of the cake; this will be helpful when it’s time to frost the sides.
- Place the second layer top-side-down on top. Make sure it aligns with the bottom cake layer.
- Spread 1 and 1/2 cups frosting evenly on top, just as you did with the bottom layer.
- Place third layer top-side-up on top. Again, make sure it’s perfectly aligned.
- Divide the remaining frosting in half. (Just eyeball it.) Dollop half of the frosting on top of the cake and use an icing spatula to smooth it to the edges. Apply *some* of the remaining frosting all around the sides of the cake, then use a bench scraper to smooth it in a thin layer. Apply the rest of the frosting on the sides of the cake, then bench scrape to smooth it all out.
- Wipe any excess frosting off of the cake stand.
You can watch me decorate this coconut cake in the video tutorial above or you can use this detailed how to assemble and decorate a layer cake post as your guide. Don’t stress; if you take your time and make sure the cake layers are totally straight, you’re all set.
But I Don’t Want to
Skip the drama and make a coconut sheet cake instead! Sheet cakes are easier to frost because they’re only one layer. See my recipe note about different size coconut cakes.
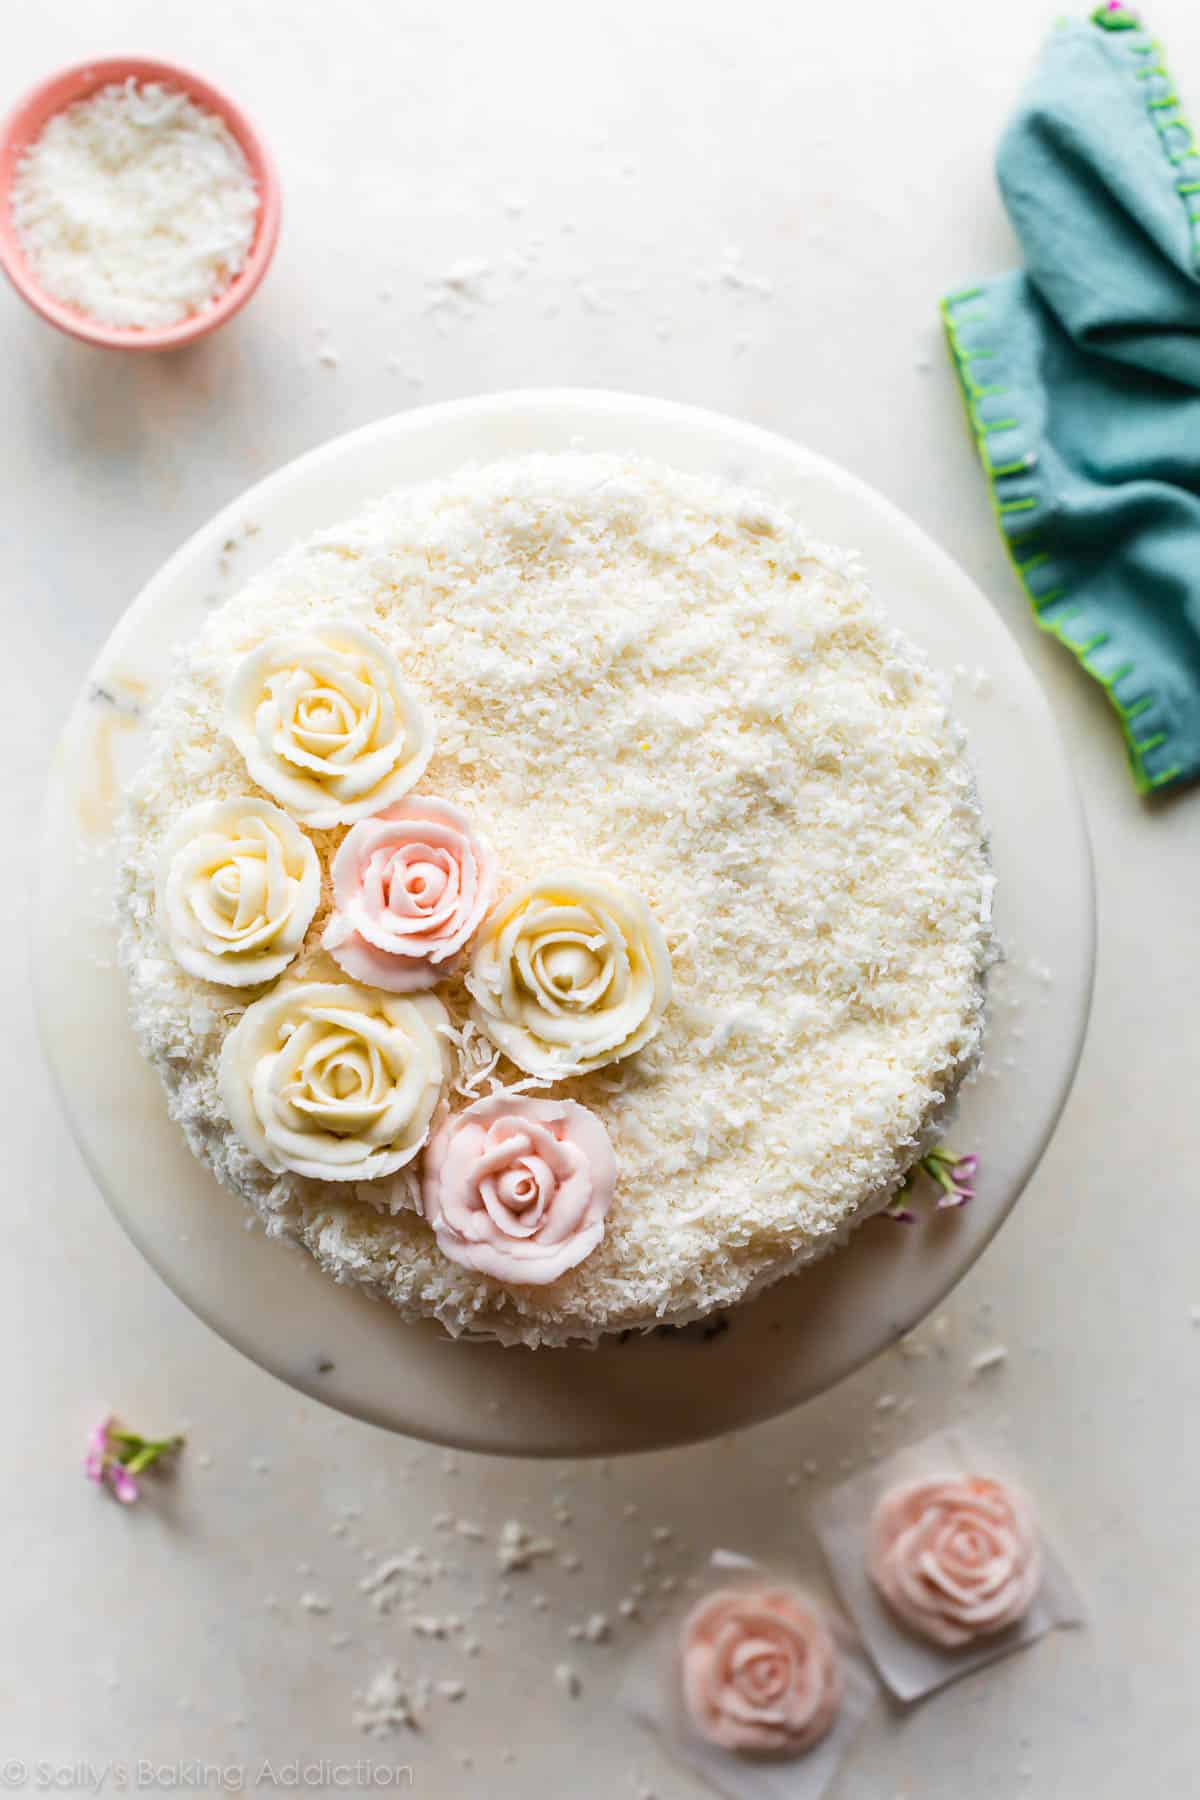
What About the Buttercream Roses?
Let’s give my assistant, Stephanie, a round of applause. This was her first time making “3D” buttercream roses and look how beautifully they turned out! She made the buttercream roses at my house and I froze them until it was time to decorate the coconut cake. She followed this video tutorial. Keep in mind that the cream cheese buttercream WILL NOT work for the intricate buttercream roses. Instead, use my vanilla buttercream and add 1 extra cup of confectioners’ sugar. You need very stiff buttercream for these roses. You also need small squares of parchment paper and:
Loosely cover the roses, then freeze or refrigerate them until ready to decorate, up to 1 week. No need to thaw prior to decorating the cake. Peel off parchment square and place the buttercream rose on the cake. If you’re traveling with the cake, I recommend securing the roses with a tiny dollop of cream cheese buttercream underneath.
Looking for something easier? Use Wilton 1M piping tip for these easy two-toned frosting buttercream roses.
More Classic Cake Recipes
Flavor is the name, moist is the game. These are some of my favorite classic cake recipes!
- Pound Cake
- Vanilla Cake
- Carrot Cake
- Red Velvet Cake
- Strawberry Cake (made from real strawberries)
- Lemon Blueberry Cake
- Chocolate Cake
Coconut Cake
- Prep Time: 35 minutes
- Cook Time: 22 minutes
- Total Time: 4 hours
- Yield: 12 servings
- Category: Dessert
- Method: Baking
- Cuisine: American
Description
This perfect coconut cake sets the bar for homemade cakes everywhere. It’s supremely moist with a soft fluffy crumb and intense coconut flavor. For success, follow this recipe carefully including using cake flour, egg whites, sour cream, and canned coconut milk.
Ingredients
- 2 and 1/2 cups (285g) cake flour (spooned & leveled)
- 2 teaspoons baking powder
- 1/2 teaspoon baking soda
- 1 teaspoon salt
- 3/4 cup (12 Tbsp; 170g) unsalted butter, softened to room temperature
- 1 and 2/3 cups (330g) granulated sugar
- 5 large egg whites, at room temperature
- 1/2 cup (120g) sour cream, at room temperature
- 2 teaspoons pure vanilla extract
- 1 teaspoon coconut extract
- 1 cup (226g/240ml) unsweetened canned coconut milk, at room temperature*
- 1 cup (80g) sweetened shredded coconut
Coconut Cream Cheese Buttercream
- 1 cup (16 Tbsp; 226g) unsalted butter, softened to room temperature
- 8 ounces (226g) full-fat brick cream cheese, softened to room temperature*
- 5 cups (600g) confectioners’ sugar
- 2 Tablespoons (30ml) canned coconut milk
- 1/2 teaspoon pure vanilla extract
- 1/2 teaspoon coconut extract
- 1/8 teaspoon salt
- 2 cups (160g) sweetened shredded coconut
Instructions
- Preheat oven to 350°F (177°C). Grease three 8-inch cake pans, line with parchment paper rounds, then grease the parchment paper. Parchment paper helps the cakes seamlessly release from the pans. (If it’s helpful, see this parchment paper rounds for cakes video & post.)
- Make the cake: Whisk the cake flour, baking powder, baking soda, and salt together. Set aside.
- Using a handheld or stand mixer fitted with a paddle or whisk attachment, beat the butter and sugar together on medium-high speed until smooth and creamy, about 2 minutes. Scrape down the sides and up the bottom of the bowl with a rubber spatula as needed. Beat in the egg whites until combined, then add the sour cream, vanilla extract, and coconut extract. Beat until combined. Mixture will look curdled as a result of the varying textures and solid butter combining. Scrape down the sides and up the bottom of the bowl as needed. With the mixer on low speed, slowly add the dry ingredients and coconut milk. Beat on low speed until combined, then add the shredded coconut. Whisk it all by hand to make sure there are no butter lumps at the bottom of the bowl. The batter will be slightly thick.
- Pour batter evenly into cake pans. Weigh them to ensure accuracy, if desired. Bake for 21–24 minutes or until the cakes are baked through. To test for doneness, insert a toothpick into the center of the cake. If it comes out clean, it’s done. Allow cakes to cool in the pans set on a cooling rack for 1 hour, then remove from the pans and place the cakes directly on the rack to continue cooling. The cakes must be completely cool before frosting and assembling.
- Make the frosting: In a large bowl using a handheld or stand mixer fitted with a whisk or paddle attachment, beat the butter and cream cheese together on medium speed until creamy and smooth, about 2 minutes. Add confectioners’ sugar, coconut milk, vanilla extract, coconut extract, and salt with the mixer running on low. Increase to high speed and beat for 3 minutes. Add more confectioners’ sugar if frosting is too thin, more coconut milk if frosting is too thick, or an extra pinch of salt if frosting is too sweet.
- Assemble and decorate: Using a large serrated knife, slice a thin layer off the tops of the cakes to create a flat surface. Discard (or crumble over ice cream!). Place 1 cake layer on your cake stand, cake turntable, or serving plate. Evenly cover the top with 1 heaping cup (about 250–300g) of frosting. Top with second cake layer and evenly cover the top with another heaping cup of frosting. Top with the third cake layer. Spread the remaining frosting all over the top and sides. I use and recommend an icing spatula to apply the frosting and a bench scraper to smooth the sides. Sprinkle coconut on top of the cake and apply it to the sides. This can get a little messy and you can watch me do it in the video tutorial. See blog post above about buttercream rose decoration.
- Refrigerate cake for at least 20 minutes before slicing. This helps the cake hold its shape when cutting, though it’s still a pretty fluffy cake!
- Cover leftover cake tightly and store in the refrigerator for up to 5 days.
Notes
- Make Ahead & Freezing Instructions: The cake layers can be baked, cooled, and covered tightly at room temperature overnight. Likewise, the frosting can be prepared, then covered and refrigerated overnight. When ready to decorate, let the frosting sit at room temperature to slightly soften for about 15 minutes, then give it one more mix with the mixer on medium speed for about 1 minute before frosting cake. Frosted cake or unfrosted cake layers can be frozen for up to 2–3 months. Thaw overnight in the refrigerator and bring to room temperature before decorating/serving.
- Special Tools (affiliate links): 8-inch Cake Pans | Electric Mixer (Handheld or Stand Mixer) | Glass Mixing Bowls | Whisk | Cake Stand or Cake Turntable | Icing Spatula | Bench Scraper | Cake Carrier (for storing)
- Cake Flour: For the best results, I strongly recommend cake flour. You can find cake flour in the baking aisle and I have many more recipes using it. If you can’t find it, try making this cake flour substitute.
- Egg Whites: Egg whites (no yolks) are KEY to the cake’s fluffy texture. For best success, I recommend using fresh eggs instead of carton egg whites. (Using an egg separator is really handy!) Here are all my recipes using leftover egg yolks. Success tip: Eggs separate much easier when they’re cold.
- Canned Coconut Milk: Canned coconut milk is a cooking ingredient, not a beverage. It is usually unsweetened, so make sure you’re using unsweetened. It’s usually found in the grocery store near the Thai food products. Do not use refrigerated carton coconut milk beverage. You need 1 cup for the cake, not the entire can. You use 2 more Tablespoons in the frosting.
- Sweetened Shredded Coconut: I recommend using sweetened shredded/flaked coconut. It’s moister than unsweetened coconut and that makes a big difference in the cake’s texture. If desired, pulse the coconut shreds in a food processor to chop them up so they aren’t as long inside and outside of the cake. Chopping the coconut is optional.
- Cream Cheese: Use brick cream cheese, not cream cheese spread. If desired, you can use this vanilla buttercream instead (no cream cheese). Use canned coconut milk instead of milk and add 1/2 teaspoon coconut extract.
- 9×13-Inch Sheet Cake: Simply pour the batter into a greased and lightly floured 9×13-inch pan and bake for 40 minutes or until a toothpick inserted in the center comes out clean.
- 2-Layer Cake: Prepare two 9-inch cake pans in step 1. Divide batter between pans and bake for 24–26 minutes or until a toothpick inserted in the center comes out clean.
- Bundt Cake: This cake batter will fit into a greased 10-cup or larger Bundt pan. I’m unsure of the exact bake time (likely around an hour); use a toothpick to test for doneness. Same oven temperature.
- Cupcakes: Fill cupcake liners 2/3 full. Bake at 350°F (177°C) for 19–21 minutes. Yields about 2–3 dozen. Or try my vanilla cupcakes recipe and substitute canned coconut milk for whole milk, 1/2 teaspoon coconut extract for the vanilla bean, and add 3/4 cup (60g) of sweetened shredded coconut.
- Why is everything at room temperature? All refrigerated items should be at room temperature so the batter mixes together easily and evenly. Read more about the importance of room temperature ingredients.


Reader Comments and Reviews
Calories?
Hi Amber, We don’t usually include nutrition information as it can vary between different brands of the same ingredients. Plus, many recipes have ingredient substitutions or optional ingredients listed. However, there are many handy online calculators where you can plug in and customize your exact ingredients/brands. Readers have found this one especially helpful: https://www.verywellfit.com/recipe-nutrition-analyzer-4157076
Can I put food coloring into the cake batter?
Hi Jasper, adding coloring is no issue at all. We recommend gel food coloring which is more color concentrated than liquid and won’t risk altering the texture of the cake.
Hello here in Uk we don’t have block cream cheese only the spread. Do you have a recipe that would work with that?
Hi Emily, In the U.S. block cream cheese is very different than the tubs and is the only cream cheese that will work for frosting. We have been told by readers outside the U.S. that cream cheese in a tub is different from ours and can work, but we have not tested it.
This cake turned out incredibly delicious!
I just made the cake and made my own cream cheese coconut frosting (because I don’t like buttercream).
I also added a lot less sugar in the cake batter (just around 200g) and it was more than enough for me 🙂
I couldn’t find coconut extract, so I used a little less butter but used a bit of coconut oil instead.
The cake turned out super fluffy! Truly a great recipe 🙂 🙂 🙂
Many greetings from Germany
Hi Sally, using this recipe for a two tier wedding cake! Can I make this in 6” pans??
Hi Cassie, You can use our coconut cupcakes batter for three 6 inch cake pans. (Skip the caramel filling and chocolate frosting.) Follow the baking instructions for 6 Inch Cakes and you can halve this frosting recipe instead. Happy baking!
I know I am not Sally, but FWIW I have used other Sally recipes to make two tier cakes (unfortunately not this exact one). By making three batches and splitting each batch between one nine and one six inch tin. So in the end has three nine inch layers and three six inch layers to stack up. I think in general I tend to like slightly thicker cake layers, and this worked well for me. Just obviously had to watch closely for baking times. Good luck!!!
Love your recipes and demonstrations. You make it easy to understand and explain things as you go. Love it.
Hello! Can I leave the flakes out of this recipe?
Hi Katie, you can omit the coconut flakes in the batter and on the frosting if needed with no other changes. Enjoy!
Should the cake flour be sifted? If so, when do you sift (before measuring or after)? I’ve LOVE this cake and have been making it for years, but noticed my old printed version calls for sifted flour and the online recipe now does not. I know I usually sift the cake flour, but I can’t remember when I do that. Any tips?
Hi Anna, we do not sift the flour in this recipe so we’re spooning it right from the container. This post on how to measure baking ingredients has a helpful video showing spooning and leveling, as well as a quick explanation on how and when to sift flour. Hope it helps!
It was delicious and people loved it but it turned out dense and heavy and not as fluffy as I would expect a cake to be. Is it normal? I followed the butter + sugar step and tried not to mix too much afterwards but still turned out dense. I made this into a sheet cake.
Hi BP, these aren’t especially tall layers, but it sounds like the batter may have been over-mixed. Over-mixing the batter is usually the culprit for squat, dense cakes. Be sure, too, that your baking powder and baking soda are fresh for optimal rise. We find they start to lose their strength after about 3 months, even if not technically expired. Here are even more tips on how to prevent dry and dense cakes. Hope this helps for next time!
Hi I love this cake!! Do you think I can put colorful sprinkles in the batter?
Definitely!
I made this cake for my husband’s birthday and it was the best coconut cake I have ever had! My grandson wants the same cake for his birthday but I need a larger cake. Any suggestions for making this into a 3 layer 10” cake?
So happy to read that, Joni! Here is everything you need to know about converting recipes to different Cake Pan Sizes.
love this recipe! if i’m trying to make a marble cake, can i add cocoa powder to this?
Hi Lindsay! A coconut marble cake sounds delicious, but we haven’t tested adapting this batter with cocoa powder. Let us know what you try! Here’s our zebra cake as well.
Hi Sally, would substituting a white cake mix work for this recipe?
Hi Gloria, we highly recommend sticking with this homemade cake recipe if you can!
VERY MOIST AND TASTY DESSERT. I ADDED MASHED BANANAS TO THIS RECIPE. YUMMY
If I only have salted butter, can I use that and do I need to reduce the amount of salt in the recipe?
Hi Beth, if using salted butter, you can reduce the salt added in the cake to 1/4 teaspoon. In the buttercream, taste the buttercream without any salt added and then add a pinch or two to your liking. Hope it’s a hit!
I love this recipe!!! I have made the cake 5 times and each time it comes out perfect. I have a friend that wants me to make a coconut/almond cake. Can I use this recipe and add a little almond extract?
Hi Janie, absolutely! You can swap some of the vanilla for almond. Such as 1 teaspoon of vanilla, 1 teaspoon of almond extract, and 1 teaspoon of coconut extract.
Good morning Blessings Sally… I have been using the majority of your recipes. They have become a hit in my with my Family and my customers. I thank you so much for them. I have not tried it yet, but would like to achieve a n 11x13x2 sheet cake for my cousin. Can you assist on how to convert this recipe? Eggs are high and with 5 egg whites per mix, I for sure don’t want to make a Boo Boo. Would appreciate the help.
Hi Angie, here’s everything you need to know about cake pan sizes and conversions. Thank you for making and trusting our recipes!
This coconut cake was amazing but can I freeze the much too much frosting?
Hi Bernie, You can freeze any leftover frosting for up to 3 months. After freezing, thaw in the refrigerator then beat the frosting on medium speed for a few seconds so it’s creamy again. After thawing or refrigerating, beating in a splash of heavy cream or milk will help thin the frosting out again, if needed.
I made this for my birthday and it was delicious! I love how moist it was and the dense crumb it had. So much coconut flavor! You never miss sally!
Morning Sally may I ask if I don’t have three 8 inch pans can I bake the batter in one pan and what would be the baking time for that? Thank you so much
Hi Jenny, we do not recommend baking all the batter in one pan. It would be too thick and not bake though properly. You can use your one pan to bake the cake in two or three layers, leaving the extra batter sitting covered at room temperature until your pan is ready to use again.
Hubby loved it. It was moist and delicious
I love this recipe and have made it three times for others, even though I’ve never tasted it myself. I know that sounds strange, but everyone else seems to love the cake. However, I’ve encountered a problem: the layers never rise properly. I’ve tried using both 9-inch and 8-inch pans, but the layers always come out thin. Perhaps I should consider reducing it to just two layers. What can I do to achieve thicker layers?
Hi Anita, these aren’t especially tall layers, but it sounds like the batter may have been over-mixed. Over-mixing the batter is usually the culprit for squat, dense cakes. Be sure, too, that your baking powder and baking soda are fresh for optimal rise. We find they start to lose their strength after about 3 months, even if not technically expired. Hope this helps for next time!
Hi Sally, this cake was delicious! I am an experienced baker however, my cake tended to crumble and crack when I assembled it, while putting some of the icing between the layers. Then when it was sliced, it crumbled to pieces. It also had a good size small bowl of icing leftover, that I will now have to find something to use it on. The day I made this, it was raining outside. I live at a normal elevation and have air conditioning. I used all the ingredients listed and followed all the steps. Is there something I could have done to make it turn out better? By the 2nd and 3rd day it was a bit more stable.
Hi Denise, We are glad you enjoyed the flavor of this cake! It can certainly be quite fragile, but if it seemed excessively crumbly, it’s possible it was overbaked a bit (even a minute or two less next time can make a difference). Did the texture seem a little dry, too? Thank you for giving it a try!
This may sound silly, but can this cake be made in a 13″ x 9″ pan.
Maybe the cake could be cut in half and it could be a square 2-layer cake.
I’m not a baker by any means, but I would love to try to make this cake.
Thanks for any advice you can give.
Hi Tony! You bet. See recipe Notes for details on baking in a 9×13 pan: Simply pour the batter into a greased and lightly floured 9×13-inch pan and bake for 40 minutes or until a toothpick inserted in the center comes out clean.
Hi Sally, can this recipe be made with gluten free flour? Thank you in advance!
Hi Natalie, we haven’t tested a gluten free version of this cake, but let us know if you do!
Any suggestions on the icing without cream cheese? My husband hates it.
Hi Ashlee, you could certainly use vanilla buttercream here instead (no cream cheese). Use canned coconut milk instead of milk and add 1/2 teaspoon coconut extract. Let us know if you give it a try!
Can you make small cupcakes with this recipe?
You bet, Jacque! See Notes after the recipe for details.
Is there a substitute you’d reccommend for the coconut milk? I don’t have access to it but is there something I can replace it with?
Hi Jeffrey, Canned coconut milk is a key ingredient in this coconut cake recipe, we don’t recommend substituting it out. Could you order some online by chance?
I’m making this cake now, but I’m stuck! In step 5: Make the frosting, when do you add the shredded coconut?
And do you fold or mix?
Hi Tina, the shredded coconut is sprinkled on top of the cake and applied it to the sides in step 6! Hope this cake is a hit for you!
Hi Sally
I’m excited to make this cake for my momma today. Question – is the coconut milk in the frosting supposed to be sweetened or unsweetened? The recipe does not specify in the frosting ingredient list.
Hi Monique, you’ll use the same as in the cake batter – unsweetened canned coconut milk. Enjoy!
I made this (with a slight twist, using Sally’s raspberry cake filling) for my mom’s birthday in April, and the whole family requested it again for Mother’s Day. My husband, who is not a “cake person” said it was the best cake he had ever eaten. I am not a huge coconut fan, but this has just the right amount of coconut flavor, and the texture is perfect!
We’re so happy it was a hit, Carolyn! Thanks for giving this recipe a try.